
How to Create a Distribution List in Outlook in Microsoft 365
A distribution list lets you group multiple email addresses under a single name, so you can message an entire team—such as Sales, Marketing, or Operations—without typing every member's address individually. This guide walks you through how to create a distribution list in Outlook, covering both manual entry and bulk import from a CSV file, plus a bonus section on building an equivalent group in Google Contacts.
Video: How to Create a Distribution List in Outlook | Microsoft Outlook Contact Group by Technologiate (2024). All credit for the demonstration goes to the creator; watch the original on YouTube. The written guide below was generated from this video by Docsie. Creator? Request a change or removal.
A distribution list lets you group multiple email addresses under a single name, so you can message an entire team—such as Sales, Marketing, or Operations—without typing every member's address individually. This guide walks you through how to create a distribution list in Outlook, covering both manual entry and bulk import from a CSV file, plus a bonus section on building an equivalent group in Google Contacts.
Prerequisites
Before you begin, make sure you have the following:
- Access to the Outlook desktop application and its Contacts (or People) section
- The email addresses of the team members you want to group, whether saved in Outlook, in your address book, or listed in a spreadsheet
- Optionally, a CSV file with Name and Email columns if you plan to import contacts in bulk
- A Google account signed in at contacts.google.com if you want to follow the Google Contacts section
Understanding distribution lists in Outlook
A company is typically organized into teams—such as a Sales Team, Marketing Team, and Operations Team—each made up of several members.
Team members often use different types of email addresses: some use company addresses (for example, john@technologyed.com), while others use free email services like Gmail, Yahoo, or Outlook.com.
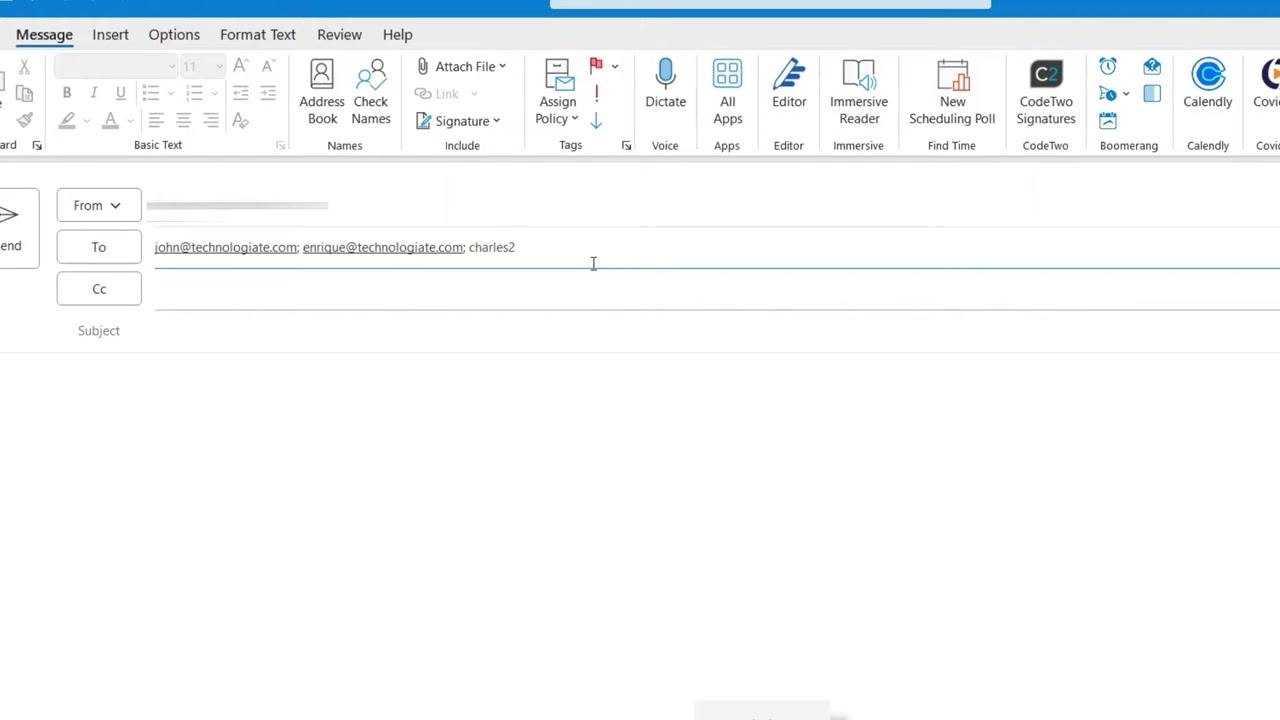
Typing each address individually is time-consuming and hard to remember, especially for teams with ten or more members. A distribution list solves this: instead of entering every address, you type the team name in the To field, and Outlook automatically expands it to include all members.

Creating a distribution list manually
-
Open the Contacts section in Outlook to begin creating a new distribution list.
-
Click New Contact Group (or New Group) in the toolbar to open a new window for the group details.
-
Enter a descriptive name for the group, such as Marketing Team.
-
Click Add Members in the contact group window to start adding people to the list.
-
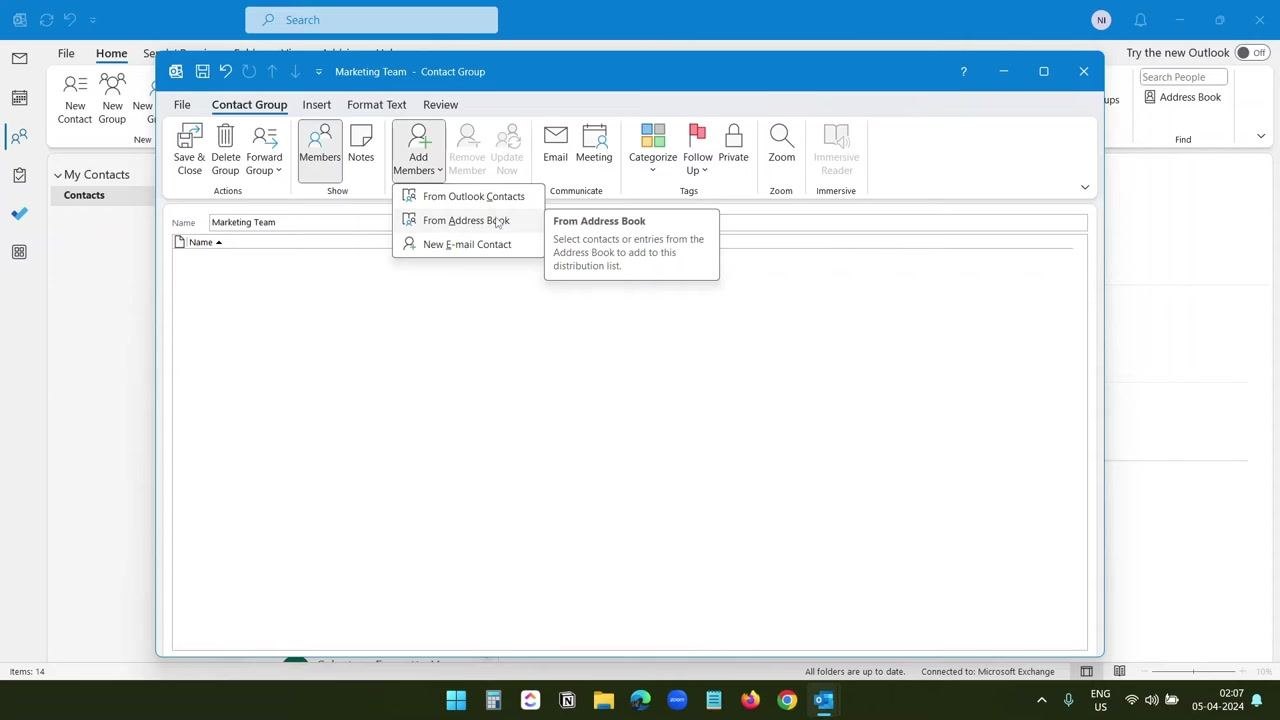
Choose how you want to add members. When you click Add Members, three options appear:
- From Outlook Contacts
- From Address Book
- New E-mail Contact
- Select the option that matches where the member's address is stored. From Outlook Contacts and From Address Book require that the address already exists in your Outlook contacts, while New E-mail Contact lets you add an address that isn't saved yet.
Adding a new member manually
When you choose to add a new member directly, enter the person's Display name (for example, "John") and E-mail address (for example, john@example.com). You can also choose whether to save the contact only to the distribution list or add it to your main Outlook contacts—leave Add to Contacts unchecked if you only want it available within the group.
Manual entry works for a handful of people, but for larger groups it's more efficient to import contacts from a CSV file, as described next.
Importing contacts from a CSV file
-
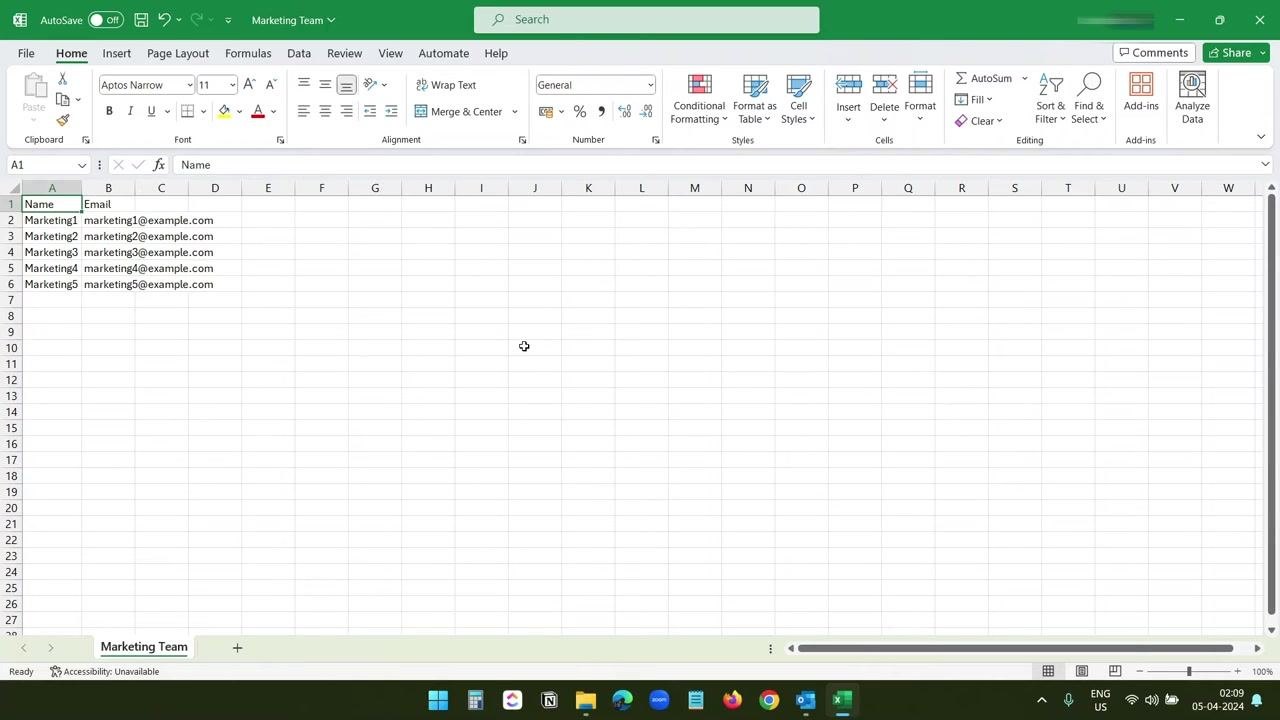
Prepare your CSV file in Excel or another spreadsheet application. Make sure it contains a Name column and an Email column, with one row per team member.
-
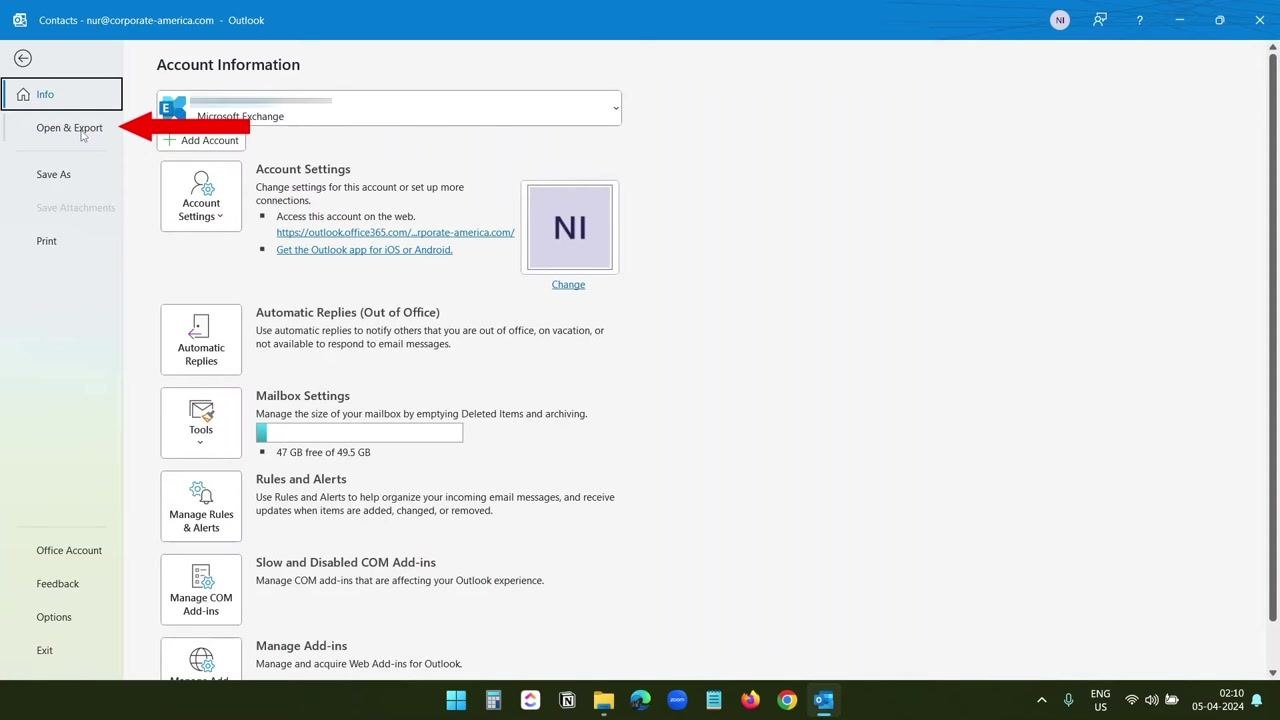
In Outlook, go to the File menu and select Open & Export from the sidebar.
-
Click Import/Export to launch the wizard, choose Import from another program or file, and click Next.
-
Select Comma Separated Values as the file type and click Next. Then click Browse, navigate to your CSV file (for example, "Marketing Team.csv" in your Downloads folder), select it, click OK, and click Next.
-
Confirm Contacts is selected as the destination folder and click Next to continue.
-
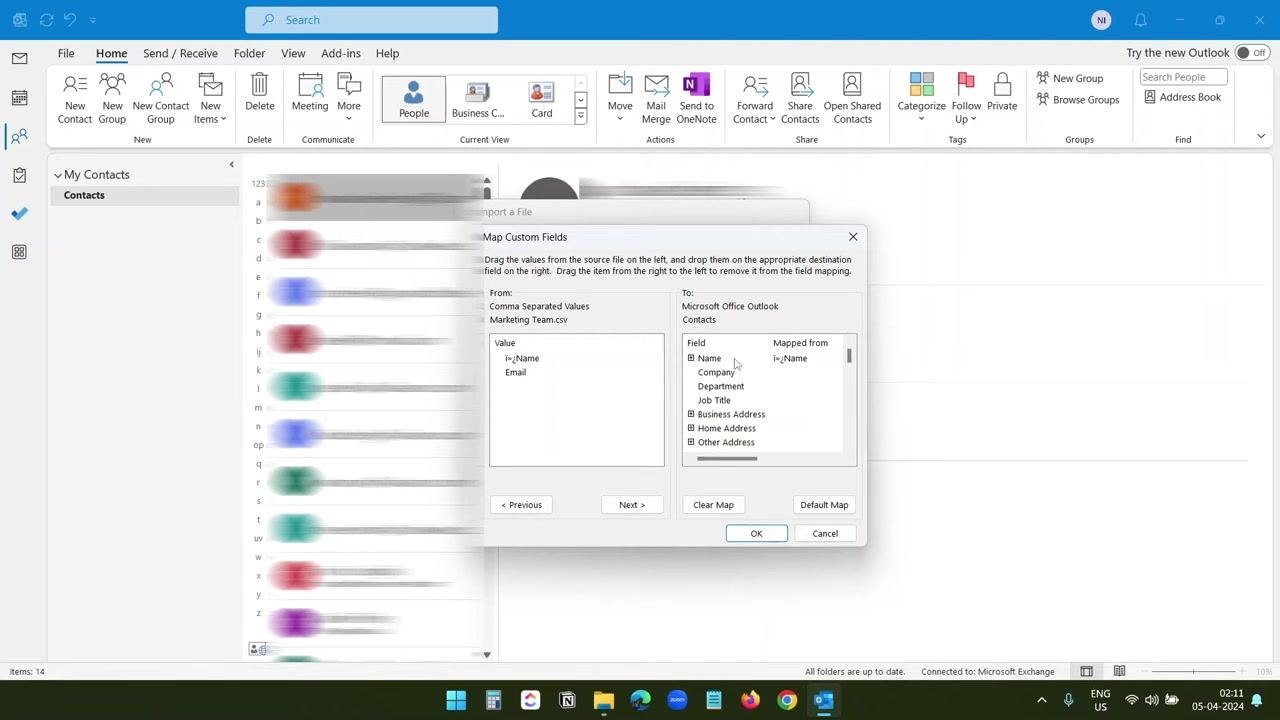
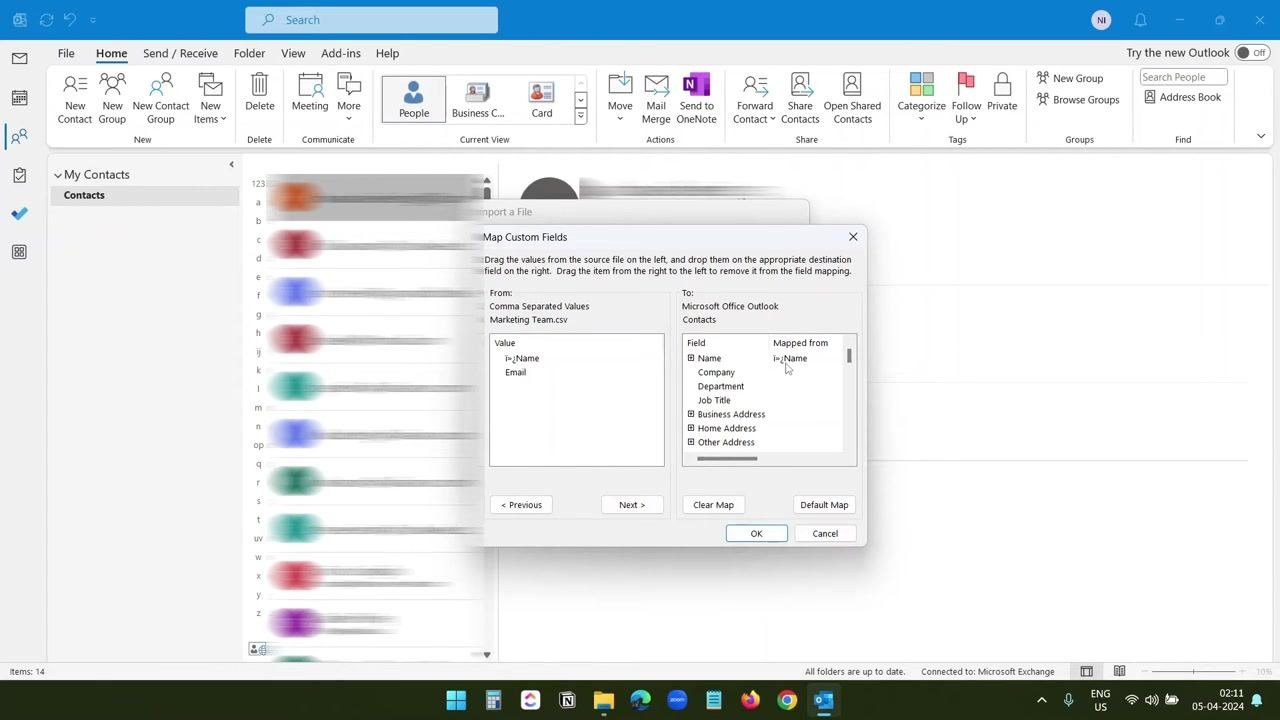
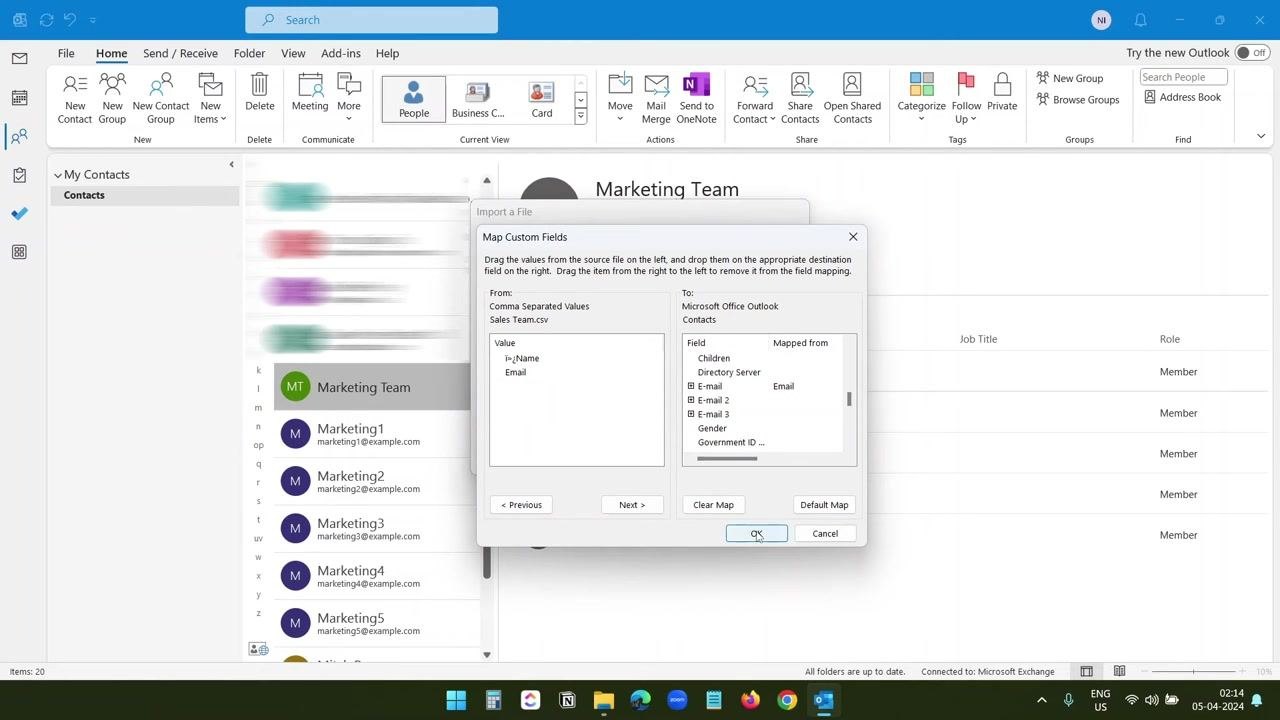
In the Map Custom Fields dialog, verify that the Name column from your CSV is mapped to the Name field in Outlook. If the Email column isn't already mapped, drag it from the left pane and drop it onto the E-mail field on the right, scrolling to locate that field if needed.
-
Confirm both Name and Email are correctly mapped, then click OK to finalize the mapping.
-
If your CSV has additional columns—such as phone numbers or secondary email addresses—drag and drop them onto the matching Outlook fields. Ignore any extra characters shown in the mapping preview, since they won't appear in the final contact names. Click OK, then click Finish to complete the import.
-
Review your Outlook Contacts list to confirm all expected contacts (for example, Marketing1 through Marketing5) were imported correctly.
Building the distribution list from imported contacts
-
Click New Group (or New Contact Group) in the Outlook ribbon and enter a name, such as Marketing Team. In the Contact Group window, click Add Members and select From Outlook Contacts.
-
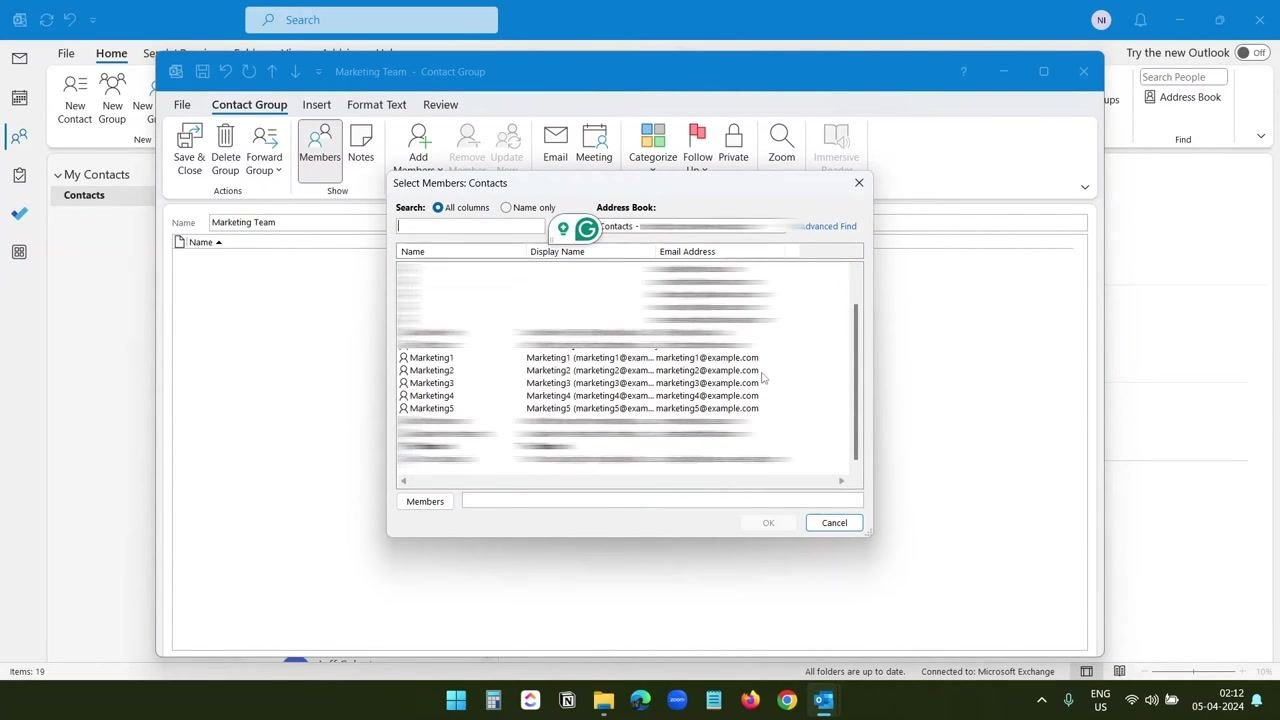
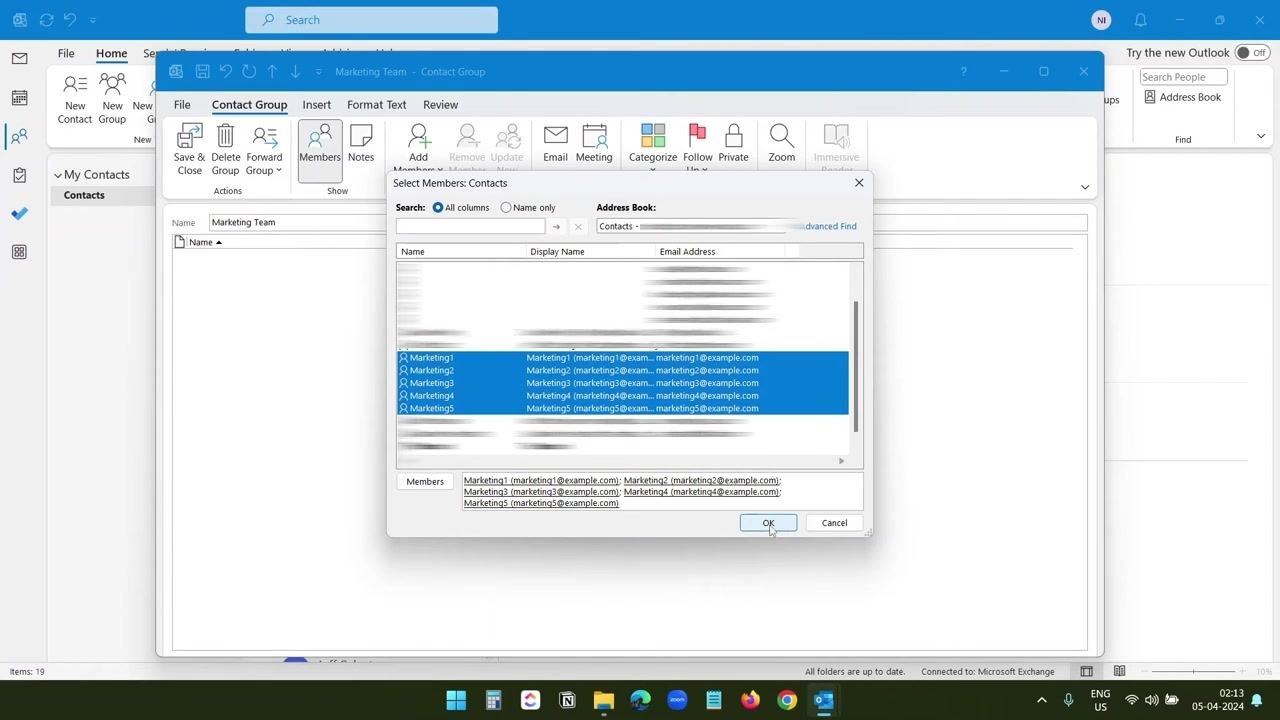
In the Select Members: Contacts dialog, scroll to find your imported contacts (for example, Marketing1 through Marketing5), select all relevant contacts, click Members to add them to the group, and click OK to confirm.
-
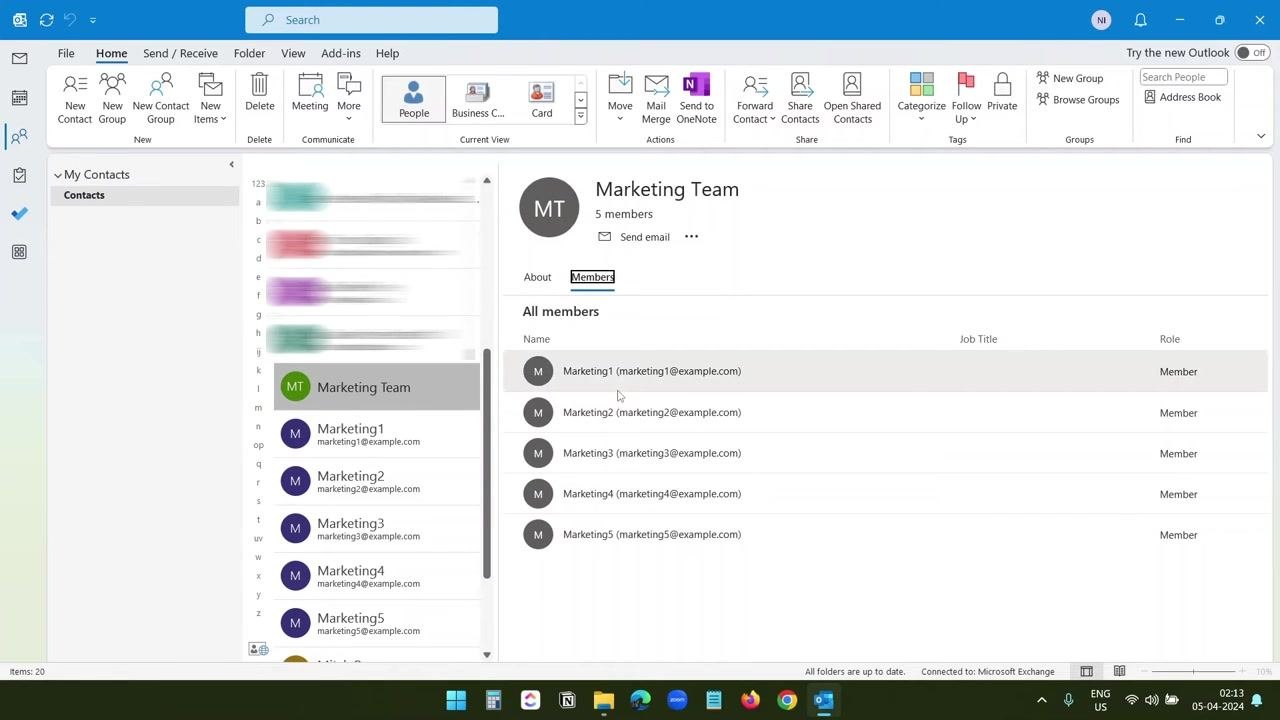
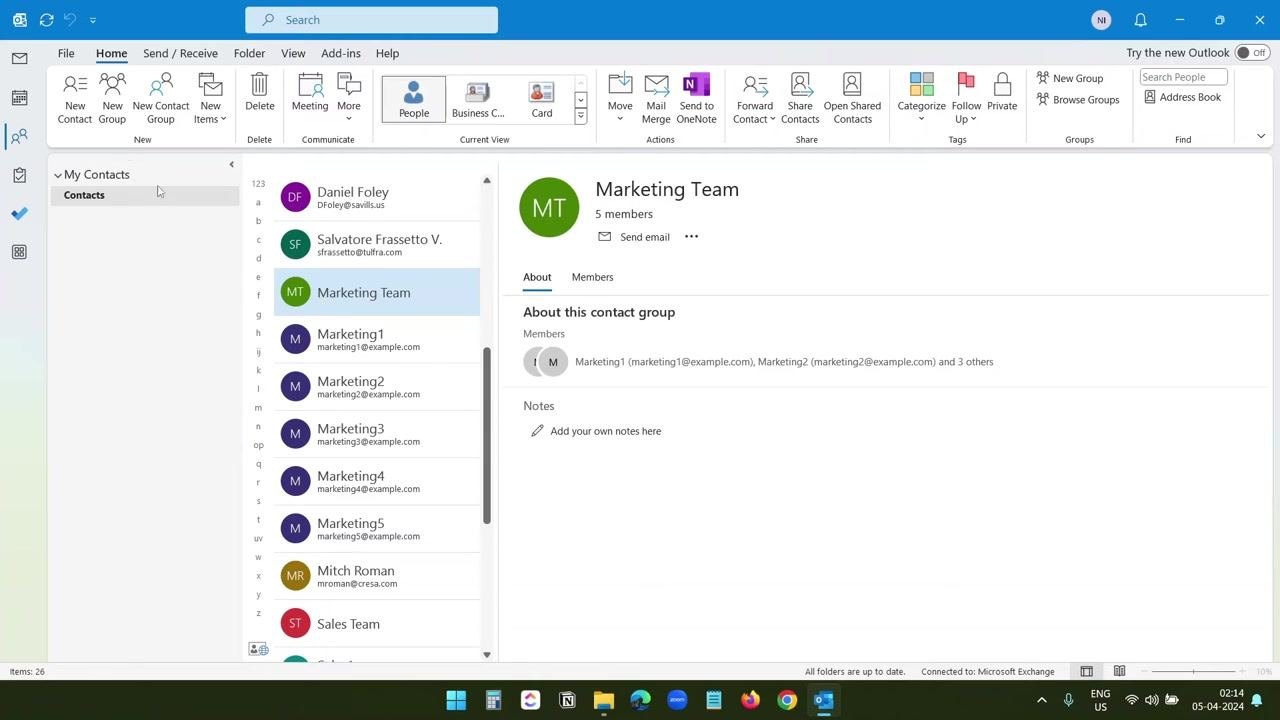
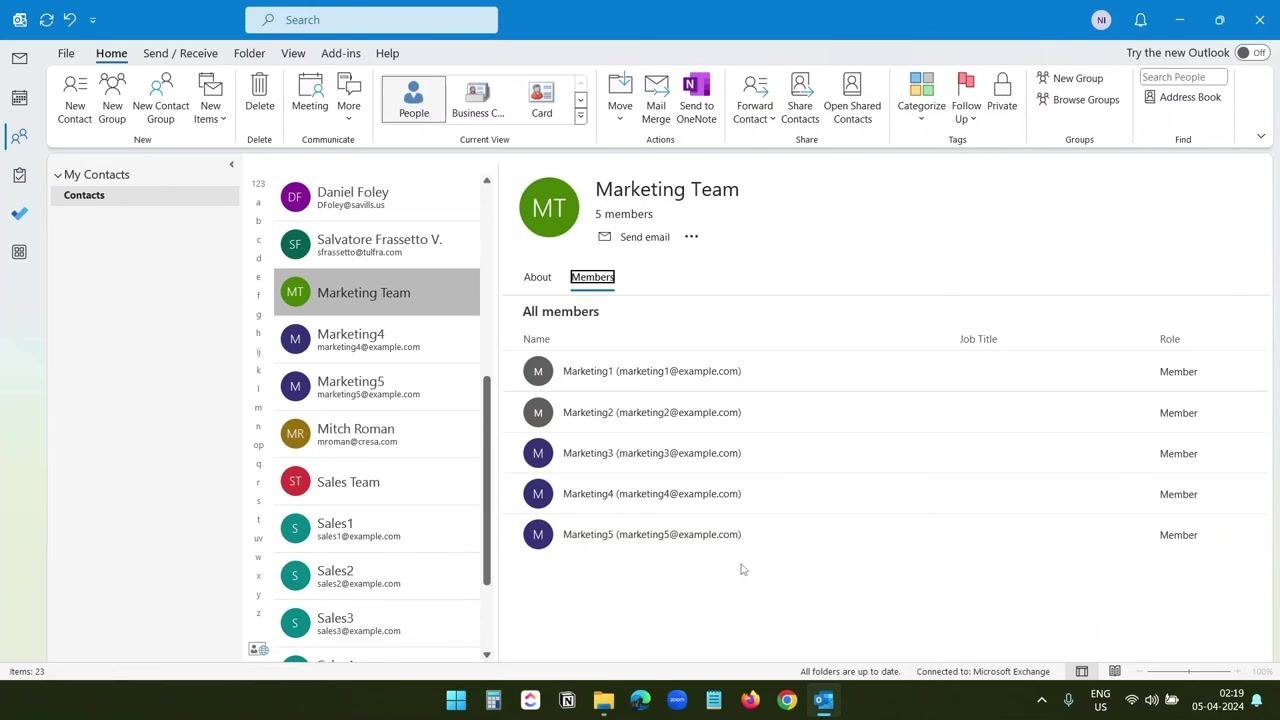
Click Save & Close to save the new distribution list. In your Contacts list, locate the new group and click on it to view its details—the About tab shows a summary confirming all intended members are listed.
-
Click the Members tab within the group contact to see the full list of members, including their names and email addresses.
Importing a second group (Sales Team example)
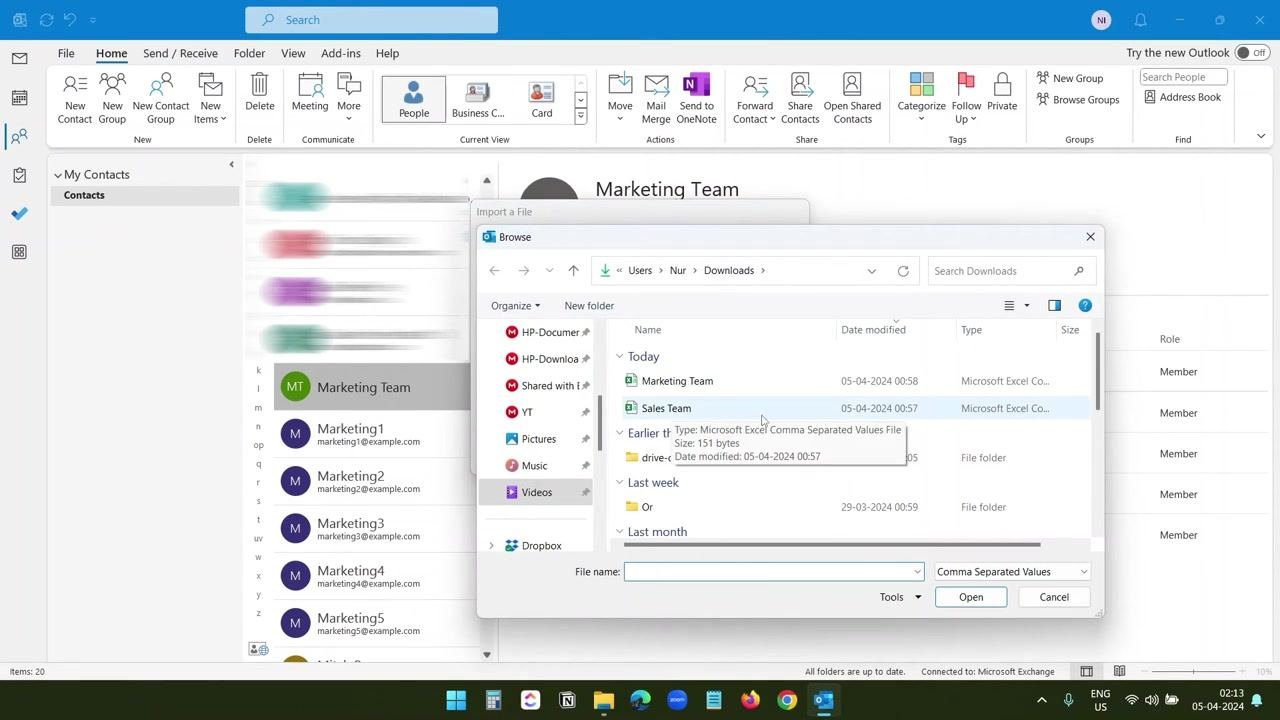
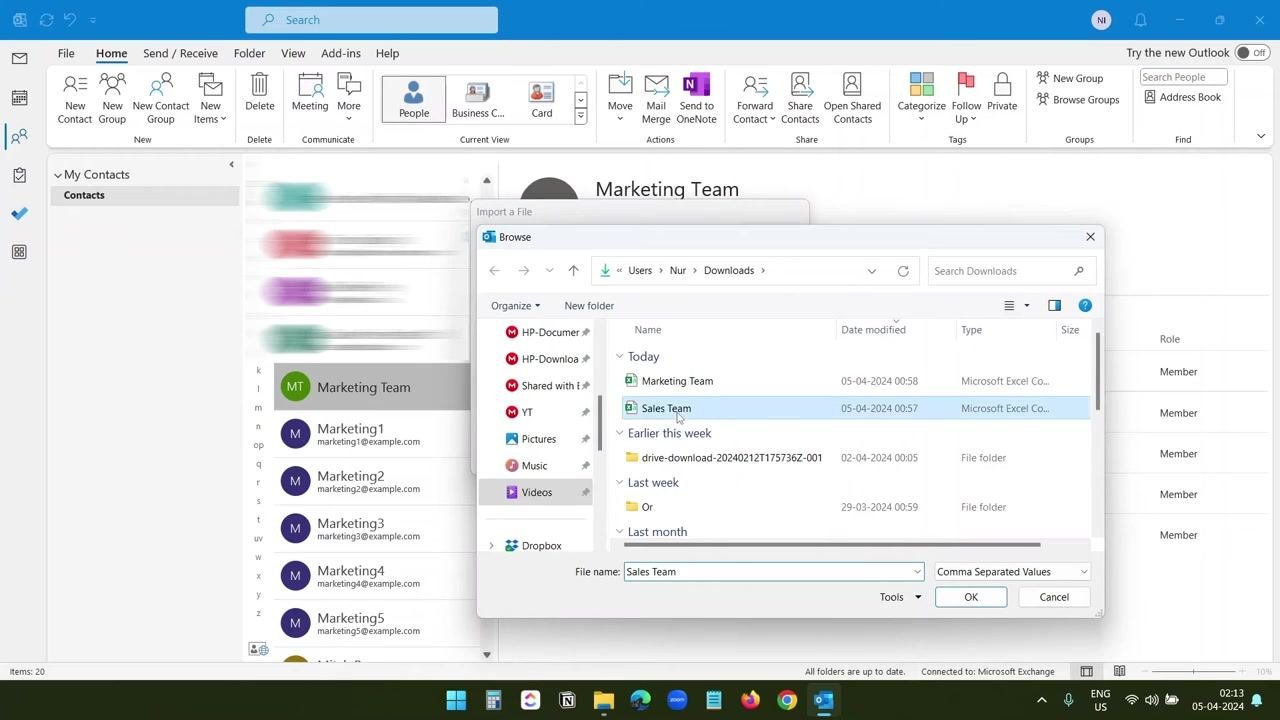
You can repeat the import process to build additional distribution lists. To import a second CSV file, go to File > Open & Export > Import/Export, select Import from another program or file, click Next, choose Comma Separated Values, click Next, then click Browse and select the new CSV file from your Downloads folder.
In the Import a File dialog, confirm the File name field shows the correct file (for example, "Sales Team") and that the file type is set to Comma Separated Values, then click OK to proceed.
In the Map Custom Fields dialog, confirm that the CSV fields—Name and Email—are correctly mapped to the corresponding Outlook Contacts fields, then click OK to finish the import.
Scroll through your Contacts list to confirm the new contacts (for example, Sales1 through Sales5) were added, and click on any contact to view their details.
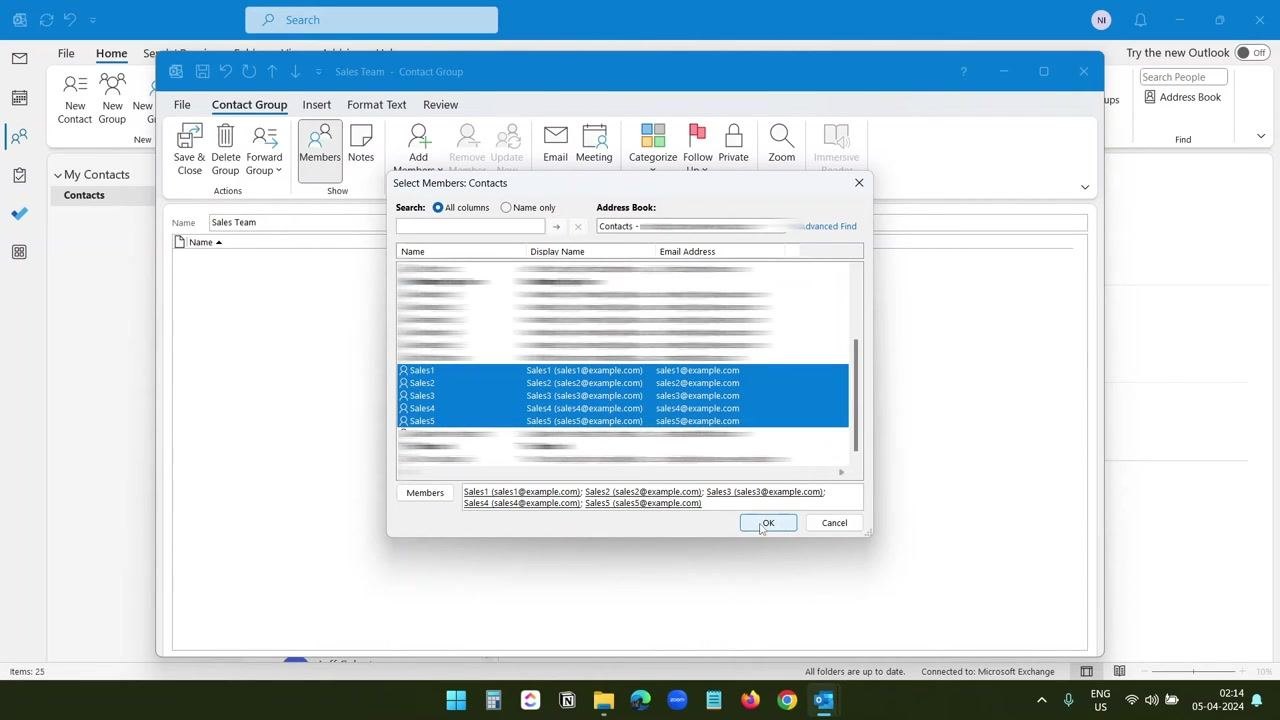
Click New Contact Group in the Home ribbon, name the group Sales Team, click Members, select all relevant contacts (Sales1 through Sales5) in the Select Members: Contacts dialog, and click OK to add them. Click Save & Close to finalize the group.
Sending an email to a distribution list
-
In the Contacts view, select the group you want to email (for example, Sales Team or Marketing Team) and click Send email, or open a new email window.
-
In the new email window, start typing the group name (for example, "sales") in the To field and select Sales Team from the suggestions to address the entire group at once.
-
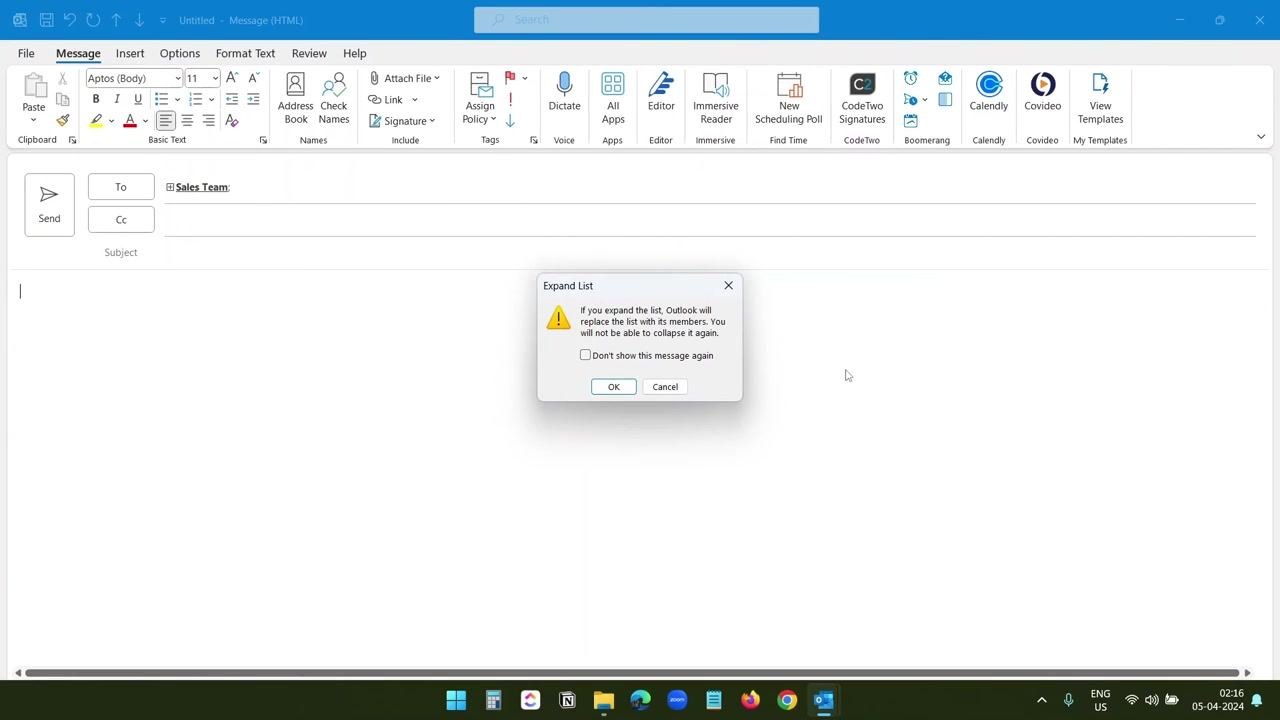
Hover over the group name in the To field to preview the member list, or click the expand icon next to the group name to view individual addresses. Outlook displays a warning: "If you expand the list, Outlook will replace the list with its members. You will not be able to collapse it again." Click OK to proceed if you want to expand the list.
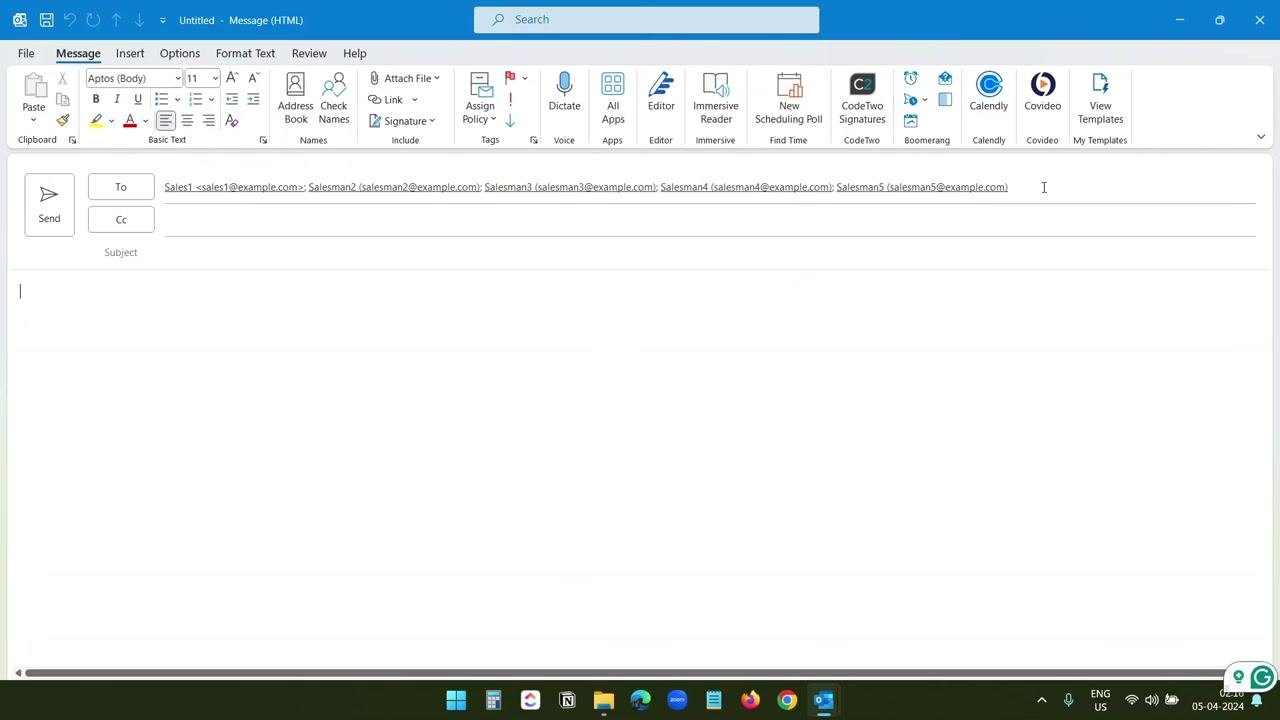
- After expanding, the group name in the To field is replaced by individual addresses (for example, Sales1 sales1@example.com, Sales2 sales2@example.com). You can remove any individual recipient from this email without affecting the original distribution group.
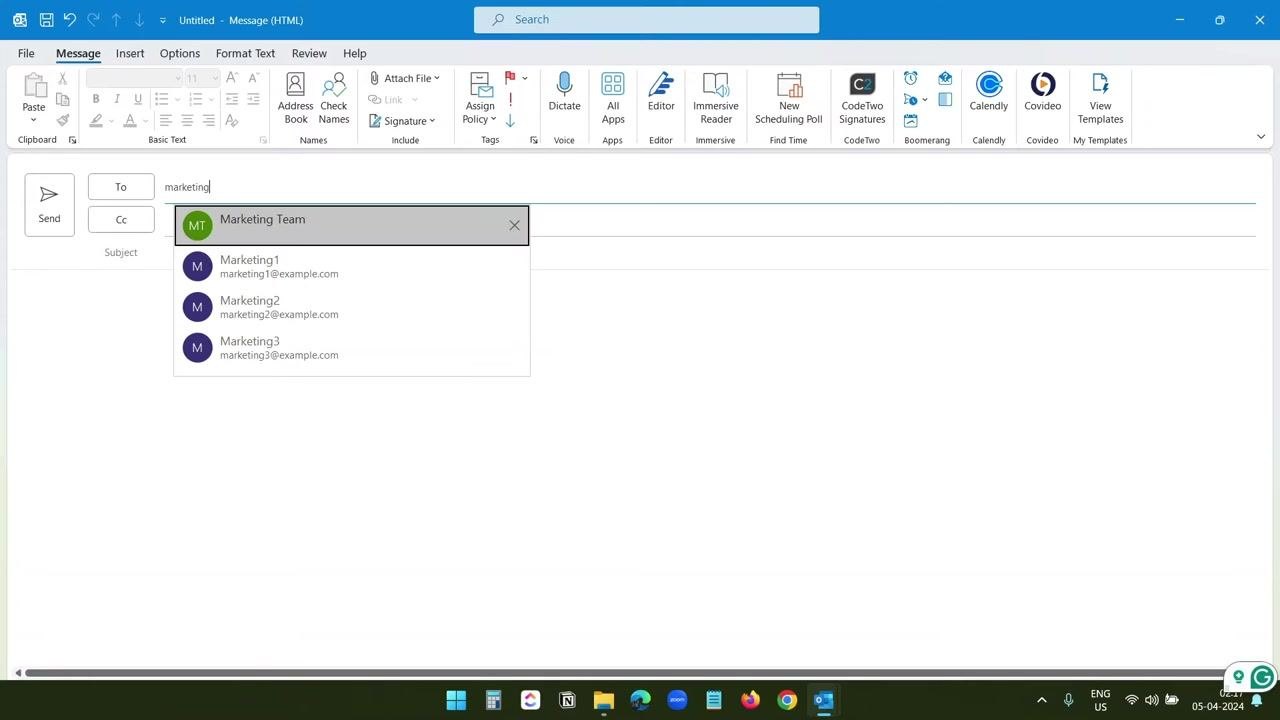
You can repeat these steps for other groups. For example, typing "marketing" in the To field shows Marketing Team alongside individual marketing contacts, and selecting Marketing Team addresses the whole group.
Clicking the expand icon next to Marketing Team displays all individual addresses (for example, Marketing1 marketing1@example.com, Marketing2 marketing2@example.com), letting you remove or edit recipients for that specific email.
Note: Removing a recipient from an email's To field does not remove that person from the distribution group itself—the group membership remains unchanged.
Managing group membership
-
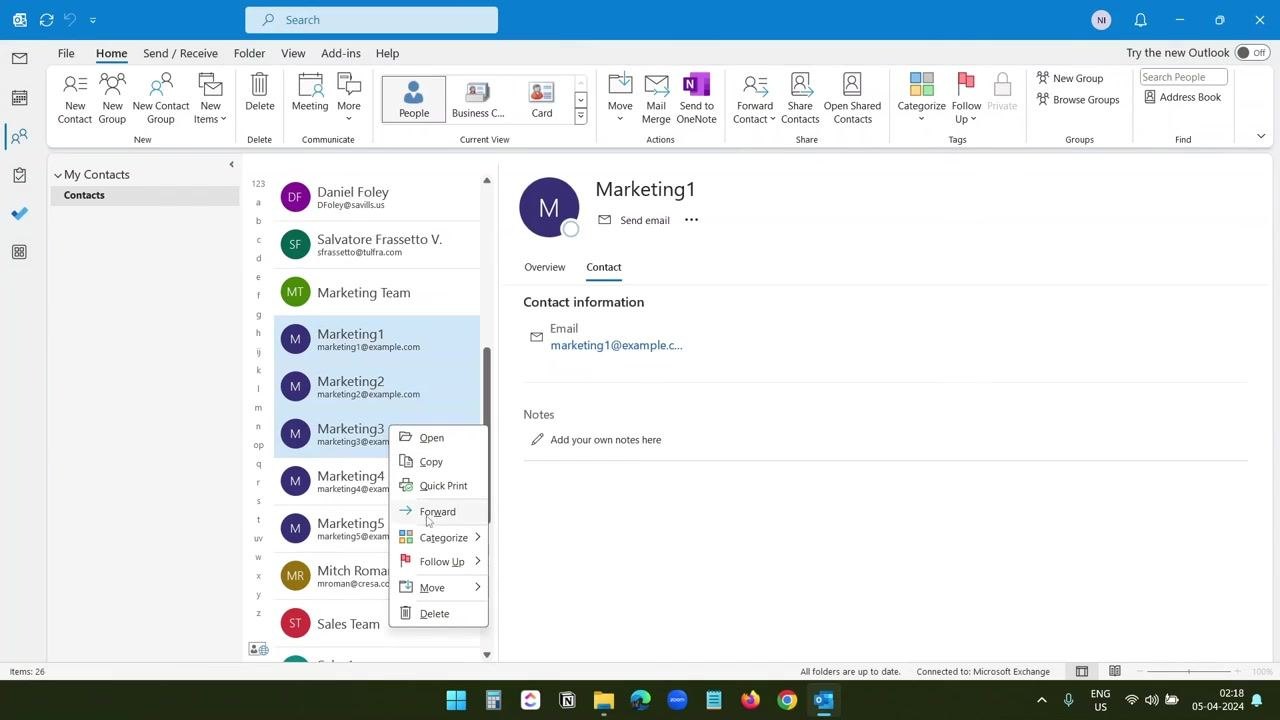
Switch to the Contacts view and select the Marketing Team group to view all its members. Click on a member (for example, Marketing1) to see their contact details, or right-click a member to access options such as Open, Copy, Quick Print, Forward, Categorize, Follow Up, Move, or Delete.
-
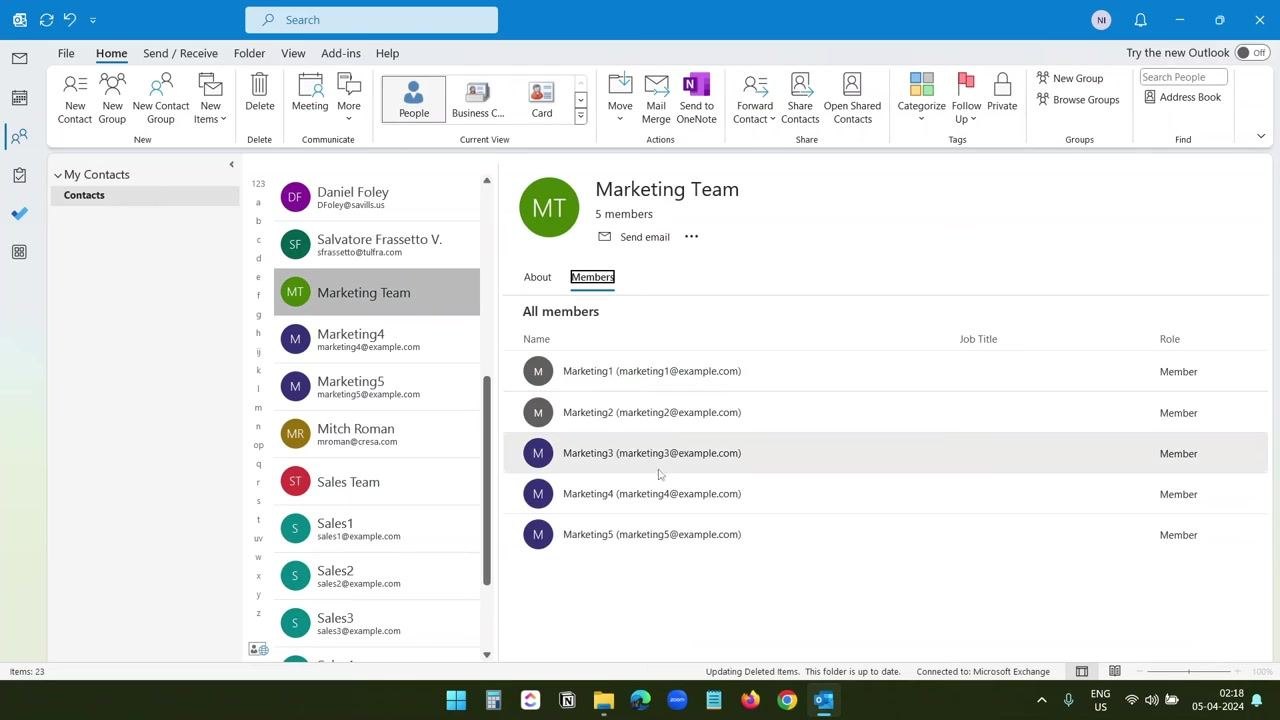
Click the Members tab to see the full list of group members and confirm that all original members are still present, even after removing someone from an individual email.
-
To add more members later, select the group and click the Edit Contact (or Members) button, then click Add Members and choose to add from Outlook Contacts, the Address Book, or as a new email contact.
-
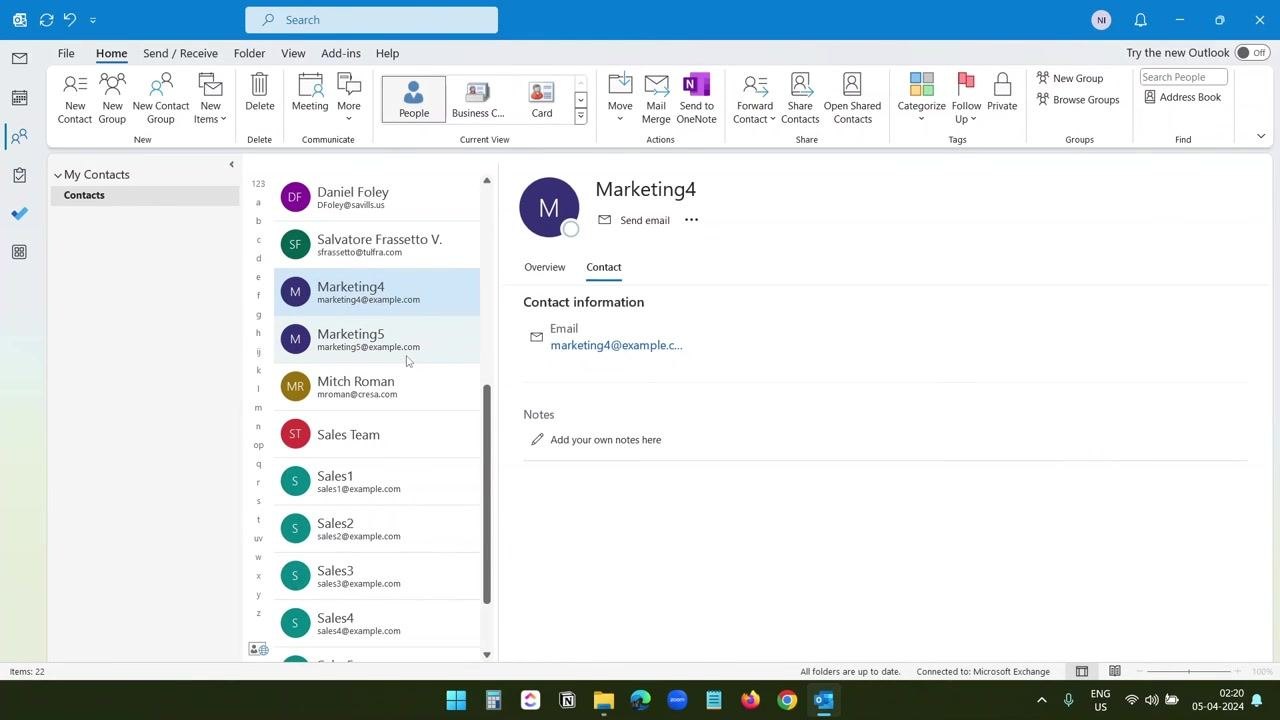
To remove a member, select them in the Contact Group window and click Remove Member in the ribbon, confirming with Yes if prompted. The group will then show one fewer member in the Contacts view.
-
Select the group again to confirm the member count has decreased and the removed contact no longer appears. You can select any remaining member to view their individual contact details.
Creating an equivalent distribution list in Google Contacts
If you use Google Contacts alongside Outlook, you can create a similar group, called a label, and send email to it through Gmail.
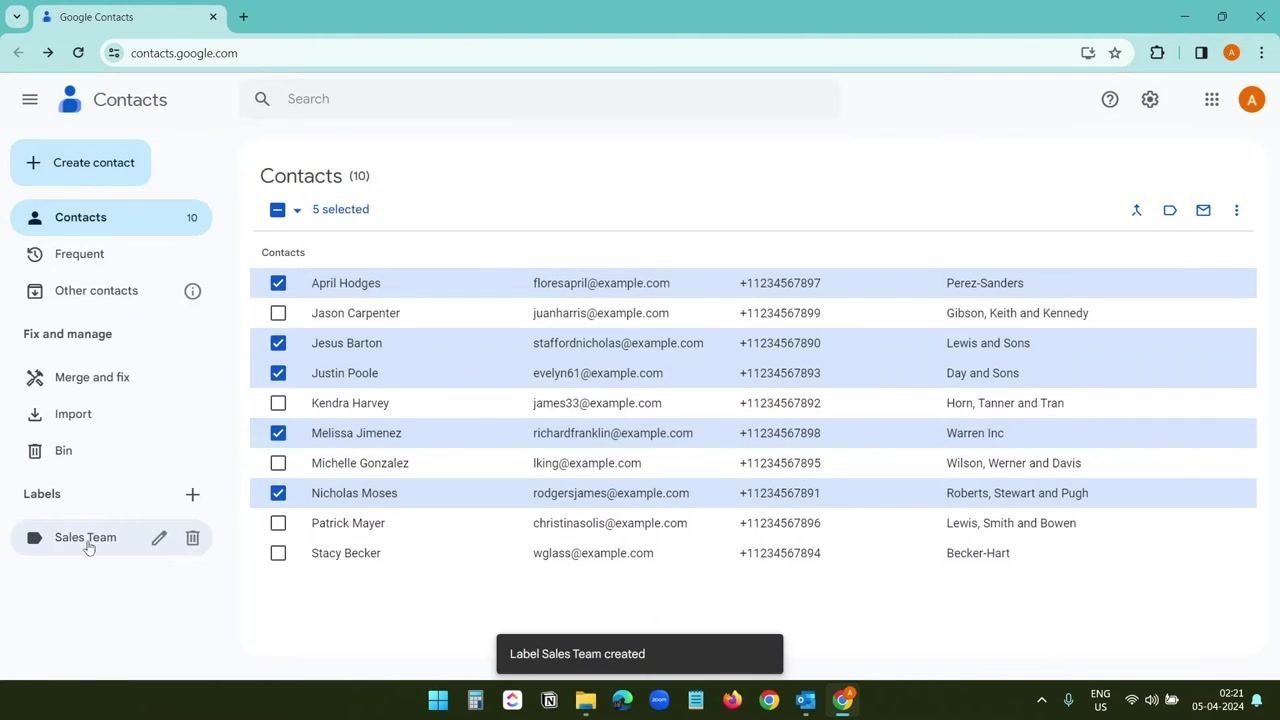
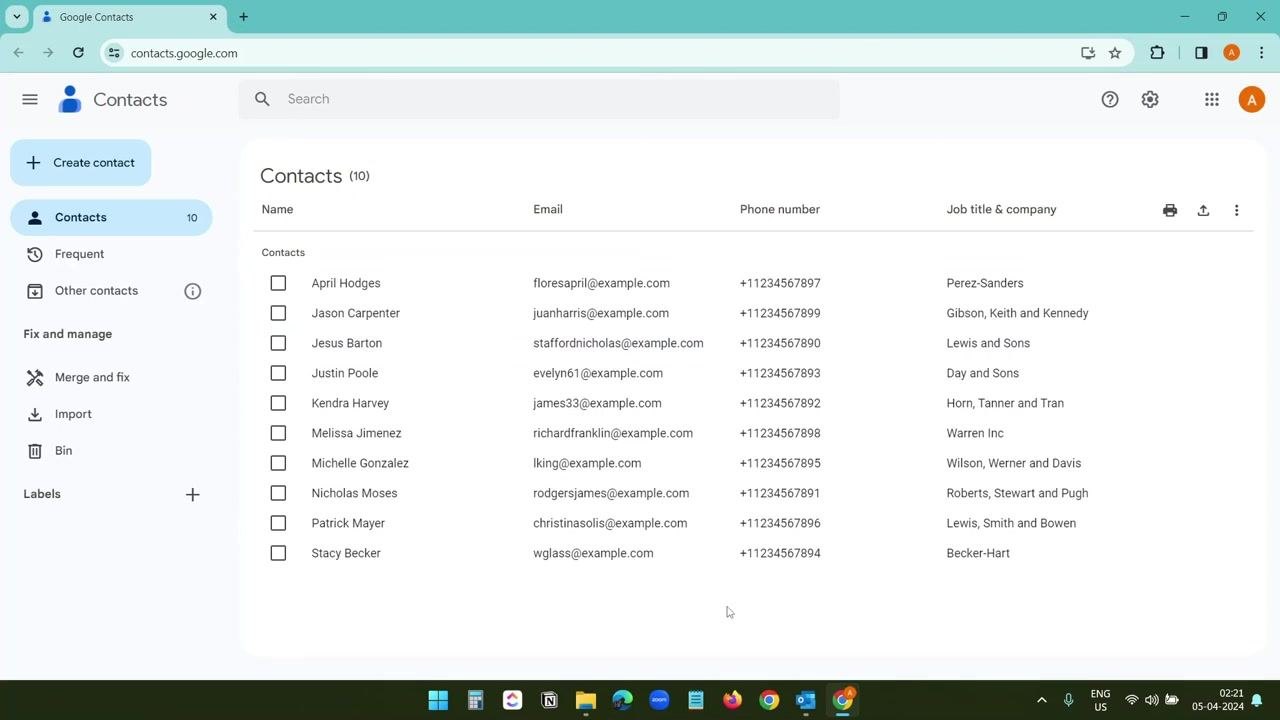
- Navigate to contacts.google.com and sign in to your Google account. The Contacts page lists all your contacts, including names, email addresses, phone numbers, and job titles or companies.
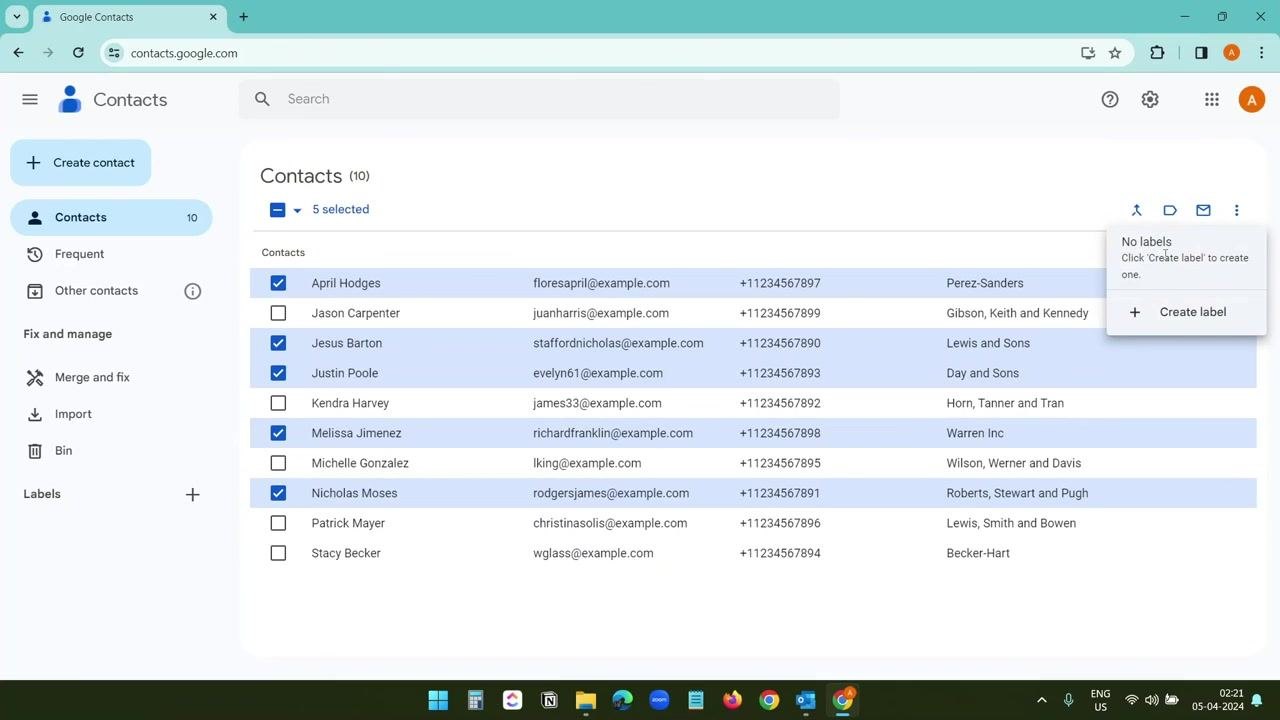
- Select the checkboxes next to the contacts you want to include in the new group, click the Label icon at the top of the list, and choose Create label from the dropdown to start a new group.
-
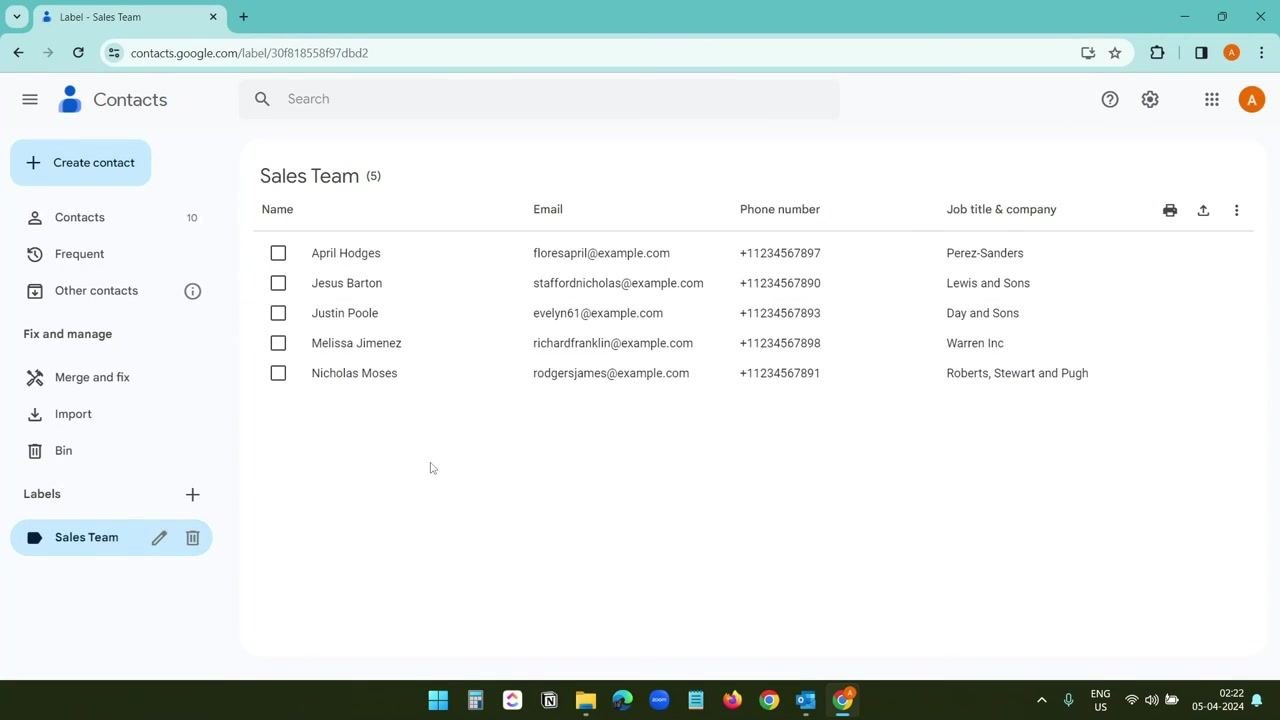
Select your new label (for example, "Sales Team") from the Labels section on the left sidebar to review the member list, including names, emails, phone numbers, and job titles or companies. Confirm that all intended members are present.
-
With the label selected, click the envelope icon at the top right of the contact list to open a new Gmail compose window with all group members automatically added to the To field. Verify each member appears as a separate recipient chip, then enter a subject, write your message, and click Send to deliver the email to the entire group.
Note: In Outlook, removing a contact from an email does not remove them from the group. In Google Contacts, labels serve the same purpose as distribution lists, letting you organize and email multiple contacts at once. Always verify group membership after adding or removing members to ensure accuracy.
Summary
You now know how to create a distribution list in Outlook both manually and by importing contacts from a CSV file, how to address and expand a distribution list when sending email, and how to add or remove members from an existing group. You've also seen how to build an equivalent group using labels in Google Contacts and send email to it through Gmail. Use these methods to streamline communication with your teams without typing individual addresses every time.
Generation details: cost, quality tiers
Docsie billed 4,500 credits ($3.15) to analyze this 9-minute video at standard quality. The rewrite, template fill and Word/PDF exports were included. The same video at each quality tier:
| Quality | Frames sampled | Credits | Approx. cost |
|---|---|---|---|
| Draft | every 16-30 s | 2,250 | $1.57 |
| Standard (this guide) | every 8-15 s | 4,500 | $3.15 |
| Detailed | every 4-7 s | 9,000 | $6.30 |
| Ultra | every 1-3 s | 18,000 | $12.60 |
Credits priced at $0.70 per 1,000; plans include a monthly allowance. Enterprise customers on on-premise or bring-your-own-model deployments run this on their own inference and pay no per-video credits.
Generated by Docsie Video-to-Docs on 2026-09-28 from a 8-minute video. Screenshots are frames from the source video and belong to their creator, Technologiate, whose original is embedded above. If you own this video and want the guide removed or credited differently, contact us and we will act within one business day.