
How to Create a Lead in Dynamics 365
A lead represents an inquiry from a potential customer about the goods or services your organization offers. Once that interest is confirmed, you can qualify the lead and begin working toward a deal. This guide walks you through how to create a lead in Dynamics 365, complete its details, send a follow-up email, and qualify it into an opportunity.
Video: How to Create and Qualify a Lead in Dynamics 365 for Sales by Integent. All credit for the demonstration goes to the creator; watch the original on YouTube. The written guide below was generated from this video by Docsie. Creator? Request a change or removal.
A lead represents an inquiry from a potential customer about the goods or services your organization offers. Once that interest is confirmed, you can qualify the lead and begin working toward a deal. This guide walks you through how to create a lead in Dynamics 365, complete its details, send a follow-up email, and qualify it into an opportunity.
Prerequisites
- Access to a Dynamics 365 for Sales environment.
- Permissions to create and edit leads, contacts, opportunities, and accounts.
- At least one saved email signature if you plan to insert one into outgoing messages.
Accessing your Dynamics 365 Sales environment
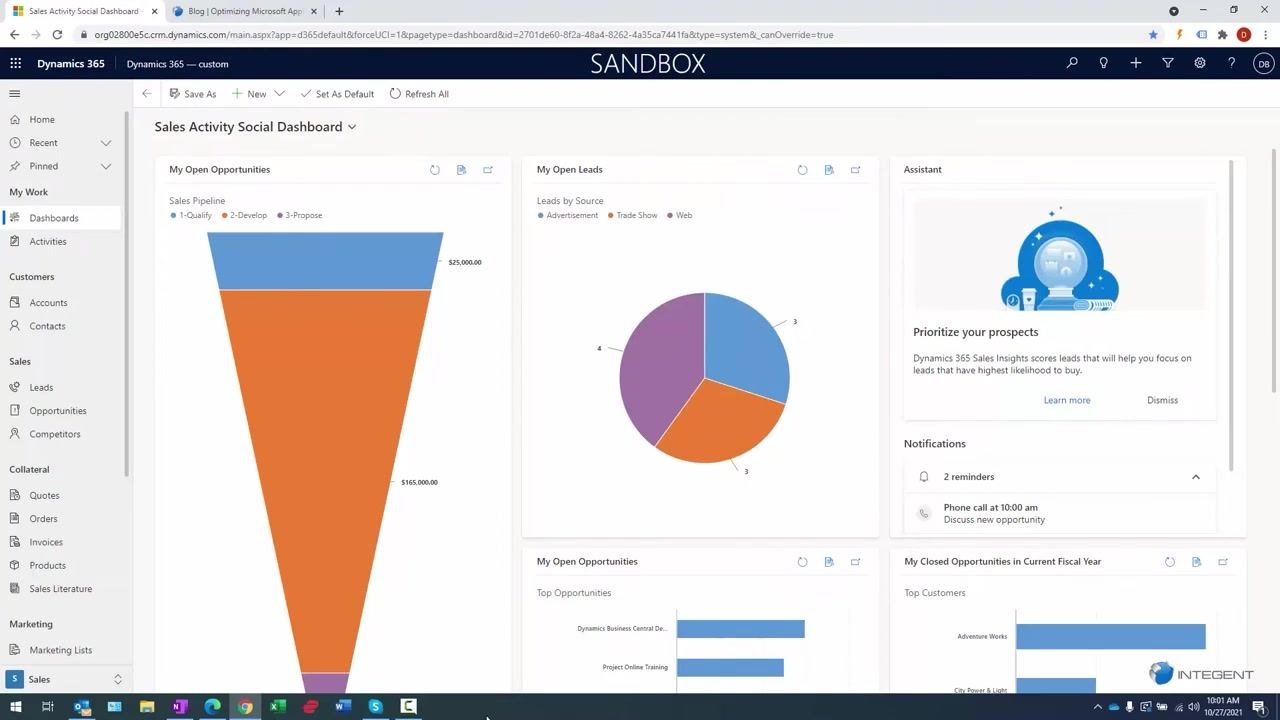
Log in to your Dynamics 365 for Sales environment. Confirm that you land on your dashboard, which displays various sales activity metrics such as a sales funnel, pie chart, and assistant panel.
Navigating to the leads list
In the left navigation pane, locate the Sales grouping and click Leads. The system displays the My Open Leads view by default, listing the leads assigned to you.
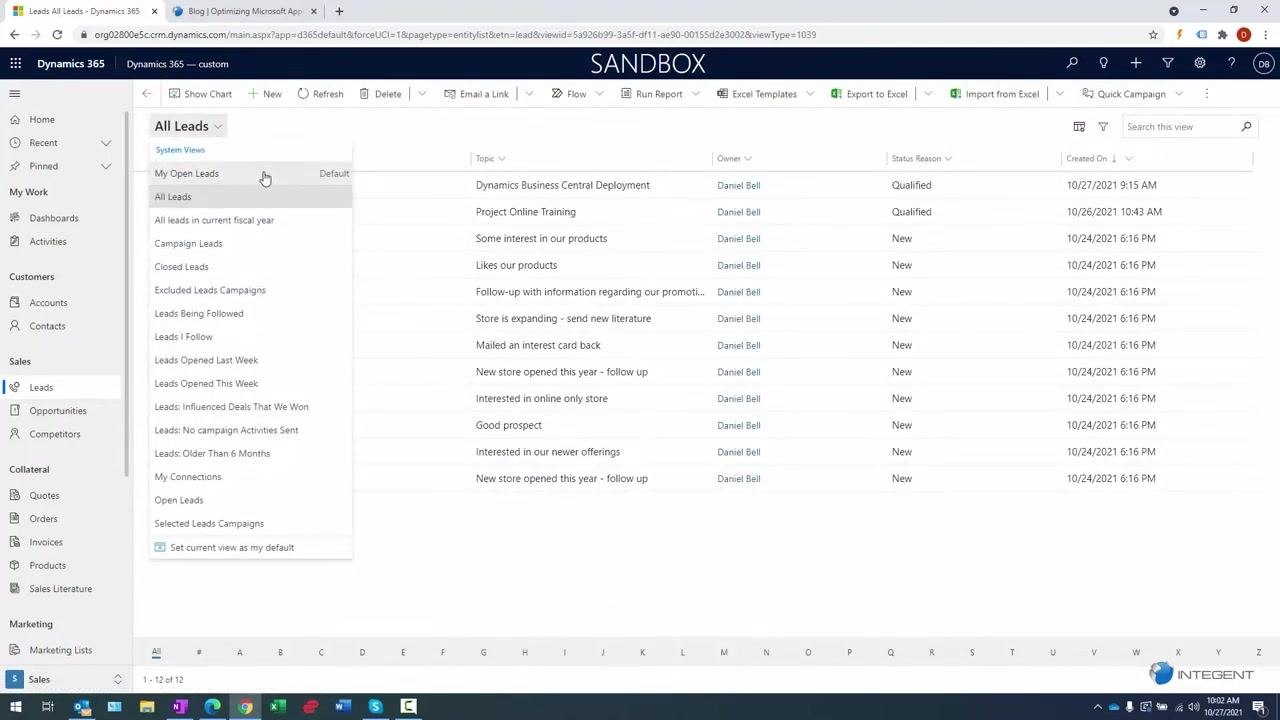
If you want to see all leads in the organization or filter by different criteria, click the dropdown next to My Open Leads and choose from views such as All Leads, Campaign Leads, or Closed Leads. For this guide, keep the My Open Leads view selected so you can focus on leads you own.
Creating a new lead
Click the New button in the toolbar above the leads list to start creating a new lead record.
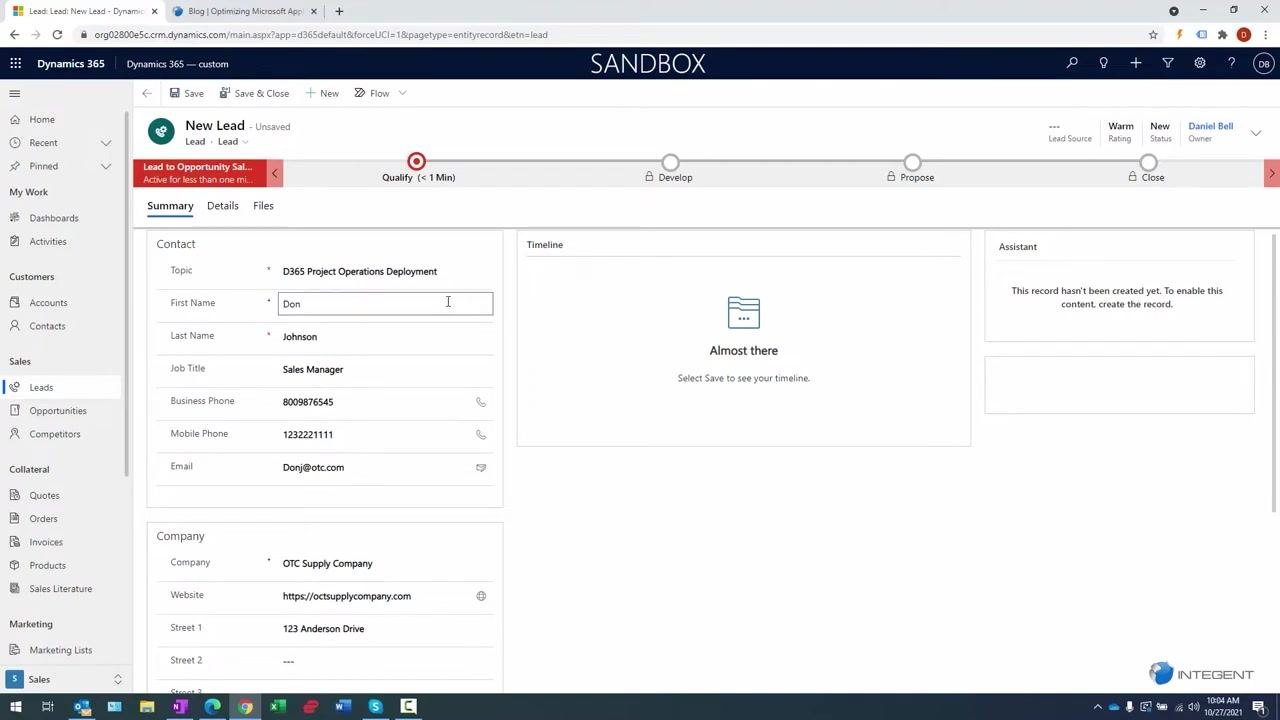
In the New Lead form, enter the Topic — for example, "D365 Project Operations Deployment" — along with the contact's first and last name, job title, business phone, mobile phone, email, and company information such as name, website, and address. The form also shows a qualification process bar at the top with the stages Qualify, Develop, Propose, and Close.
Entering contact and company information
Complete the Contact section with details such as First Name, Last Name, Job Title, Business Phone, Mobile Phone, and Email. Then complete the Company section with the company name, website, street address, state/province, ZIP/postal code, and country/region. Capturing all available company information helps support future opportunities.
Adding a description for the lead
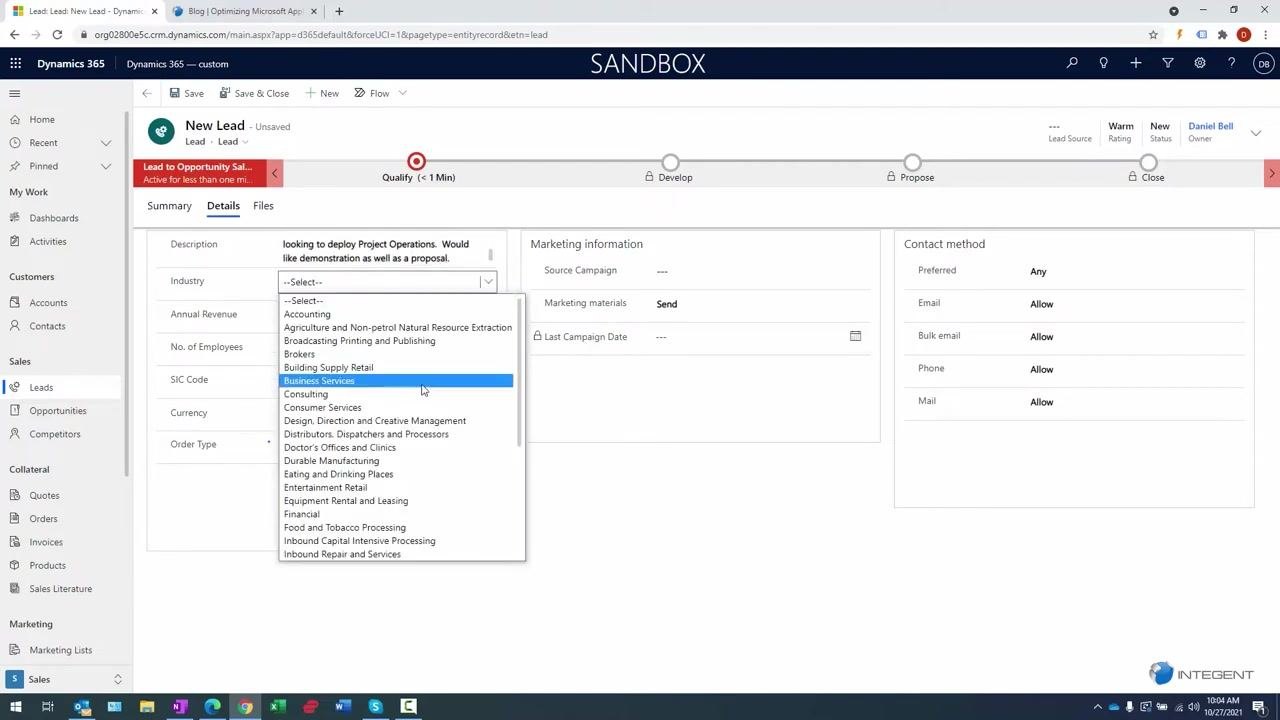
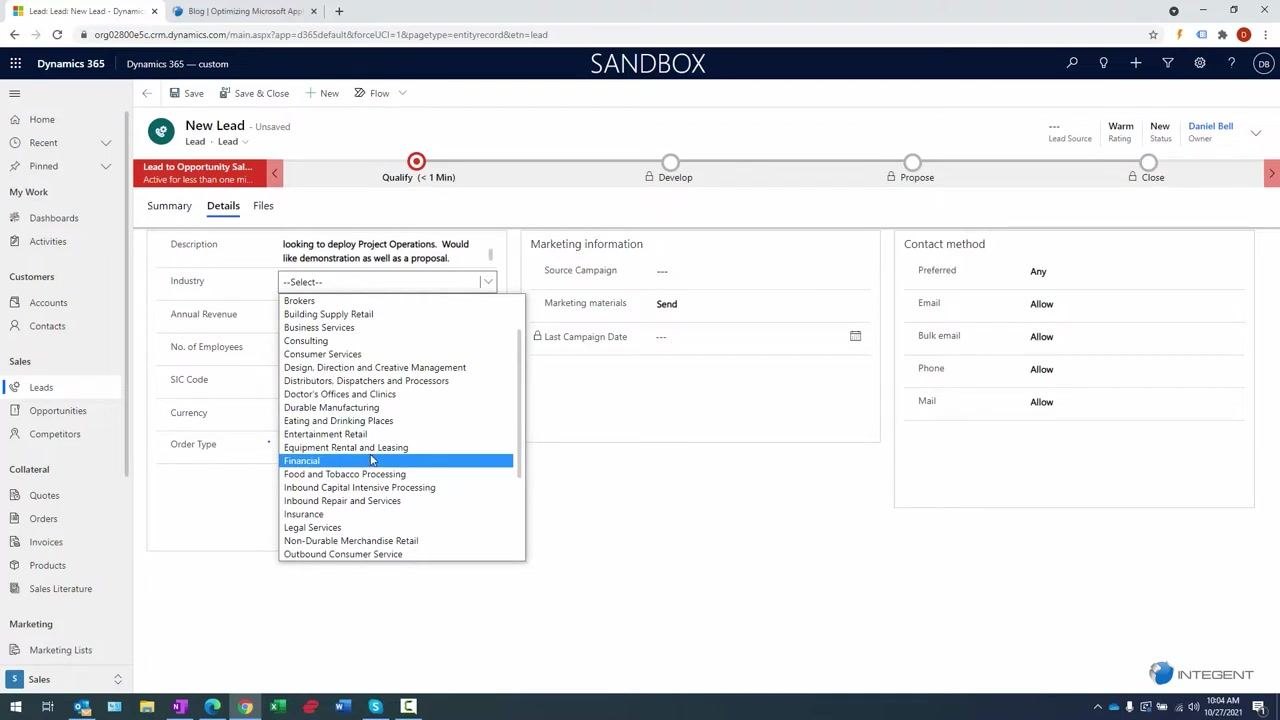
Click the Details tab at the top of the New Lead form to enter additional information. In the Description field, summarize the lead's inquiry — for example, noting what the contact requested, such as a demonstration or proposal. This context helps anyone reviewing the record later understand the opportunity.
Specifying the industry
In the Industry dropdown, select the option that best matches the company's business. Choose the closest match based on what the company produces or offers.
Entering annual revenue and employee count
In the Annual Revenue field, enter the company's annual revenue, and in No. of Employees, enter the employee count. Confirm that Industry, Order Type, and Currency are set correctly, then leave remaining fields at their defaults unless you have additional information.
Adding marketing campaign information (optional)
If the lead originated from a marketing campaign — such as a form fill or event — click the Source Campaign field under Marketing information and select the appropriate campaign from the dropdown list. This helps you track lead sources and support marketing efforts.
Saving the lead record
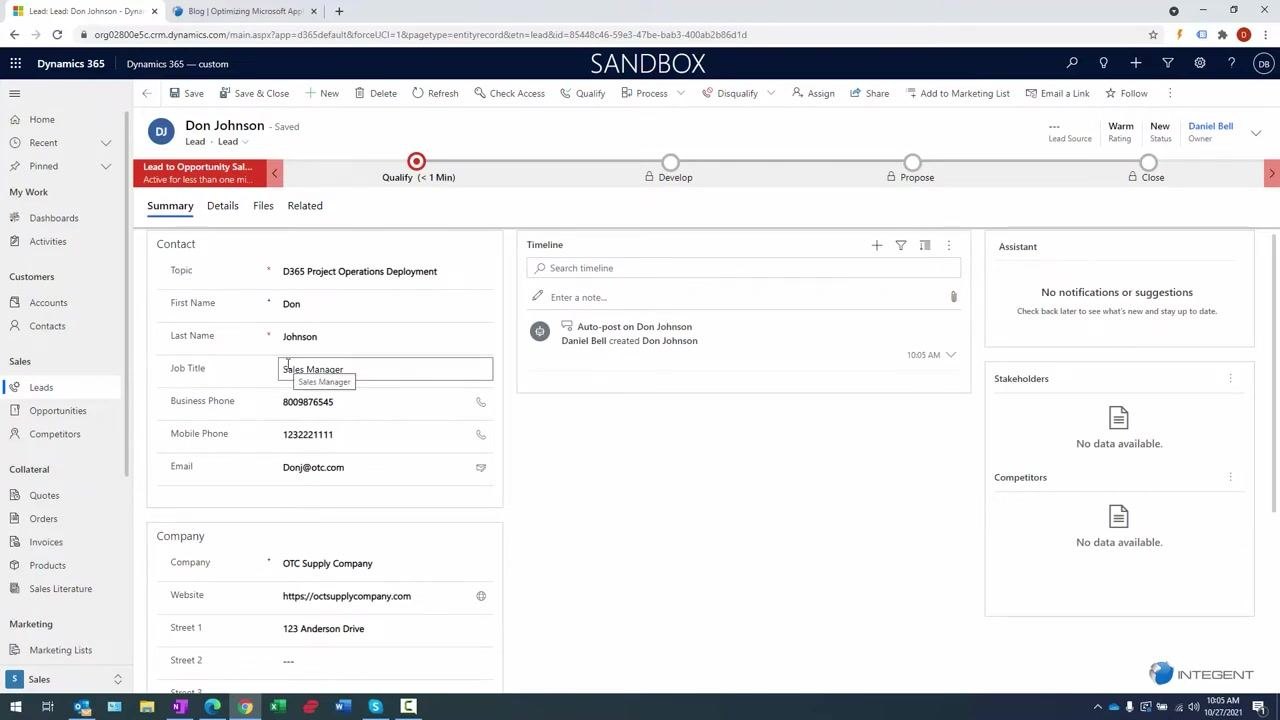
Click Save at the top of the form to save all entered information. Confirm that the lead status updates and that the information is retained.
Reviewing the summary tab
Click the Summary tab to review the lead's contact and company information. Verify that all details — name, job title, phone numbers, email, company, website, and address — are correct and visible.
Logging an activity on the timeline
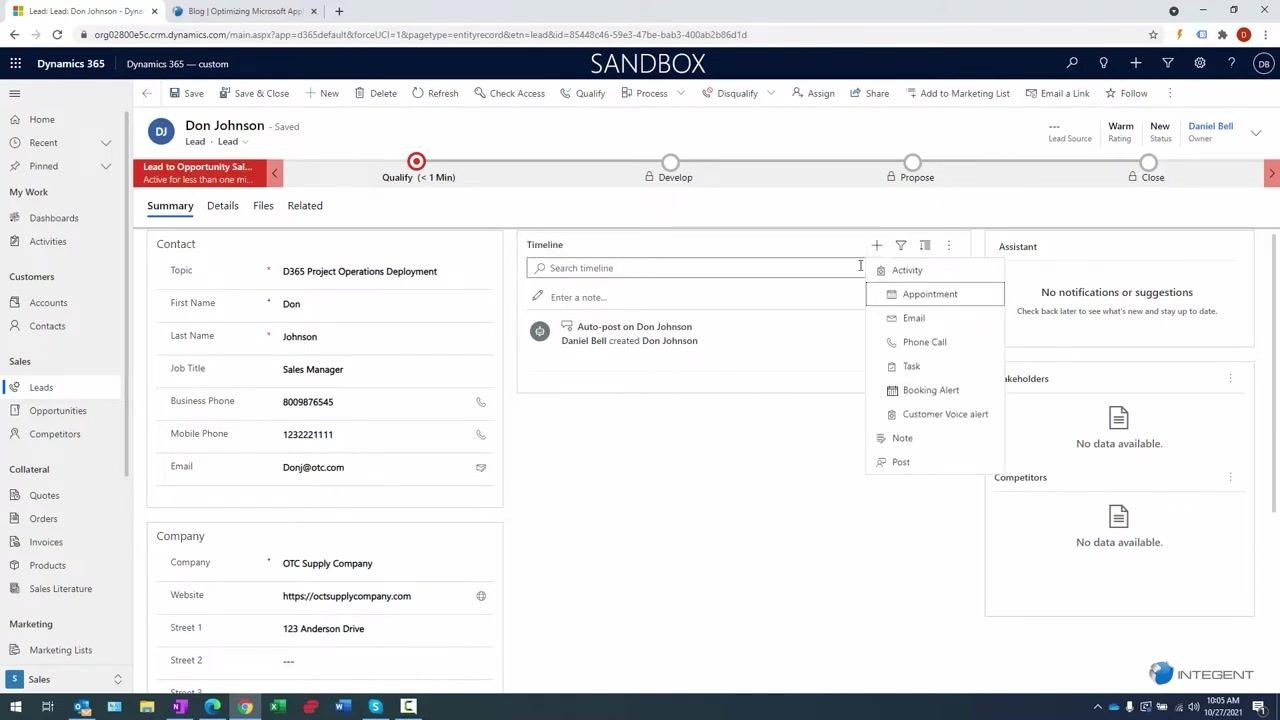
In the Timeline section, click the plus (+) sign to add a new activity. Review the available activity types, which include Appointment, Email, Phone Call, Task, Booking Alert, Customer Voice Alert, Note, and Post.
Sending a proposal email to the lead
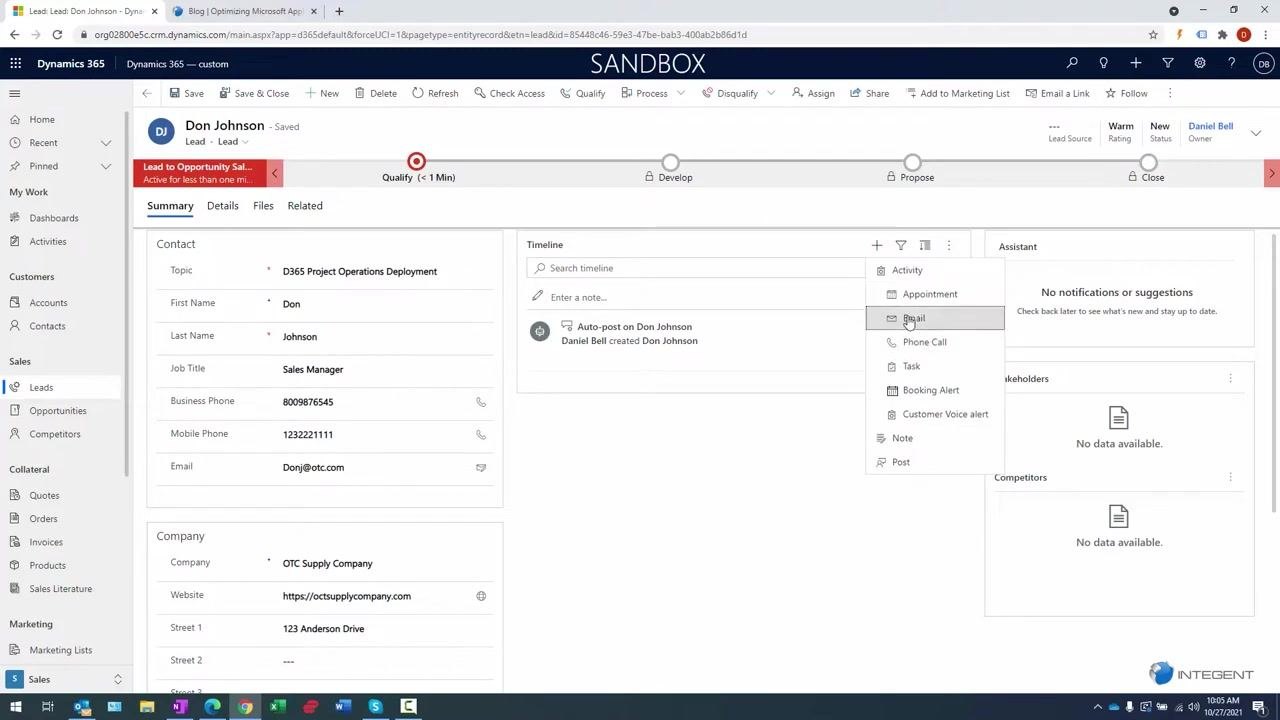
Select Email from the activity dropdown. In the new email window, fill in the From, To, and Subject fields, write your message body, and click Attach File to add the proposal document to the email.
Adding a signature to your email
Click Insert Signature in the email toolbar to add a standardized signature to your message. You can create email signatures in the Personal Options or Settings areas of your environment.
Sending the email
Review your email content to confirm all necessary information and attachments are included, then click Send in the toolbar. A closed email activity is created automatically in the system.
Verifying the email activity in the lead timeline
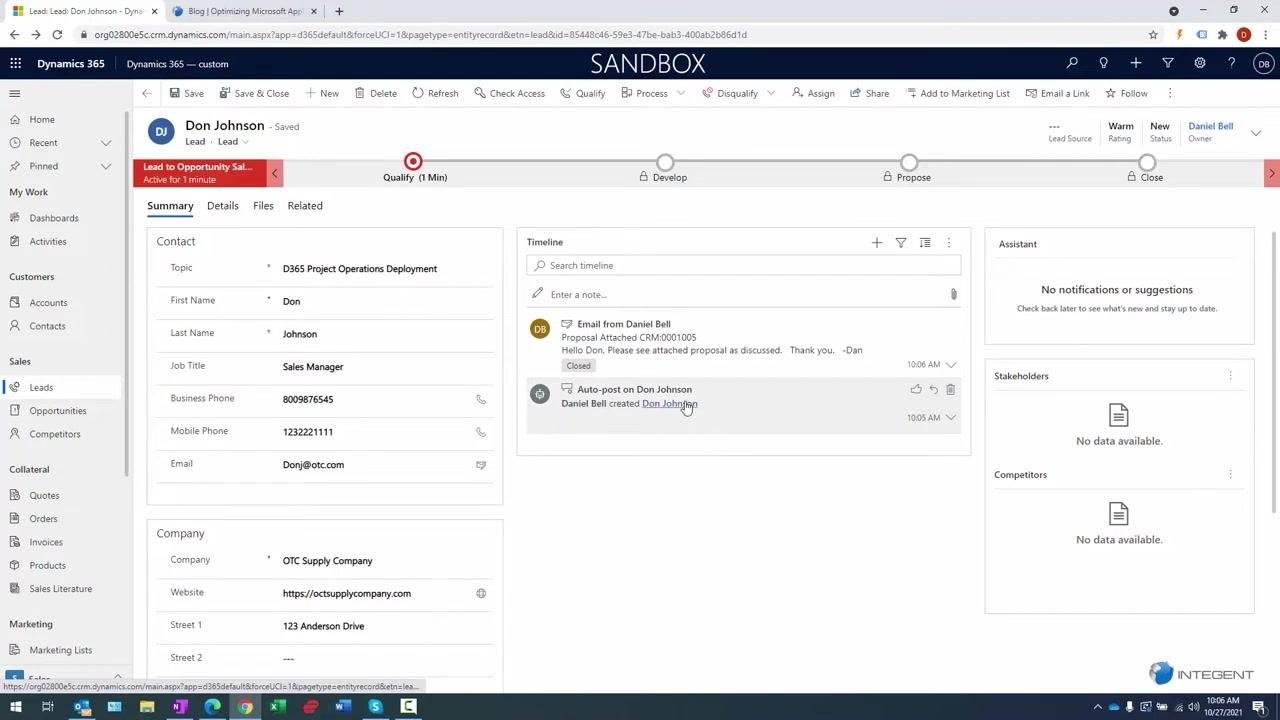
Navigate to the relevant lead record. In the Timeline section, confirm that an "Email from [sender]" activity appears with the correct subject and message content, that its status shows Closed, and that an auto-post indicates who created the lead record.
Opening the sent email record
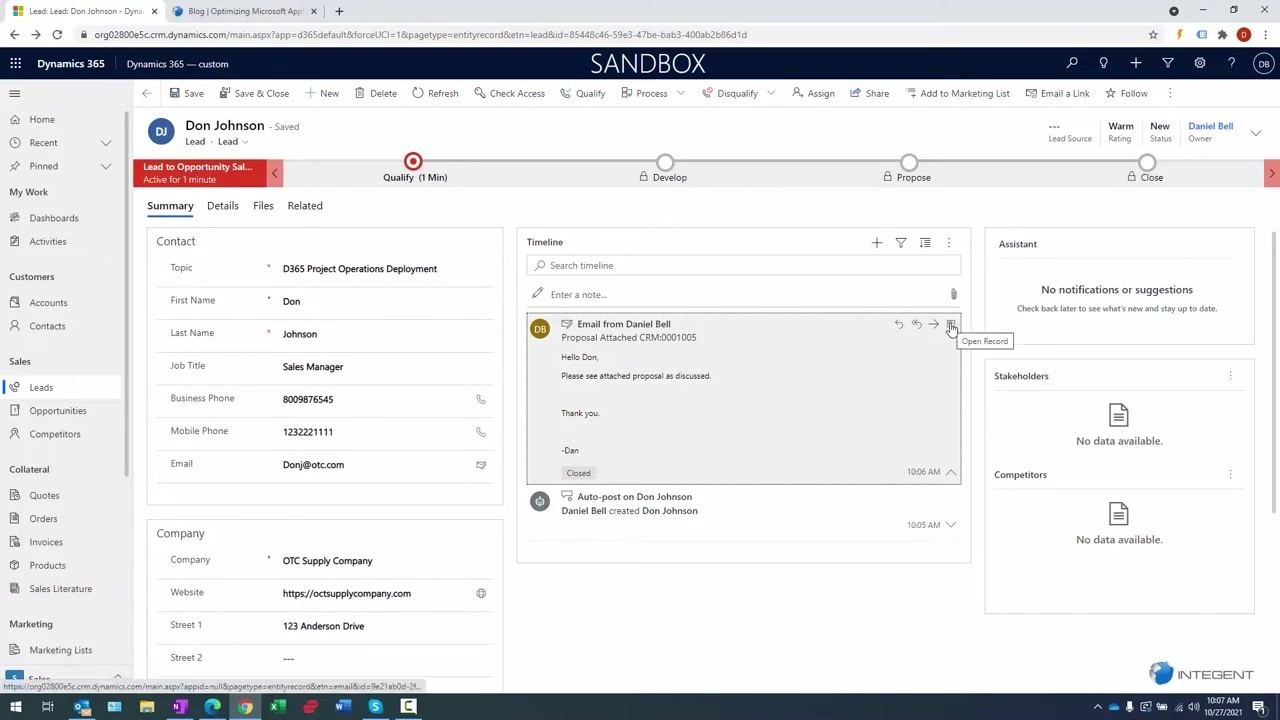
In the Timeline, locate the email activity and click the Open Record icon — a square with an arrow — next to it to view the full email record.
Reviewing the lead's qualification status
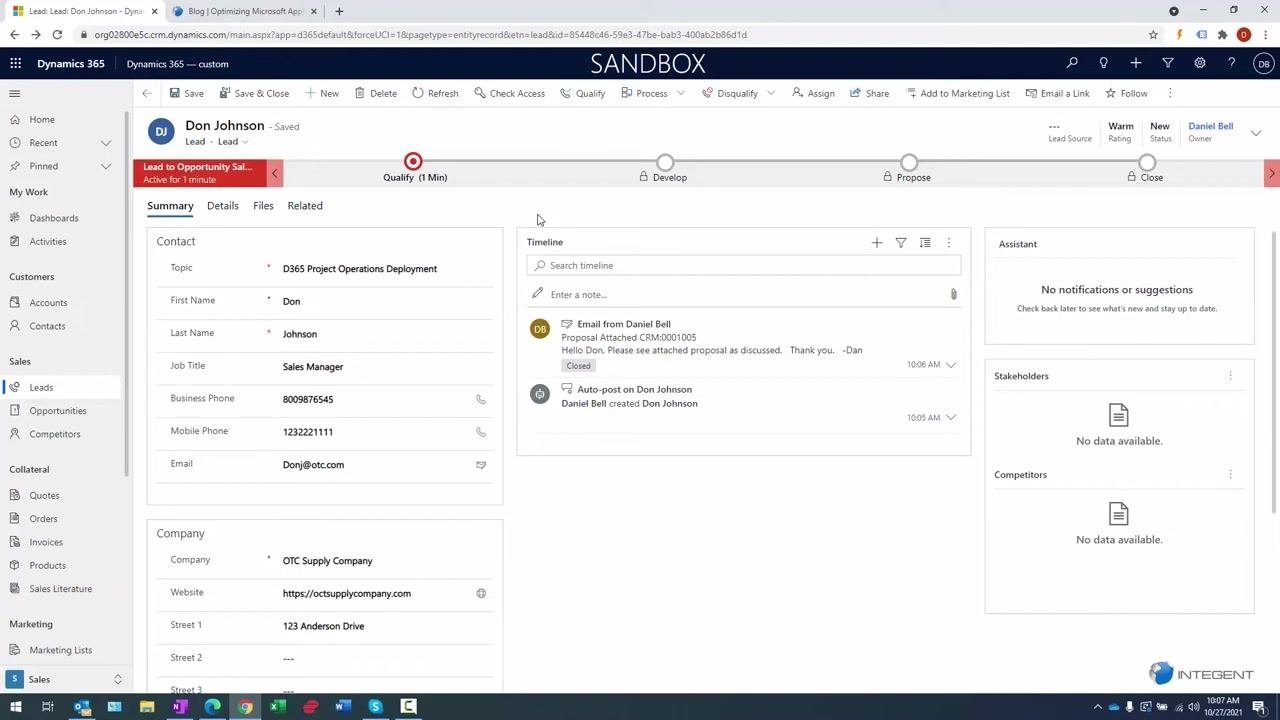
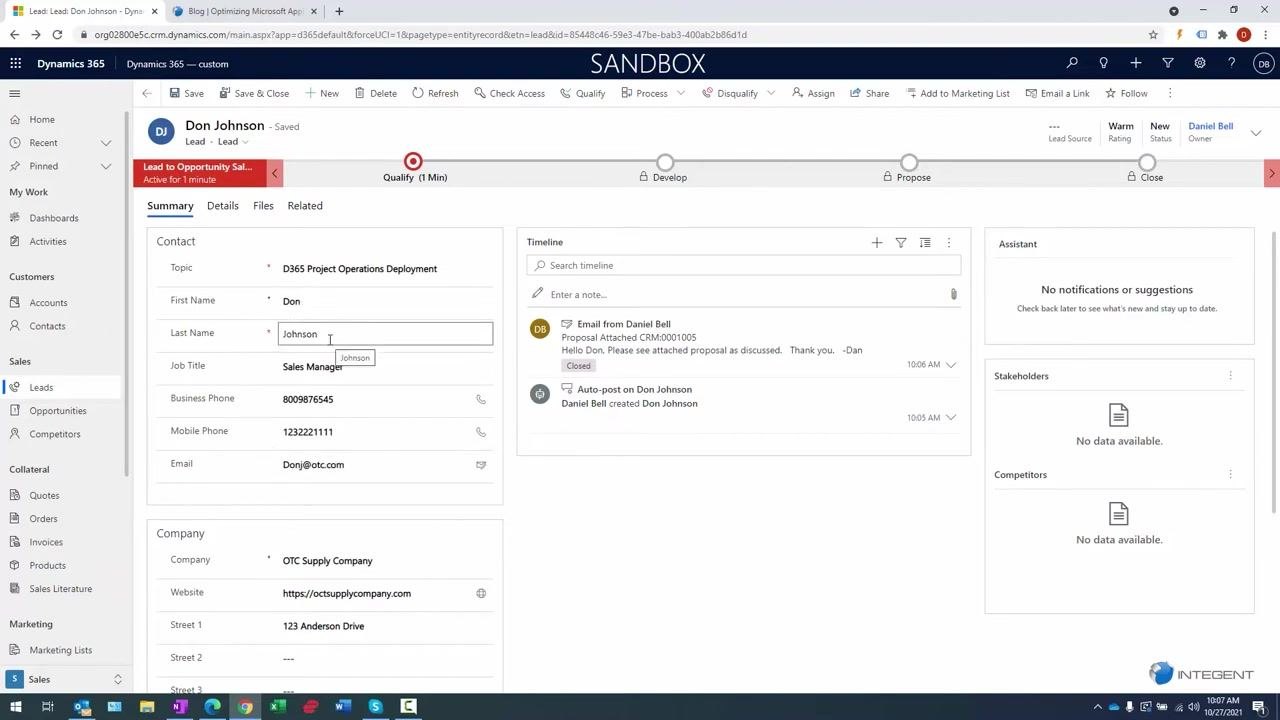
Confirm that the lead is in the Qualify stage, as indicated by the process bar at the top. Review the contact and company information — topic, name, job title, phone numbers, email, company, website, and address — to ensure everything is accurate.
Qualifying the lead
In the toolbar, click the Qualify button to move the lead to the next stage in your sales process. This action converts the lead into an opportunity and associates it with the relevant account.
Reviewing the new opportunity record
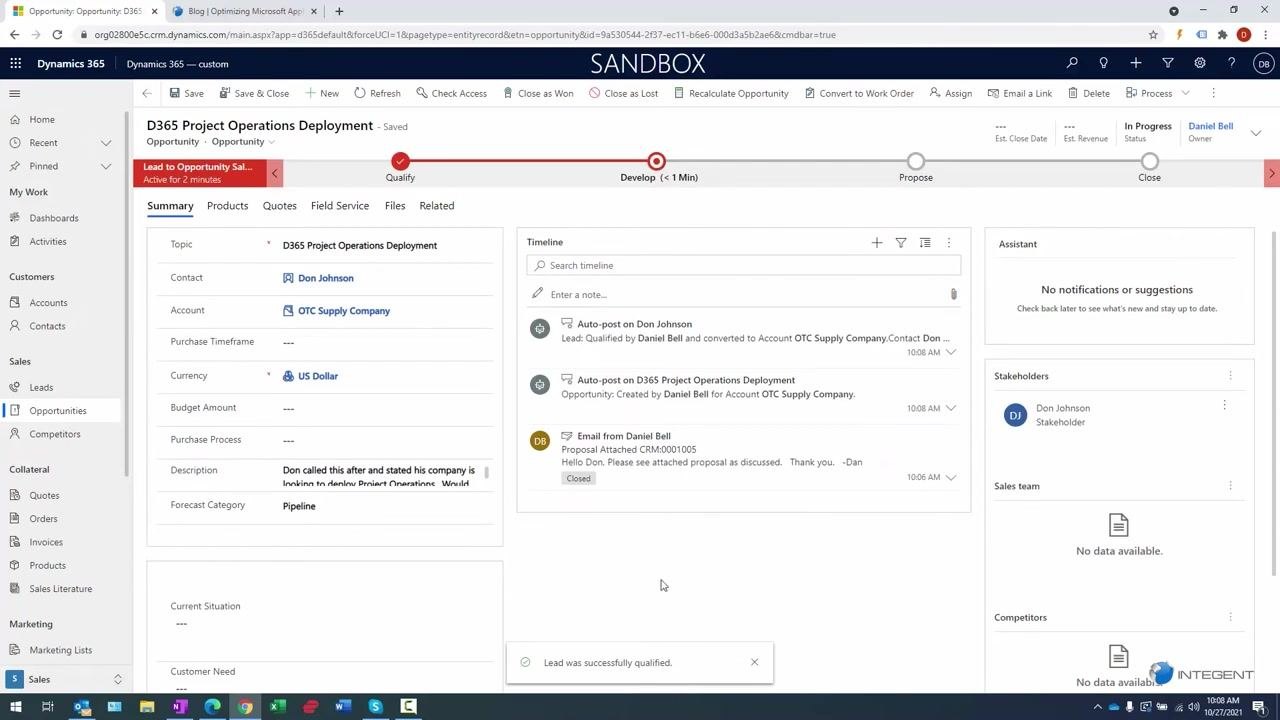
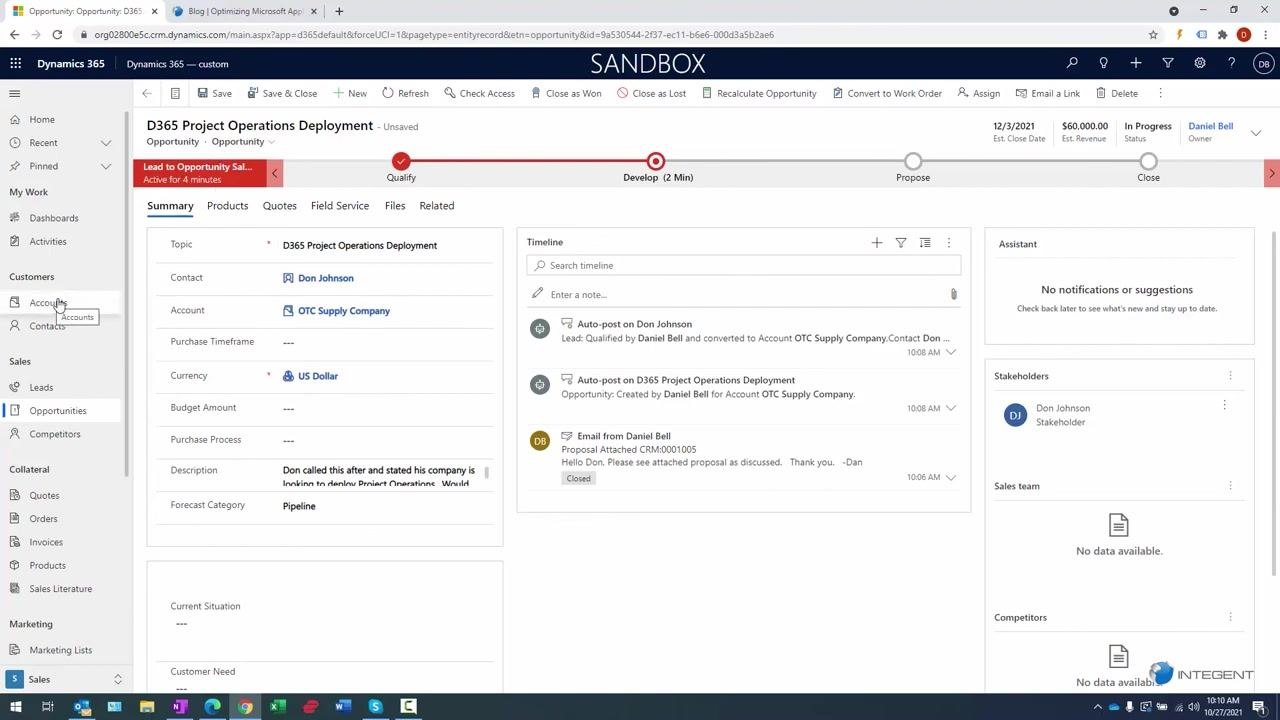
After you qualify a lead, Dynamics 365 automatically creates an opportunity record. The Process Bar at the top shows the opportunity has moved into the Develop stage. The Summary tab displays the topic, contact, account, currency, description, and forecast category, while the Timeline shows auto-posts for lead qualification and opportunity creation along with related email activity. A notification at the bottom confirms that the lead was successfully qualified.
Understanding the opportunity process bar
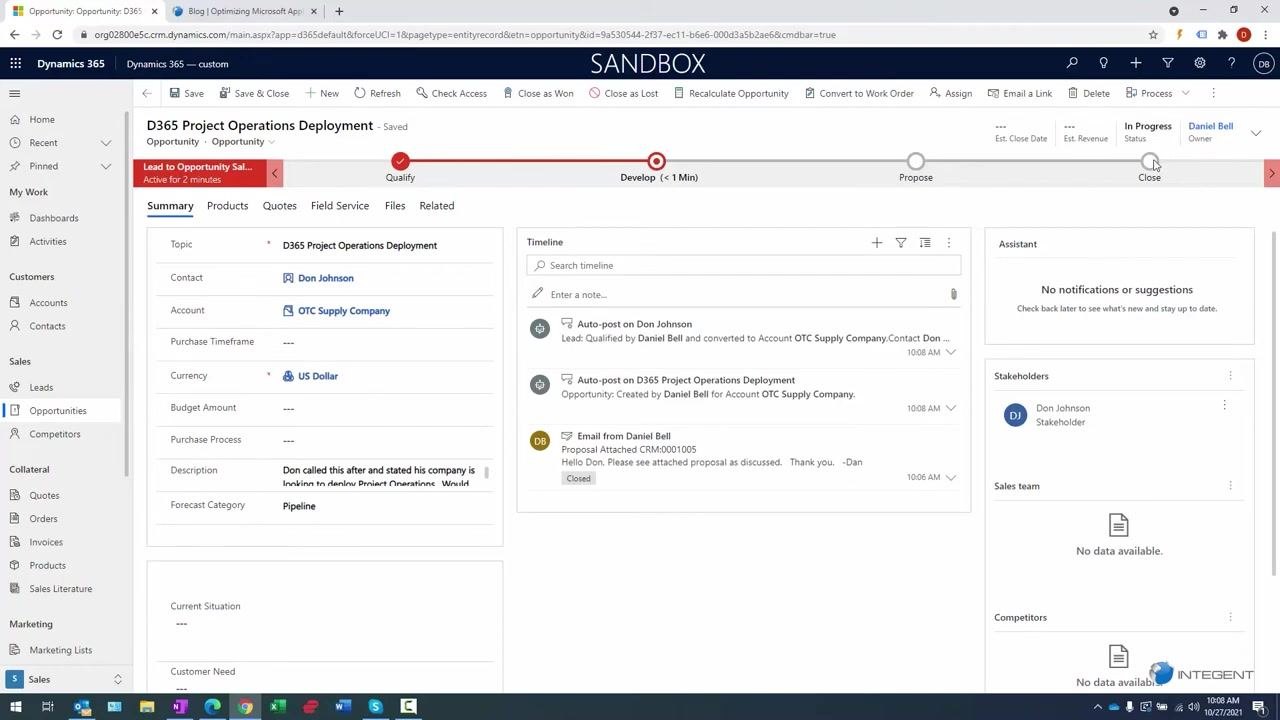
The process bar at the top tracks the sales process stages: Qualify, Develop, Propose, and Close. The opportunity's current stage, status, and owner are displayed next to the highlighted stage. Use the process bar to navigate between stages and view or enter the information required for each one.
Completing stage-specific fields
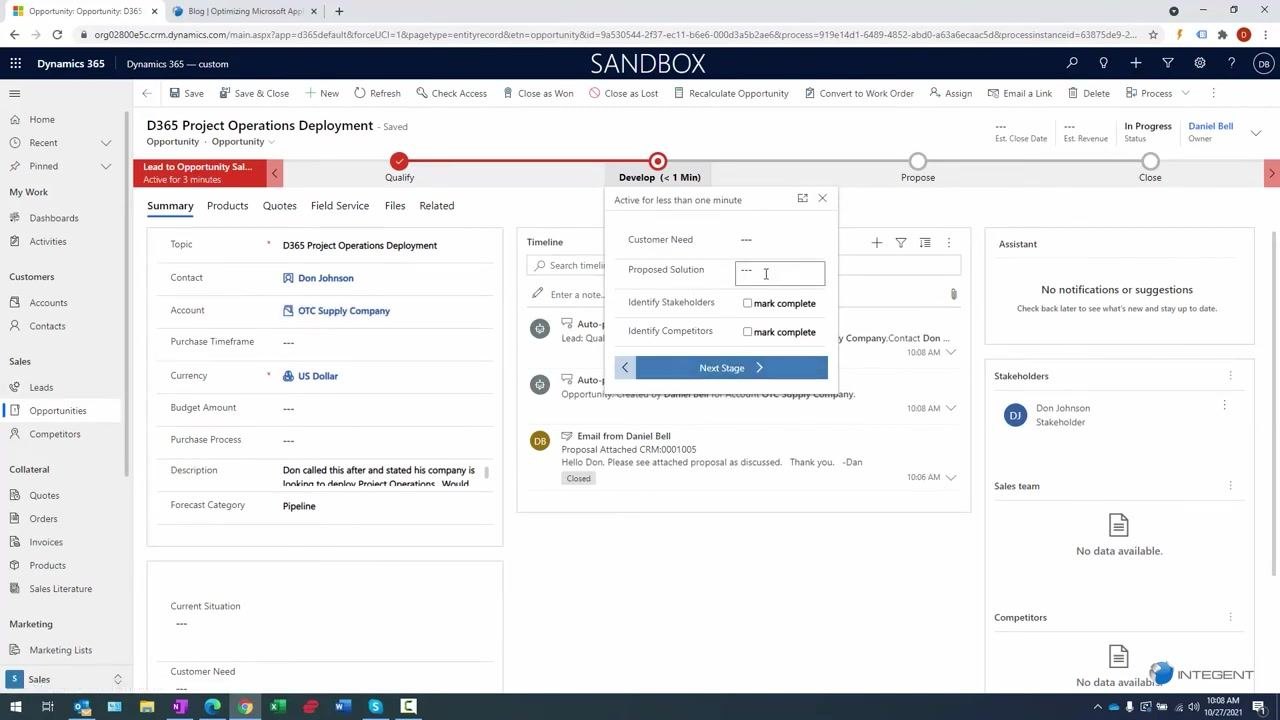
Click the current stage in the process bar to open a pop-up with the required fields, such as Customer Need, Proposed Solution, and checkboxes for Identify Stakeholders and Identify Competitors. Click Next Stage to progress the opportunity once all required fields are completed.
Verifying timeline activities for the opportunity
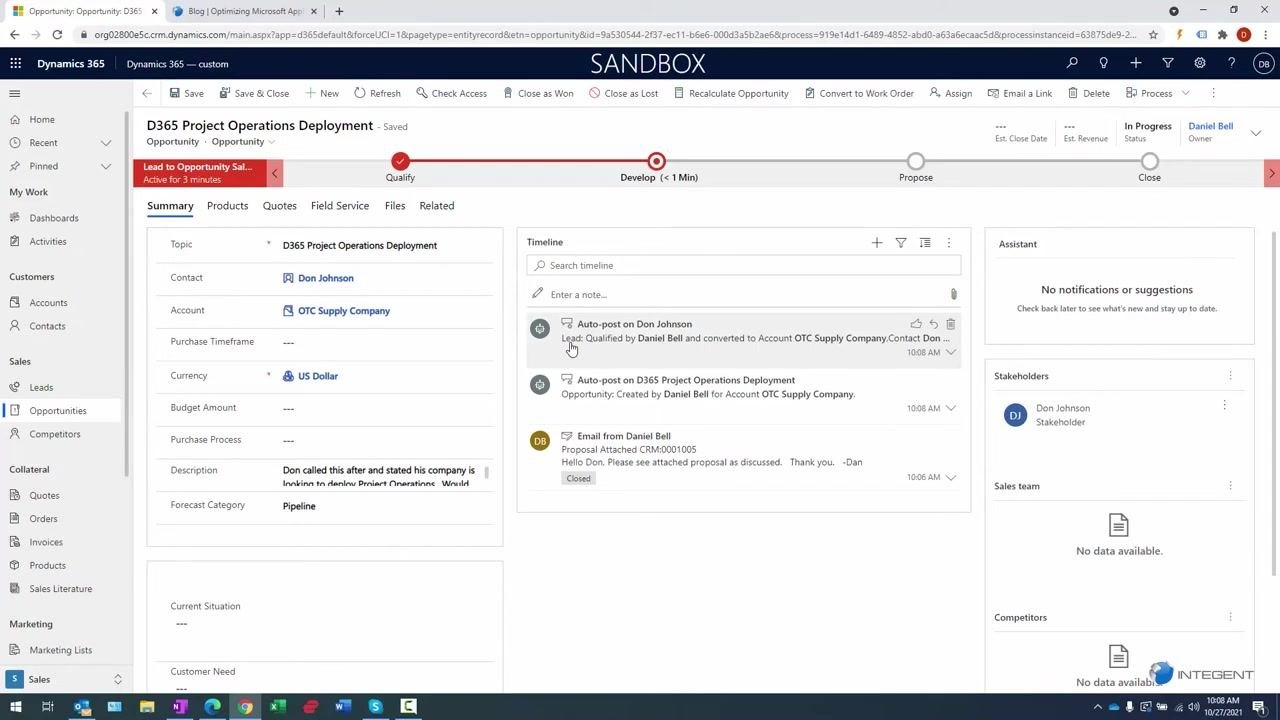
In the Timeline panel, confirm that auto-posts show the lead being qualified and converted to an account and contact, that the opportunity was created, and that related email activity appears with its closed status. These entries confirm the workflow from lead qualification through to opportunity creation.
Reviewing the contact record
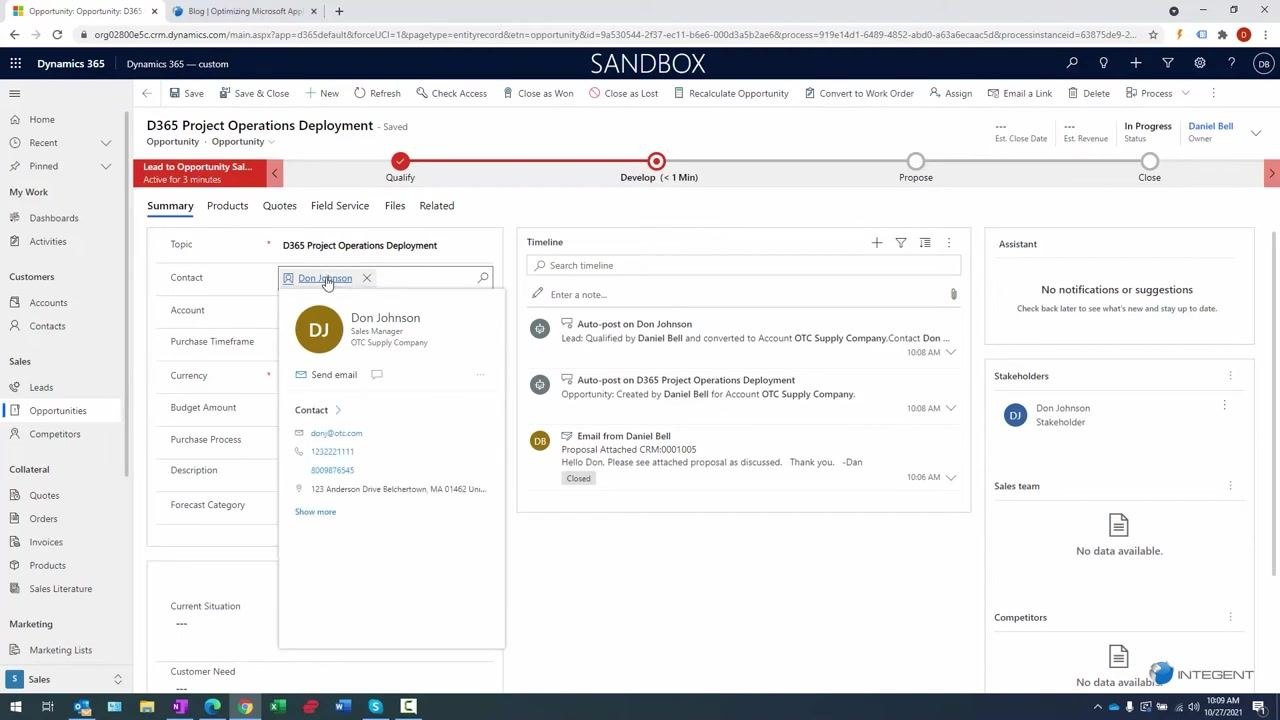
In the Summary tab, click the contact link to view the contact's details in a pop-up, including name, job title, company, email, phone numbers, address, and an option to send an email directly.
Opening the full contact record
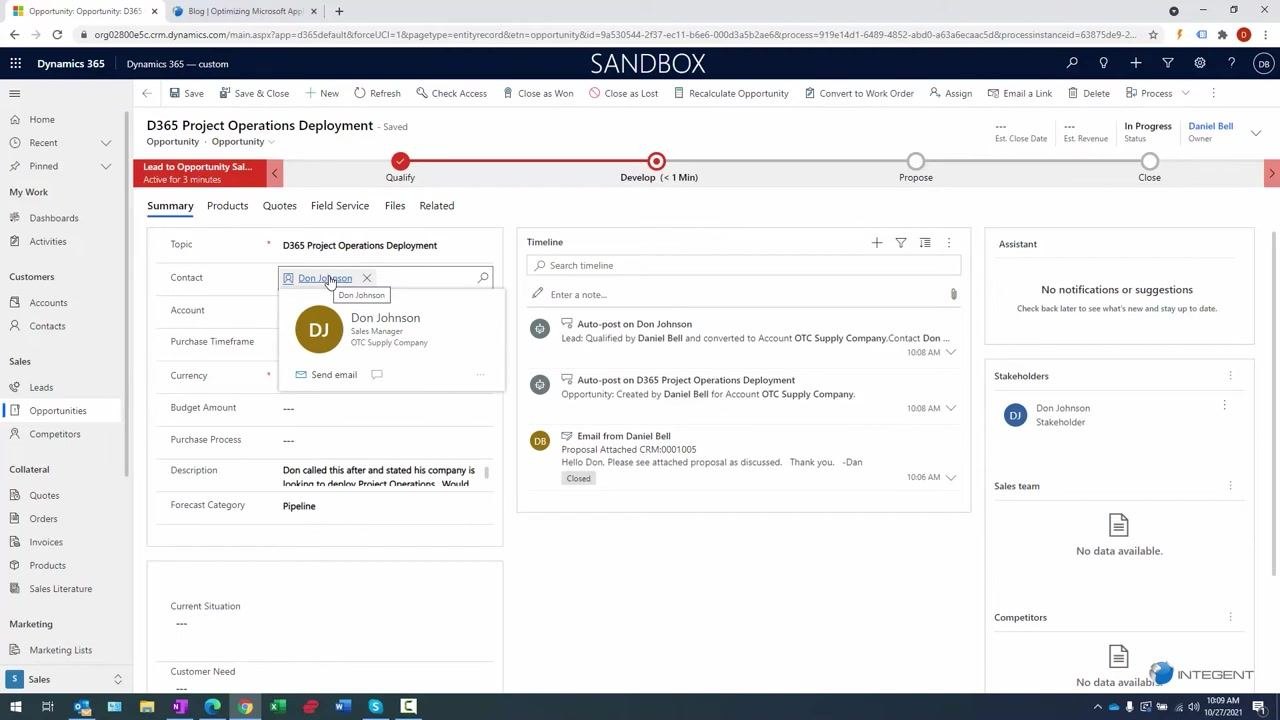
Click the contact's name, or the pop-up itself, to open the full contact record. The Contact Information section displays detailed fields, the Timeline panel shows auto-posts for lead qualification and contact creation along with email activity, and the right panel lists the associated company and opportunity.
Verifying opportunity association from the contact record
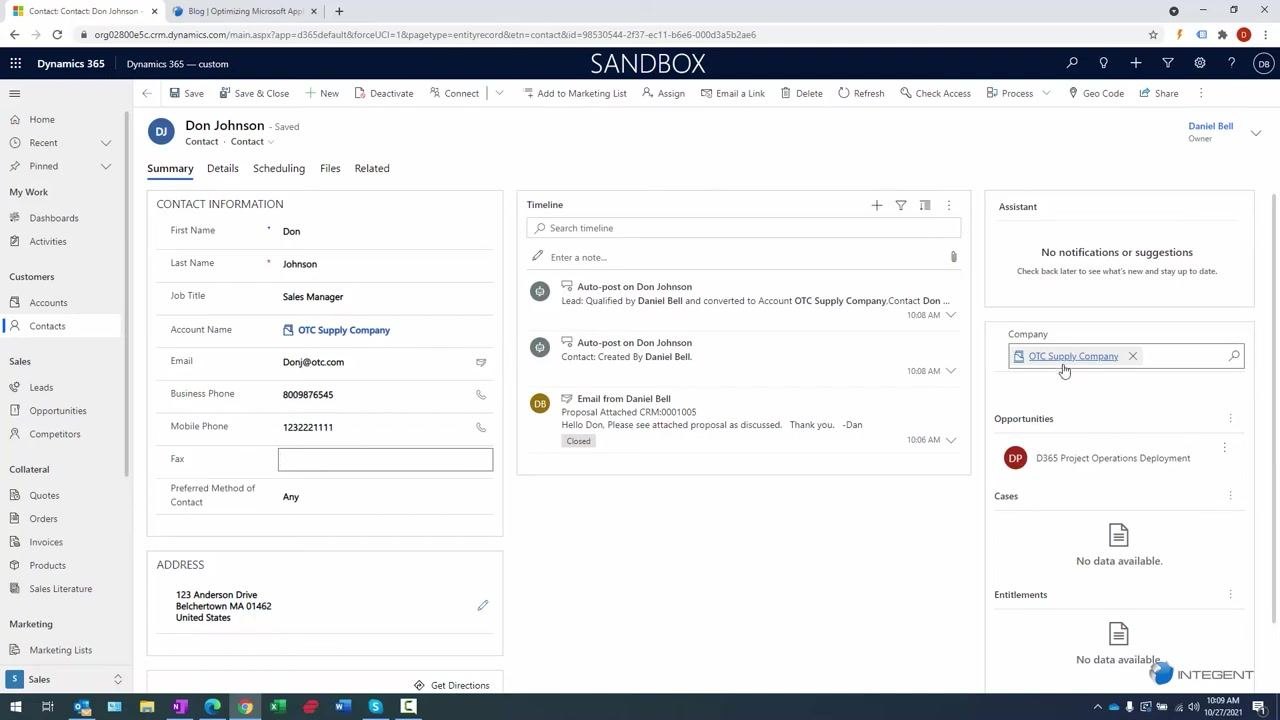
In the contact record's right panel, confirm that the associated company and opportunity are correctly listed. This ensures the contact, account, and opportunity are properly linked in Dynamics 365.
Navigating to the account record
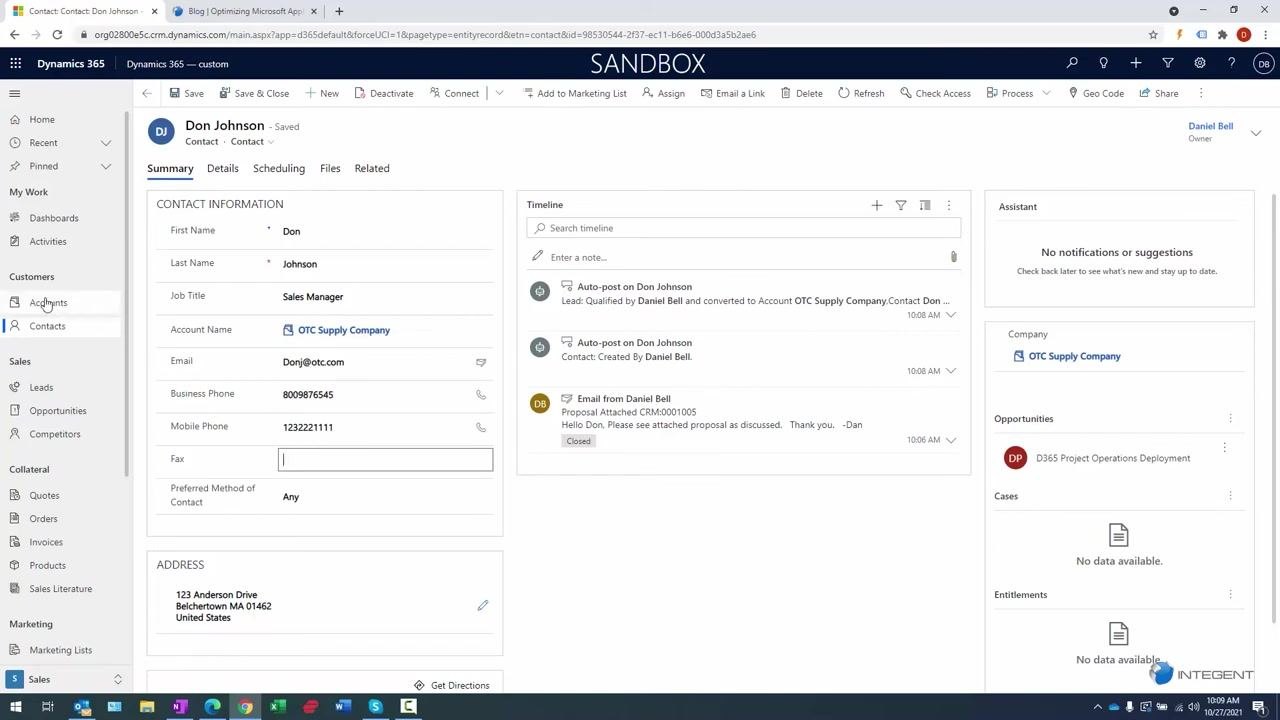
In the contact record, click the company link in the right panel, or under Account Name, to open the account record. Alternatively, use the left navigation pane under Customers and select Accounts to review all related opportunities, contacts, and activities for the account.
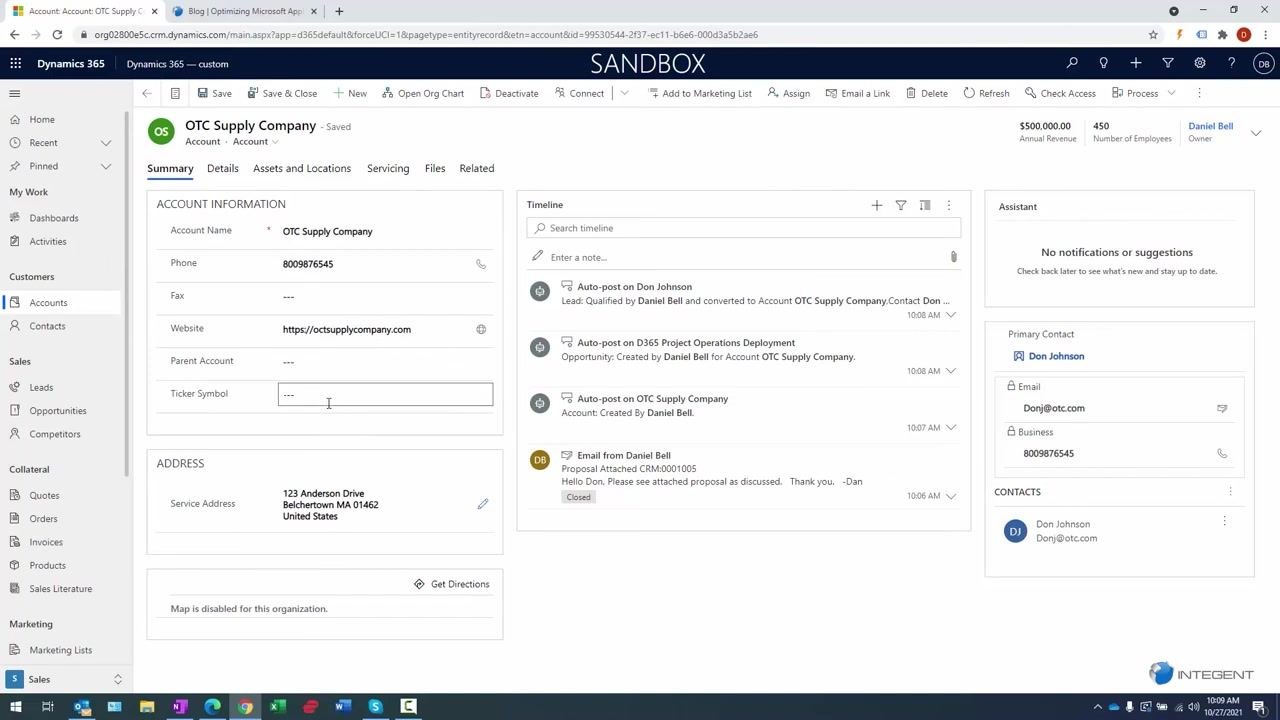
Reviewing the account record
The Account record displays the Account Information panel (name, phone, website, ticker symbol), the Address panel, the Timeline panel with auto-posts and related email activity, and the Primary Contact panel. The left navigation pane highlights Accounts under Customers.
Accessing the list of open opportunities
In the left navigation pane, click Opportunities under the Sales section. The My Open Opportunities view appears, listing current opportunities with columns such as Topic, Potential Customer, Est. Close Date, Est. Revenue, Contact, Account, Probability, and Rating.
Opening and editing the opportunity record
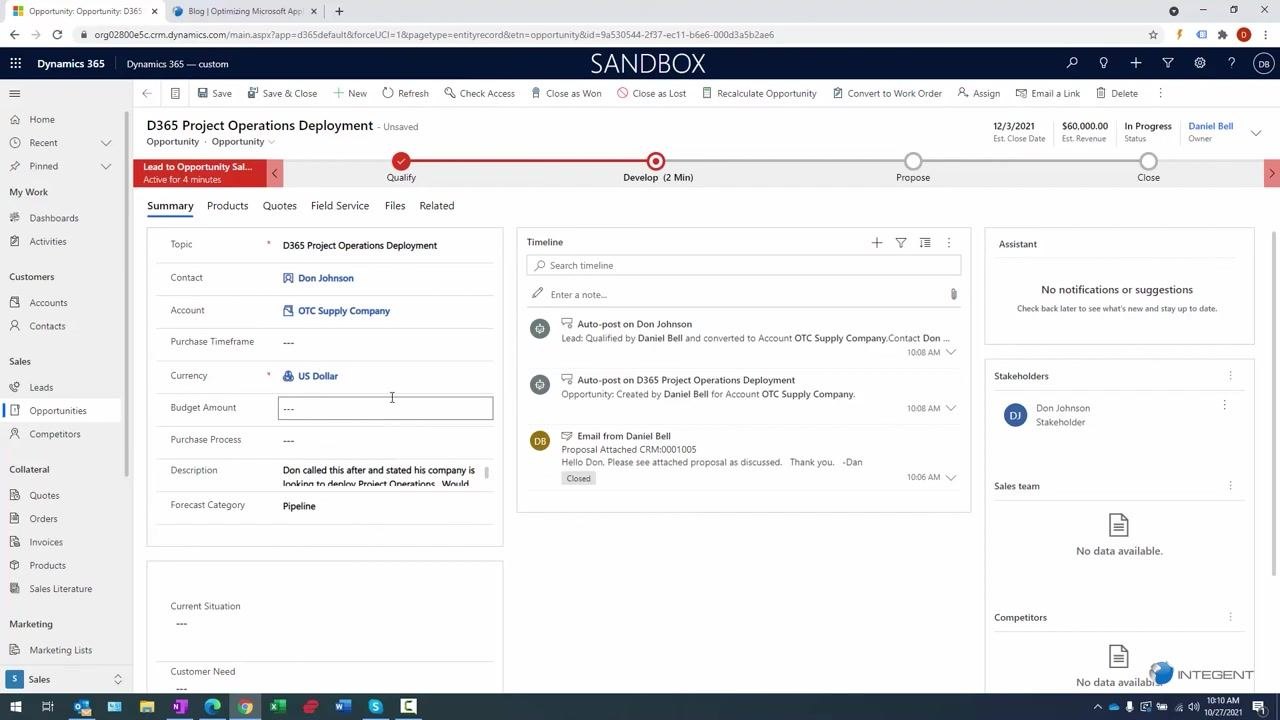
Click the opportunity to open its record. The form displays the process bar, a Summary tab with key fields, a Timeline panel with auto-posts and email activity, and sections for Stakeholders, Sales team, and Competitors. The right panel displays the estimated close date, estimated revenue, status, and owner, where you can open the date picker to set the estimated close date.
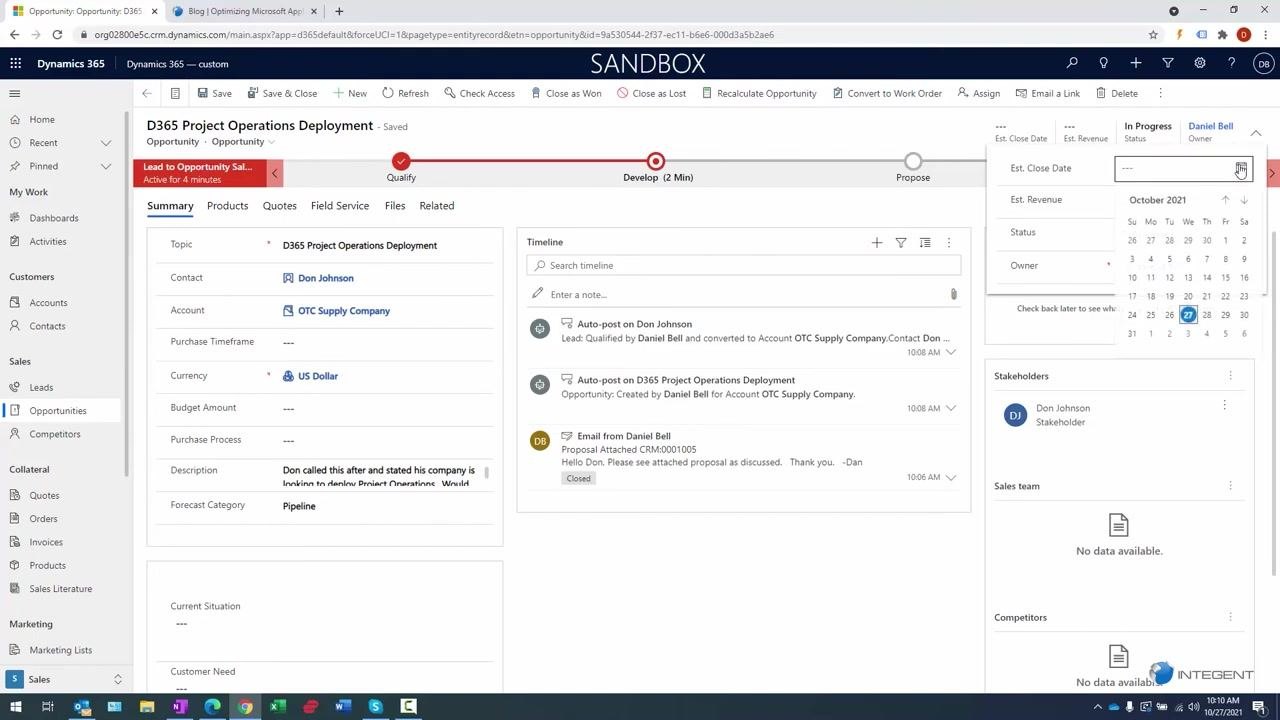
Entering estimated close date and revenue
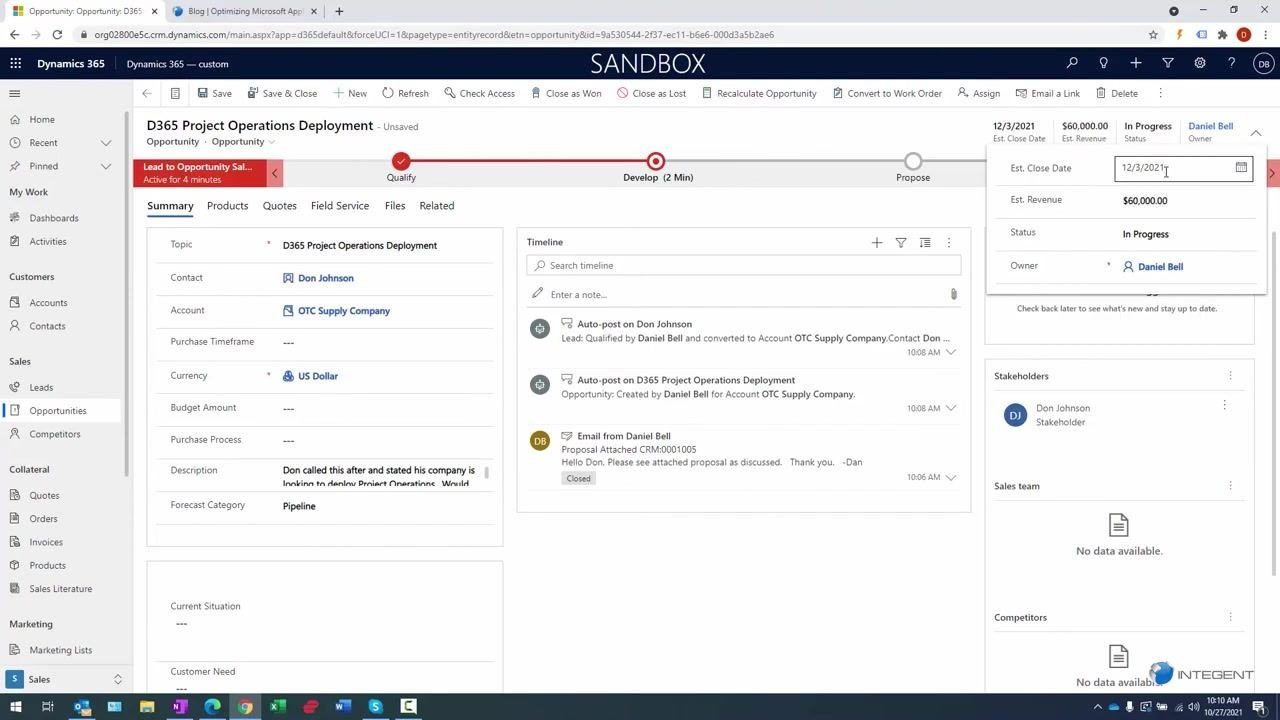
Fill in the Est. Close Date, Est. Revenue, Status, and Owner fields. These values then appear at the top right of the opportunity form.
Completing additional opportunity fields
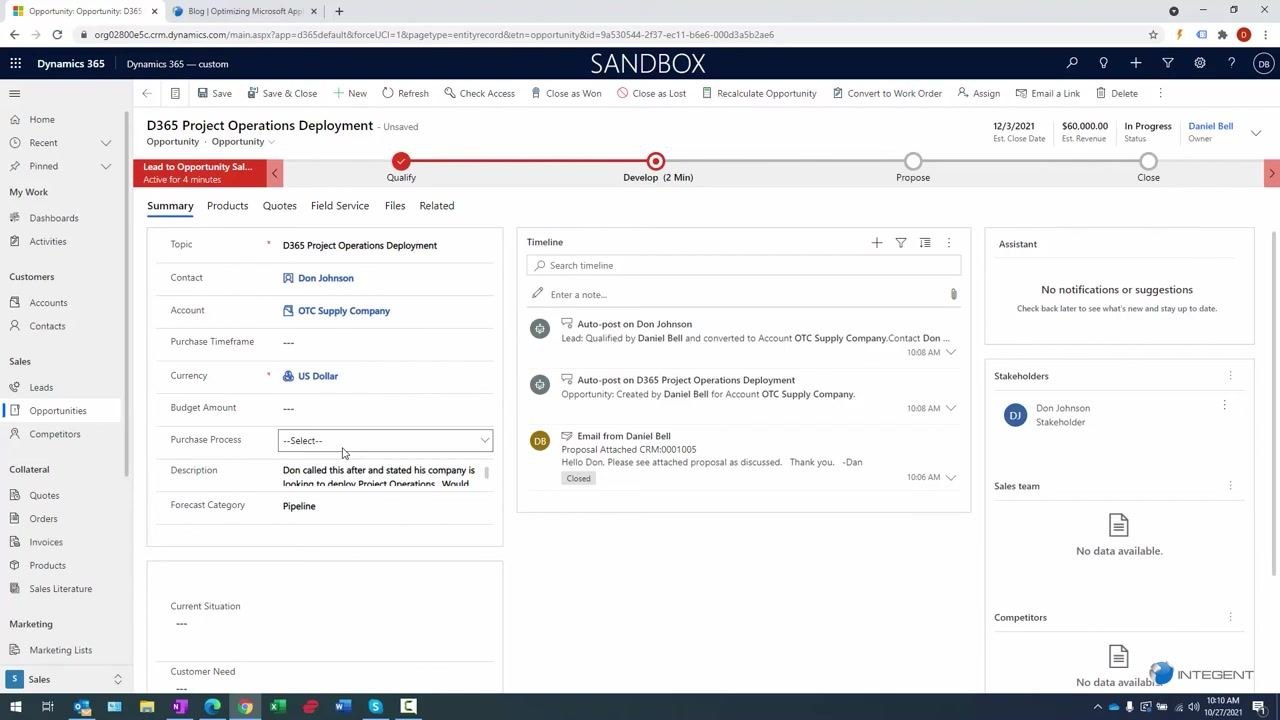
Enter any remaining relevant information, such as Budget Amount or Purchase Process, which is available as a dropdown selection. Ensure all required and relevant fields are filled out to maintain accurate records.
Navigating between related records
Use the left navigation pane to switch between Accounts, Contacts, and Opportunities as needed. This lets you verify that the opportunity, account, and contact records are properly linked and updated.
What's next
With your lead created, qualified, and converted, you now have a linked opportunity, contact, and account record in Dynamics 365. From here, continue updating the opportunity as it moves through the Develop, Propose, and Close stages, and keep the timeline current with new activities and communications to maintain accurate, actionable records throughout your sales pipeline.
Generation details: cost, quality tiers
Docsie billed 5,000 credits ($3.50) to analyze this 10-minute video at standard quality. The rewrite, template fill and Word/PDF exports were included. The same video at each quality tier:
| Quality | Frames sampled | Credits | Approx. cost |
|---|---|---|---|
| Draft | every 16-30 s | 2,500 | $1.75 |
| Standard (this guide) | every 8-15 s | 5,000 | $3.50 |
| Detailed | every 4-7 s | 10,000 | $7.00 |
| Ultra | every 1-3 s | 20,000 | $14.00 |
Credits priced at $0.70 per 1,000; plans include a monthly allowance. Enterprise customers on on-premise or bring-your-own-model deployments run this on their own inference and pay no per-video credits.
Generated by Docsie Video-to-Docs on 2026-10-01 from a 9-minute video. Screenshots are frames from the source video and belong to their creator, Integent, whose original is embedded above. If you own this video and want the guide removed or credited differently, contact us and we will act within one business day.