
How to Create a Business Process Flow in Dynamics 365
This guide walks you through how to create a business process flow in Dynamics 365, using the built-in "Lead to Opportunity" process as a working example. You will learn how to add new fields and stages, apply conditional logic so stages appear only when specific criteria are met, and attach workflows to automate actions at each stage.
Video: Setting up Business Process Flows within Microsoft Dynamics 365 by Subscribe360 (2016). All credit for the demonstration goes to the creator; watch the original on YouTube. The written guide below was generated from this video by Docsie. Creator? Request a change or removal.
This guide walks you through how to create a business process flow in Dynamics 365, using the built-in "Lead to Opportunity" process as a working example. You will learn how to add new fields and stages, apply conditional logic so stages appear only when specific criteria are met, and attach workflows to automate actions at each stage.
Prerequisites
- Access to Dynamics 365 with valid login credentials.
- Permissions to open the Settings area and edit records under Process Center.
- At least one existing business process flow to edit (this guide uses "Lead to Opportunity Sales Process").
- Any workflow you want to attach to a stage must already exist and be active in your Dynamics 365 environment.
Reviewing the existing process flow
Step 1: Open the Lead to Opportunity process flow
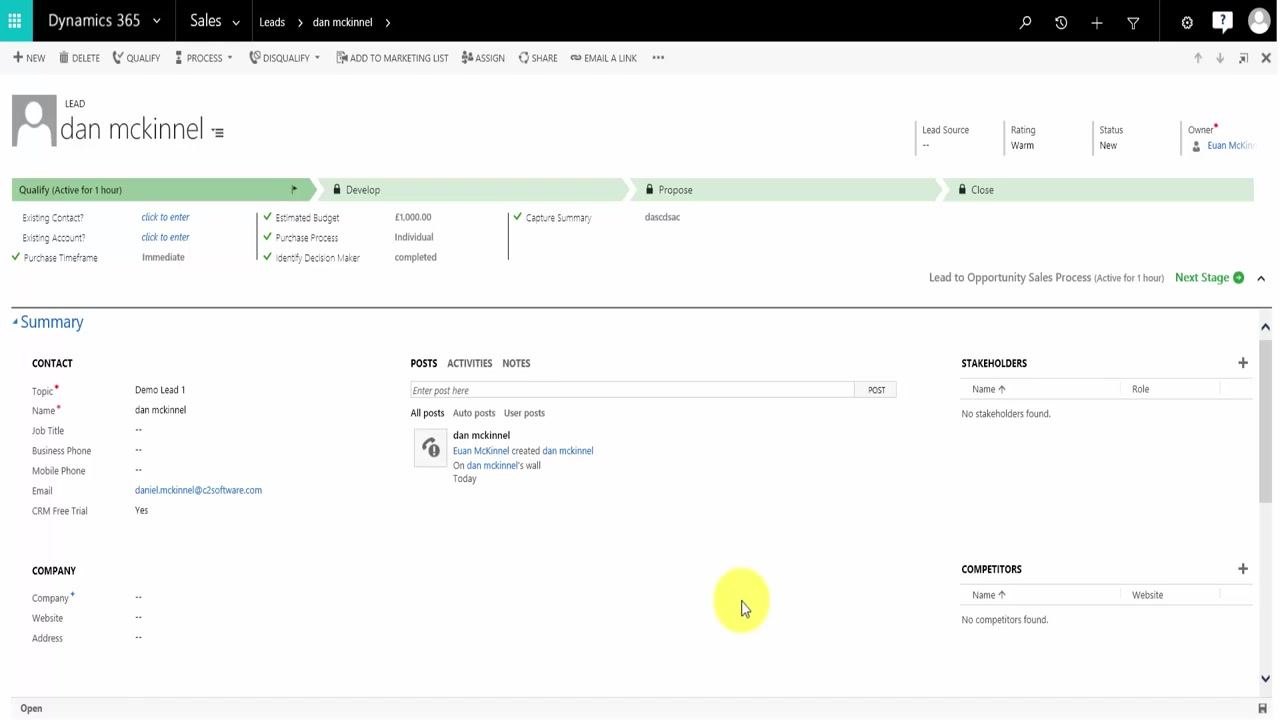
Log in to Dynamics 365 and open a record that uses the "Lead to Opportunity" business process flow. The stages appear across the top of the form: Qualify, Develop, Propose, and Close. In the Qualify stage you will see fields such as "Existing Contact?", "Existing Account?", "Purchase Timeframe", and a CRM Free Trial field. The summary panel on the right shows contact details, while the Stakeholders and Competitors sections remain empty until populated.
Step 2: Review the timed stage indicator
Each stage in the flow displays how long it has been active — for example, "Qualify (Active for 1 hour)." This lets you report on how much time is spent in each stage of the process.
Step 3: Navigate to the process designer
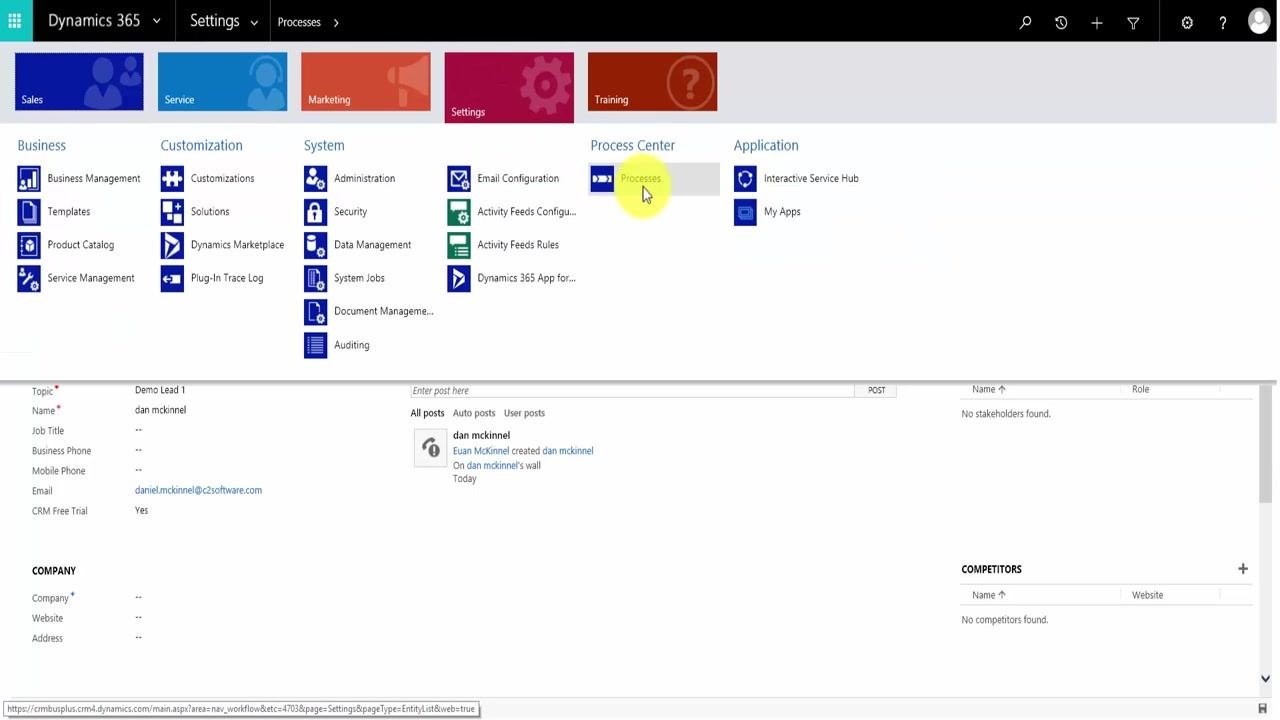
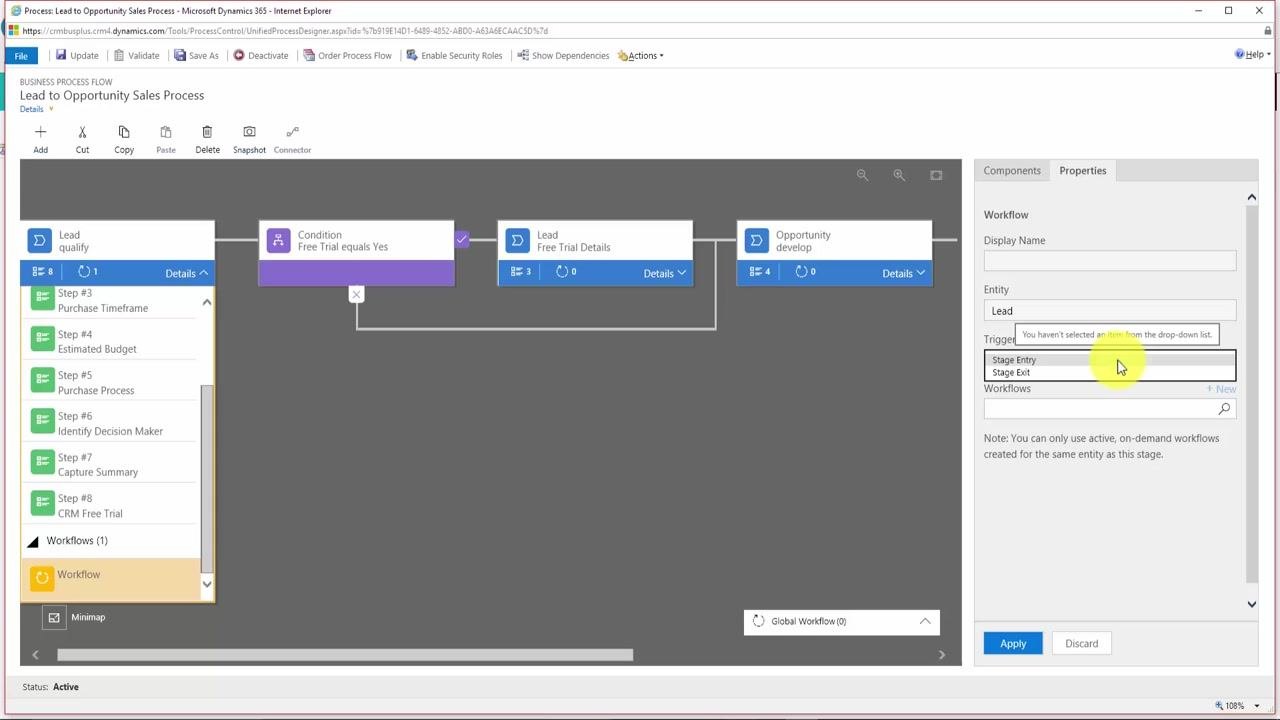
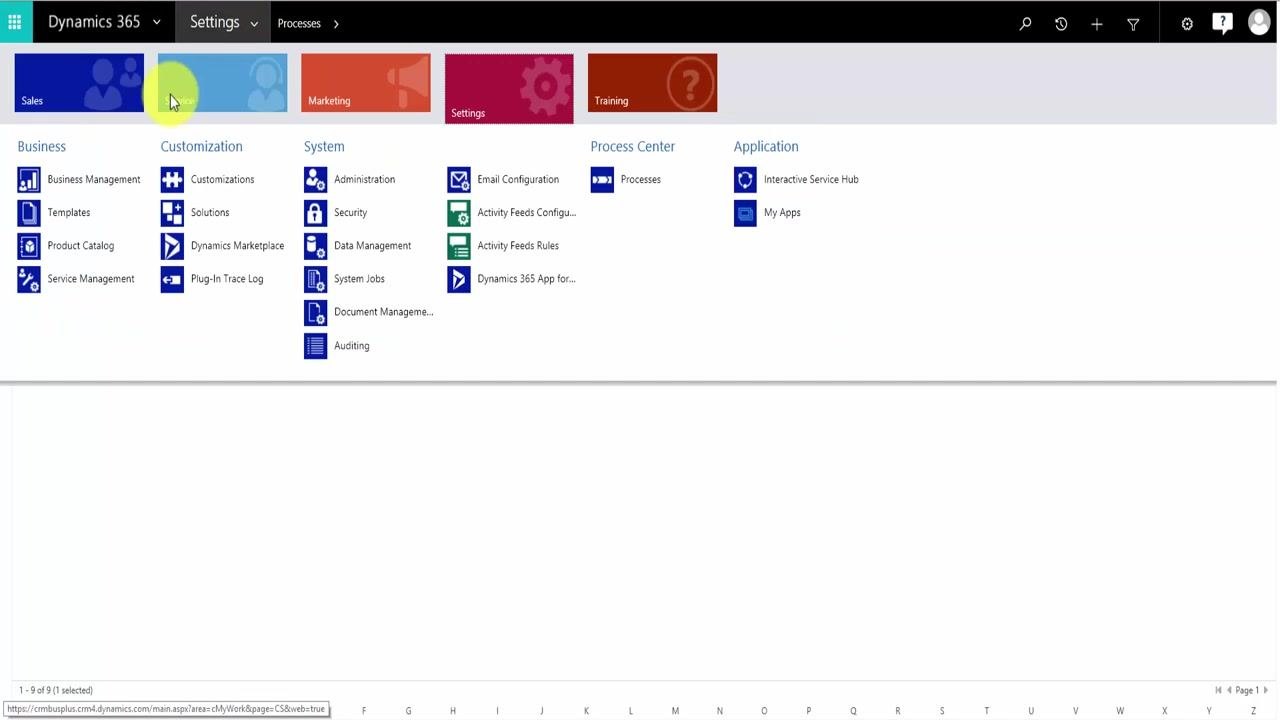
To begin editing, open the Settings area from the main navigation, then select Processes under the Process Center section.
Step 4: Open the process for editing
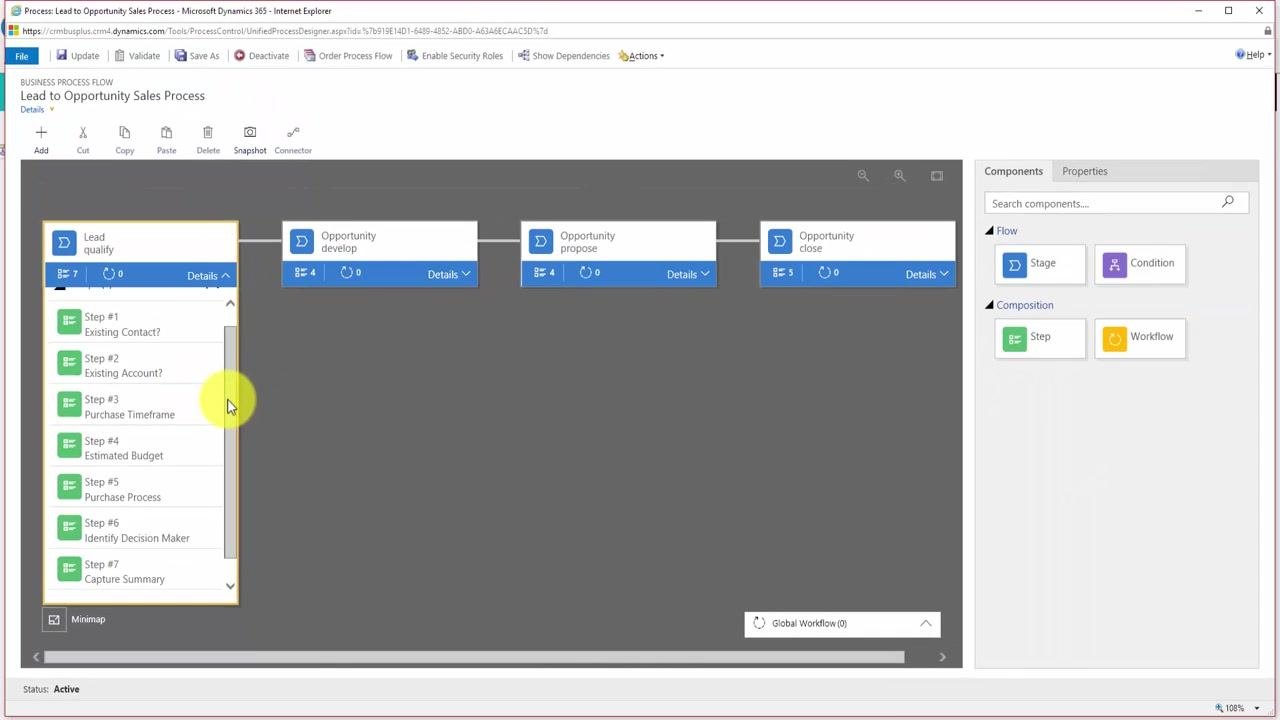
In the Processes list, open "Lead to Opportunity Sales Process." The process designer opens, showing the stages as connected boxes — "Lead qualify," "Opportunity develop," "Opportunity propose," and "Opportunity close." The right panel lists the components you can add: Stage, Condition, Step, and Workflow.
Step 5: View the steps in the Qualify stage
Click Details on the "Lead qualify" stage box to expand it. You will see the current steps: Existing Contact?, Existing Account?, Purchase Timeframe, Estimated Budget, Purchase Process, Identify Decision Maker, and Capture Summary. You will add a new step for the CRM Free Trial field after this list.
Adding a new field and stage
Step 6: Add a new step to the Qualify stage
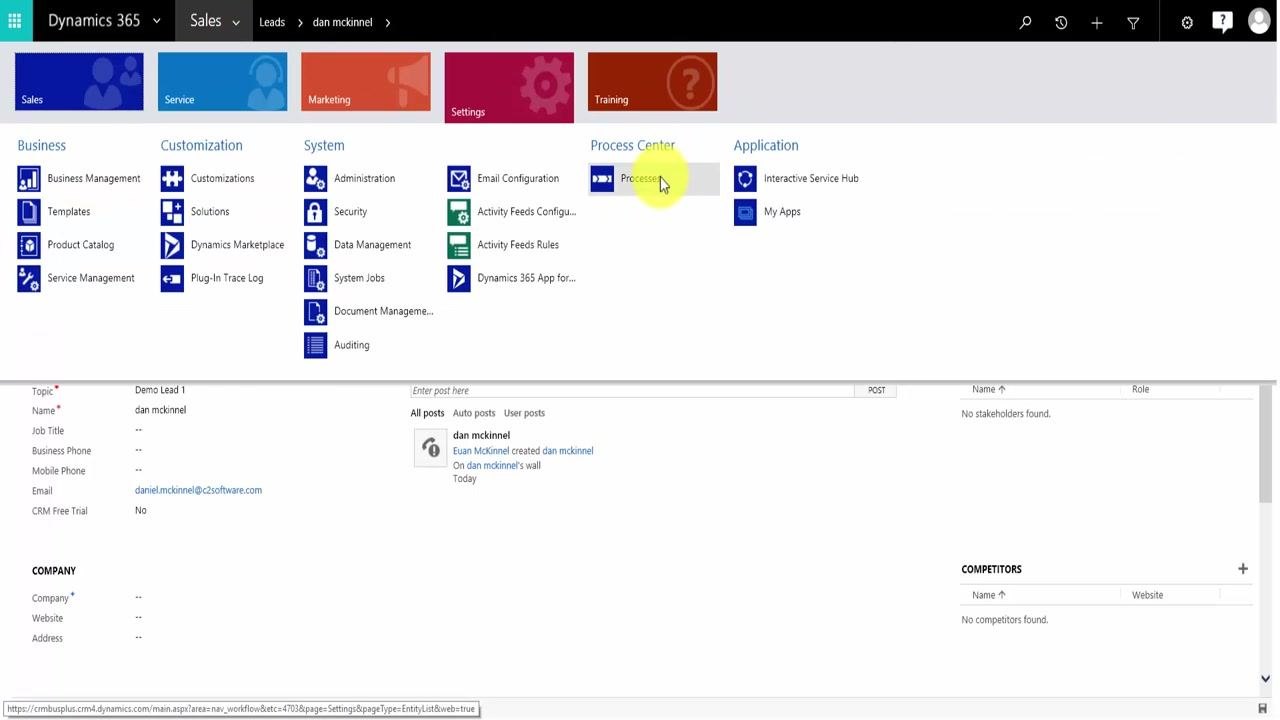
Click Add in the toolbar, then choose Add Step under the "Composition" section. A plus (+) icon appears between the existing steps so you can insert the new step at any position. Insert it after "Capture Summary" so it becomes Step #8.
Step 7: Configure the new step
Select the new Step #8 in the left panel. In the Properties panel, set the Display Name to "CRM Free Trial," choose "CRM Free Trial" as the Data Field, tick Required to make the field mandatory, and confirm the Sequence is set to 8. Click Apply to save the step.
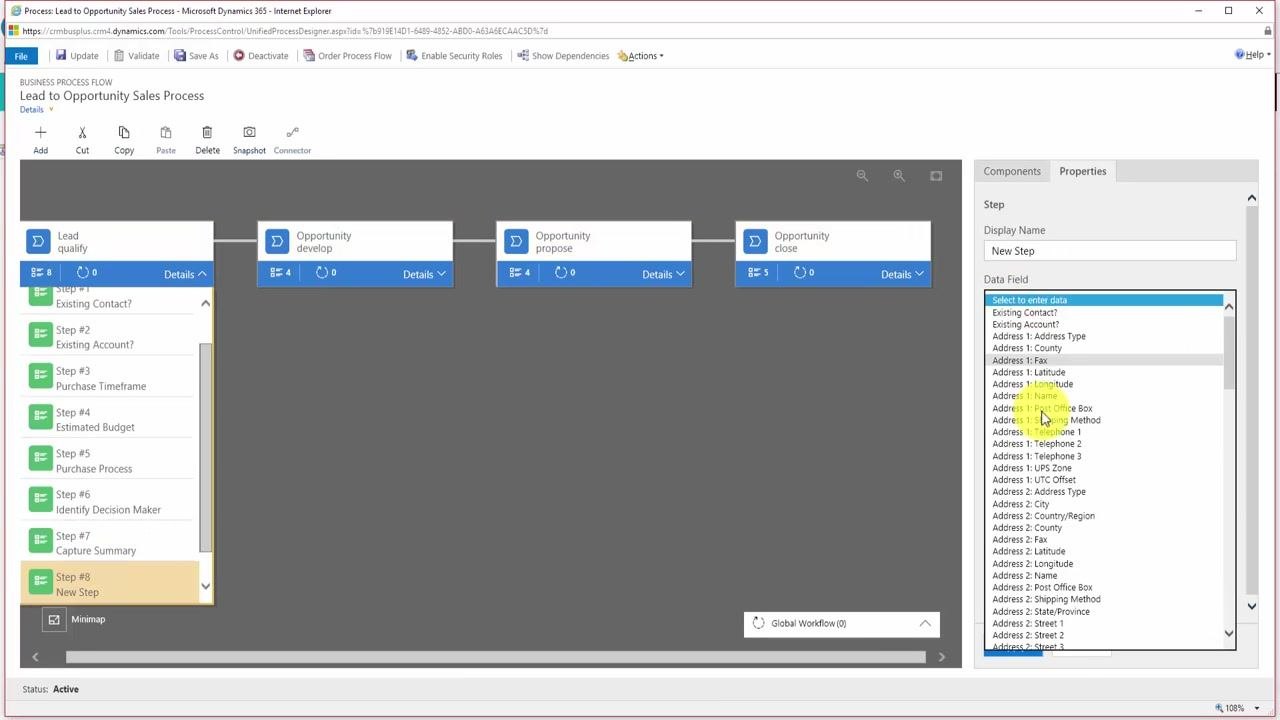
Step 8: Add a new stage
Click Add again, then select Add Stage under the "Flow" section. Click the plus (+) icon between "Lead qualify" and "Opportunity develop" to insert the new stage between them.
Step 9: Configure the new stage
Select the new stage and, in the Properties panel, set the Display Name to "Free Trial Details," the Category to "Qualify," and the Entity to "Lead." Leave Relationship as "None." Click Apply to save the stage.
Step 10: Configure the first step in the new stage
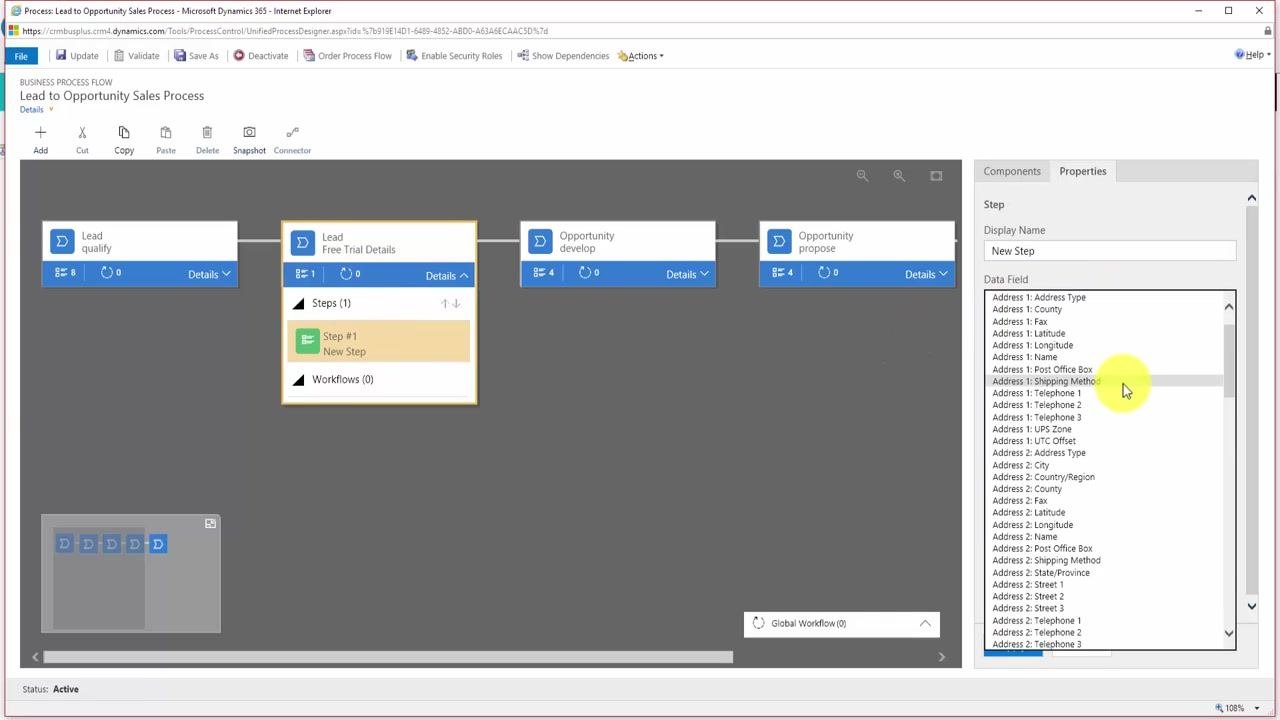
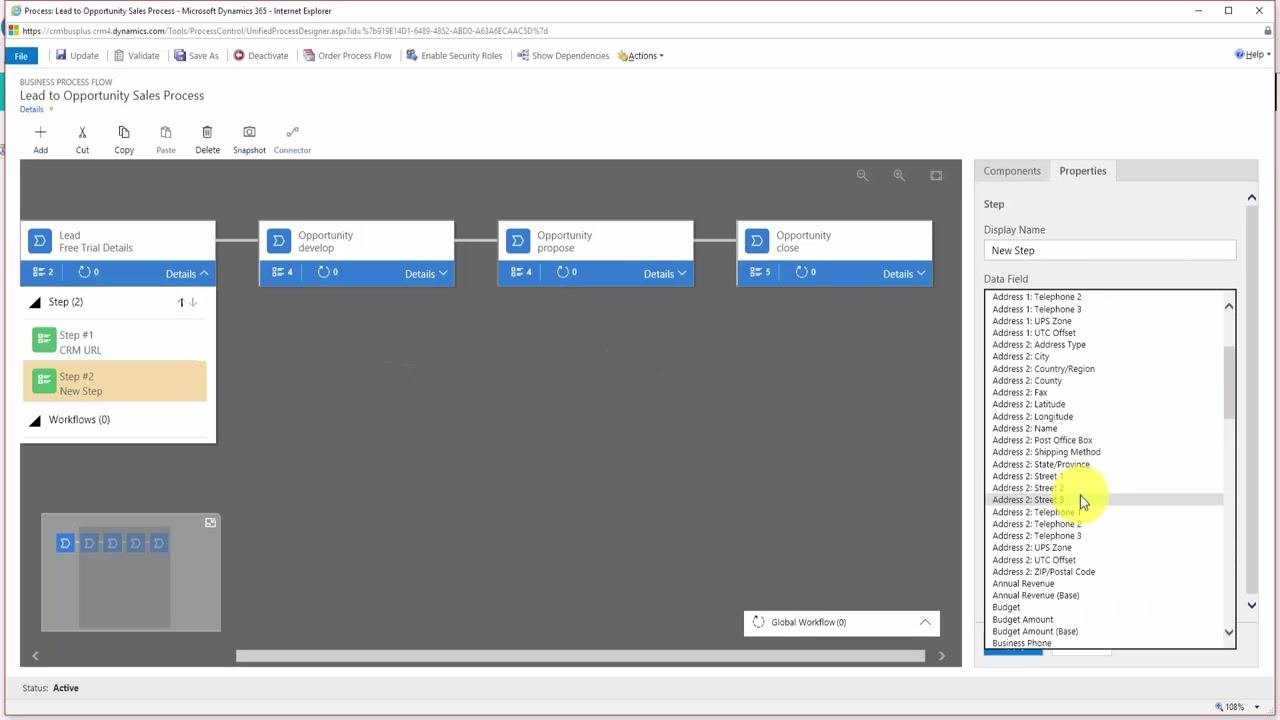
The new stage automatically includes a "Step #1: New Step." Set the Display Name (for example, "Trial URL") and select the appropriate Data Field for the trial URL. Repeat this process with Add Step to add further steps to the stage as needed.
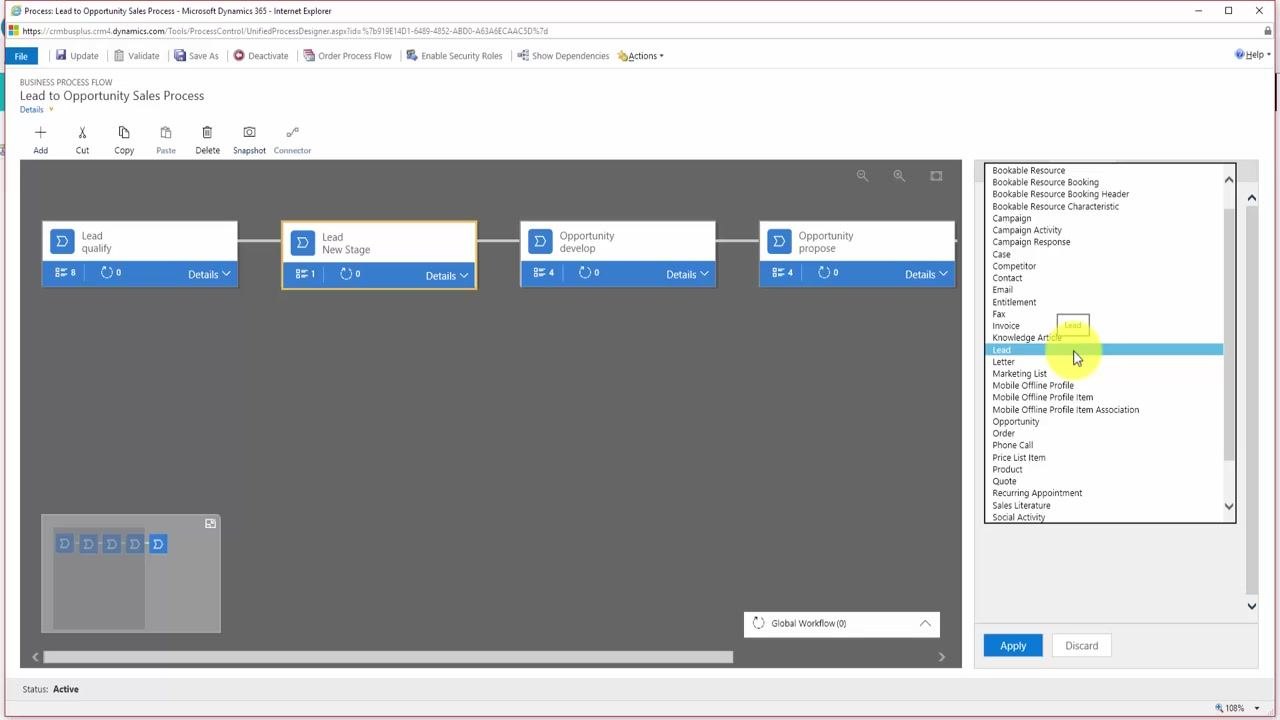
Step 11: Add a second step for the CRM username
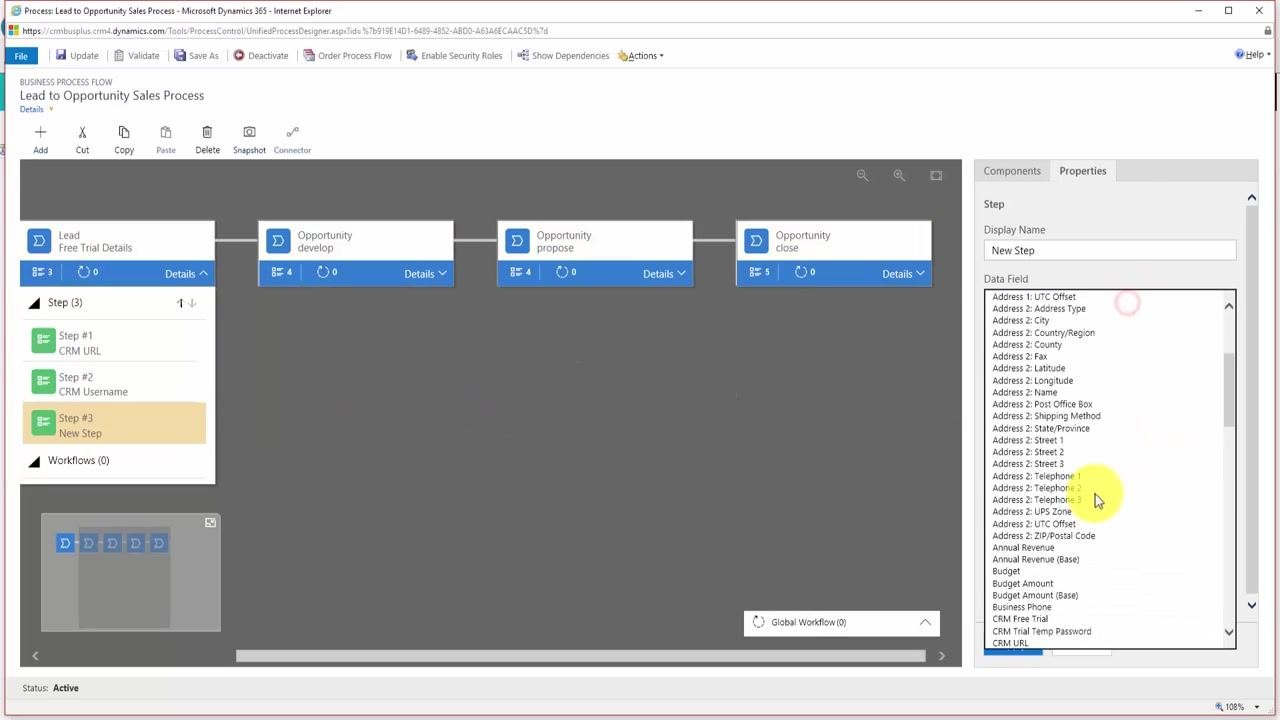
Under "Lead > Free Trial Details," add another step. Set Display Name to "CRM Username," choose "CRM Username" as the Data Field, set Sequence to 2, and click Apply.
Step 12: Add a third step for the trial password
Add a further step for the trial password. Set Display Name to "CRM Trial Temp Password," choose "CRM Trial Temp Password" as the Data Field, set Sequence to 3, and click Apply.
Adding conditional logic
Step 13: Add a condition before the new stage
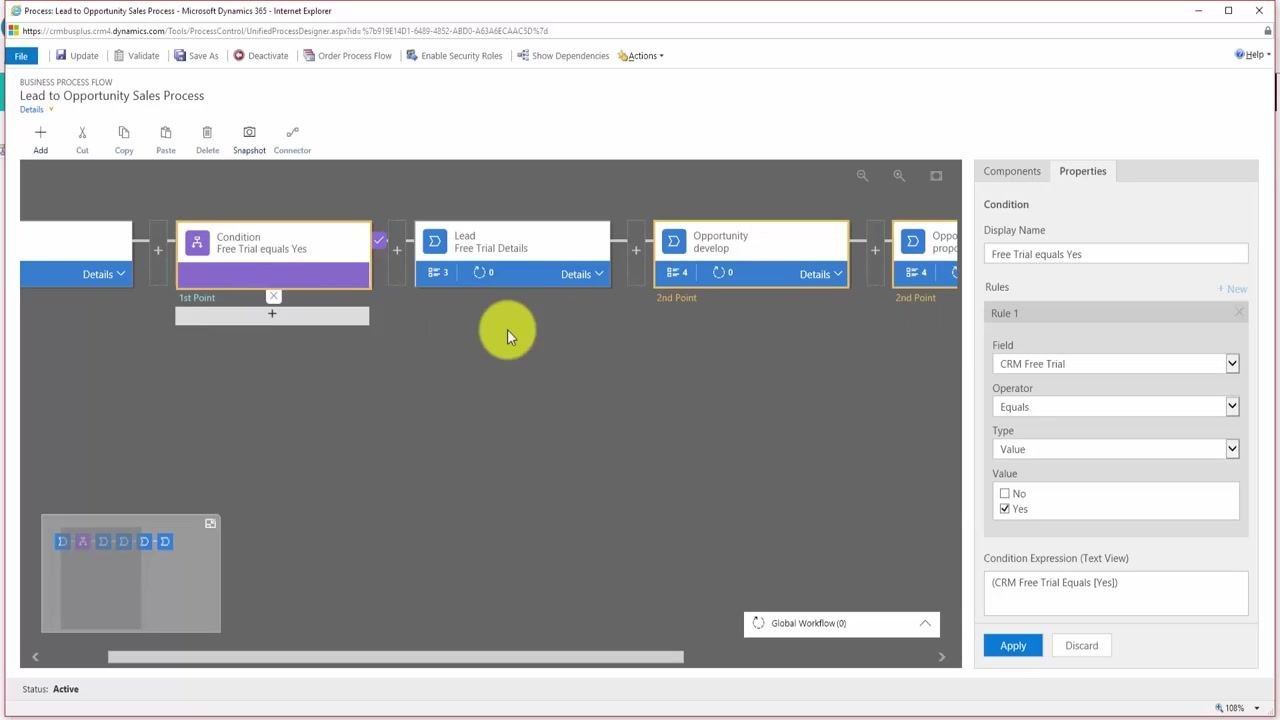
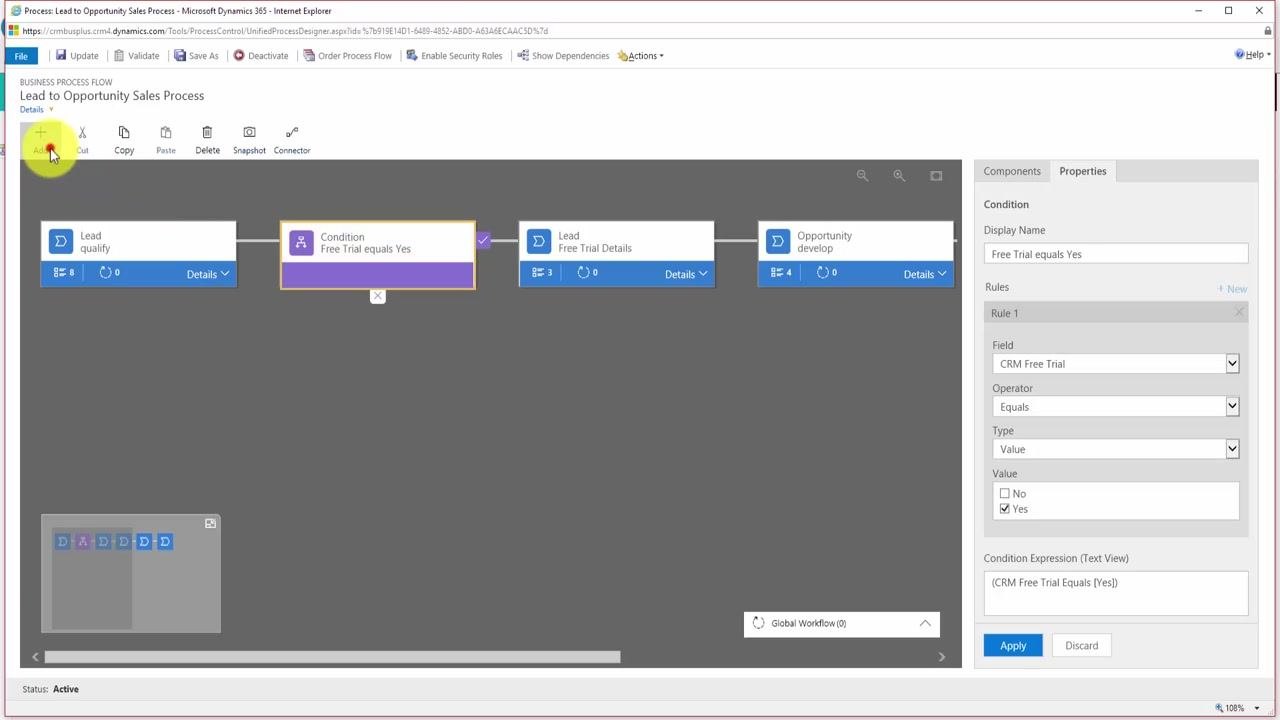
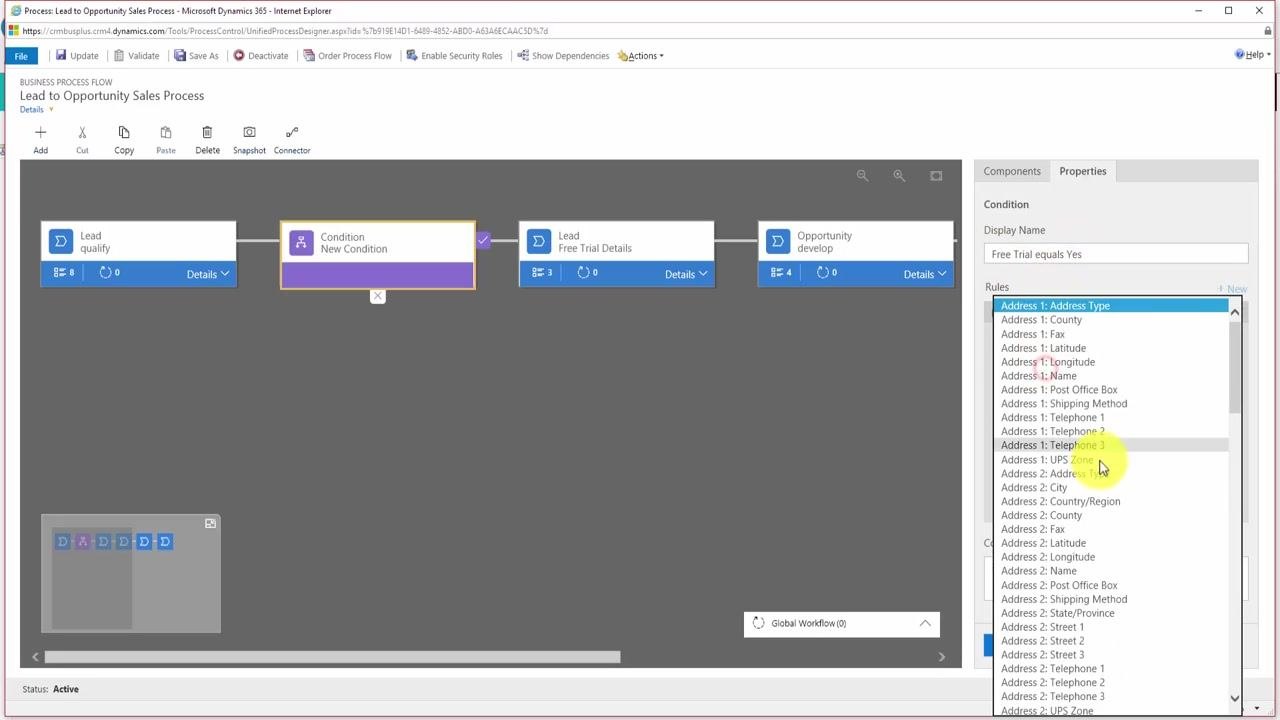
Click Add, then select Add Condition under the "Flow" section. Insert the condition after "Lead qualify" and before "Free Trial Details." Select the new condition block and, in Properties, set Display Name to "Free Trial equals Yes." Under Rules, set Field to "CRM Free Trial," Operator to "Equals," Type to "Value," and tick the checkbox for Yes. Click Apply to save the condition.
Once applied, a tick (✔) and a cross (✖) appear on the condition block. The tick path represents the flow when CRM Free Trial equals Yes, leading into "Free Trial Details." The cross path represents the flow when the condition is not met.
Step 14: Define the path when the condition is not met
If CRM Free Trial does not equal Yes, define where the process should go from the cross (✖) path — you can add new steps or stages there, or connect it directly to another part of the flow, such as "Opportunity develop." To do this, click the Connector button in the toolbar and draw the connection from the cross to the desired stage.
Validating and testing the process flow
Step 15: Confirm the condition properties
Reopen "Lead to Opportunity Sales Process" in the process designer and select the "Free Trial equals Yes" condition to confirm its properties: Field set to CRM Free Trial, Operator set to Equals, and Value set to Yes.
Step 16: Review the branching logic
With the condition applied, the flow branches based on the CRM Free Trial value. If the condition is met, the process follows the upper path into "Lead Free Trial Details." If it is not met, the process follows the lower path.
Step 17: Validate the process
Click Validate in the toolbar to check the configuration for errors. Confirm that a "Validation successful" message appears and that the branching logic displays correctly in the diagram.
Step 18: Open a Sales record to test the flow
Return to the main dashboard and click the Sales tile to access sales records.
Step 19: Verify the conditional logic on a lead
Open a lead record from the Leads list. Check the process bar at the top of the record: if CRM Free Trial is set to "Yes," the "Free Trial Details" stage opens for data entry. Enter or verify the details in that stage as required.
Step 20: Test the alternate path
Change the CRM Free Trial field on the lead record to "No" and observe that the process bar updates so the flow moves to the next stage instead of "Free Trial Details."
Adding workflows to a stage
Step 21: Return to process settings
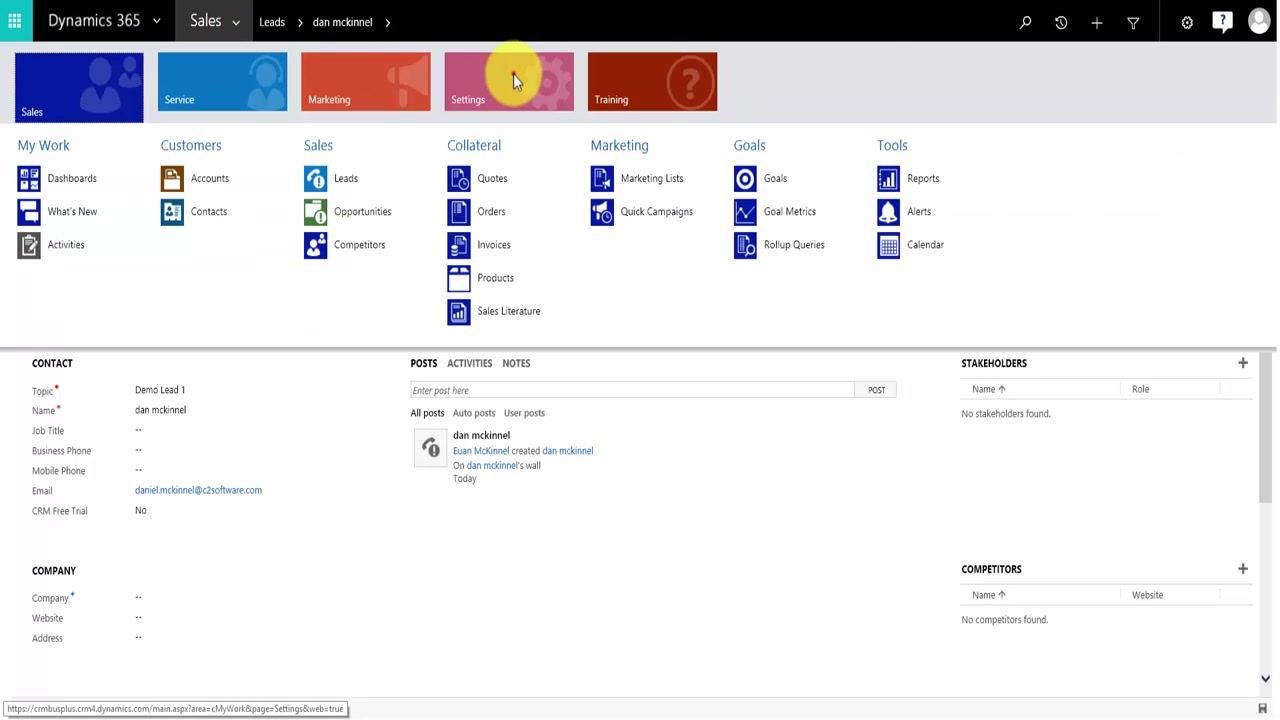
From the dashboard, click the Settings tile to access system and process configuration options.
Step 22: Open the Process Center
In Settings, locate the Process Center section and click Processes to manage business process flows and workflows.
Step 23: Locate the Workflows section on a stage
Open a stage in the process designer and scroll to the bottom of its details to find the Workflows section. You can now attach workflows to stages in addition to steps. Note that any workflow you want to attach must already exist in the system.
Step 24: Add a workflow to the stage
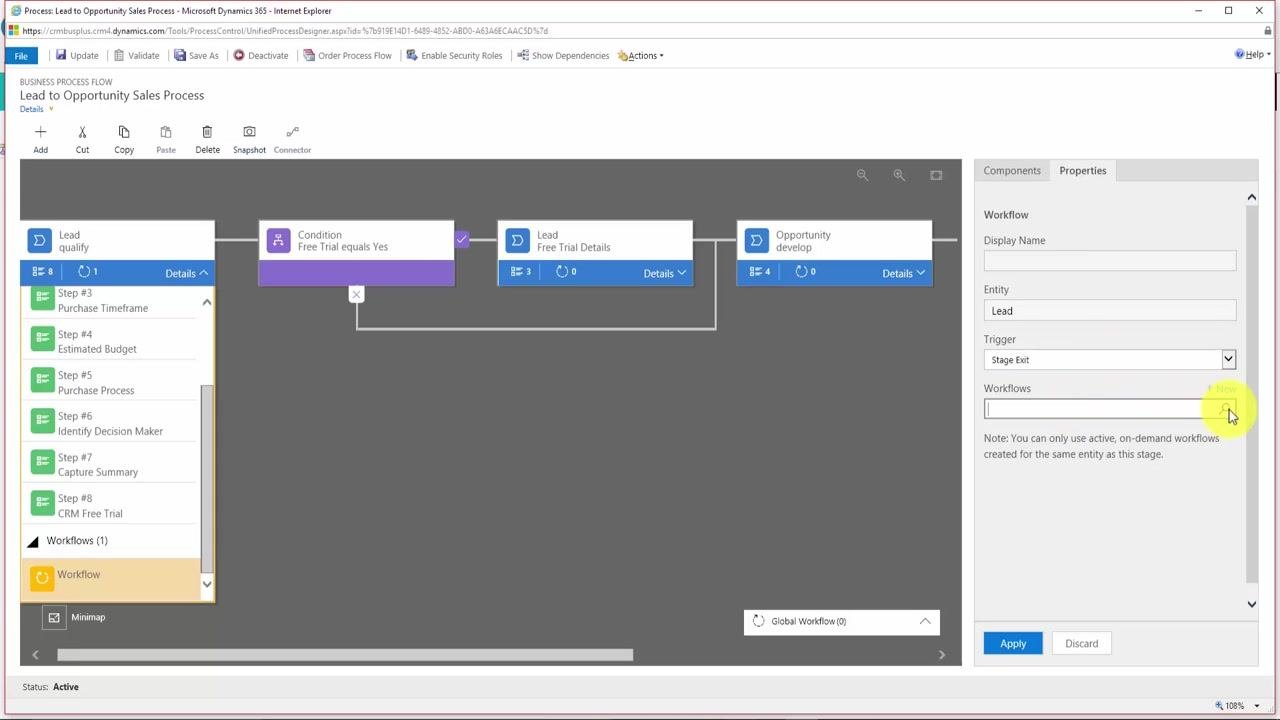
On the desired stage (for example, "Lead qualify"), use the "+" menu and select Add Workflow. A new entry appears under the Workflows section, and the properties panel on the right displays the workflow configuration options.
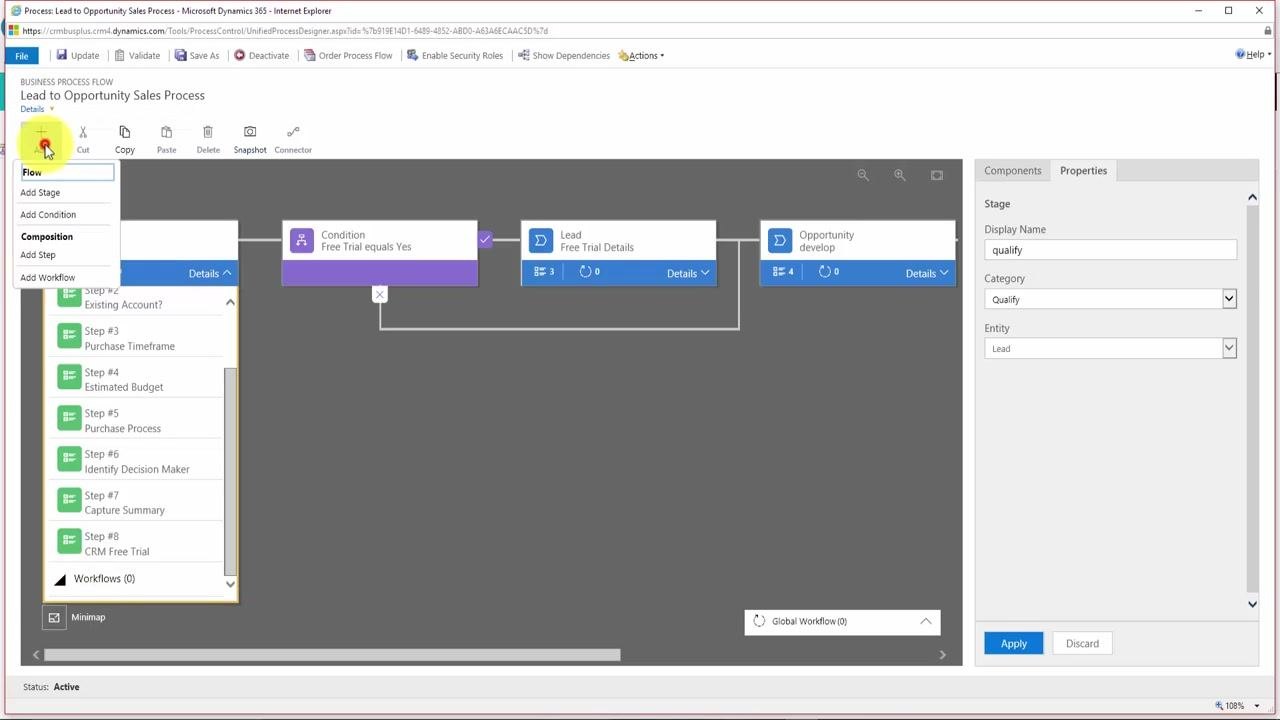
Step 25: Configure the workflow properties
In the properties panel, enter a Display Name for the workflow and set the Entity to the relevant record type (for example, "Lead"). Choose the Trigger — either Stage Entry or Stage Exit — depending on when the workflow should run. Use the lookup field to select an existing workflow, or click + New to create one if none is available. Note that only active, on-demand workflows for the same entity as the stage can be selected, so the workflow must be created and activated in Dynamics 365 before it can be assigned here.
Step 26: Save and confirm the workflow assignment
Click Apply to save the workflow assignment to the stage, or Discard to cancel the change. Once saved, the workflow appears listed under the Workflows section for that stage. If no workflow is selected, the section remains empty until one is assigned.
What's next
Once your fields, stages, conditions, and workflows are configured, review the entire process flow to confirm everything works as intended:
- Validate the process again to check for errors.
- Save and activate the process flow so it is available in your Dynamics 365 environment.
- Test the flow with different field values to confirm that conditional stages and workflows trigger correctly.
With these steps, you have created a business process flow in Dynamics 365 that adds a new required field, introduces a conditional stage, and attaches a workflow — giving your sales process the ability to adapt dynamically based on lead data and automate key actions at each stage.
Generation details: cost, quality tiers
Docsie billed 4,000 credits ($2.80) to analyze this 8-minute video at standard quality. The rewrite, template fill and Word/PDF exports were included. The same video at each quality tier:
| Quality | Frames sampled | Credits | Approx. cost |
|---|---|---|---|
| Draft | every 16-30 s | 2,000 | $1.40 |
| Standard (this guide) | every 8-15 s | 4,000 | $2.80 |
| Detailed | every 4-7 s | 8,000 | $5.60 |
| Ultra | every 1-3 s | 16,000 | $11.20 |
Credits priced at $0.70 per 1,000; plans include a monthly allowance. Enterprise customers on on-premise or bring-your-own-model deployments run this on their own inference and pay no per-video credits.
Generated by Docsie Video-to-Docs on 2026-09-14 from a 7-minute video. Screenshots are frames from the source video and belong to their creator, Subscribe360, whose original is embedded above. If you own this video and want the guide removed or credited differently, contact us and we will act within one business day.