
How to Configure an Sla in Dynamics 365
This guide walks you through how to configure an SLA in Dynamics 365 and apply it to lead records, so that leads are contacted within four hours of creation. If the SLA is not met, the lead is automatically reassigned to another resource. You will enable SLA functionality on the Lead entity, build the SLA KPI timer infrastructure, and add the SLA section to the Lead form so users can monitor compliance directly from each record.
Video: How Do I Configure an SLA in Dynamics 365 for Sales by Western Computer (2018). All credit for the demonstration goes to the creator; watch the original on YouTube. The written guide below was generated from this video by Docsie. Creator? Request a change or removal.
This guide walks you through how to configure an SLA in Dynamics 365 and apply it to lead records, so that leads are contacted within four hours of creation. If the SLA is not met, the lead is automatically reassigned to another resource. You will enable SLA functionality on the Lead entity, build the SLA KPI timer infrastructure, and add the SLA section to the Lead form so users can monitor compliance directly from each record.
Prerequisites
- Starting with CRM 2016 version 8.1, you can add SLAs to any entity except recurring appointments.
- Out-of-the-box SLA KPIs are available only for the Case and Lead entities. For any other entity, you must first create SLA KPI timers in QuickView forms before configuring the SLA.
- You need access to a Dynamics 365 CRM instance and permissions to customize the system.
Open the Leads area
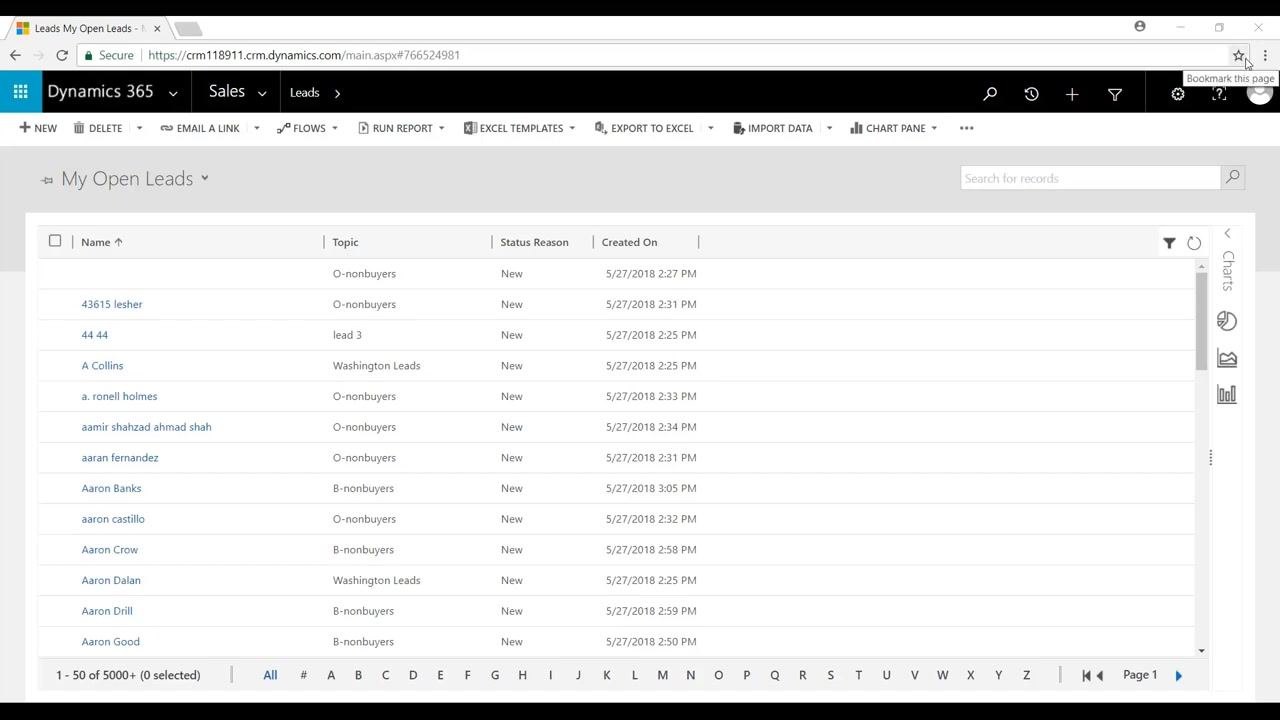
Launch your web browser, navigate to your Dynamics 365 CRM instance, and log in if prompted. From the main navigation bar, select Sales, then Leads. The My Open Leads view displays your lead records with columns for Name, Topic, Status Reason, and Created On.
Navigate to customizations
Click Settings in the top navigation bar. In the drop-down menu, locate the Customization section and click Customizations.
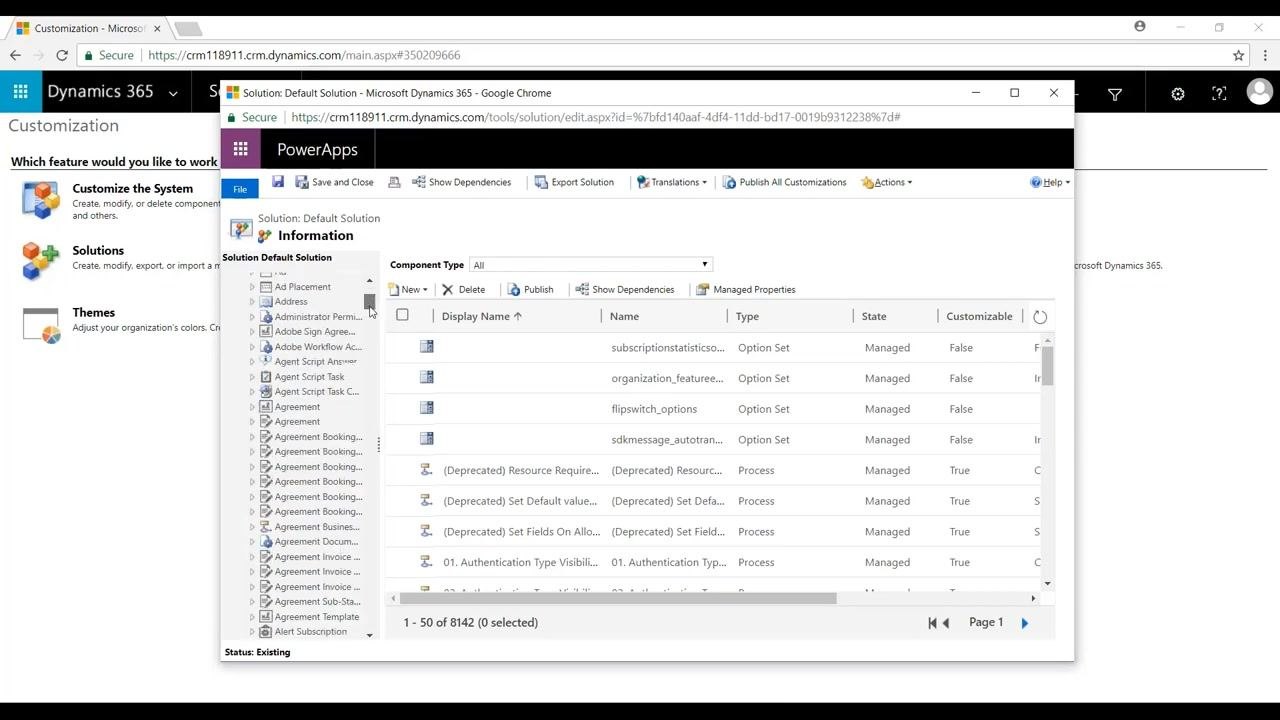
In the Customization area, select Customize the System to open the PowerApps editor. The editor displays the Default Solution with a list of components in the left navigation pane.
Enable SLA on the Lead entity
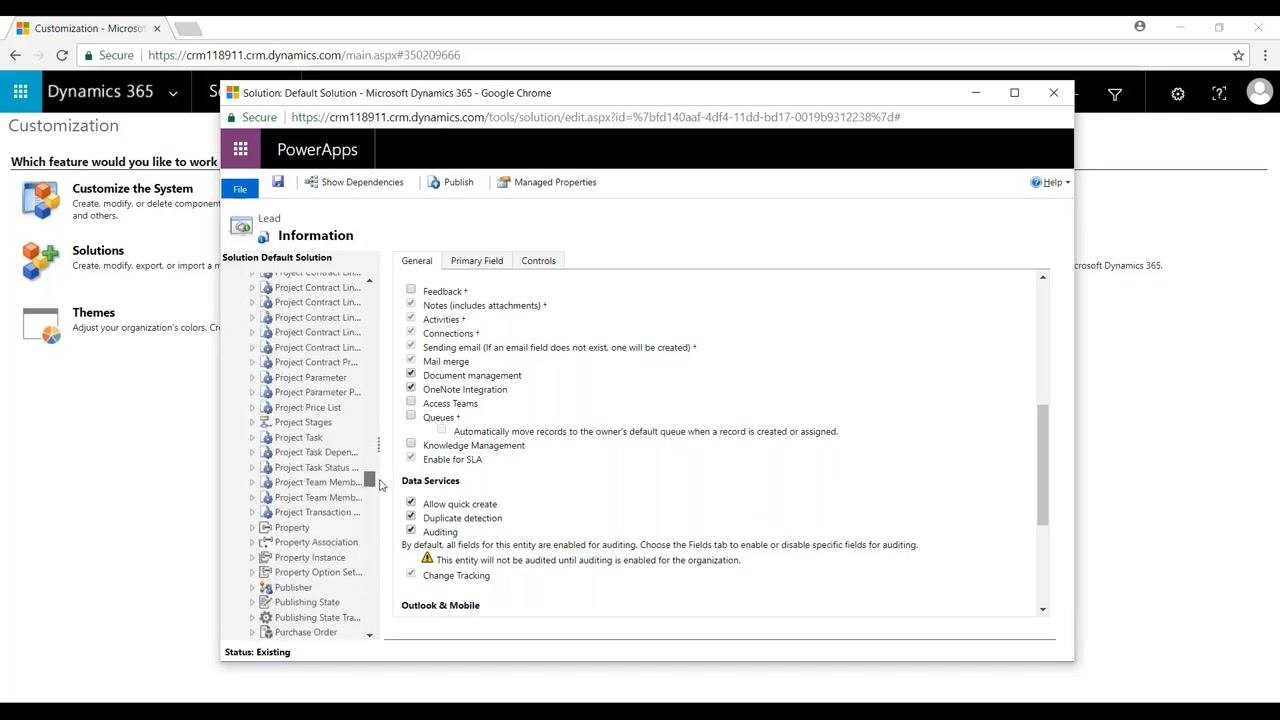
In the left navigation pane, scroll to find the Lead entity and click it to open its properties. Scroll down to the Communications & Collaboration section and confirm that Enable for SLA is checked.
If you are configuring SLAs for an entity other than Case or Lead, plan to create SLA KPI timers in QuickView forms before continuing.
Create a one-to-many relationship for the SLA KPI timer
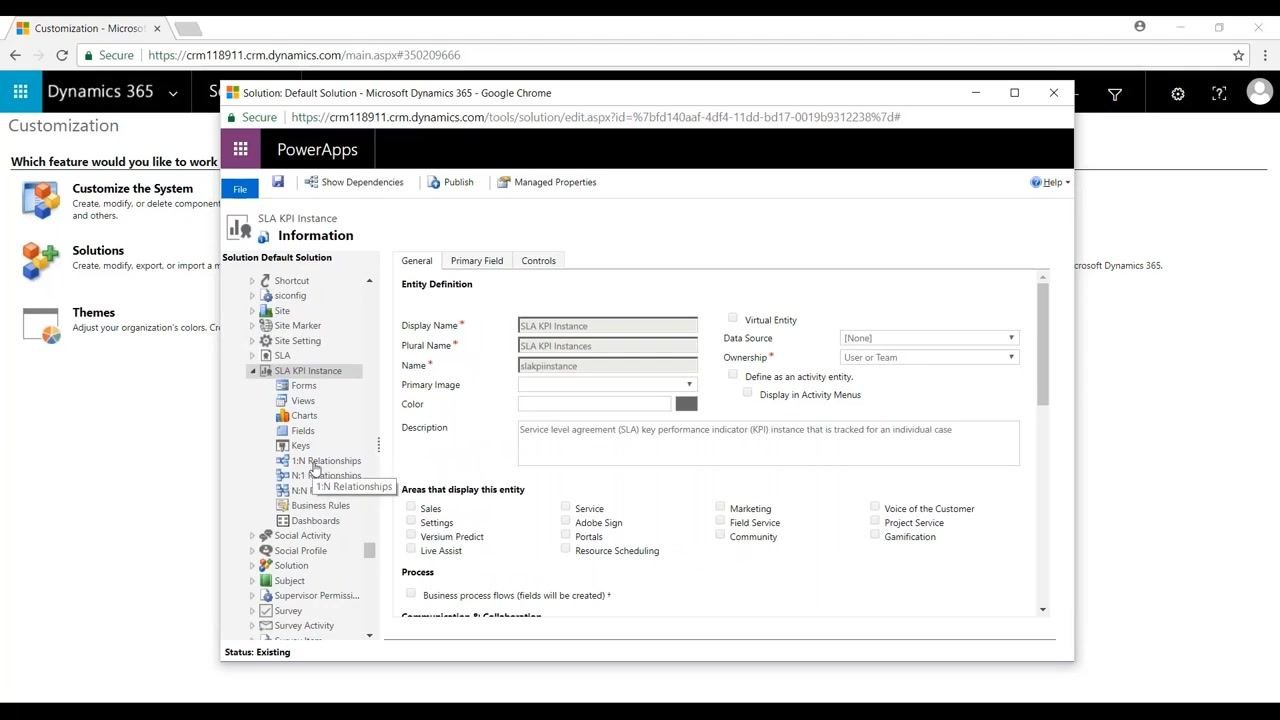
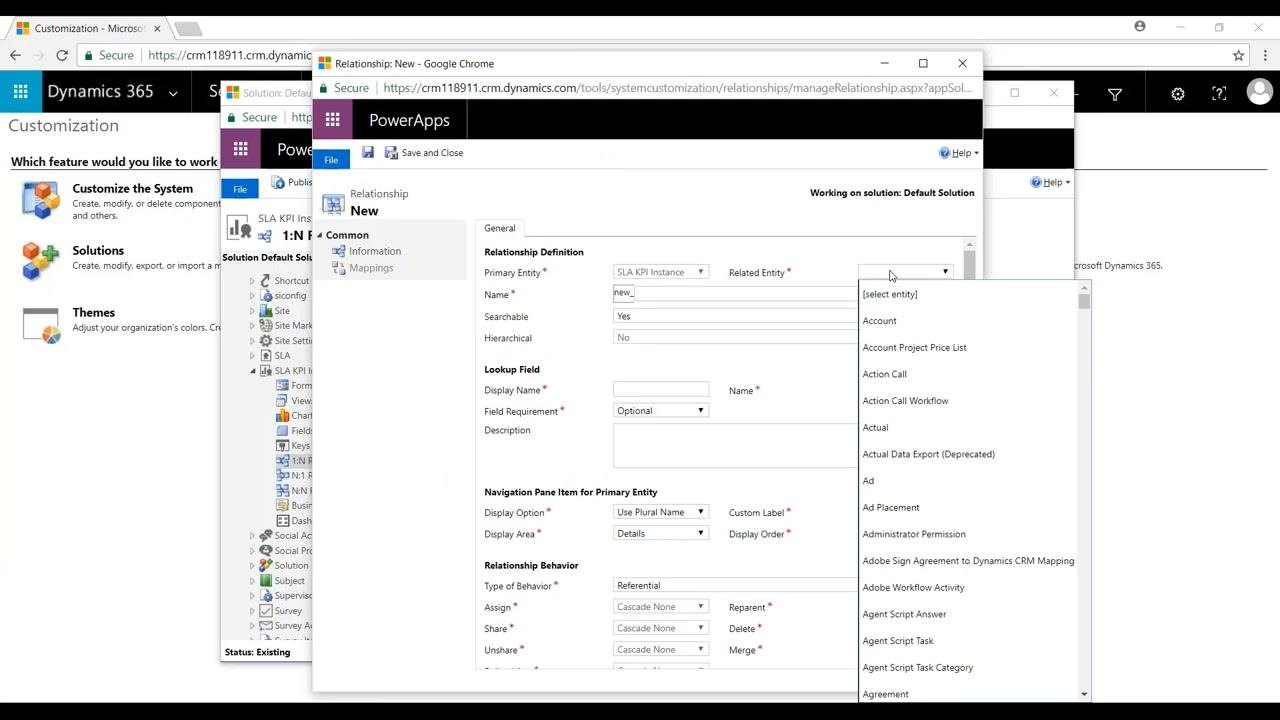
In the PowerApps editor, navigate to the SLA KPI Instance entity, expand its options, and select 1:N Relationships. Click New 1-to-Many Relationship.
In the Relationship Definition window, configure the following:
- Primary Entity:
SLA KPI Instance - Related Entity:
Lead - Name: A descriptive name such as
new_slakpiinstance_lead - Lookup Field Display Name:
Contact Within 4 hours - Field Requirement: Leave as
Optional
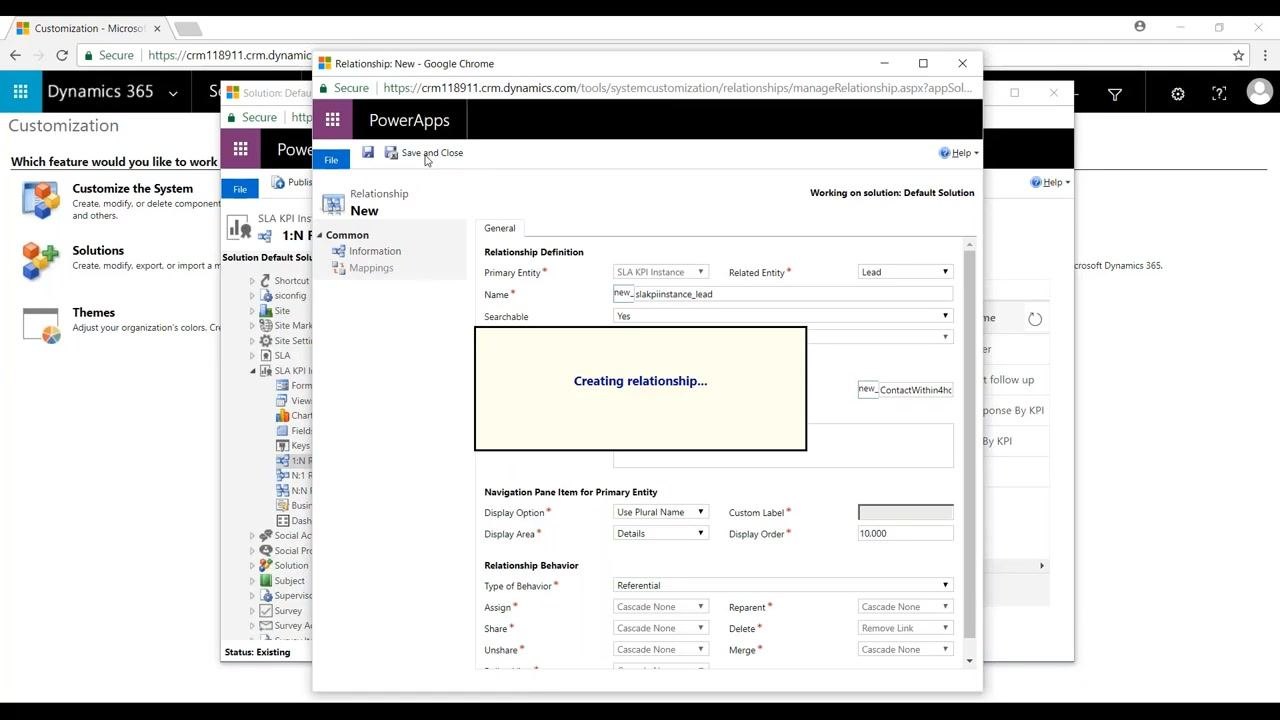
Adjust any other settings as needed for your business process, then click Save and Close to create the relationship.
Wait for the system to process the request. A "Creating relationship..." message confirms the relationship is being created.
Create a Quick View form for the timer
In the left navigation pane, under SLA KPI Instance, select Forms. Click to add a new form and choose Quick View Form.
Name the form Contact Within Four Hours. The form editor opens with a blank layout where you can add controls and fields.
Add and configure the timer control
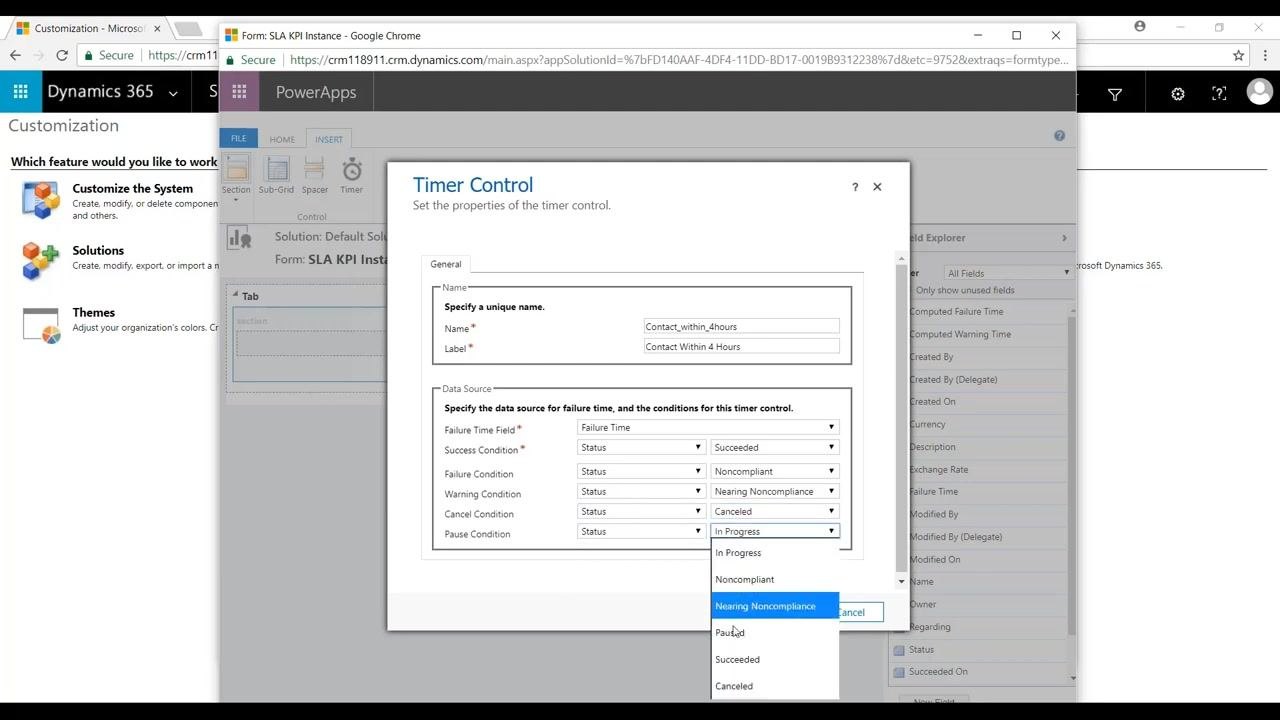
In the form editor, insert a Timer Control onto the form. In the Timer Control properties window, configure the following:
- Name:
Contact_within_4hours - Label:
Contact Within 4 Hours - Failure Time Field:
Failure Time - Success Condition:
Status=Succeeded - Failure Condition:
Status=Noncompliant - Warning Condition:
Status=Nearing Noncompliance - Cancel Condition:
Status=Canceled - Pause Condition:
Status=Paused
Click OK to save the timer control settings, then save the form with the name Contact Within Four Hours and click Save and Close to finalize the setup.
Add an SLA section to the Lead form
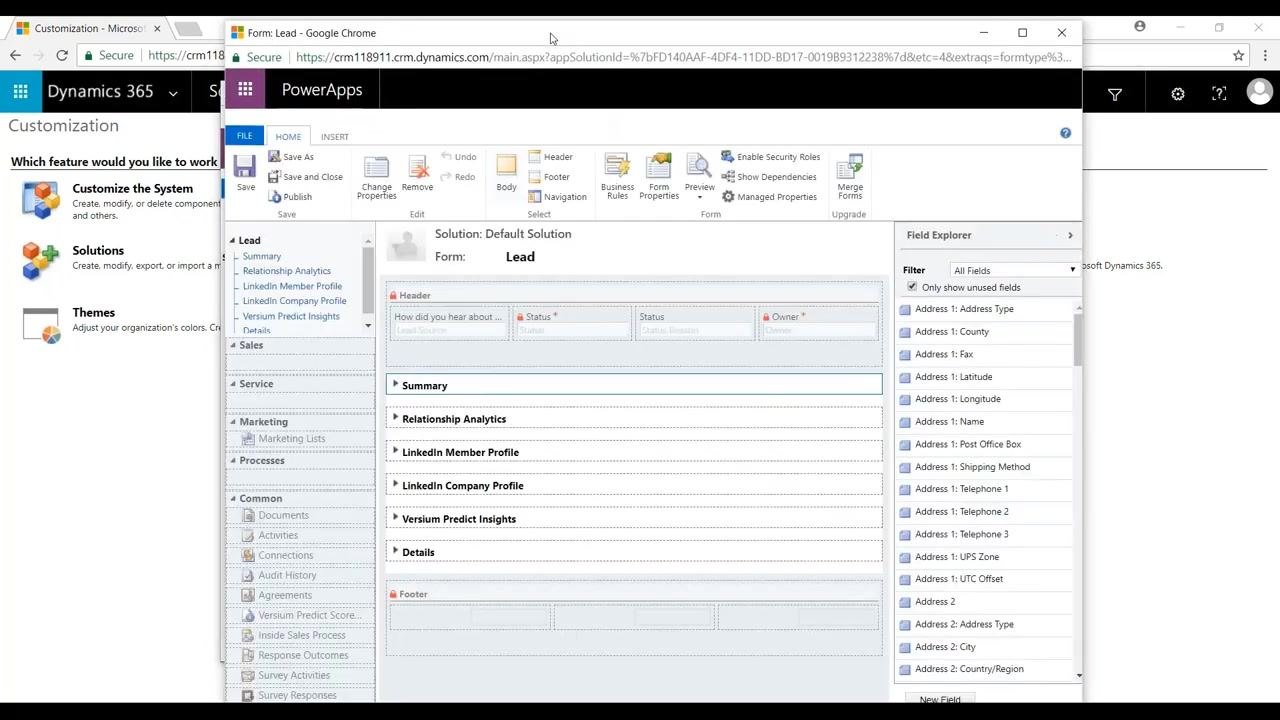
In the left navigation pane, expand Lead and select Forms, then open the main Lead form for editing.
In the form layout, add a new section and name it SLA. The section appears in the form layout, ready for additional fields and controls.
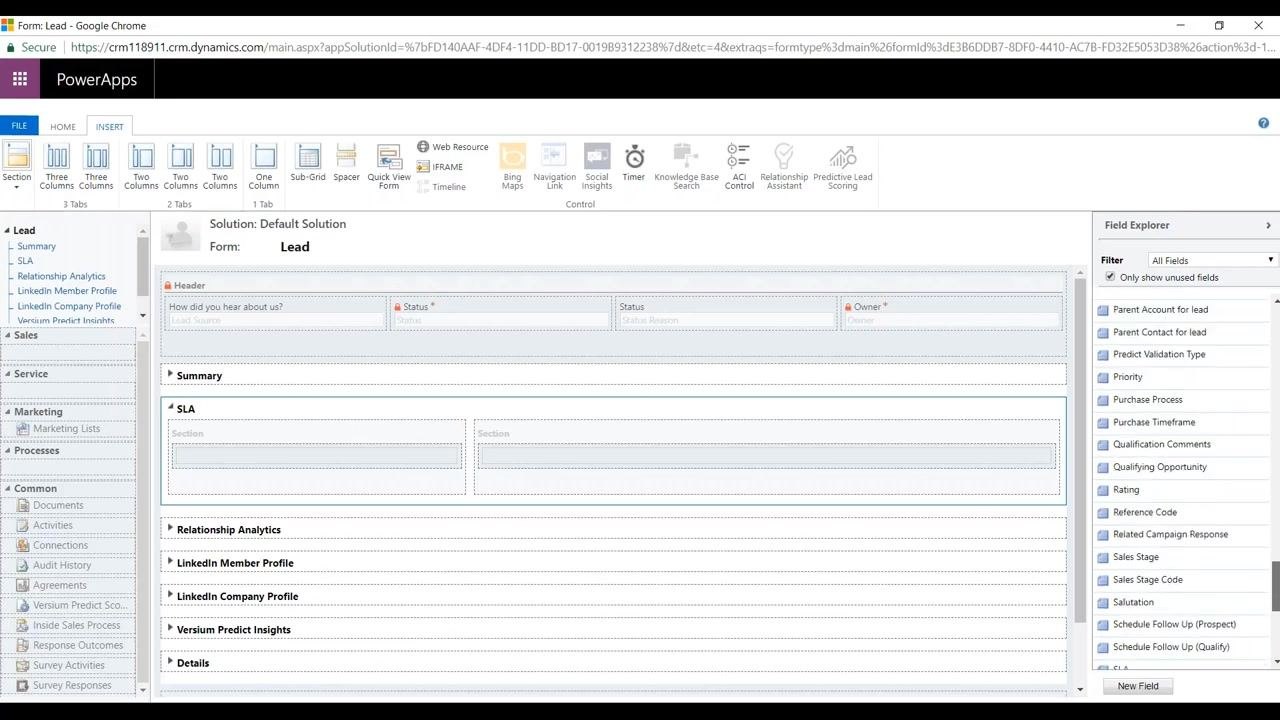
Add the SLA lookup field
In the Field Explorer on the right, locate the SLA field and drag it into the new SLA section.
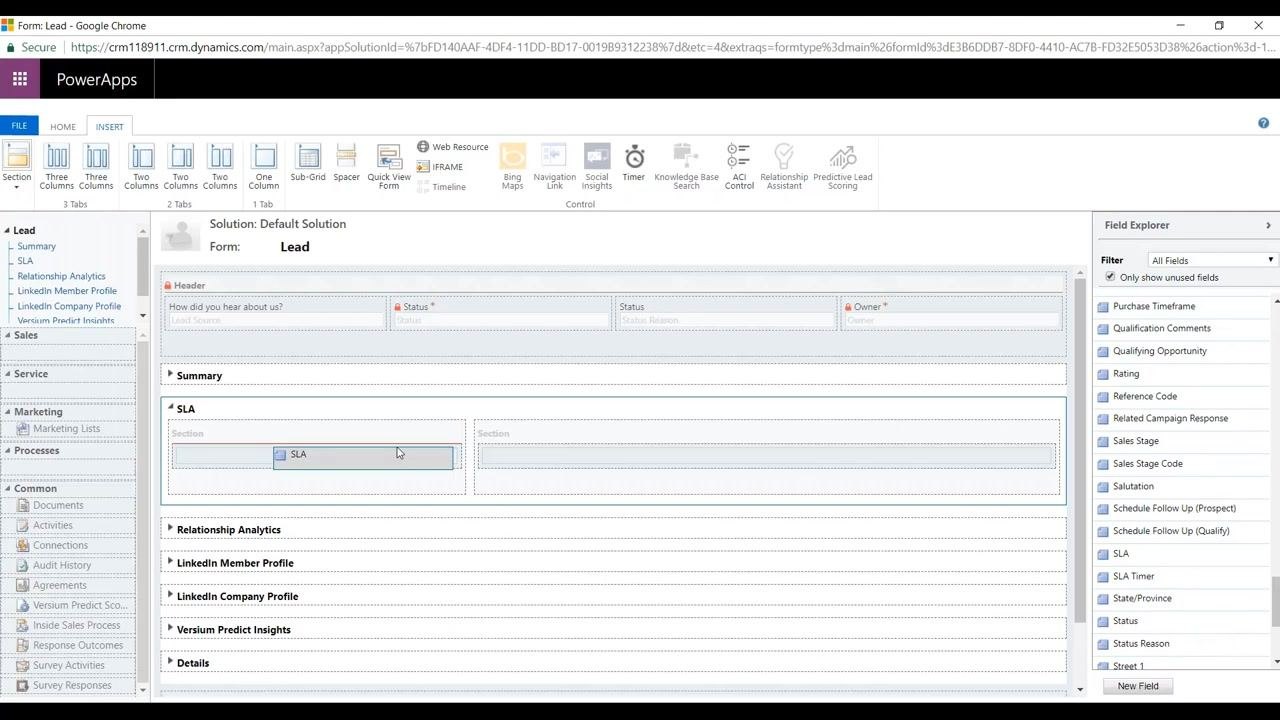
Add a Quick View form to the SLA section
In the form editor ribbon, click Quick View Form. In the Quick View Control Properties window, configure the following:
- Name:
Contact_within_4hours - Label:
Contact Within 4 Hours - Lookup Field:
Contact Within 4 hours - Related Entity:
SLA KPI Instance - Quick View Form:
Contact Within 4 Hours
Click OK to add the Quick View Form to the SLA section.
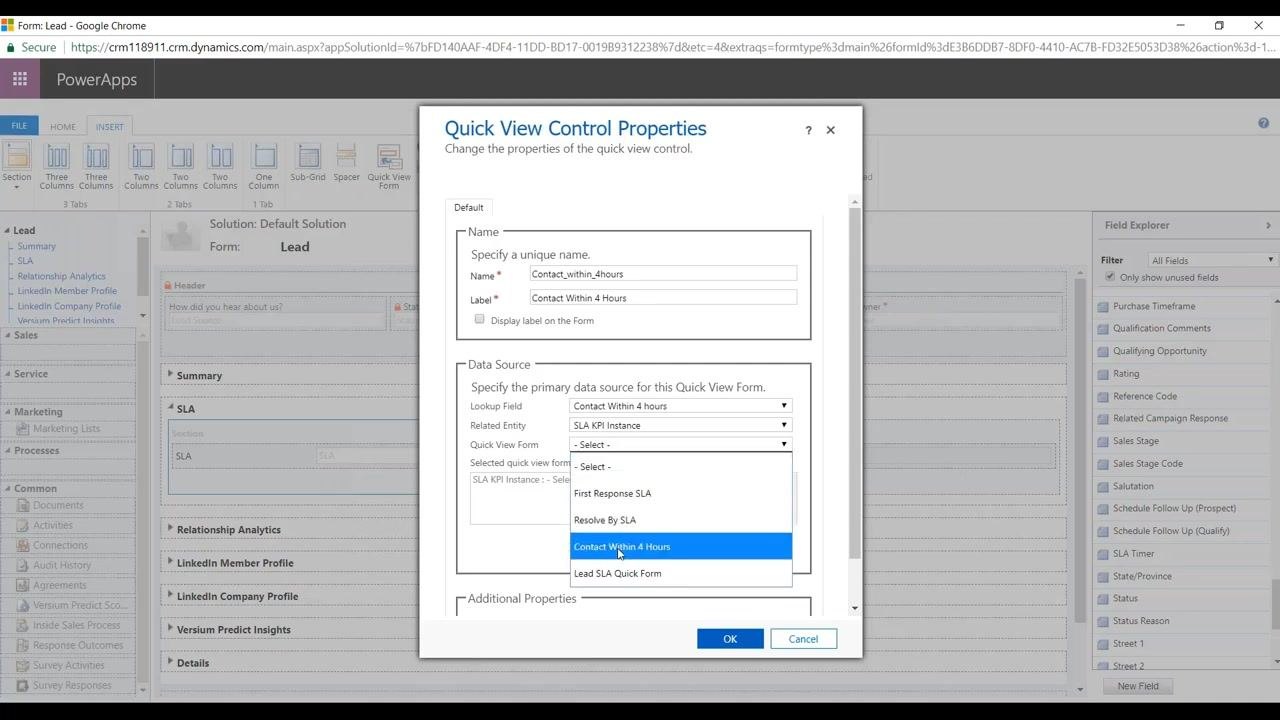
Add a subgrid for related SLA KPI instances
In the form editor, add a Sub-Grid control to the SLA section. This subgrid displays all related SLA KPI Instance records for the lead, filtered by the relationship you created earlier.
When prompted, name the subgrid SLAs and click OK to confirm. The subgrid helps you keep track of what's due and what's coming for each lead.
Set subgrid properties
In the Set Properties dialog, configure the following:
- Name: A unique name for the subgrid, such as
SLAs - Label: A display label, such as
SLAs - Entity:
SLA KPI Instance - Default View: An appropriate view, such as
My Active SLA KPI Instances
Adjust any additional options as needed, such as enabling the search box or view selector, then click OK to save the subgrid properties.
Confirm that the subgrid appears in the SLA section of the Lead form layout, labeled appropriately and ready to display related records.
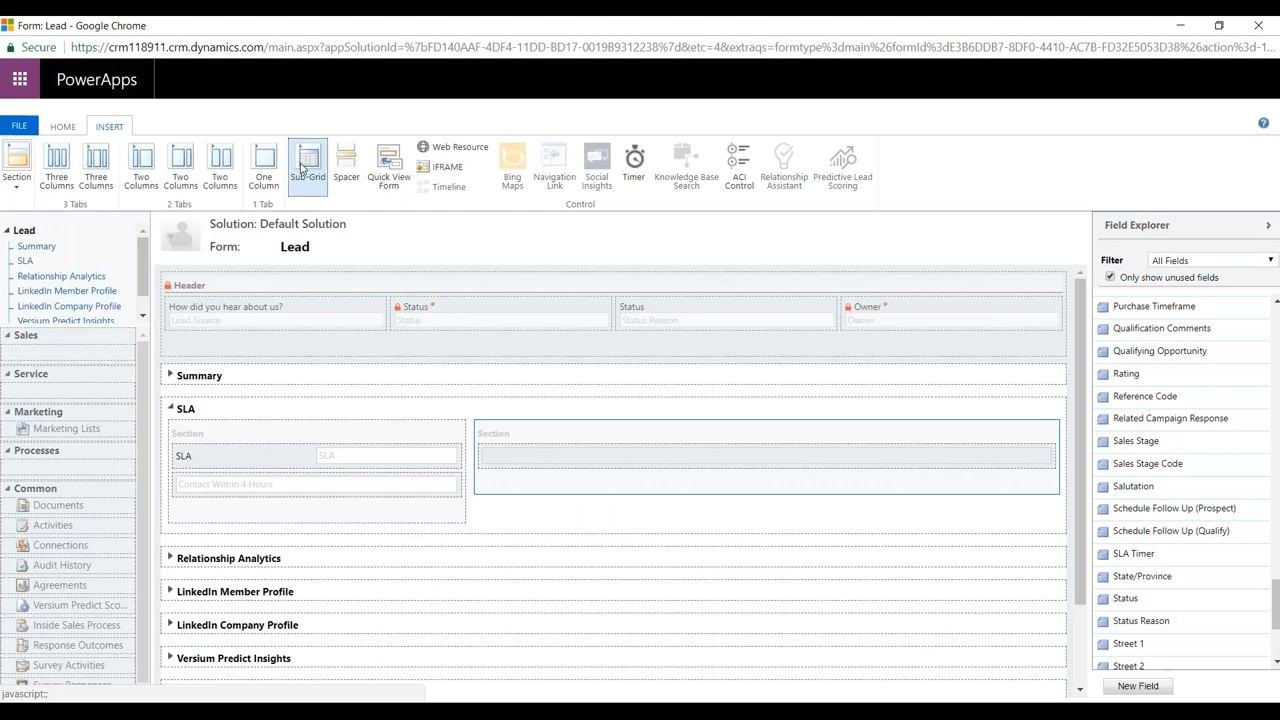
Save and publish the form
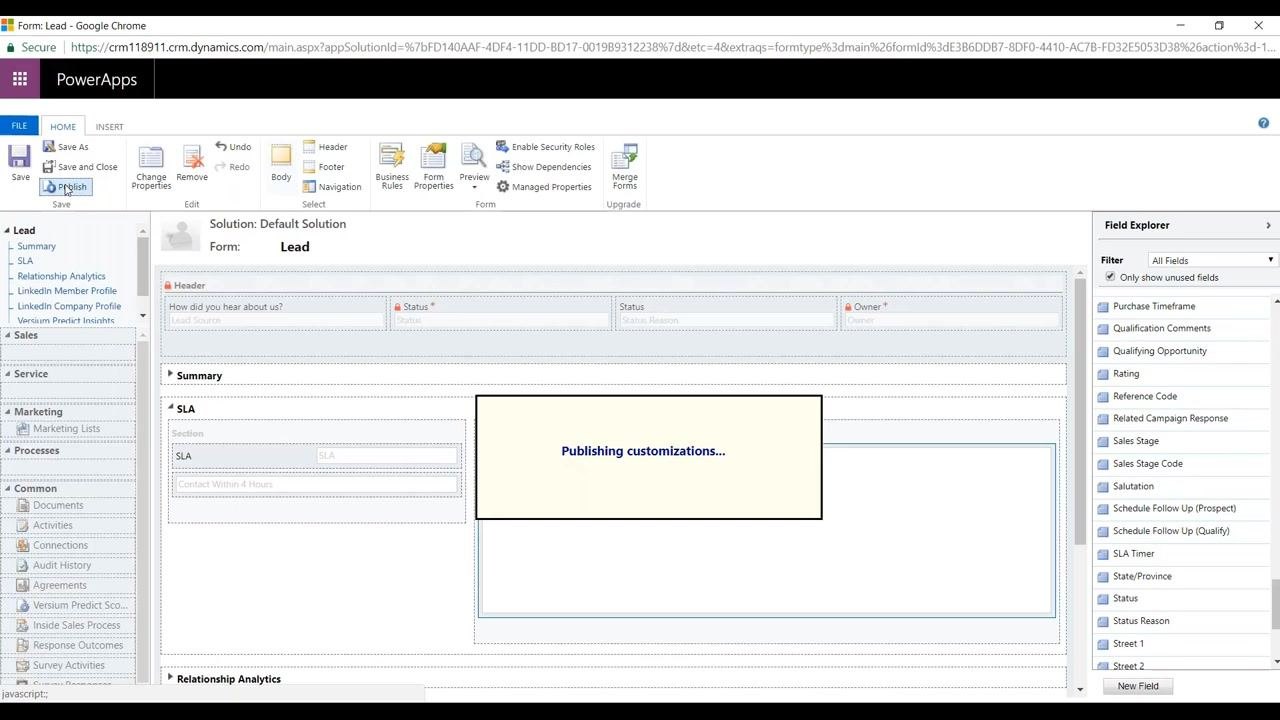
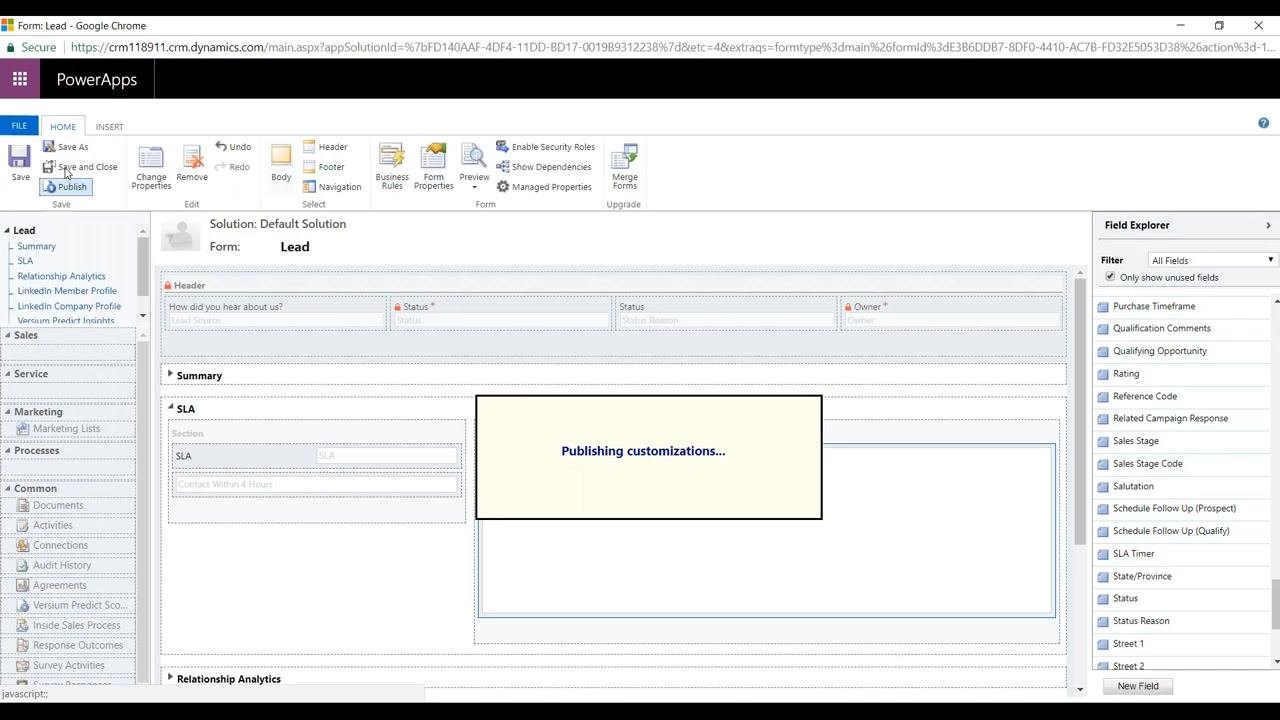
Click Save in the form editor toolbar to save your changes, then click Publish to apply the customizations. A dialog appears indicating that customizations are being published.
Remain on the page until the "Publishing customizations..." dialog disappears, confirming your changes are live.
Summary
You have configured an SLA in Dynamics 365 for the Lead entity by enabling SLA support, creating a one-to-many relationship between SLA KPI Instance and Lead, building a Quick View form with a timer control for the "Contact Within Four Hours" SLA, and adding a dedicated SLA section to the Lead form with a lookup field, Quick View form, and subgrid. This setup enforces timely follow-up on leads and gives users clear visibility into SLA compliance directly from each Lead record.
What's next
Continue defining additional SLA details and KPI timers as required for your business process, and repeat the QuickView form and timer control setup for any other entities beyond Case and Lead that need SLA tracking.
Generation details: cost, quality tiers
Docsie billed 3,000 credits ($2.10) to analyze this 6-minute video at standard quality. The rewrite, template fill and Word/PDF exports were included. The same video at each quality tier:
| Quality | Frames sampled | Credits | Approx. cost |
|---|---|---|---|
| Draft | every 16-30 s | 1,500 | $1.05 |
| Standard (this guide) | every 8-15 s | 3,000 | $2.10 |
| Detailed | every 4-7 s | 6,000 | $4.20 |
| Ultra | every 1-3 s | 12,000 | $8.40 |
Credits priced at $0.70 per 1,000; plans include a monthly allowance. Enterprise customers on on-premise or bring-your-own-model deployments run this on their own inference and pay no per-video credits.
Generated by Docsie Video-to-Docs on 2026-09-14 from a 5-minute video. Screenshots are frames from the source video and belong to their creator, Western Computer, whose original is embedded above. If you own this video and want the guide removed or credited differently, contact us and we will act within one business day.