
How to Reset Settings in CATIA
If your CATIA interface looks wrong, you can restore it by resetting the settings to their defaults. This guide shows you how to reset settings in CATIA, restart the software, choose your preferred user interface style, and check that your workspace is back to normal.
Video: How to Reset Catia V5 to default by 3D Comparison (2019). All credit for the demonstration goes to the creator; watch the original on YouTube. The written guide below was generated from this video by Docsie. Creator? Request a change or removal.
If your CATIA interface looks wrong, you can restore it by resetting the settings to their defaults. This guide shows you how to reset settings in CATIA, restart the software, choose your preferred user interface style, and check that your workspace is back to normal.
Prerequisites
- CATIA is installed and open on your computer.
- You know which scope of settings you want to reset. For a full reset, you will choose For all the tabpages.
Identify the problem before you reset settings in CATIA
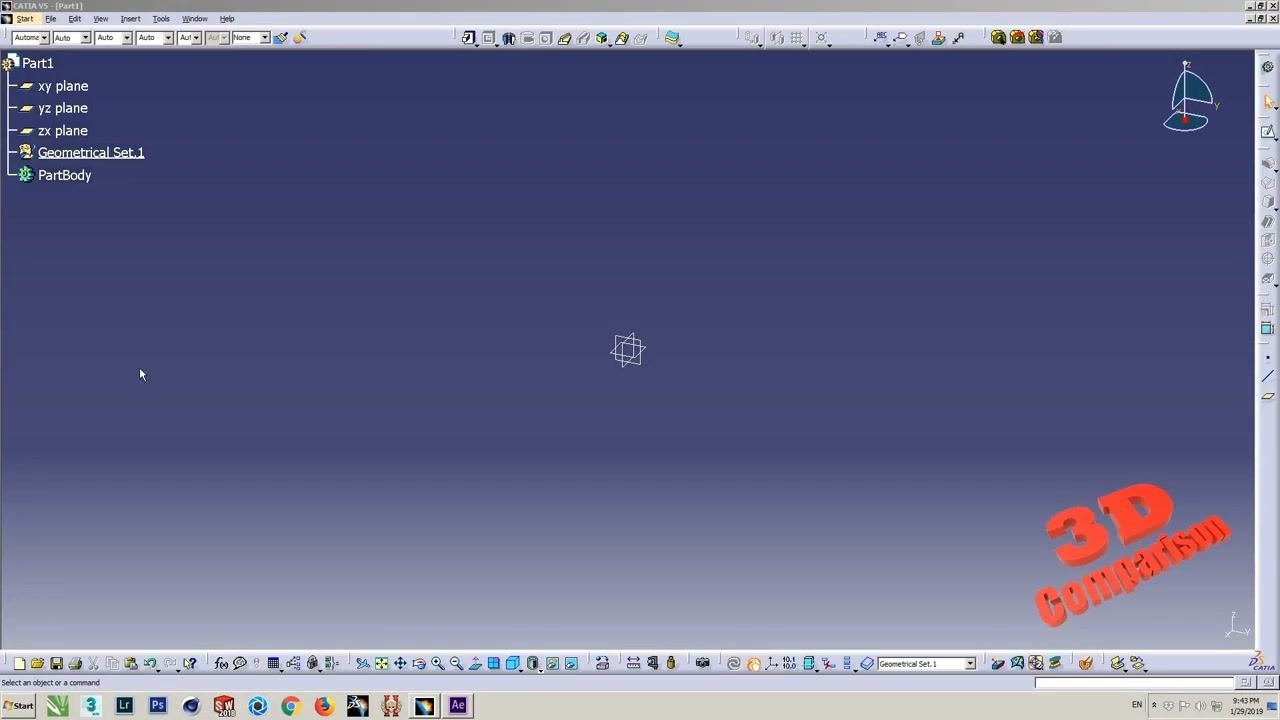
Missing or resized interface elements, such as the tree that shows operations, parts, and assemblies, are common signs that you need a reset. These problems often occur in shared environments, such as student labs, where other users may change the interface.
For example, the tree structure can show xy plane, yz plane, zx plane, Geometrical Set.1, and PartBody. If this tree is missing or resized, it may be hidden or minimized.
You can hide or show the tree by pressing F3 on your keyboard. If you want to select a specific plane, such as xy plane, make sure it is visible and highlighted.
Open the Options dialog
- In the top menu, click Tools.
- Select Options from the dropdown menu.
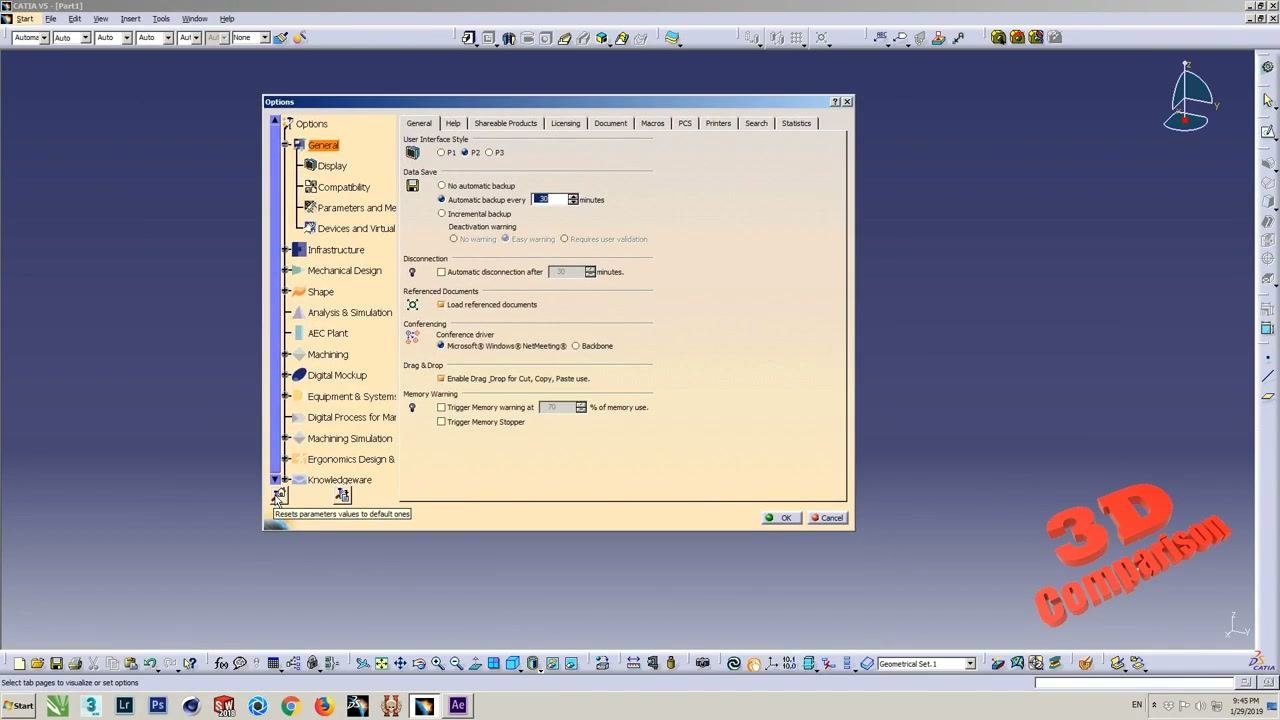
- In the left sidebar of the Options dialog, select the General category.
Click the reset button
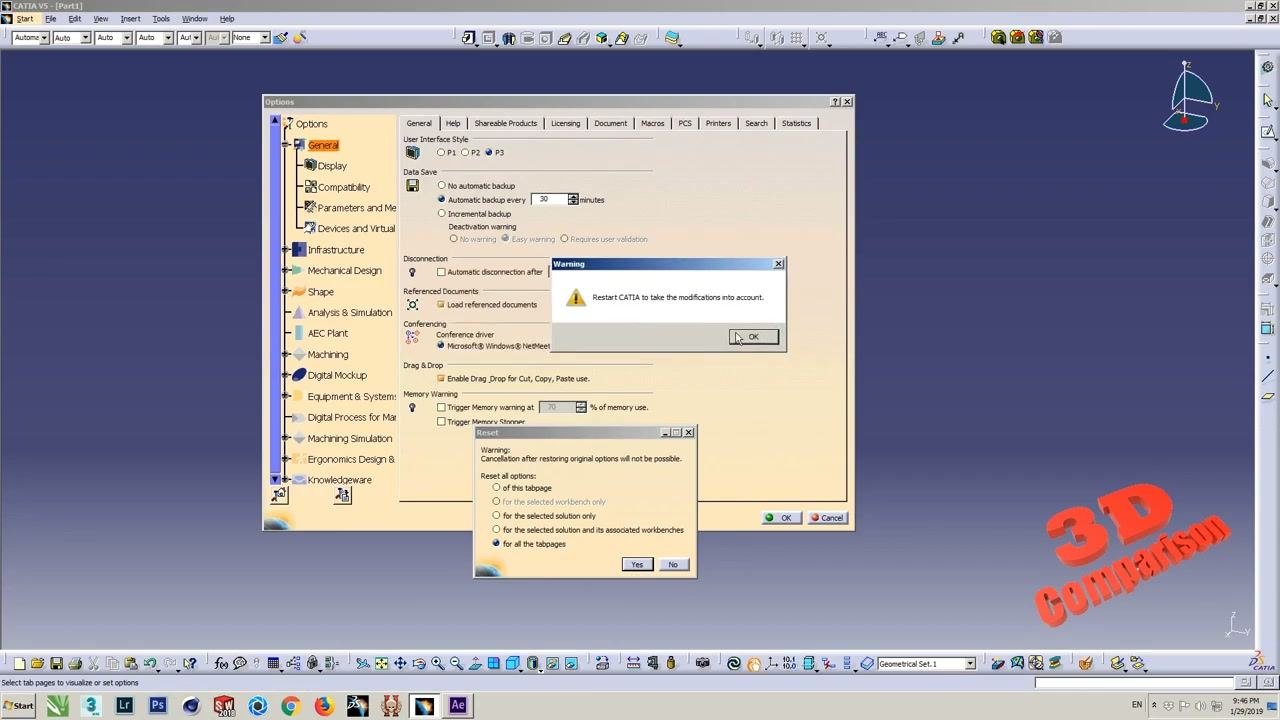
In the bottom left corner of the Options dialog, find the button labeled "Resets parameters values to default ones." Click it to begin the reset process.
Choose the reset scope
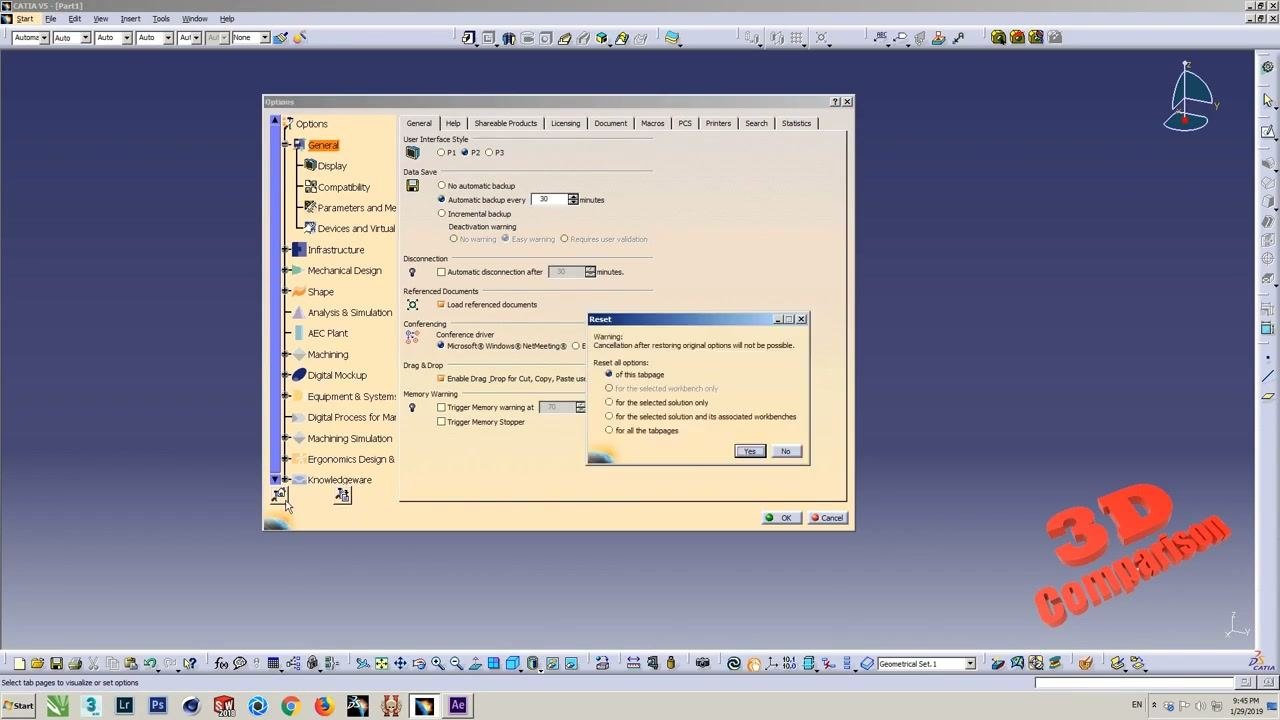
A Reset dialog appears with these options:
- For this tabpage
- For the selected workbench only
- For the selected solution only
- For the selected solution and its associated workbenches
- For all the tabpages
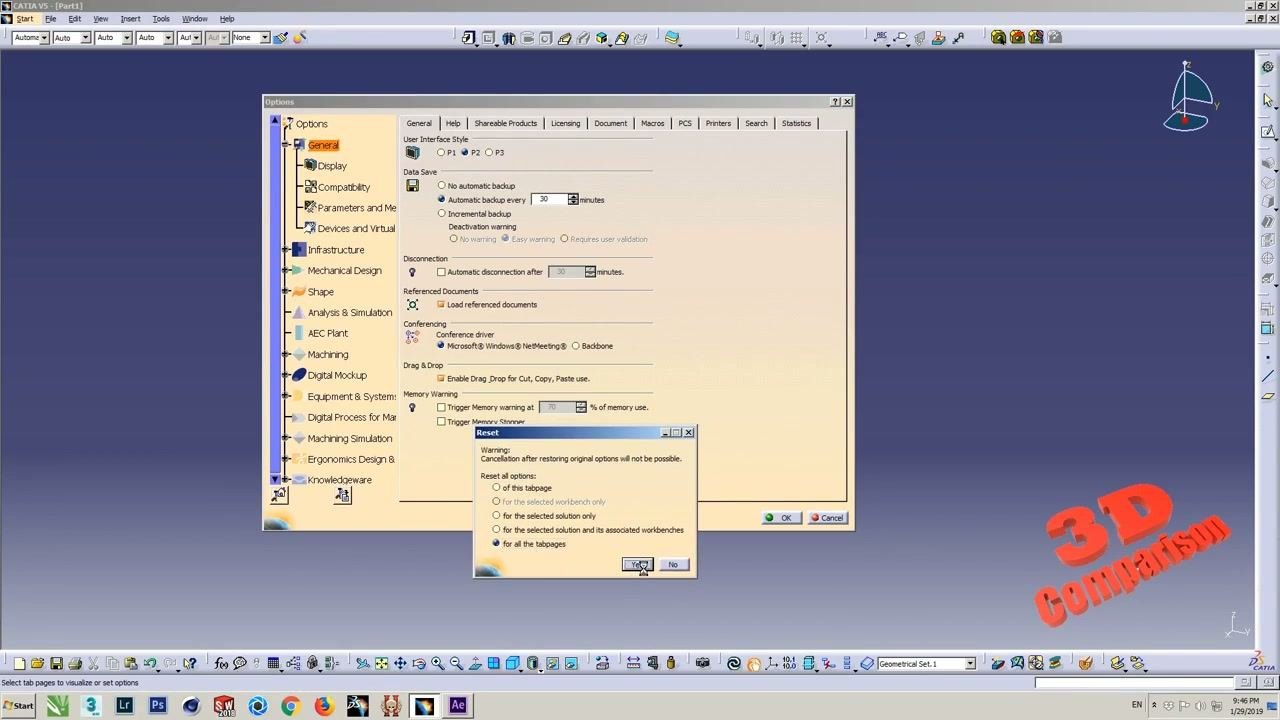
Select the option that fits your needs. For a full reset, choose For all the tabpages.
Confirm the reset
Click Yes to confirm and reset the settings to their defaults.
Restart CATIA to apply the reset
After you confirm, a warning dialog states: "Restart CATIA to take the modifications into account."
- Click OK in the warning dialog.
- Close the Options dialog if it is still open.
- Exit CATIA completely.
- Restart CATIA so all settings return to their defaults.
Check the default user interface
When CATIA restarts, look at which user interface style loads by default:
- Newer versions may default to the P3 (immersive) interface.
- Older versions may default to P1 (classic) or P2 (standard).
If the interface is not the one you prefer, continue to the next step to change it.
Change the user interface style (optional)
- In the top menu, click Tools.
- Select Options from the dropdown menu.
- In the left sidebar of the Options dialog, select the General category.
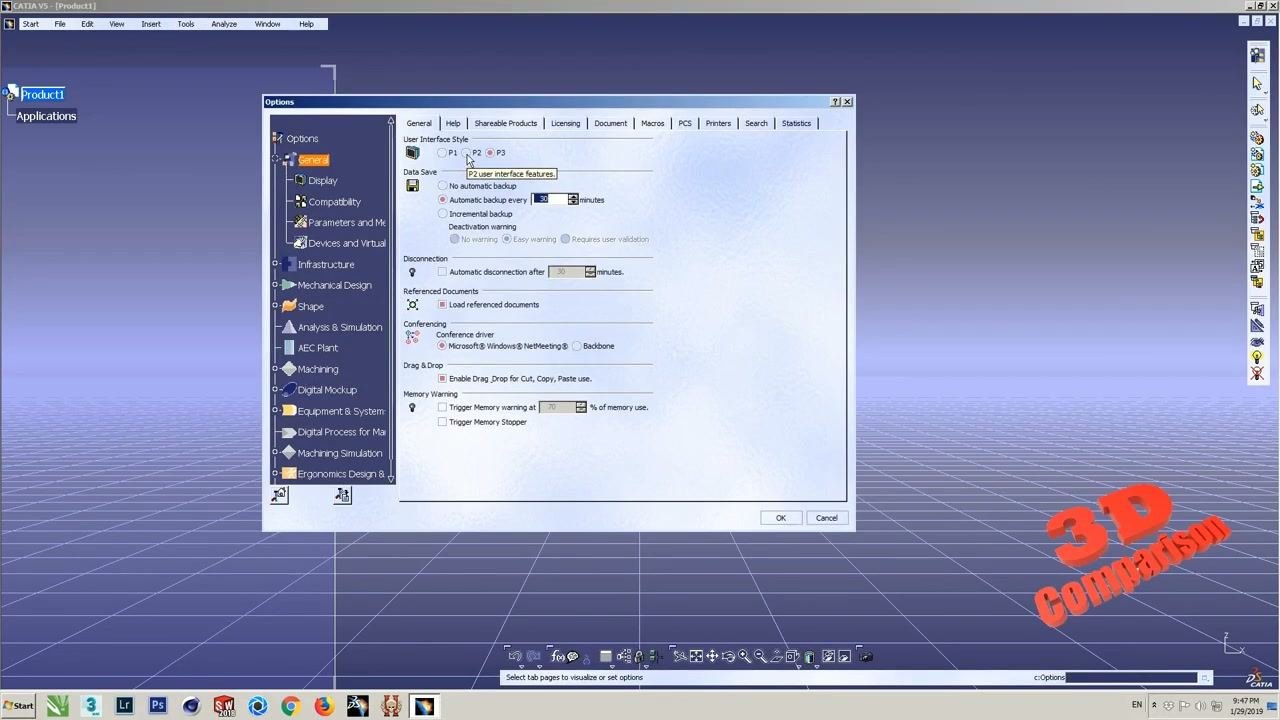
- Under "User Interface Style," click the radio button for your preferred style (for example, P2):
- P1: Classic user interface
- P2: Standard user interface
- P3: Immersive user interface
- Click OK to confirm.
- If prompted, click OK again to acknowledge that a restart is required.
- Close CATIA and restart it to apply the new interface style.
Confirm the interface change
After CATIA restarts, check that it displays the interface style you selected. If a message or overlay says another reset is needed to change the interface, follow the on-screen instructions.
Verify the final reset and workspace
- Restart CATIA after you reset and select your preferred interface style (for example, P2).
- Confirm that CATIA opens directly into the Product Structure module.
- Switch to the Part Design (Mechanical Part Design) module by selecting it from the available modules.
- Create a new part.
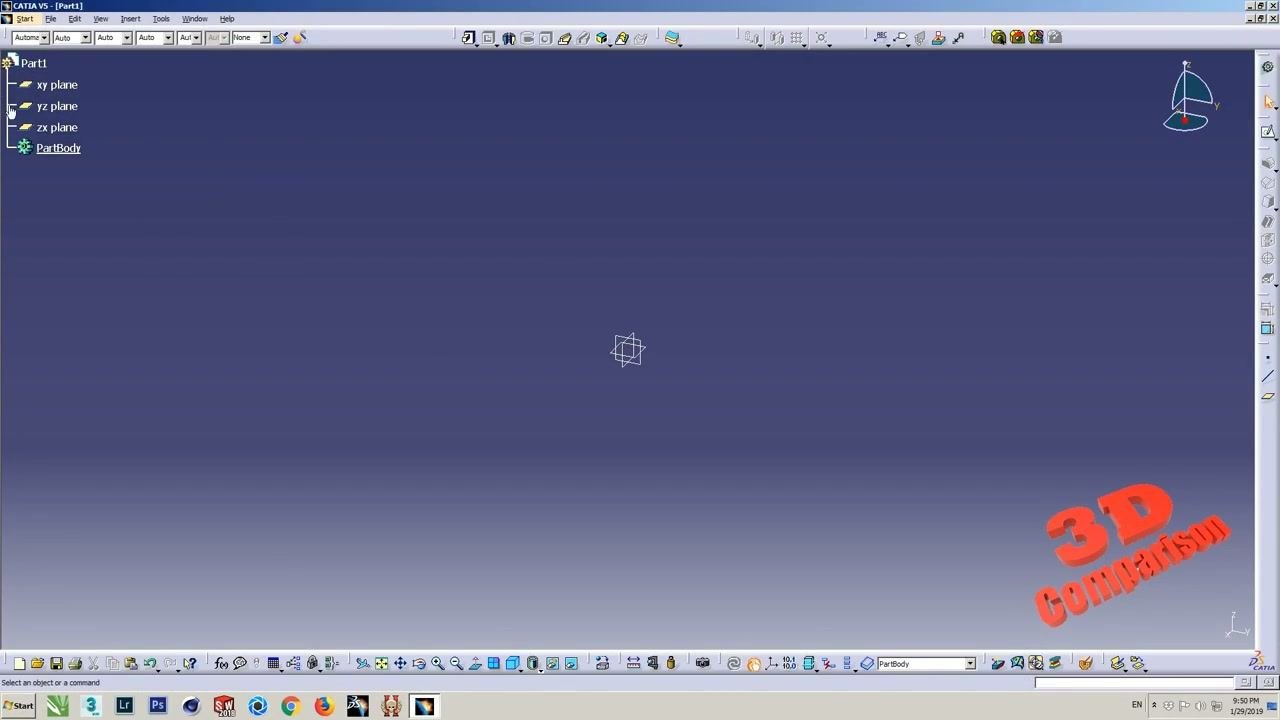
- Check that the specification tree is visible on the left and shows Part1, xy plane, yz plane, zx plane, and PartBody.
- Confirm that the workspace is clear and that all default toolbars and navigation aids are present.
Troubleshooting: settings are not fully reset
If some interface elements or settings are not back to their defaults:
- Repeat the reset process described in the previous steps.
- Manually adjust any remaining settings by going to Tools > Options.
A single reset usually resolves most issues.
Summary
You now know how to reset settings in CATIA. Open Tools > Options, select the General category, click the reset button, choose your reset scope, and confirm with Yes. Then restart CATIA, choose your preferred interface style (P1, P2, or P3), and check that the specification tree and default toolbars appear in a new part.
Generation details: cost, quality tiers
Docsie billed 2,500 credits ($1.75) to analyze this 5-minute video at standard quality. The rewrite, template fill and Word/PDF exports were included. The same video at each quality tier:
| Quality | Frames sampled | Credits | Approx. cost |
|---|---|---|---|
| Draft | every 16-30 s | 1,250 | $0.88 |
| Standard (this guide) | every 8-15 s | 2,500 | $1.75 |
| Detailed | every 4-7 s | 5,000 | $3.50 |
| Ultra | every 1-3 s | 10,000 | $7.00 |
Credits priced at $0.70 per 1,000; plans include a monthly allowance. Enterprise customers on on-premise or bring-your-own-model deployments run this on their own inference and pay no per-video credits.
Generated by Docsie Video-to-Docs on 2026-11-15 from a 4-minute video. Screenshots are frames from the source video and belong to their creator, 3D Comparison, whose original is embedded above. If you own this video and want the guide removed or credited differently, contact us and we will act within one business day.