
How to Approve Timecards in ADP
This guide walks you through how to approve timecards in ADP, including how to access the ADP eTime Reference Guide, review your time card for different pay periods, and submit your approval before the end of each pay period. Following these steps ensures your time card is accurate and processed on time.
Video: ADP Employee Training How to review & approve timecard by interface rehab. All credit for the demonstration goes to the creator; watch the original on YouTube. The written guide below was generated from this video by Docsie. Creator? Request a change or removal.
This guide walks you through how to approve timecards in ADP, including how to access the ADP eTime Reference Guide, review your time card for different pay periods, and submit your approval before the end of each pay period. Following these steps ensures your time card is accurate and processed on time.
Prerequisites
Before you begin, make sure you have access to your ADP home page and the top navigation bar, which includes the RESOURCES and MYSELF tabs. No additional setup is required.
Accessing the ADP eTime reference guide
If you need step-by-step instructions for any ADP task, you can access the ADP eTime Reference Guide for Employees at any time.
- Go to the RESOURCES tab in the top navigation bar.
- Select Forms Library from the dropdown menu.
- In the Forms Library, locate and click ADP eTime Reference Guide For Employee under the HR & Benefits Forms section.
Navigating to your time card
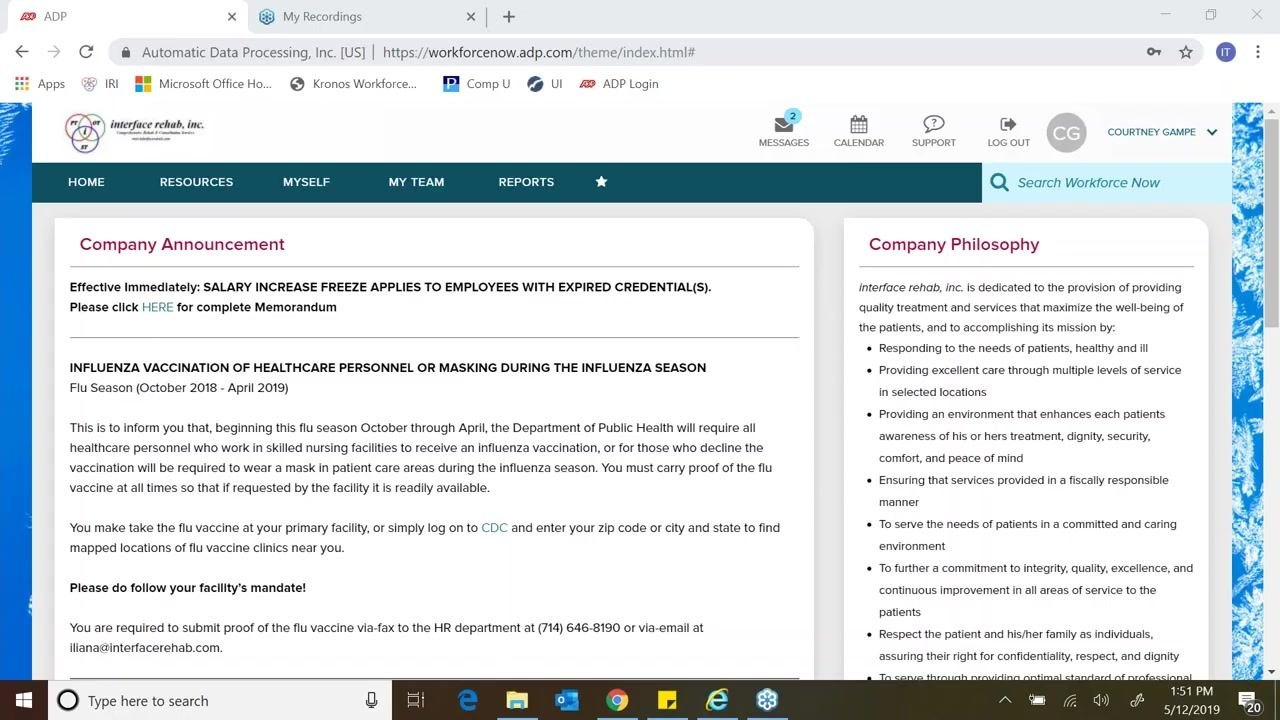
To begin reviewing your time card, start from your ADP home page.
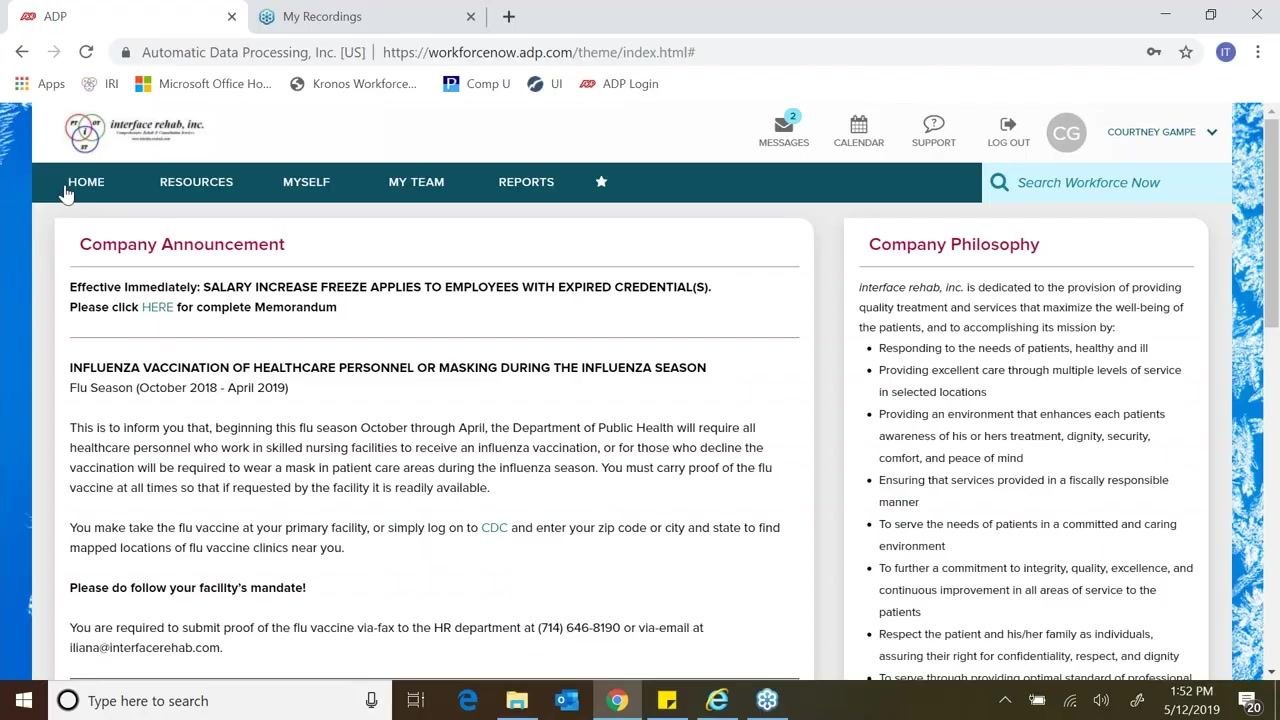
- Navigate to the MYSELF tab in the top navigation bar.
- Under the MYSELF tab, locate the Time & Attendance section on the right.
- Click Time under the Time & Attendance section. If your menu does not match this example, expand or collapse the menu to view more or fewer options.
Opening your time card
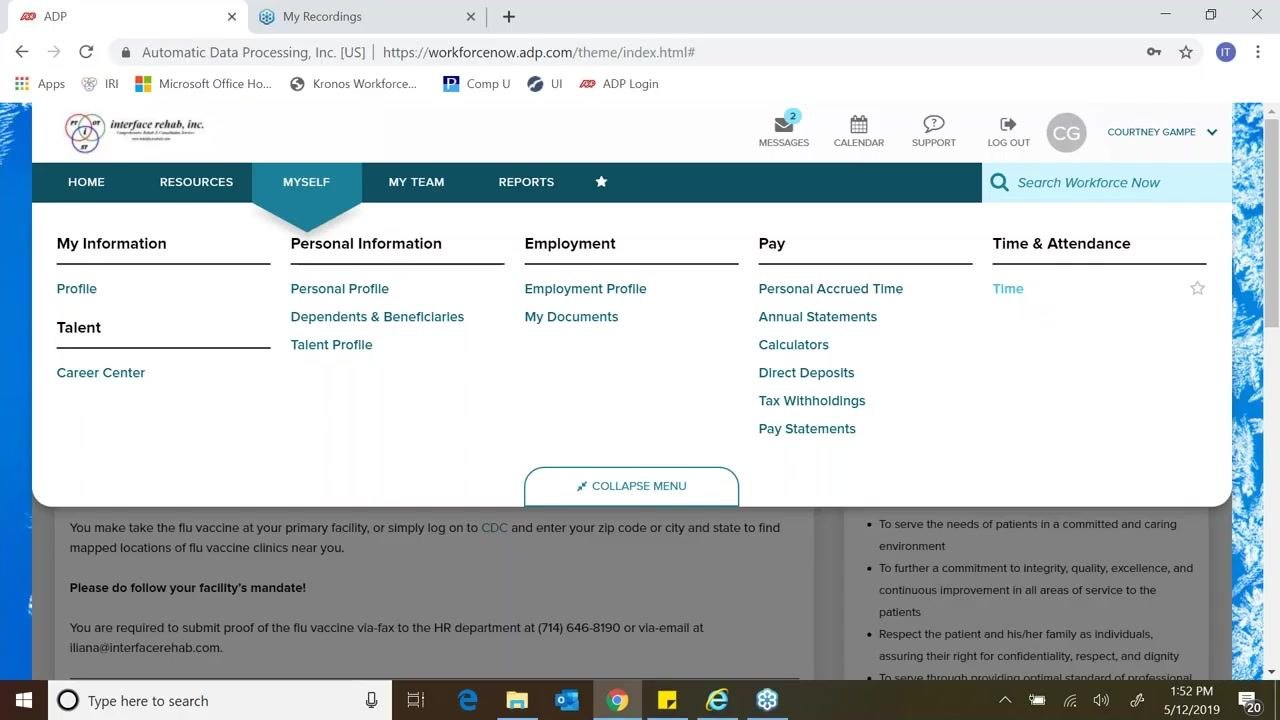
A pop-up screen appears once you click Time. The opening page of this pop-up is your time card.
- If your time card does not automatically appear, use the widget bar on the right-hand side of the pop-up window.
- Click My Timecard to access your time card.
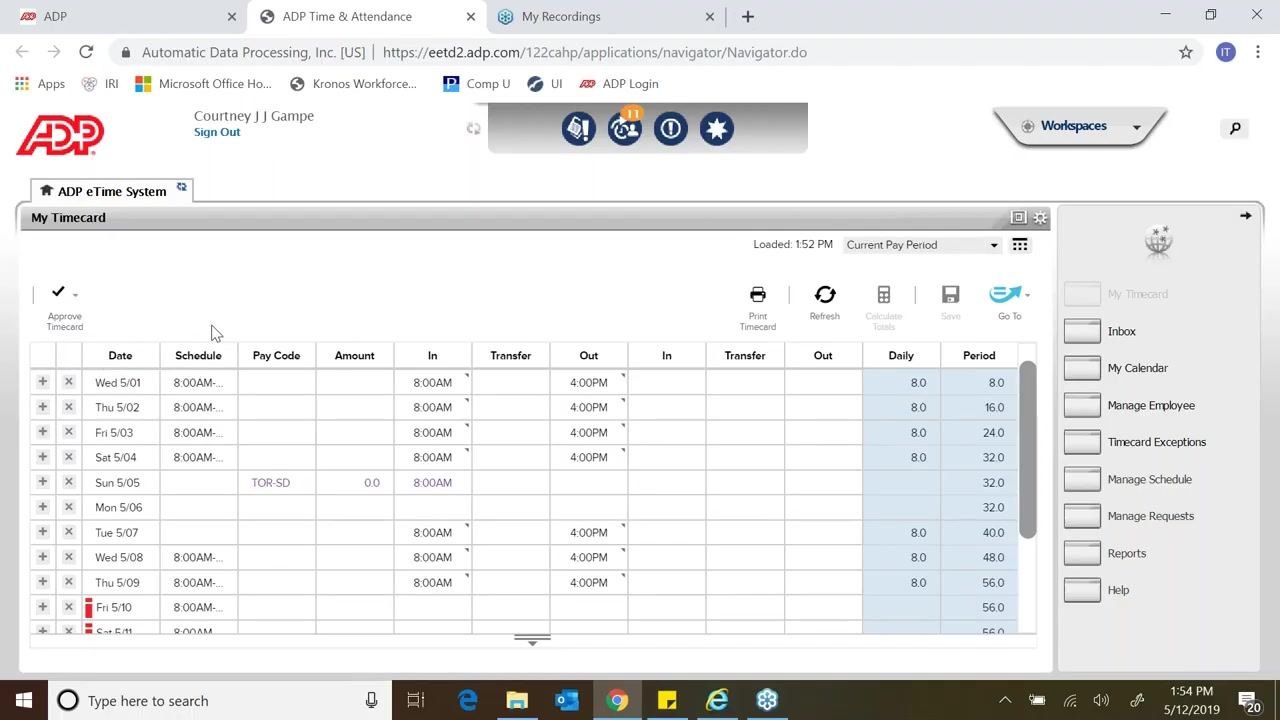
- Your time card defaults to the Current Pay Period.
Reviewing a different pay period
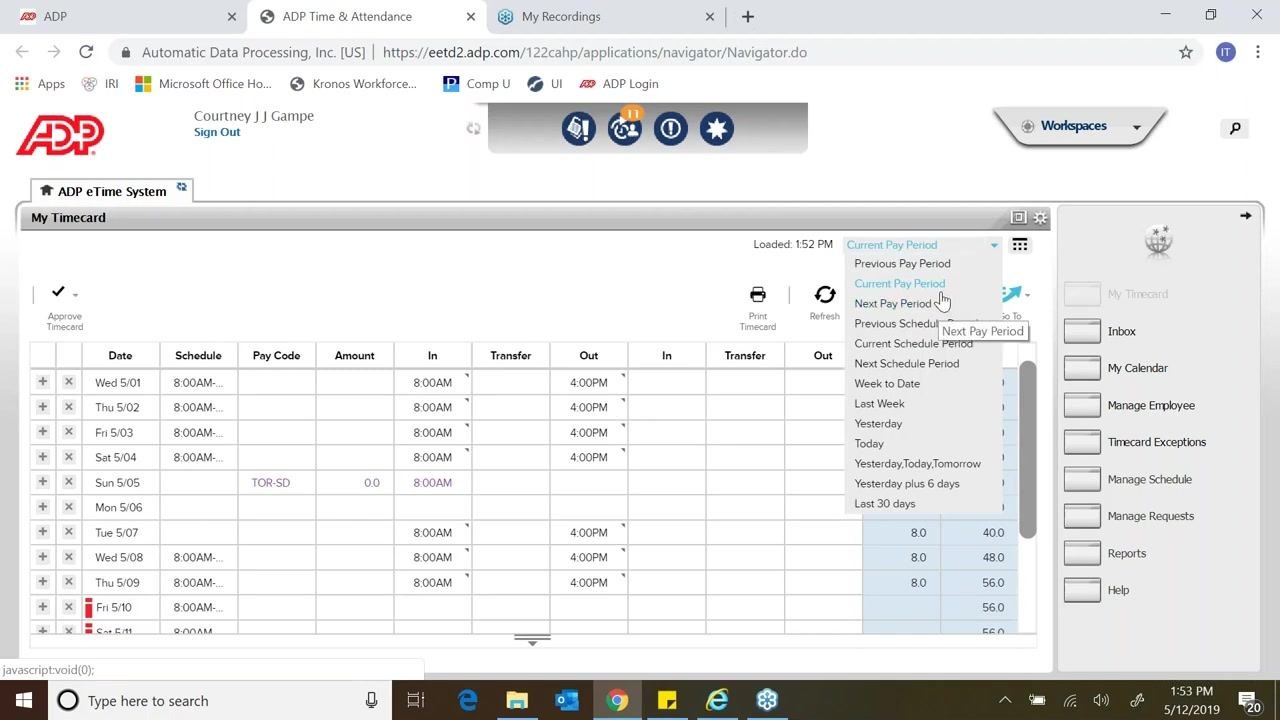
To review past, current, or upcoming pay periods, use the pay period selector in your time card window.
- Locate the dropdown menu in the upper right corner of the My Timecard window, labeled "Current Pay Period."
- Click the dropdown arrow to open the list of available periods.
- Select from options such as Previous Pay Period, Current Pay Period, Next Pay Period, or use custom date ranges.
Selecting a custom date range
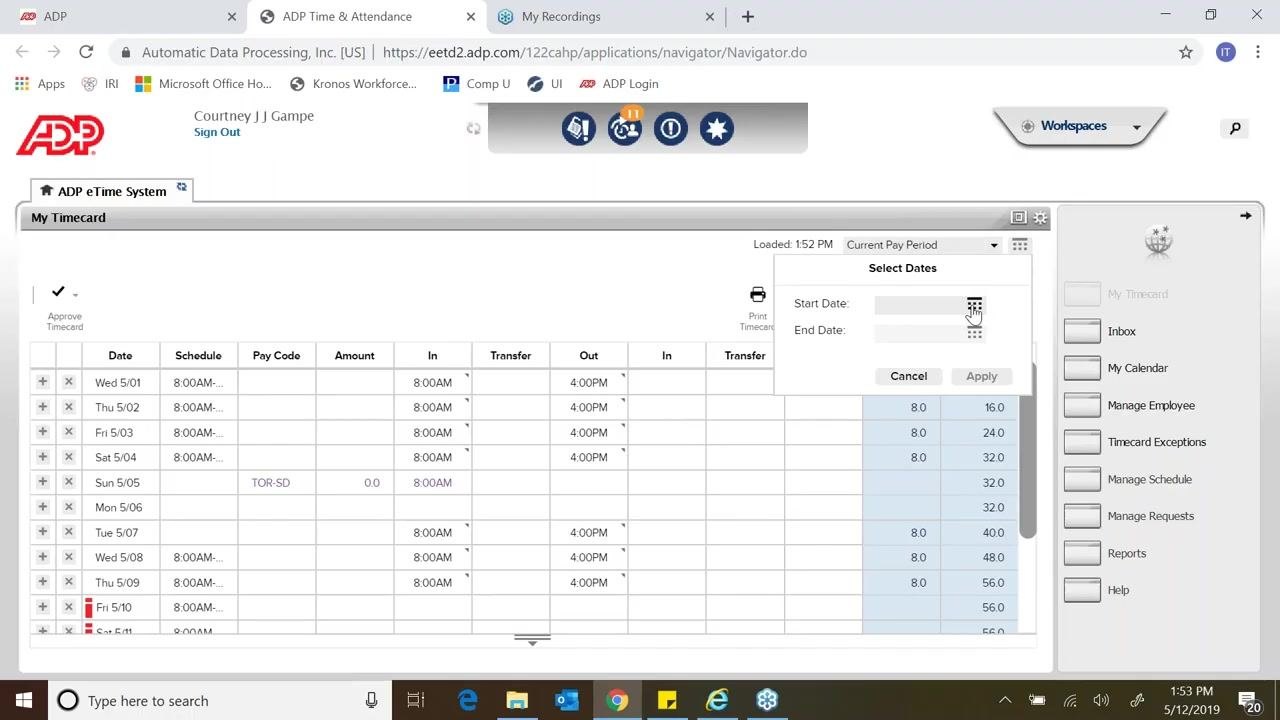
If you need to review a specific set of dates, you can set a custom range instead of using the preset periods.
- Click the calendar icon next to the "Start Date" and "End Date" fields in the "Select Dates" pop-up.
- Enter or select your desired start and end dates.
- Click Apply to view your time card for the selected period.
Reviewing your time card for accuracy
At the end of each pay period (which end on the 15th and the last day of the month), you are required to review your time card thoroughly.
- Confirm that all punches (in and out times) are accurate.
- Make sure there are no missed punches or errors.
It is strongly recommended that you review your time card regularly rather than only at the end of the pay period:
- Check your time card at least every other day, and at a minimum, once a week.
- This helps you catch and submit any missed punches early for correction by your Director of Rehab (DOR).
- Regular review prevents a backlog of missed punch requests at the end of the pay period, making the process easier for both you and your DOR.
How to approve timecards in ADP
Once you have confirmed that all entries on your time card are correct, you can submit your approval.
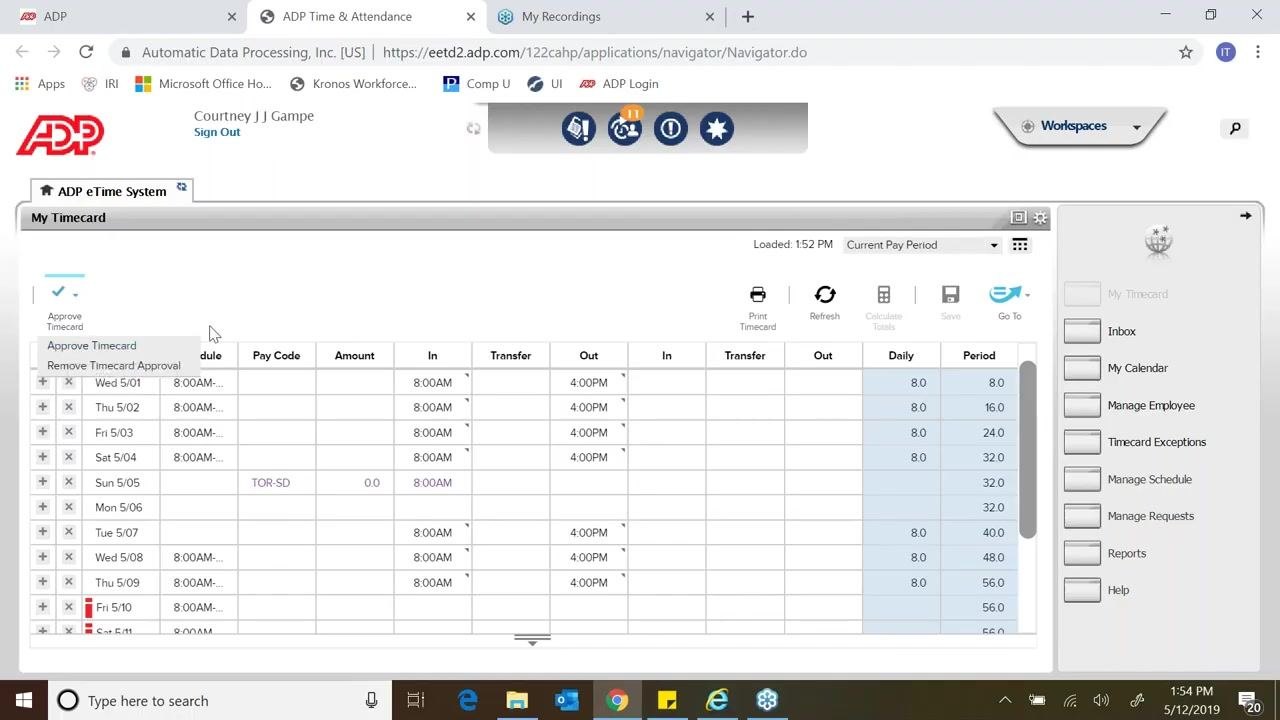
- Go to the upper left corner of the My Timecard window.
- Click the Approve Timecard checkmark icon.
- In the dropdown, select Approve Timecard to finalize your approval.
If you notice any missed punches or errors before approving, submit the necessary corrections as soon as possible to your DOR for easy correction. Timely and regular review of your time card ensures accuracy and reduces administrative workload for your supervisors.
Getting additional help and support
If you have any questions or encounter issues with the ADP time card process, reach out for support.
- Contact your Director of Rehab (DOR) for direct assistance.
- Alternatively, contact your Regional Mentor for further guidance.
Do not hesitate to ask for clarification or support if you are unsure about any step in the process. Prompt communication ensures your time card is accurate and submitted on time.
Summary
Knowing how to approve timecards in ADP, review different pay periods, and catch errors early helps ensure your time card is accurate and submitted on time. Regular review, combined with prompt communication with your DOR or Regional Mentor when issues arise, keeps payroll processing running smoothly for you and your team.
Generation details: cost, quality tiers
Docsie billed 2,000 credits ($1.40) to analyze this 4-minute video at standard quality. The rewrite, template fill and Word/PDF exports were included. The same video at each quality tier:
| Quality | Frames sampled | Credits | Approx. cost |
|---|---|---|---|
| Draft | every 16-30 s | 1,000 | $0.70 |
| Standard (this guide) | every 8-15 s | 2,000 | $1.40 |
| Detailed | every 4-7 s | 4,000 | $2.80 |
| Ultra | every 1-3 s | 8,000 | $5.60 |
Credits priced at $0.70 per 1,000; plans include a monthly allowance. Enterprise customers on on-premise or bring-your-own-model deployments run this on their own inference and pay no per-video credits.
Generated by Docsie Video-to-Docs on 2026-10-06 from a 3-minute video. Screenshots are frames from the source video and belong to their creator, interface rehab, whose original is embedded above. If you own this video and want the guide removed or credited differently, contact us and we will act within one business day.