
How to Delete SharePoint Site in SharePoint
Knowing how to delete a SharePoint site is essential for managing your organization's Microsoft 365 environment, whether you're cleaning up unused team sites or decommissioning a project space. This guide walks you through four different methods for deleting a SharePoint site—directly in SharePoint, through the SharePoint Admin Center, through the Microsoft 365 Admin Center, and using PowerShell—along with a bonus tip on restoring a site you delete by mistake.
Video: How to Delete a SharePoint Site (2024) by Business Tech Planet (2023). All credit for the demonstration goes to the creator; watch the original on YouTube. The written guide below was generated from this video by Docsie. Creator? Request a change or removal.
Knowing how to delete a SharePoint site is essential for managing your organization's Microsoft 365 environment, whether you're cleaning up unused team sites or decommissioning a project space. This guide walks you through four different methods for deleting a SharePoint site—directly in SharePoint, through the SharePoint Admin Center, through the Microsoft 365 Admin Center, and using PowerShell—along with a bonus tip on restoring a site you delete by mistake.
Prerequisites
Before you delete a SharePoint site, confirm the following:
- You must be a site owner or an administrator (specifically a global or site collection admin) to delete a SharePoint site.
- Administrators can delegate site deletion permissions to other users if needed.
- Deleting a site affects all associated resources and groups, so confirm you have the right target before proceeding.
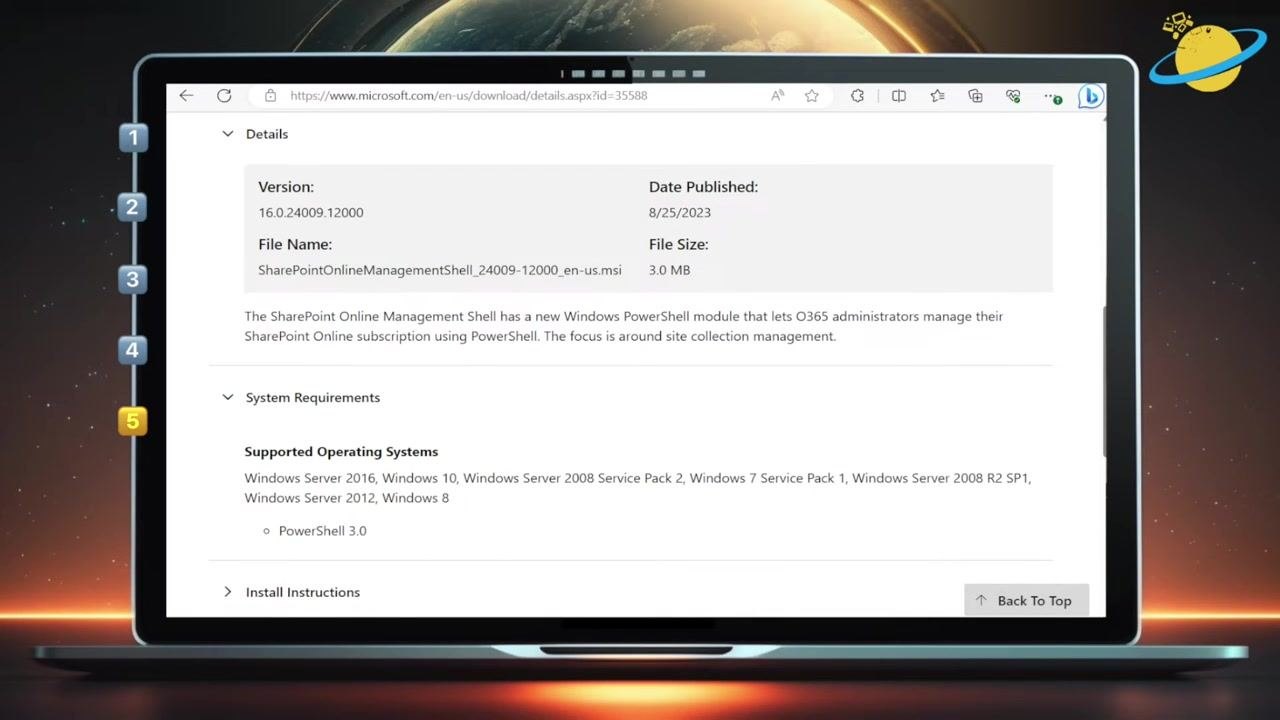
- For the PowerShell method, you need the SharePoint Online Management Shell installed on a supported operating system with PowerShell 3.0 or higher.
Method 1: Delete a SharePoint site directly in SharePoint
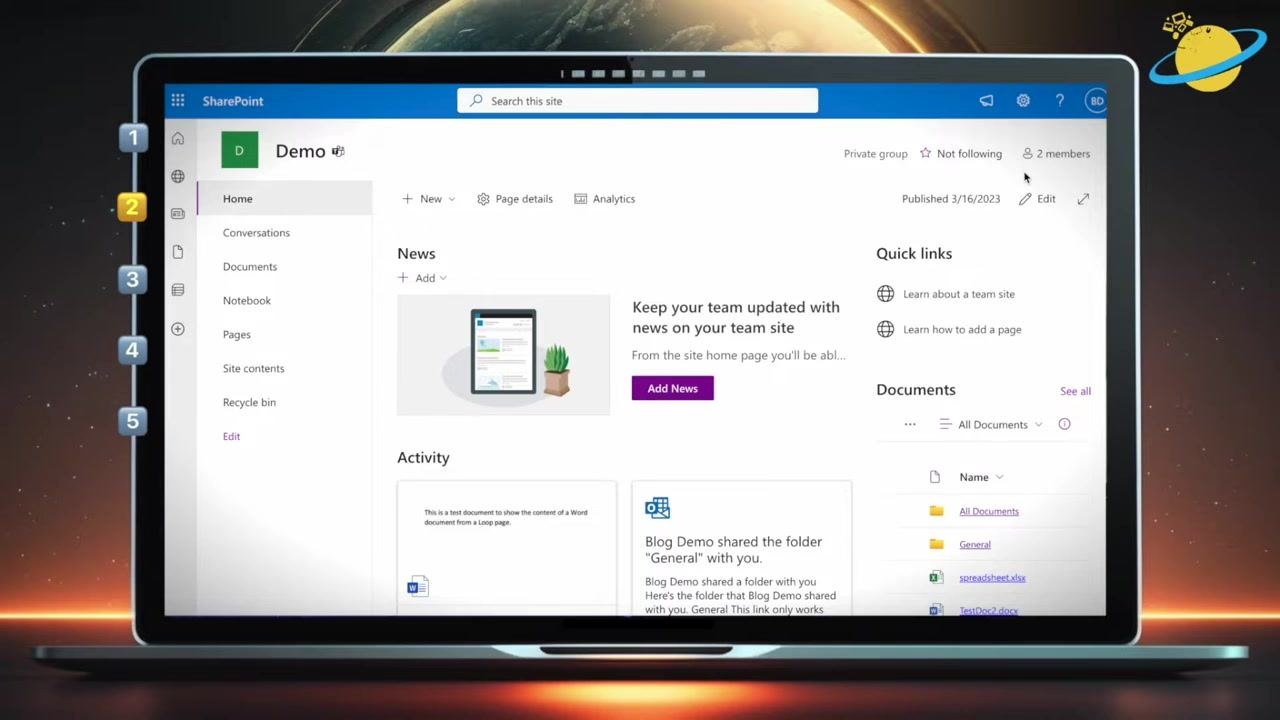
- Navigate to the SharePoint site you want to delete.
-
Click the gear icon located in the top right corner of the site.
-
Select Site information from the drop-down menu.
- Scroll down and click Delete site.
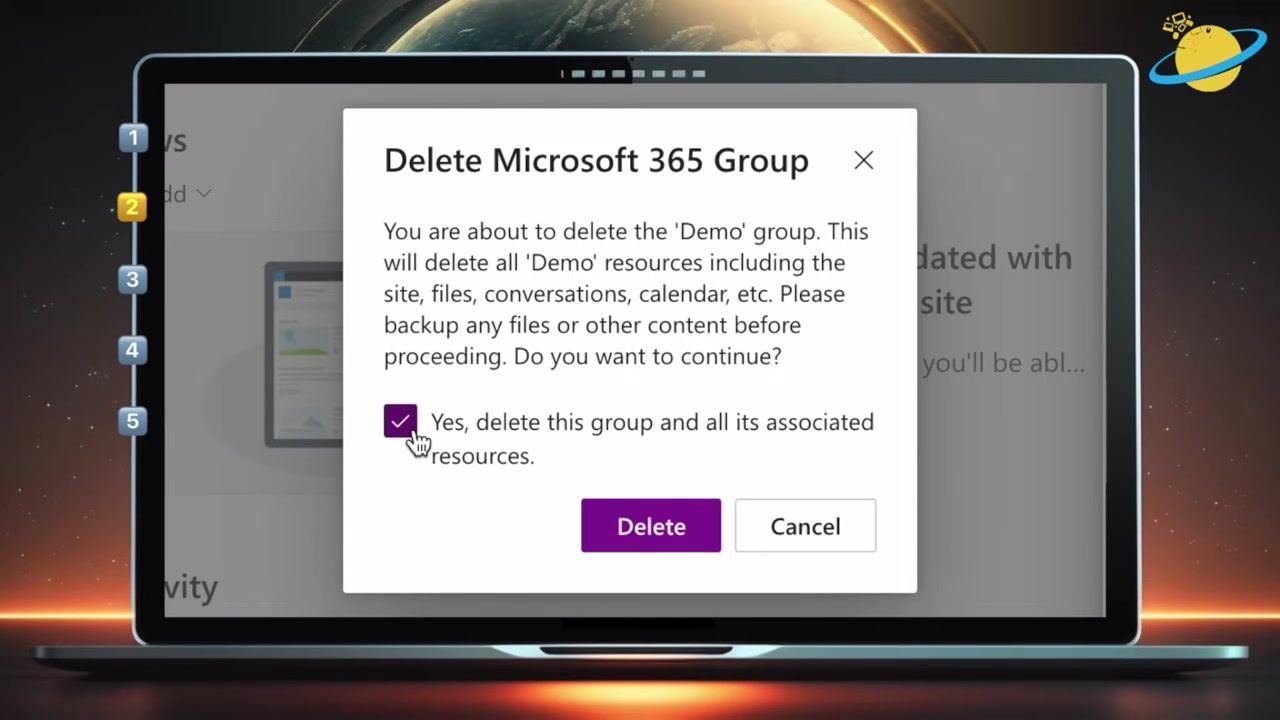
- In the dialog box that appears, check the box labeled Yes, delete this group and all its associated resources.
- Click the Delete button to confirm the deletion.
Method 2: Delete a SharePoint site in the SharePoint Admin Center
- Go to Microsoft365.com and sign in with your admin credentials.
-
Click Admin on the left sidebar, or use the App Launcher (grid icon in the top left) to select Admin from the list of apps.
-
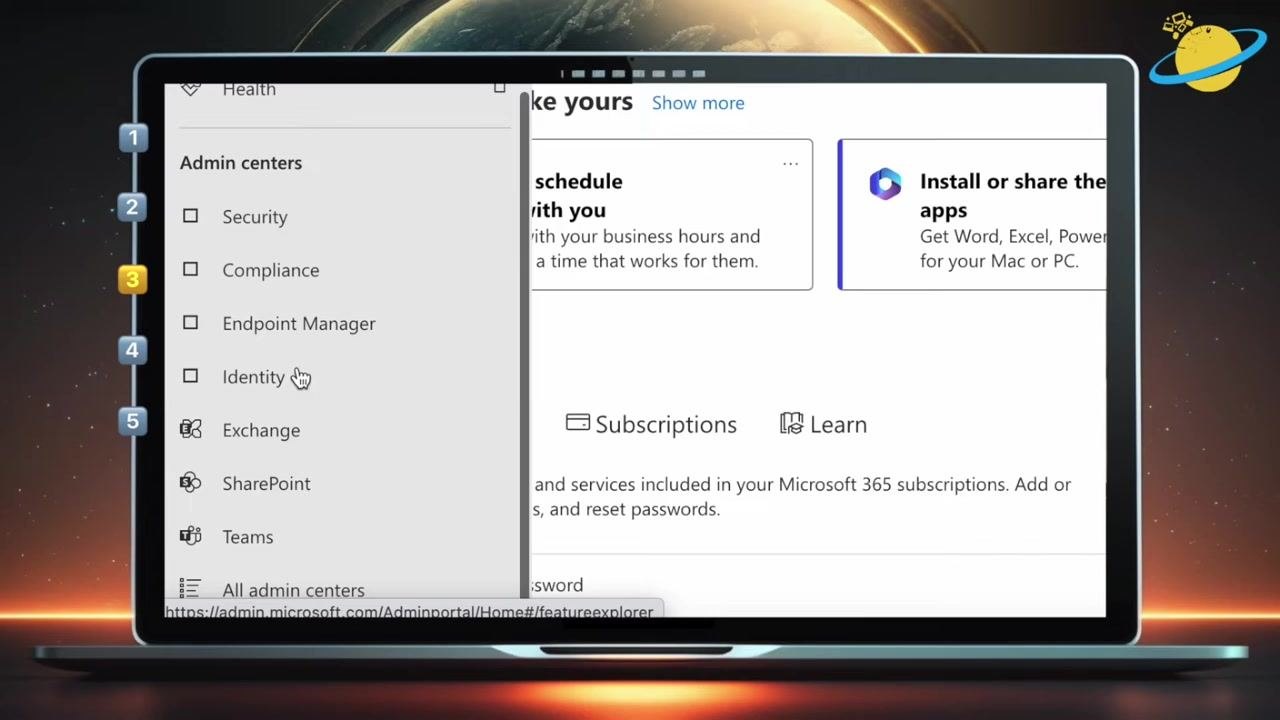
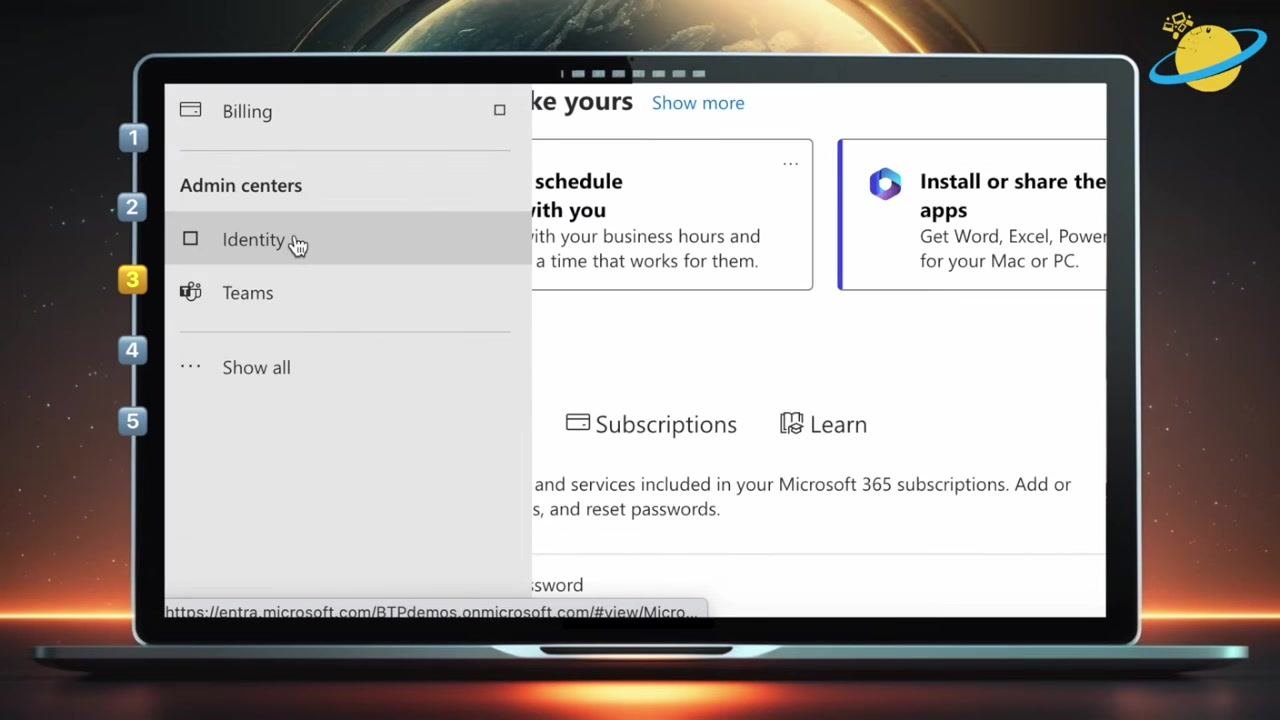
In the Admin Center, click the menu icon in the top left, scroll down, and click Show all to expand the full list of admin centers.
-
Open the left navigation menu and scroll to the Admin centers section, then select SharePoint from the list.
-
In the SharePoint Admin Center, click Active sites under the Sites tab on the left menu.
-
Locate the site you want to delete and select it by clicking the radio button next to its name (for example, "Marketing Team").
-
Click the three-dot ellipsis at the top menu and select Delete from the dropdown.
-
In the confirmation window that appears, click the Delete button to confirm.
Method 3: Delete a SharePoint site in the Microsoft 365 Admin Center
- Go to Microsoft365.com and sign in with your admin credentials.
- On the left menu, select Admin to open the Microsoft 365 Admin Center.
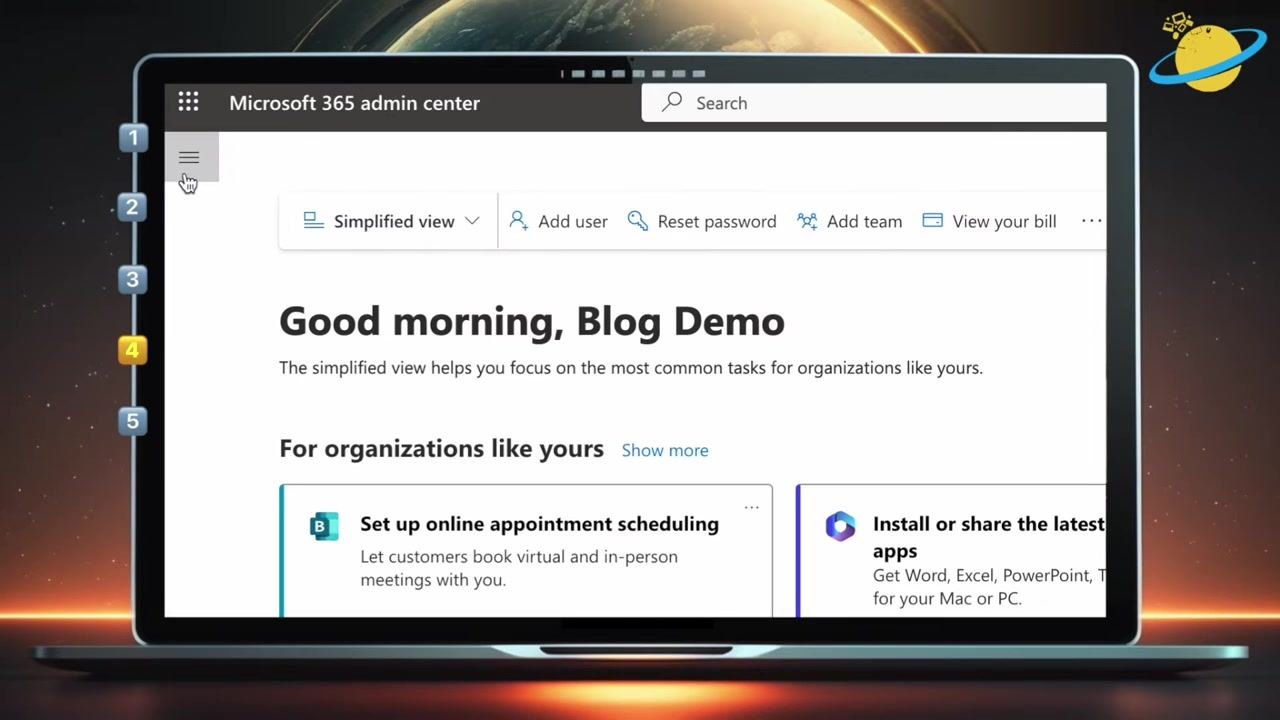
- Click the menu icon (three horizontal lines) in the top left to expand the navigation pane.
-
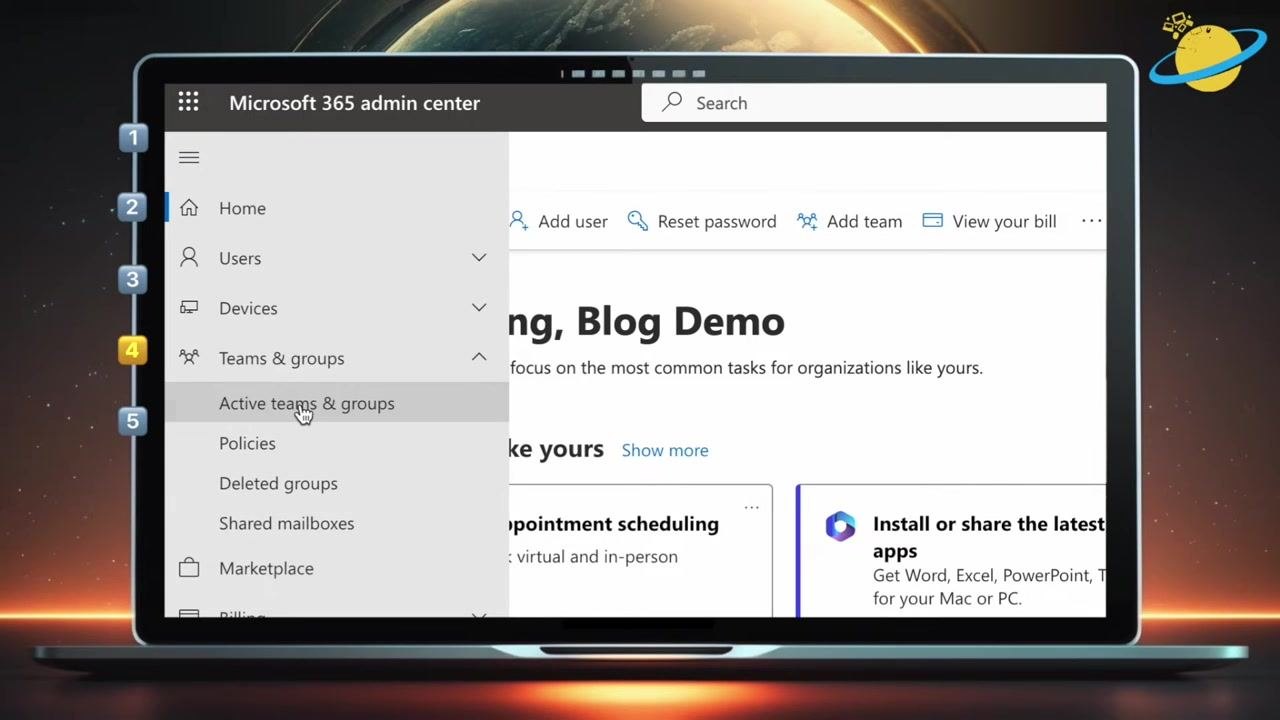
In the expanded menu, go to Teams & groups and select Active teams & groups.
-
Locate and click the site (team or group) you want to delete, for example "Marketing Team."
-
In the flyout pane that appears on the right, click Delete at the top.
-
In the confirmation dialog, click the Delete team button to finalize the deletion.
Method 4: Delete a SharePoint site using PowerShell
Install the SharePoint Online Management Shell
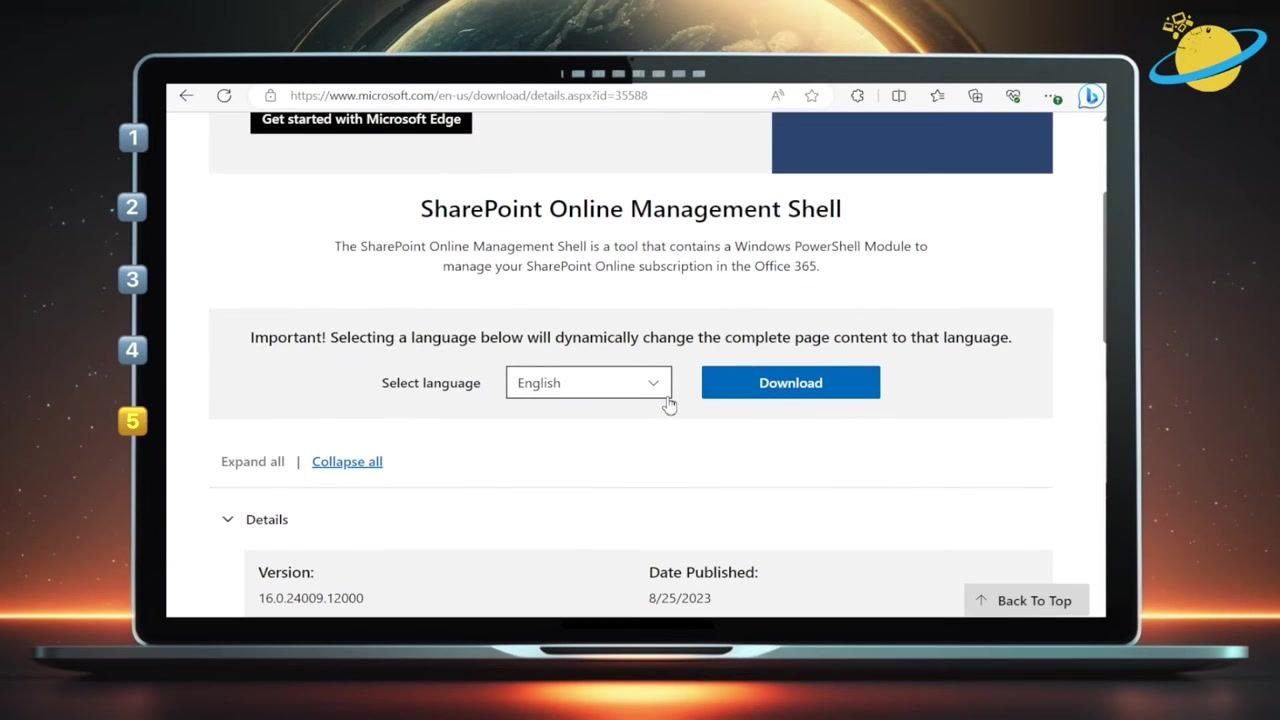
- Confirm your system meets the requirements: supported operating systems include Windows Server 2016, Windows 10, Windows Server 2008 Service Pack 2, Windows 7 Service Pack 1, Windows Server 2012, and Windows 8, and PowerShell 3.0 or higher is required.
-
On the download page, select your preferred language from the dropdown and click the Download button to download the installer.
-
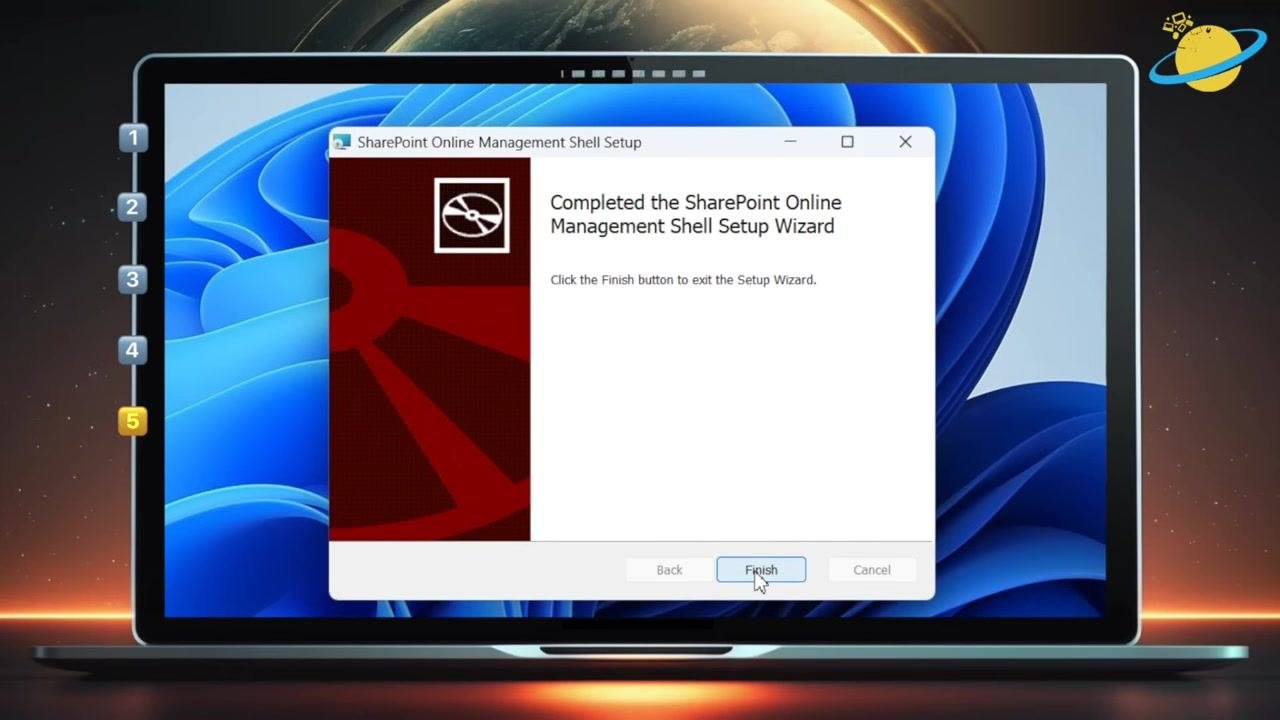
Run the installer and follow the on-screen instructions. When the setup wizard displays "Completed the SharePoint Online Management Shell Setup Wizard," click Finish to exit the installer.
Connect to SharePoint and Azure AD
-
Open PowerShell as an administrator: click the Windows search bar, type
PowerShell, right-click Windows PowerShell in the results, and select Run as administrator. -
Open your browser and navigate to your SharePoint site, then copy the site address (URL) up to your tenant name, before
.sharepoint.com. - In the PowerShell window, type the connection command, using the left arrow key to place your cursor at the end of your tenant name (just before
.sharepoint.com) so you can insert-admin:
   Connect-SPOService -url https://[your-tenant]-admin.sharepoint.com
   ```

4. Press **Enter** to run the command. You will be prompted to sign in with your admin account.

5. Install the Azure AD PowerShell module by typing the following command and pressing **Enter**:
Install-Module -Name AzureAD ```
- Connect to Azure AD by typing the following command, pressing Enter, and signing in again with your admin credentials:
Connect-AzureAD
```
7. After signing in, verify your connection. PowerShell displays your account, environment, tenant ID, and tenant domain information.
<figure><img src="/assets/tutorials/sharepoint/delete-sharepoint-site/step-11.jpg" alt="The Windows search menu is open with "powershell" typed in the search bar. "Windows PowerShell" is selected, and options include Open, Run as administrator, Open file location, Pin to Start, and Pin to taskbar." loading="lazy" width="1280" height="720"><figcaption>The Windows search menu is open with "powershell" typed in the search bar. "Windows PowerShell" is selected, and options include Open, Run as administrator, Open file location, Pin to Start, and Pin to taskbar.</figcaption></figure>
<figure><img src="/assets/tutorials/sharepoint/delete-sharepoint-site/step-12.jpg" alt="The Administrator: Windows PowerShell window is open. The command "Connect-SPOService -url" is being typed." loading="lazy" width="1280" height="720"><figcaption>The Administrator: Windows PowerShell window is open. The command "Connect-SPOService -url" is being typed.</figcaption></figure>
<figure><img src="/assets/tutorials/sharepoint/delete-sharepoint-site/step-13.jpg" alt="The Administrator: Windows PowerShell window shows the full command: "Connect-SPOService -url https://btpdemos-admin.sharepoint.com"." loading="lazy" width="1280" height="720"><figcaption>The Administrator: Windows PowerShell window shows the full command: "Connect-SPOService -url https://btpdemos-admin.sharepoint.com".</figcaption></figure>
<figure><img src="/assets/tutorials/sharepoint/delete-sharepoint-site/step-14.jpg" alt="The Administrator: Windows PowerShell window shows the command executed and waiting for the next input." loading="lazy" width="1280" height="720"><figcaption>The Administrator: Windows PowerShell window shows the command executed and waiting for the next input.</figcaption></figure>
<figure><img src="/assets/tutorials/sharepoint/delete-sharepoint-site/step-15.jpg" alt="The Administrator: Windows PowerShell window shows the command "Install-Module -Name AzureAD" being typed." loading="lazy" width="1280" height="720"><figcaption>The Administrator: Windows PowerShell window shows the command "Install-Module -Name AzureAD" being typed.</figcaption></figure>
### Delete the Microsoft 365 group and the SharePoint site
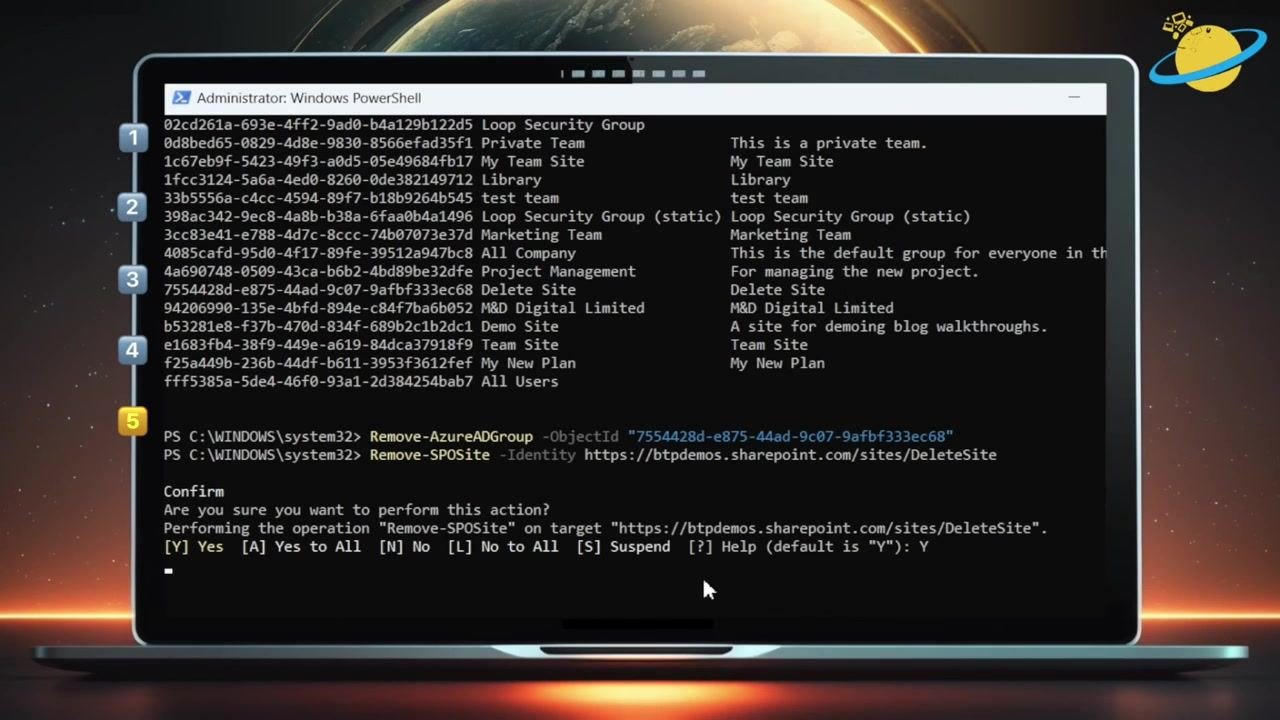
1. Retrieve the group ID for your SharePoint site by typing the following command and pressing **Enter**:
Get-AzureADGroup ```
This lists all Azure AD groups so you can identify the one associated with your SharePoint site. Review the output columns ObjectId, DisplayName, and Description to find the correct group, and note its ObjectId.
- Remove the Azure AD group using its
ObjectId:
   Remove-AzureADGroup -ObjectId "7554428d-e875-44ad-9c07-9afbf333ec68"
   ```

3. Remove the associated SharePoint Online site:
Remove-SPOSite -Identity https://btpdemos.sharepoint.com/sites/DeleteSite ```
You will be prompted to confirm the action. Type Y and press Enter to proceed.
- If you see an error stating the site belongs to a Microsoft 365 group, this may occur even after deleting the group, due to a synchronization delay. The error message reads:
Remove-SPOSite : This site belongs to a Microsoft 365 group. To delete the site, you must delete the group.
- Wait for synchronization to complete. It may take some time for the group and site deletion to take effect across Microsoft 365 services. Check the SharePoint site periodically to confirm removal.
Key commands used:
- Get-AzureADGroup
- Remove-AzureADGroup -ObjectId "<ObjectId>"
- Remove-SPOSite -Identity "<SiteURL>"
If you see the error about the site belonging to a Microsoft 365 group after deleting the group, wait and retry the site deletion after some time. This is typically caused by backend synchronization delays.
Bonus tip: Restoring a deleted SharePoint site
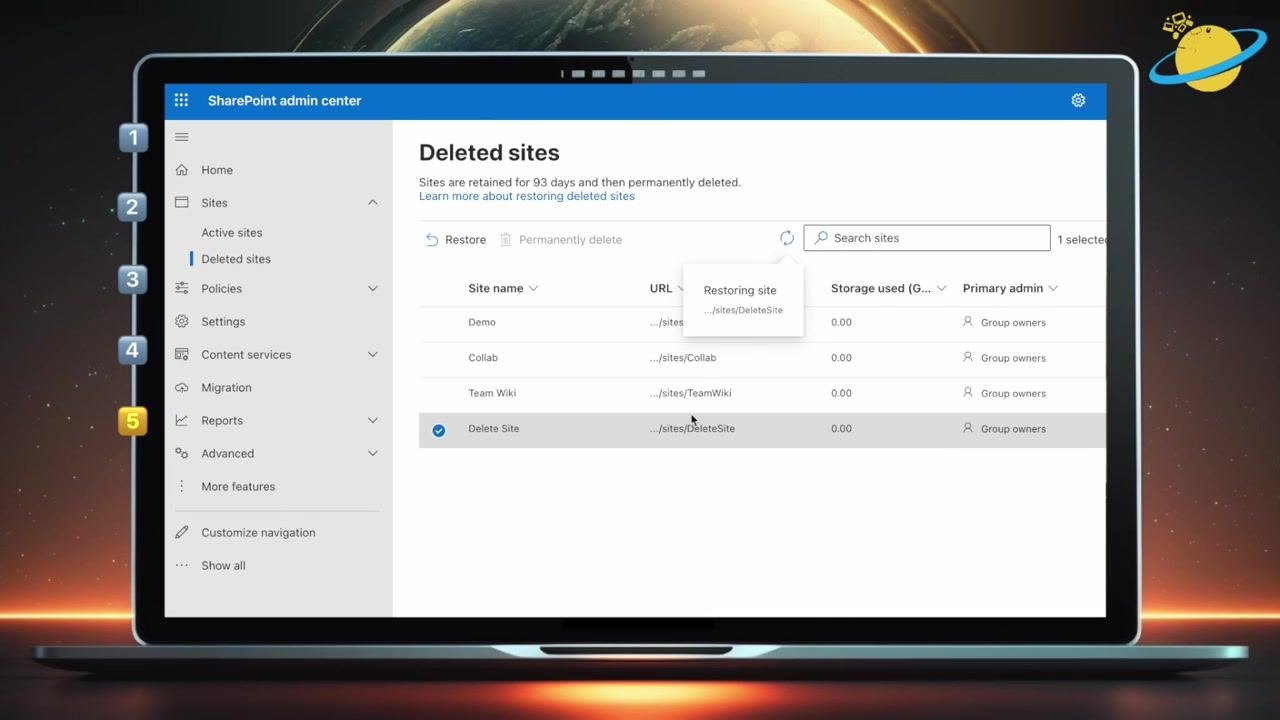
If you have accidentally deleted a SharePoint site, you can restore it within 93 days of deletion using the SharePoint Admin Center.
-
Navigate to the SharePoint Admin Center in your browser and make sure you are signed in with the necessary admin credentials. The dashboard shows options such as Home, Sites, Policies, and Settings in the left navigation pane, along with widgets like "Site search" and "Service health."
-
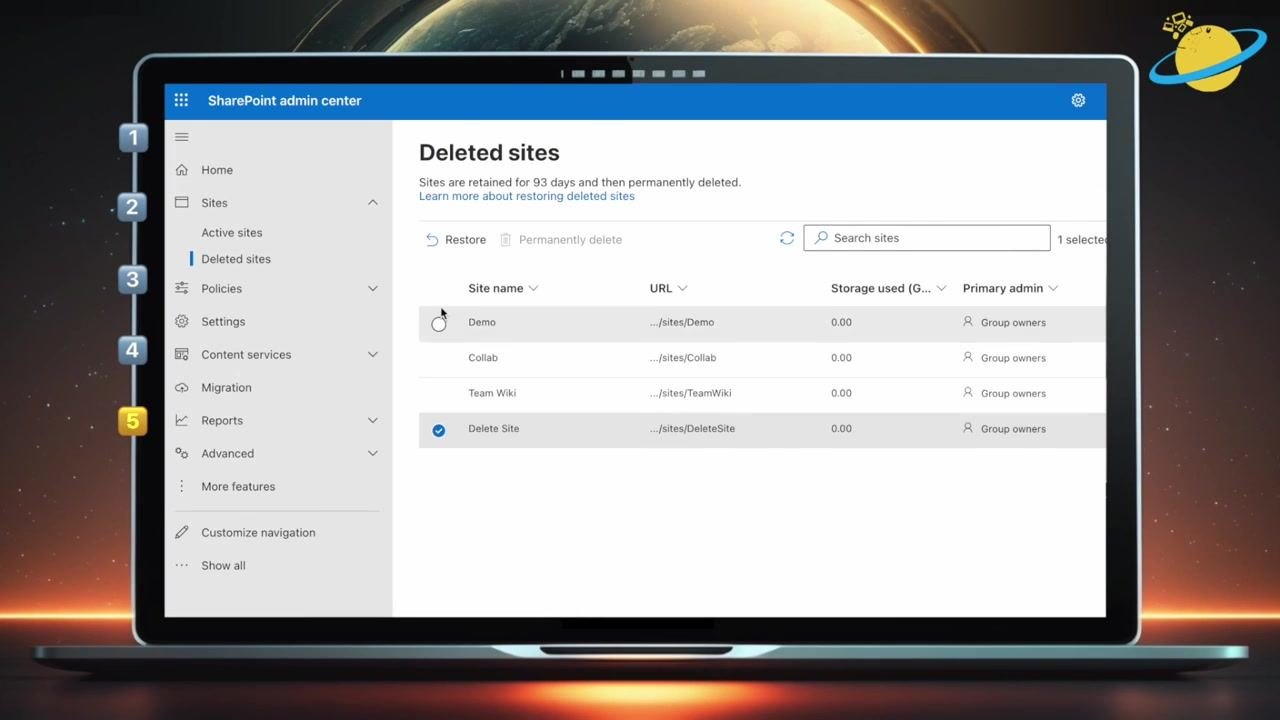
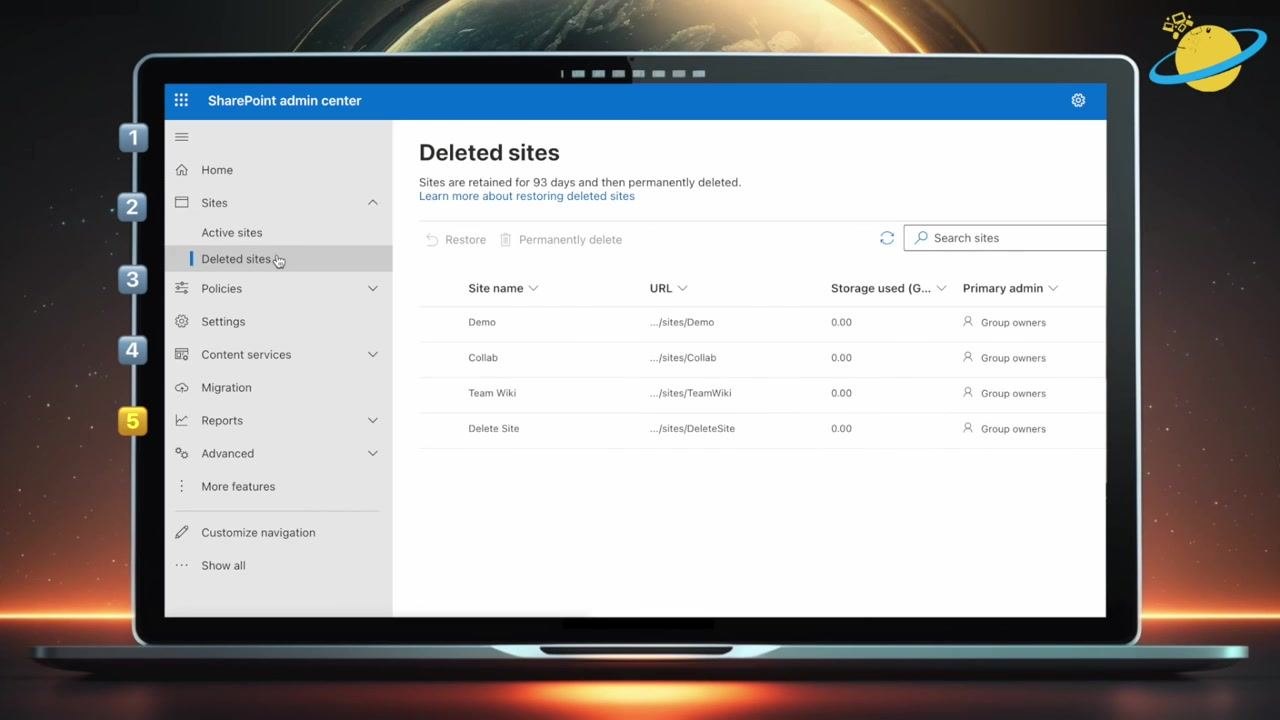
In the left navigation pane, expand the Sites section and click Deleted sites. The main panel lists all sites deleted within the last 93 days, with columns for site name, URL, storage used, and primary admin.
-
Locate the site you want to restore (for example, "Delete Site" with URL .../sites/DeleteSite) and click the radio button next to its name. The Restore button at the top becomes active.
-
Click Restore at the top of the deleted sites list. A progress indicator, such as "Restoring site .../sites/DeleteSite," appears while the process completes.
-
Once the process is complete, check the Active sites list to confirm the site has been restored and is accessible to users as before.
Note: Sites can only be restored within 93 days of deletion. After this period, they are permanently deleted and cannot be recovered. If you do not see your site in the "Deleted sites" list, verify the deletion date or contact Microsoft support.
Summary
There are four ways to delete a SharePoint site: directly in SharePoint, through the SharePoint Admin Center, through the Microsoft 365 Admin Center, or using PowerShell. Site owners and administrators can perform this action, and admins can delegate the permission to other users when needed. Because deleting a site removes its associated group and resources, always confirm you're targeting the right site before you proceed—and remember that you have a 93-day window to restore a site if you delete it by mistake.
Generation details: cost, quality tiers
Docsie billed 4,000 credits ($2.80) to analyze this 8-minute video at standard quality. The rewrite, template fill and Word/PDF exports were included. The same video at each quality tier:
| Quality | Frames sampled | Credits | Approx. cost |
|---|---|---|---|
| Draft | every 16-30 s | 2,000 | $1.40 |
| Standard (this guide) | every 8-15 s | 4,000 | $2.80 |
| Detailed | every 4-7 s | 8,000 | $5.60 |
| Ultra | every 1-3 s | 16,000 | $11.20 |
Credits priced at $0.70 per 1,000; plans include a monthly allowance. Enterprise customers on on-premise or bring-your-own-model deployments run this on their own inference and pay no per-video credits.
Generated by Docsie Video-to-Docs on 2026-09-10 from a 7-minute video. Screenshots are frames from the source video and belong to their creator, Business Tech Planet, whose original is embedded above. If you own this video and want the guide removed or credited differently, contact us and we will act within one business day.