
How to Create Care Plans in PointClickCare
This guide explains how to create care plans in PointClickCare, covering how to access a resident's record, interpret the Focus, Goals, and Interventions/Tasks columns, add new focuses, resolve and personalize existing items, print and search the care plan, and complete care plan reviews.
Video: How to Access & Update a Care Plan in PointClickCare 2026 by Charting Made Easy (2026). All credit for the demonstration goes to the creator; watch the original on YouTube. The written guide below was generated from this video by Docsie. Creator? Request a change or removal.
This guide explains how to create care plans in PointClickCare, covering how to access a resident's record, interpret the Focus, Goals, and Interventions/Tasks columns, add new focuses, resolve and personalize existing items, print and search the care plan, and complete care plan reviews.
Prerequisites
- You need an active PointClickCare login with access to the correct facility.
- You need permissions to view and edit resident clinical records.
- You should confirm you are working in the correct facility before making any changes.
Accessing and editing a resident care plan
Log in and access the dashboard
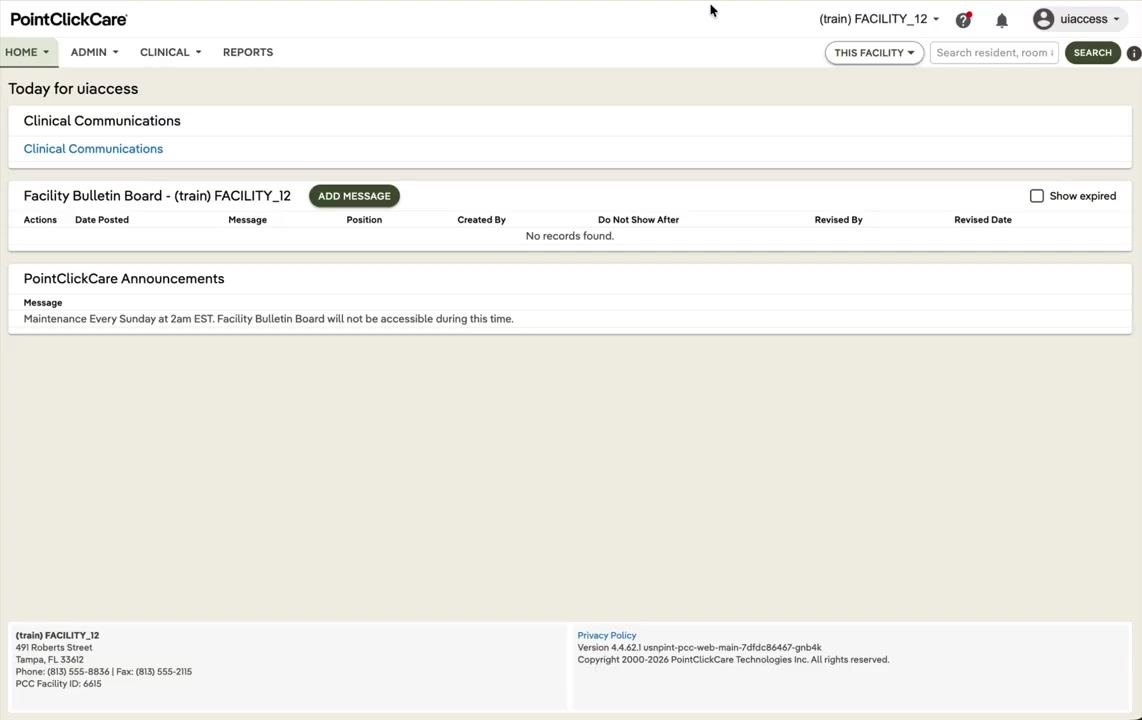
After logging in, you land on the main dashboard. The dashboard displays sections such as Clinical Communications, Facility Bulletin Board, and PointClickCare Announcements. Confirm you are in the correct facility (for example, (train) FACILITY_12) before proceeding.
Navigate to the clinical residents list
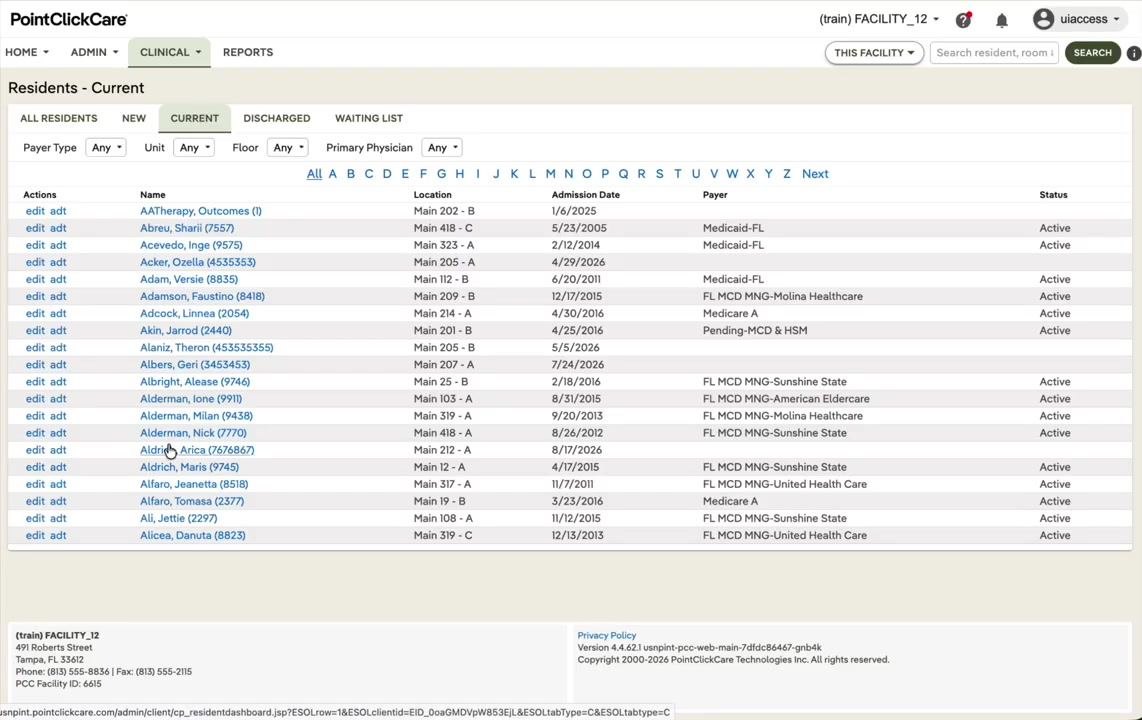
Go to the top menu and select the CLINICAL tab, then click Residents to view the list of current residents. The resident list includes columns for Actions, Name, Location, Admission Date, Payer, and Status. Use the available filters if you need to narrow the list by unit, floor, or physician.
Select the resident
Locate the resident you want to view, for example "Aldrich, Arica (7676867)." Click the resident's name or the edit link next to their name to open their profile.
Open the Care Plan tab
In the resident's profile, navigate to the CARE PLAN tab among the other options (DASH, PROFILE, CENSUS, and so on). This section displays the Date Initiated, Next Review Date, Created By and Revised By fields, and a Review History table with Start Date, Target Completion Date, and Completed Date. You can view, print, or edit the care plan directly from this screen.
Open the care plan for editing
Click the edit button to open the care plan for editing. The Care Plan Detail screen appears, showing the full structure of the care plan.
Read and interpret the care plan
Review each focus area to understand the resident's needs. Read the associated goals to see what the care team is aiming to achieve, and examine the interventions and tasks to know what actions are required from staff.
By following these steps, you can access, read, and begin editing a resident's care plan. The next sections cover how to interpret each column and make specific edits.
Understanding the care plan columns
This section explains how to interpret the three main columns of the care plan: Focus, Goals, and Interventions/Tasks. It also clarifies the difference between interventions and tasks, and how to evaluate goals.
Focus column
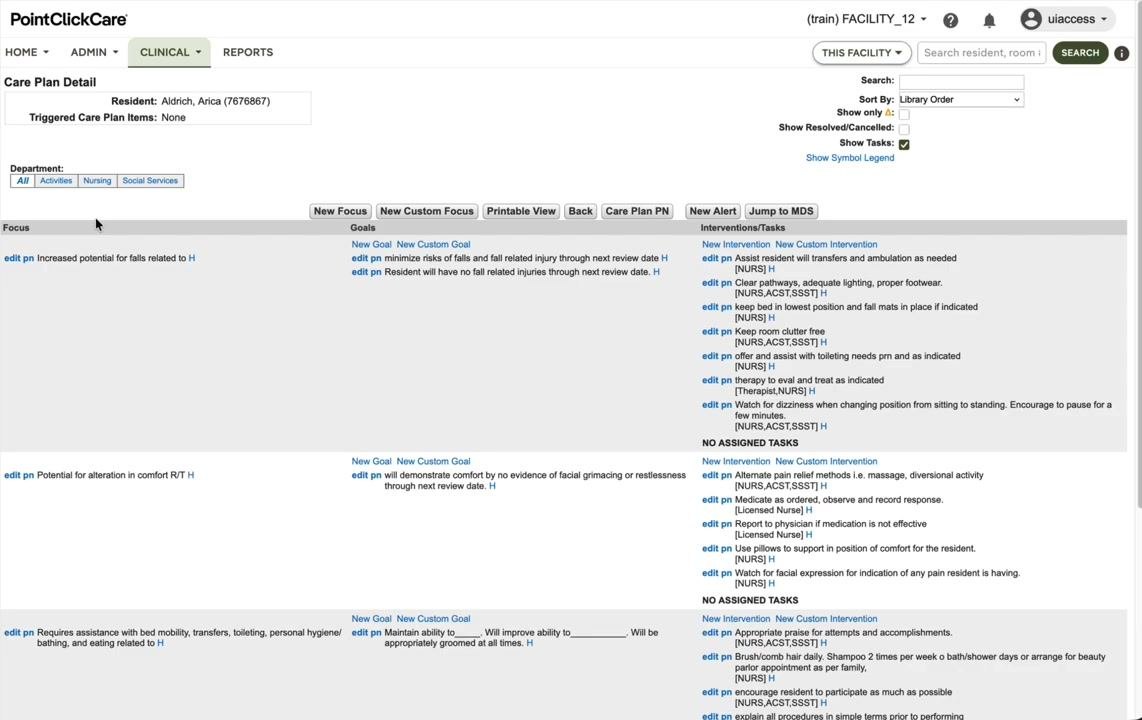
The Focus column lists the resident's primary problems or needs. For example, "Increased potential for falls related to H" indicates the resident is at higher risk of falling due to their health status. The focus statement is a concise description of the problem being addressed.
Goals column
Each focus area contains one or more Goals. Goals describe what you expect for the resident by the next review date, and they should be measurable so you can determine at the next review whether the goal was achieved. Example goals include:
- "Minimize risks of falls and fall related injury through next review date."
- "Resident will have no fall related injuries through next review date."
In long-term care, goals often focus on maintenance — preventing decline or incidents — rather than improvement. Success or failure is determined by whether the outcome occurred; for example, if the resident had a fall, the goal was not met.
Interventions/Tasks column
The Interventions/Tasks column details what staff should do to address the focus.
- Interventions are specific instructions for staff, written so anyone could follow them, even if unfamiliar with the resident. Examples include "Assist resident with transfers and ambulation as needed" and "Provide floor mats to resident to help prevent injury."
- Tasks are interventions with a schedule and a documentation prompt, such as "Place floor mat next to resident bed and sign off when completed."
In the care plan, you will usually see interventions, and sometimes tasks. Tasks are actionable items that require staff to document completion.
Example focus entry
- Focus: Increased potential for falls related to H
- Goals:
- Minimize risks of falls and fall related injury through next review date.
- Resident will have no fall related injuries through next review date.
- Interventions/Tasks:
- Assist resident with transfers and ambulation as needed.
- Clear pathways, adequate lighting, proper footwear.
- Keep bed in lowest position and all falls in place if indicated.
- Keep room clutter free.
- Offer and assist with toileting needs per plan and as indicated.
- Therapy to evaluate and treat as indicated.
- Watch for dizziness when changing position from sitting to standing. Encourage to pause for a few minutes.
When reviewing a care plan, read each focus area to understand the resident's risks or needs. Review the goals to know what outcomes are being targeted and how success is measured. Follow the interventions and tasks as written, ensuring all actions are completed and documented as required.
By understanding the structure and intent of each column, you can accurately interpret and implement the resident's care plan, ensuring all care actions are purposeful and measurable.
Adding a new focus to the care plan
This section explains the difference between interventions and tasks, introduces the cardex, and shows how to add a new focus to a resident's care plan. It also clarifies the distinction between a custom focus and a focus selected from the care plan library.
Interventions versus tasks
Interventions are general guidelines for staff, such as "Keep bed in lowest position and fall mats in place if indicated" or "Clear pathways, get rid of clutter." Interventions provide overall guidance on what needs to be done for the resident, while tasks are specific, scheduled actions that require documentation upon completion.
Understanding the cardex
The cardex is a summary tool where staff can quickly view care instructions. All tasks appear on the cardex, and some interventions may also appear there.
Two ways to add a focus
The care plan is structured as a text document with columns for Focus, Goals, and Interventions/Tasks. You can add a new focus in two ways:
- New Custom Focus: Enter a free-form statement specific to the resident.
- Library Focus: Select from a preset list of focuses, goals, and interventions created by your facility administrator.
Adding a custom focus
Click the New Custom Focus button to open the custom focus entry window. In the Custom Focus Statement window:
- Confirm the resident's name and ID at the top.
- Ensure the status is set to Active.
- Enter the Date Initiated (for example, 8/18/2026).
- Type your custom focus statement in the Description field.
- Optionally, assign review departments and dates as needed.
- Click Save or Save & New to add the custom focus to the care plan.
Adding a focus from the library
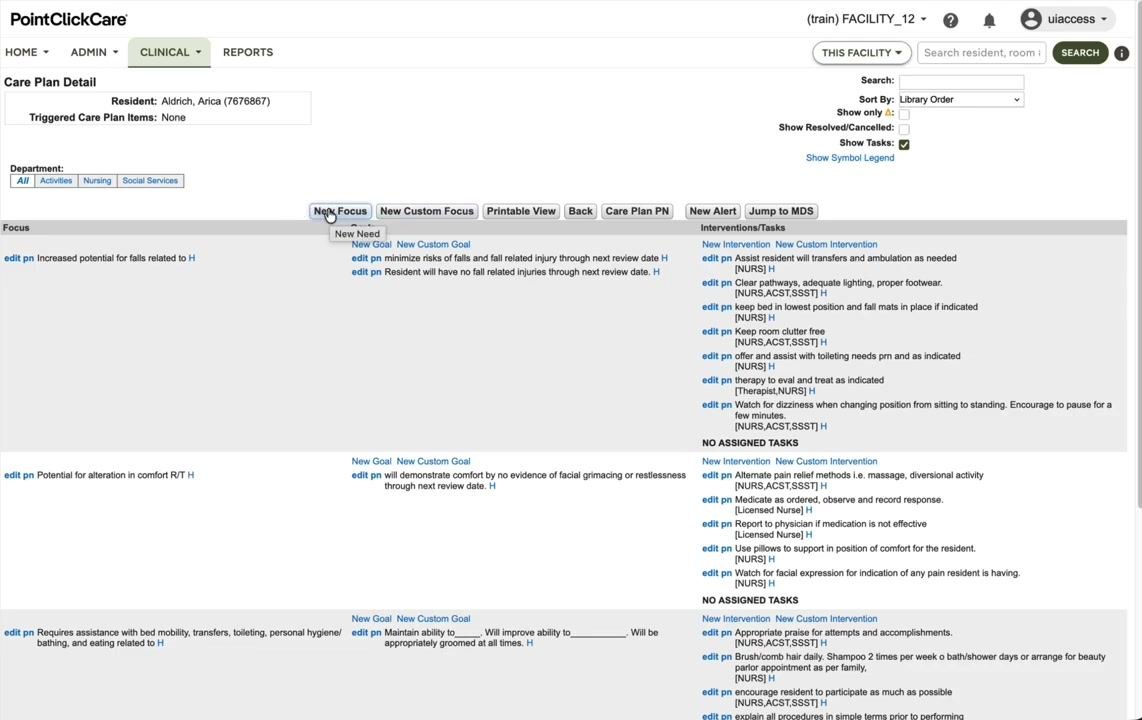
Click the New Focus button at the top of the Care Plan Detail screen. A dropdown appears, allowing you to select from preset focuses, goals, and interventions. This method is preferred for consistency and efficiency, as most facilities have a pre-built library of care plan items.
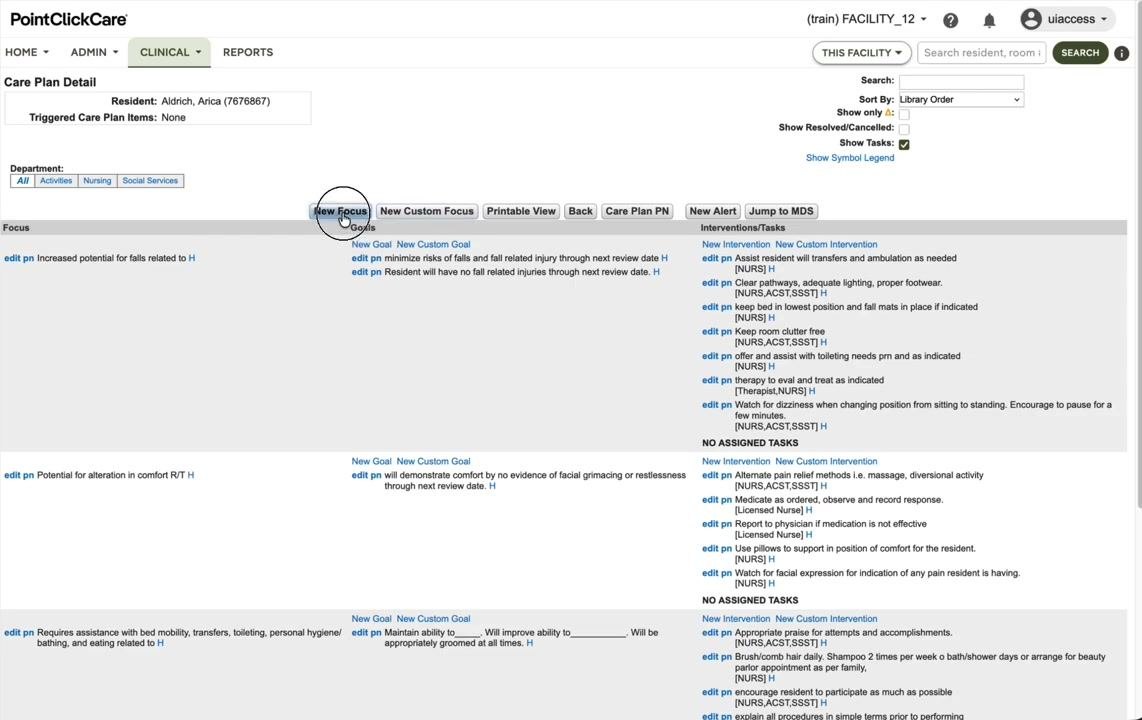
Use the care plan library whenever possible to maintain standardization across resident care plans, and reserve custom focuses for unique situations not covered by the library.
By following these steps, you can accurately add new focuses to a resident's care plan, ensuring all care needs are documented and communicated effectively to staff.
Adding and managing a focus
Open the Care Plan Wizard
Ensure you are in the Care Plan Detail section for the correct resident (for example, Aldrich, Arica). Click to open the Care Plan Wizard.
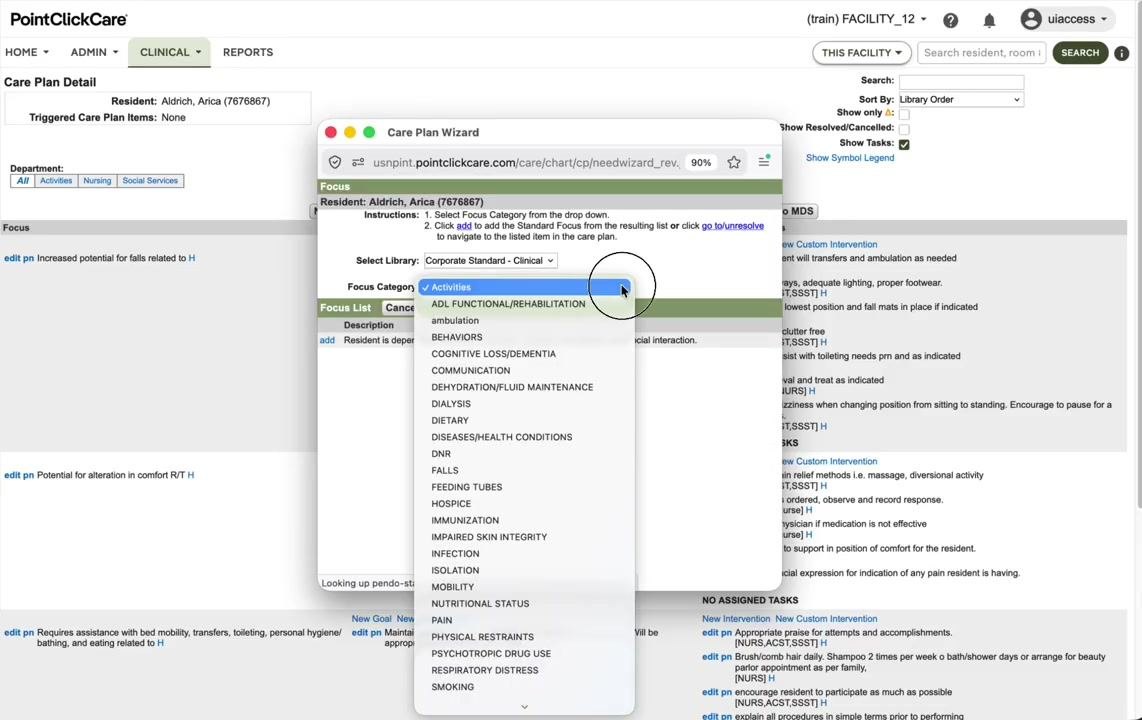
Select the focus category
In the Care Plan Wizard, locate the Focus Category dropdown menu. Click the dropdown to display the available focus categories, scroll through the list, and select IMPAIRED SKIN INTEGRITY.
Choose a standard focus
After selecting IMPAIRED SKIN INTEGRITY, review the available focus list and click add next to "Potential for skin breakdown R/T" to select this standard focus.
Edit focus details
The Edit Focus window appears. Confirm the following details:
- Standard Focus: Potential for skin breakdown R/T
- Date Initiated: 8/18/2026 (or as appropriate)
- Status: Active
- Description: Potential for skin breakdown R/T
Assign review departments as needed, for example setting Review Department One to Nursing, then click Next to proceed.
Add interventions
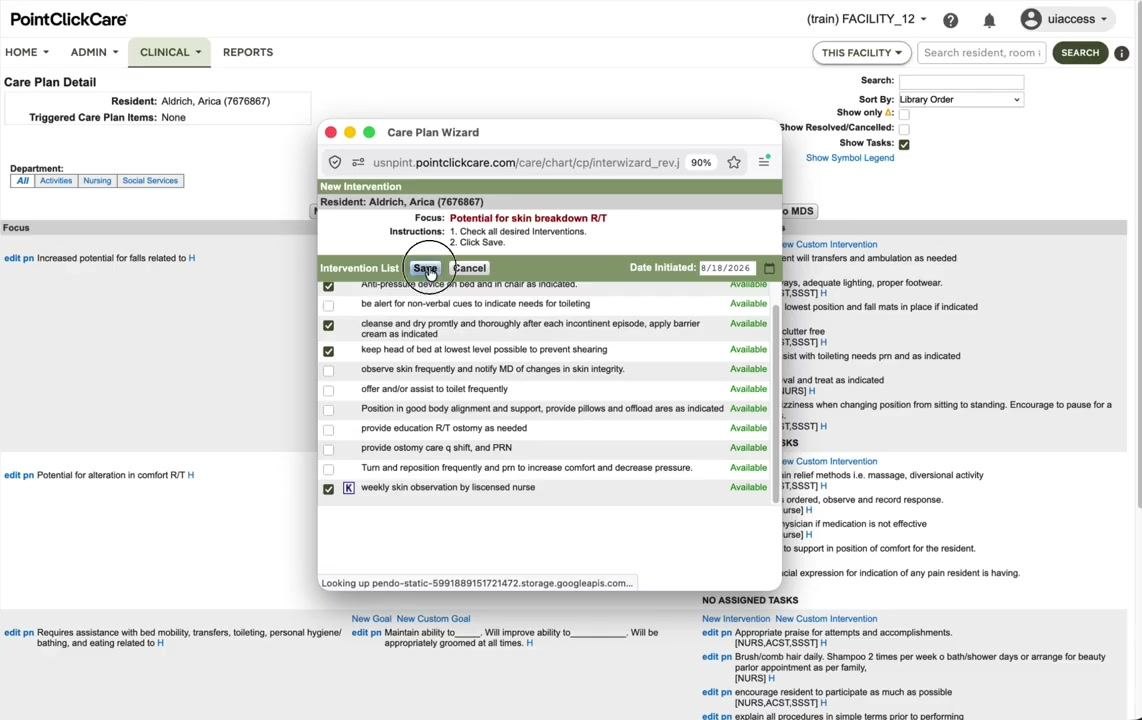
The New Intervention window opens, listing possible interventions for the selected focus. Check the boxes for the following interventions:
- Anti-pressure device on bed and in chair as indicated
- Cleanse and dry promptly and thoroughly after each incontinent episode, apply barrier cream as indicated
- Keep head of bed at lowest level possible to prevent shearing
- Weekly skin observation by licensed nurse
Ensure the Date Initiated is correct, for example 8/18/2026.
Save the interventions
Click the Save button to add the selected interventions to the care plan.
Review the updated care plan
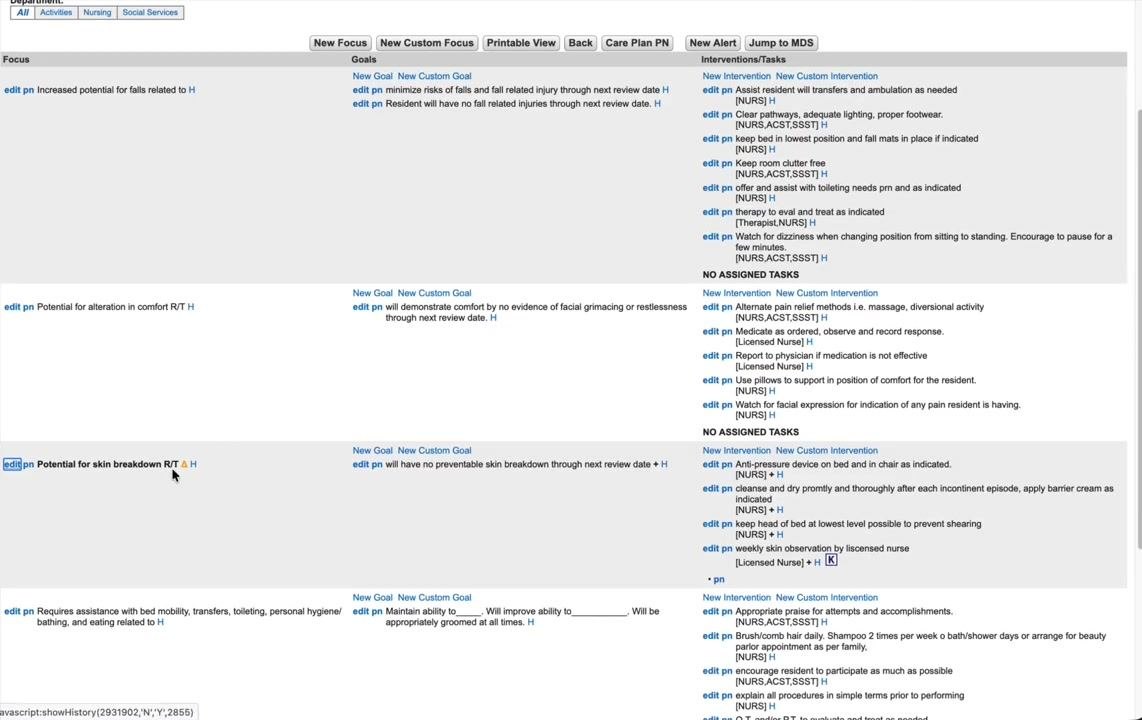
The main Care Plan Detail screen now displays the new focus, goals, and interventions. Confirm that "Potential for skin breakdown R/T" appears under Focus, with the goal "will have no preventable skin breakdown through next review date" and the interventions you selected.
Save and review changes
Changes to the care plan, such as adding a new focus, goals, or interventions, are not permanently saved until the care plan is reviewed. If you add a new focus and then press Delete before review, the focus is removed without warning. If a focus has already been reviewed, attempting to delete it displays the message: "The focus has been reviewed and thus cannot be deleted from the care plan."
Resolving and personalizing a focus
Identify the focus to resolve
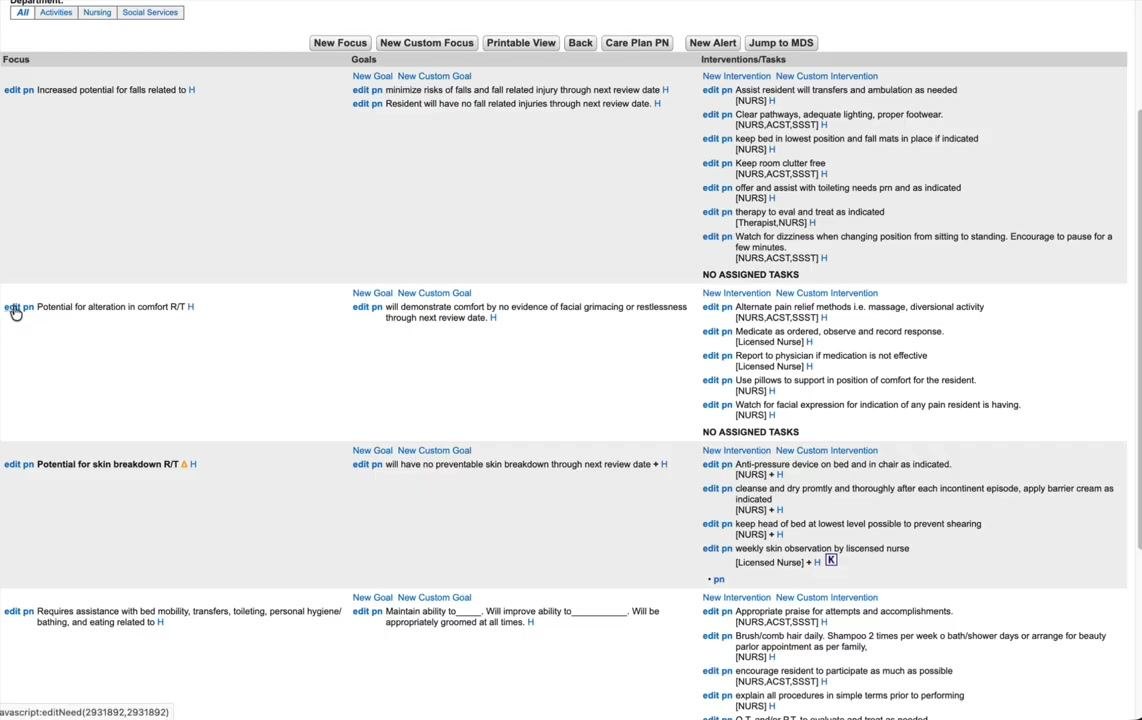
Review the Care Plan Detail screen for the resident (for example, Aldrich, Arica). Locate the focus you want to resolve, such as "Potential for alteration in comfort R/T" or "Potential for skin breakdown R/T." Each focus is listed in the left column, with associated goals and interventions/tasks to the right. A yellow triangle icon next to a focus indicates that personalization is required.
Resolve a focus
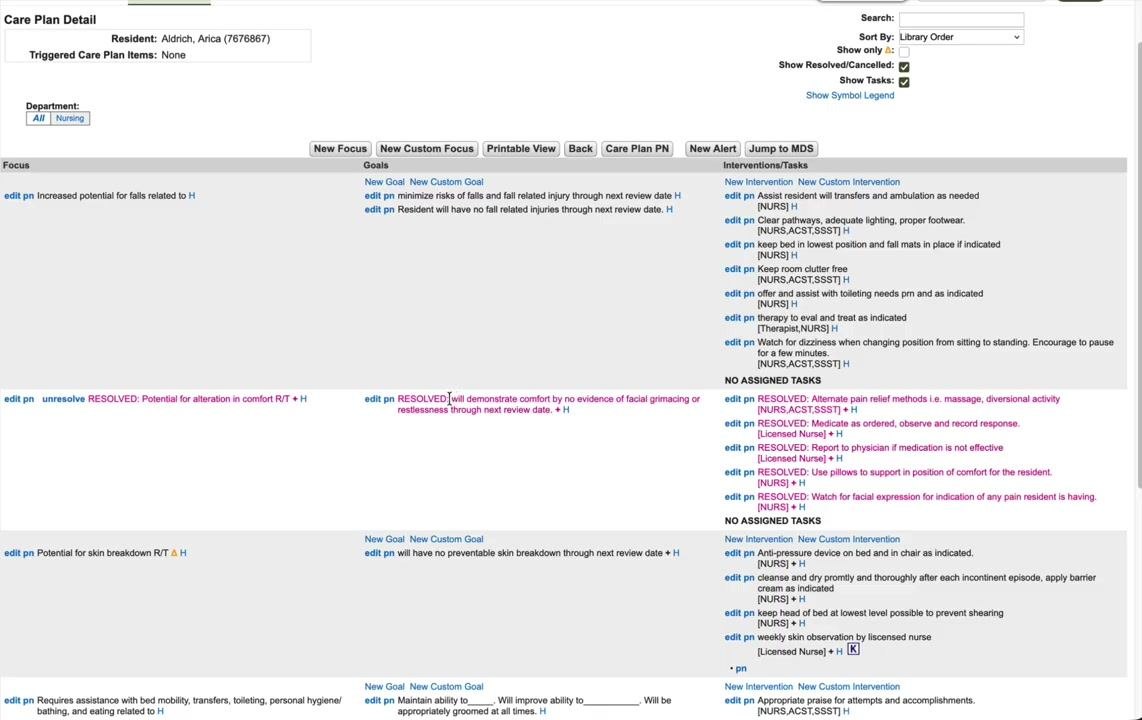
If a resident no longer has an issue related to a specific focus, for example they no longer need pain relief, you can resolve that focus. Click the edit pn link next to the relevant focus. After resolving, the focus is marked as RESOLVED in pink text, and all associated goals and interventions are also marked as resolved. An unresolve option appears, allowing you to revert the resolution if needed.
Personalize the focus
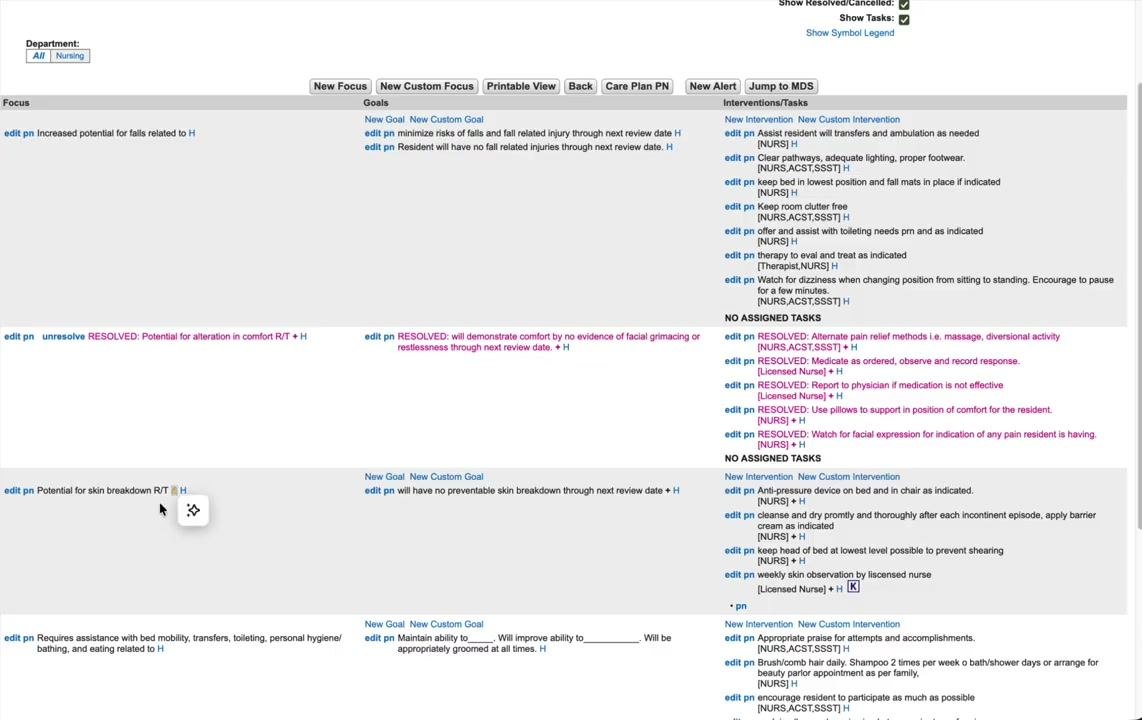
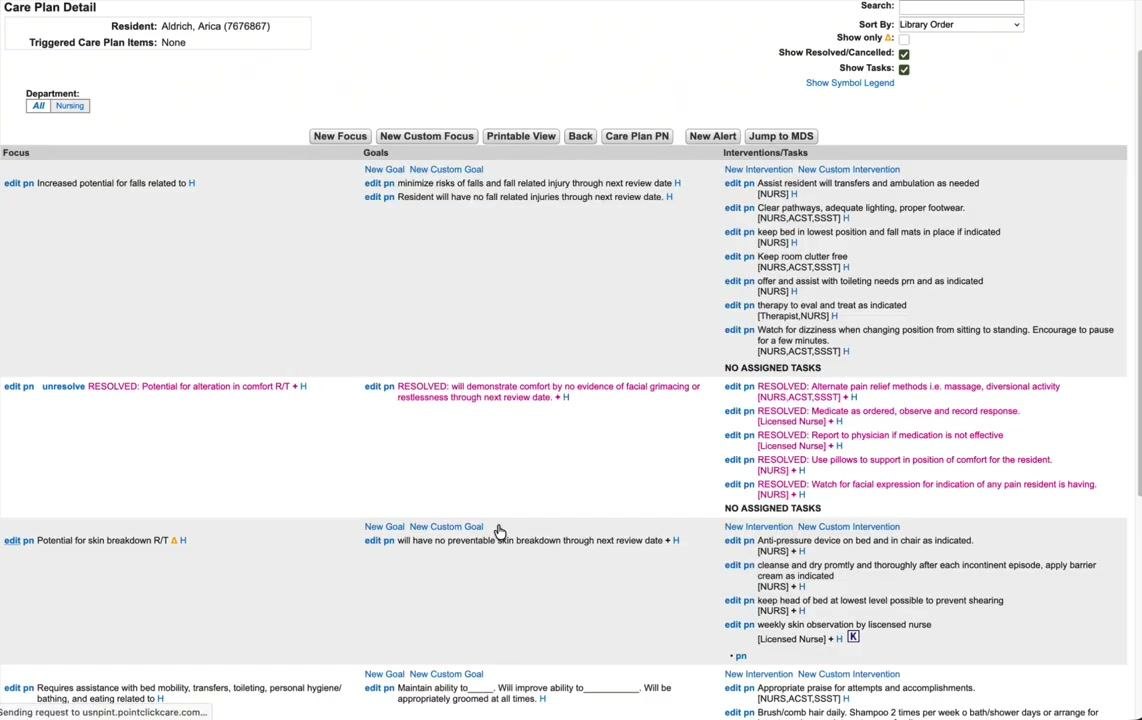
Some focuses display a yellow triangle icon, indicating that personalization is required. Hovering over or clicking the icon may provide additional information. The system expects you to customize the focus, goal, or intervention with resident-specific details rather than relying only on preset library options.
To remove the personalization warning, edit the focus, goal, or intervention to include specific information about the resident, such as specific risk factors, locations of concern, or individualized care instructions. Once personalized, the yellow triangle icon disappears, indicating the focus is now tailored to the resident's needs.
Review the updated care plan
Confirm that resolved focuses are clearly marked and that personalized focuses no longer display the warning icon. Ensure all goals and interventions are up to date and specific to the resident.
By following these steps, you can resolve focuses that are no longer relevant and ensure all care plan items are properly personalized for each resident.
Reviewing, printing, and searching the care plan
Print the care plan
Click the Printable View or Care Plan PN button to open print options. In the Print Options window, select your desired settings:
- Ensure Care Plan is checked.
- Optionally, check Include Resolved/Cancelled Items to print all items, including those marked as resolved.
- Additional options include displaying by department, setting a revision history range, excluding certain dates, including progress notes, or adding a signature page.
Click the Print button to generate the care plan report.
View the printed care plan report
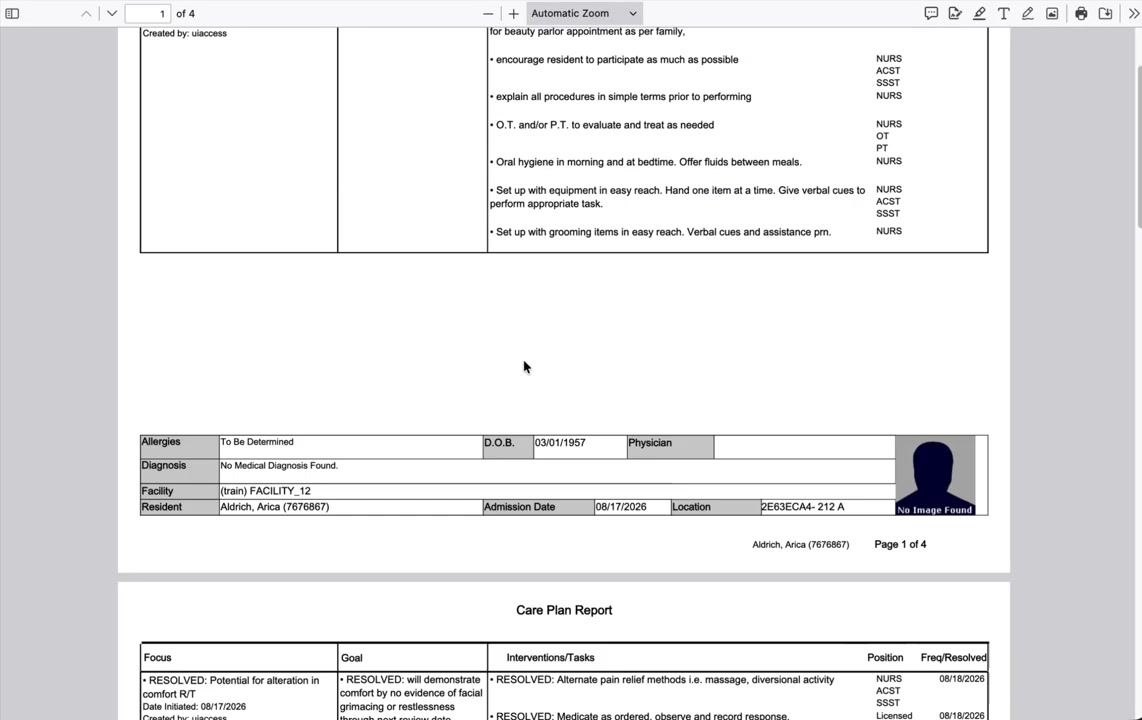
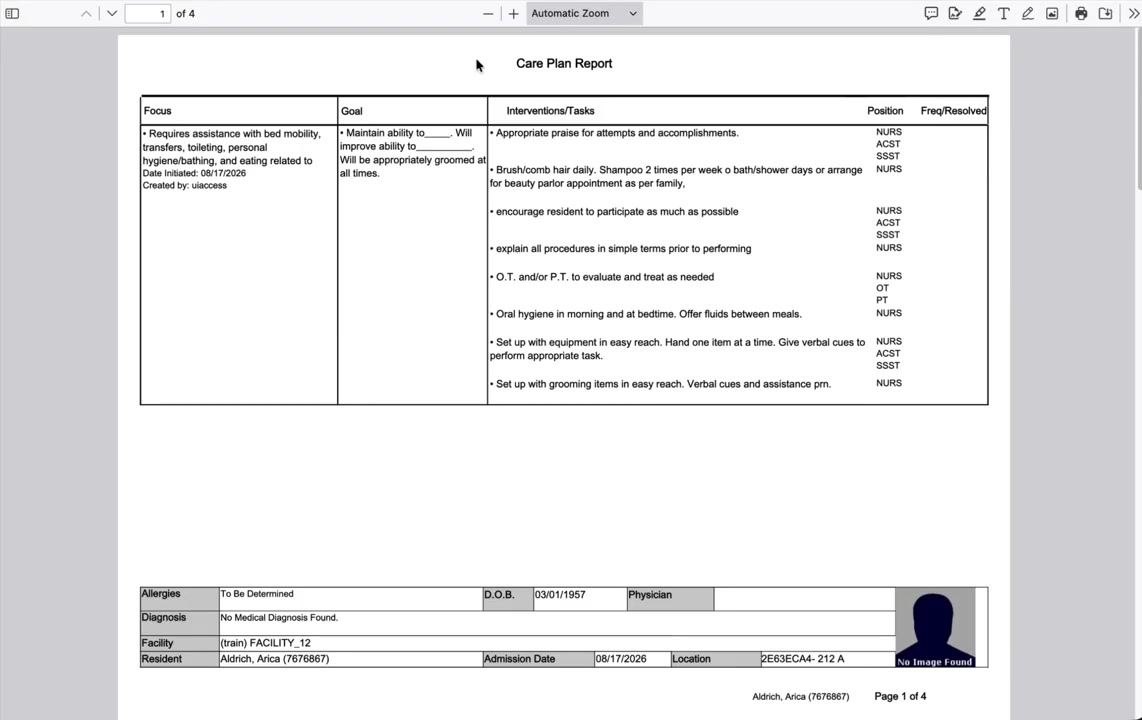
The printed care plan report opens in a new window or tab. The report includes:
- Resident details (name, ID, facility, admission date, location, allergies, diagnosis, date of birth, physician).
- A summary table listing each focus, goal, and interventions/tasks, along with position and frequency/resolved date.
For example, you may see "RESOLVED: Potential for alteration in comfort R/T" with its associated resolved interventions. Review the report for completeness and accuracy.
Add a progress note
To document additional information, click the New Alert or Progress Note button. In the New Progress Note window:
- Confirm the resident's name and ID are correct.
- Select the note type (for example, "MDS / Care Plan Note").
- Optionally, link the note to a previous note or care plan item/task.
- Set the effective date and time.
- Enter relevant notes in the provided field.
- Click SIGN to save and finalize the note, or SAVE AS DRAFT to save it for later editing.
Set a new alert for the resident
Click the New Alert button on the Care Plan Detail screen. This lets you create an alert specific to the resident, ensuring important information is flagged for care staff. Follow the on-screen prompts to complete the alert setup.
Search within the care plan
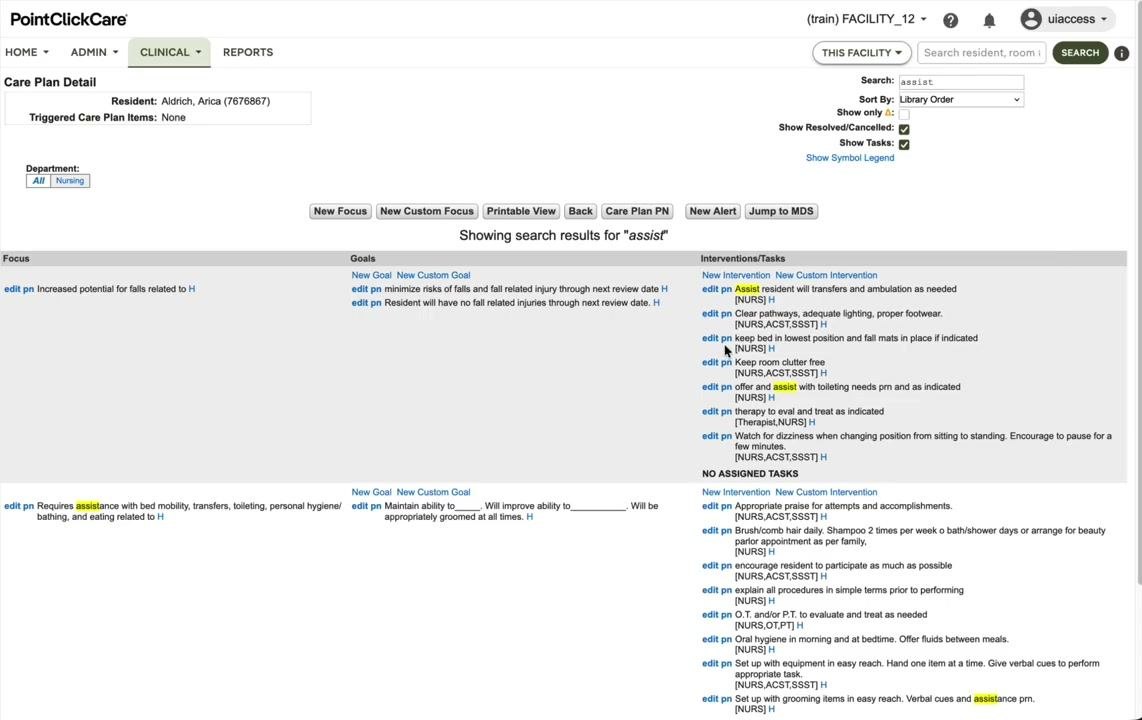
Use the Search box at the top right of the Care Plan Detail screen to find specific terms. Enter a keyword, for example "assist," and press Enter. The system highlights all instances of the search term in the Focus, Goals, and Interventions/Tasks columns. This feature is useful for quickly locating specific interventions, aids, or terms within a large care plan.
Clear the search
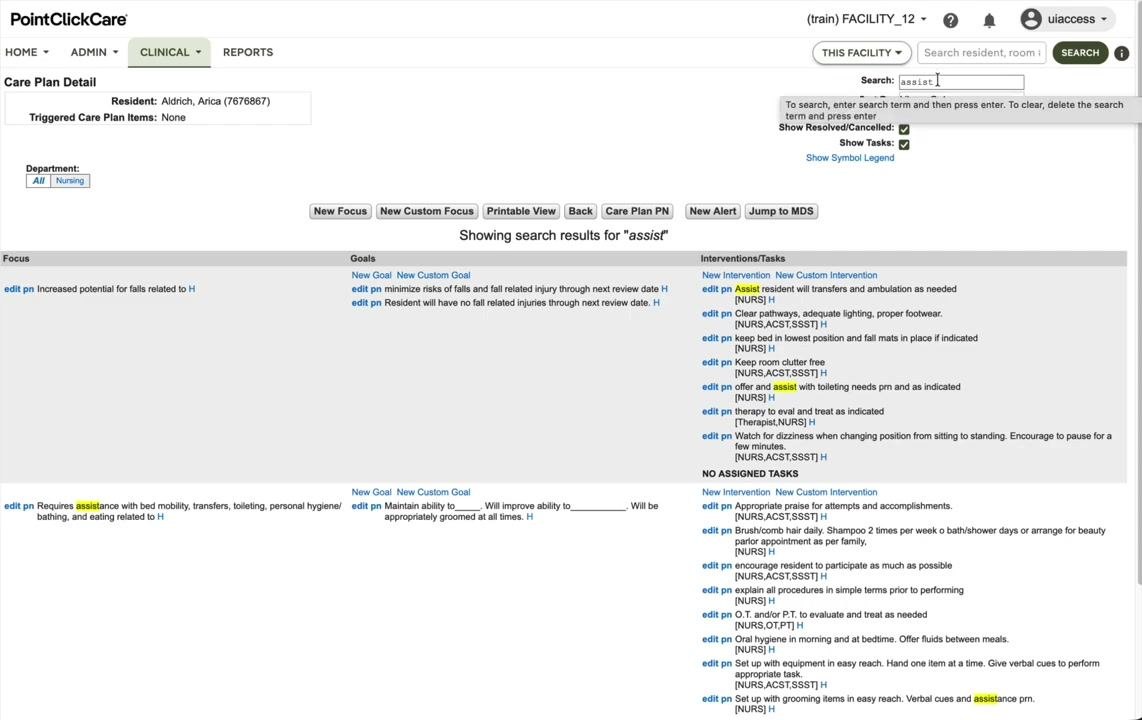
To remove the search filter, delete the text from the search box and press Enter. The care plan view returns to normal, displaying all items without highlights.
By following these steps, you can efficiently review, print, document, and search within a resident's care plan, ensuring all information is accessible and up to date for quality resident care.
Filtering care plan items by personalization requirement
Filter care plan items by personalization requirement
Locate the Show only dropdown in the Care Plan Detail screen. Select Personalization required to filter and display only those items that require personalization. When this filter is active, resolved or canceled items are not visible. The Show Tasks checkbox lets you display tasks that appear on the Kardex for interventions.
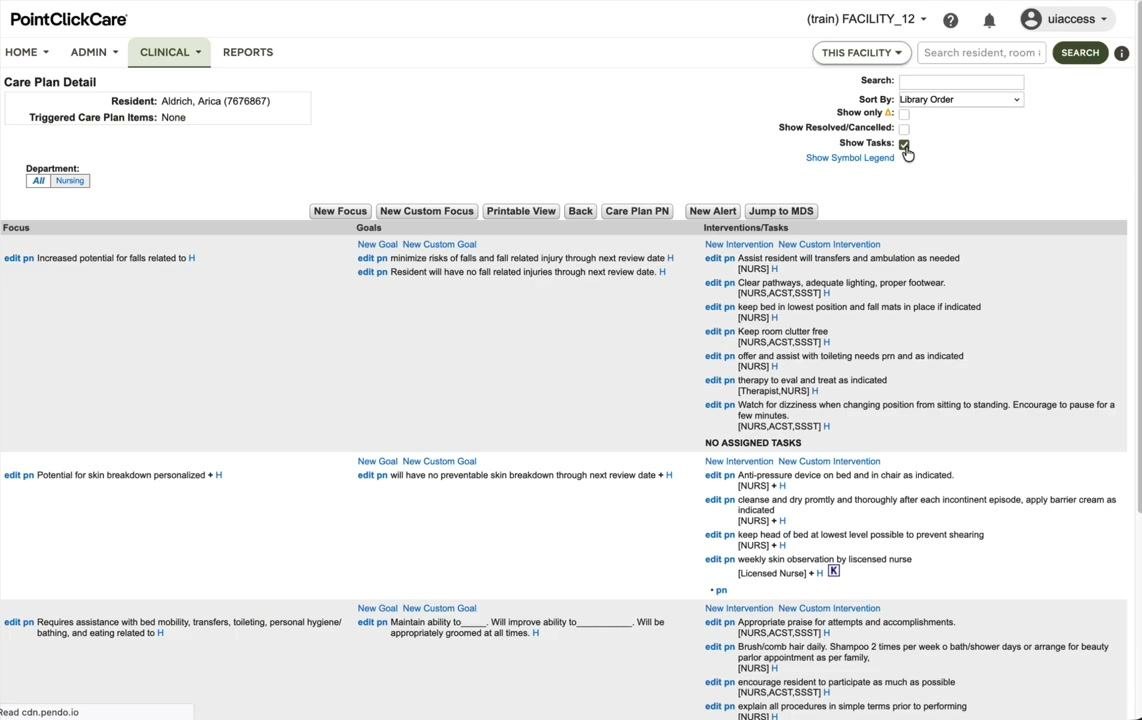
Understand interventions displayed on the Kardex
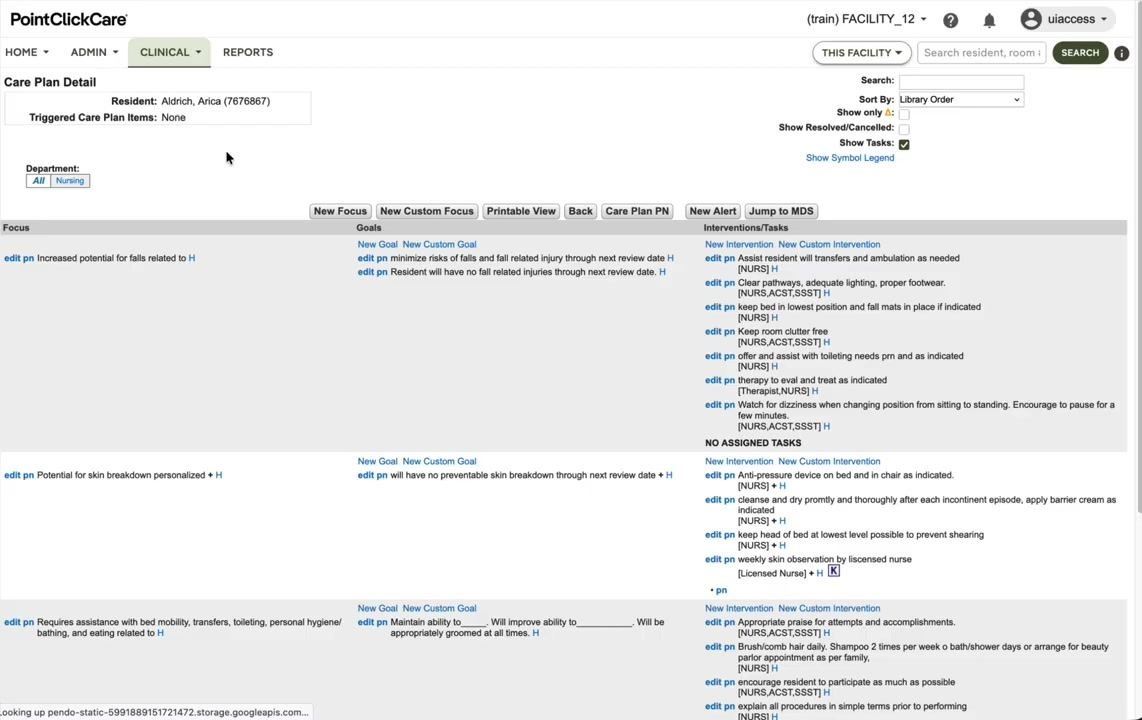
Review the Interventions/Tasks column in the Care Plan Detail screen. Identify interventions with a small K icon next to them; this indicates the intervention will be available on the Kardex. Hover over the K icon to see the tooltip "Shows on Kardex."
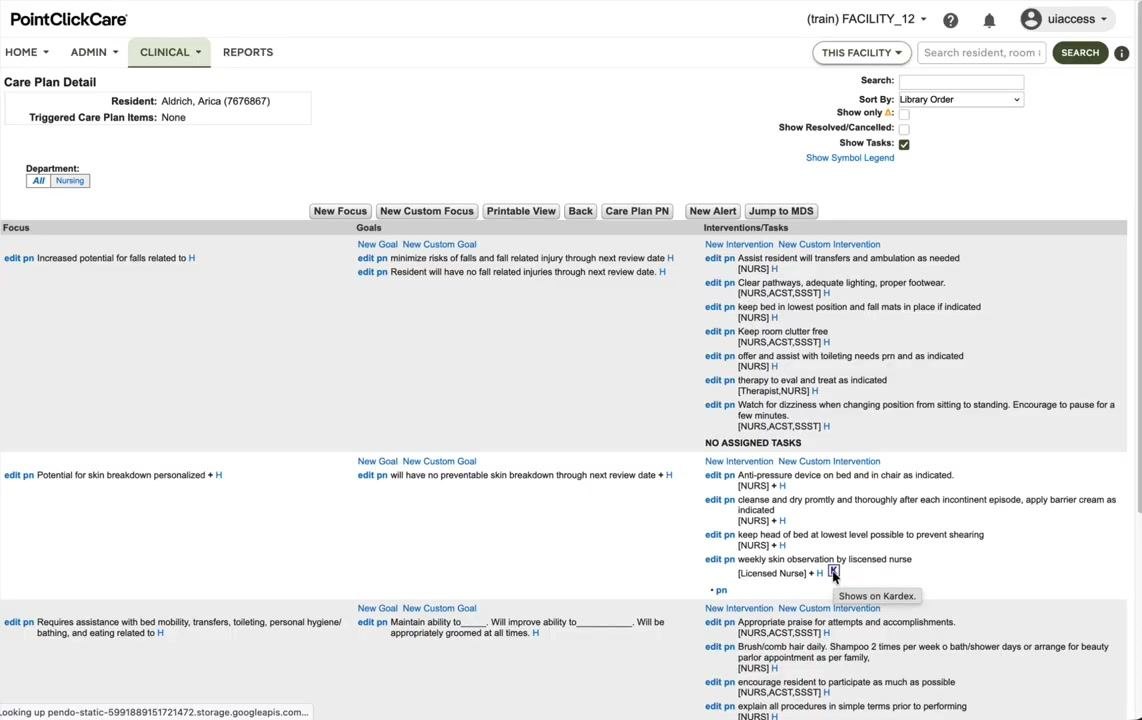
View the Kardex for a resident
Select the desired resident, for example Arica Aldrich, from the list, and open the Kardex to view actionable care plan items. The Kardex displays specific actions required for the resident, such as:
- Weekly skin observation by licensed nurse
- Transferring
- Bathing (specify)
- Daily check for skin integrity during turning
The Kardex is designed as a practical document for CNAs or nurses, summarizing actionable tasks.
Conducting a care plan review
Initiate a new care plan review
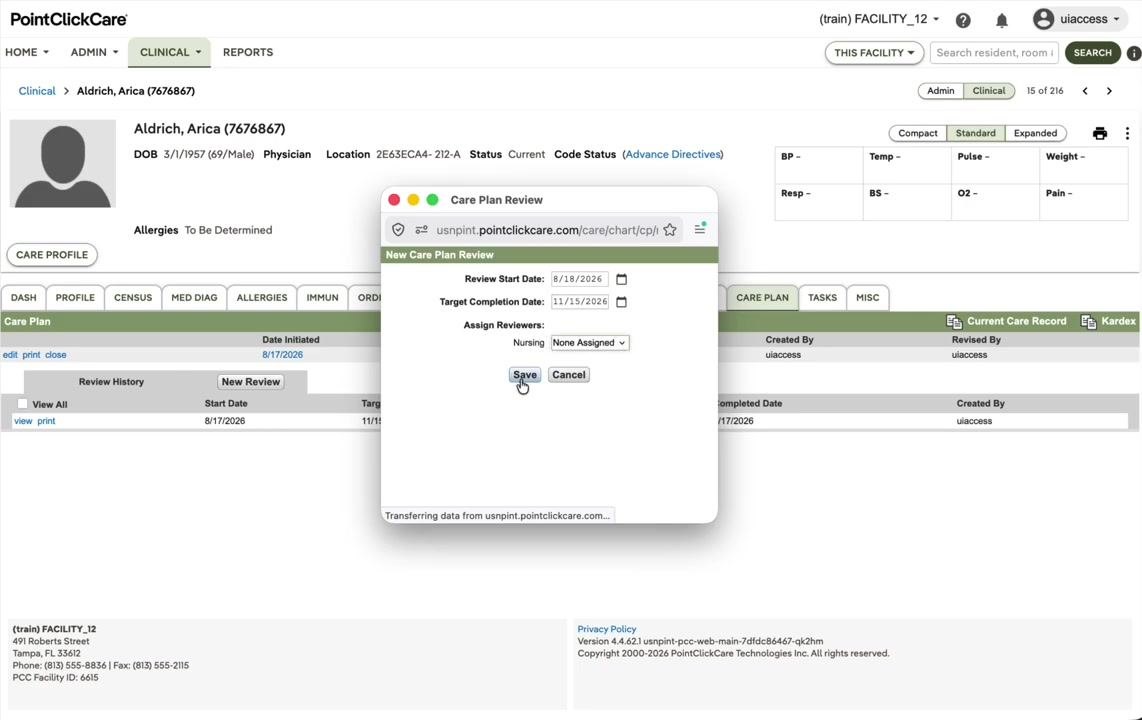
In the resident's profile, ensure you are on the CARE PLAN tab. Click the New Review button in the Review History section to start a new care plan review. A Care Plan Review dialog appears. Enter the following details:
- Review Start Date: 8/18/2026
- Target Completion Date: 11/15/2026
- Assign Reviewers: Select from the dropdown (for example, Nursing – None Assigned)
Click Save to create the new review.
Verify the new review entry
After saving, confirm that a new line appears in the Review History table. The new review entry should display a Start Date of 8/18/2026, a Target Completion Date of 11/15/2026, and a blank Completed Date until the review is completed. The care plan may be grayed out, indicating it is currently under review.
Edit or manage review assignments
In the Review History table, use the edit, del, reassign, or print links to manage the review as needed. Click edit to modify review details, reassign to change the assigned reviewer, or print to print the review details.
Assign departmental responsibility
Click on a review entry to open the Care Plan Reviews screen, which lists the following fields:
- Department: (for example, Nursing)
- Assigned To: (blank if not yet assigned)
- Reviewed By: (blank until signed)
- Completed Date: (blank until signed)
Use the edit link to update department or assignment details.
Sign off on the care plan review
Once the review is ready, click the sign link next to the department. After signing, the Reviewed By and Completed Date fields populate, for example Reviewed By: uiaccess, Completed Date: 8/18/2026. The row is highlighted in green, indicating completion.
Review and edit care plan focuses and interventions
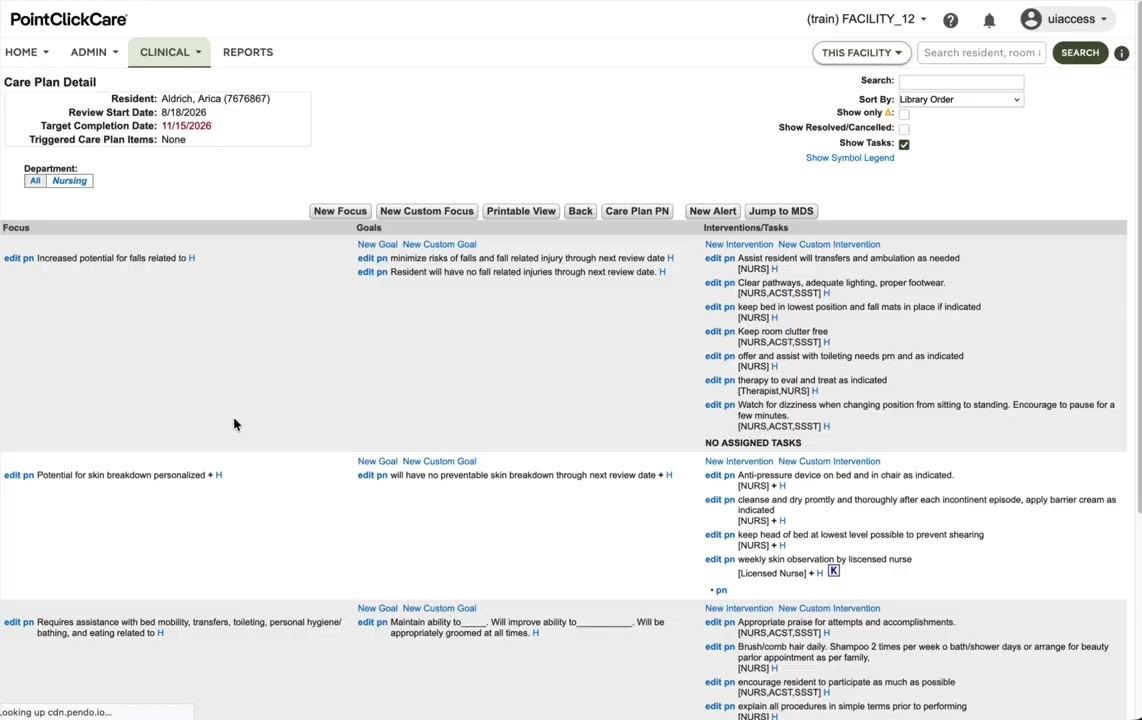
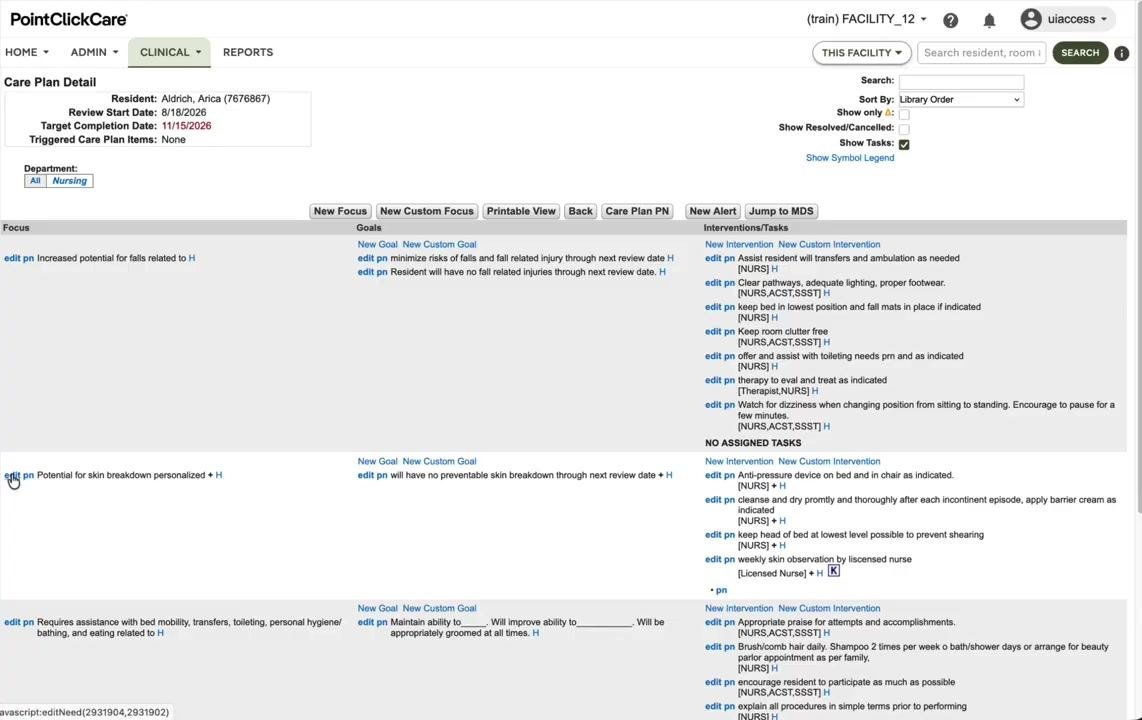
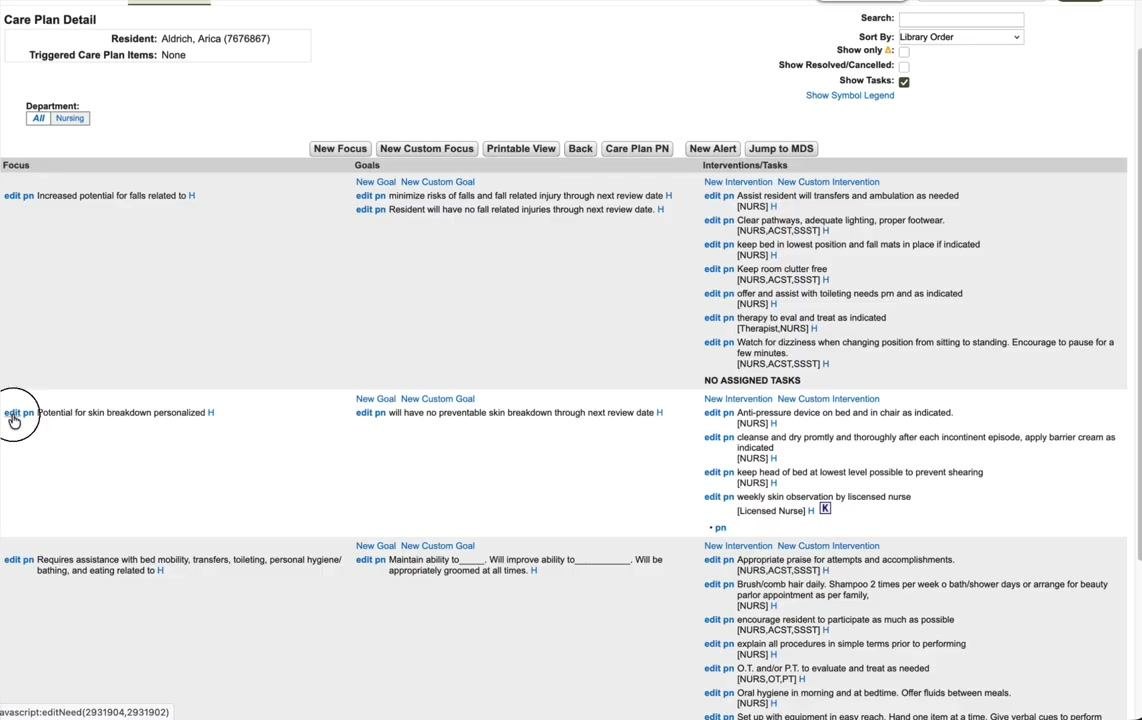
Go to the Care Plan Detail screen to view all focuses, goals, and interventions. Each focus, for example "Potential for skin breakdown personalized," can be edited by clicking edit pn. Review the associated goals and interventions/tasks for each focus, and use the edit pn and New Custom Goal/Intervention links to update or add new items as needed.
By following these steps, you can initiate, assign, manage, and complete care plan reviews, as well as update care plan focuses and interventions for each resident. This ensures all care plan documentation is current, reviewed by the appropriate departments, and actionable for care staff.
Verify care plan detail and saved status
After completing edits and reviews, confirm that the care plan is saved. Navigate to the Care Plan Detail screen for the resident (for example, Aldrich, Arica) and review the following sections:
- Focus: Lists all current care plan focuses, such as "Increased potential for falls related to H," "Potential for skin breakdown personalized," and "Requires assistance with bed mobility..."
- Goals: Shows associated goals for each focus, such as "minimize risks of falls" and "will have no preventable skin breakdown."
- Interventions/Tasks: Displays interventions and tasks for each focus, with options to edit pn or add new interventions.
Use the edit pn link to modify any focus, goal, or intervention as needed, and confirm that all changes are reflected and saved in the system.
Return to the resident profile and confirm review history
Navigate back to the resident's main profile by selecting the CARE PLAN tab. Review the Care Plan section to confirm:
- All review entries are listed in the Review History table.
- Each review displays the correct Start Date, Target Completion Date, and Completed Date.
- The care plan status reflects all recent updates and completions.
Use the view or print links to access or print review details as needed.
What's next
By completing these final steps, you ensure that all care plan edits, reviews, and documentation are properly saved and reflected in the system. The Care Plan Detail and Review History screens provide a complete record of care planning activities for each resident, supporting compliance and quality care delivery. Now that you know how to create care plans in PointClickCare, you can continue reviewing focuses regularly, personalizing items as needed, and completing scheduled reviews to keep each resident's care plan current.
Generation details: cost, quality tiers
Docsie billed 7,000 credits ($4.90) to analyze this 14-minute video at standard quality. The rewrite, template fill and Word/PDF exports were included. The same video at each quality tier:
| Quality | Frames sampled | Credits | Approx. cost |
|---|---|---|---|
| Draft | every 16-30 s | 3,500 | $2.45 |
| Standard (this guide) | every 8-15 s | 7,000 | $4.90 |
| Detailed | every 4-7 s | 14,000 | $9.80 |
| Ultra | every 1-3 s | 28,000 | $19.60 |
Credits priced at $0.70 per 1,000; plans include a monthly allowance. Enterprise customers on on-premise or bring-your-own-model deployments run this on their own inference and pay no per-video credits.
Generated by Docsie Video-to-Docs on 2026-10-14 from a 13-minute video. Screenshots are frames from the source video and belong to their creator, Charting Made Easy, whose original is embedded above. If you own this video and want the guide removed or credited differently, contact us and we will act within one business day.