
How to Do an Incident Report in PointClickCare
Documenting an incident thoroughly and accurately is an essential part of resident care. This guide walks you through how to do an incident report in PointClickCare, from creating the initial record through to completing injury details, documenting contributing factors, recording witness statements, triggering the Morse Fall Scale form, and collecting the required signatures. The steps below use an example incident — a witnessed fall involving resident James Anderson — to illustrate each stage of the process.
Video: Creating a New Incident Report for Risk Management in PointClickCare (PCC) by CR Learning. All credit for the demonstration goes to the creator; watch the original on YouTube. The written guide below was generated from this video by Docsie. Creator? Request a change or removal.
Documenting an incident thoroughly and accurately is an essential part of resident care. This guide walks you through how to do an incident report in PointClickCare, from creating the initial record through to completing injury details, documenting contributing factors, recording witness statements, triggering the Morse Fall Scale form, and collecting the required signatures. The steps below use an example incident — a witnessed fall involving resident James Anderson — to illustrate each stage of the process.
Prerequisites
- Access to the Care Services module in PointClickCare.
- Appropriate security permissions to create, sign, and, if needed, lock incident reports.
- Knowledge of the resident's details and the circumstances of the incident being reported.
Starting a new incident report
Open the Incidents section
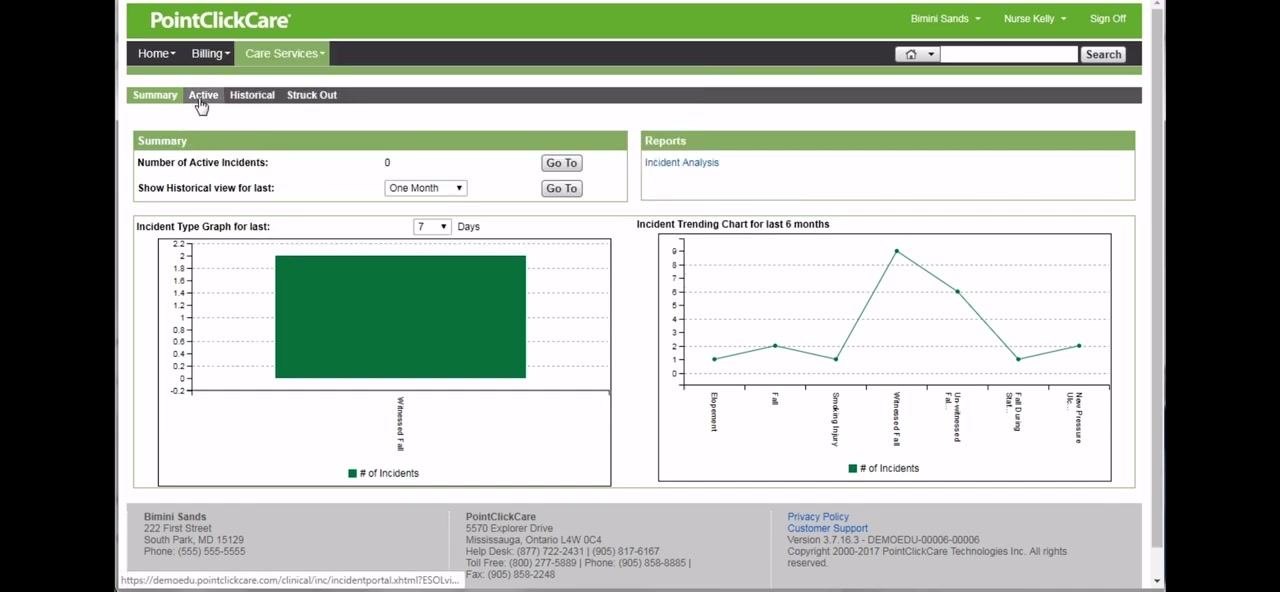
Navigate to the Care Services module and select the Incidents section.
Confirm you are in the Active view
Make sure you are on the Active tab, located at the top of the Incidents section. This view displays incident graphs and summary information for the community.
Create a new incident
Click the New button to create a new incident report.
Documenting incident details
Enter the Nursing Description
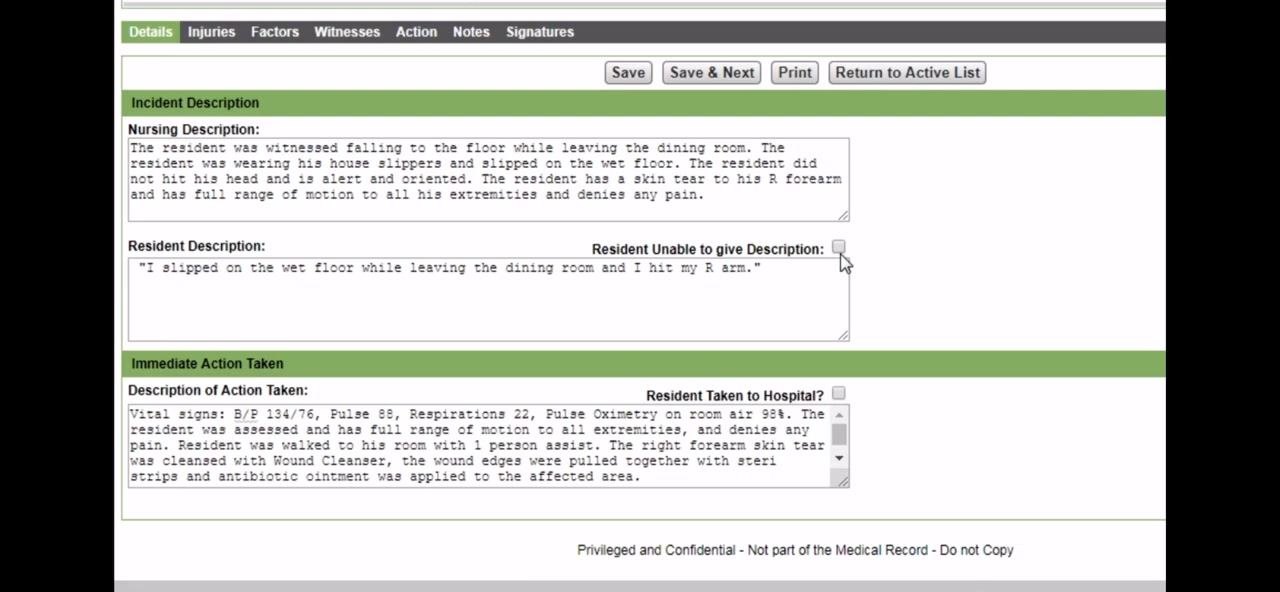
After clicking New, you are taken to the Details section of the incident report, where you'll see fields for Incident Description and Immediate Action Taken.
Enter the Nursing Description of the incident. For example:
"The resident was witnessed falling to the floor while leaving the dining room. The resident was wearing his house slippers and slipped on the wet floor. The resident did not hit his head and is alert and oriented. The resident has a skin tear to his R forearm and has full range of motion to all his extremities and denies any pain."
Record the resident's statement
Obtain and enter the resident's own account of the incident in the Resident Description field. If the resident is unable to describe what happened, select the Resident Unable to give Description checkbox instead.
In this example, Mr. Anderson is able to describe the incident, so the following is entered:
"I slipped on the wet floor while leaving the dining room and I hit my R arm."
Document the action taken
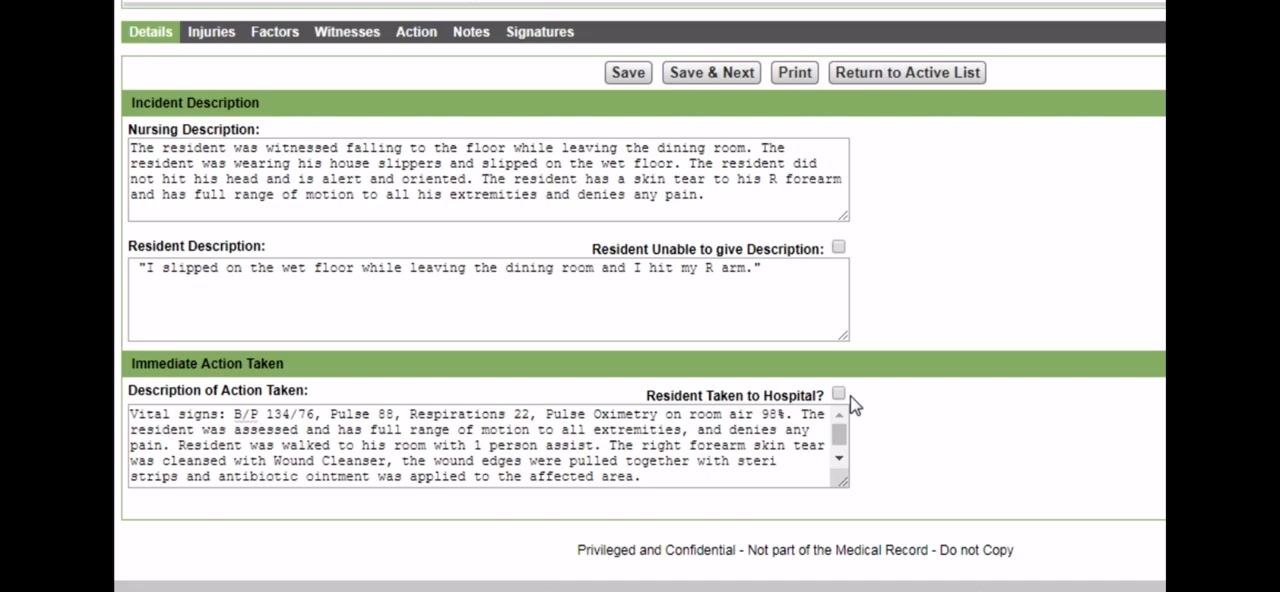
In the Description of Action Taken field, record the clinical response to the incident. For example:
"Vital signs: B/P 134/76, Pulse 88, Respirations 22, Pulse Oximetry on room air 98%. The resident was assessed and has full range of motion to all extremities, and denies any pain. Resident was walked to his room with 1 person assist. The right forearm skin tear was cleansed with Wound Cleanser, the wound edges were pulled together with steri strips and antibiotic ointment was applied to the affected area."
Indicate whether the resident was hospitalized
If the resident was taken to the hospital, select the Resident Taken to Hospital? checkbox. This enables additional hospital information fields for reporting purposes. In this example, the box remains unchecked since Mr. Anderson was not taken to the hospital.
Recording injuries and pain assessment
Save and move to the Injuries section
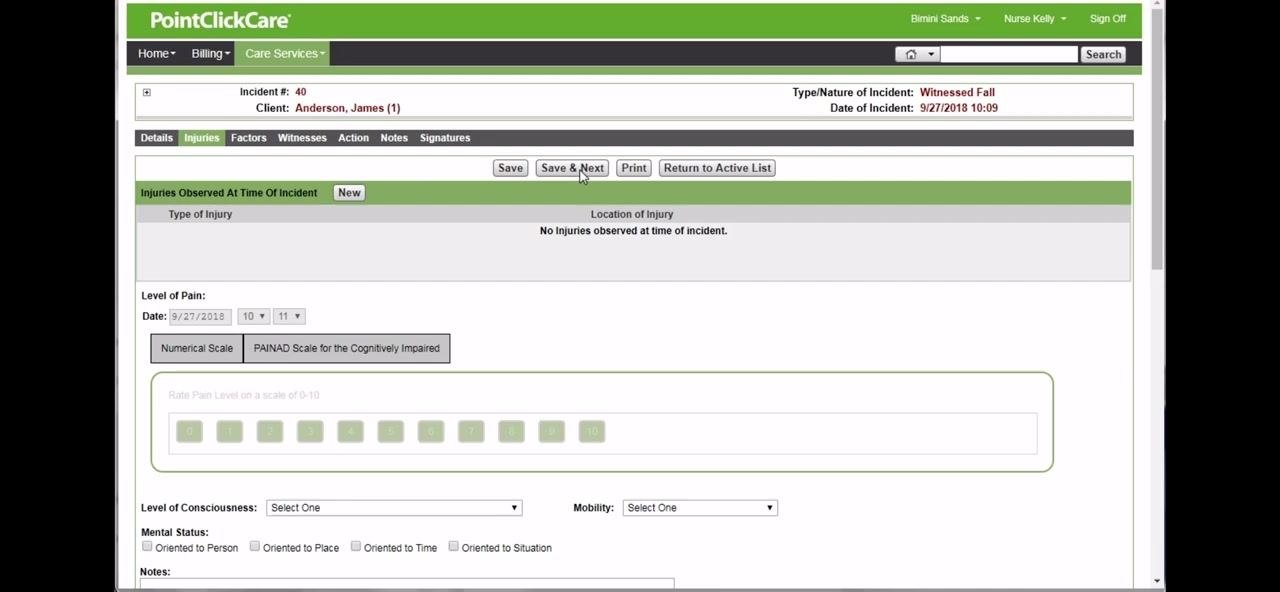
Once you have completed the Immediate Action Taken section, click Save & Next at the top of the screen to advance.
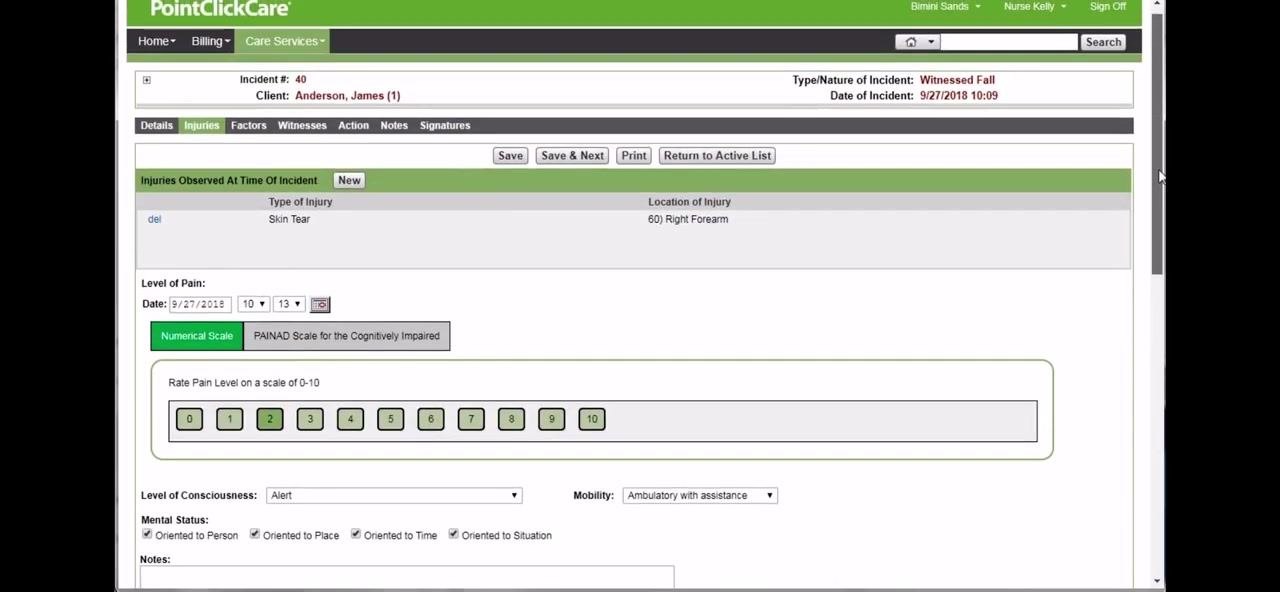
The Injuries tab opens, displaying "Injuries Observed At Time Of Incident." If no injuries are listed yet, click New to add one.
Add injury details
In the New Injury at Time of Incident popup:
- Set Type of Injury to
Skin Tear. - Set Location of Injury to
60) Right Forearm.
Click Save to add the injury.
Document the pain level
In the Level of Pain section:
- Set the Date to
9/27/2018. - Select the Numerical Scale.
- Rate the pain level as
2by clicking the corresponding button on the scale.
This pain value will also appear in the Weights and Vitals tabs of the resident's chart.
Record consciousness, mobility, and mental status
Complete the remaining assessment fields:
- Set Level of Consciousness to
Alert. - Set Mobility to
Ambulatory with assistance. - Under Mental Status, check all that apply: Oriented to Person, Oriented to Place, Oriented to Time, and Oriented to Situation.
If your community is configured for post-incident injury reporting, you can also enter injuries discovered after the initial incident, such as bruising found days later. In this example, there are no post-incident injuries, so this section is left blank.
Documenting contributing factors
Record predisposing factors
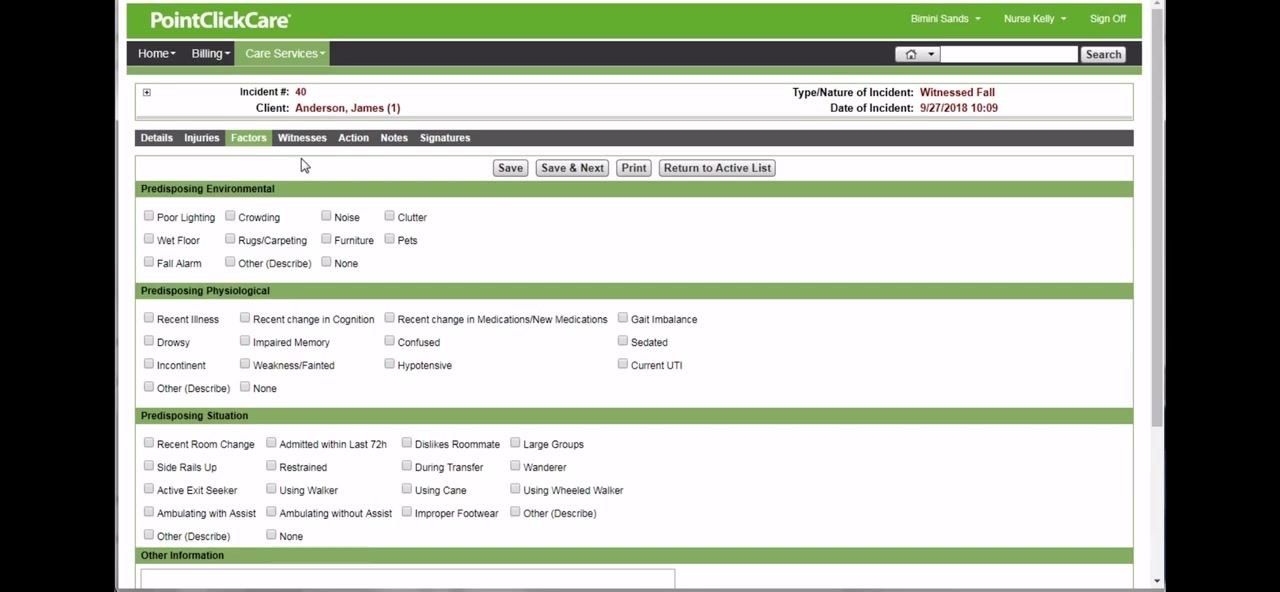
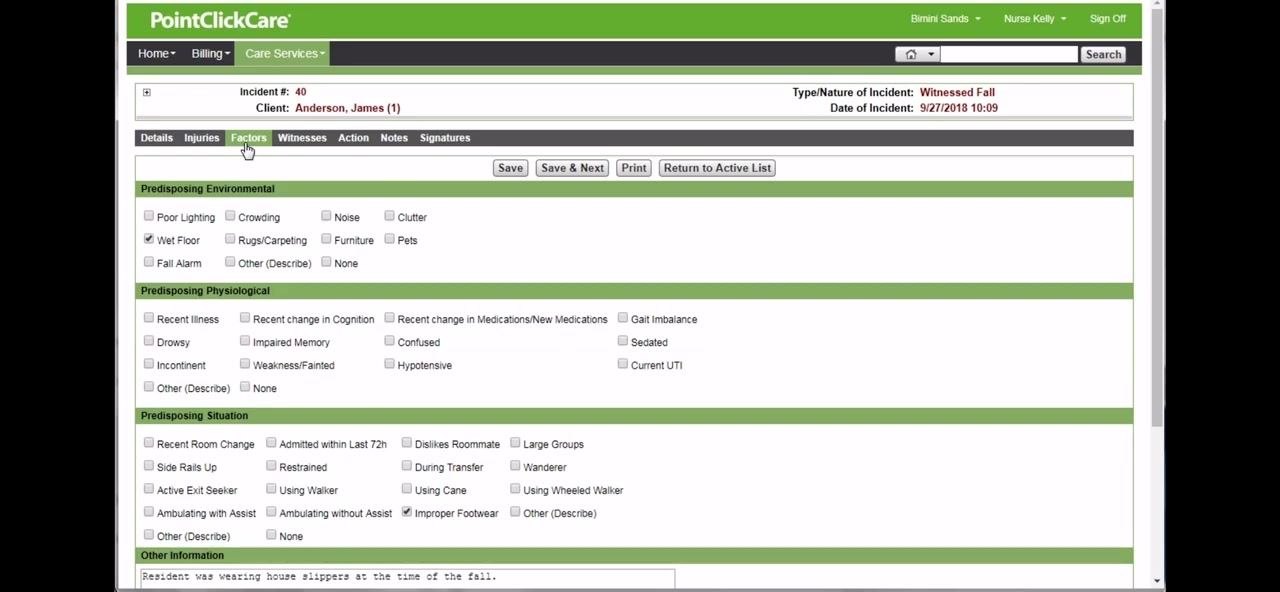
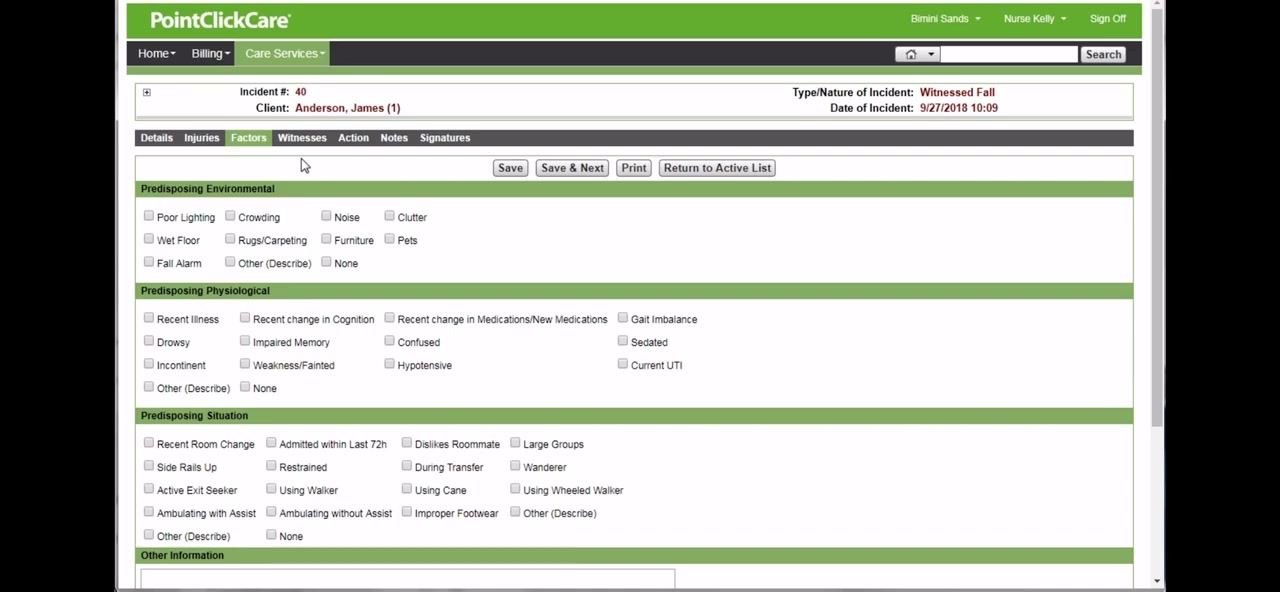
Click Save & Next to move to the Factors tab. This section lets you document environmental, physiological, and situational factors that may have contributed to the incident.
In this example:
- Under Predisposing Environmental, check
Wet Floor. - Under Predisposing Situation, check
Improper Footwear. - In the Other Information field, enter:
Resident was wearing house slippers at the time of the fall.
Click Save & Next to proceed to the Witnesses section.
Adding witness information
Add a witness
In the Witnesses tab, check the box for Was this incident witnessed?, then click New to add a witness.
In the Incident Witness popup, enter the witness details:
- Set Relation to
Staff. - Enter Name:
Angela. - Set Position as appropriate (for example,
Registered Nurse). - Set Date to
9/27/2018. - In Who took statement, enter
Nurse Kelly. - In Statement, enter Angela's account of the incident.
- Enter any available phone numbers if required.
Click Save to add the witness.
Recording notifications and progress notes
Notify and document relevant parties
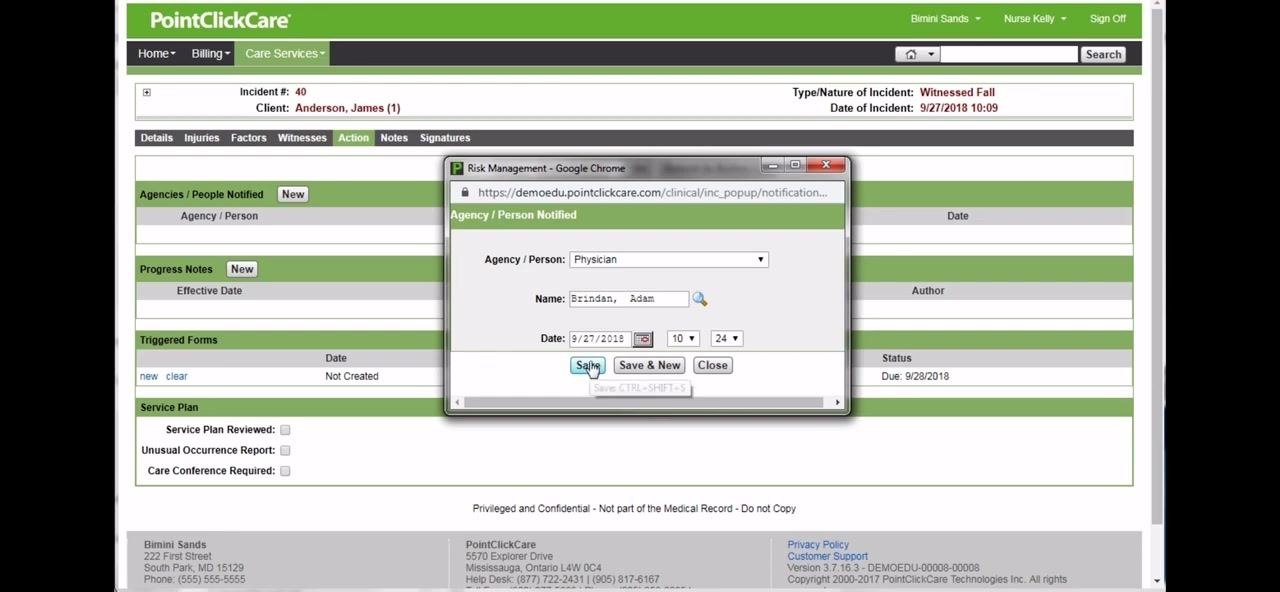
Go to the Action tab to record notifications, progress notes, and triggered forms. Under Agencies / People Notified, click New.
In the popup:
- Set Agency / Person to
Physician. - Enter Name:
Brindan, Adam. - Set Date to
9/27/2018and Time to10:24.
Click Save.
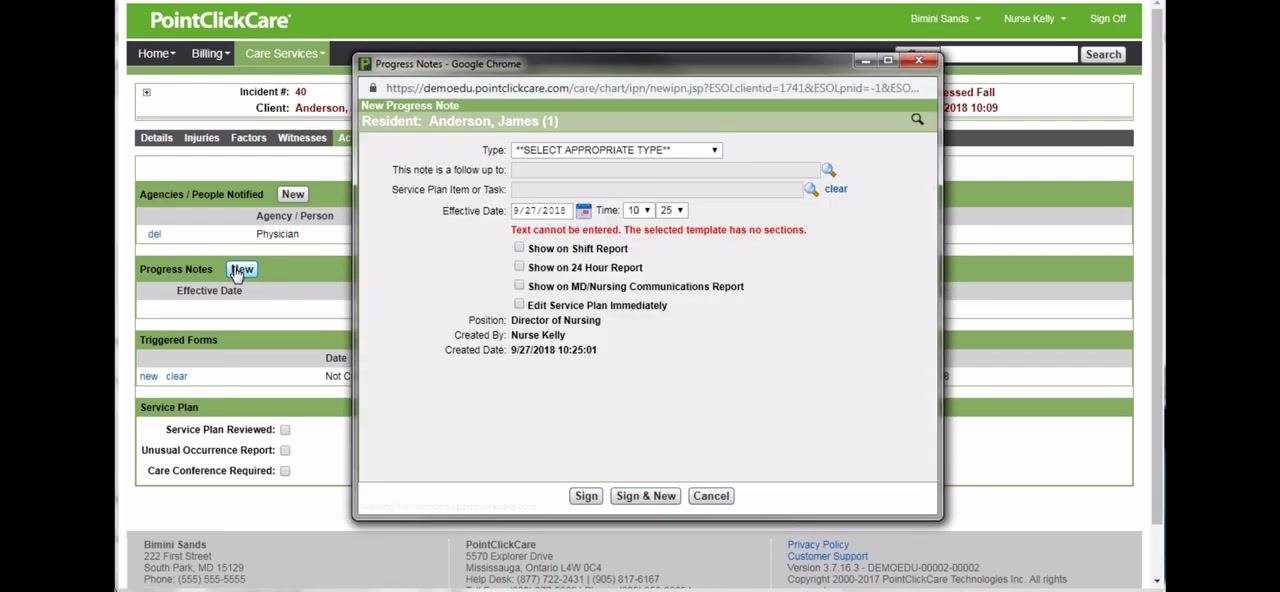
Under Progress Notes, click New. In the New Progress Note popup:
- Select the appropriate Type (for example,
Incident Note). - Set Effective Date to
9/27/2018and Time to10:25. - Enter the progress note details about the incident.
- Check any relevant boxes, such as Show on Shift Report or Show on 24 Hour Report.
- Click Sign and follow the prompt to sign the note.
After saving and signing, verify the progress note appears correctly, showing:
- Effective Date:
9/27/2018 10:25 - Type:
Incident Note - Note: a summary of the incident
- Author:
Nurse Kelly
Triggering and completing the Morse Fall Scale
Trigger the Morse Fall Scale form
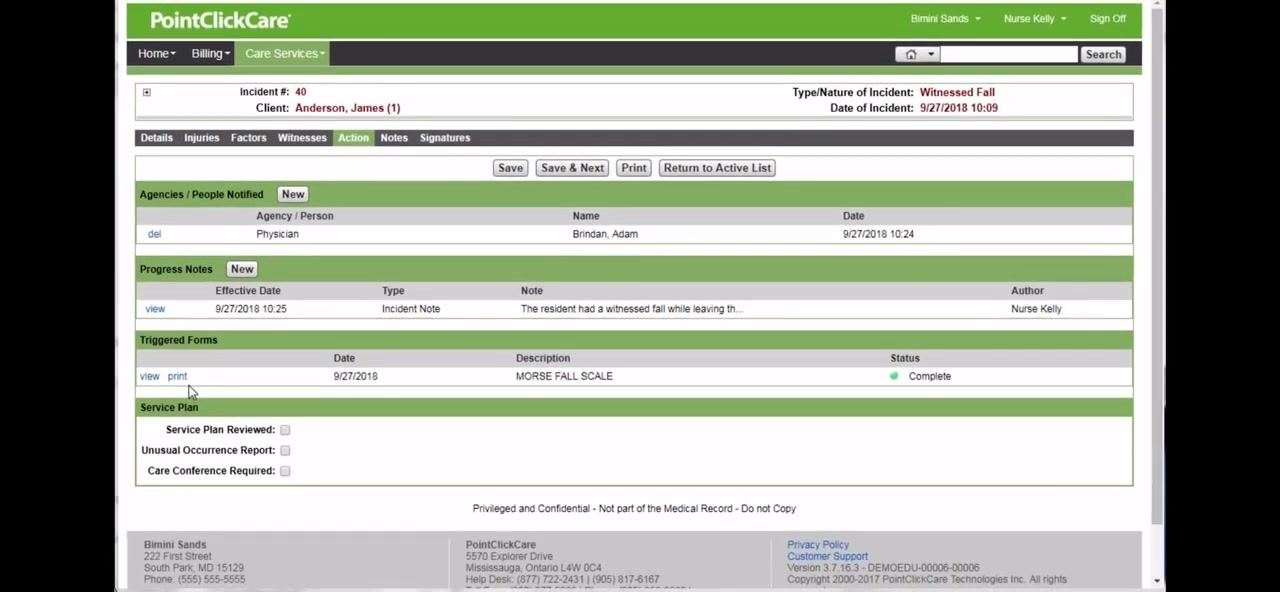
Navigate to the Action tab of the incident report, confirming you are on the correct incident by checking the Incident # and Client name at the top. Review the Agencies / People Notified and Progress Notes sections for accuracy.
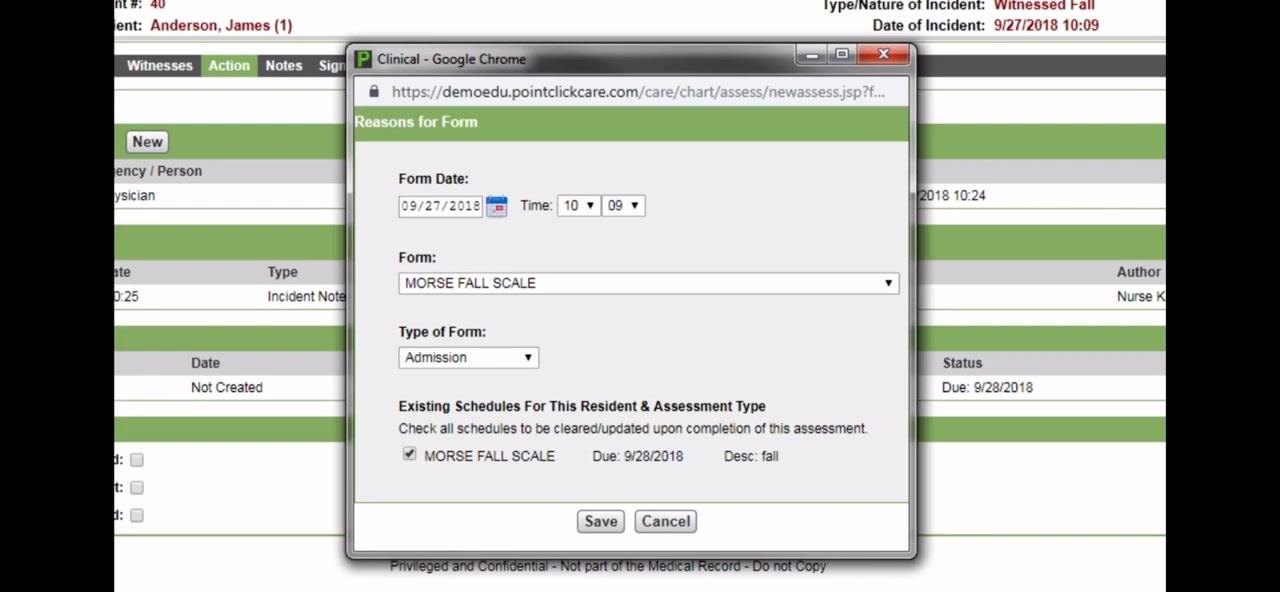
Under Triggered Forms, locate the MORSE FALL SCALE entry. If the form has not yet been created, click the new link to begin.
When prompted, fill out the Reasons for Form dialog:
- Set the Form Date to
09/27/2018and Time to10:09. - Ensure the Form field is set to
MORSE FALL SCALE. - In the Type of Form dropdown, select the appropriate type (for example,
Post Fall). - Review the Existing Schedules For This Resident & Assessment Type and ensure the relevant schedule (MORSE FALL SCALE, Due: 9/28/2018, Desc: fall) is checked.
Click Save to create the form with the specified date and time.
Complete the Morse Fall Scale form
Fill in all required fields:
- History of Falling: select 1 (No) or 2 (Yes).
- Secondary Diagnosis: select 1 (No) or 2 (Yes).
- Ambulatory Aid: choose the appropriate option (None/bedrest/wheelchair/nurse assist, Uses crutches/cane/walker, or Uses furniture for support).
- IV or IV Access: select 1 (No) or 2 (Yes).
- Gait: select the appropriate description (Impaired or Weak).
Use Save & Sign, Save, Save & Exit, or Save & Sign & Lock & Exit as appropriate, and follow any prompts to complete, sign, and lock the form.
Review the completed form
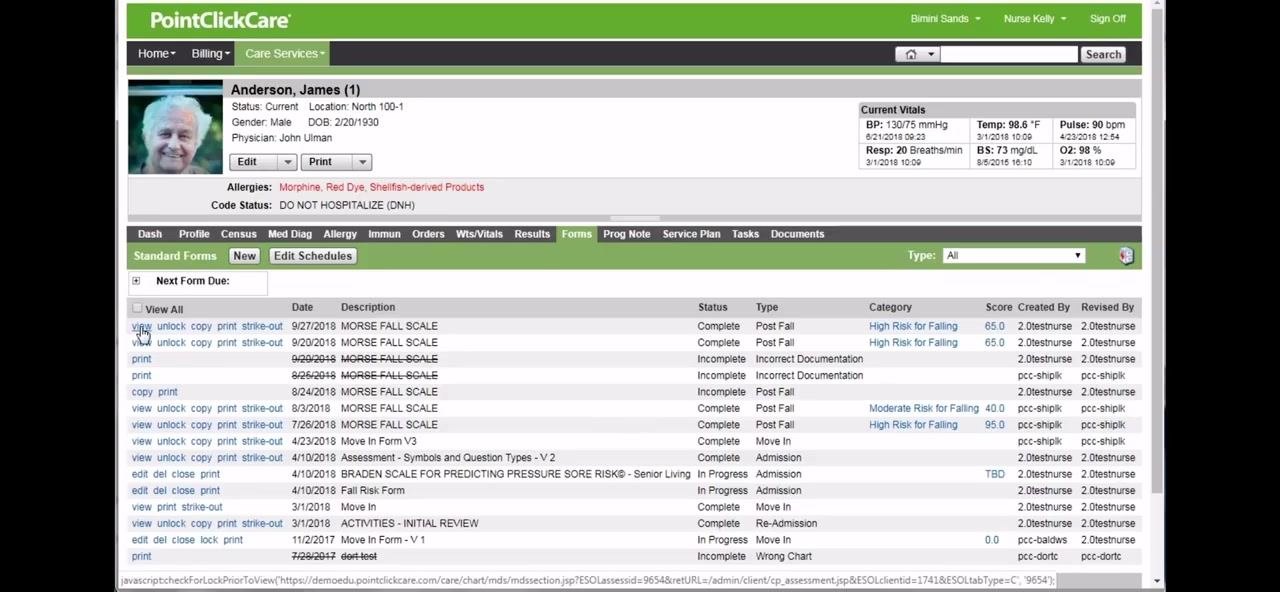
Go to the Forms tab in the resident's chart and locate the most recent MORSE FALL SCALE entry (for example, 9/27/2018, Status: Complete, Type: Post Fall, Category: High Risk for Falling, Score: 65.0). Use the view link to open and review the form.
With appropriate security permissions, you can also use the go to Incident link within the form to return directly to the incident report.
Return to the incident from the form
In the Morse Fall Scale form, click the go to Incident link next to the triggering event to navigate back to the incident report.
Confirm the triggered form status
Back in the Action tab, verify that the Triggered Forms section now shows the completed Morse Fall Scale form with the correct date and a status of Complete. You can use the view or print links to access or print the completed form.
Adding notes and collecting signatures
Add a note about the incident
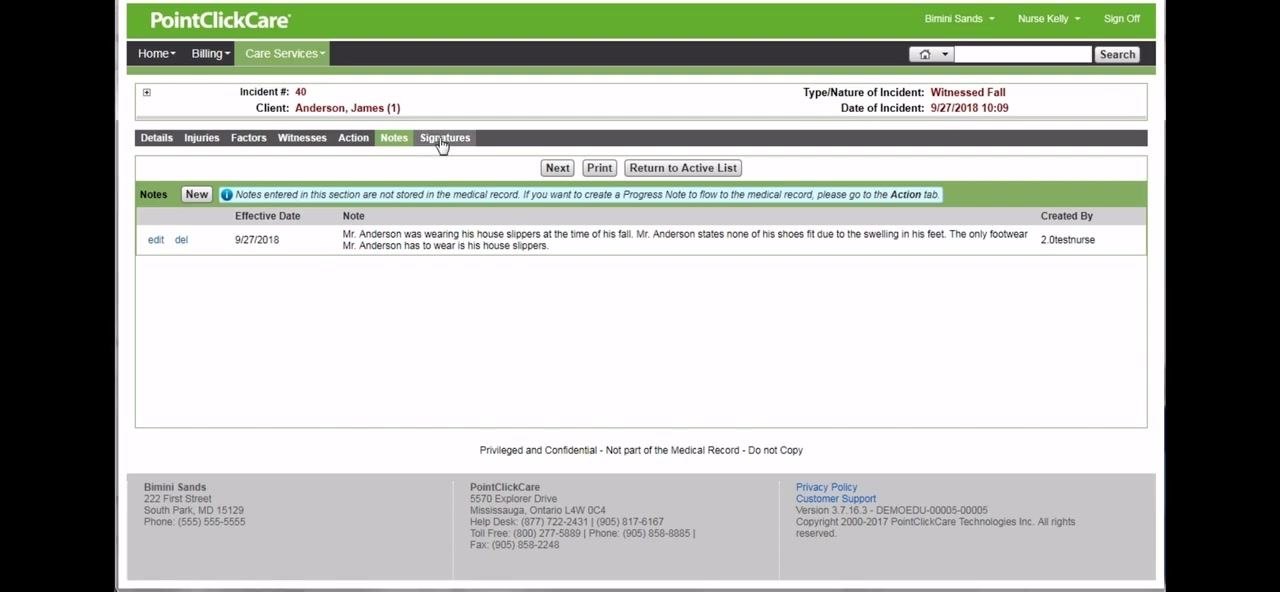
Navigate to the Notes tab within the incident report, then click New to add a note. Enter relevant details about the incident. For example:
"Mr. Anderson was wearing his house slippers at the time of his fall. Mr. Anderson states none of his shoes fit due to the swelling in his feet. The only footwear Mr. Anderson has to wear is his house slippers."
Keep in mind that notes entered in this section are not stored in the medical record. For progress notes that flow to the medical record, use the Action tab instead.
Review and edit the note
After saving, review the note entry under the Notes tab. You can use the edit or del (delete) links to modify or remove the note if needed. Confirm the note displays the correct Effective Date (for example, 9/27/2018) and is attributed to the correct user.
When finished, click the Signatures tab to proceed.
Sign the incident report
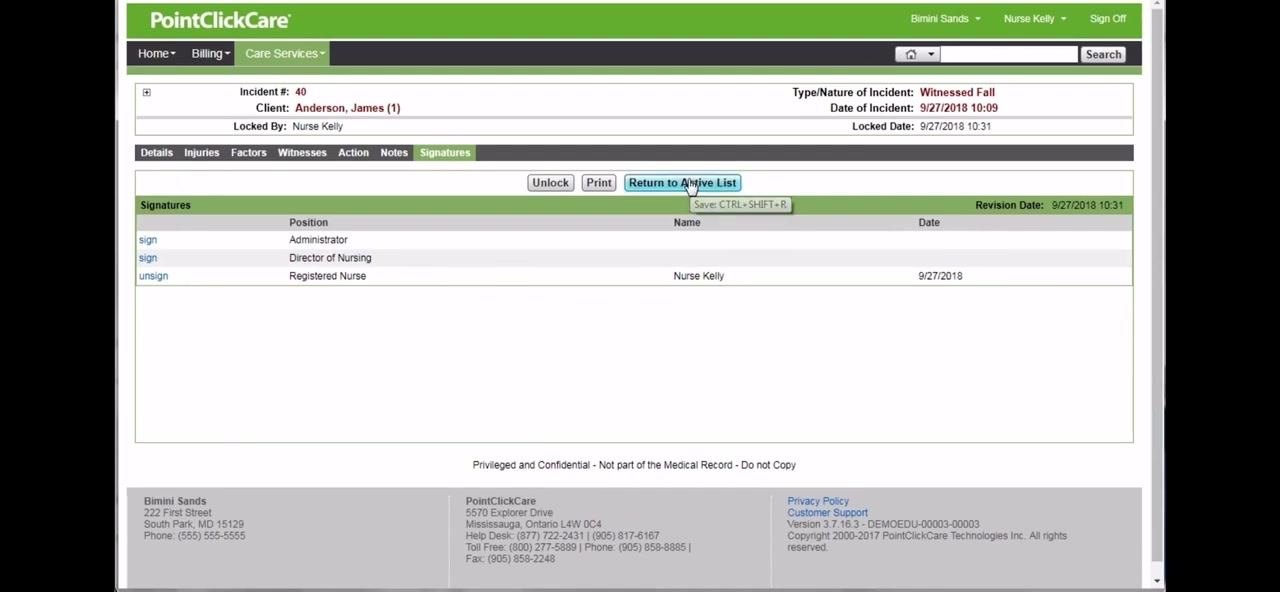
In the Signatures tab, review the list of required signers. The table displays positions such as Administrator, Director of Nursing, and Registered Nurse, each with a sign link.
Click the sign link next to your role to electronically sign the report. Depending on configuration, the system may also allow you to lock the incident report upon signature.
Verify and manage signatures
Once signed, your name and the date appear in the corresponding row. If needed, use the unsign link to remove your signature, or the Unlock button to make further edits before finalizing. When all required signatures are collected, the incident report is considered complete.
Return to the Active List
Click the Return to Active List button to exit the incident report and return to the main list of active incidents. This allows other staff to view, sign, or further process the incident as needed.
Summary
By following these steps, you create a complete and accurate incident report in PointClickCare — from the initial nursing and resident descriptions, through injury and pain assessment, contributing factors, witness statements, physician notification, and the Morse Fall Scale form, to the final notes and signatures. A thoroughly documented incident report, like the one created here for Mr. Anderson's witnessed fall, is ready for review and sign-off by other staff as needed.
Generation details: cost, quality tiers
Docsie billed 4,000 credits ($2.80) to analyze this 8-minute video at standard quality. The rewrite, template fill and Word/PDF exports were included. The same video at each quality tier:
| Quality | Frames sampled | Credits | Approx. cost |
|---|---|---|---|
| Draft | every 16-30 s | 2,000 | $1.40 |
| Standard (this guide) | every 8-15 s | 4,000 | $2.80 |
| Detailed | every 4-7 s | 8,000 | $5.60 |
| Ultra | every 1-3 s | 16,000 | $11.20 |
Credits priced at $0.70 per 1,000; plans include a monthly allowance. Enterprise customers on on-premise or bring-your-own-model deployments run this on their own inference and pay no per-video credits.
Generated by Docsie Video-to-Docs on 2026-10-14 from a 7-minute video. Screenshots are frames from the source video and belong to their creator, CR Learning, whose original is embedded above. If you own this video and want the guide removed or credited differently, contact us and we will act within one business day.