
How to Discharge a Patient in PointClickCare
The ADT (Admit, Discharge, Transfer) dashboard is where you manage every change in a resident's status within your facility. This guide walks you through the Residents dashboard in PointClickCare, shows you how to admit a new resident, and explains how to discharge a patient in PointClickCare or transfer them to another care setting such as a hospital or hospice.
Video: How to Admit, Transfer & Discharge a Resident in PointClickCare 2026 by Charting Made Easy. All credit for the demonstration goes to the creator; watch the original on YouTube. The written guide below was generated from this video by Docsie. Creator? Request a change or removal.
The ADT (Admit, Discharge, Transfer) dashboard is where you manage every change in a resident's status within your facility. This guide walks you through the Residents dashboard in PointClickCare, shows you how to admit a new resident, and explains how to discharge a patient in PointClickCare or transfer them to another care setting such as a hospital or hospice.
Prerequisites
- An active PointClickCare login with access to the CLINICAL tab.
- Confirmation that you are working in the correct facility (shown at the top of the dashboard).
- Resident information on hand, including admission/discharge dates, payer details, and physician assignments.
Understanding ADT terminology
ADT stands for Admit, Discharge, and Transfer. These three actions are the core functions you use to manage a resident's status throughout their stay in the facility.
Accessing the clinical dashboard
- Log in to PointClickCare.
- Review the main dashboard, which displays sections such as Clinical Communications, Facility Bulletin Board, and PointClickCare Announcements.
- Confirm you are in the correct facility (for example, (train) FACILITY_12) using the facility and user information shown at the top of the screen.
- Use the top navigation bar to access clinical features.
Viewing the residents list
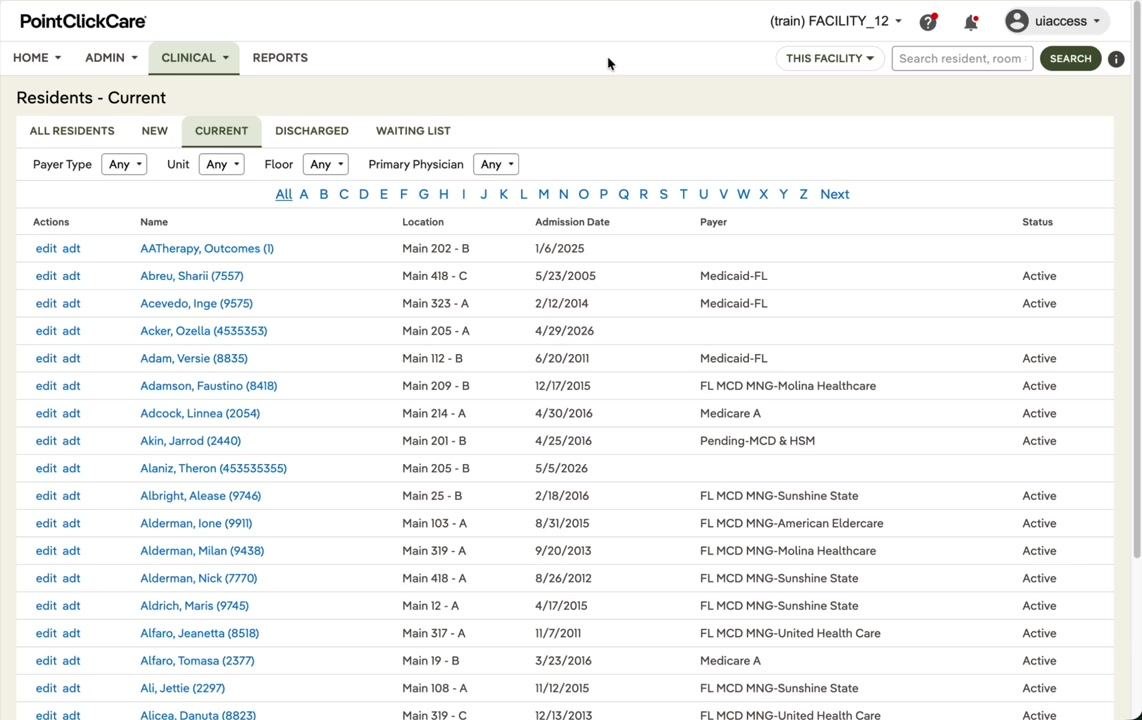
- Click CLINICAL in the top navigation bar.
- Select Residents to open the facility's resident list.
- Note the available tabs: ALL RESIDENTS, NEW, CURRENT, DISCHARGED, and WAITING LIST.
Each tab represents a different resident status:
- Current: Residents who are admitted and assigned a bed in the facility.
- New: Residents entered into the system but not yet admitted.
- Discharged: Residents who have left the facility.
- Waiting List: Residents waiting for admission (typically an extension of the New tab).
Filtering and searching residents
- Use the filters above the resident list to narrow results by Payer Type, Unit, Floor, or Primary Physician.
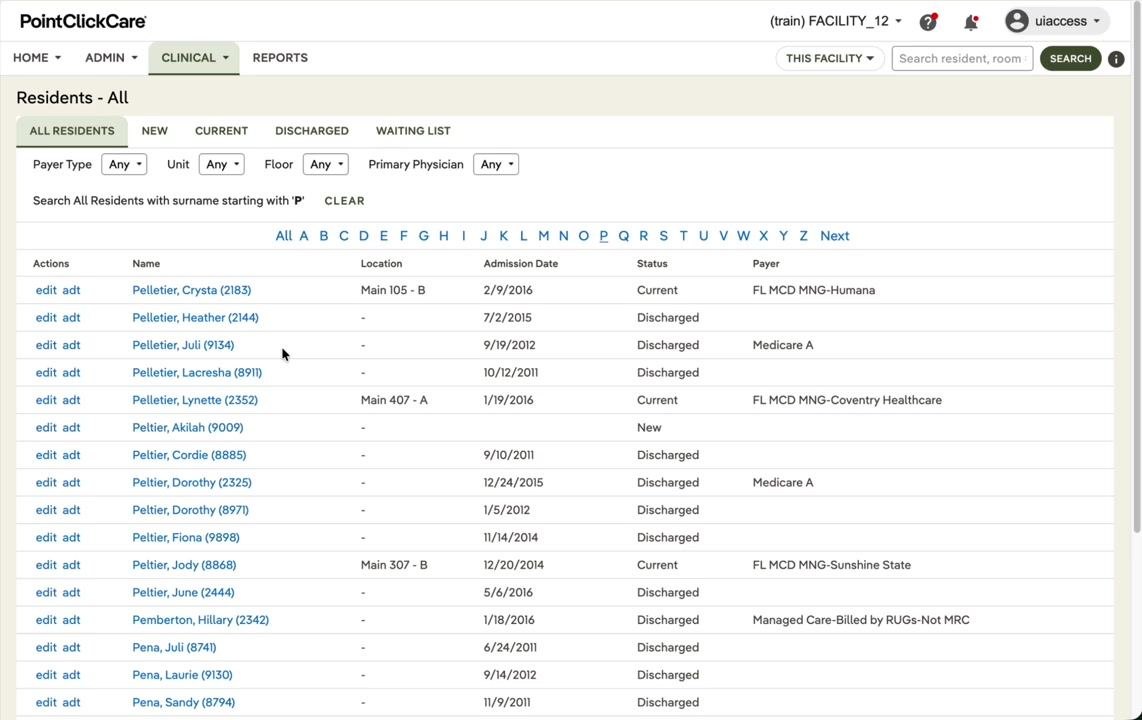
- Click the alphabet bar (A–Z) to filter residents by the first letter of their last name. For example, click P to view residents whose names start with "P."
Switching between resident status tabs
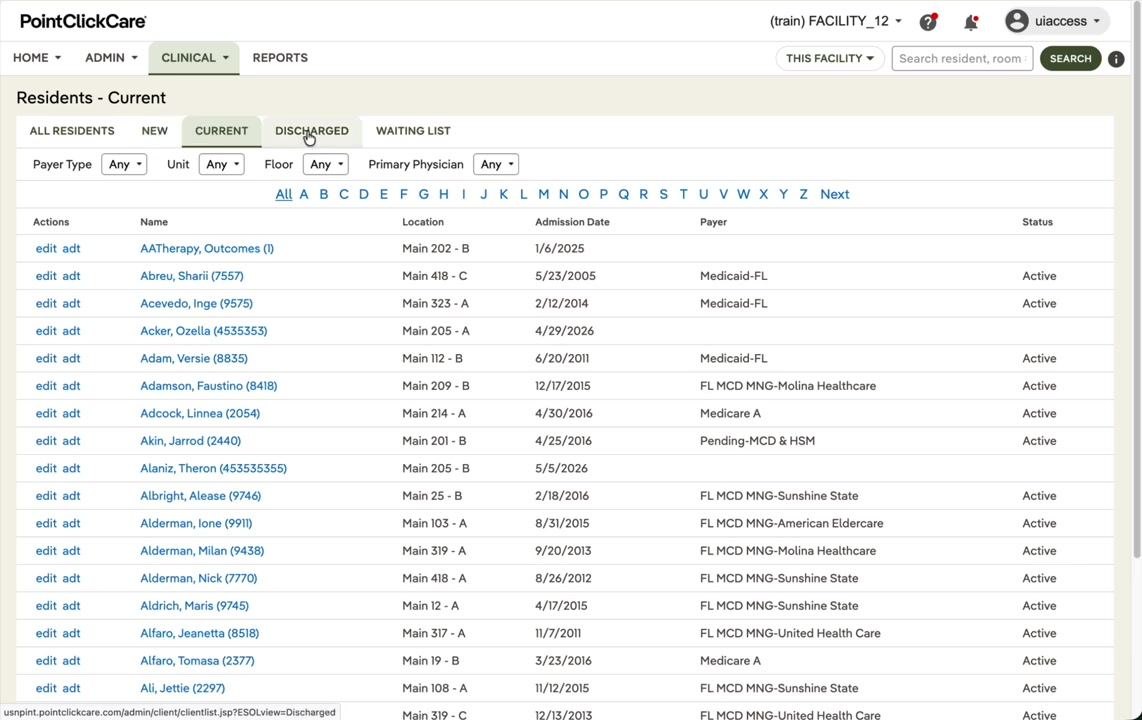
- Click CURRENT to view all currently admitted residents.
- Click NEW to view residents entered but not yet admitted.
- Click DISCHARGED to view residents who have left the facility.
- Click WAITING LIST to view residents awaiting admission.
Admitting a new resident
Locate the resident to admit
- Go to the ALL RESIDENTS tab.
- Use the search bar or the alphabet filter to find the resident by name — for example, search for "Peltier, Akilah" or click P to filter by last name.
- Identify the resident whose status shows as New.
Open the resident profile
- Click the resident's name (for example, Peltier, Akilah (9009)) to open their profile.
- Confirm the status shown at the top of the profile reads New, indicating the resident is entered but not yet admitted.
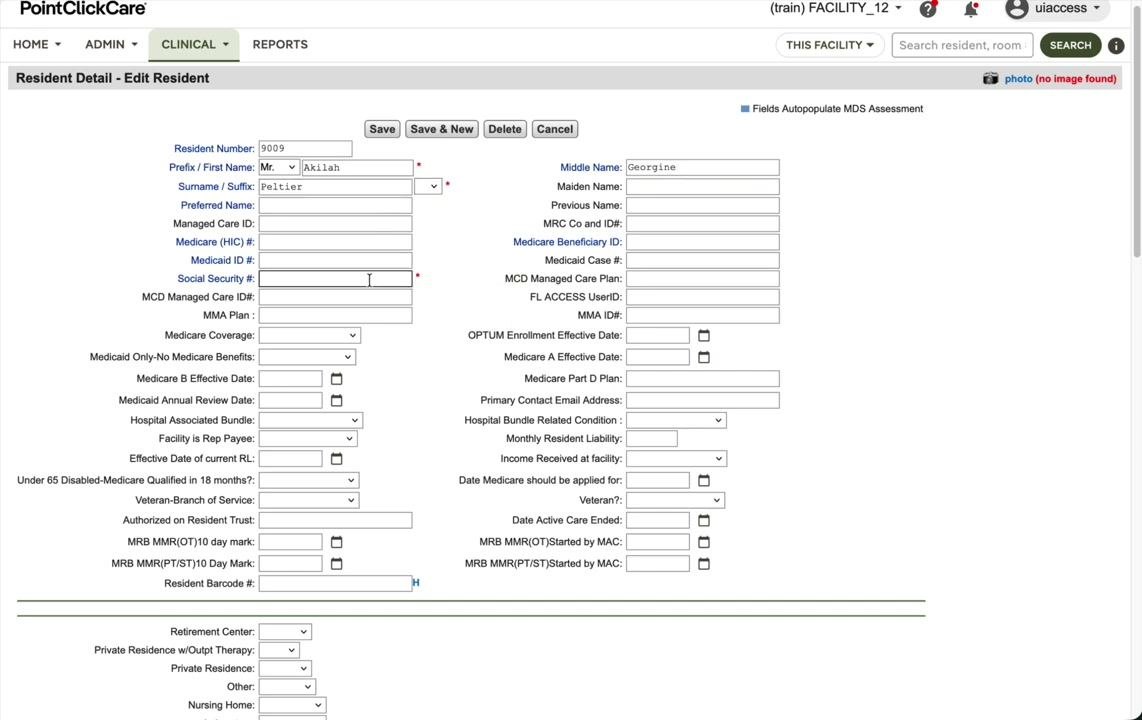
Review resident demographics
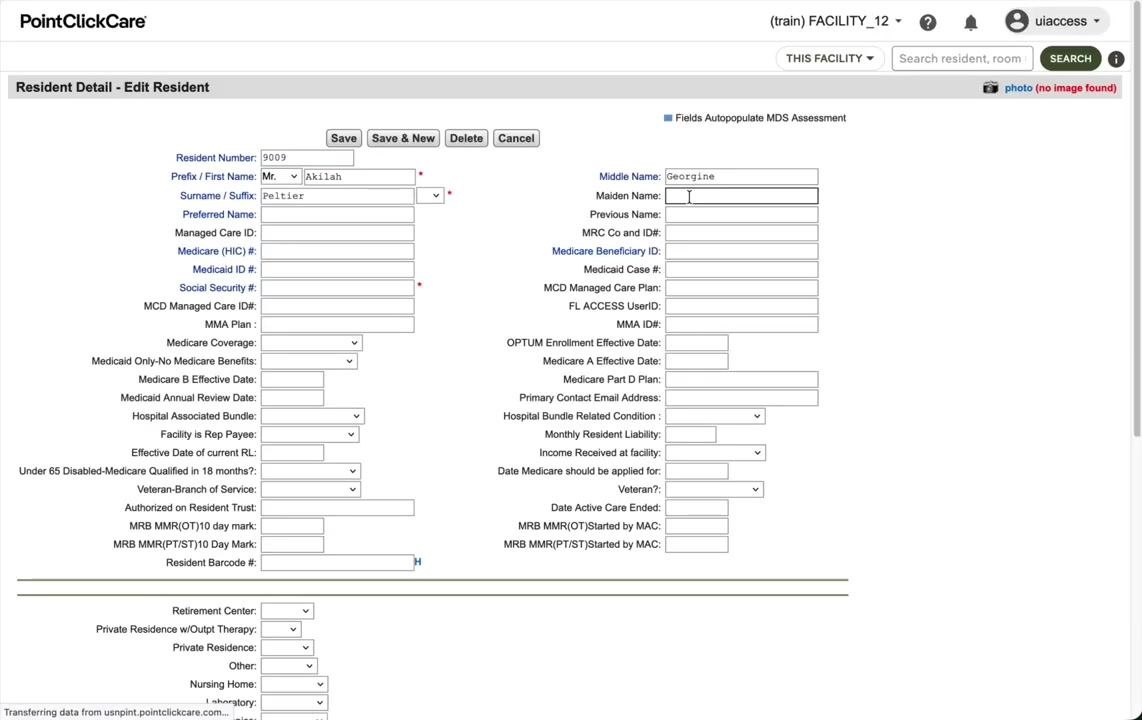
- Click the three-dot menu (⋮) and select Edit Demographics.
- On the Resident Detail - Edit Resident screen, verify that all required demographic fields are complete, including:
- Prefix/First Name: Mr./Akilah
- Surname: Peltier
- Middle Name: Georgine
- Social Security #: check for missing data
- Date of Birth: 9/1/1924
- Do not make changes unless necessary — this step is for verification only.
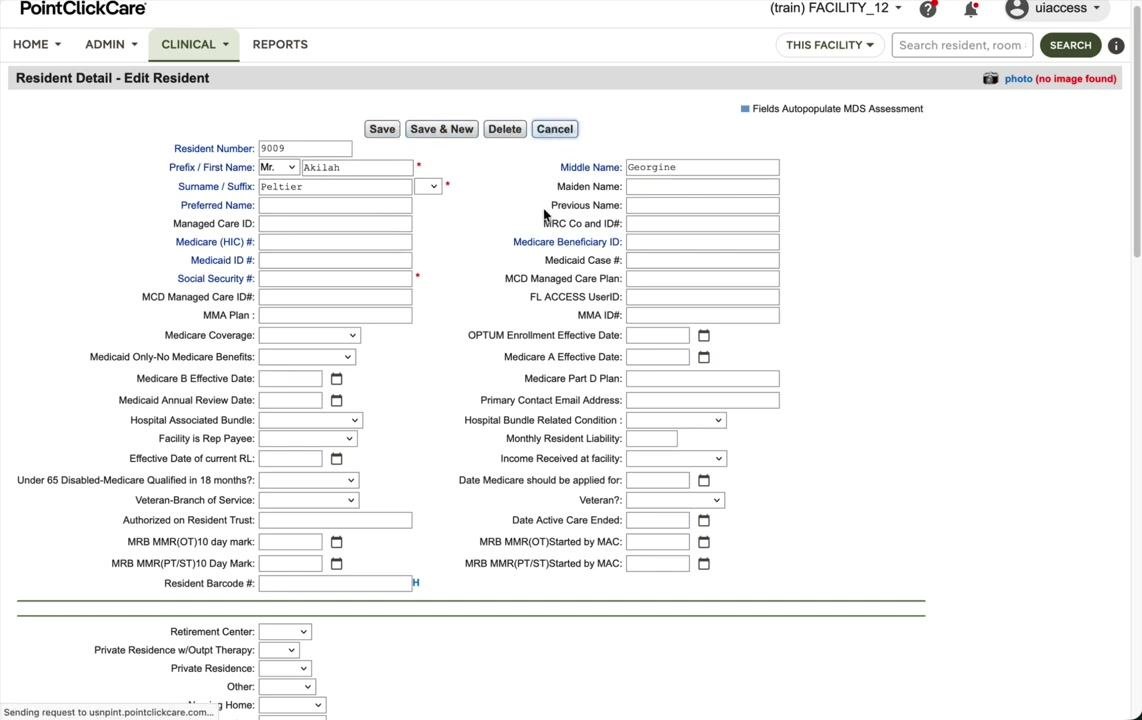
Return to the resident profile
If no changes are needed, click Cancel to exit the demographic edit screen and return to the resident's main profile dashboard.
Start the admission process
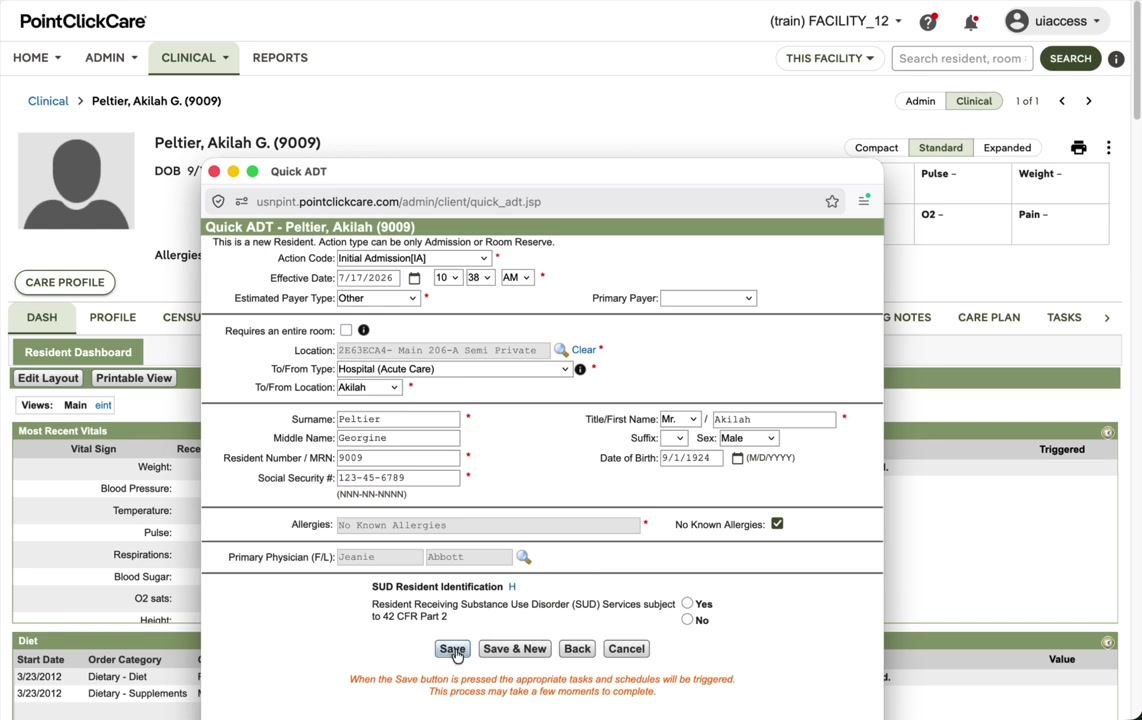
Hover over the CLINICAL menu and select Quick ADT. The Quick ADT window opens for the selected resident.
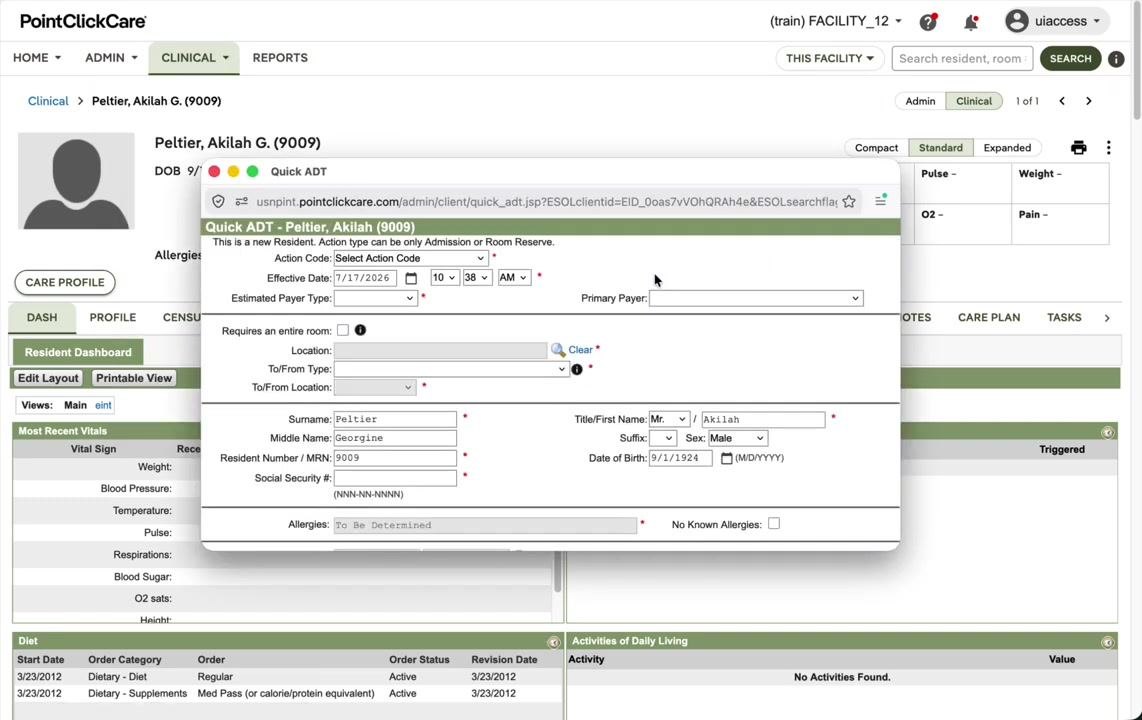
Complete the Quick ADT admission form
In the Quick ADT window, complete the following fields:
- Action Code: Select Initial Admission [A] from the dropdown.
- Effective Date: Enter the correct admission date (for example, 7/17/2026).
- Time: Enter the correct admission time (for example, 10:38 AM). Accurate timing matters for compliance and billing.
- Estimated Payer Type: Select the appropriate payer type.
- Primary Payer: Enter the primary payer if required.
- Location: Enter the resident's room or bed location if known.
- Other required fields: Complete all mandatory fields marked with an asterisk (*).
Select the estimated payer type
In the Quick ADT window, locate the Estimated Payer Type dropdown. If you are unsure of the payer type, select Other — you can update it later if needed.
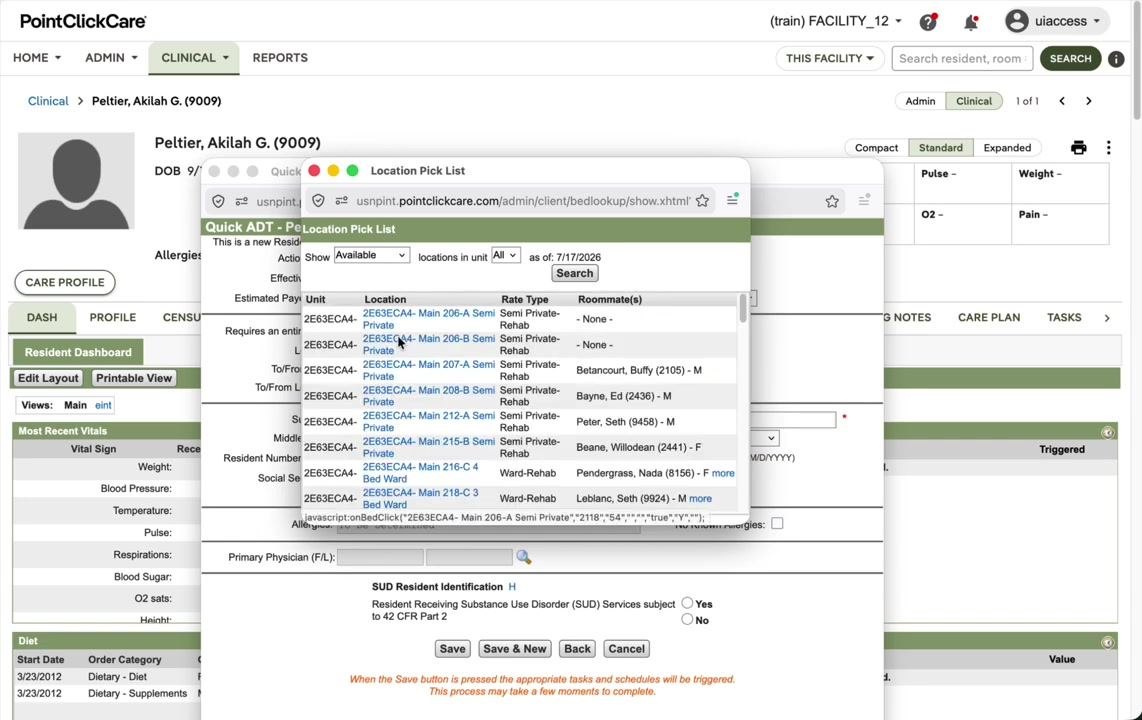
Assign a room without a roommate
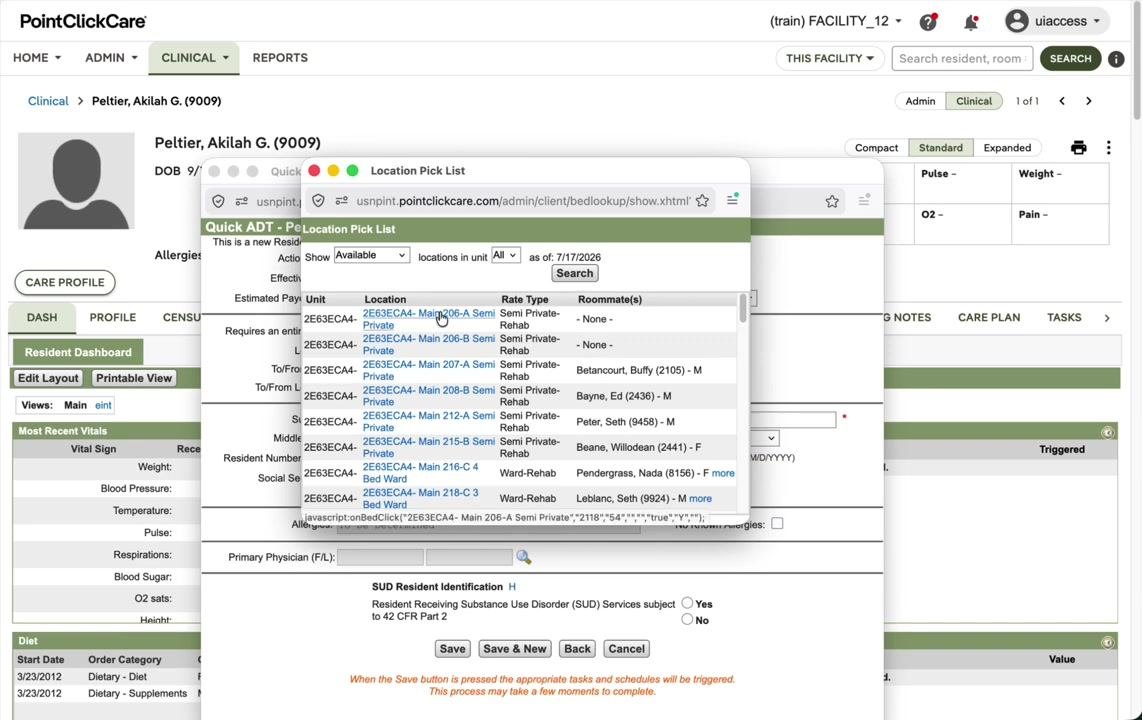
- Click the magnifying glass icon next to the Location field to open the Location Pick List.
- Review the available rooms. The Roommate(s) column shows whether a room is private or shared.
- Select a room marked - None - in the Roommate(s) column to assign a private room (for example, "2E63ECA4 - Main 206-A Semi Private").
- Click the desired room to assign it to the resident.
Specify the admission source
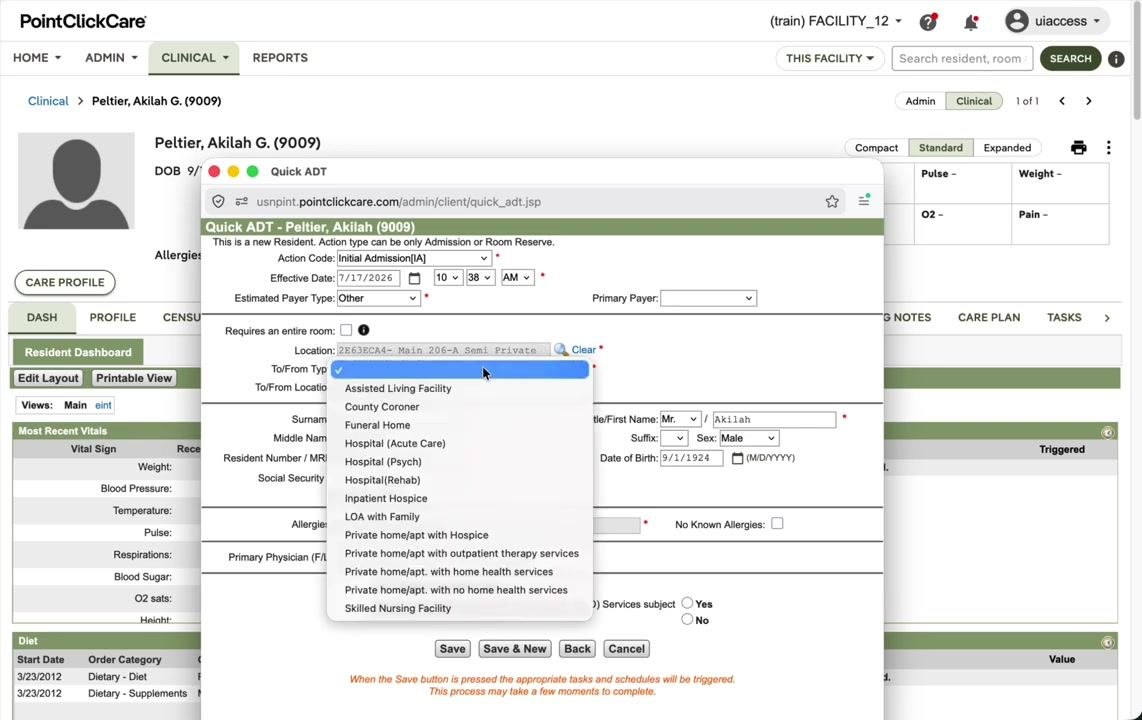
- In the To/From Type dropdown, select the source from which the resident is being admitted — for example, Hospital (Acute Care) if coming from an acute care hospital.
- In the To/From Location field, enter or select the specific location or name (for example, "Akilah").
Enter or update the Social Security number
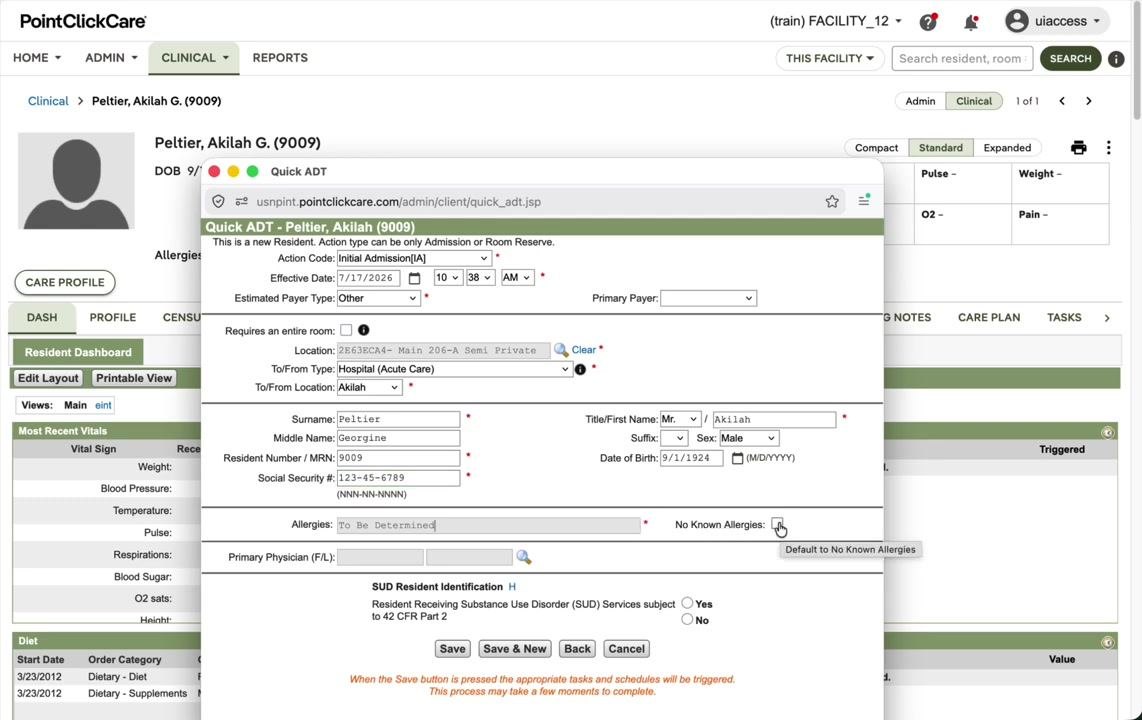
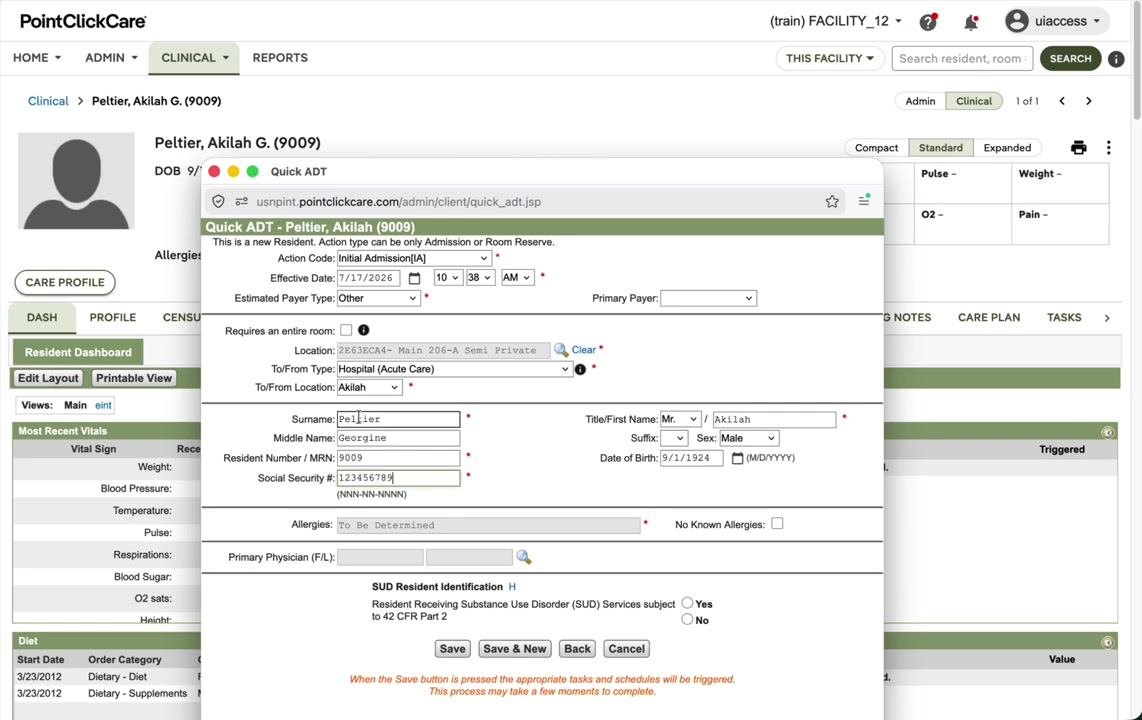
If the Social Security Number was missing from demographics, enter it now in the Social Security # field (for example, "123-45-6789"), and confirm all other required demographic fields are complete.
Document allergies
In the Allergies field, enter any known allergies. If there are none, check the No Known Allergies box to indicate this.
Assign the primary physician
- Click the field or button to select the primary physician.
- In the Select Medical Professionals window, find and check the box for the appropriate physician (for example, "Jeanie Abbott, Attending Physician").
- Confirm the Primary box is checked for the selected physician.
- Click OK (or the equivalent button) to confirm the selection.
Review all entered information
Double-check every field for accuracy before saving, including:
- Action Code: "Initial Admission [A]"
- Effective Date: "7/17/2026"
- Time: "10:38 AM"
- Estimated Payer Type: "Other"
- Location: "2E63ECA4 - Main 206-A Semi Private"
- To/From Type: "Hospital (Acute Care)"
- Social Security #: "123-45-6789"
- Allergies: "No Known Allergies" (box checked)
- Primary Physician: "Jeanie Abbott"
Save the admission
Click Save to finalize the admission. The system processes the admission and triggers any associated tasks and schedules.
Verify the resident's admission status
- Navigate to the CLINICAL menu and select Residents.
- On the Residents - Current tab, use the search bar or alphabet filter to locate the resident by surname (for example, "Peltier, Akilah").
- Confirm the resident now appears in the Current list with the correct location, admission date (for example, "7/17/2026"), and status "Active."
Following these steps ensures all required admission details are accurately entered and the resident is fully admitted in PointClickCare. Always verify the resident's status in the Current list to confirm a successful admission.
How to discharge a patient in PointClickCare
This section explains how to discharge a patient in PointClickCare, as well as how to transfer a current resident to another care setting.
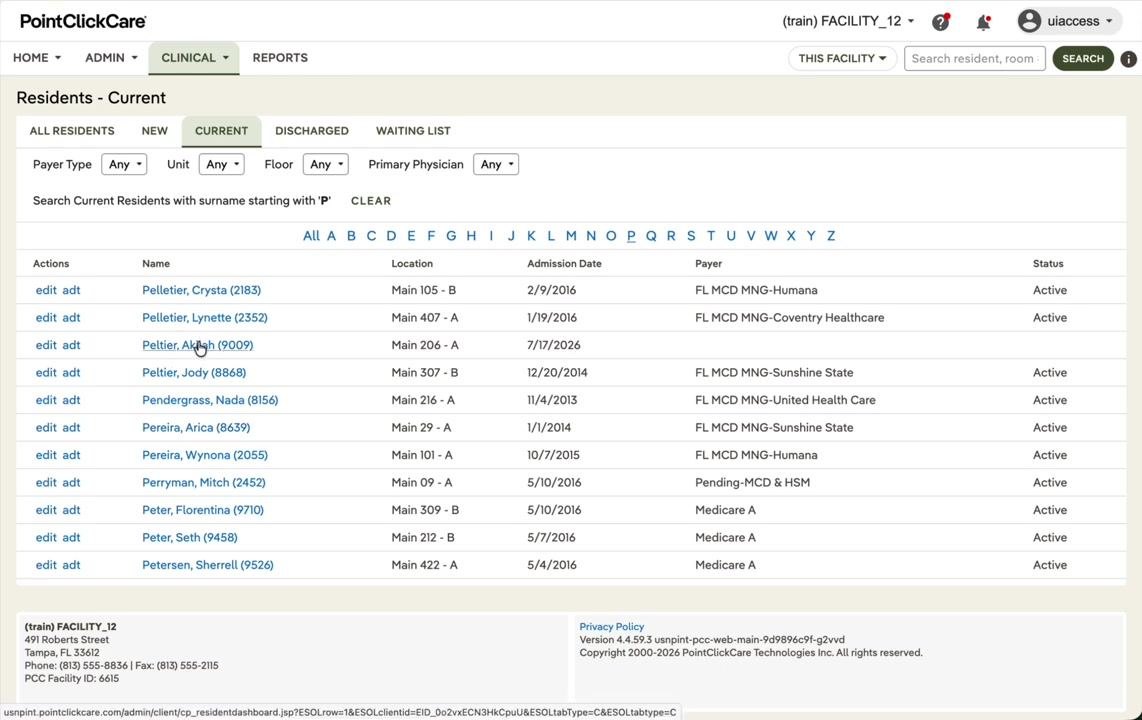
Access the current residents list
- Navigate to the CLINICAL tab.
- Click CURRENT to view all active residents.
- Use the search bar or alphabetical filter to locate the resident you wish to transfer or discharge. The list displays names, locations, admission dates, payers, and status.
Open the Quick ADT for the resident
Click the edit adt link next to the desired resident's name to open the Quick ADT window for that resident.
Initiate a transfer or discharge
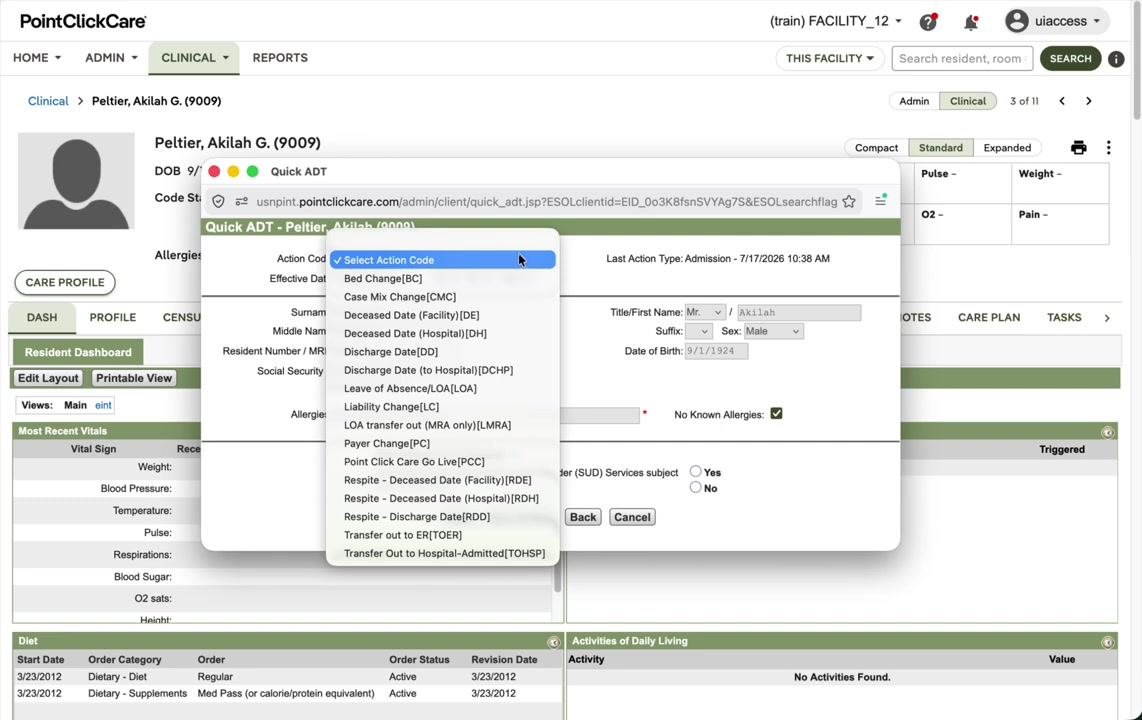
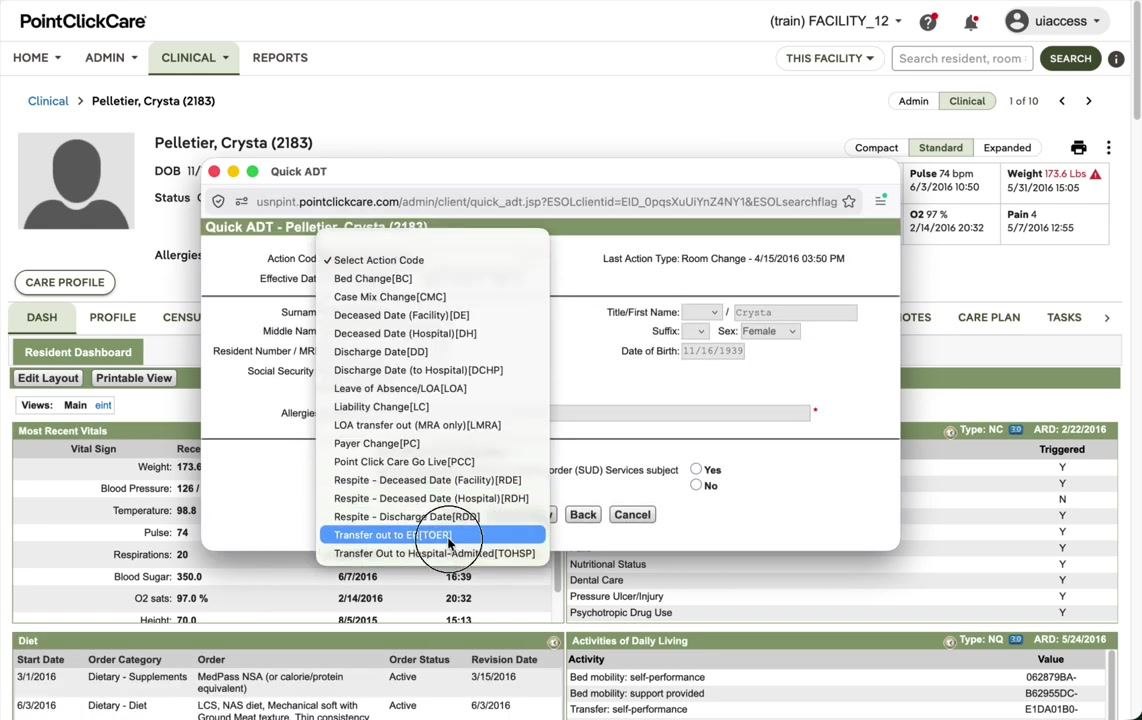
- In the Quick ADT window, click the Action Code dropdown menu.
- Select the appropriate action:
- For a transfer: choose Transfer out to ER[TOER] or Transfer Out to Hospital-Admitted[TOHSP] as needed.
- For a discharge: choose Discharge Date[DD].
- The dropdown also includes options such as Bed Change, Case Mix Change, Leave of Absence, Liability Change, and various other discharge/transfer types.
Enter transfer or discharge details
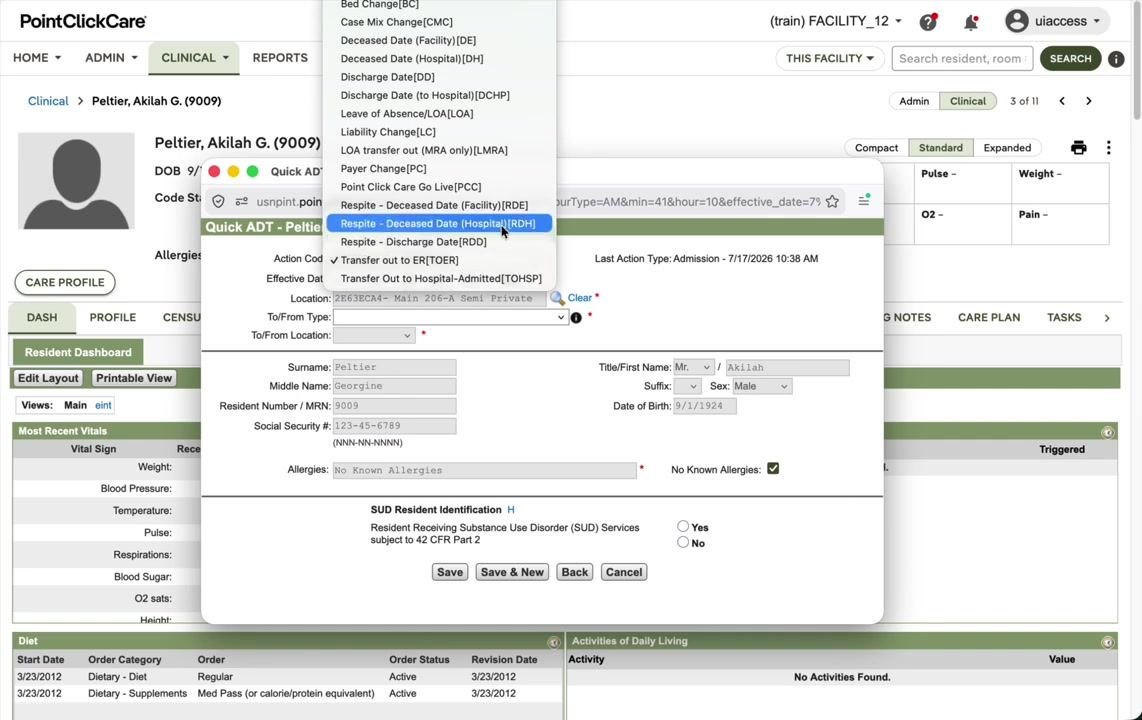
Complete the required fields:
- Effective Date: Enter the date and time of the transfer or discharge (for example, 7/17/2026, 10:41 AM).
- Location: The current location is auto-filled.
- To/From Type: Select the destination type from the dropdown (for example, Assisted Living Facility, Hospital (Acute Care), Inpatient Hospice, etc.).
- To/From Location: Enter or select the specific location if required.
For example, when discharging a resident to inpatient hospice, select Inpatient Hospice as the To/From Type and enter the location (for example, "Collen").
Save the transfer or discharge
- Review all entered information for accuracy.
- Click Save at the bottom of the Quick ADT window.
- The system processes and saves the transfer or discharge; a "Saving..." message may appear briefly.
- Once saved, the resident's status updates accordingly.
Verify the resident's status
Navigate to the DISCHARGED tab in the Residents section to confirm the resident now appears in the discharged list.
Transferring a resident to hospital acute care
Select the transfer destination
- In the Quick ADT window, confirm the Action Code is set to Transfer out to ER[TOER].
- Set the Effective Date and time (for example, 7/17/2026, 10:43 AM).
- Confirm the Location field is auto-filled with the resident's current location.
- In the To/From Type dropdown, select Hospital (Acute Care) from the list of destination types.
- In the To/From Location field, enter or select the specific hospital location (for example, "Aliene").
Indicate emergency transfer status
If this is an emergency transfer, check the Emergency Transfer box. For emergency transfers, a physician order is not required; otherwise, enter the name of the ordering physician in the Ordered by field.
Specify the reason for transfer
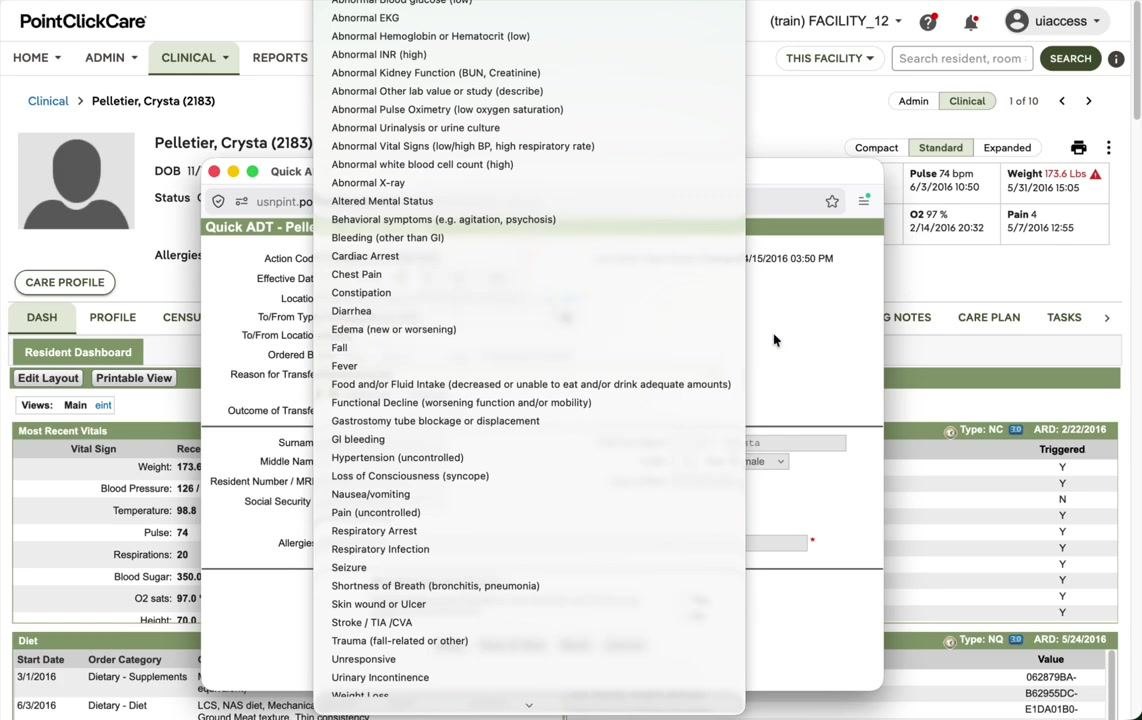
- Click the Reason for Transfer dropdown to view the list of clinical reasons.
- Select the most appropriate reason (for example, "Abdominal pain," "Pain (uncontrolled)," "Chest Pain," or "Fall"). The list also includes options such as abnormal vital signs, altered mental status, fever, and functional decline.
Set the transfer type and outcome
- Choose whether the transfer is Unplanned or Planned using the appropriate radio button.
- In the Outcome of Transfer dropdown, select the result: "ED Visit Only," "Admitted, Inpatient," "Admitted, Observation," "Admitted, Status Uncertain," or "Other." For example, select Admitted, Inpatient if the resident was admitted to the hospital as an inpatient.
Save the transfer
Review all entered information for accuracy, then click Save at the bottom of the Quick ADT window to complete the transfer process.
Verify the resident's status
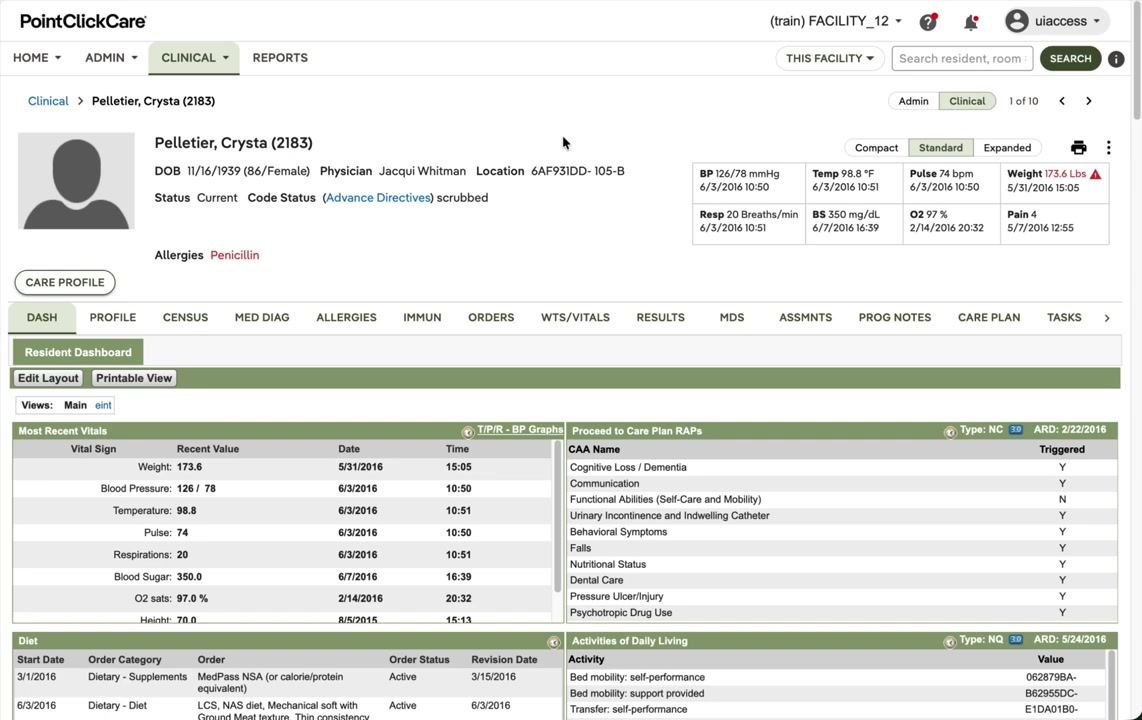
After saving, the resident no longer appears in the Current residents list, and the resident's dashboard reflects the updated status and location.
What's next
With the ADT dashboard, you can manage the full resident lifecycle in PointClickCare — from initial admission, through filtering and tracking status, to transfers and discharge. Always confirm the resident's status in the Current or Discharged tab after each action to ensure the change was processed correctly.
Generation details: cost, quality tiers
Docsie billed 4,500 credits ($3.15) to analyze this 9-minute video at standard quality. The rewrite, template fill and Word/PDF exports were included. The same video at each quality tier:
| Quality | Frames sampled | Credits | Approx. cost |
|---|---|---|---|
| Draft | every 16-30 s | 2,250 | $1.57 |
| Standard (this guide) | every 8-15 s | 4,500 | $3.15 |
| Detailed | every 4-7 s | 9,000 | $6.30 |
| Ultra | every 1-3 s | 18,000 | $12.60 |
Credits priced at $0.70 per 1,000; plans include a monthly allowance. Enterprise customers on on-premise or bring-your-own-model deployments run this on their own inference and pay no per-video credits.
Generated by Docsie Video-to-Docs on 2026-10-12 from a 8-minute video. Screenshots are frames from the source video and belong to their creator, Charting Made Easy, whose original is embedded above. If you own this video and want the guide removed or credited differently, contact us and we will act within one business day.