
How to Create an Account Hierarchy in Oracle Fusion
Account hierarchies in Oracle Fusion Financials are structured using "trees," which are hierarchical data models. These hierarchies are foundational for managing and reporting financial data within the General Ledger (GL) applications. This guide walks you through how to create an account hierarchy in Oracle Fusion, from understanding tree structures to building, importing, and verifying the hierarchy end to end.
Video: Oracle Fusion GL Account Hierarchies | Oracle General Ledger Account Hierarchy | Oracle Fusion BISP by BISP Solutions (2022). All credit for the demonstration goes to the creator; watch the original on YouTube. The written guide below was generated from this video by Docsie. Creator? Request a change or removal.
Account hierarchies in Oracle Fusion Financials are structured using "trees," which are hierarchical data models. These hierarchies are foundational for managing and reporting financial data within the General Ledger (GL) applications. This guide walks you through how to create an account hierarchy in Oracle Fusion, from understanding tree structures to building, importing, and verifying the hierarchy end to end.
Prerequisites
- Access to an Oracle Fusion Financials implementation project.
- A value set already defined in the chart of accounts (for example, "Fusion Accounts") in which you will enable the hierarchy.
- Microsoft Excel to work with the FBDI (file-based data import) template.
- Appropriate privileges to access Manage Account Hierarchies, Scheduled Processes, and implementation project task lists.
Understanding account hierarchies
Understand what account hierarchies represent
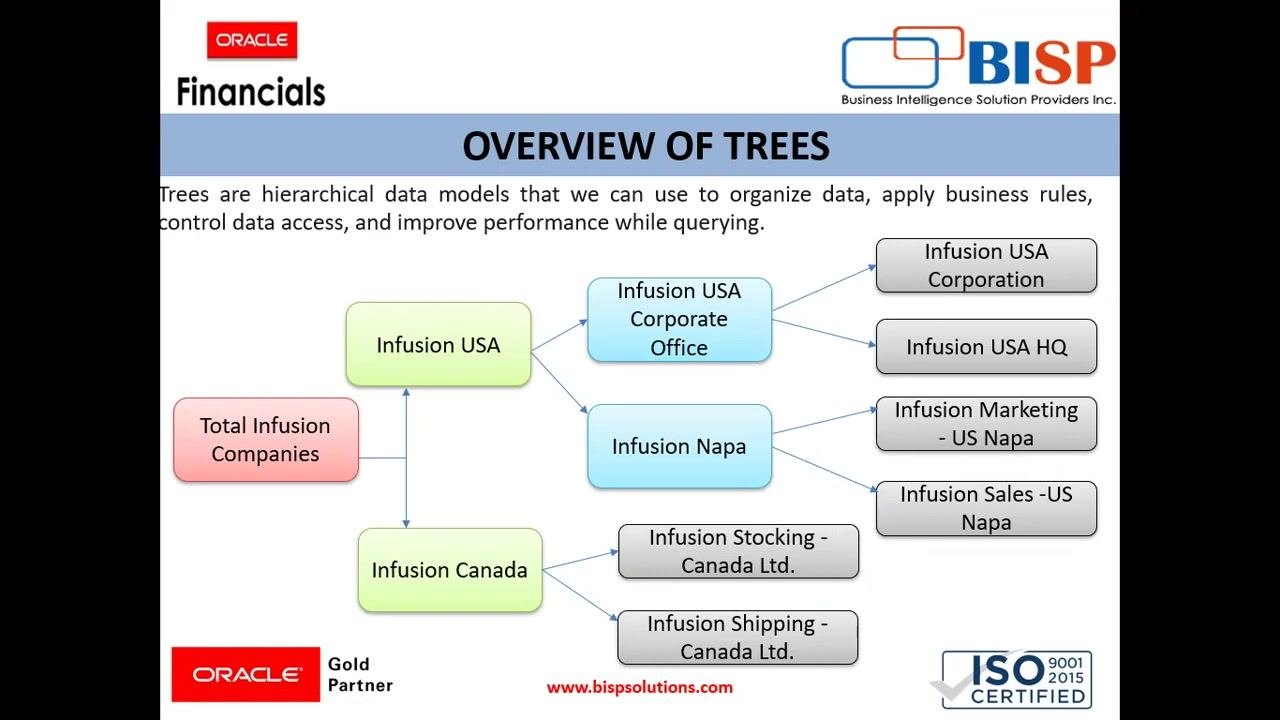
Account hierarchies in Oracle Fusion Financials are built on "trees," which are hierarchical data models used to organize and report financial data within the General Ledger (GL) applications.
Recognize the primary uses of account hierarchies
Account hierarchies serve several key purposes:
- Organize data efficiently.
- Apply business rules.
- Control data access.
- Improve performance during data queries.
- Support financial reports, Smart View inquiries, allocation definitions, cross-validation rules, and revaluation definitions.
Review an example hierarchy structure
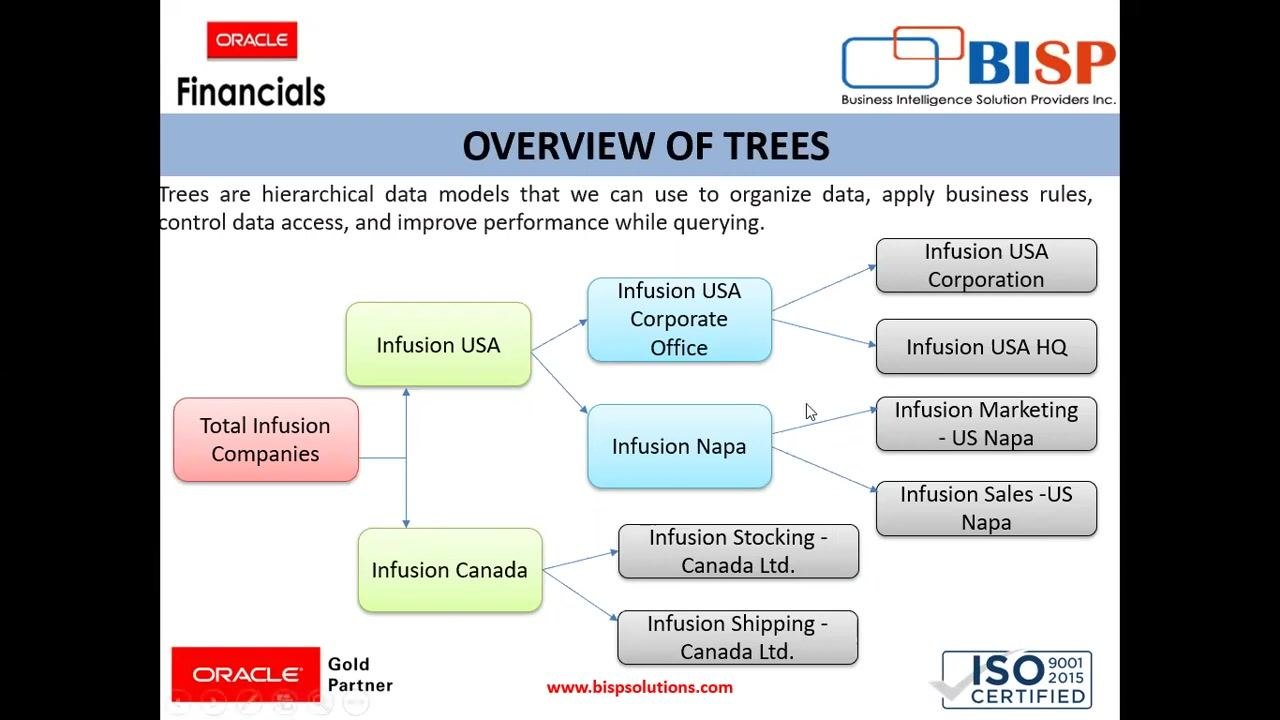
A typical hierarchy has a root node with multiple branches representing organizational entities. In the example used throughout this guide:
- The root node is "Total Infusion Companies."
- Two main branches extend from it: "Infusion USA" and "Infusion Canada."
- "Infusion USA" further branches into "Infusion USA Corporate Office" and "Infusion Napa."
- "Infusion USA Corporate Office" branches into "Infusion USA Corporation" and "Infusion USA HQ."
- "Infusion Napa" branches into "Infusion Marketing - US Napa" and "Infusion Sales - US Napa."
- "Infusion Canada" branches into "Infusion Stocking - Canada Ltd." and "Infusion Shipping - Canada Ltd."
Each node represents an organizational entity, and the structure allows for clear parent-child relationships.
Learn the key terminology
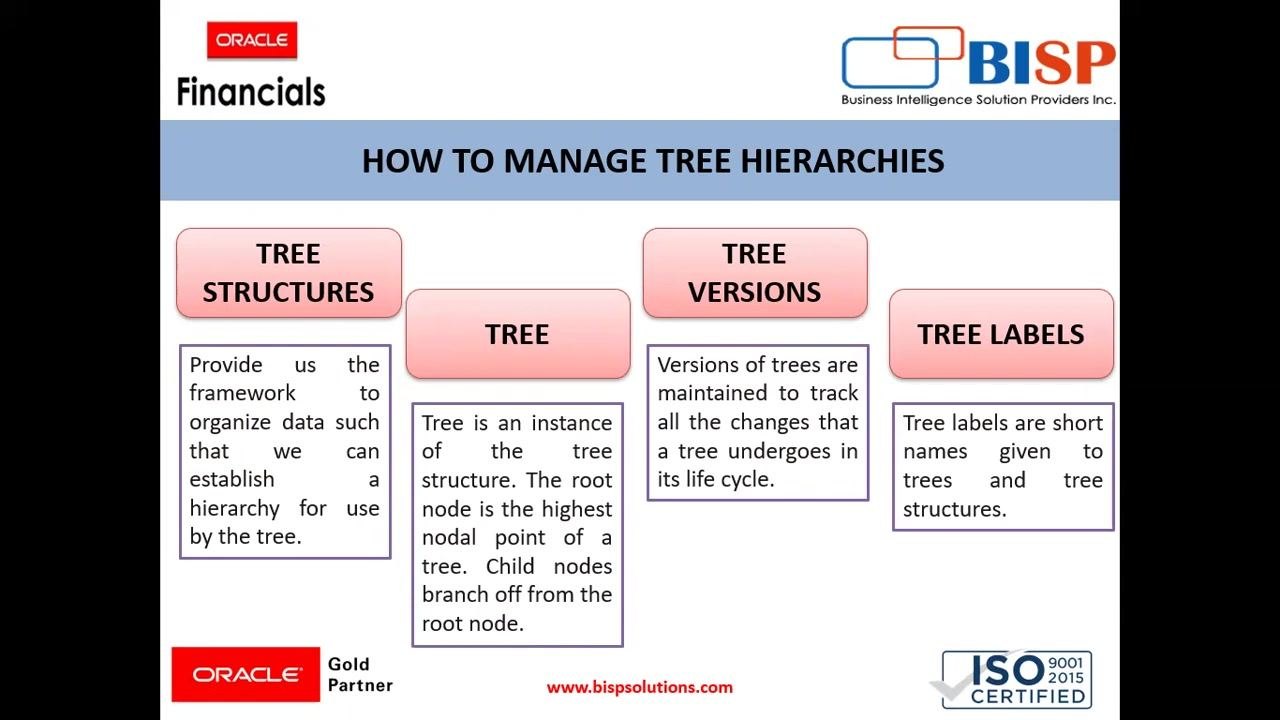
Before building a hierarchy, it helps to understand these core concepts:
- Tree Structures: Provide the framework to organize data so that you can establish a hierarchy for use by the tree.
- Tree: An instance of the tree structure. The root node is the highest nodal point of a tree, and child nodes branch off from the root node.
- Tree Versions: Versions of trees are maintained to track all the changes that a tree undergoes in its life cycle.
- Tree Labels: Short names given to trees and tree structures.
With this foundational understanding of account hierarchies, their structure, and essential components, you're ready to create one in Oracle Fusion.
Creating the account hierarchy
Navigate to the Manage Account Hierarchies task
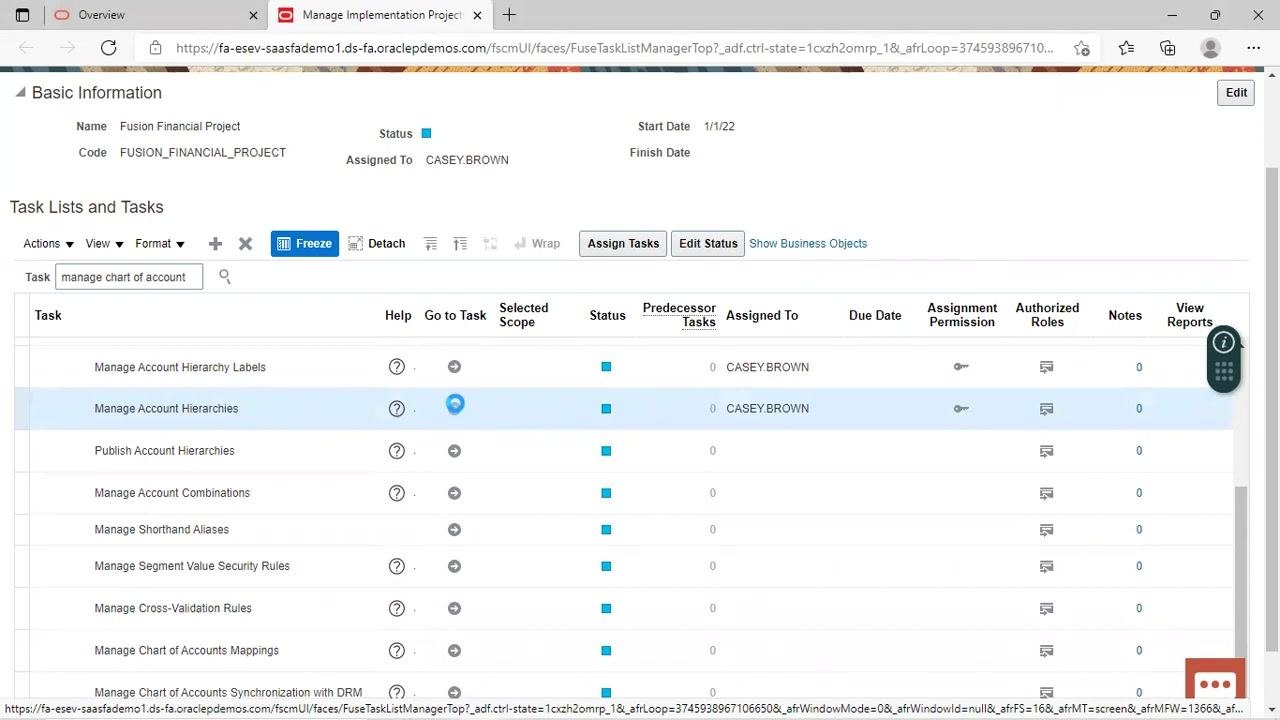
You will use the file-based data import (FBDI) technique to import account hierarchies into your Oracle Fusion instance. Start by locating the task in your implementation project:
- Go to your implementation project dashboard.
- Locate the task list and find Manage Account Hierarchies.
- Click the Go to Task icon next to Manage Account Hierarchies.
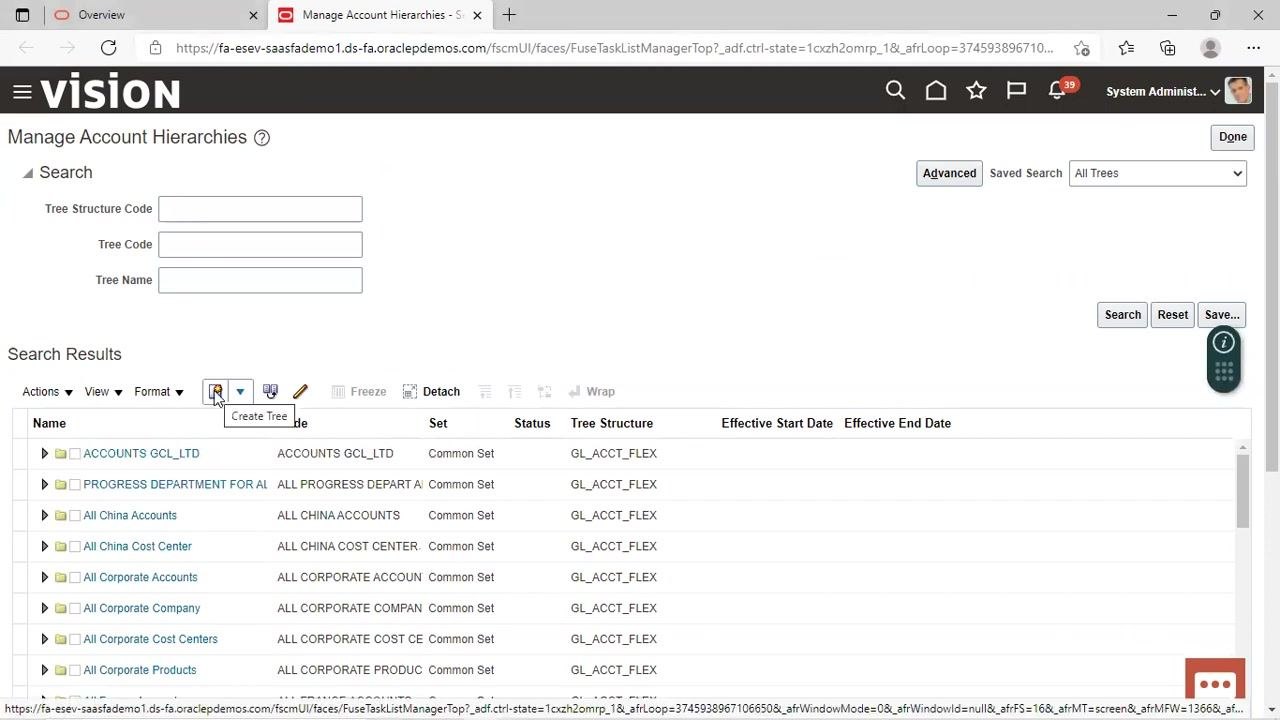
The Manage Account Hierarchies screen displays a list of all trees already created in the system.
Create a new tree
Click the Create Tree icon (the folder with a plus sign) above the search results.
Enter the tree definition details
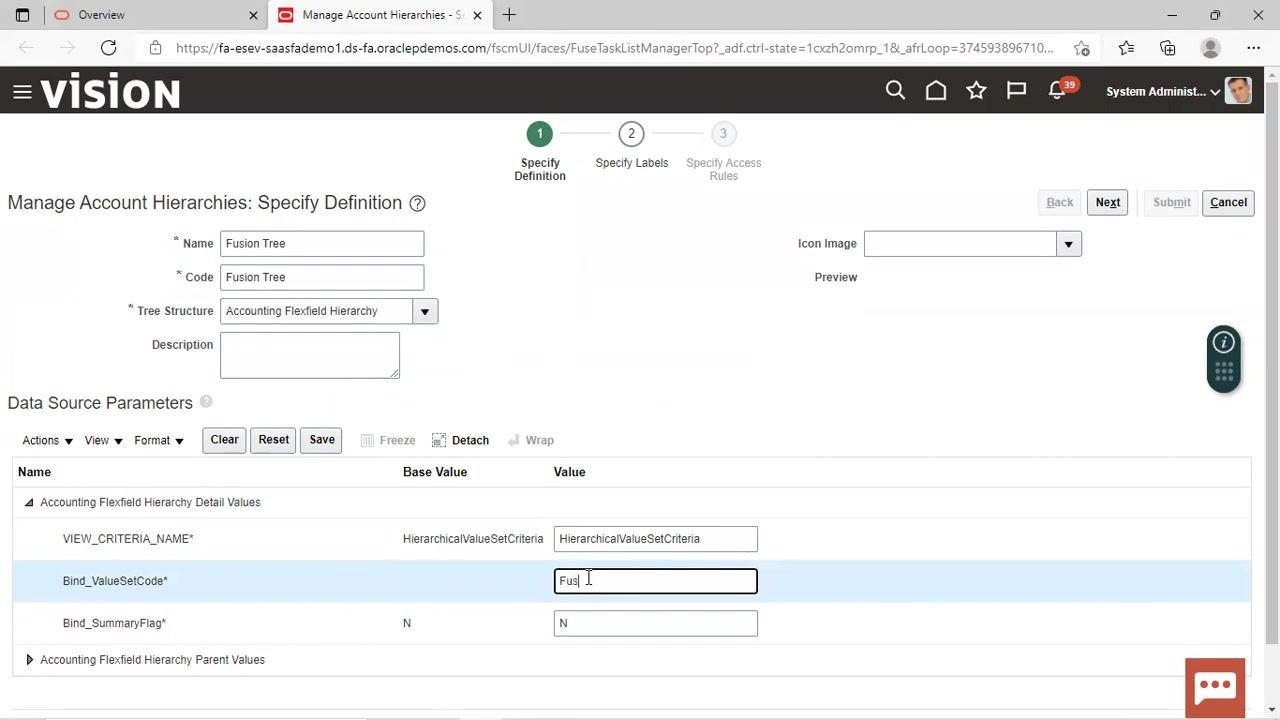
On the Manage Account Hierarchies: Specify Definition form, fill in the following fields:
- Name: Enter "Fusion Tree".
- Code: Enter "Fusion Tree".
- Tree Structure: Click the dropdown and select "Accounting Flexfield Hierarchy".
- (Optional) Enter a description if needed.
- (Optional) Select an icon image if desired.
Click Next to proceed.
Bind the value set code for the hierarchy
In the Data Source Parameters section, locate the Bind_ValueSetCode field and enter the value set code in which you are enabling the hierarchy — for example, "FusionAccount".
Enter the parent value set code for the hierarchy
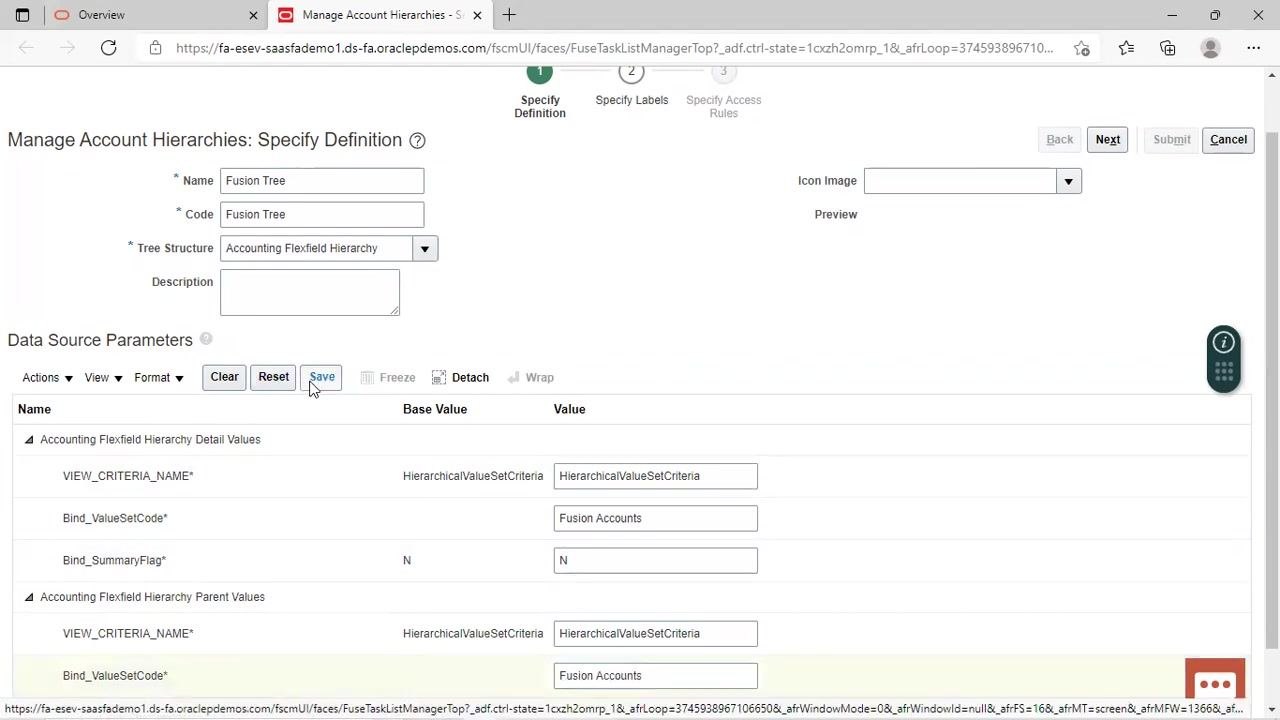
In the Accounting Flexfield Hierarchy Parent Values section, enter Bind_ValueSetCode = Fusion Accounts. Ensure both the detail and parent value set codes are set to "Fusion Accounts".
Save the tree definition
Click the Save button in the Data Source Parameters section to save your entries.
Proceed to the next step
Click the Next button at the top right to continue. If prompted, click Next again to move through the wizard steps.
Submit the tree definition
Click the Submit button to finalize the creation of the tree definition.
Creating a tree version
Search for your tree
In the Tree Name field, enter "Fusion Tree". Click the Search button to locate your newly created tree.
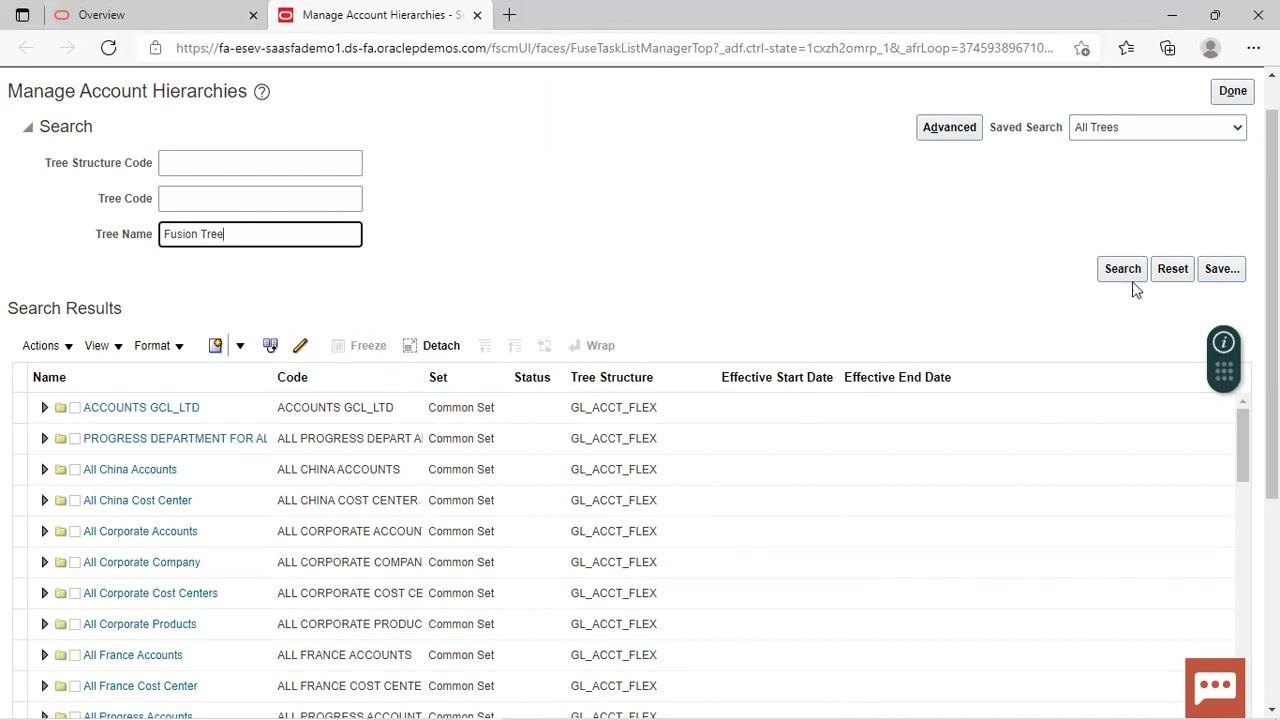
Select the tree and create a version
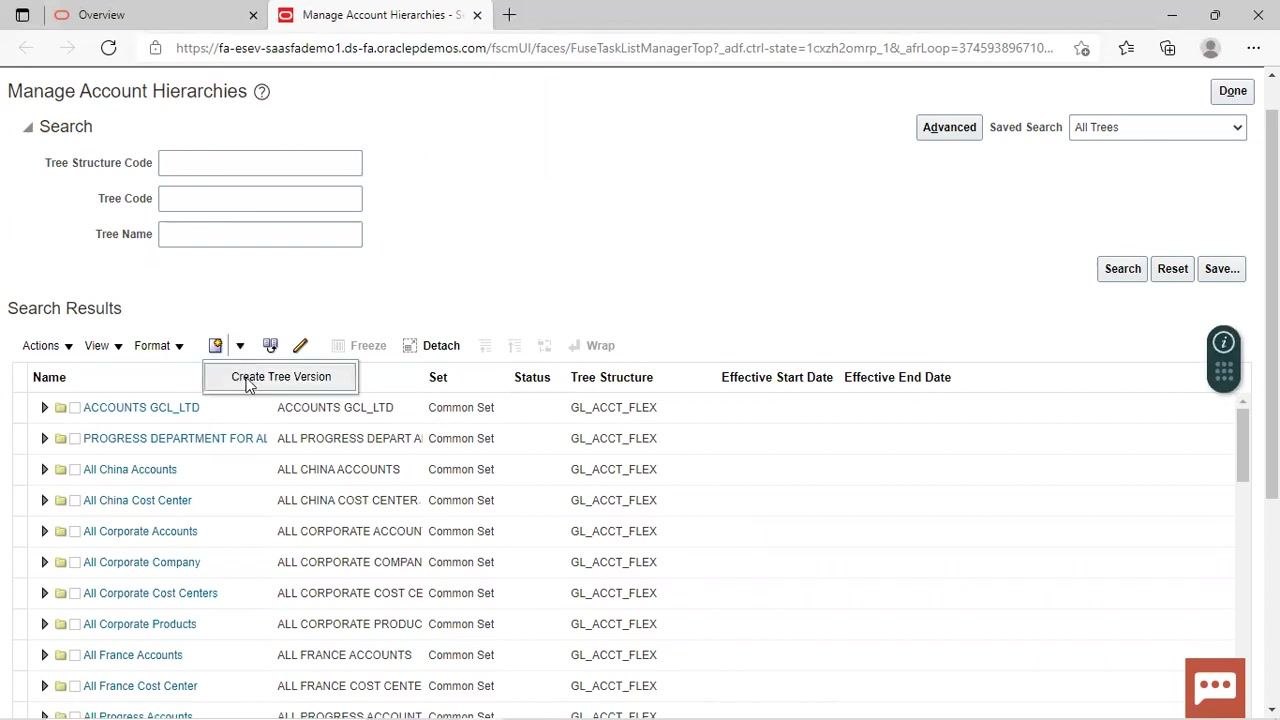
In the search results, select the row for Fusion Tree, then click the Create Tree Version icon.
Enter tree version details
On the Manage Account Hierarchies: Specify Definition form for the tree version, fill in the following:
- Name: Enter "Fusion Tree Version".
- Effective Start Date: Enter "1/8/22".
- (Optional) Add a description or note if needed.
Click Next to proceed.
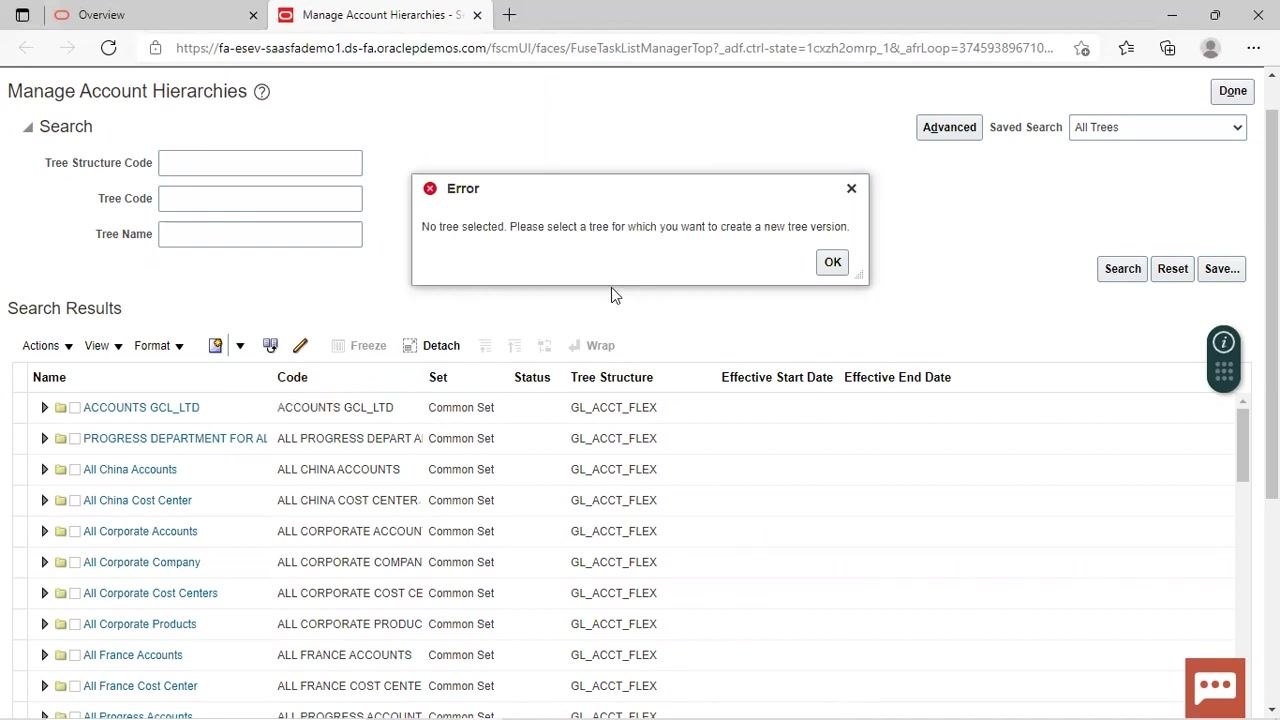
Confirm tree version creation
A confirmation dialog appears stating "A new blank tree version created successfully. Click OK to do node operations." Click OK to continue.
Submit the tree version
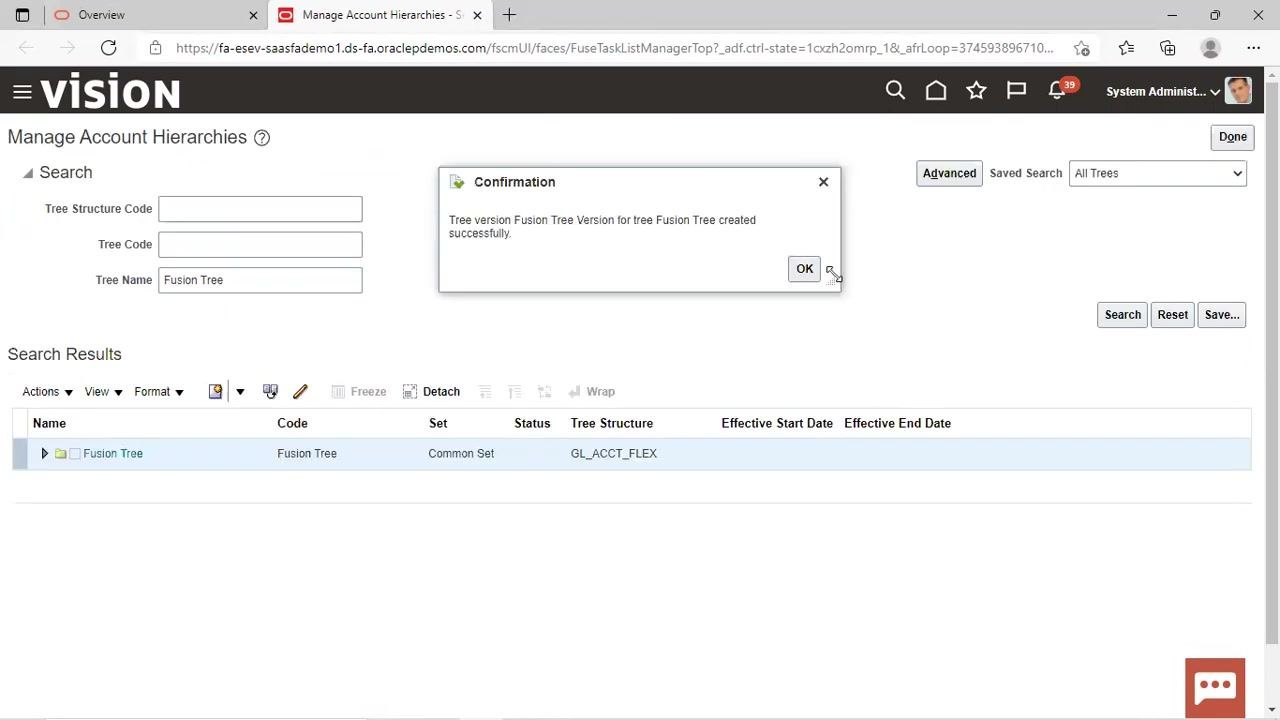
Click the Submit button to finalize the tree version creation. A confirmation dialog appears stating "Tree version Fusion Tree Version for tree Fusion Tree created successfully." Click OK to finish.
You have now successfully created both a new account hierarchy (tree) and its initial version in Oracle Fusion Financials. The next step is to download the FBDI template from the Oracle repository to prepare your data for import.
Importing the segment value hierarchy using the FBDI template
Prepare to upload data using FBDI sheets
After creating the blank hierarchy (tree), you upload the account hierarchy data using the FBDI templates provided by Oracle.
Download the FBDI template for importing segment values and hierarchies
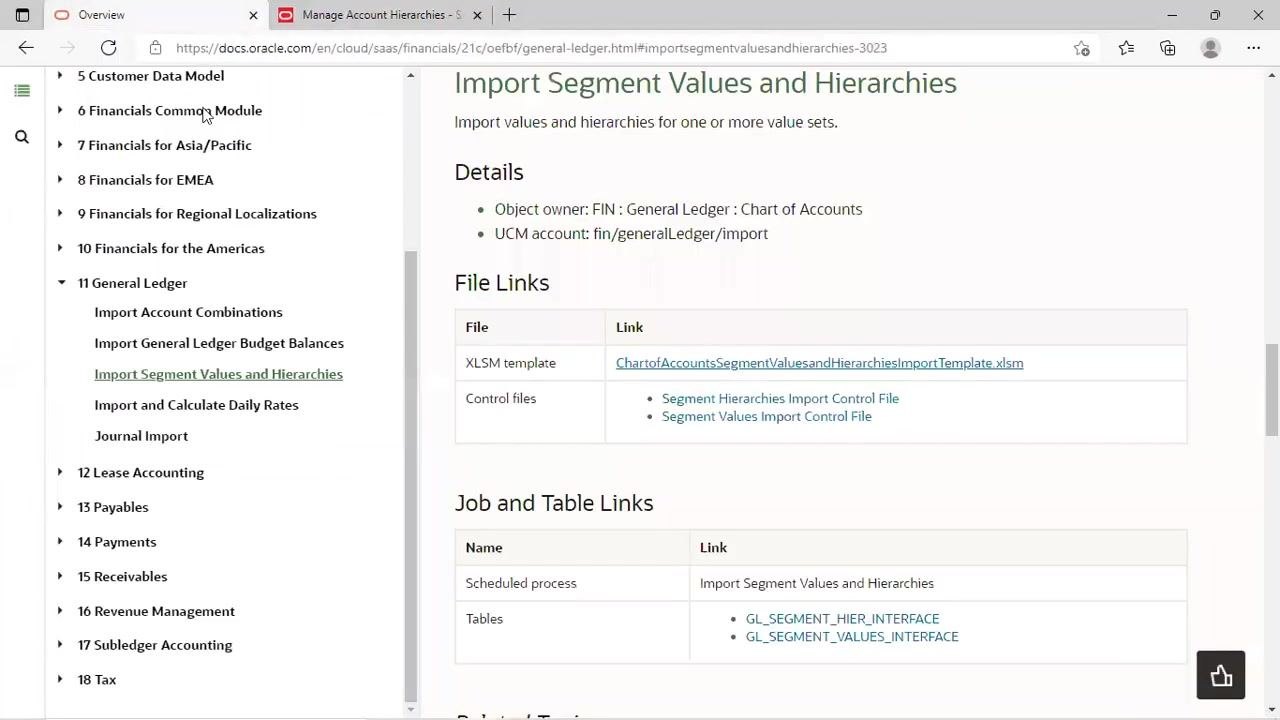
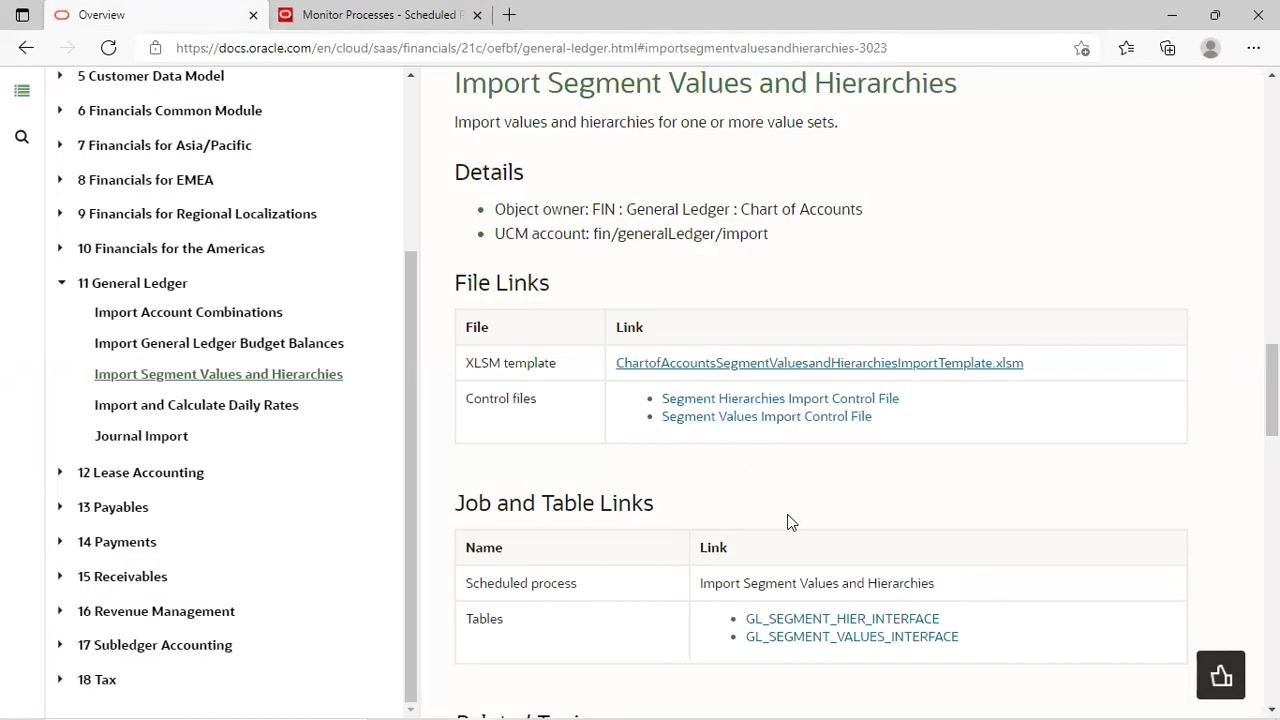
- Open your web browser and navigate to the Oracle documentation page for "Import Segment Values and Hierarchies."
- In the navigation pane on the left, expand 11 General Ledger and select Import Segment Values and Hierarchies.
- In the main content area, locate the File Links section.
- Under XLSM template, click the link labeled ChartofAccountsSegmentValuesandHierarchiesImportTemplate.xlsm to download the FBDI template.
- Optionally, review and download the control files:
- Click Segment Hierarchies Import Control File to download the control file for hierarchies.
- Click Segment Values Import Control File to download the control file for values.
- Note the Job and Table Links section for reference:
- The scheduled process for import is Import Segment Values and Hierarchies.
- The relevant interface tables are GL_SEGMENT_HIER_INTERFACE and GL_SEGMENT_VALUES_INTERFACE.
With the FBDI template and supporting files downloaded, you're ready to populate the template with your data and perform the import.
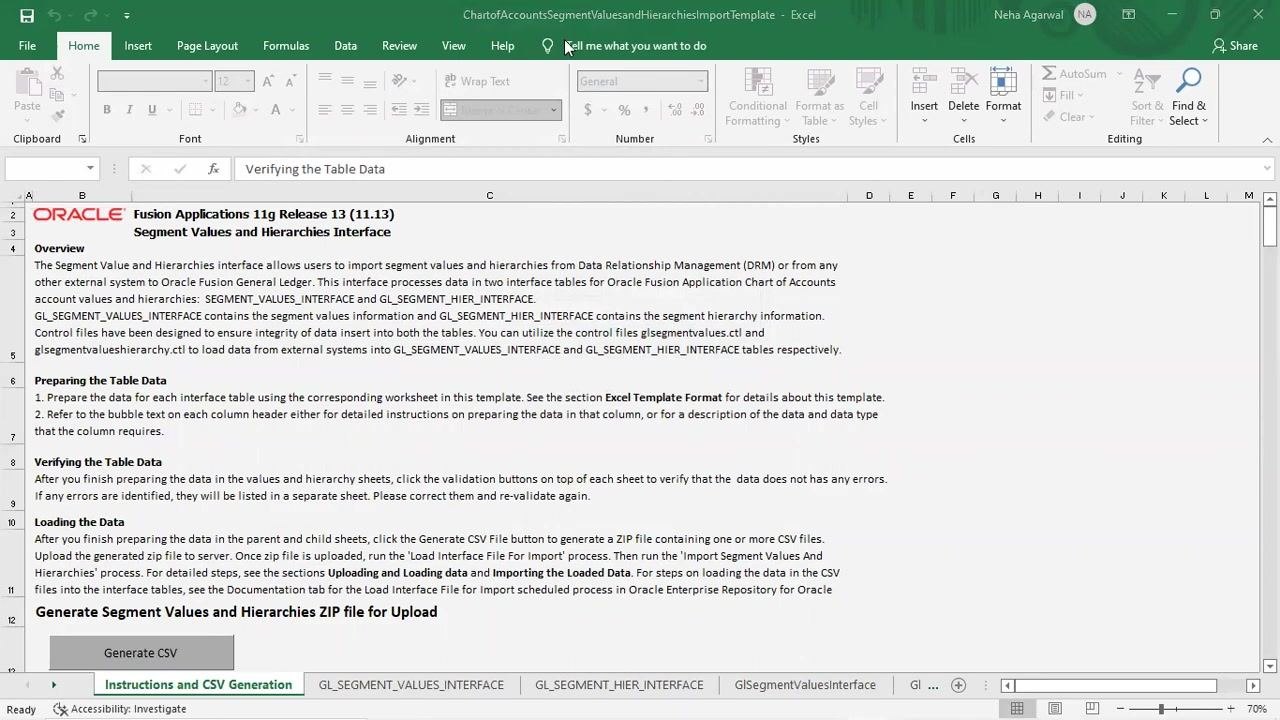
Open the downloaded template
- Locate the downloaded XLSM file and open it in Microsoft Excel.
- If prompted, the file opens in Protected View. Click Enable Editing at the top to allow changes.
- The template contains multiple sheets, including "Instructions and CSV Generation", "GL_SEGMENT_VALUES_INTERFACE", and "GL_SEGMENT_HIER_INTERFACE".
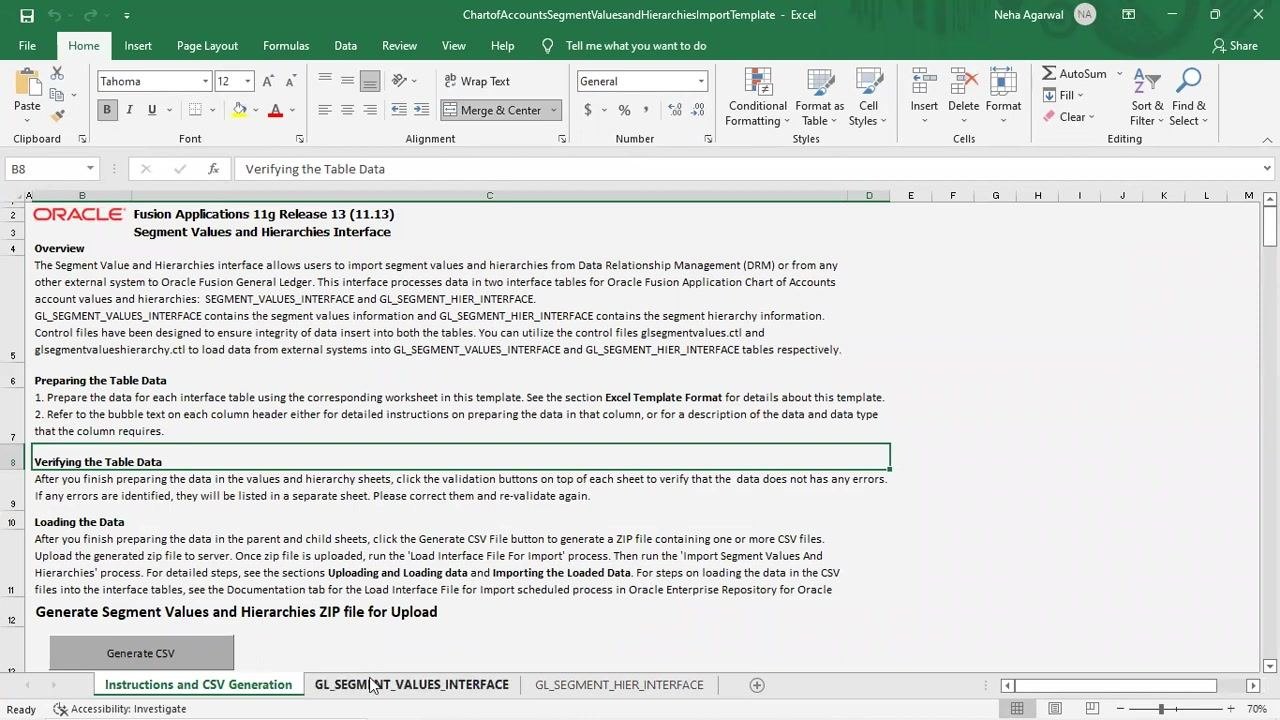
Review the instructions
Switch to the Instructions and CSV Generation sheet. Read the overview and instructions, which explain:
- How to prepare the data for each interface table.
- How to verify the table data using validation buttons.
- How to generate the CSV file for upload.
Enter segment values
- Go to the GL_SEGMENT_VALUES_INTERFACE sheet.
- In the
*Value Set Codecolumn, enter the value set code you will use (for example, "Fusion Accounts"). - Copy this value set code and paste it for all relevant rows in the column.
- Fill in other required columns such as
*Value,Start Date,End Date,*Summary Flag,*Enabled Flag,Account Type,*Allow Posting Flag, and*Allow Budgeting Flagas per your data requirements.
Update all hierarchy values in the template
In the GL_SEGMENT_HIER_INTERFACE sheet, ensure all required fields are filled:
- Enter
Fusion Accountsin the Value Set Code column. - Enter
Fusion Treein the Tree Code column. - Enter
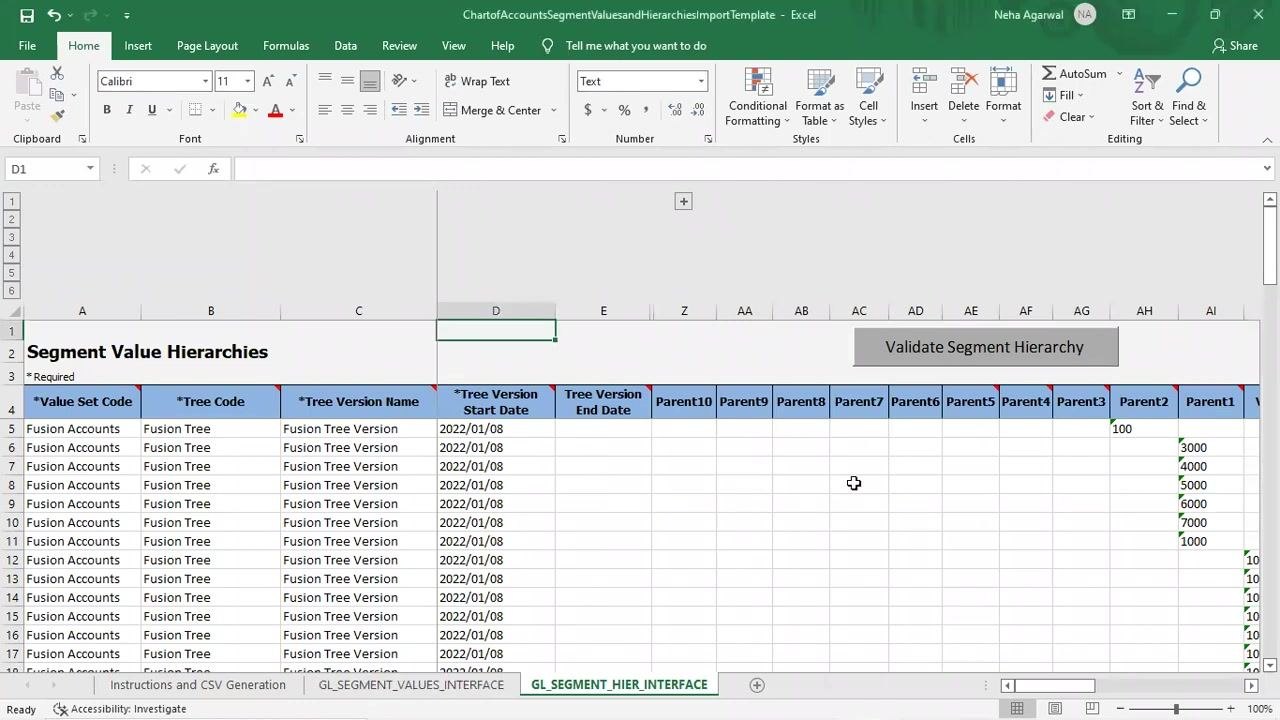
Fusion Tree Versionin the Tree Version Name column. - Fill in the parent and value columns to define the hierarchy (for example, Parent1 = 100, Value = 3000, 4000, etc.).
Update all rows to reflect the correct tree version and hierarchy structure.
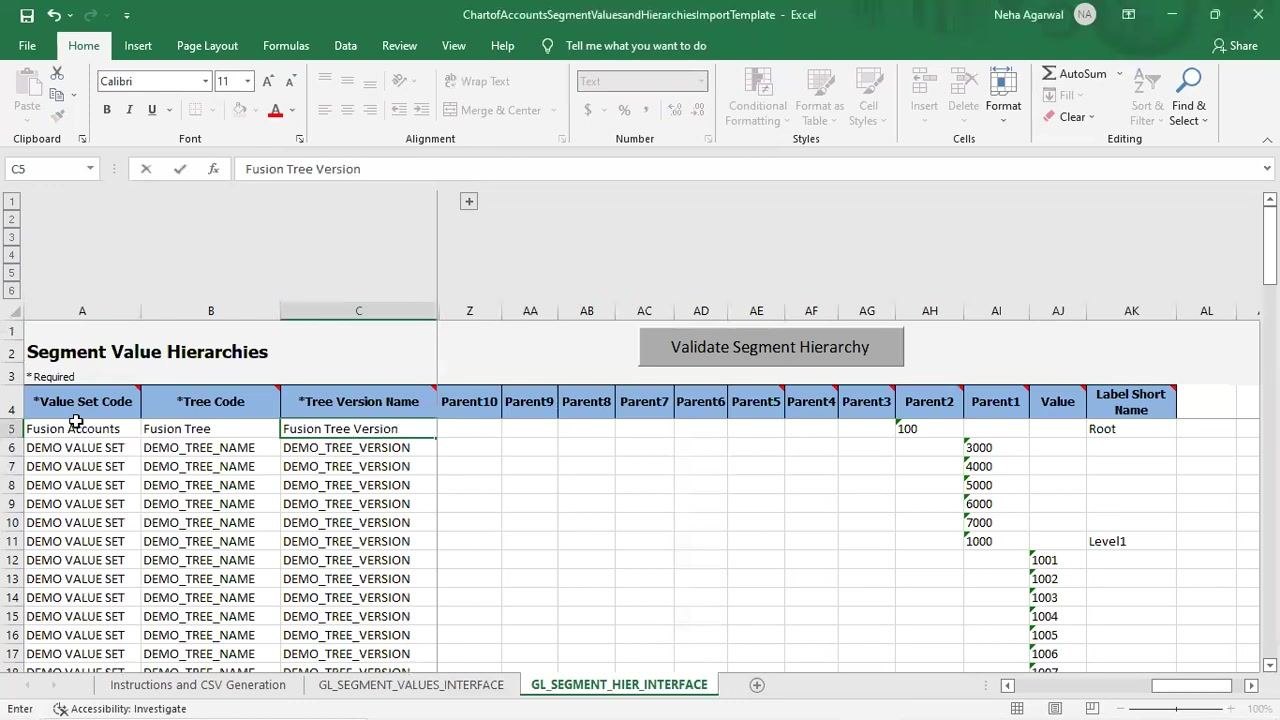
Validate segment hierarchies
Click the Validate Segment Hierarchy button at the top of the GL_SEGMENT_HIER_INTERFACE sheet. Wait for the validation process to complete. If errors are found, correct them as indicated and re-validate.
Validate segment values
Switch to the GL_SEGMENT_VALUES_INTERFACE sheet and click the Validate Segment values button at the top of the sheet. A dialog box appears confirming "Validations Completed. No errors found." Click OK to close the dialog box.
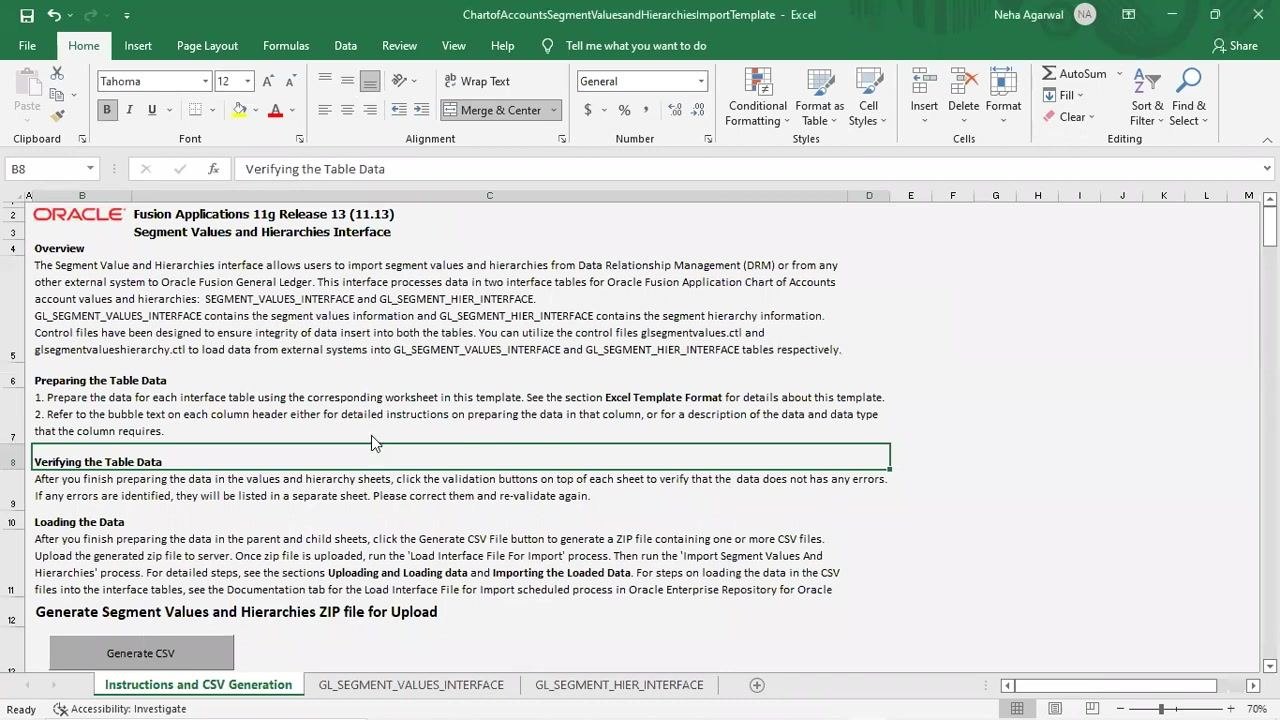
Generate the CSV ZIP file
- Go to the Instructions and CSV Generation sheet.
- Click the Generate CSV button under "Generate Segment Values and Hierarchies ZIP File for Upload".
- The system prompts you to save the generated ZIP file.
- Save the file to your desktop or a known location for easy access.
When prompted, select the desktop as the save location for the generated ZIP file, and ensure it is saved successfully for later upload. Monitor the progress dialog (for example, "Saving Segment hierarchy csv file. 20% Complete") until the process finishes, and do not close Excel or interrupt the process until the file is fully saved.
Scheduling the import process
Navigate to the Scheduled Processes option
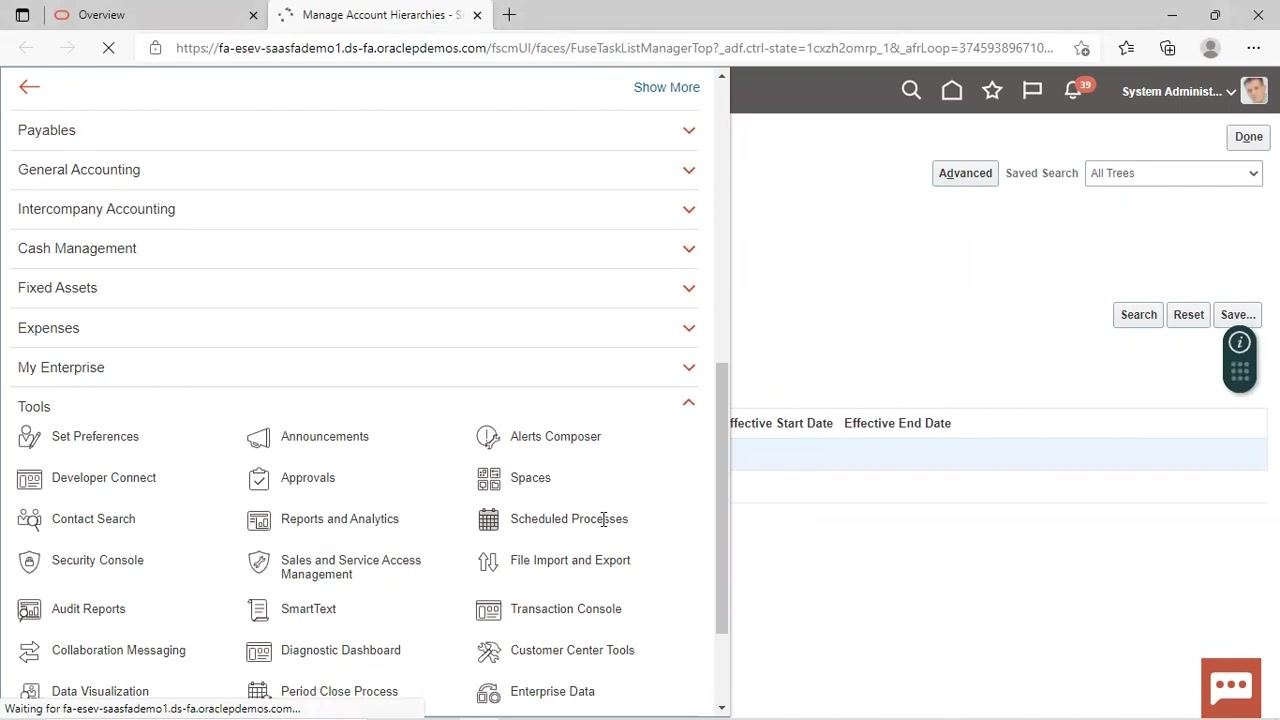
- In Oracle Fusion Applications, open the Navigator menu.
- Locate and select Scheduled Processes under the "Tools" section.
This allows you to initiate the process for uploading your segment values and hierarchies.
Schedule a new process
In the Scheduled Processes window, click the Schedule New Process button. A dialog box titled "Schedule New Process" appears.
Search for the required job
- In the "Schedule New Process" dialog, click the search icon next to the Name field.
- In the "Search and Select: Name" popup, type
load interface file for importin the Name field. - Click Search to locate the job.
- Once the job appears, select Load Interface File for Import and click OK.
Confirm the dialog now shows Type: Job, Name: Load Interface File for Import, and the description "Transfers setup or transaction data files from a user-specified location to the interface tables." Click OK to proceed.
Select the import process and data file
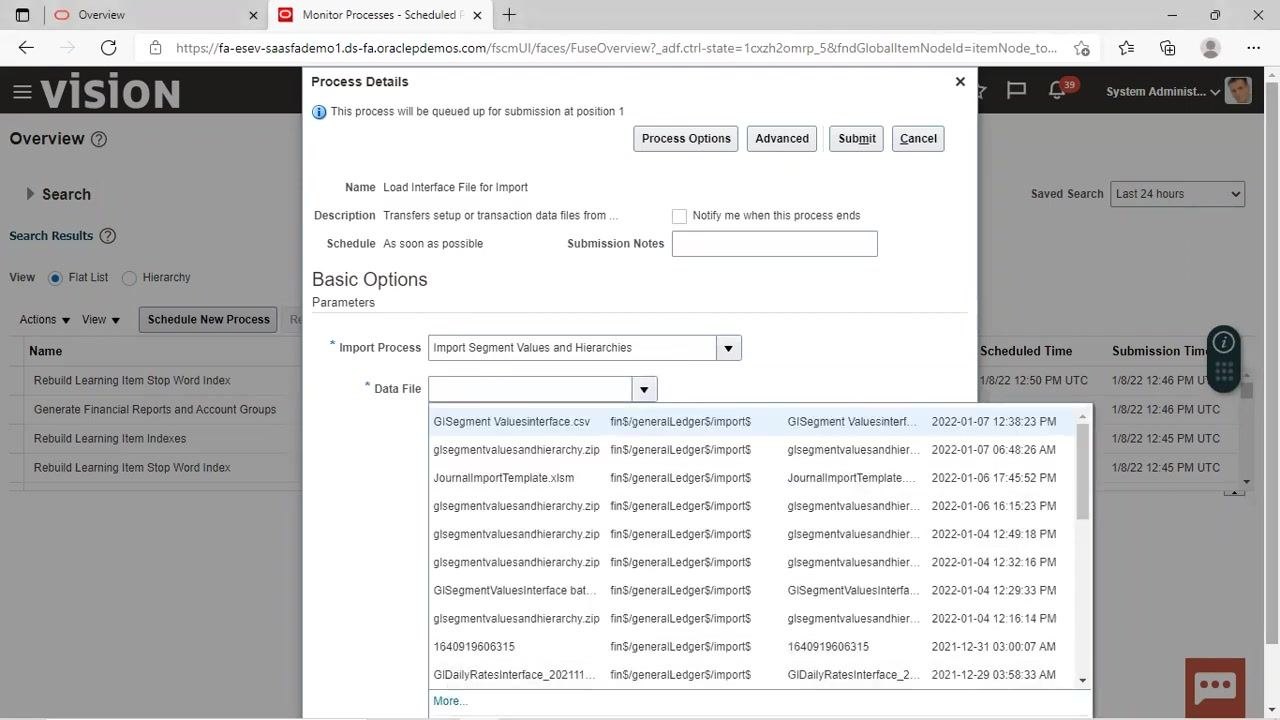
In the Process Details window, set the following:
- Import Process: Select
Import Segment Values and Hierarchiesfrom the dropdown. - Data File: Click the dropdown to view available files.
If your file is not listed, choose the option to upload a new file.
Choose the correct data file
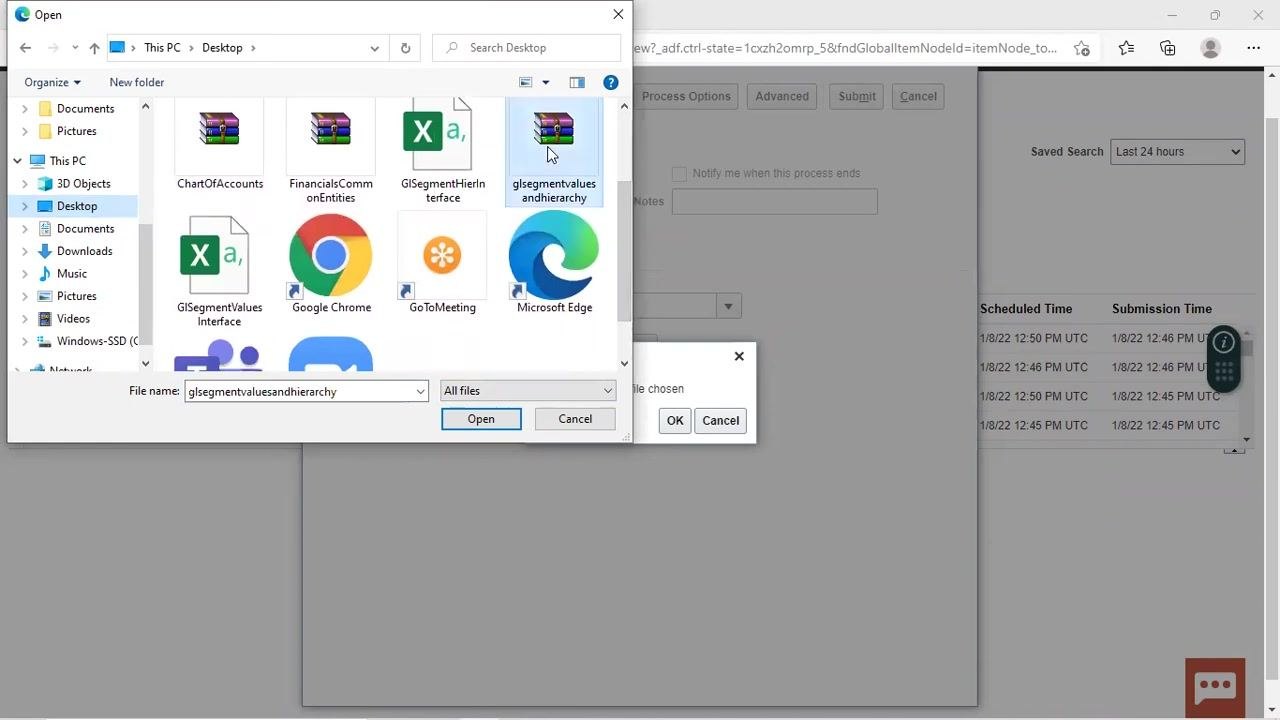
From the list, select the ZIP file you generated earlier (for example, glsegmentvaluesandhierarchy.zip). Ensure the file path and timestamp match your recent export. If needed, click "More..." to browse for additional files or upload a new one.
Upload the data file
- In the Oracle Fusion Process Details window, click the dropdown or browse button next to the Data File field.
- In the file selection dialog, navigate to the location where you saved your ZIP file (for example,
glsegmentvaluesandhierarchy.zip). - Select the file and click Open.
Submit the import process
After selecting the file, click OK in the file selection dialog. In the Oracle Fusion process window, click Submit to start the import process.
Continue to monitor the process status and review any output or error logs as needed.
Verifying the chart of accounts hierarchy creation and value set upload
Monitor scheduled processes for chart of accounts hierarchies
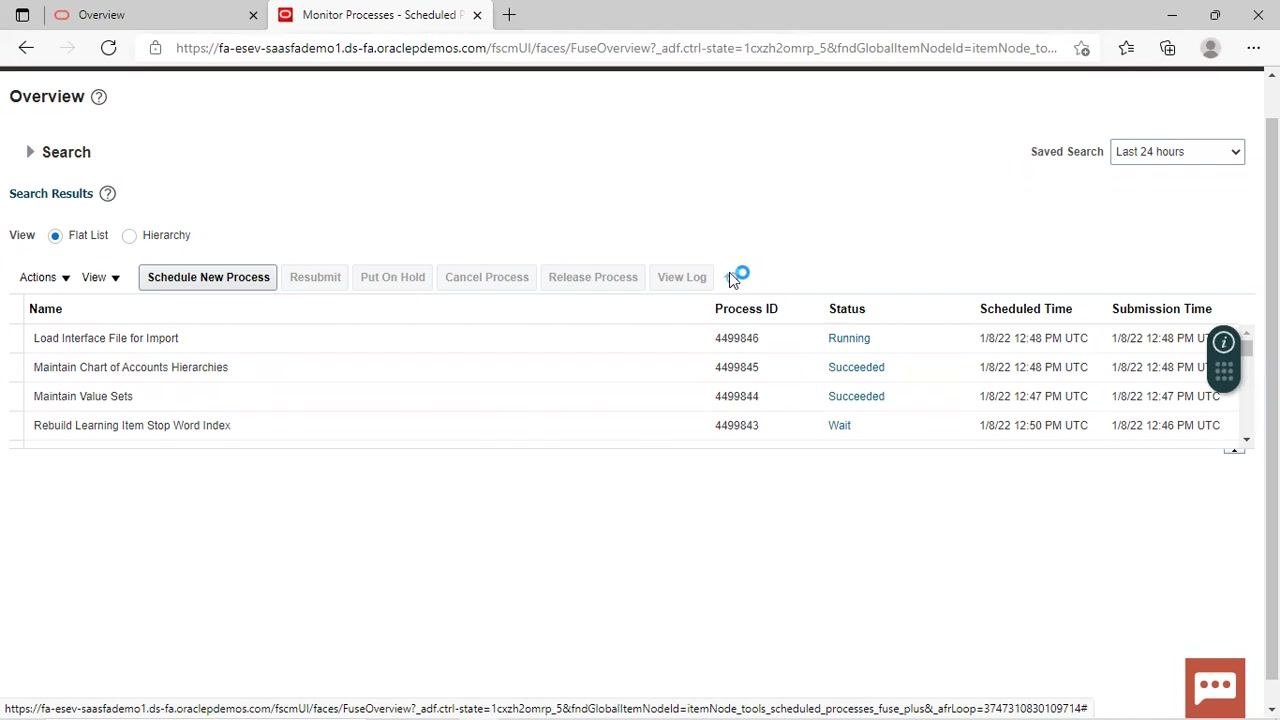
- Navigate to the "Monitor Processes - Scheduled Processes" screen.
- Review the list of scheduled processes to confirm the status of relevant jobs.
- Look for processes such as "Maintain Chart of Accounts Hierarchies" and verify their status is "Succeeded".
- Note the Process ID, Status, Scheduled Time, and Submission Time for each process.
- Example statuses to look for: "Wait", "Running", "Succeeded".
- Ensure that all required processes for chart of accounts hierarchies have completed successfully.
Access and review chart of accounts value sets
- Navigate to the "Manage Chart of Accounts Value Sets" screen.
- Ensure the Value Set Code is "Fusion_Accounts".
- Confirm the Validation Type is "Independent" and the Value Data Type is "Character".
- Verify the module is set to "General Ledger".
- Use the Manage Values button to further inspect or edit the value set if necessary.
Verify uploaded value sets in Fusion Accounts
- Go to the "Manage Values" screen for the value set code "Fusion_Accounts".
- In the Search section, confirm that the value set code is set to "Fusion_Accounts".
- Review the Search Results table to ensure that the expected values (for example, 1125, 1126, 1127, etc.) are present.
- Confirm that each value is enabled (checkbox checked) and has the correct Start Date (for example, 1/8/22).
- Check that the End Date is blank (if values should remain active) and that the Sort Order is as required.
Check implementation project task completion
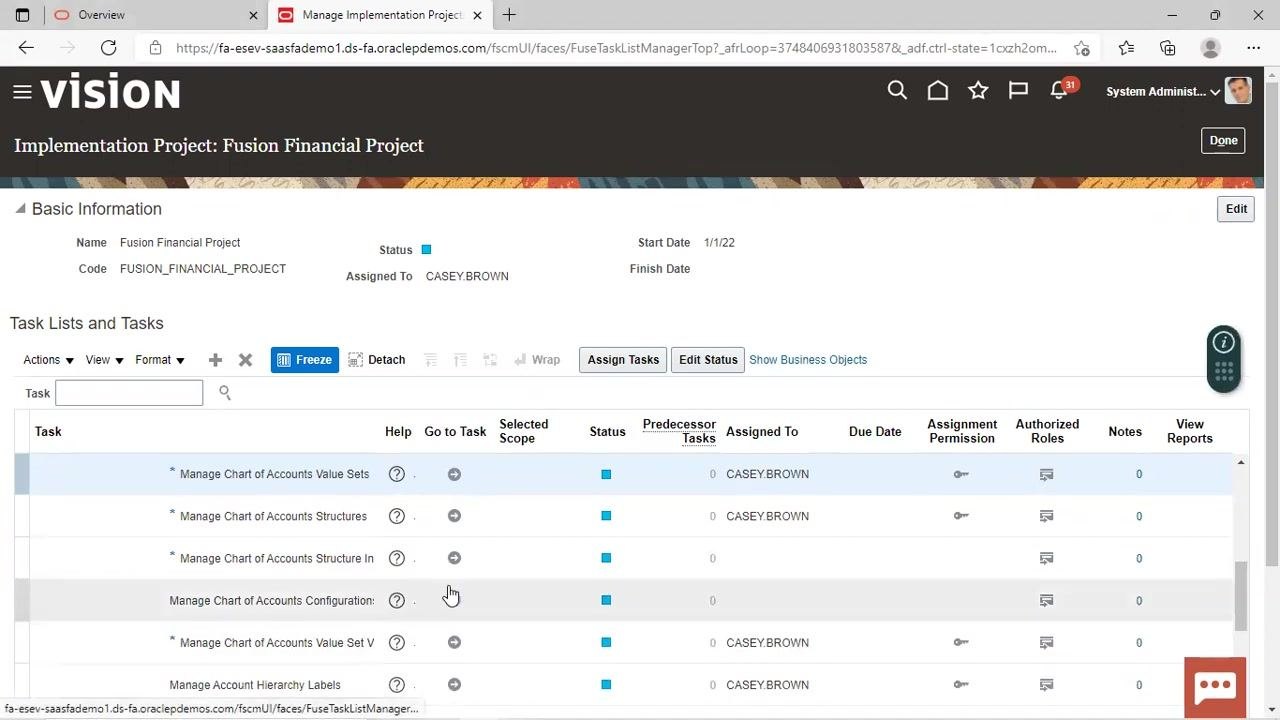
- Open the "Implementation Project: Fusion Financial Project" screen.
- Under "Task Lists and Tasks", verify that tasks related to chart of accounts are listed and assigned.
- Confirm that tasks such as "Manage Chart of Accounts Value Sets", "Manage Chart of Accounts Structures", and "Manage Account Hierarchy Labels" are present.
- Check the "Status" column to ensure tasks are marked as completed or in progress as appropriate.
- Review the "Assigned To" column to confirm the responsible user (for example, CASEY.BROWN).
Review the full task list for project completion
- Scroll through the full task list to ensure all relevant tasks under "Define Chart of Accounts" are accounted for.
- Confirm that each task is assigned, has the correct status, and is tracked for completion.
- Use the Assign Tasks and Edit Status buttons as needed to update task assignments or statuses.
Summary
By following this guide, you have learned how to create an account hierarchy in Oracle Fusion: defining the tree and tree version, downloading and populating the FBDI template, validating and generating the data file, scheduling the import process, and verifying that the chart of accounts hierarchies and value sets were successfully created and uploaded. You have also confirmed that all related implementation project tasks are tracked and completed.
Generation details: cost, quality tiers
Docsie billed 6,000 credits ($4.20) to analyze this 12-minute video at standard quality. The rewrite, template fill and Word/PDF exports were included. The same video at each quality tier:
| Quality | Frames sampled | Credits | Approx. cost |
|---|---|---|---|
| Draft | every 16-30 s | 3,000 | $2.10 |
| Standard (this guide) | every 8-15 s | 6,000 | $4.20 |
| Detailed | every 4-7 s | 12,000 | $8.40 |
| Ultra | every 1-3 s | 24,000 | $16.80 |
Credits priced at $0.70 per 1,000; plans include a monthly allowance. Enterprise customers on on-premise or bring-your-own-model deployments run this on their own inference and pay no per-video credits.
Generated by Docsie Video-to-Docs on 2026-10-14 from a 11-minute video. Screenshots are frames from the source video and belong to their creator, BISP Solutions, whose original is embedded above. If you own this video and want the guide removed or credited differently, contact us and we will act within one business day.