
How to Change Address in Workday
This guide explains how HR representatives can update an employee's personal information in Workday, including how to submit changes, track approval status, and confirm completion.
Video: How to Change Personal Information of Employee in Workday | Step-by-Step Guide by CSPHR (2025). All credit for the demonstration goes to the creator; watch the original on YouTube. The written guide below was generated from this video by Docsie. Creator? Request a change or removal.
This guide explains how HR representatives can update an employee's personal information in Workday, including how to submit changes, track approval status, and confirm completion.
Prerequisites
- Access to the Workday portal with HR credentials.
- Appropriate permissions to view and edit employee personal information (the availability of certain options, such as the Edit button, depends on your permission level).
Overview of update methods
Workday allows personal information to be updated in two ways:
- Employees can update their own information directly.
- HR representatives can make changes on behalf of an employee.
This guide focuses on the HR process for updating employee personal information.
Log in to the Workday portal
Access the Workday portal using your HR credentials.
Search for the employee
Enter the employee's name in the search bar at the top of the Workday dashboard.
Open the employee profile
Select the employee from the search results to open their profile.
Locate the Personal option
In the employee profile, use the left-hand navigation menu and click Personal to access the employee's personal information.
Edit employee information
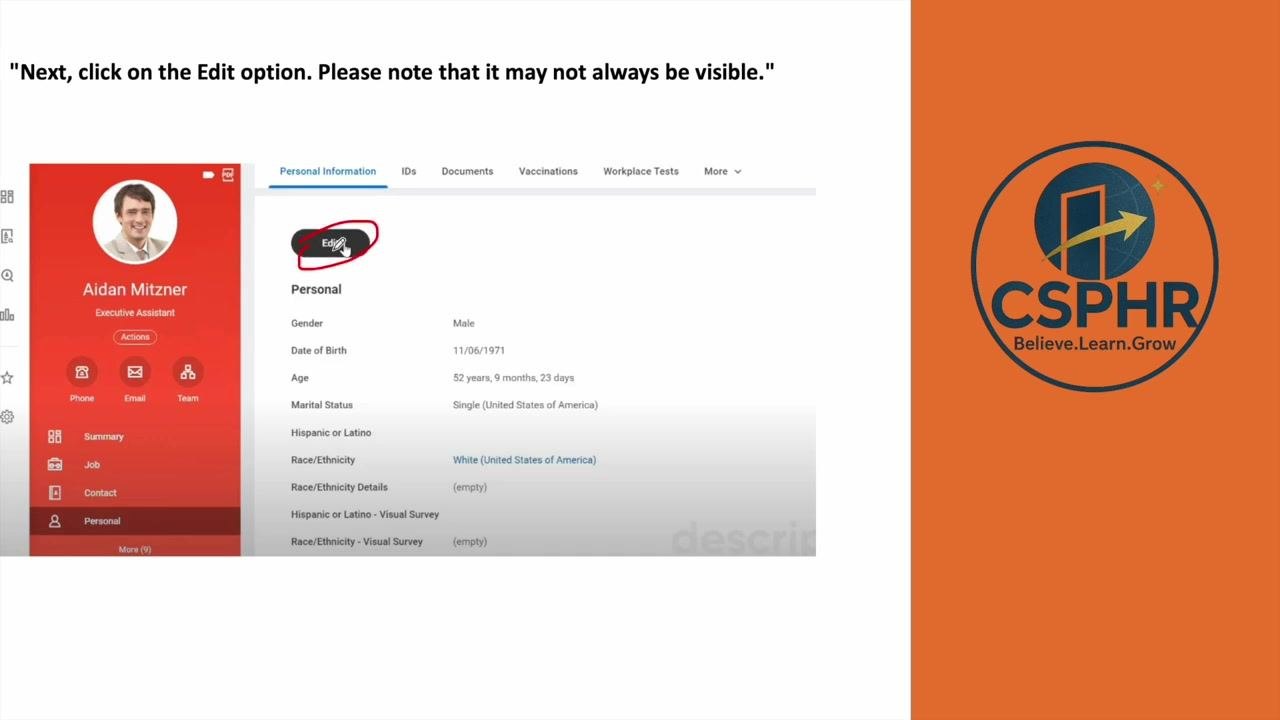
On the Personal Information page, click the Edit button to begin making changes.
Note: The Edit button may not always be visible, depending on your permissions.
Use the Actions menu if Edit is not visible
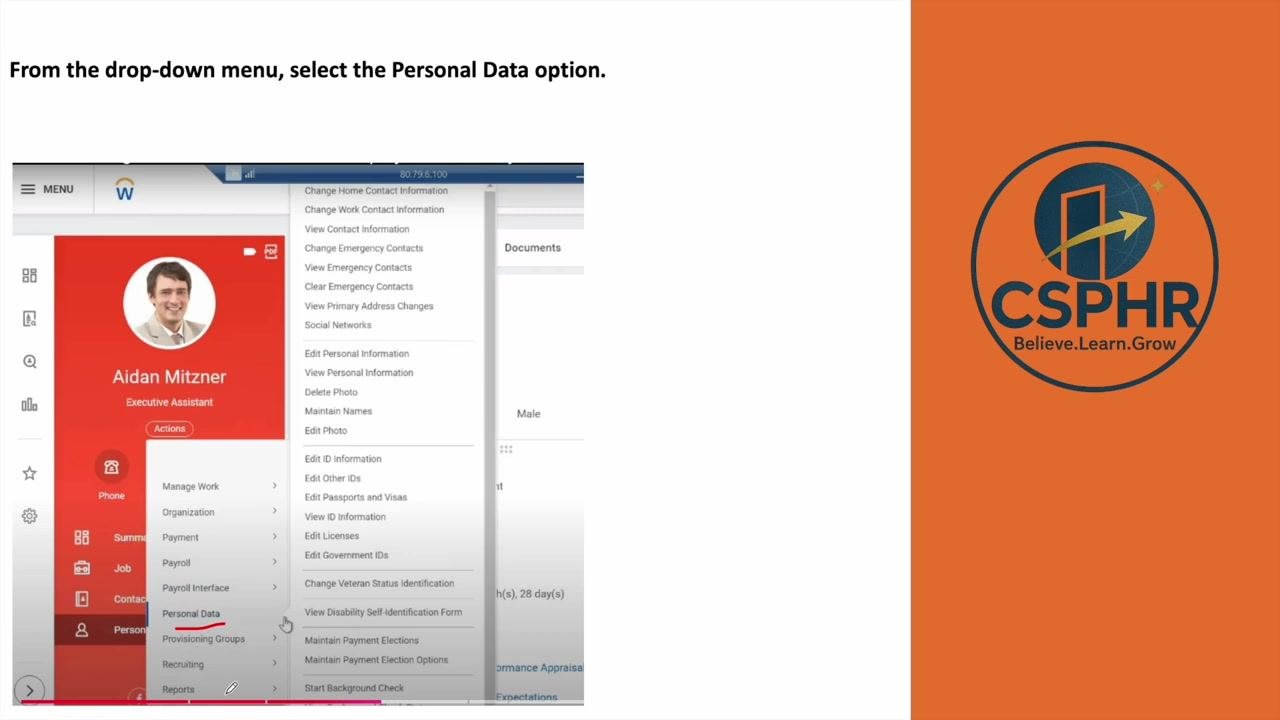
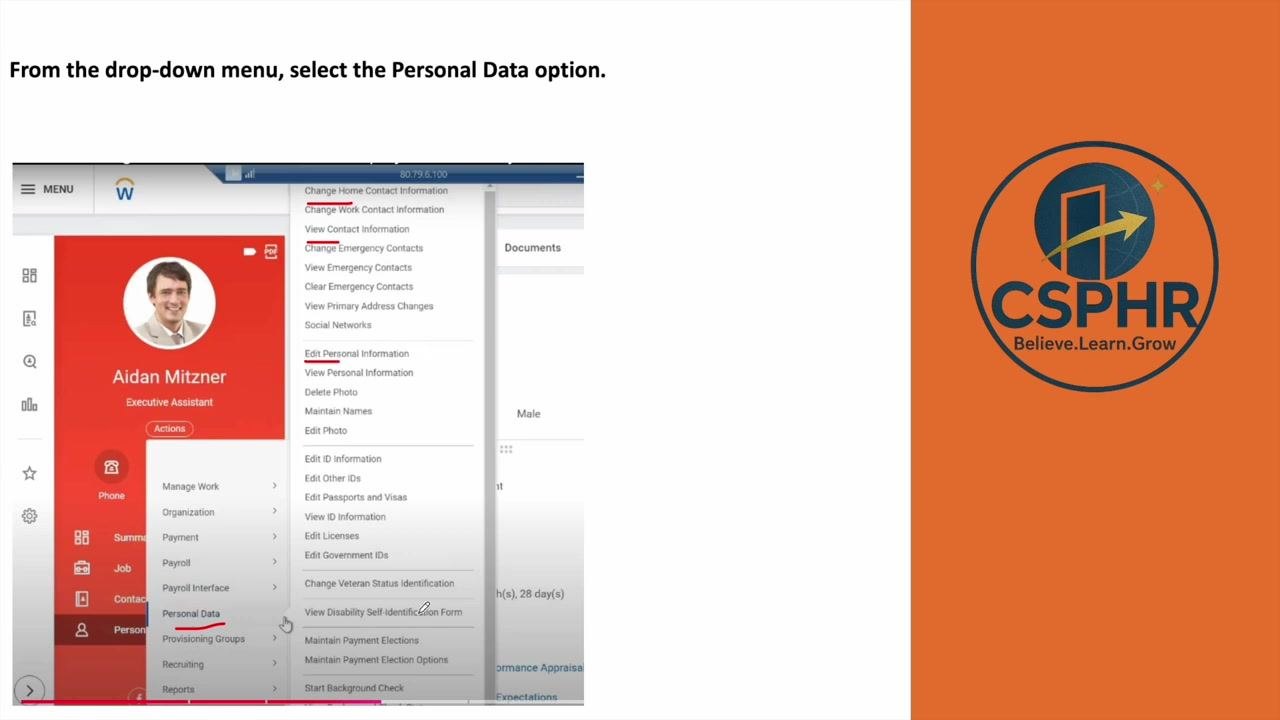
If the Edit button is not available, click Actions in the employee profile, then select Personal Data from the drop-down menu. This opens additional options for editing personal information.
Select Edit Personal Information
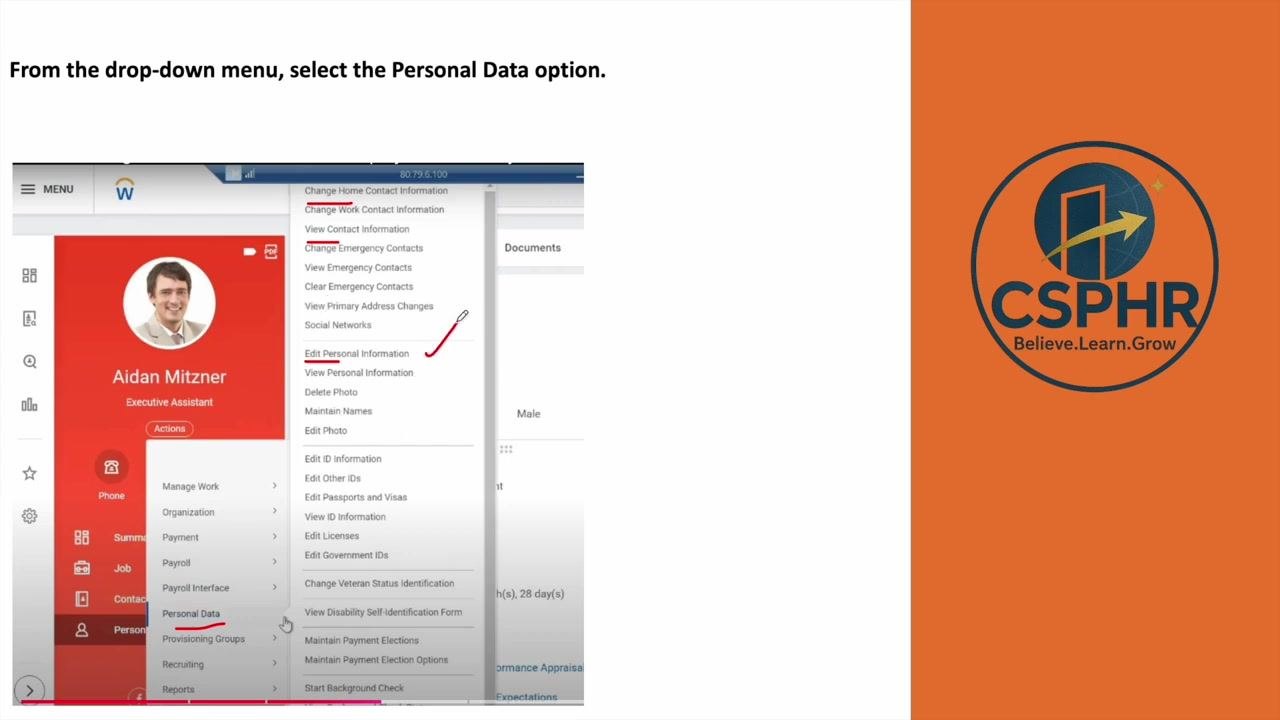
In the expanded menu, click Edit Personal Information to change specific details such as date of birth or marital status.
Update the required information
For example, to change the date of birth:
- Locate the Date of Birth field.
- Enter the new date (for example, changing from 11/06/1971 to the correct date).
- Use the calendar picker if needed.
After making the necessary changes, click Submit at the bottom of the page.
Review and process the changes
Once submitted, review the updated details in the Details and Process section. Confirm that the employee name and the pending action are correct.
Wait for employee approval
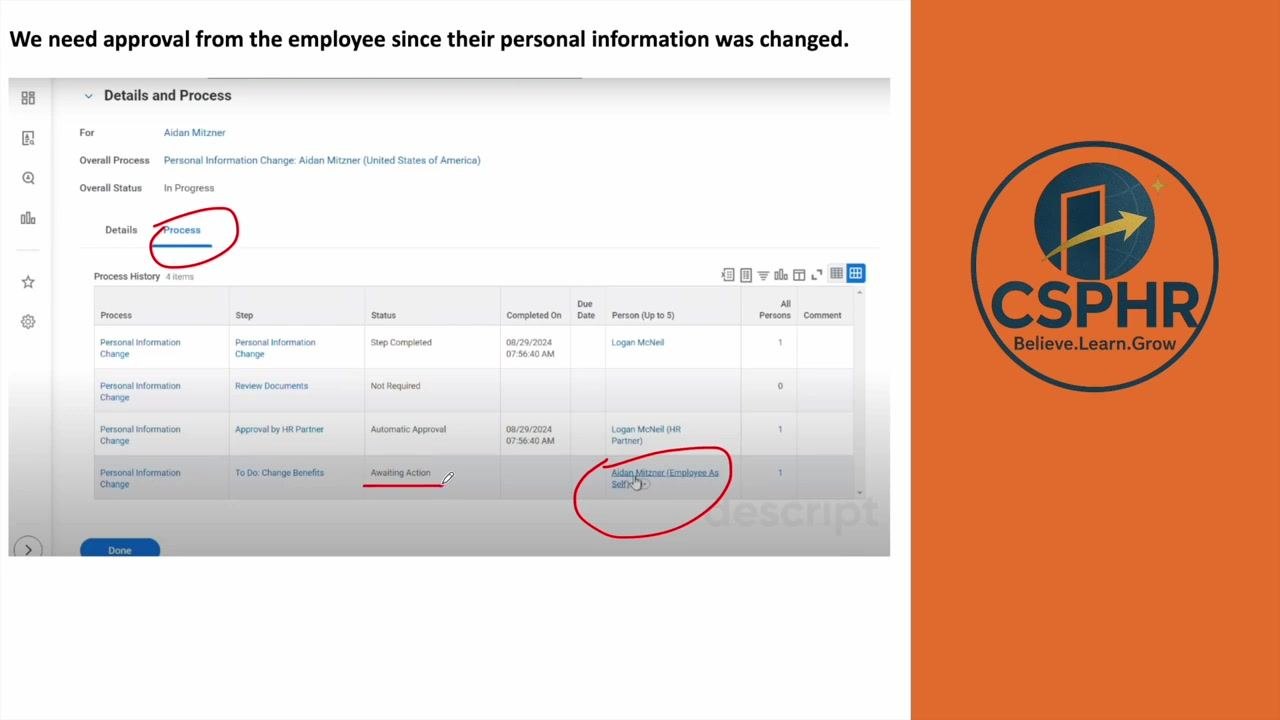
After submitting changes to personal information (such as date of birth), the process requires approval from the employee. In the Details and Process section, review the Process History table:
- Locate the row labeled "Personal Information Change."
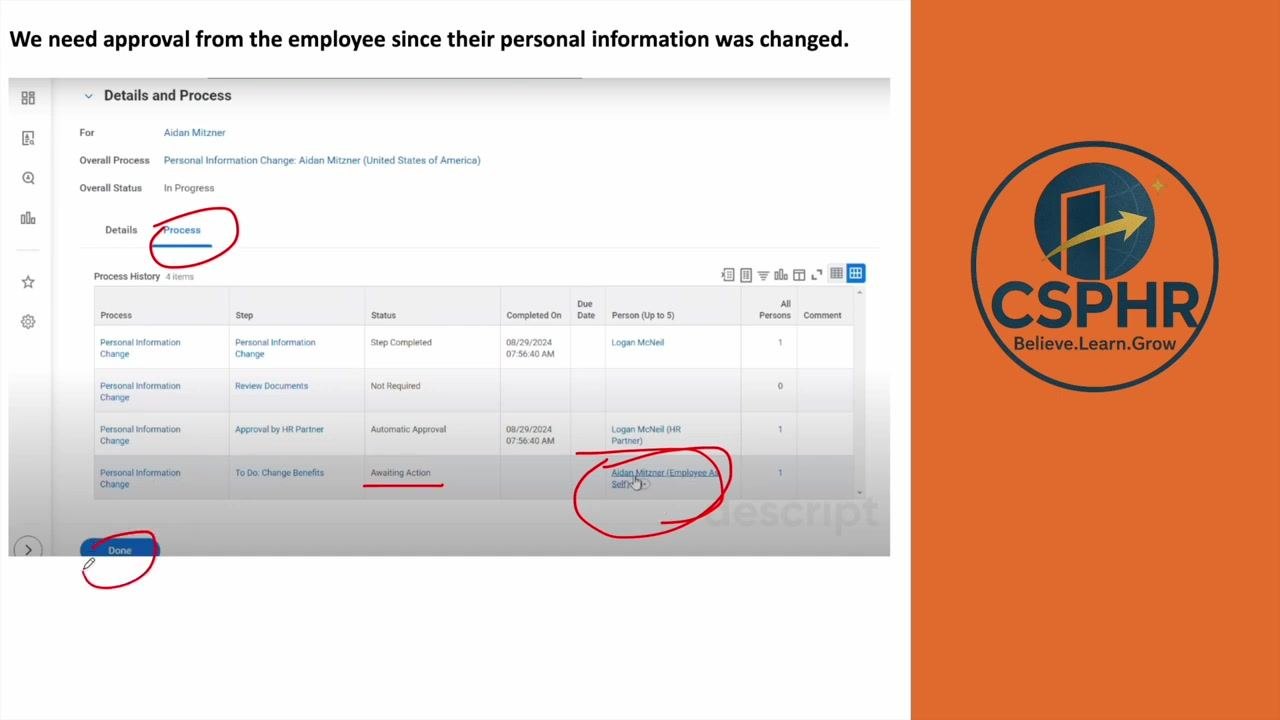
- Check the Status column for "Awaiting Action."
- Confirm the Person column lists the employee's name (for example, "Aidan Mitzner (Employee As Self)").
This confirms the process is pending employee approval.
Complete the HR task
Click Done at the bottom of the Details and Process screen to finish your part of the process.
Verify the change in Worker History
Navigate to the employee's profile, click the Job tab in the left-hand menu, then select Worker History from the top navigation bar. In the Worker History table, locate the entry for "Personal Information Change" and check the Status column:
- "In Progress" means the change is still awaiting employee approval.
- "Successfully Completed" means the process is finished.
The Assigned To column displays the employee's name if action is still required.

Wait for the employee to approve the change
The process remains "In Progress" until the employee logs in and approves the change. Once approved, the status updates to "Successfully Completed" in the Worker History.
Additional resources and support
For more guidance on Workday or HR processes, consider enrolling in practical HR training. CSPHR offers:
- 100% practical HR training with live online classes.
- Coverage of Core HR, Payroll, Excel, HR Analytics, and AI tools.
- Personalized guidance, resume support, and placement assistance.
- Job-readiness within 90 days of training completion.
Contact details:
- Website: www.csphr.co.in
- Phone: +91-9108617806
- Email: management@csphrglobal.com
If you are looking for specific HR training, visit the CSPHR website, reach out via WhatsApp or phone at +91-9108617806, or contact management@csphrglobal.com by email.
Summary
By following these steps, HR representatives can efficiently update and track changes to employee personal information in Workday, ensuring accuracy and compliance throughout the process. For additional guidance, revisit the contact information above or explore further training resources on the CSPHR website.
Generation details: cost, quality tiers
Docsie billed 2,000 credits ($1.40) to analyze this 4-minute video at standard quality. The rewrite, template fill and Word/PDF exports were included. The same video at each quality tier:
| Quality | Frames sampled | Credits | Approx. cost |
|---|---|---|---|
| Draft | every 16-30 s | 1,000 | $0.70 |
| Standard (this guide) | every 8-15 s | 2,000 | $1.40 |
| Detailed | every 4-7 s | 4,000 | $2.80 |
| Ultra | every 1-3 s | 8,000 | $5.60 |
Credits priced at $0.70 per 1,000; plans include a monthly allowance. Enterprise customers on on-premise or bring-your-own-model deployments run this on their own inference and pay no per-video credits.
Generated by Docsie Video-to-Docs on 2026-09-08 from a 3-minute video. Screenshots are frames from the source video and belong to their creator, CSPHR, whose original is embedded above. If you own this video and want the guide removed or credited differently, contact us and we will act within one business day.