
How to Create a SharePoint Site in SharePoint
This guide walks you through several ways to create a SharePoint site: directly from the SharePoint start screen, by creating a shared library in OneDrive, or automatically through Microsoft Teams. You will also learn how Teams channels map to SharePoint folders and how to create a new team from an existing SharePoint site.
Video: How to Create a SharePoint Team Site by CBT Nuggets (2022). All credit for the demonstration goes to the creator; watch the original on YouTube. The written guide below was generated from this video by Docsie. Creator? Request a change or removal.
This guide walks you through several ways to create a SharePoint site: directly from the SharePoint start screen, by creating a shared library in OneDrive, or automatically through Microsoft Teams. You will also learn how Teams channels map to SharePoint folders and how to create a new team from an existing SharePoint site.
Prerequisites
- Access to your organization's SharePoint homepage, OneDrive, and Microsoft Teams.
- Sufficient permissions to create sites, since your organization controls who can create new SharePoint sites, teams, and shared libraries.
- To create a team from an existing SharePoint site, you must be the owner of the associated Microsoft 365 group.
Method 1: Create a team site directly in SharePoint
-
Access the SharePoint start screen
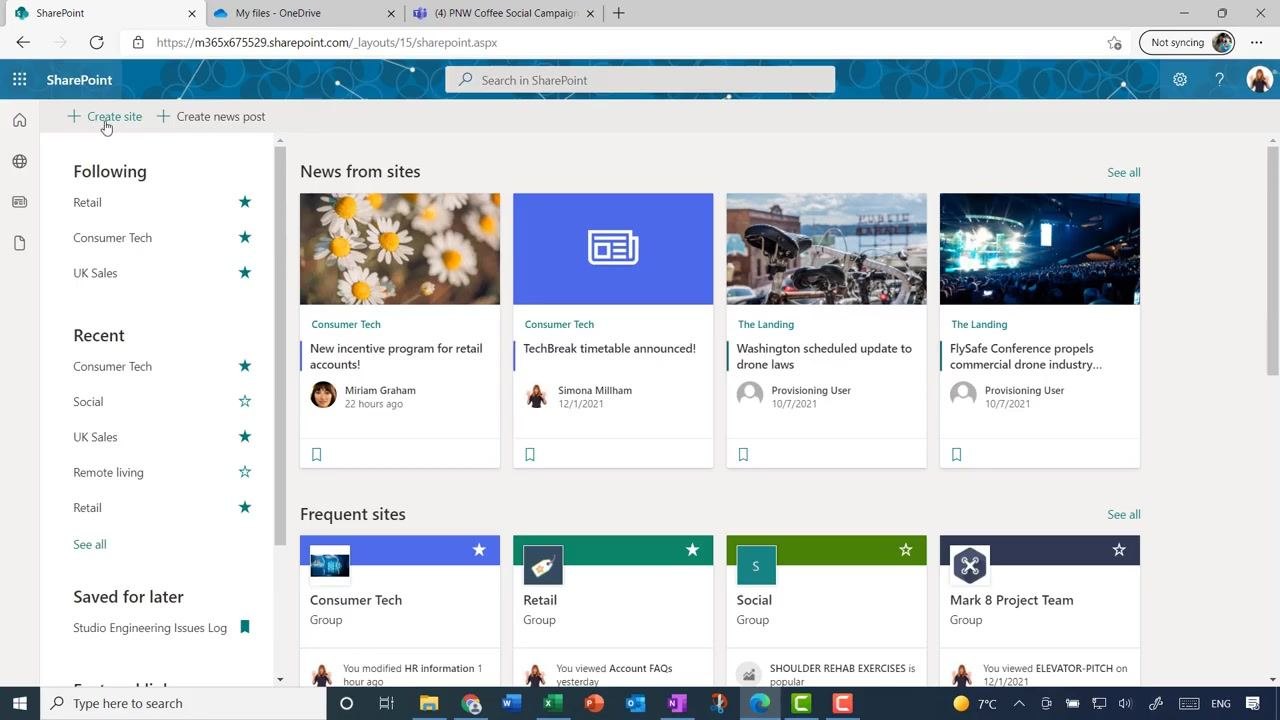
- Open your browser and navigate to your organization's SharePoint homepage.
-
Locate the Create site button
- Look for the Create site button at the top left-hand corner of the SharePoint start screen.
- If you do not see this button, your permissions may not allow you to create new sites.
-
Initiate site creation
- Click Create site.
- Choose Team site rather than Communication site when prompted.
-
Enter site information
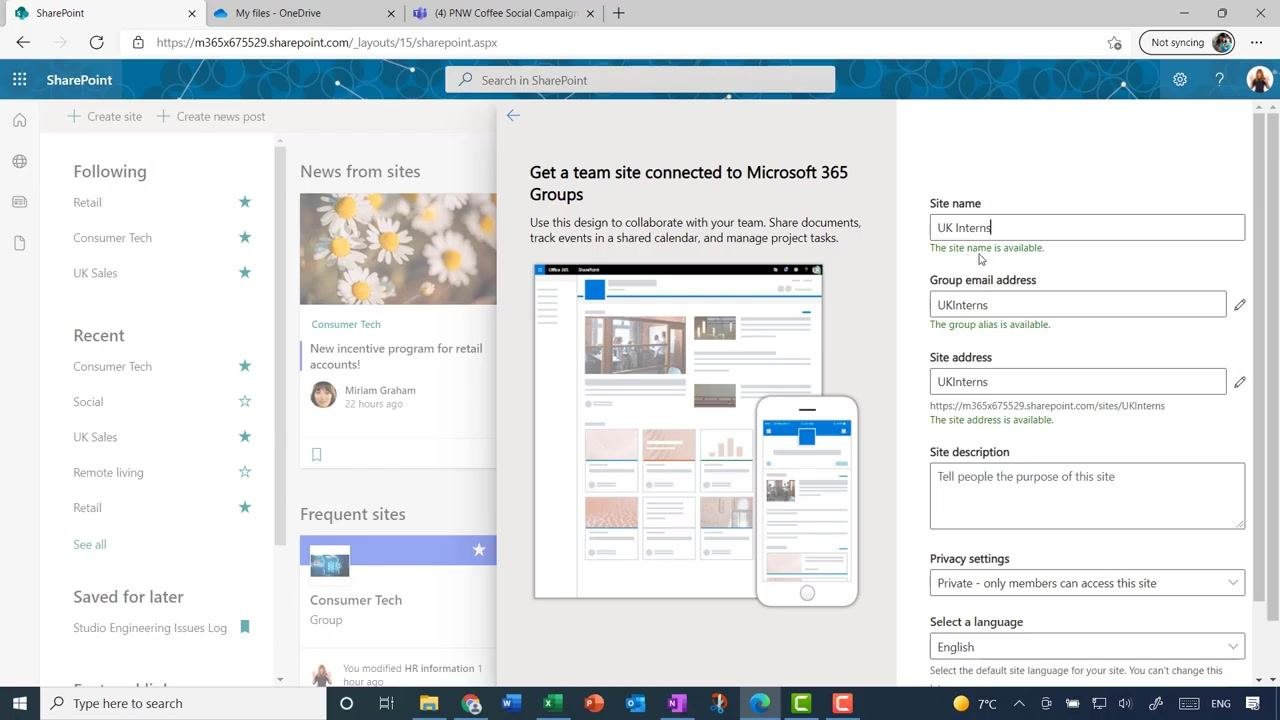
- In the site creation form, fill in the following fields:
- Site name: enter "UK Interns".
- Group email address: this auto-populates as "UKInterns".
- Site address: this auto-populates as "UKInterns".
- Site description: enter a description such as "Tell people the purpose of this site".
- As you type the site name, SharePoint checks whether the name is available. Confirm you see the message "The site name is available."
- In the site creation form, fill in the following fields:
- Set privacy and language options
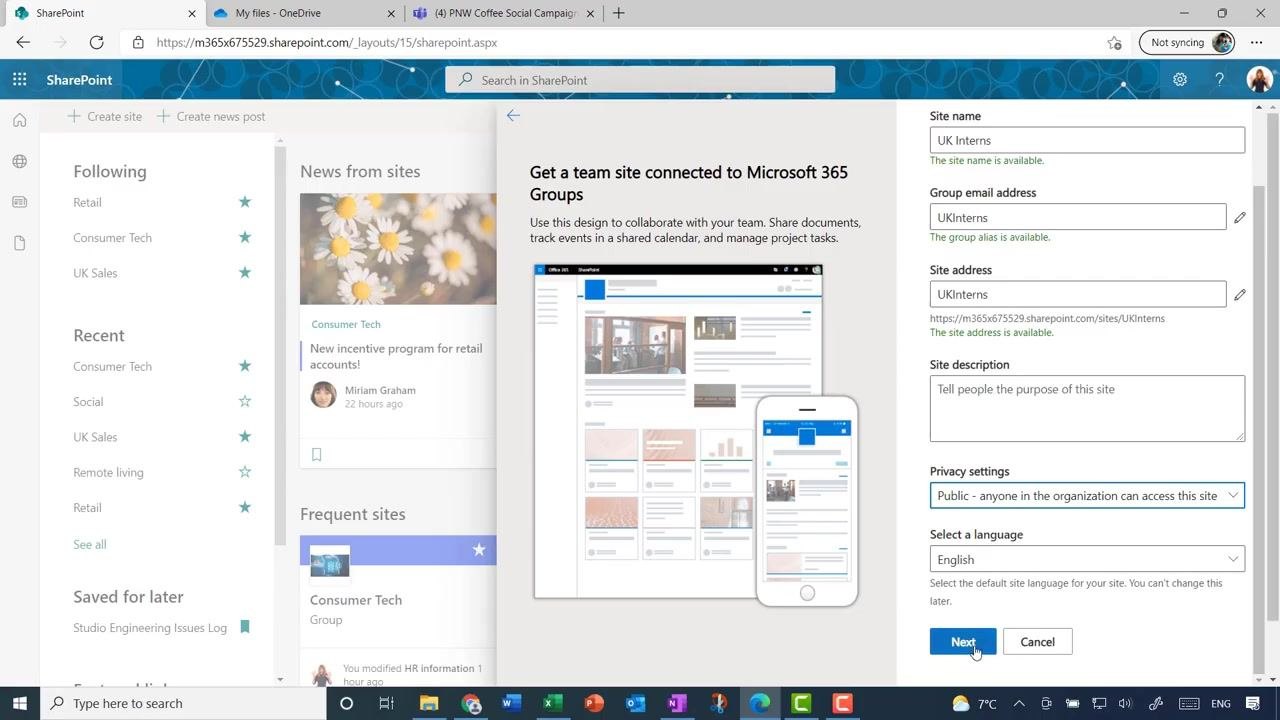
- Privacy settings: select "Public - anyone in the organization can access this site".
- Select a language: choose "English" from the dropdown.
- Click Next to proceed.
-
Complete site creation
- Review the information and click Finish if prompted.
- Wait a few moments while SharePoint creates your new site.
-
Review your new team site
- Once the site is created, you land on the new Team Site homepage.
- The homepage includes a News area at the top for team updates, a Quick links section for navigation, a Documents section on the left for file storage, and an Activity feed showing recent actions.
-
Explore additional options
- Browse templates to change the look and feel of your site.
- Add more owners or members as needed for site management and collaboration.
Method 2: Create a shared library and SharePoint site from OneDrive
Creating a shared library directly from OneDrive also creates a new SharePoint site for your group.
-
Open OneDrive
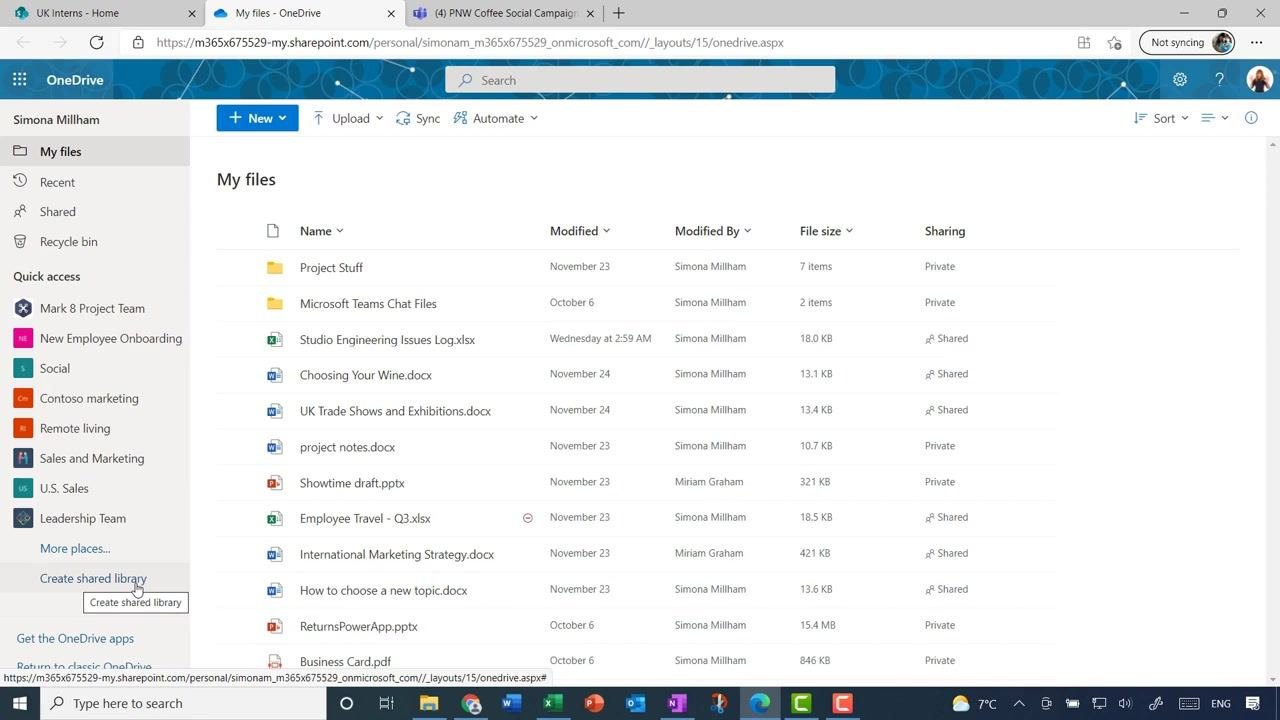
- Navigate to OneDrive by selecting the OneDrive app or visiting the OneDrive web portal.
-
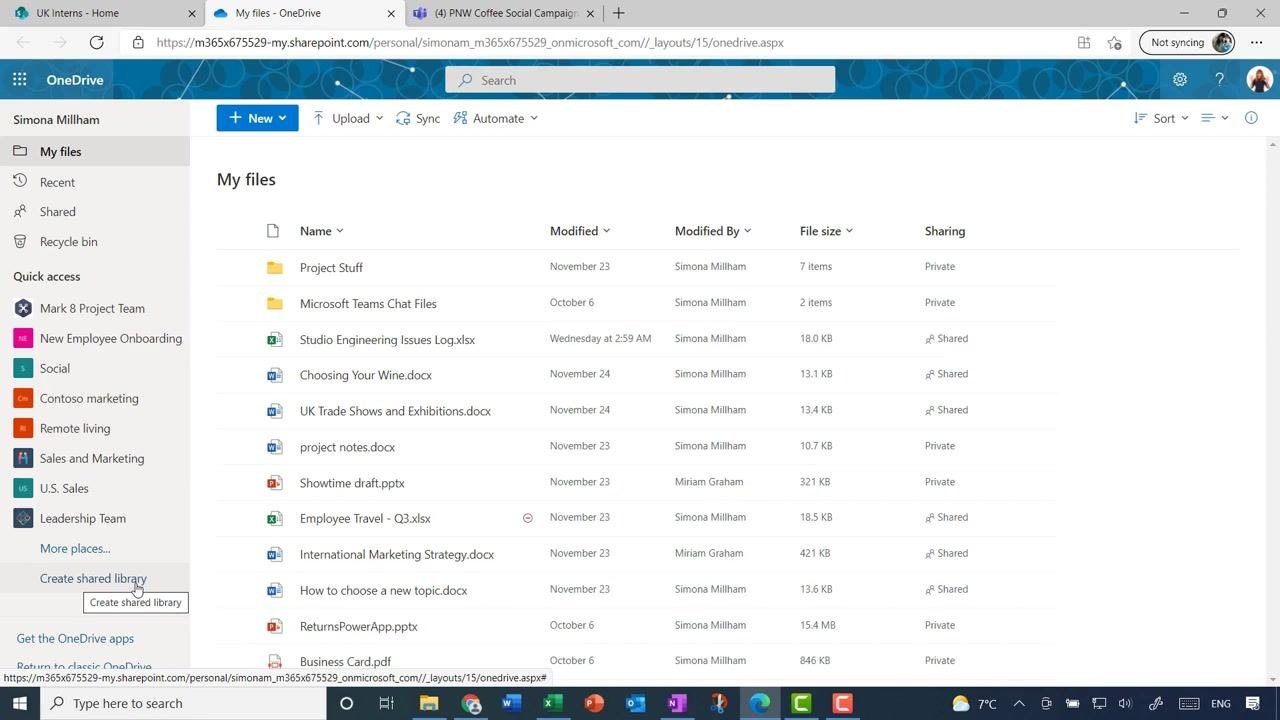
Locate the Create shared library option
- In the left sidebar, under "Quick access," scroll down to find Create shared library.
- Hover over or click this option to begin.
-
Initiate shared library creation
- Click Create shared library.
- A dialog box titled "Create a shared library" appears.
-
Enter shared library details
- Name: enter "Trainer Conference".
- Wait for the confirmation "This name is available."
- Members: add the people you want to share the library with, for example "Joni Sherman" and "Miriam Graham".
- Optionally, click Advanced settings to configure additional options.
-
Create the shared library
- Click Create.
- OneDrive creates the new shared library and, in the background, a new SharePoint site.
-
Access the new shared library
- You land on the document library for "Trainer Conference" within OneDrive.
- Here, you can upload, sync, and manage files just like any other document library.
- View the associated SharePoint site
- Click Go to site, if available, or navigate to the SharePoint site through your organization's SharePoint portal.
- The new site has the same layout as other Team Sites, including News, Quick links, Documents, and Activity sections.
- Verify the site layout
- Confirm that the new SharePoint site follows the standard Team Site layout, similar to sites created directly in SharePoint.
Method 3: Create a SharePoint site automatically via Microsoft Teams
-
Open Microsoft Teams
- Launch the Microsoft Teams app or access it through the web.
-
Create a new team
- When you create a new team in Microsoft Teams, a corresponding SharePoint site is automatically created for file storage and collaboration.
-
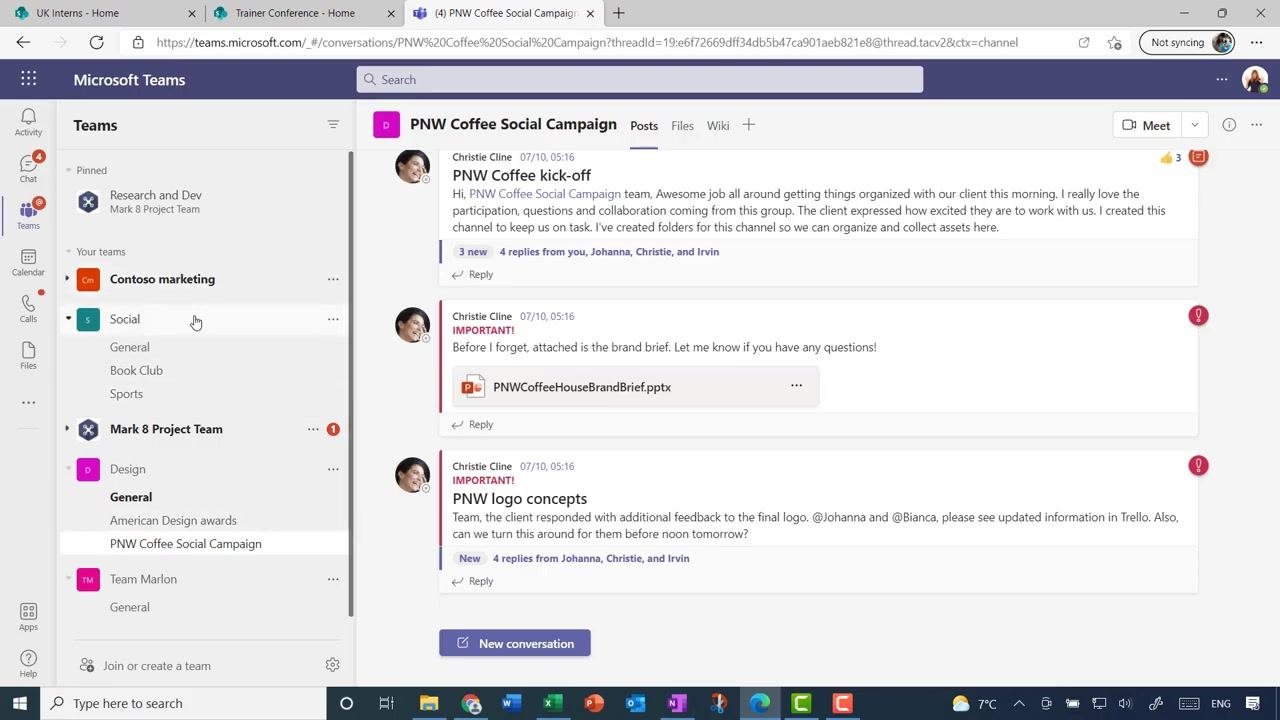
View existing teams and their SharePoint sites
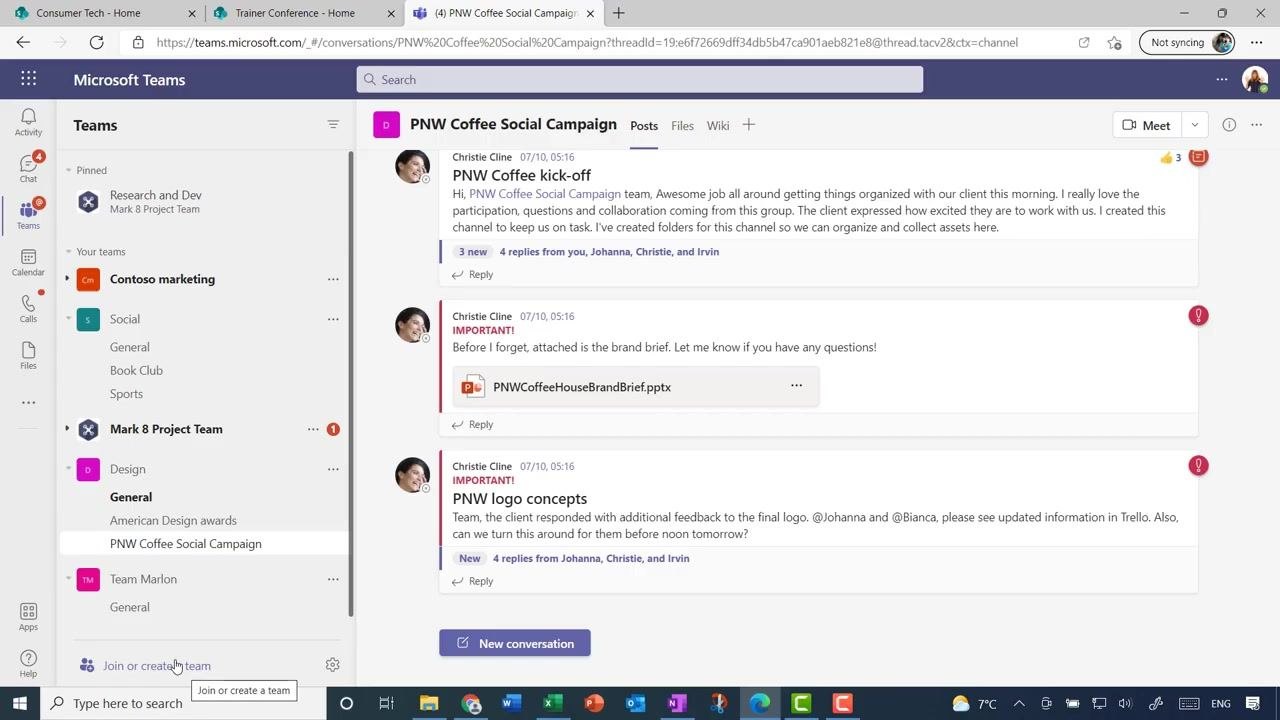
- In the Teams interface, select a team, for example "Social" or "PNW Coffee Social Campaign".
- Each team has its own channels and file storage, backed by a SharePoint site.
-
Access files and collaboration tools
- Use the Files tab within each team to reach the underlying SharePoint document library.
- Collaborate with team members using posts, files, and other integrated tools.
Understanding channel integration between Teams and SharePoint
- Review team channels in Microsoft Teams
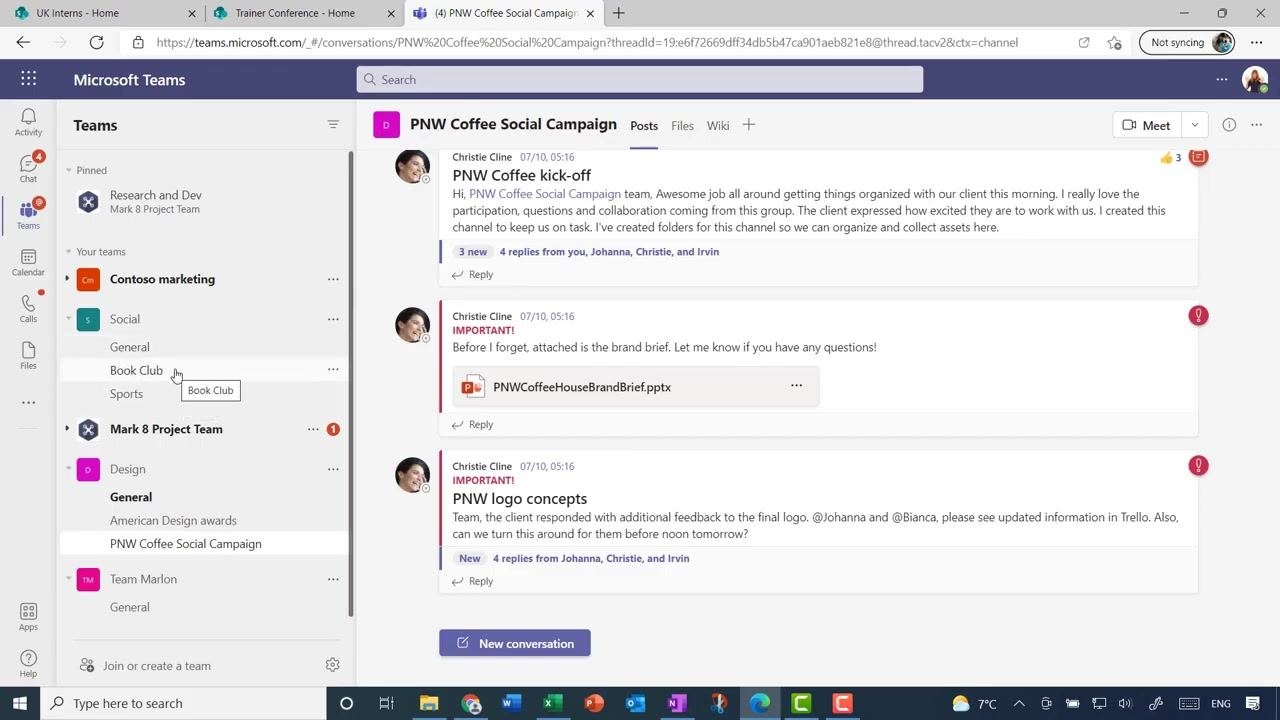
- Open Microsoft Teams and select your team, for example "Social".
- Observe the default "General" channel and any custom channels you have created, such as "Book Club" and "Sports". Each channel is listed under the team in the left sidebar.
-
Understand automatic SharePoint site creation
- When a new team is created in Microsoft Teams, a corresponding SharePoint site is automatically generated.
- This site uses the standard Team Site layout, including News, Quick links, Documents, and Activity sections.
-
View channel folders in the SharePoint document library
- Navigate to the associated SharePoint site for your team, for example the "Social" site.
- In the Documents section, notice that each Teams channel, such as "Book Club", "General", and "Sports", has its own folder. Files shared in each Teams channel are organized into separate folders within the SharePoint document library.
Create a team from an existing SharePoint site
- Identify an existing SharePoint site
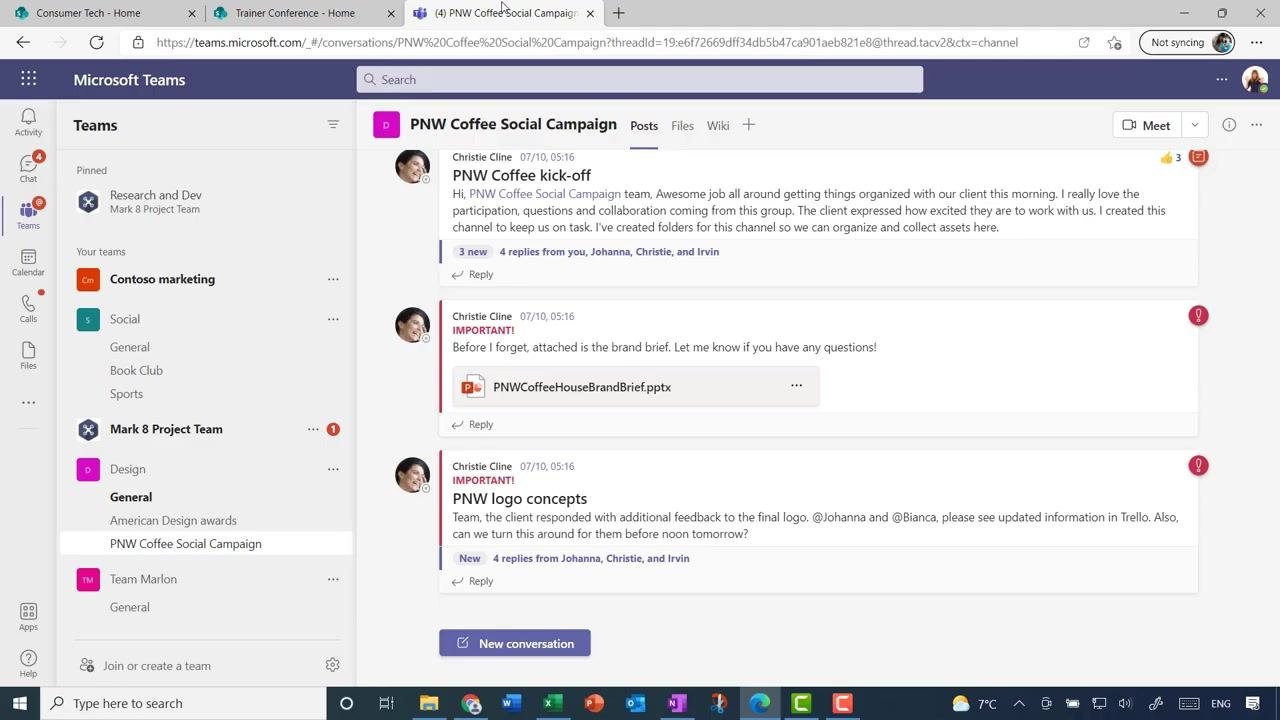
- If you have an established SharePoint site, such as "Consumer Tech", you can create a Microsoft Team that links to it.
- Open SharePoint and locate your site under "Frequent sites" or "Following".
-
Review the SharePoint site layout
- Open the site, for example "Consumer Tech".
- Confirm the layout, including News, Activity, Links, and Documents sections. This site may already have files and folders organized for your group.
-
Initiate team creation from the SharePoint site in Microsoft Teams
- Return to Microsoft Teams.
- At the bottom of the Teams sidebar, click Join or create a team.
- Select the team creation method
- In the "Create a team" dialog, choose From a group or team.
- This option lets you create a new team from an existing Microsoft 365 group, which is automatically created when you set up a SharePoint team site.
- You can only create a new team from a group that you own, so make sure you are logged in as the group owner.
Example: Create and use a Microsoft Teams site for a Consumer Tech team
- Select the Microsoft 365 group for your team
- In Microsoft Teams, a dialog titled "Which Microsoft 365 group do you want to use?" appears.
- Scroll through the list of available groups and select "Consumer Tech".
- Click Create to proceed. This action permanently adds Teams to your existing Microsoft 365 Group.
-
Wait for the team site to be created
- After clicking Create, wait for the process to complete; this may take a minute.
- Once finished, Teams displays the new team site.
-
Verify the General channel is ready
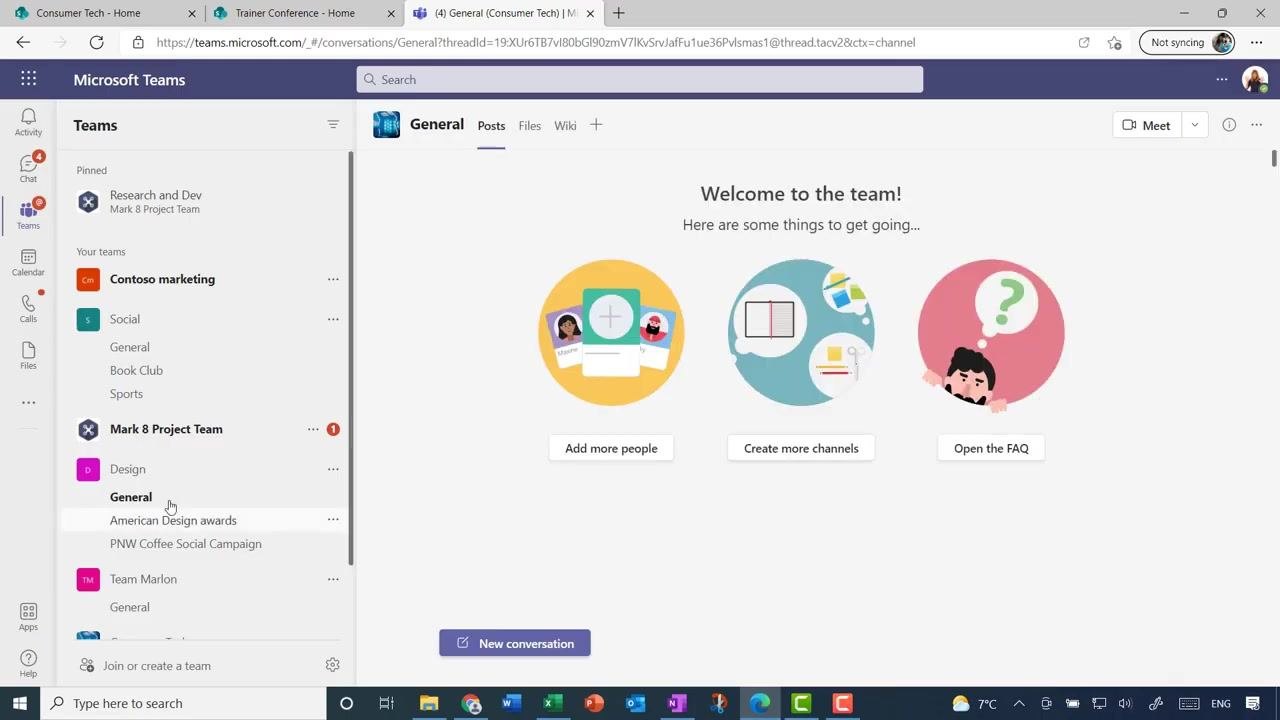
- In the Teams sidebar, locate "Consumer Tech" under "Your teams" and click it to expand its channels.
- Confirm that the "General" channel is present and selected.
- The main area displays a welcome message: "Welcome to the team! Here are some things to get going..." with options to Add more people, Create more channels, and Open the FAQ.
-
Start a new conversation in the General channel
- Click New conversation at the bottom of the main area to begin team discussions.
-
Add a new channel for team discussions
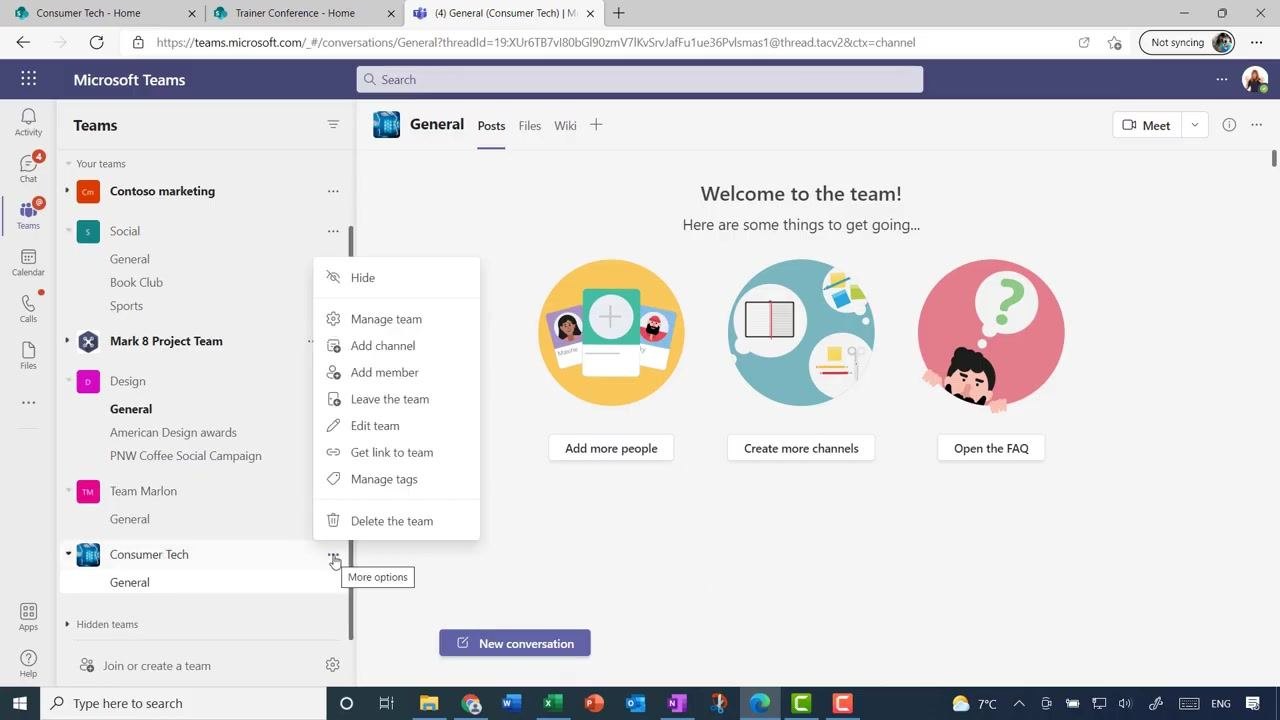
- Hover over the "Consumer Tech" team name in the left sidebar.
- Click the three-dot More options button next to the team name.
- Select Add channel to create a new channel, for example one for discussing new products. Other options in this menu include Hide, Manage team, Add member, Leave the team, Edit team, Get link to team, Manage tags, and Delete the team.
-
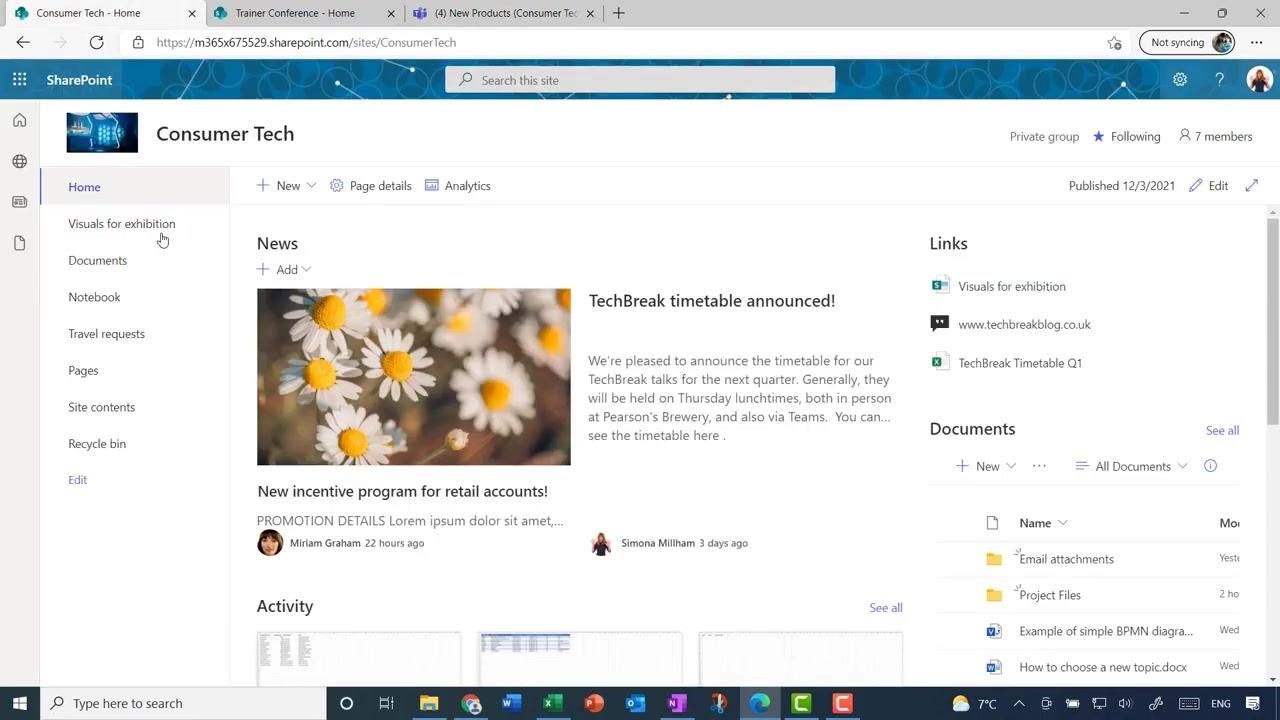
Access the linked SharePoint site
- Open the SharePoint site associated with the Consumer Tech team.
- The site displays a navigation menu on the left (Home, Visuals for exhibition, Documents, Notebook, Travel requests, Pages, Site contents, Recycle bin), a News section with announcements such as "TechBreak timetable announced!", a Links section, and a Documents section showing folders and files.
-
Verify automatic folder creation for new channels
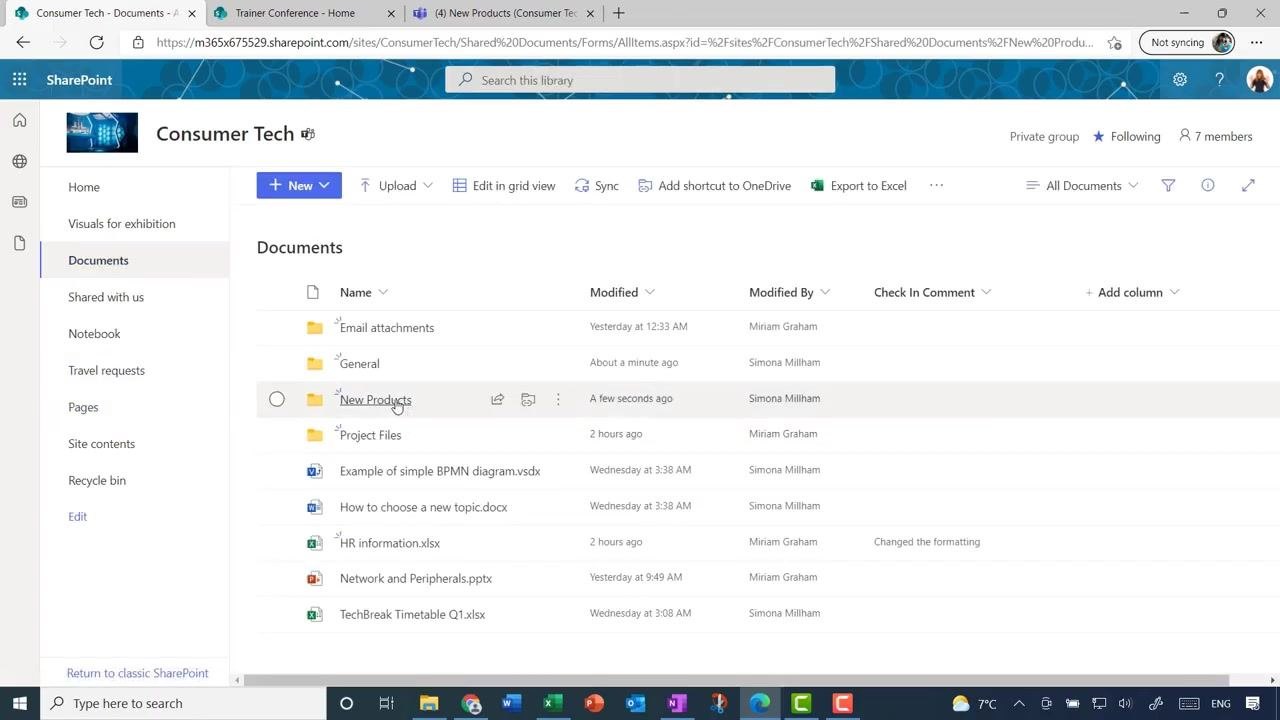
- In the SharePoint site, click Documents in the left navigation.
- Confirm that a new folder, such as "New Products", was automatically created to correspond with the new channel added in Teams. Other folders, such as "Email attachments," "General," and "Project Files," may also be present.
- The "Modified" and "Modified By" columns show recent activity and the user responsible.
- Open the channel's document library
- Click the "New Products" folder to open it.
- The folder is empty initially, with a prompt to "Drag files here" to upload documents.
- Use the options at the top, including New, Upload, Edit in grid view, Share, Copy link, Sync, and Download, to manage files within this channel's document library.
What's next
You now know several ways to create a SharePoint site: directly from the SharePoint start screen, through a shared library in OneDrive, or automatically when you create a team in Microsoft Teams. You have also seen how Teams channels correspond to folders in the SharePoint document library and how to create a new team from an existing SharePoint site. From here, you can explore site templates, manage owners and members, and continue organizing channels and folders to fit your team's collaboration needs.
Generation details: cost, quality tiers
Docsie billed 3,500 credits ($2.45) to analyze this 7-minute video at standard quality. The rewrite, template fill and Word/PDF exports were included. The same video at each quality tier:
| Quality | Frames sampled | Credits | Approx. cost |
|---|---|---|---|
| Draft | every 16-30 s | 1,750 | $1.22 |
| Standard (this guide) | every 8-15 s | 3,500 | $2.45 |
| Detailed | every 4-7 s | 7,000 | $4.90 |
| Ultra | every 1-3 s | 14,000 | $9.80 |
Credits priced at $0.70 per 1,000; plans include a monthly allowance. Enterprise customers on on-premise or bring-your-own-model deployments run this on their own inference and pay no per-video credits.
Generated by Docsie Video-to-Docs on 2026-09-10 from a 6-minute video. Screenshots are frames from the source video and belong to their creator, CBT Nuggets, whose original is embedded above. If you own this video and want the guide removed or credited differently, contact us and we will act within one business day.