
How to Create a List in SharePoint
This guide walks you through creating a custom SharePoint Online list to track invoices from start to finish. You will learn how to create a blank list, rename and add columns of various data types, enter a sample invoice, edit items in grid view, and consider next steps for workflow automation.
Video: How to Create a Custom List in SharePoint Online by Lui Iacobellis (2021). All credit for the demonstration goes to the creator; watch the original on YouTube. The written guide below was generated from this video by Docsie. Creator? Request a change or removal.
This guide walks you through creating a custom SharePoint Online list to track invoices from start to finish. You will learn how to create a blank list, rename and add columns of various data types, enter a sample invoice, edit items in grid view, and consider next steps for workflow automation.
Prerequisites
- Access to a SharePoint Online site where you have permission to create lists.
- You must be logged in to the site before you begin.
Creating the Invoice Tracker list
-
Navigate to the SharePoint Online site where you want to create your list. Ensure you are logged in and have the necessary permissions.
-
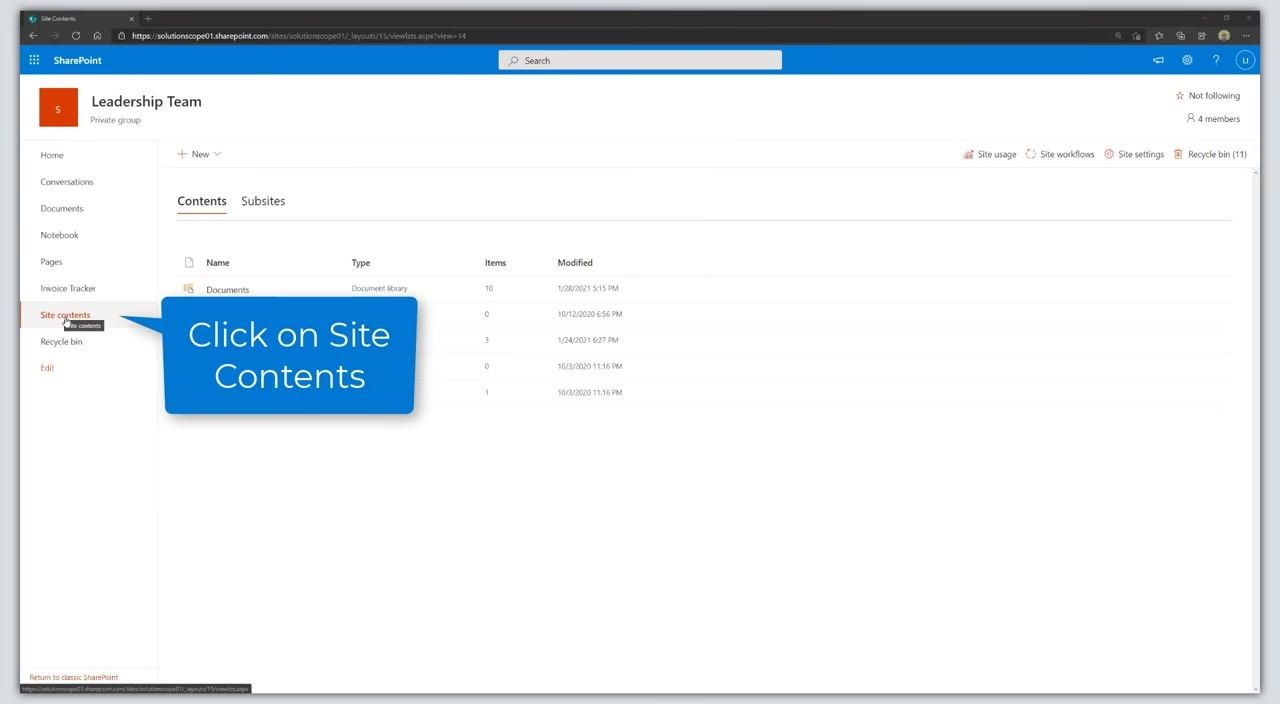
Click Site contents in the left navigation menu. This displays all the contents of your SharePoint site.
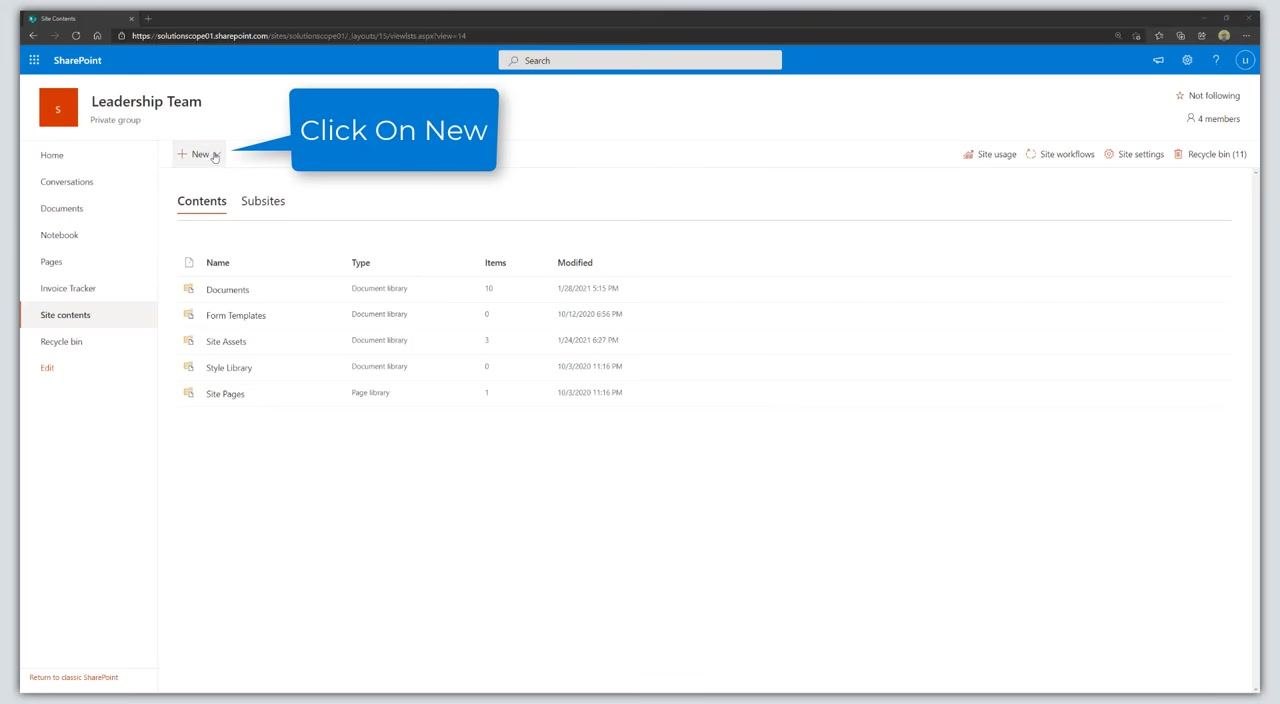
- Click the New button at the top of the Site contents page. A dropdown menu appears with options to create new items.
-
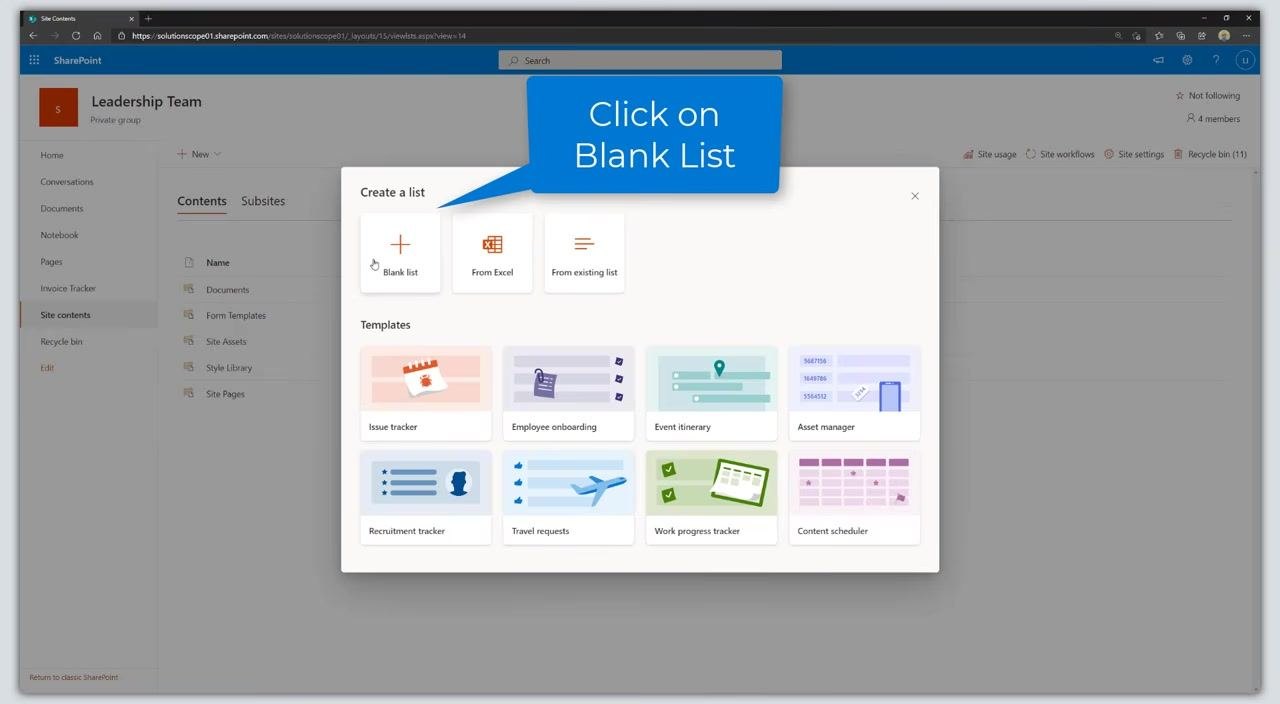
Select List from the dropdown menu. A dialog appears with options to create a list from a template or from scratch.
-
Click Blank list to start from scratch. This lets you build a fully custom list without using a template.
-
Enter the list details:
- Name: Enter "Invoice Tracker".
- Description: Optionally, provide a description (for example, "A list to record invoice details for approval and review workflow").
- Check Show in site navigation if you want the list to appear in the site's navigation.
-
Click Create to generate the new list.
-
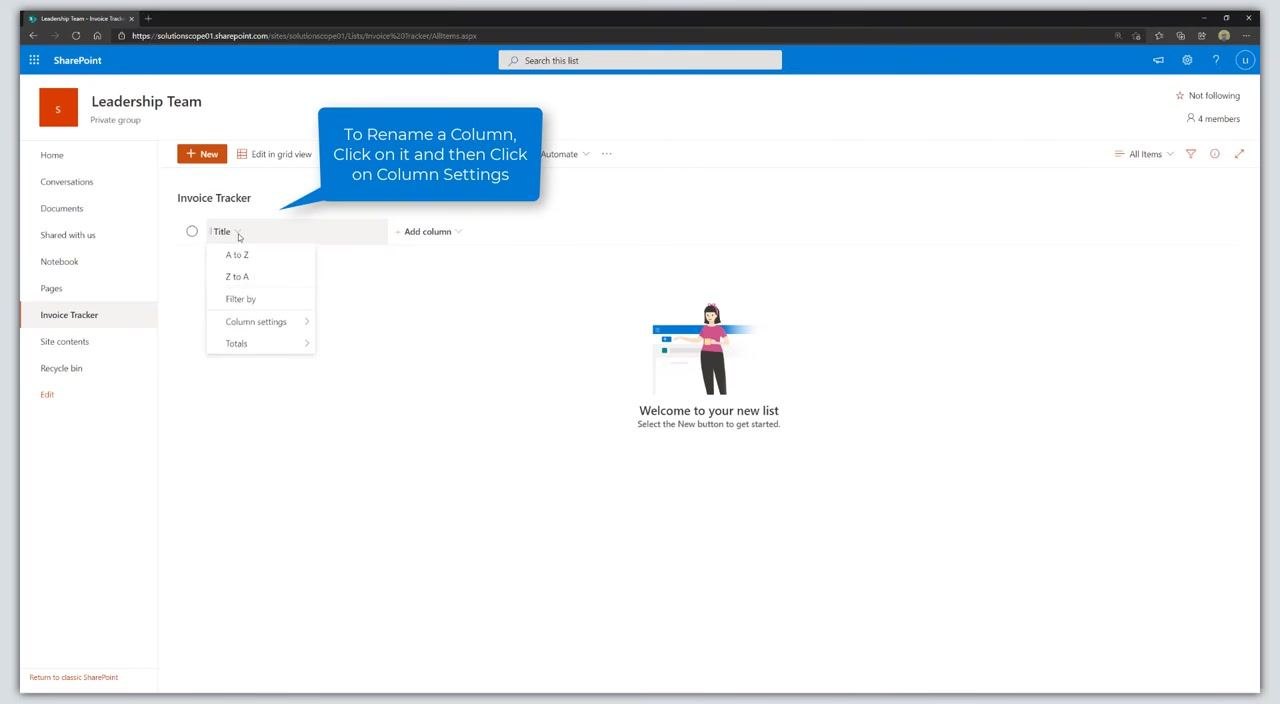
Review your new SharePoint list. By default, the list contains only one column named "Title". The main area displays a welcome message prompting you to start adding items.
-
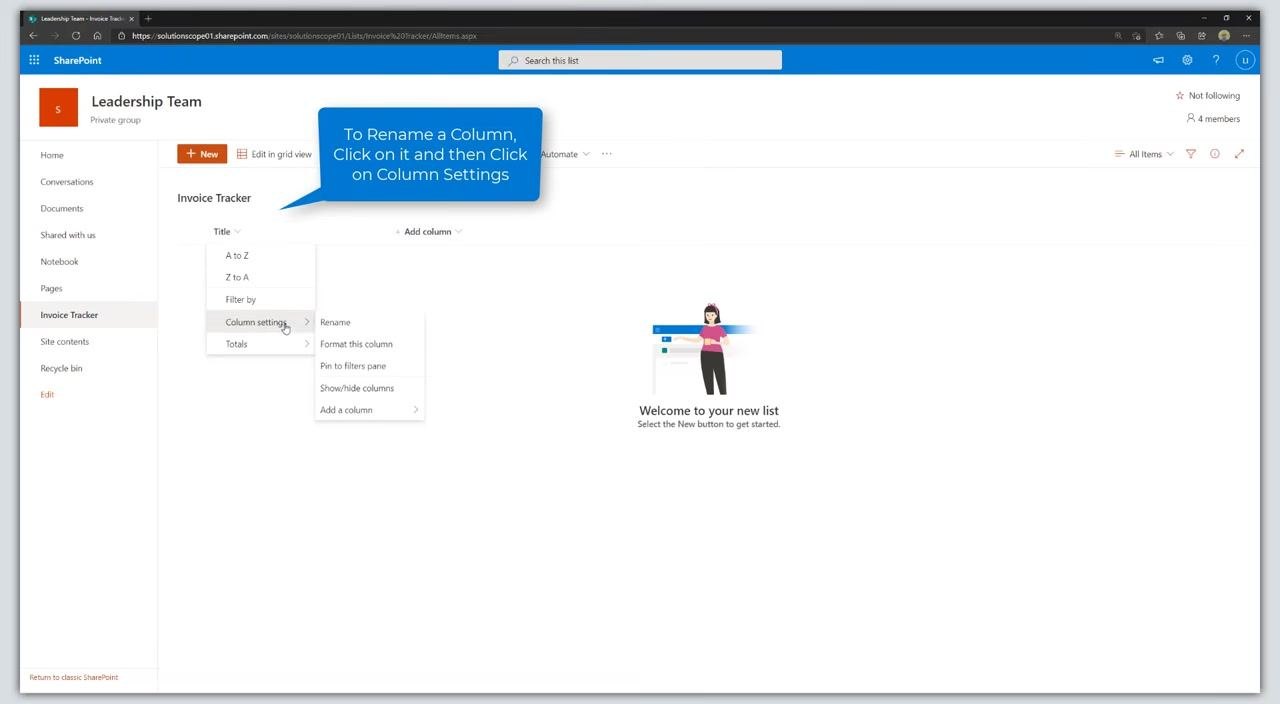
Repurpose the default "Title" column:
- Click the Title column header.
- Select Column settings from the dropdown menu.
- Click Rename.
-
Rename the column to Invoice Description. Enter "Invoice Description" as the new column name and click Save to apply the change.
-
Add a new column to the list by clicking Add column next to the "Invoice Description" column, then choose the appropriate column type for your next field (for example, text, number, or date).
At this point, you have created a custom SharePoint Online list named "Invoice Tracker" and renamed the default column to "Invoice Description". You are now ready to add additional columns as needed for your workflow.
Adding the Invoice Date, Invoice Amount, and Vendor columns
- Add the "Invoice Date" column:
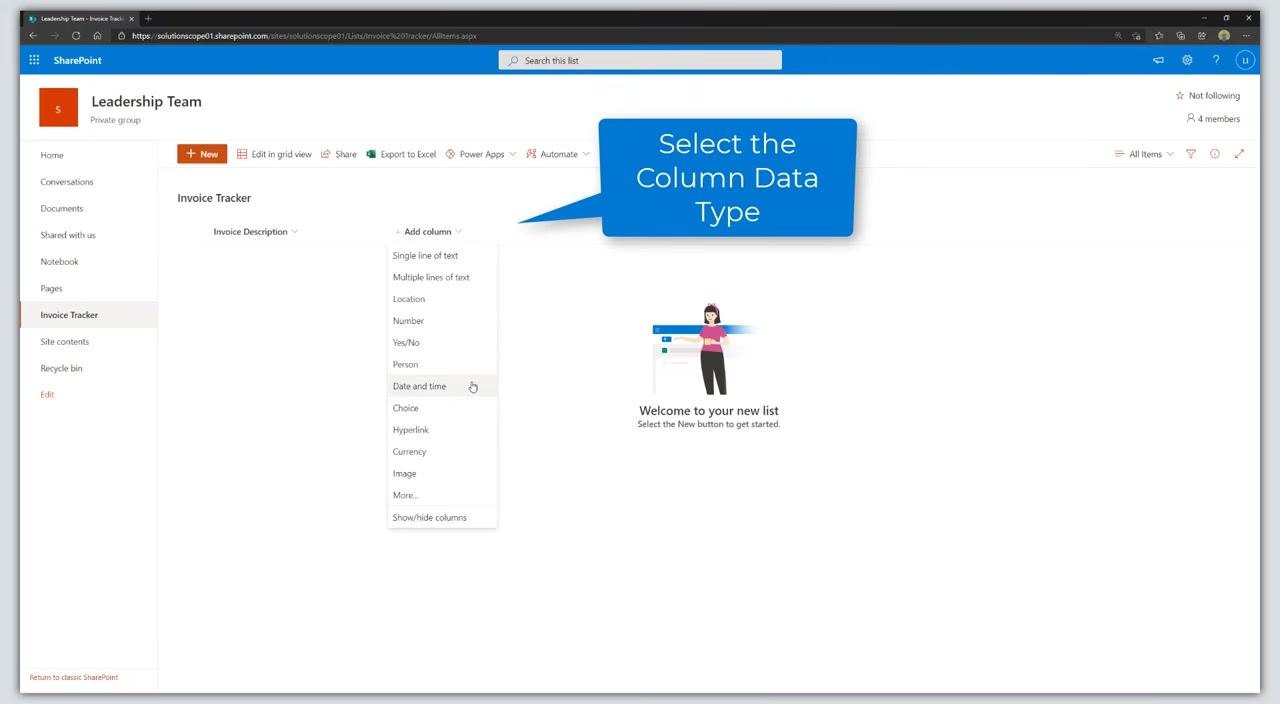
- Click Add column next to the existing columns in your "Invoice Tracker" list.
- From the dropdown menu, select Date and time as the column data type.
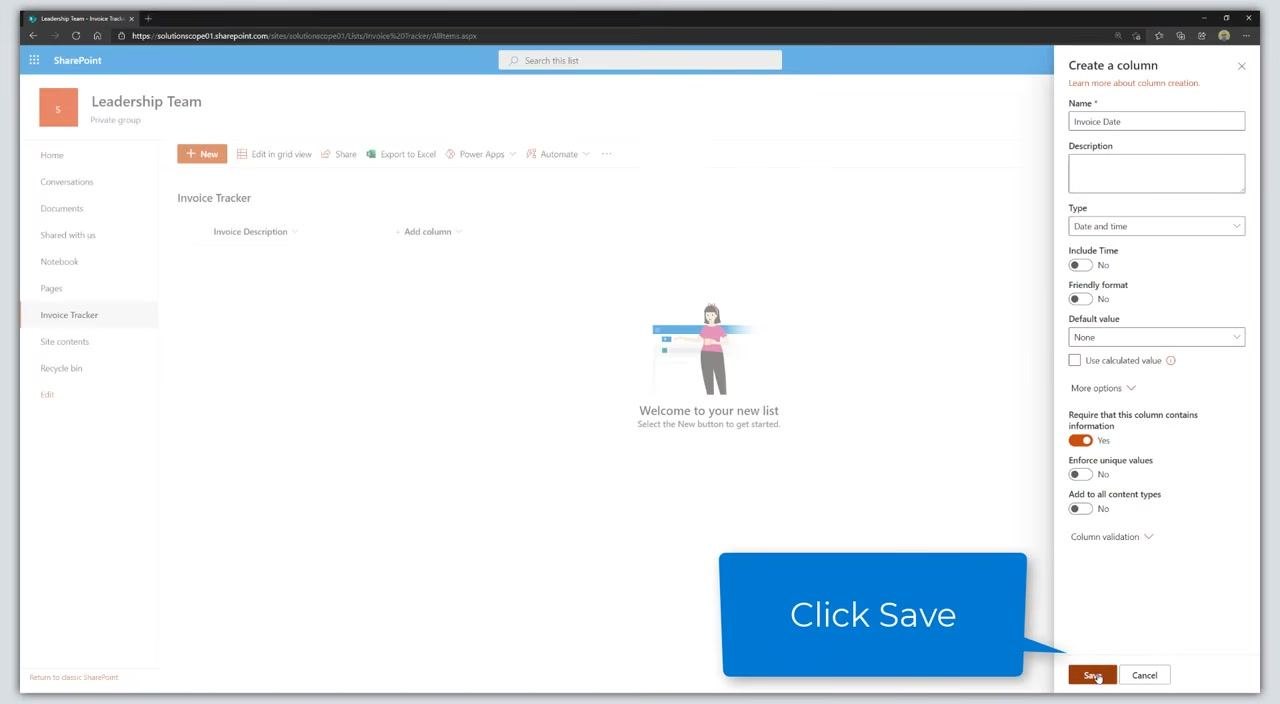
- In the **Create a column** panel on the right, enter **Invoice Date** in the **Name** field.
- Leave **Type** set to **Date and time**.
- Set **Include Time** to **No**.
- Set **Friendly format** to **No**.
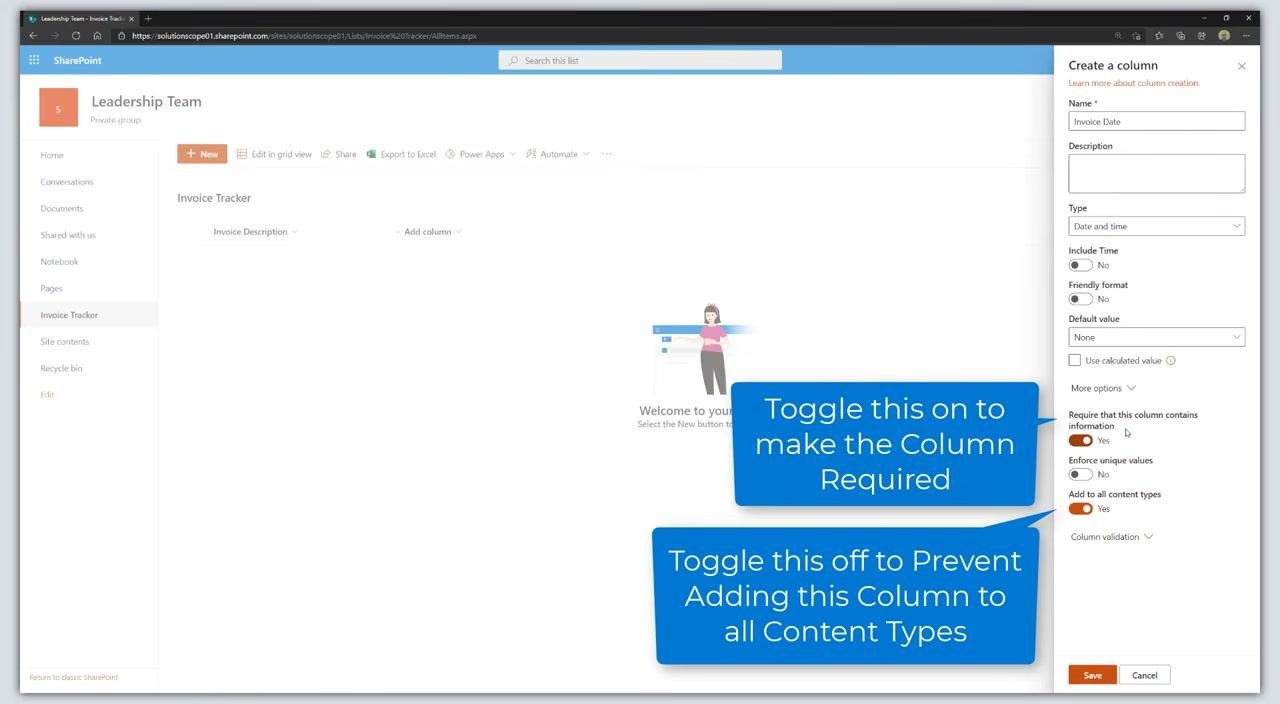
- Click **More options** to expand additional settings.


- Toggle **Require that this column contains information** to **Yes** to make the column required.
- Toggle **Add to all content types** to **No** to prevent adding this column to all content types.


- Click **Save** to create the column.
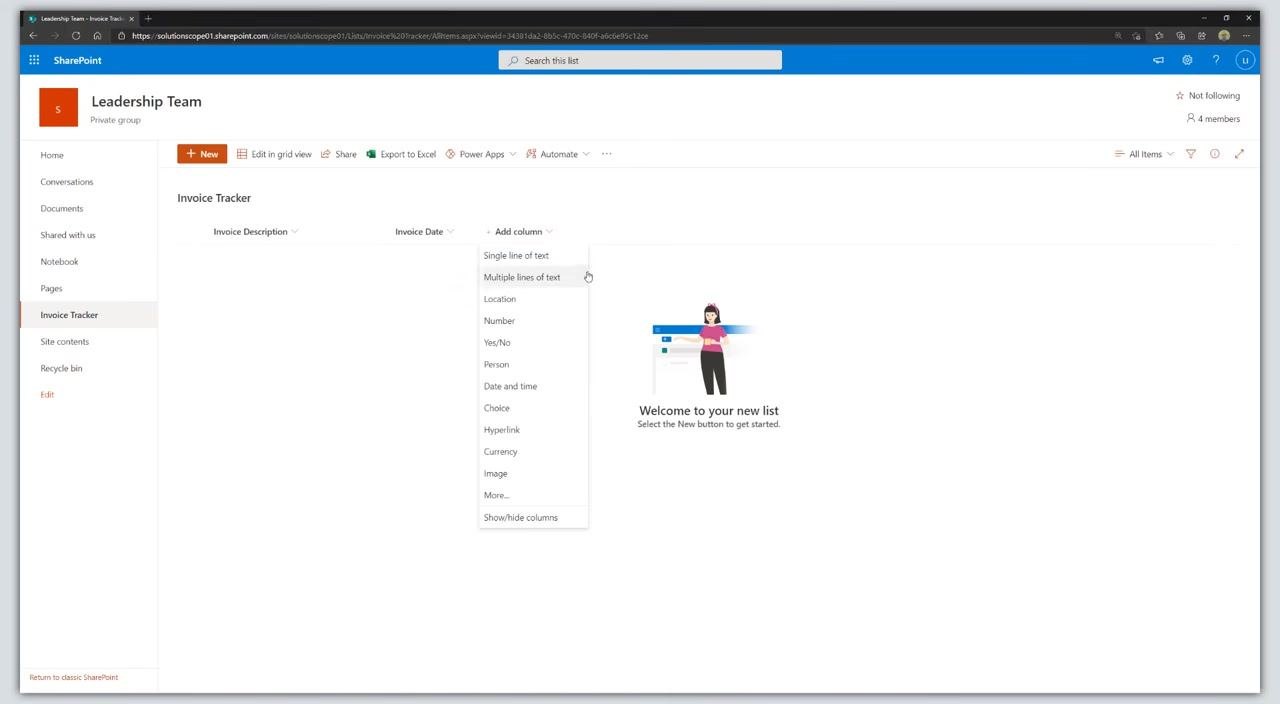
- Add the "Invoice Amount" column:
- Click Add column again.
- Select Currency from the dropdown menu as the data type.
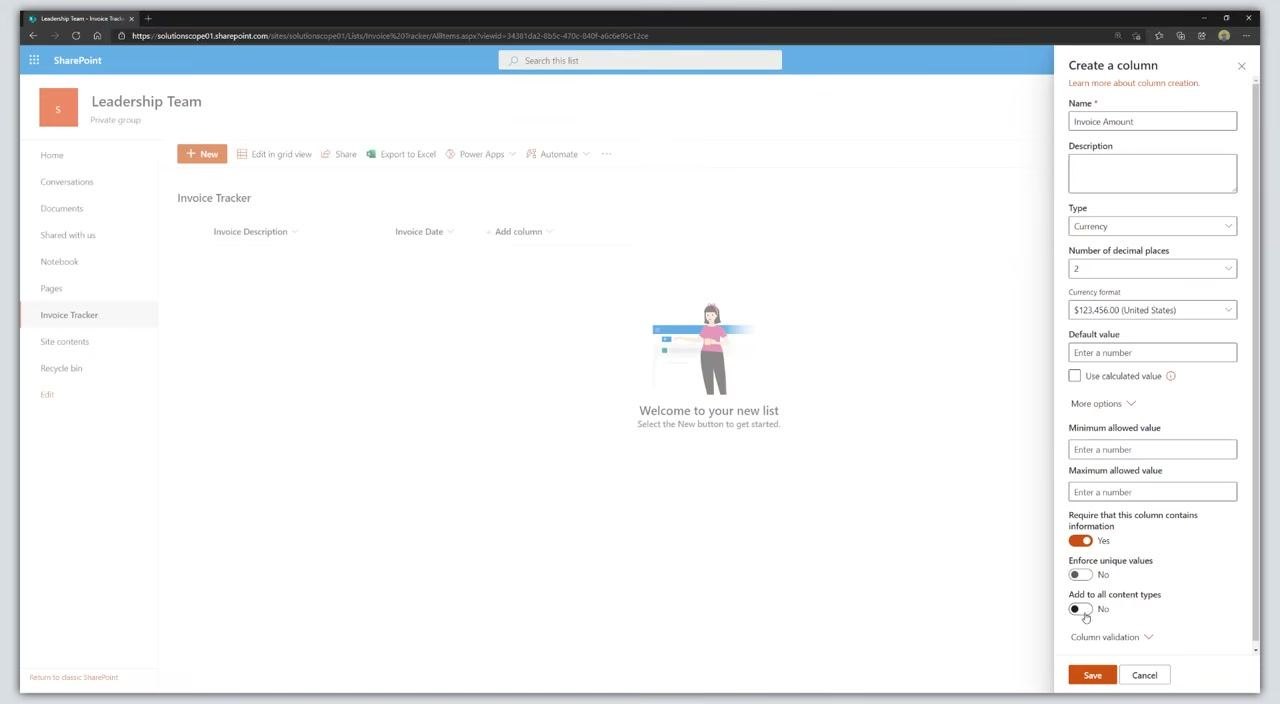
- In the **Create a column** panel, enter **Invoice Amount** in the **Name** field.
- Set **Number of decimal places** to **2**.
- Leave **Currency format** at the default (for example, $123,456.00 United States).
- Click **More options**.
- Toggle **Require that this column contains information** to **Yes**.
- Toggle **Add to all content types** to **No**.
- Click **Save** to create the column.
- Add the "Vendor" column:
- Click Add column once more.
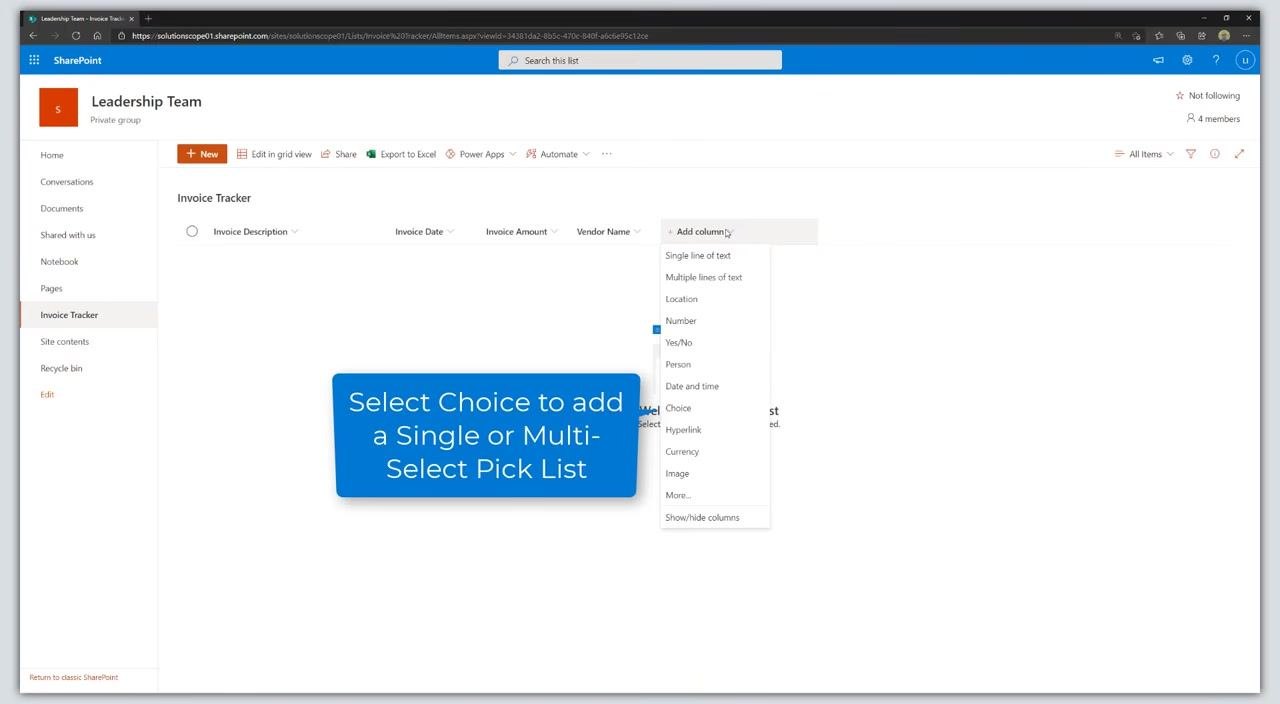
- Select Single line of text from the dropdown menu to capture the vendor name.
At this point you have added the "Invoice Date" column (required, date only) and the "Invoice Amount" column (required, currency with 2 decimals), and started adding the "Vendor" column (single line of text) to your Invoice Tracker list.
Adding the Vendor Name and Status columns
Add the "Vendor Name" column
- Click Add column in your Invoice Tracker list.
- Select Single line of text as the column type.
- In the Create a column panel on the right, enter Vendor Name in the Name field.
- Leave Type set to Single line of text.
- (Optional) Set the Maximum number of characters as needed (default is 255).
- Click More options to expand additional settings.
- Toggle Require that this column contains information to Yes to make the column required.
- Toggle Add to all content types to No.
- Click Save to create the column.
Add the "Status" column
- Click Add column again.
-
From the dropdown menu, select Choice as the column type.
-
In the Create a column panel, enter Status in the Name field.
- Under Choices, enter the following options (one per line):
- Pending Approval
- Approved
- More Information Required
- Paid
- (Optional) Click the color palette icon next to each choice to assign a color for visual distinction.
- Set the Default value to Pending Approval so that new items default to this status.
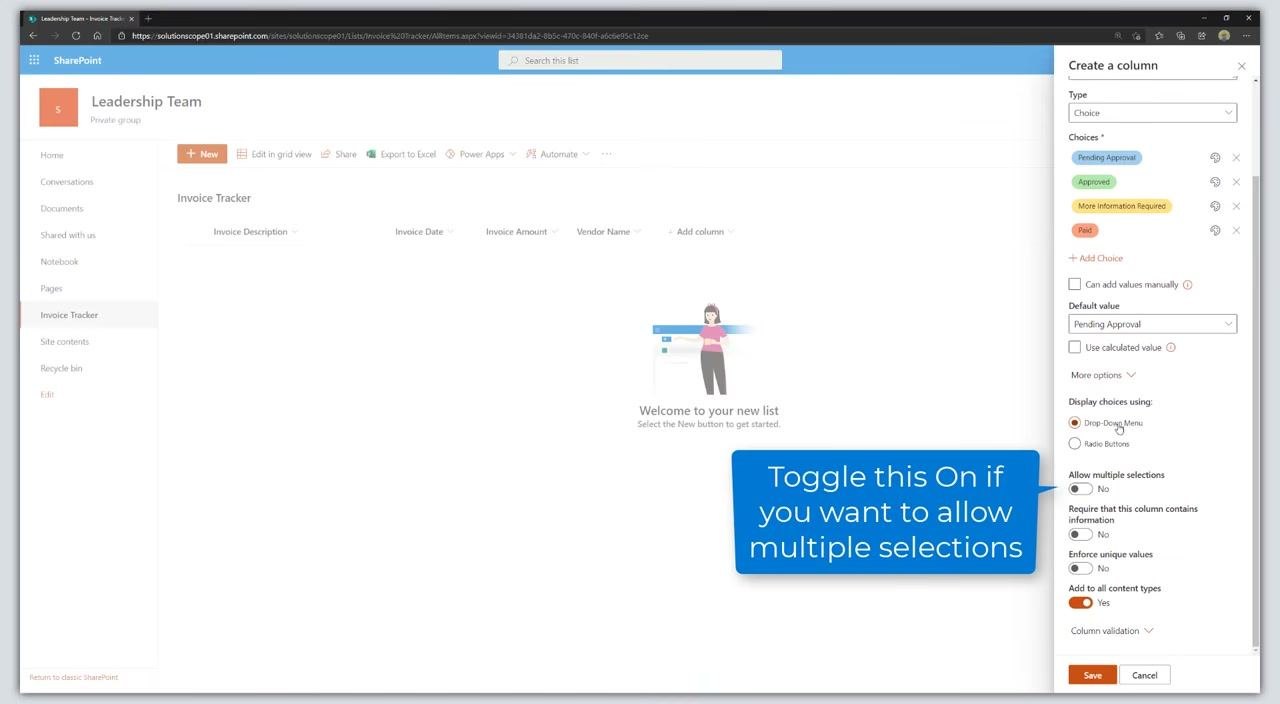
- Click More options to expand additional settings.
- Under Display choices using, leave the default Drop-Down Menu selected.
- Ensure Allow multiple selections is toggled to No.
- Toggle Require that this column contains information to Yes to make the column required.
- Toggle Add to all content types to No.
- Click Save to create the column.
At this point, you have added the "Vendor Name" column (required, single line of text) and the "Status" column (required, choice with workflow statuses and a default value) to your Invoice Tracker list. Continue adding any additional workflow or tracking columns as needed for your process.
Adding person and comment columns
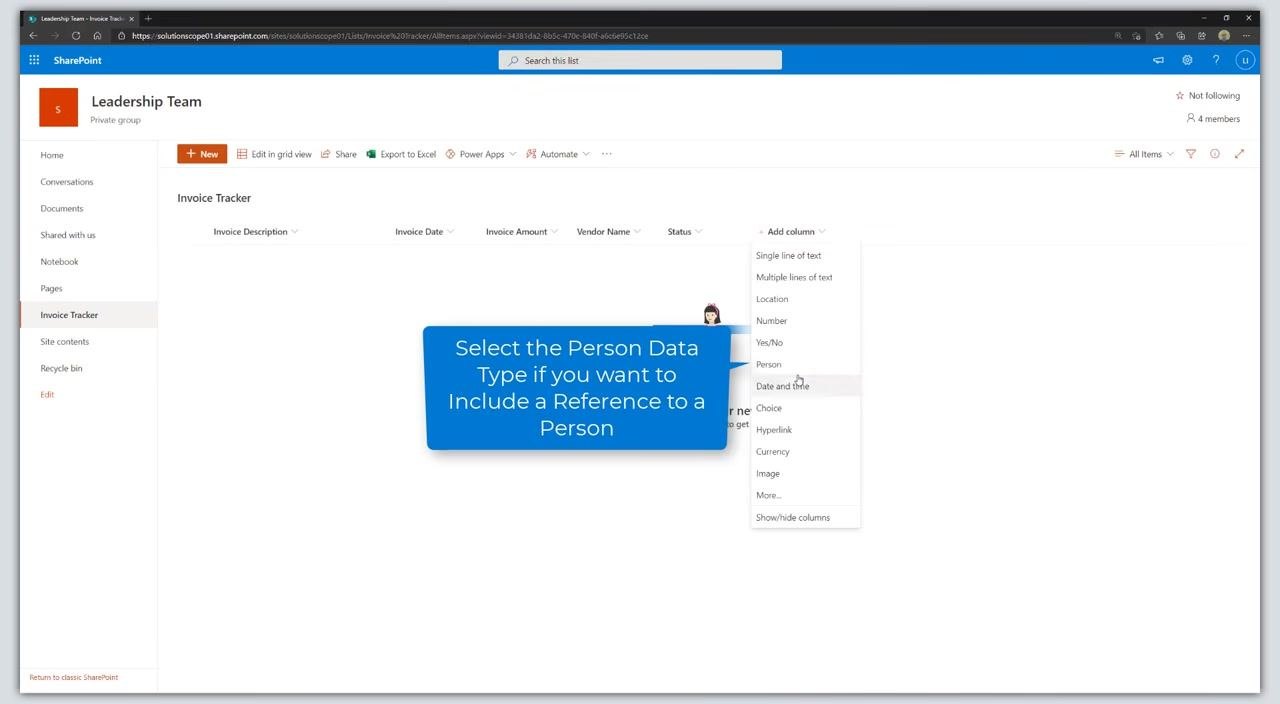
- Click the Add column dropdown in your SharePoint list to begin adding a new column. The dropdown menu appears with various data type options.
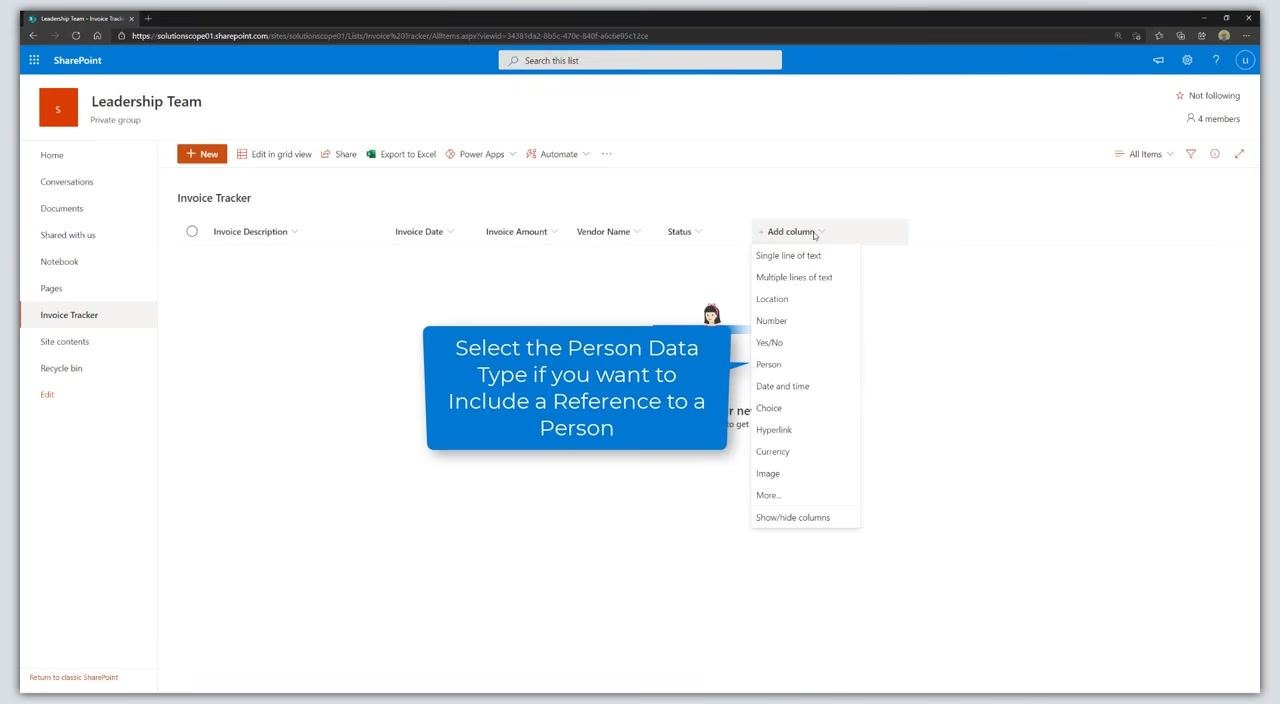
- Select Person as the data type for the new column. This allows you to include a reference to a person in your list.
-
In the Create a column panel on the right, enter the following details:
- Name: Requestor
- Type: Person or Group (automatically selected)
- (Optional) Check Allow selection of Groups if you want to allow the selection of Active Directory Groups (distribution lists).
- Click More options to expand additional settings.
-
Add another column for a different person reference:
- Click Add column again and select Person as the data type.
- In the Create a column panel, enter:
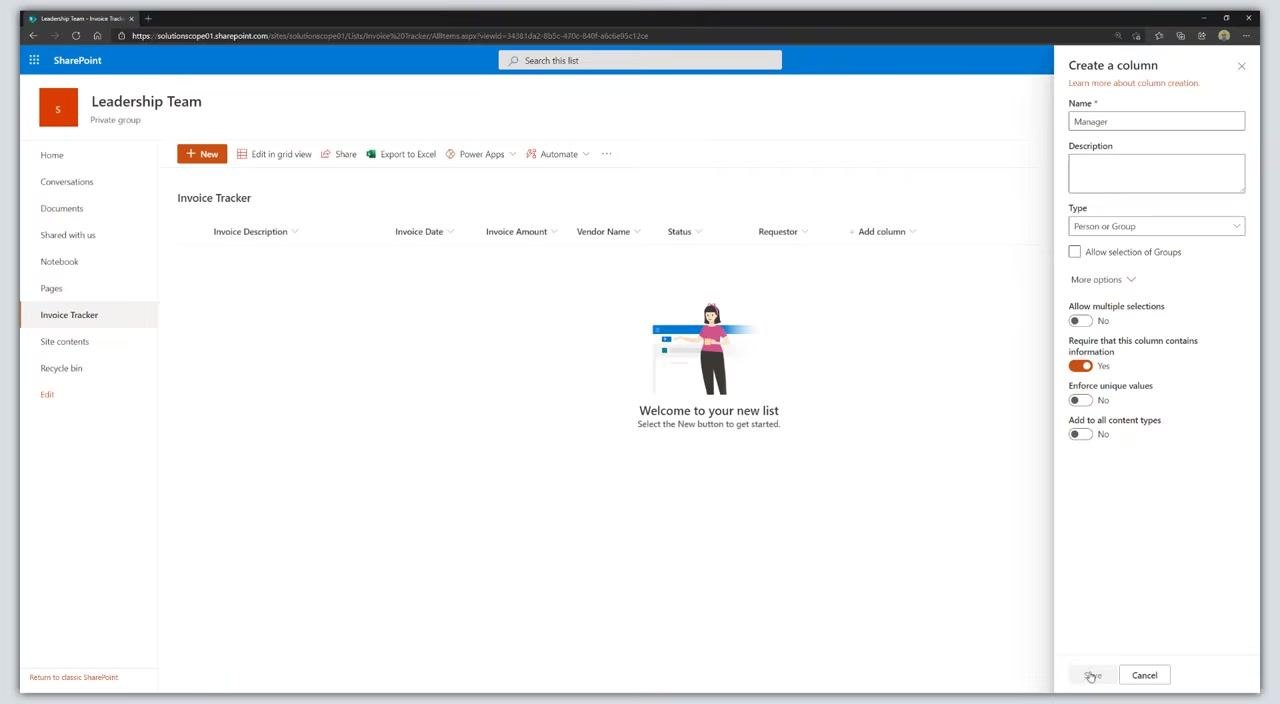
- Name: Manager
- Type: Person or Group
- Click More options to expand additional settings.
-
Make the "Manager" column required:
- Under More options, toggle Require that this column contains information to Yes.
- Ensure Allow multiple selections and Enforce unique values are set to No.
- Click Save to add the column.
- Add another person column if needed (for example, Finance):
- Repeat the process: click Add column, select Person, enter Name: Finance, and adjust settings as needed.
- Set Require that this column contains information to No if it is not required.
- Click Save.
-
Add a Comments column with multiple lines of text:
- Click Add column and select Multiple lines of text from the dropdown.
- In the Create a column panel, enter:
- Name: Comments
- Type: Multiple lines of text
- Click More options to expand additional settings.
-
Enable enhanced rich text for the Comments column:
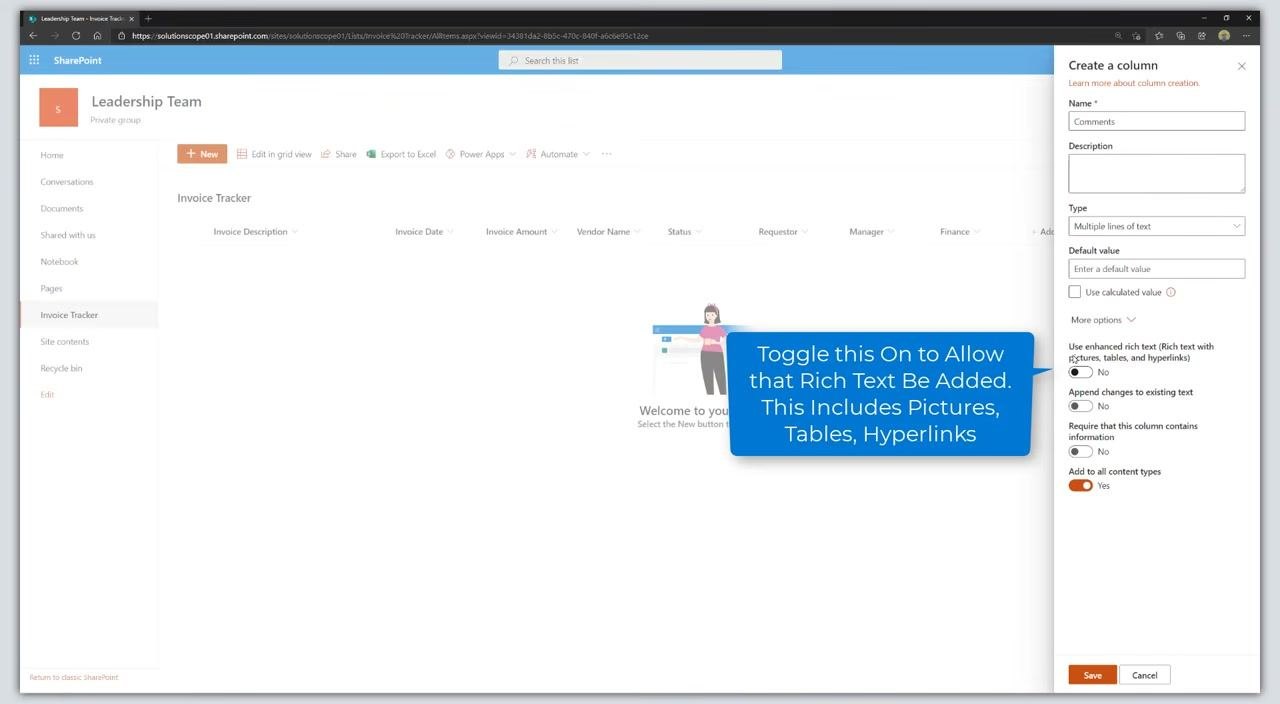
- Under More options, toggle Use enhanced rich text (Rich text with pictures, tables, and hyperlinks) to Yes if you want to allow rich formatting.
- Optionally, adjust other settings such as Append changes to existing text or Require that this column contains information.
- Click Save to add the column.
At this point, you have added several columns to your Invoice Tracker list, including person references and a comments field with rich text capabilities. Each step ensures the correct data type and settings are applied for your workflow.
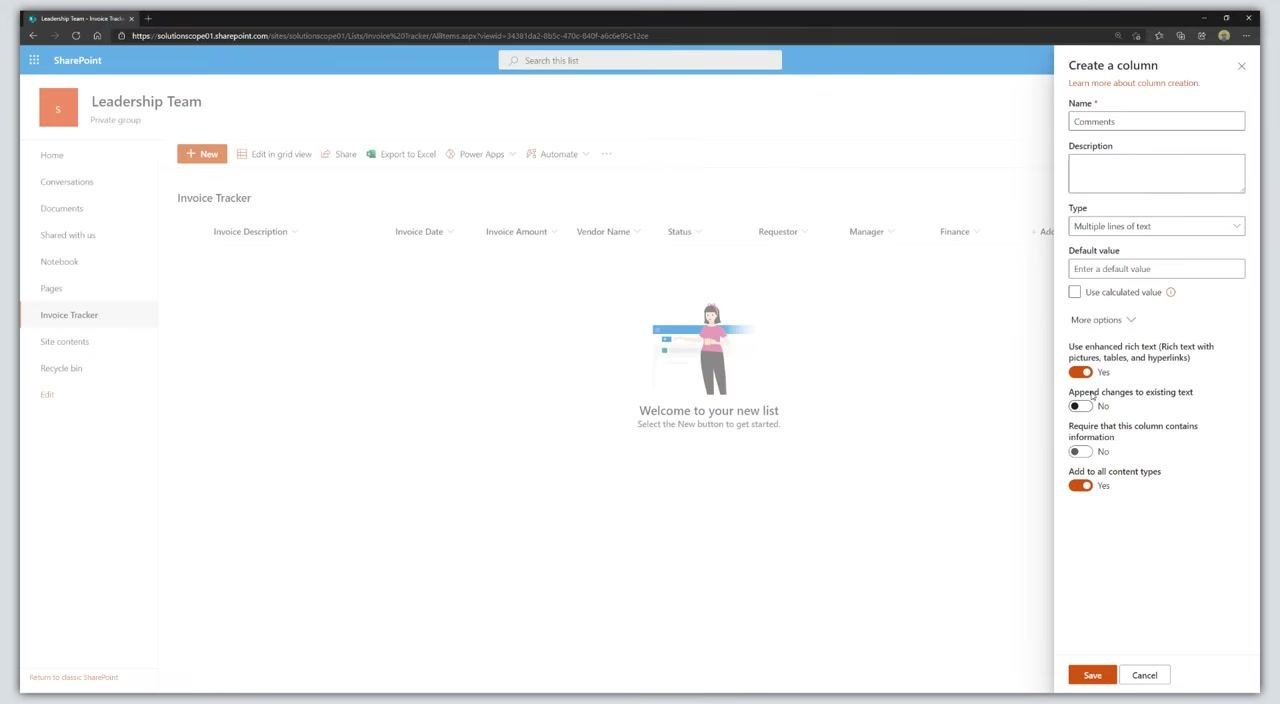
- Configure the Comments column settings. In the Create a column panel for the Comments field, ensure the following options are set:
- Use enhanced rich text (Rich text with pictures, tables, and hyperlinks): Yes (toggle is orange).
- Append changes to existing text: No (toggle is gray).
- Require that this column contains information: No (toggle is gray).
- Add to all content types: Yes (toggle is orange).
Leave Append changes to existing text set to No because the audit trail will record the history of an invoice.
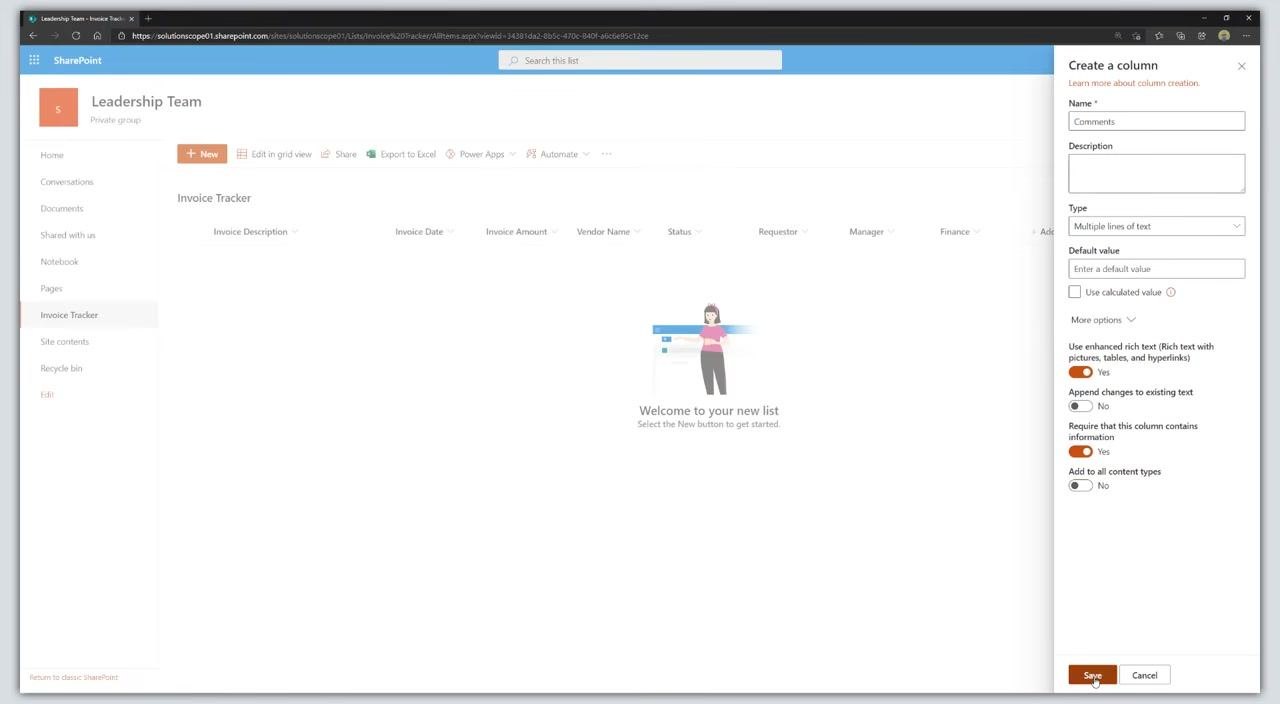
- Click the Save button at the bottom of the Create a column panel to add the Comments column to your list.
Adding a sample invoice entry
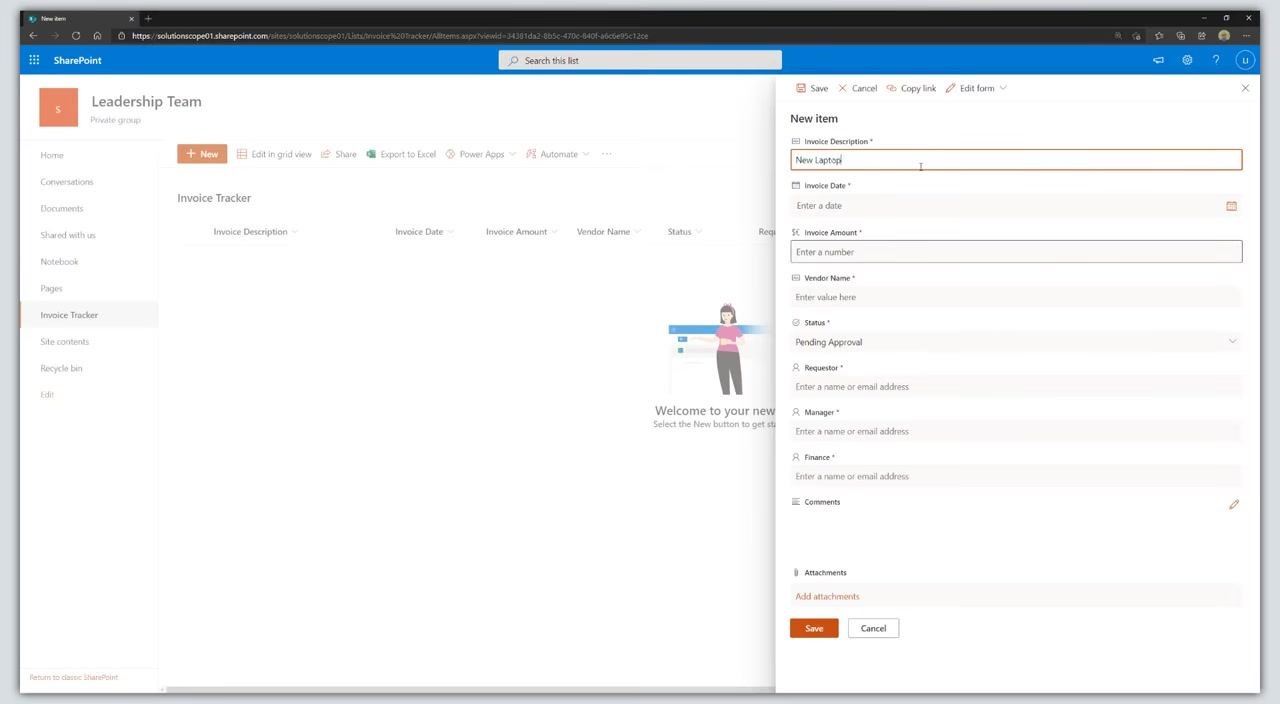
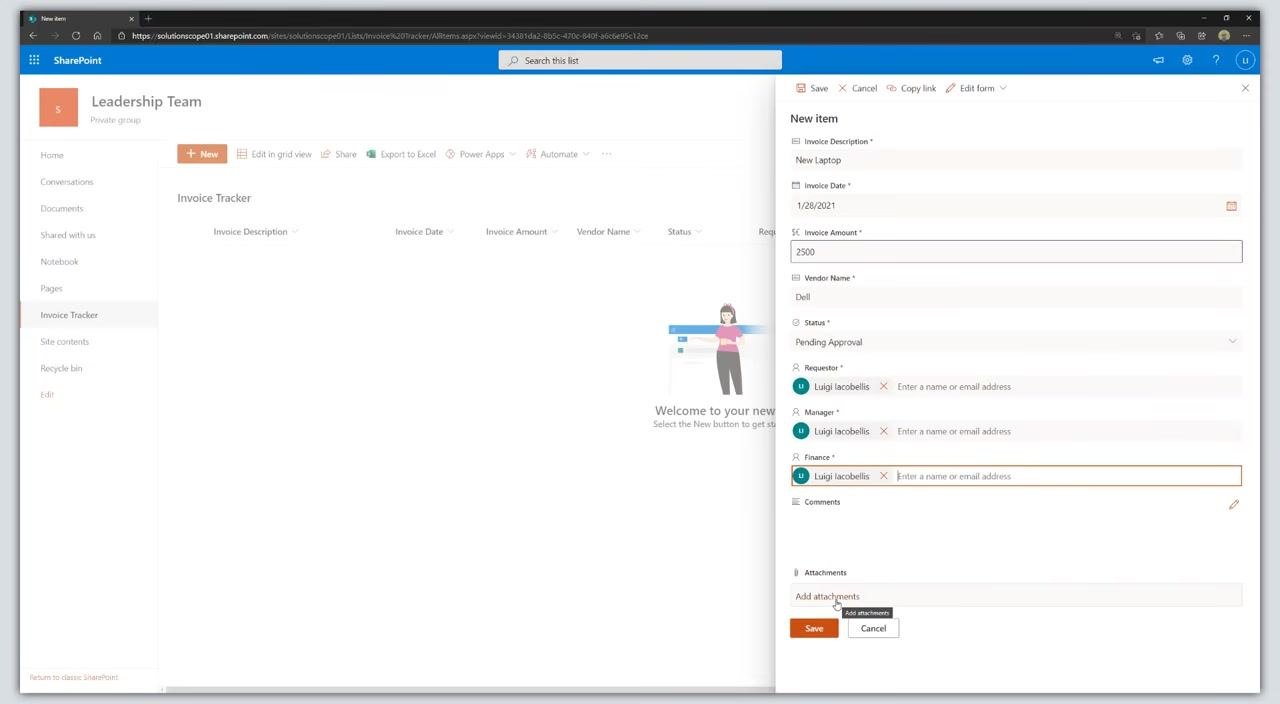
- Click the New button at the top of the Invoice Tracker list to open the new item form. In the New item panel, enter the following details:
- Invoice Description: New Laptop
- Invoice Date: 1/28/2021 (or select today's date)
- Invoice Amount: 2500
- Vendor Name: Dell
- Status: Pending Approval (default)
- Requestor: Enter your name or email address
- Manager: Enter the manager's name or email address
- Finance: Enter the finance contact's name or email address
- Comments: (optional, can be left blank or filled in as needed)
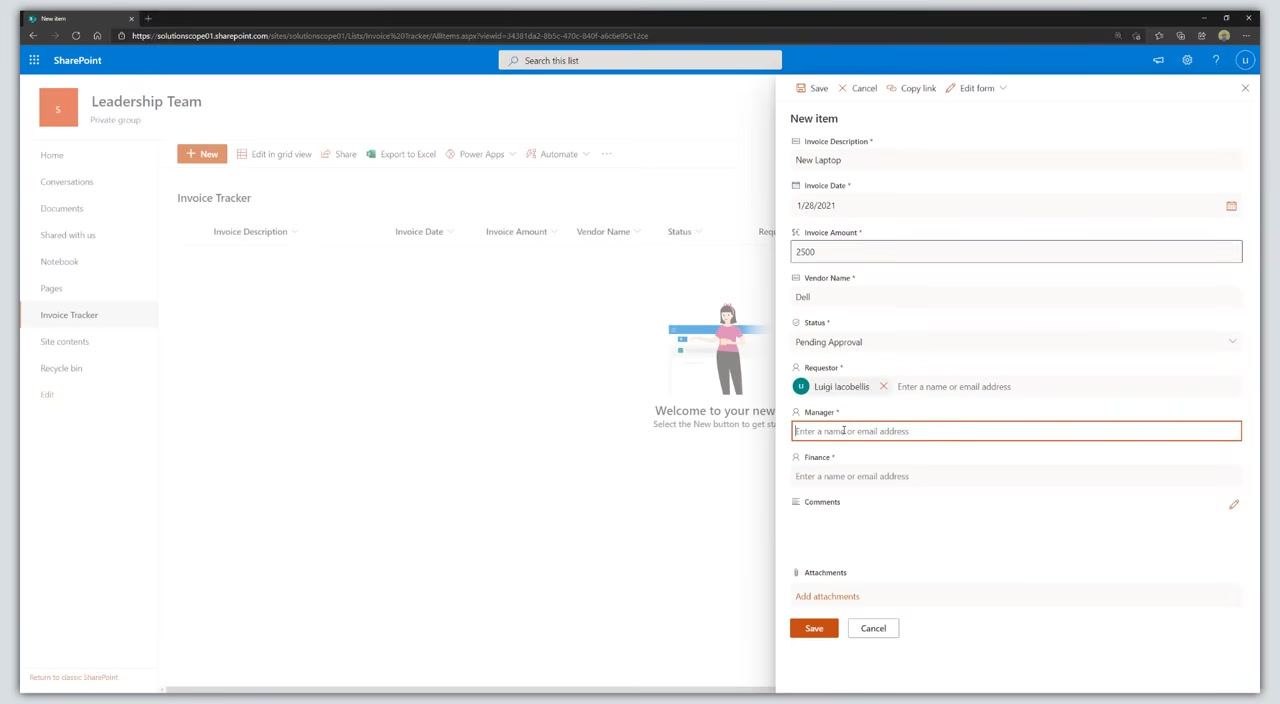
- Select the Requestor, Manager, and Finance contacts:
- In the Requestor field, enter your name or email address.
- In the Manager field, enter the manager's name or email address.
- In the Finance field, enter the finance contact's name or email address.
- (Optional) Add attachments to the invoice by clicking Add attachments at the bottom of the new item form to upload supporting documents.
-
Click the Save button at the bottom of the new item form to add the invoice to your tracker.
-
Edit items directly in grid view:
- Click Edit in grid view at the top of the Invoice Tracker list to enable inline editing.
- Update fields directly in the list, similar to working with a spreadsheet.
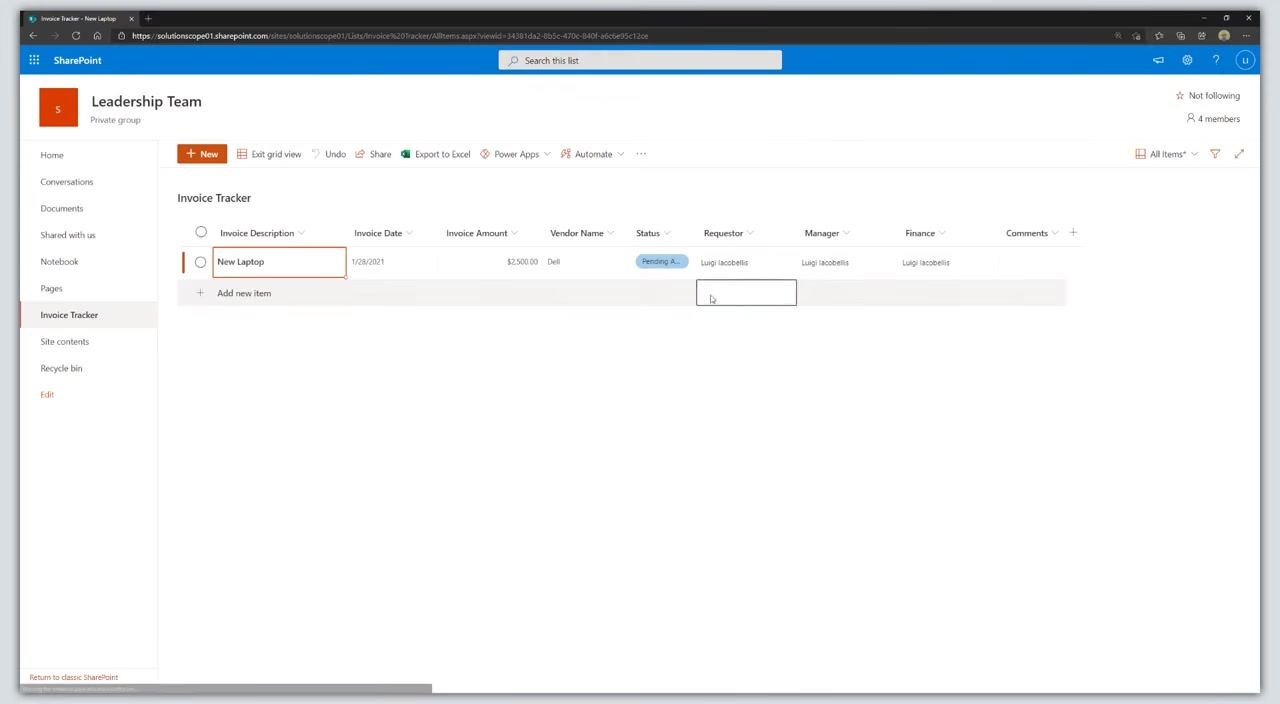
- Review your completed Invoice Tracker. Confirm that your new invoice entry appears in the list with all details filled in, including Invoice Description, Date, Amount, Vendor, Status, Requestor, Manager, Finance, and Comments.
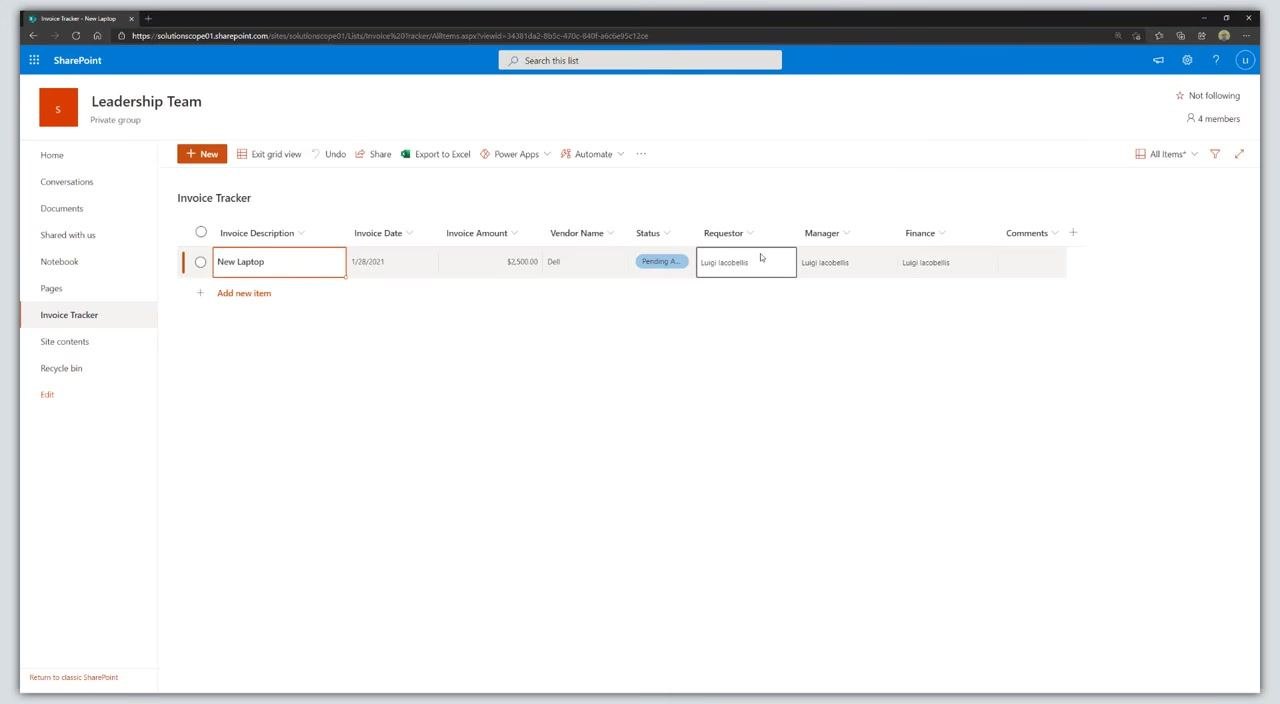
By following these steps, you have successfully configured your SharePoint Invoice Tracker list, added custom columns, and entered a sample invoice. You can now manage invoices, assign roles, add comments, and attach supporting documents directly within your SharePoint site.
What's next
-
Set up email notifications for status changes: To keep all stakeholders informed, configure SharePoint to send email notifications to the Requestor, Manager, and Finance contacts whenever there are changes in the invoice status. This ensures that each individual is promptly notified about updates or required actions related to their assigned invoices. Note: the specific steps for setting up automated email notifications (such as using Power Automate or SharePoint alerts) are not covered in this guide, but this is a recommended next step for workflow automation.
-
Stay updated with SharePoint tutorials: For ongoing learning and to stay current with the latest SharePoint Online features and best practices, subscribe to relevant tutorial channels or resources. This will help you maximize the value of your Invoice Tracker and other SharePoint solutions.
Summary
By following all the steps in this guide, you have learned how to:
- Create and configure a custom SharePoint list for invoice tracking.
- Add and manage invoice entries, including attachments and comments.
- Assign roles and prepare for workflow automation with notifications.
- Continue your SharePoint learning journey with recommended resources.
Generation details: cost, quality tiers
Docsie billed 4,500 credits ($3.15) to analyze this 9-minute video at standard quality. The rewrite, template fill and Word/PDF exports were included. The same video at each quality tier:
| Quality | Frames sampled | Credits | Approx. cost |
|---|---|---|---|
| Draft | every 16-30 s | 2,250 | $1.57 |
| Standard (this guide) | every 8-15 s | 4,500 | $3.15 |
| Detailed | every 4-7 s | 9,000 | $6.30 |
| Ultra | every 1-3 s | 18,000 | $12.60 |
Credits priced at $0.70 per 1,000; plans include a monthly allowance. Enterprise customers on on-premise or bring-your-own-model deployments run this on their own inference and pay no per-video credits.
Generated by Docsie Video-to-Docs on 2026-09-08 from a 8-minute video. Screenshots are frames from the source video and belong to their creator, Lui Iacobellis, whose original is embedded above. If you own this video and want the guide removed or credited differently, contact us and we will act within one business day.