
How to Create a Change Request in ServiceNow
This guide walks you through the process of creating a change request from a Configuration Item (CI) in ServiceNow. You will learn how to navigate the ServiceNow interface, search for the appropriate CI, customize your list view, and either associate CIs with an existing change request or create a new one.
Video: Create Change Request from CI in Servicenow | Change request in Servicenow | Servicenow Admin by Rai Gurukul (2021). All credit for the demonstration goes to the creator; watch the original on YouTube. The written guide below was generated from this video by Docsie. Creator? Request a change or removal.
This guide walks you through the process of creating a change request from a Configuration Item (CI) in ServiceNow. You will learn how to navigate the ServiceNow interface, search for the appropriate CI, customize your list view, and either associate CIs with an existing change request or create a new one.
Prerequisites
- Access to ServiceNow with permissions to view and manage Configuration Items and Change Requests.
- Familiarity with the UNIX Servers list and Change Request forms in your organization's ServiceNow instance.
Access the change requests list
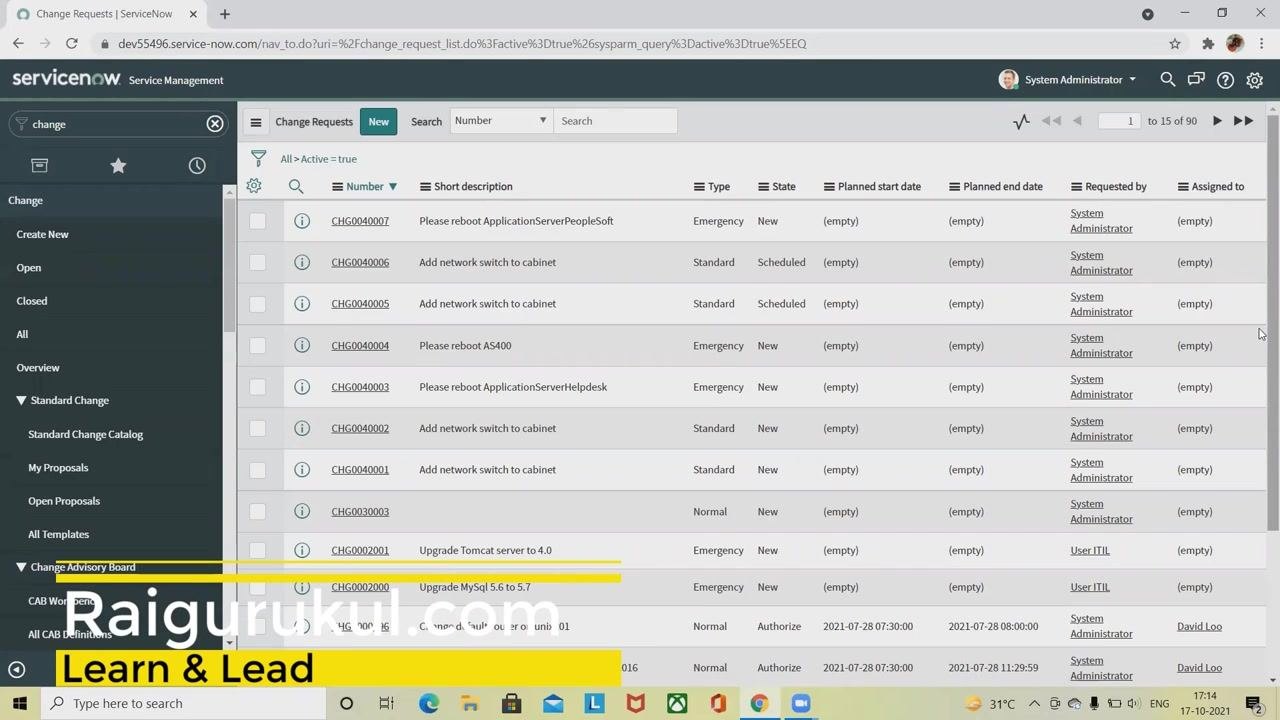
Open ServiceNow and navigate to the Change Requests page. This page displays a list of existing change requests with columns such as Number, Short Description, Type, State, Planned Start Date, Planned End Date, Requested By, and Assigned To.
Example entries include: - CHG0040007: Please reboot ApplicationServerPeopleSoft (Emergency, New) - CHG0040006: Add network switch to cabinet (Standard, Scheduled)
The left sidebar contains navigation options such as Create New, Open, Closed, Standard Change, and Change Advisory Board.
Navigate to configuration items
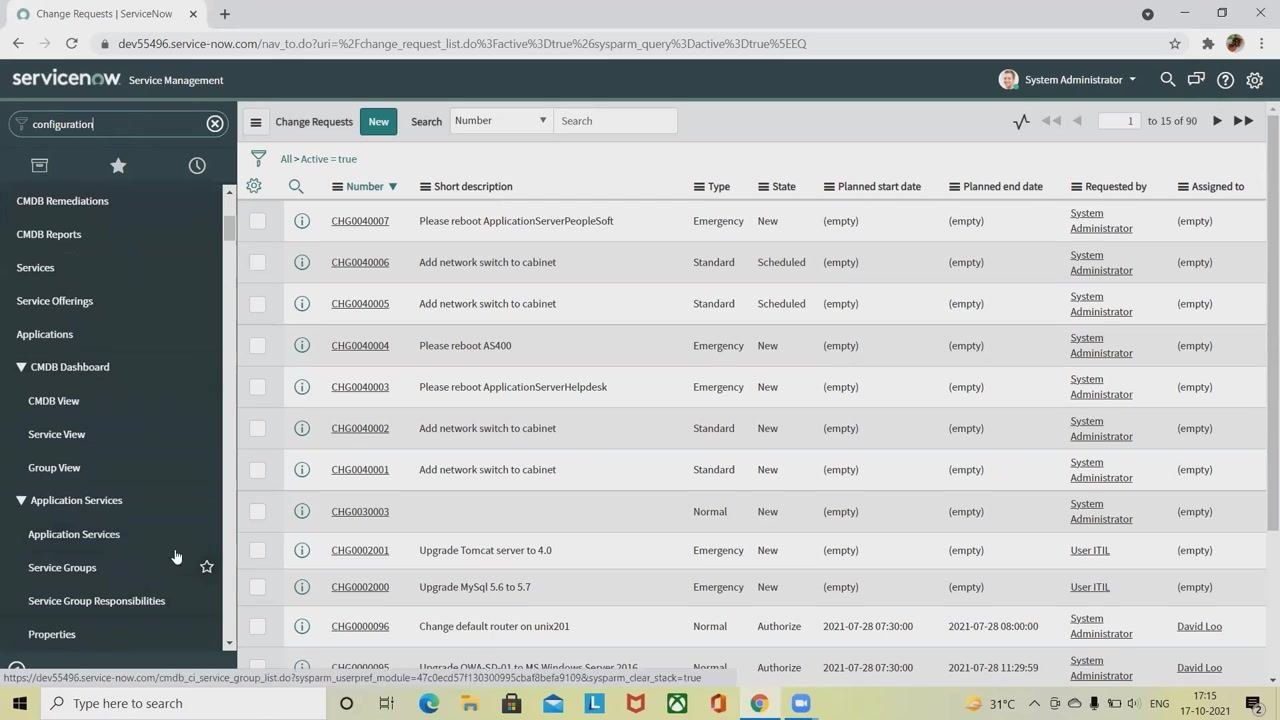
In the left sidebar, use the search bar and type "conf" or "configuration" to filter the menu. Locate and expand the Servers section under the filtered results.
Select UNIX servers
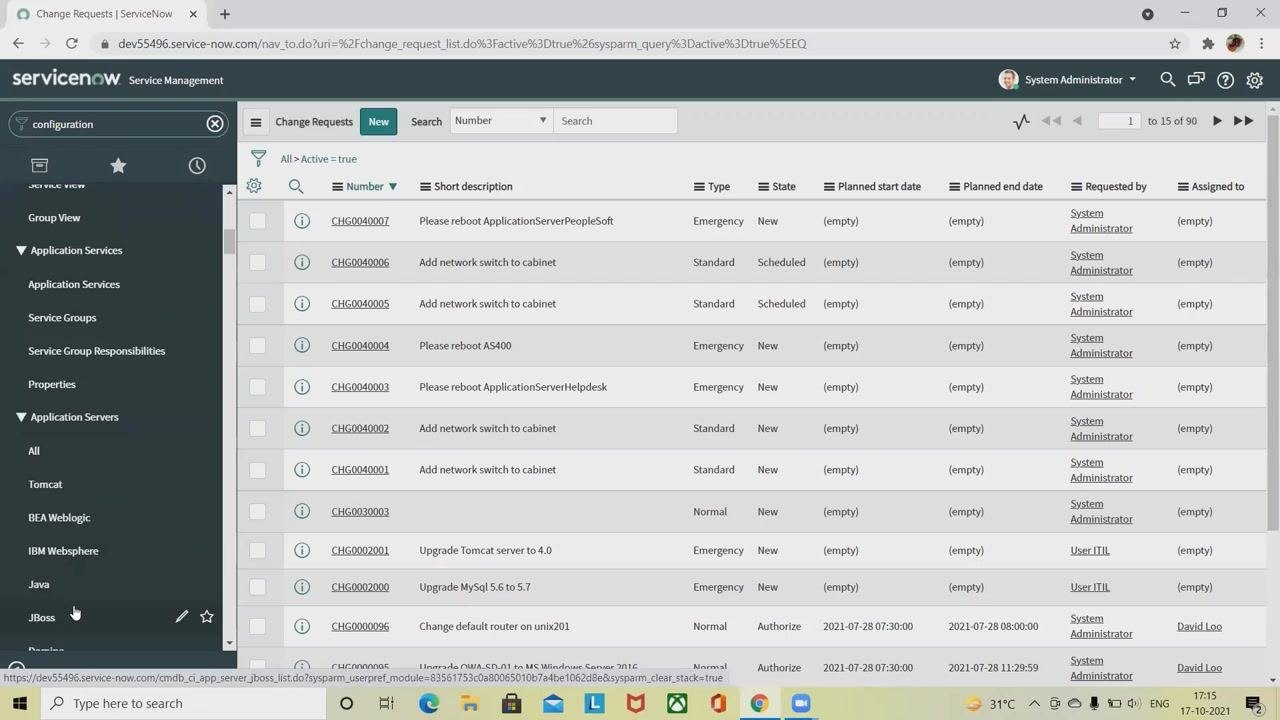
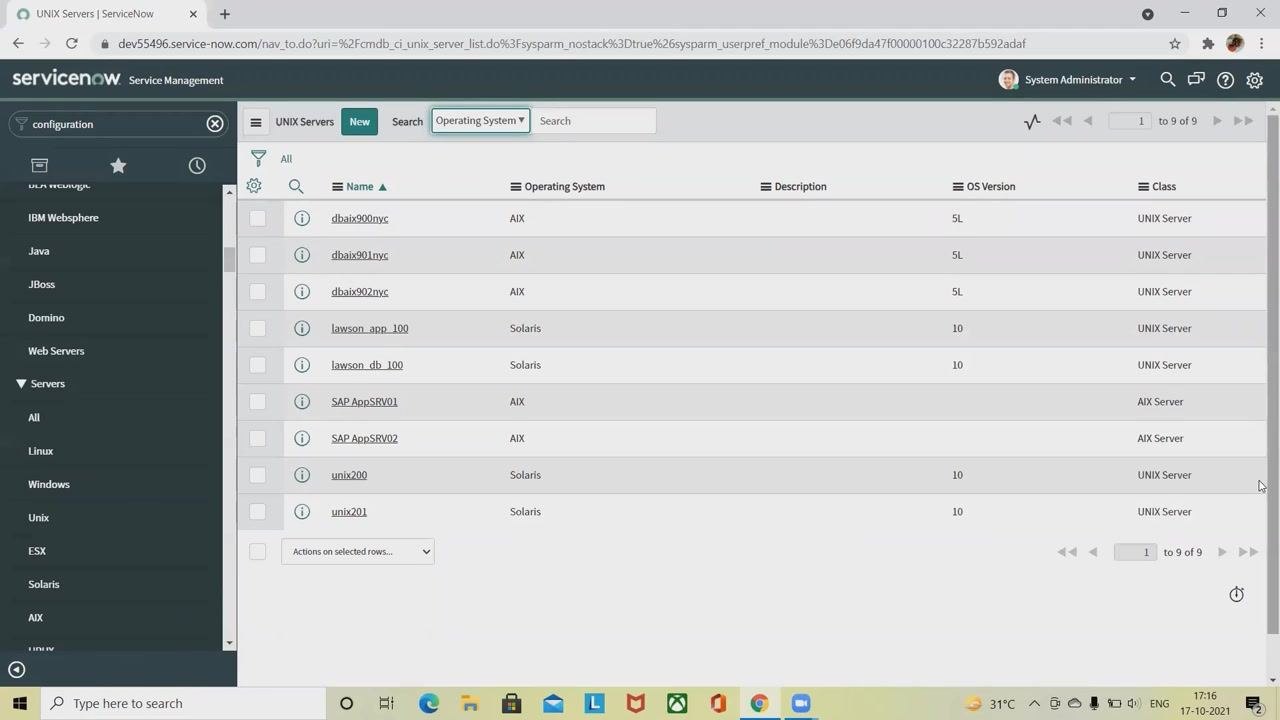
Under the Servers section, click Unix to view the list of UNIX servers. The main panel updates to display a list of UNIX servers with columns for Name, Operating System, Description, OS Version, and Class.
Example server entries: - dbaix900nyc (AIX, 5L, UNIX Server) - lawson_app_100 (Solaris, 10, UNIX Server)
Select one or more CIs
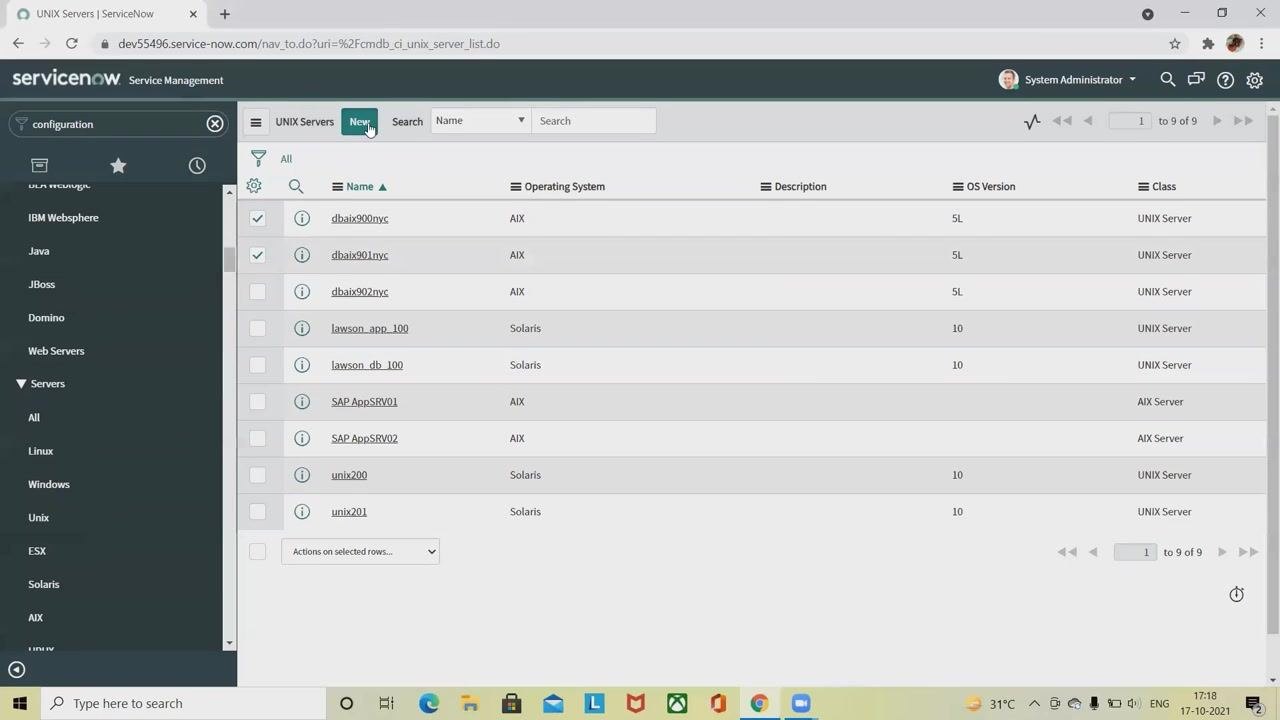
In the UNIX Servers list, select one or more CIs by checking the boxes next to their names. For example, select "dbaix900nyc" and "dbaix901nyc."
Customize list columns (optional)
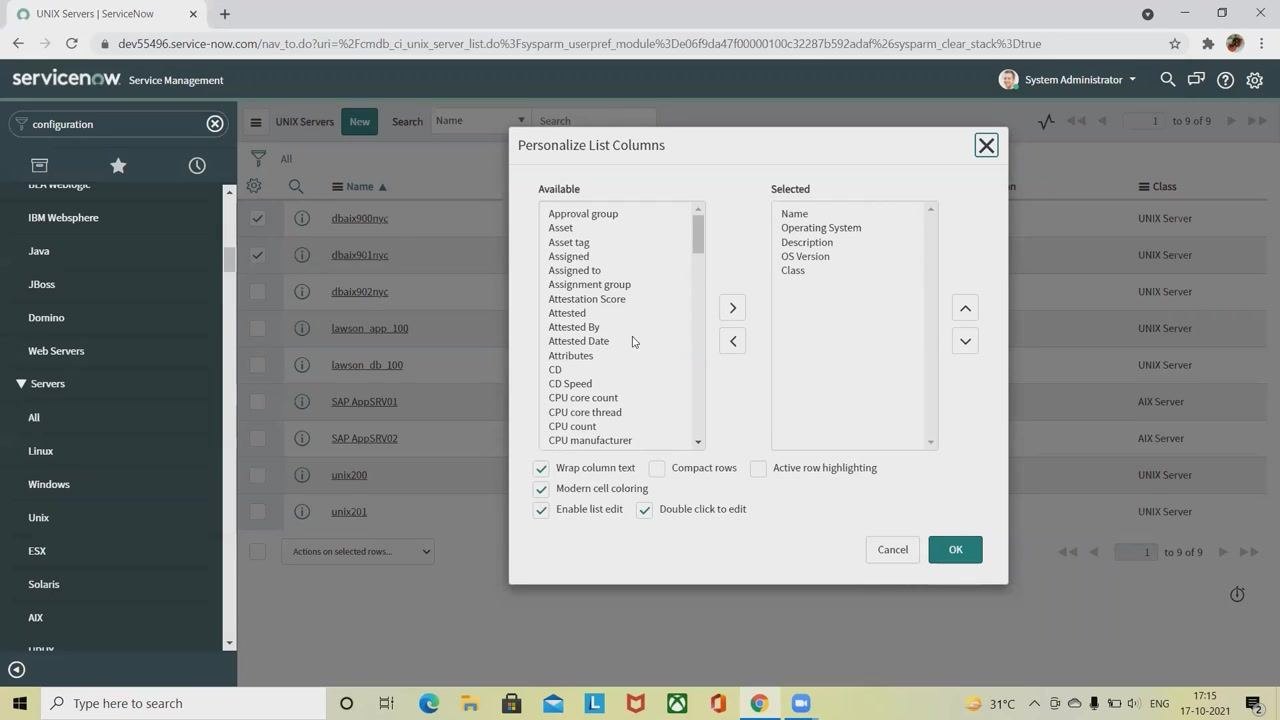
To personalize the columns displayed in the UNIX Servers list, click the gear icon (Personalize List). In the Personalize List Columns dialog, move fields between Available and Selected as needed.
Default selected columns are Name, Operating System, Description, OS Version, and Class. Additional options include Approval group, Asset, Assigned to, CPU details, and more.
You can also enable options such as: - Wrap column text - Compact rows - Active row highlighting - Modern cell coloring - Enable list edit - Double click to edit
Click OK to apply your changes.
Search and filter CIs
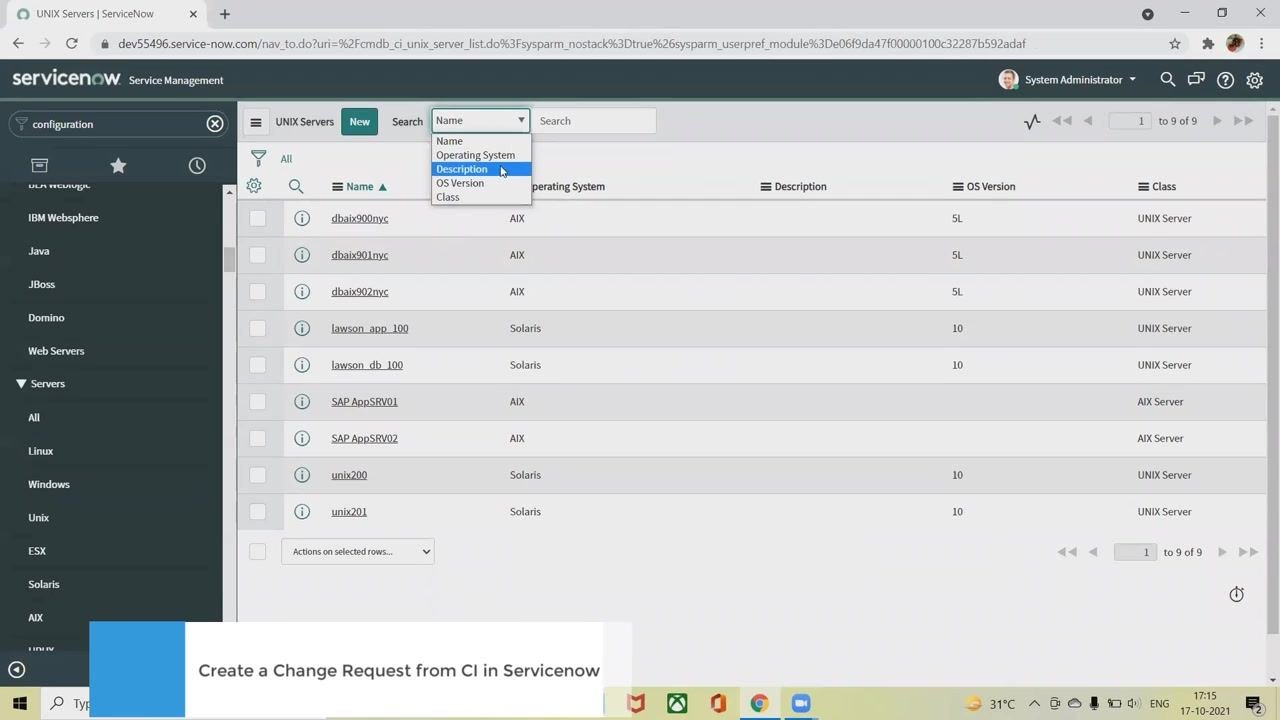
Use the search bar above the UNIX Servers list to filter by Name, Operating System, Description, OS Version, or Class. Select the desired filter from the dropdown and enter your search term.
Create a new UNIX server CI (if needed)
If the CI you need does not exist, click the New button at the top of the UNIX Servers list.
A new record form appears. In the Name field, enter the name of your new UNIX server or the name associated with your team's request. Fill in additional details as required:
- Asset tag
- Manufacturer
- Asset
- Company
- Serial number
- Model ID
- Assigned to
- Configuration section: Model number, Operating System, OS Version, OS Service Pack, Disk space (GB), Description, RAM (MB), CPU speed (MHz), CPU count, CPU manufacturer, CPU type
Click Submit to save the new UNIX server CI.
Choose an action for selected CIs
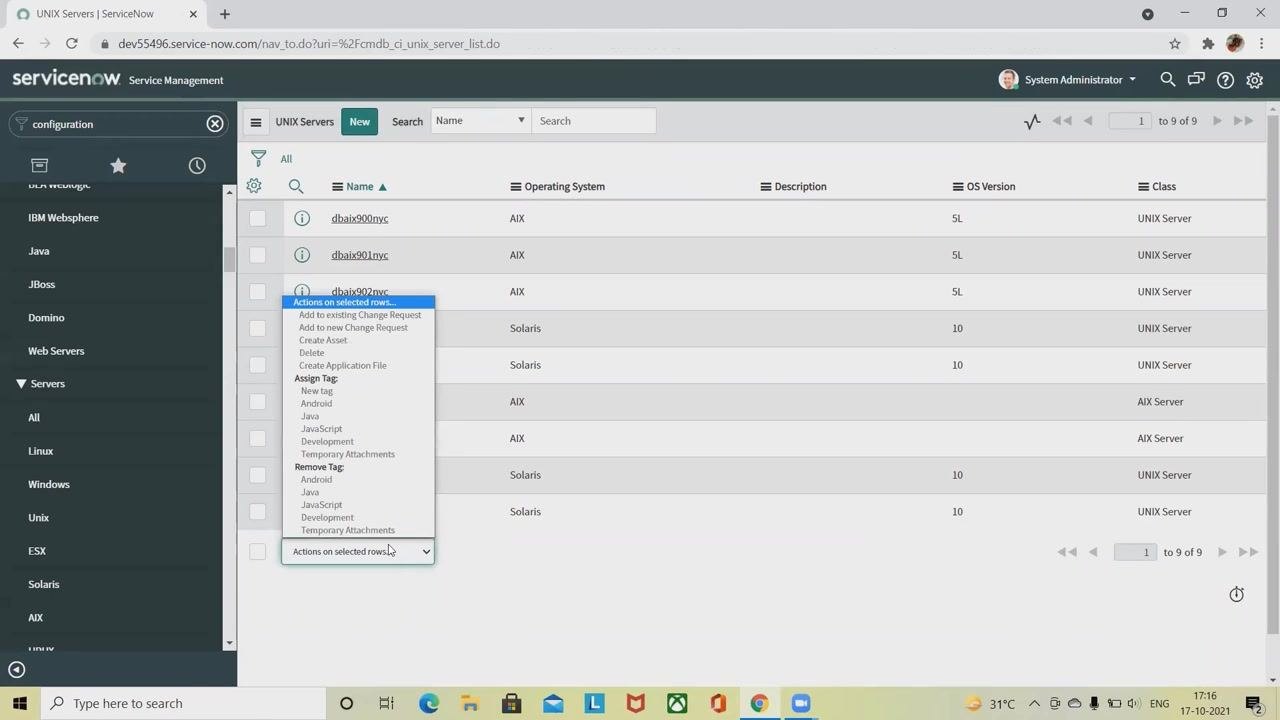
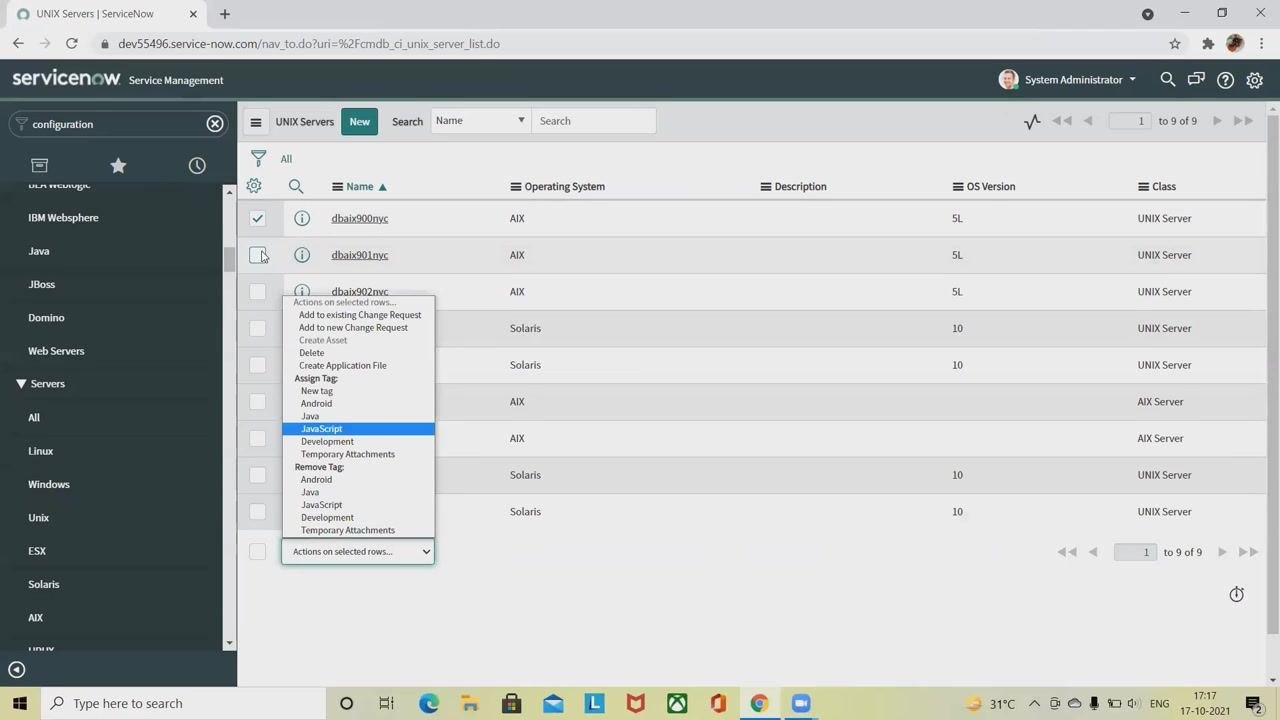
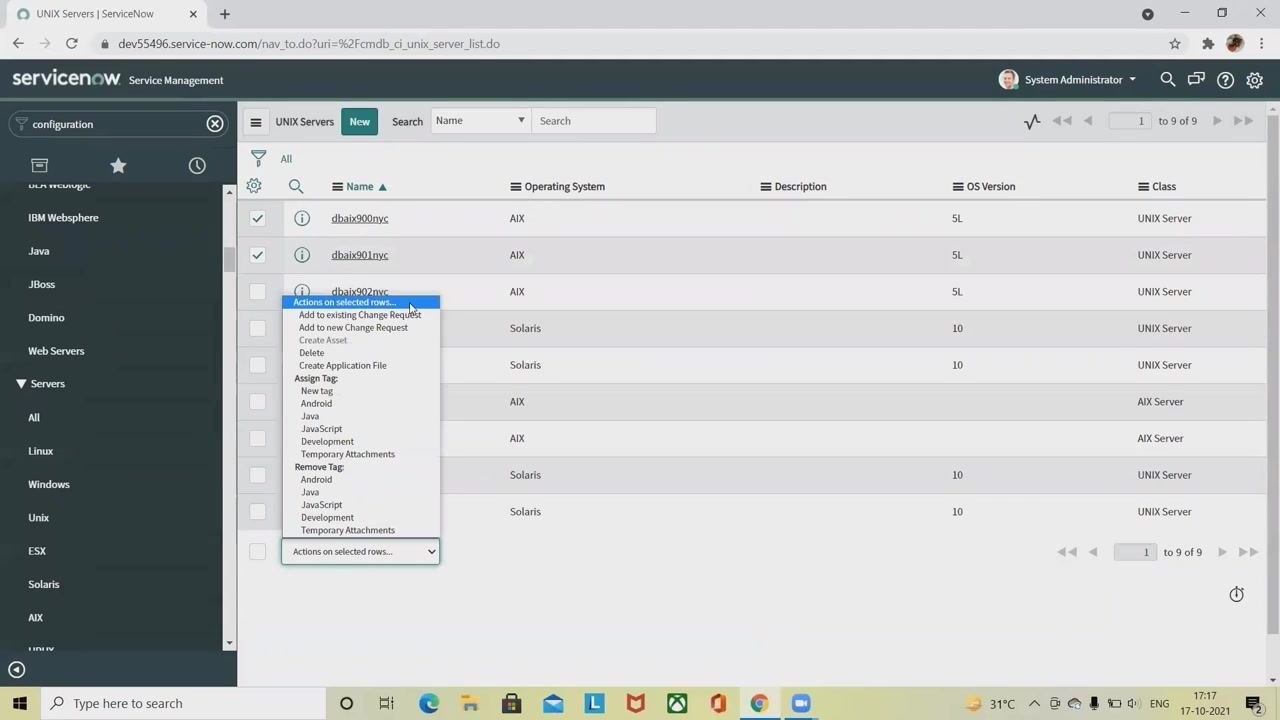
In the UNIX Servers list, select one or more CIs by checking the boxes next to their names. At the bottom of the list, open the Actions on selected rows... dropdown menu.
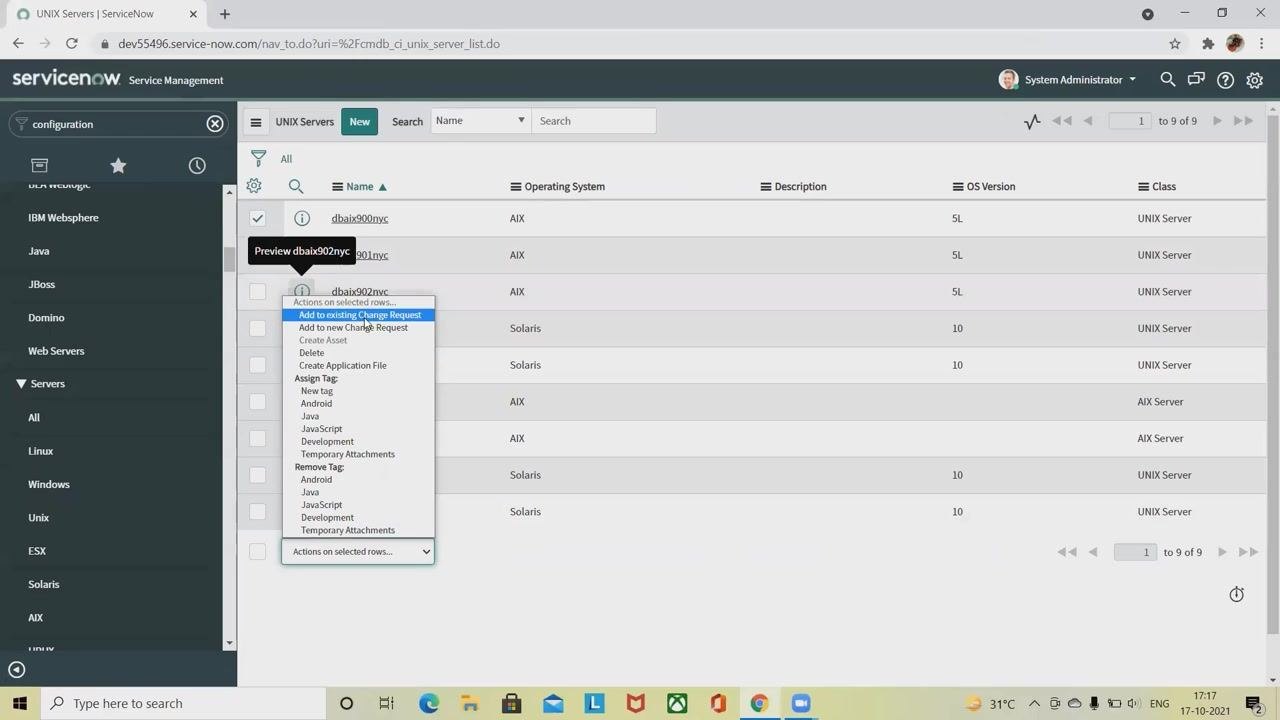
Available actions include: - Add to existing Change Request - Add to new Change Request - Create Asset - Delete - Create Application File - Assign Tag (New tag, Android, Java, JavaScript, Development, Temporary Attachments) - Remove Tag (Android, Java, JavaScript, Development, Temporary Attachments)
Select the action you require. To associate the CIs with an existing change request, choose Add to existing Change Request.
Add selected CIs to an existing change request
If you are unable to select the option, ensure you have selected multiple items in the list. After selecting the desired CIs, choose Add to existing Change Request from the dropdown.
A dialog box titled Choose a Change Request appears. In the Change Request field, enter the number or search for the change request you want to associate with the selected CIs. Click the search icon to look up available change requests.
A new window displays the list of change requests matching your search criteria. If no records are found, adjust your search term.
Once you find the appropriate change request, select it and click OK to associate the selected UNIX server CIs with the change request.
Search for and associate a change request
In the Choose a Change Request dialog, use the Search tab to locate an existing change request. In the Number section, enter the change request number (for example, "123" or "CR") to search for a specific request. If no records are found, try different search terms or verify the number.
You can change the search filter from Number to Short description if needed, using the dropdown next to the search box.
If the change request exists, select it and click OK to associate the selected UNIX server CIs with the change request. If the change request does not exist, you cannot proceed with associating the CIs to an existing request.
Create a new change request from selected CIs
If you want to create a new change request, first select the desired UNIX server CIs from the list. Open the Actions on selected rows... dropdown and select Add to new Change Request.
Click the New button at the top of the UNIX Servers list to start creating a new UNIX server CI if needed.
Fill in all required fields in the new record form:
- Name
- Asset tag
- Manufacturer
- Asset
- Company
- Serial number
- Model ID
- Assigned to
- Configuration section: Model number, Operating System, OS Version, OS Service Pack, Disk space (GB), Description, RAM (MB), CPU speed (MHz), CPU count, CPU manufacturer, CPU type
Ensure all mandatory fields are completed, then click Submit to create the new UNIX server CI or change request.
Complete the change request details
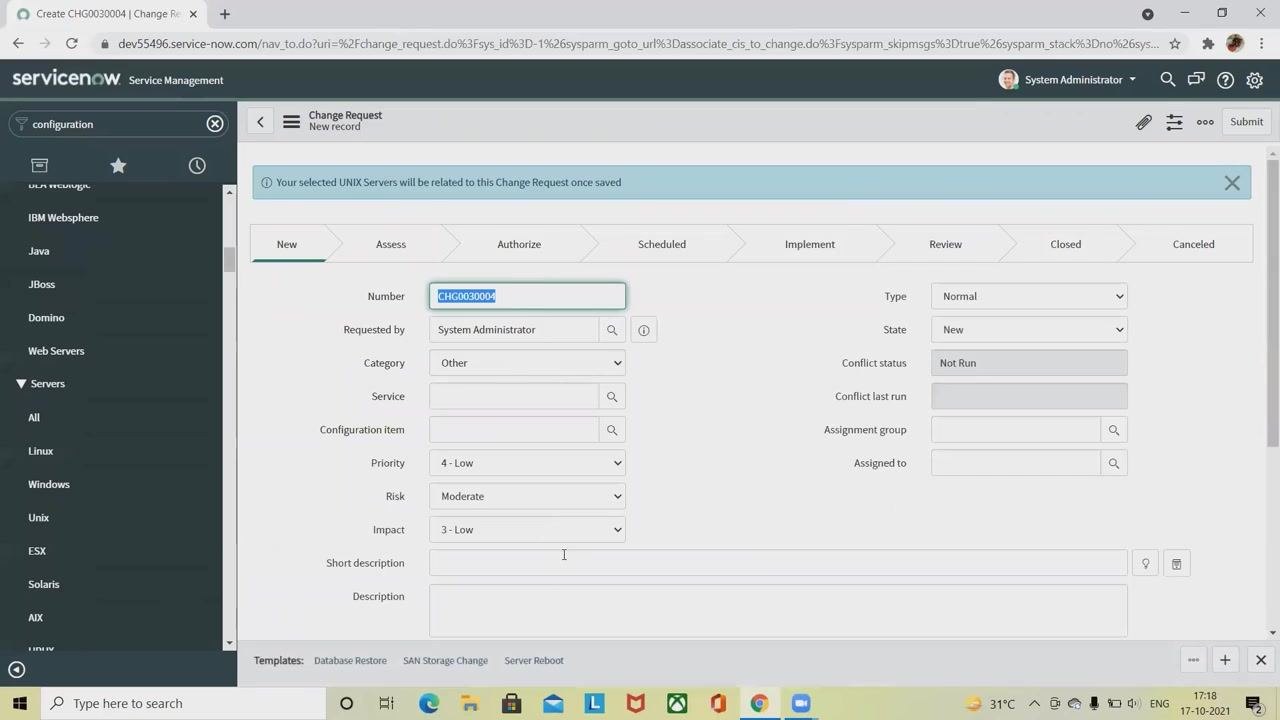
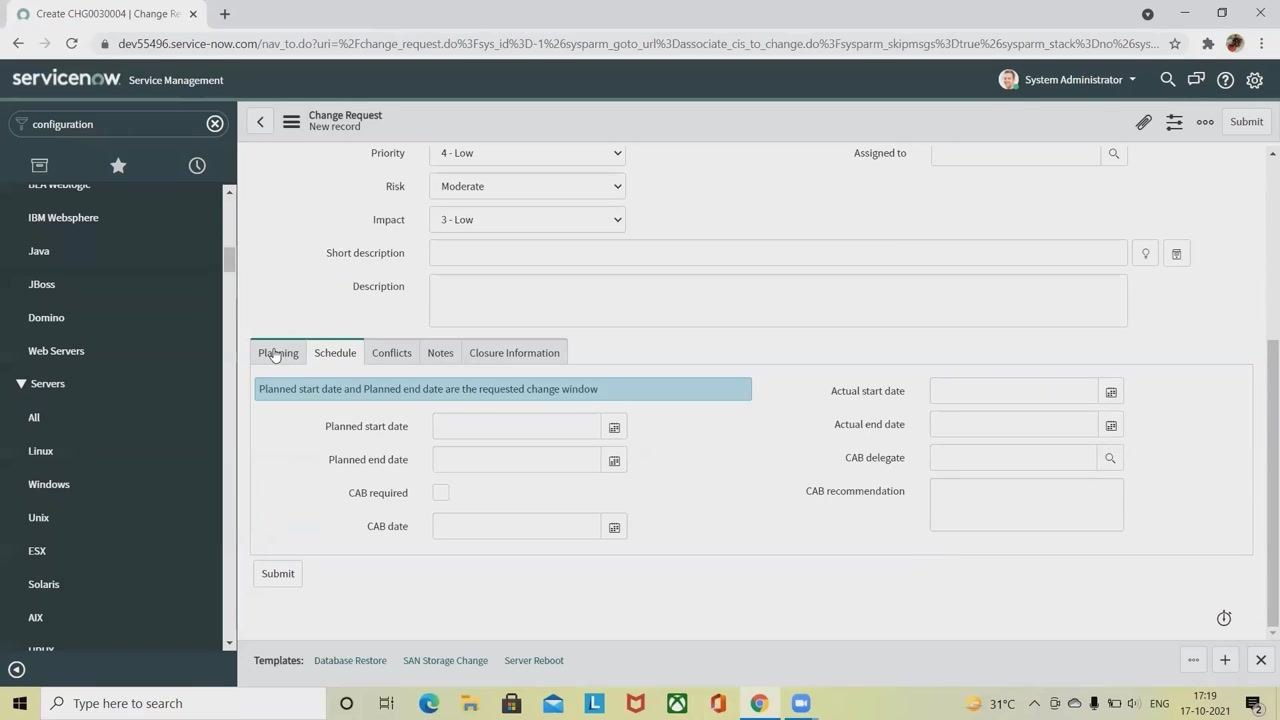
When creating a new change request, a detailed form appears. Enter or verify the following details:
- Number (auto-generated, e.g., "CHG0030004")
- Requested by (e.g., "System Administrator")
- Category (e.g., "Other")
- Service
- Configuration item
- Priority (e.g., "4 - Low")
- Risk (e.g., "Moderate")
- Impact (e.g., "3 - Low")
- Type (e.g., "Normal")
- State (e.g., "New")
- Assignment group, Assigned to (if applicable)
- Short description and Description
Use the tabs to provide additional information: - Planning: Enter planned start and end dates, CAB required, CAB date, etc. - Schedule - Conflicts - Notes - Closure Information
Complete all required sections as per your organization's process.
Click Submit to save and create the change request. Your selected UNIX server CIs will now be associated with the new change request.
Finalize and submit the change request
Review all entered details in the Change Request form to ensure accuracy and completeness. Navigate through the tabs (Planning, Schedule, Conflicts, Notes, Closure Information) to verify all required information is provided.
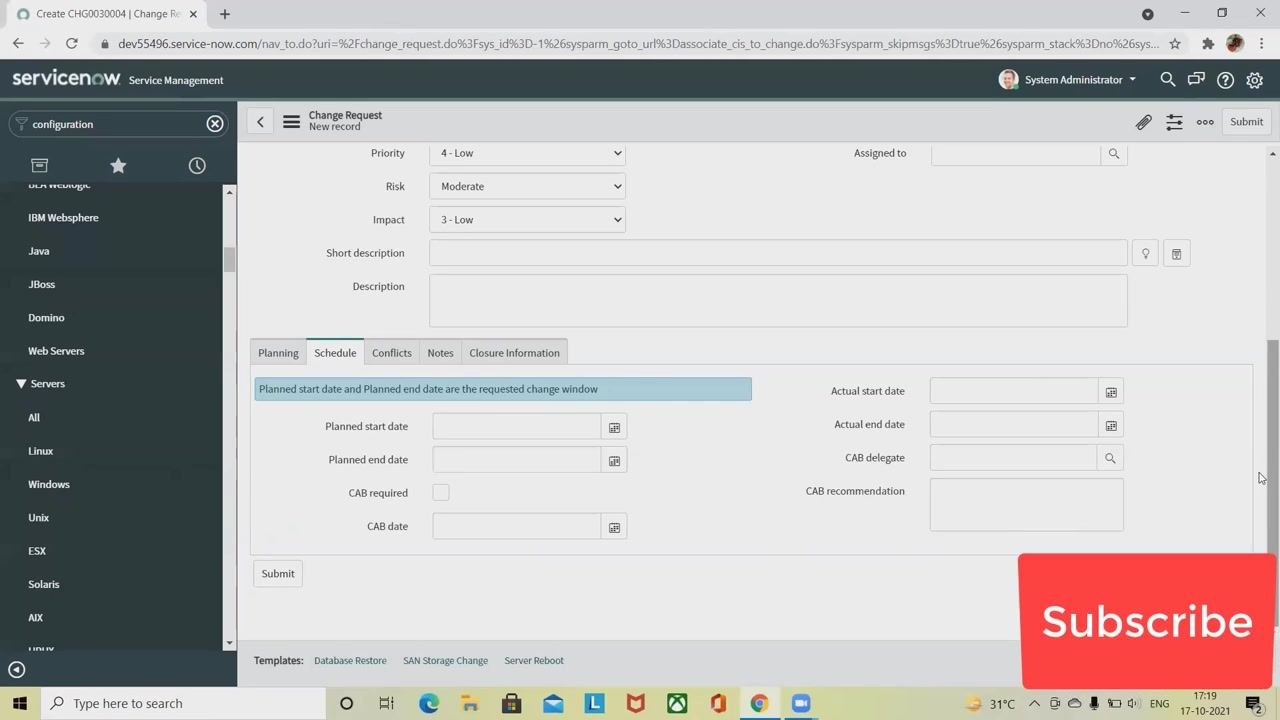
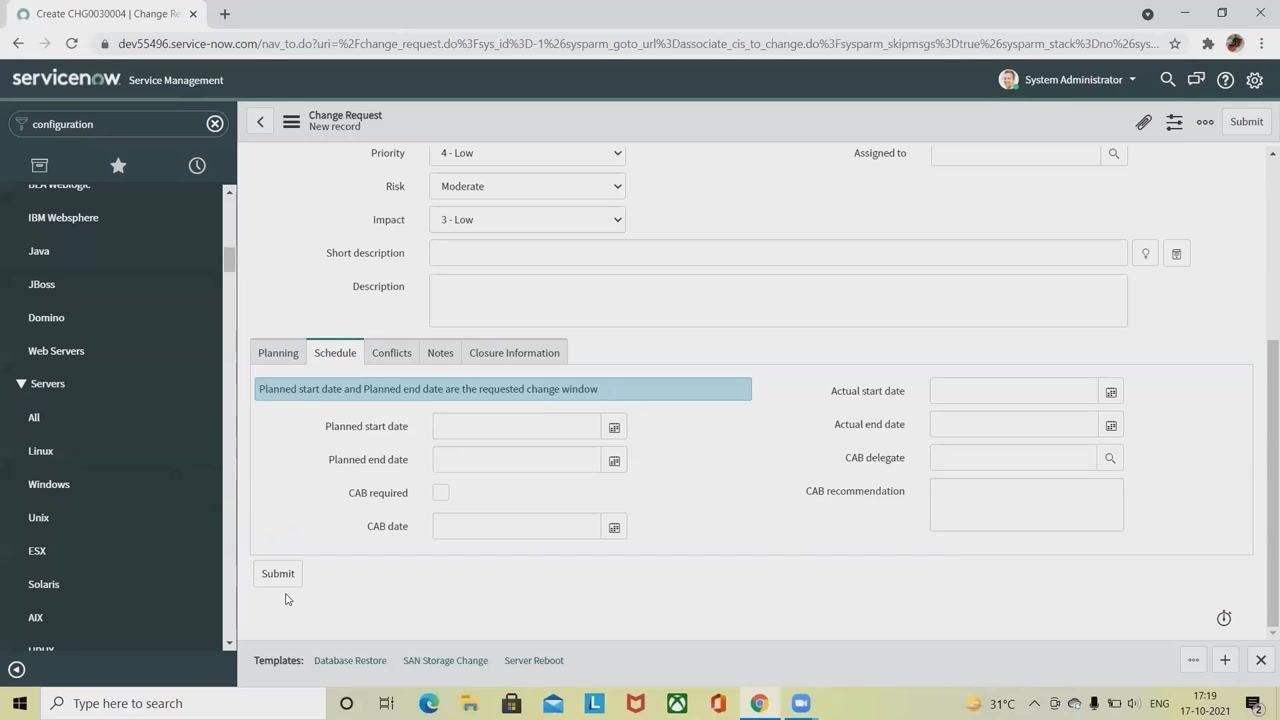
In the Schedule tab, confirm or enter the following fields as needed: - Planned start date and Planned end date - CAB required (check if a Change Advisory Board review is needed) - CAB date (if applicable) - Actual start date and Actual end date (if available) - CAB delegate and CAB recommendation (if applicable)
Once all information is complete, click the Submit button at the bottom of the form to save and create the change request.
After submission, the change request is created successfully, and your selected UNIX server CIs are associated with it.
Summary
By following these steps, you can efficiently locate and select configuration items (CIs) in ServiceNow, customize your view, and either associate existing CIs with a change request or create a new one. This ensures accurate tracking and management of changes within your IT environment, with all required details captured for effective change management.
What's next
For more tutorials and updates on ServiceNow workflows, consider subscribing to the relevant resource channel and enabling notifications to stay informed of new instructional content.
Generation details: cost, quality tiers
Docsie billed 3,000 credits ($2.10) to analyze this 6-minute video at standard quality. The rewrite, template fill and Word/PDF exports were included. The same video at each quality tier:
| Quality | Frames sampled | Credits | Approx. cost |
|---|---|---|---|
| Draft | every 16-30 s | 1,500 | $1.05 |
| Standard (this guide) | every 8-15 s | 3,000 | $2.10 |
| Detailed | every 4-7 s | 6,000 | $4.20 |
| Ultra | every 1-3 s | 12,000 | $8.40 |
Credits priced at $0.70 per 1,000; plans include a monthly allowance. Enterprise customers on on-premise or bring-your-own-model deployments run this on their own inference and pay no per-video credits.
Generated by Docsie Video-to-Docs on 2026-09-08 from a 5-minute video. Screenshots are frames from the source video and belong to their creator, Rai Gurukul, whose original is embedded above. If you own this video and want the guide removed or credited differently, contact us and we will act within one business day.