
How to Create a Customer in SAP S/4HANA
This guide walks you through how to create a customer in SAP S/4HANA using the Business Partner (BP) transaction. In S/4HANA, both customers and vendors are created through the Business Partner transaction, replacing the older customer creation method. If you try to use the legacy transaction, the system displays a warning message because it is now obsolete. A business partner can represent a customer, a vendor, or any other partner in your business, so there is no need to create separate records for companies that act as both a customer and a vendor.
Video: How to create Business Partner (BP) /Customer in SAP S/4 HANA by KH Zeeds (2023). All credit for the demonstration goes to the creator; watch the original on YouTube. The written guide below was generated from this video by Docsie. Creator? Request a change or removal.
This guide walks you through how to create a customer in SAP S/4HANA using the Business Partner (BP) transaction. In S/4HANA, both customers and vendors are created through the Business Partner transaction, replacing the older customer creation method. If you try to use the legacy transaction, the system displays a warning message because it is now obsolete. A business partner can represent a customer, a vendor, or any other partner in your business, so there is no need to create separate records for companies that act as both a customer and a vendor.
Prerequisites
- Access to the SAP GUI with authorization for transaction code BP.
- Knowledge of your organization's sales area data: Sales Organization, Distribution Channel, and Division.
- The correct reconciliation account number, or access to your FI (Financial Accounting) consultant to obtain it.
- Company code information for the customer you are creating.
Open the Business Partner transaction
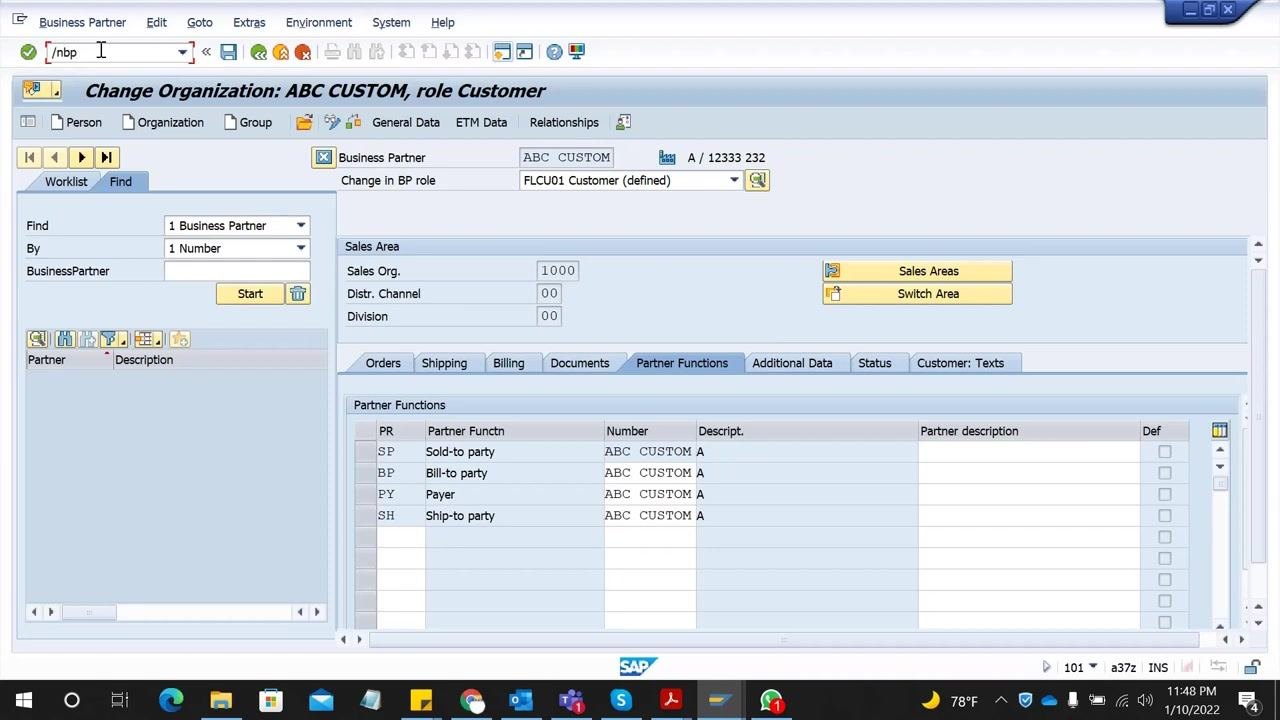
Open the SAP GUI and enter transaction code /nBP in the command field, then press Enter. This opens the Business Partner screen where you create and manage customer and vendor records.
As a reference, the Partner Functions tab shows the roles assigned to a completed business partner record, including Sold-to party, Bill-to party, Payer, and Ship-to party, all linked to the same business partner.
Select the number assignment type
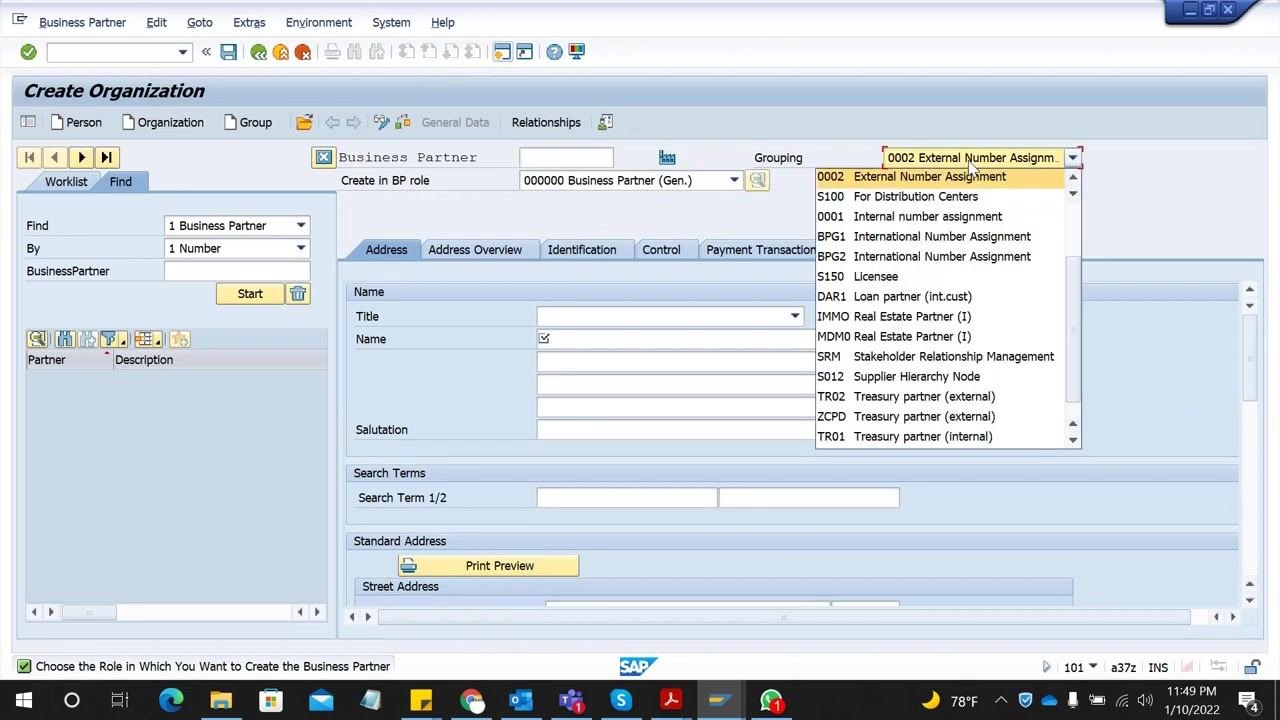
From the BP screen, select the option to create organization data, then choose the Grouping that determines how the business partner number is assigned:
- 0002 External Number Assignment – choose this option if you want to provide your own customer number.
- 0001 Internal Number Assignment – choose this option if you want SAP to assign the number automatically.
If you select external assignment, you must provide the customer number manually.
Select the business partner role
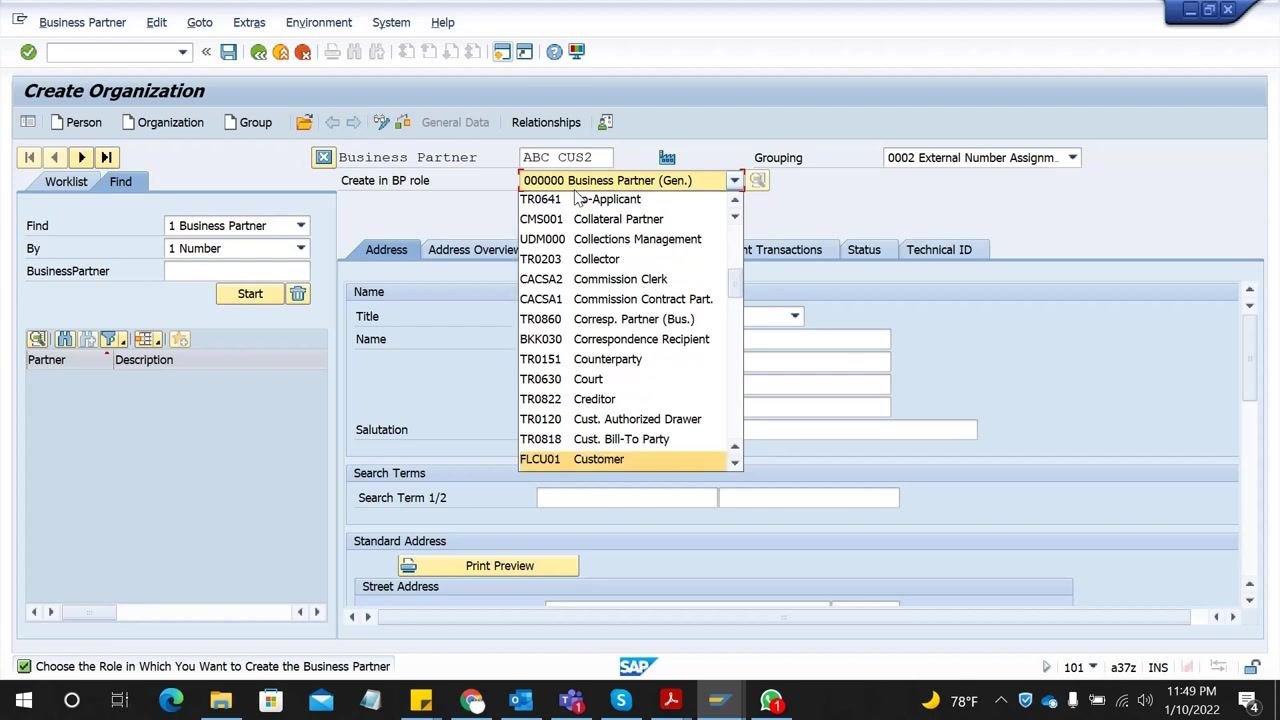
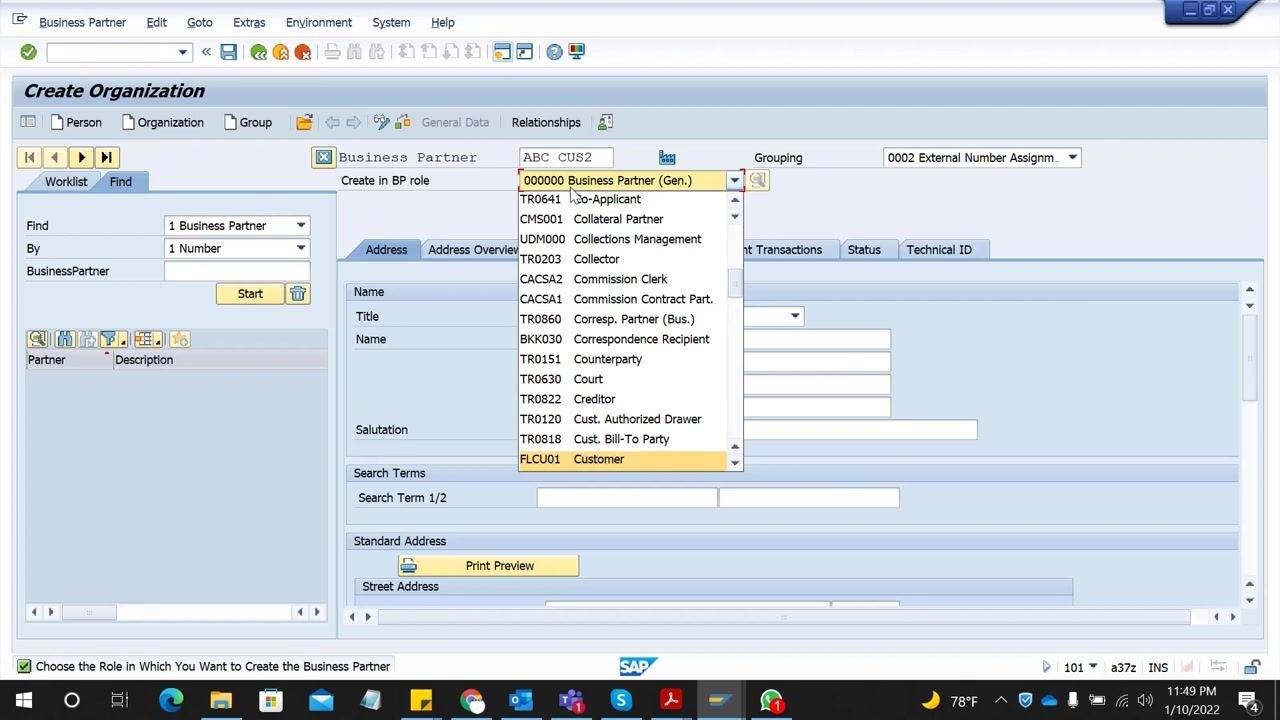
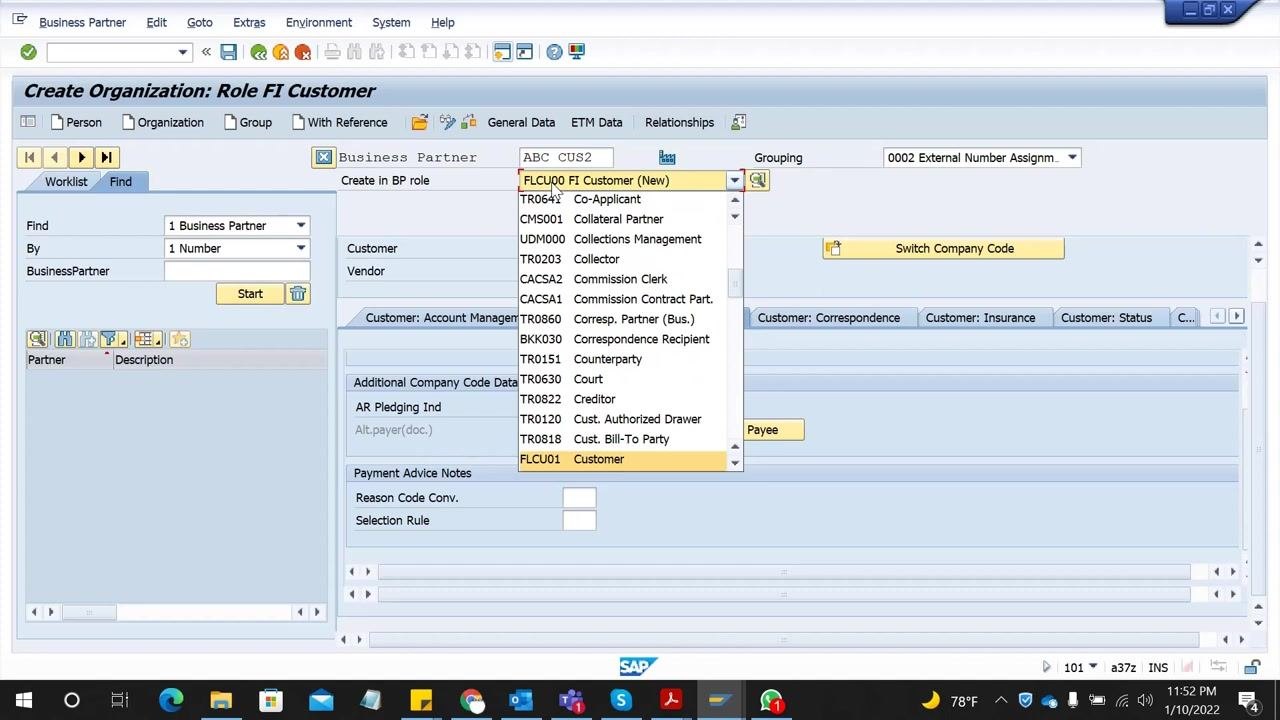
In the Create in BP role dropdown, scroll down and select FLCU01 Customer. This ensures the business partner is created with customer-specific data.
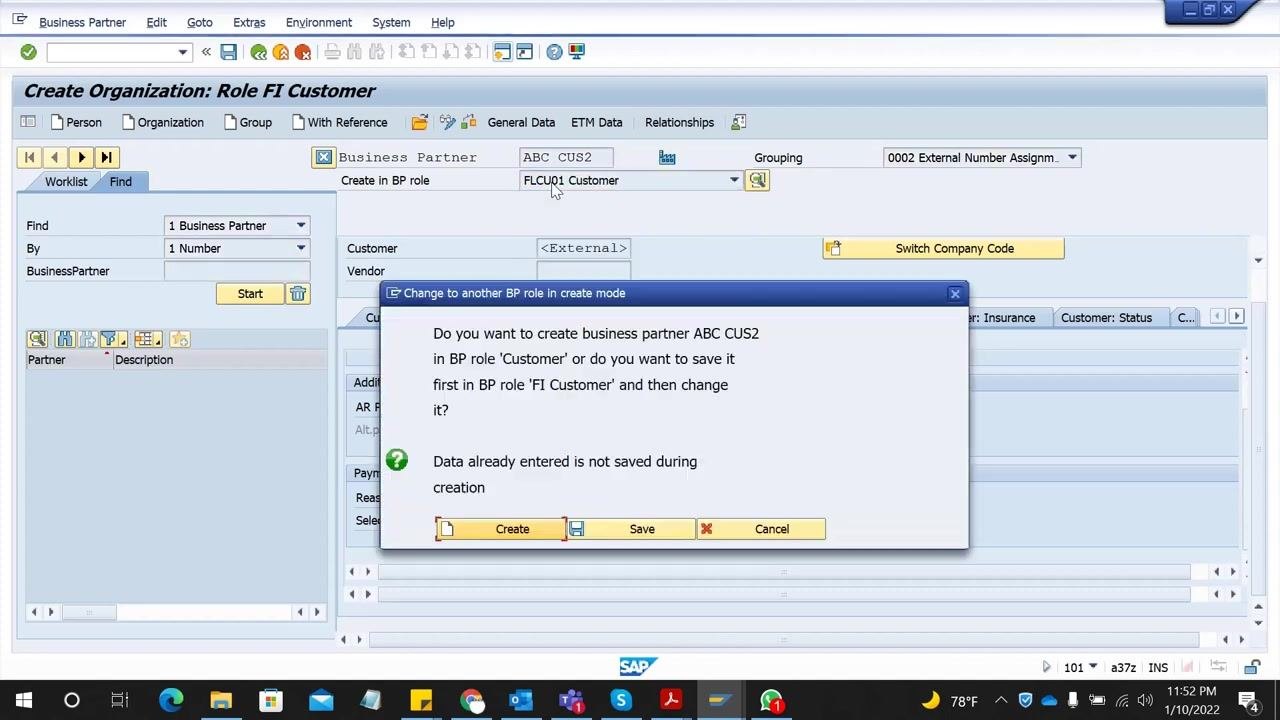
Confirm the role change prompt
If you attempt to switch roles before saving, the system prompts you to choose between creating the business partner directly in the new role or saving it first in the general role. Click Create to proceed directly with the customer role. Note that data already entered is not saved during this creation prompt.
Enter basic company information
In the Address tab, fill in the following fields:
- Title – select the appropriate title, e.g.,
0003 Company. - Name – enter the company name, e.g.,
ABC PVT LTD. - Search Term – enter a term to help you find the customer later, e.g.,
ABC.
These fields help you uniquely identify and search for the customer later in the system.
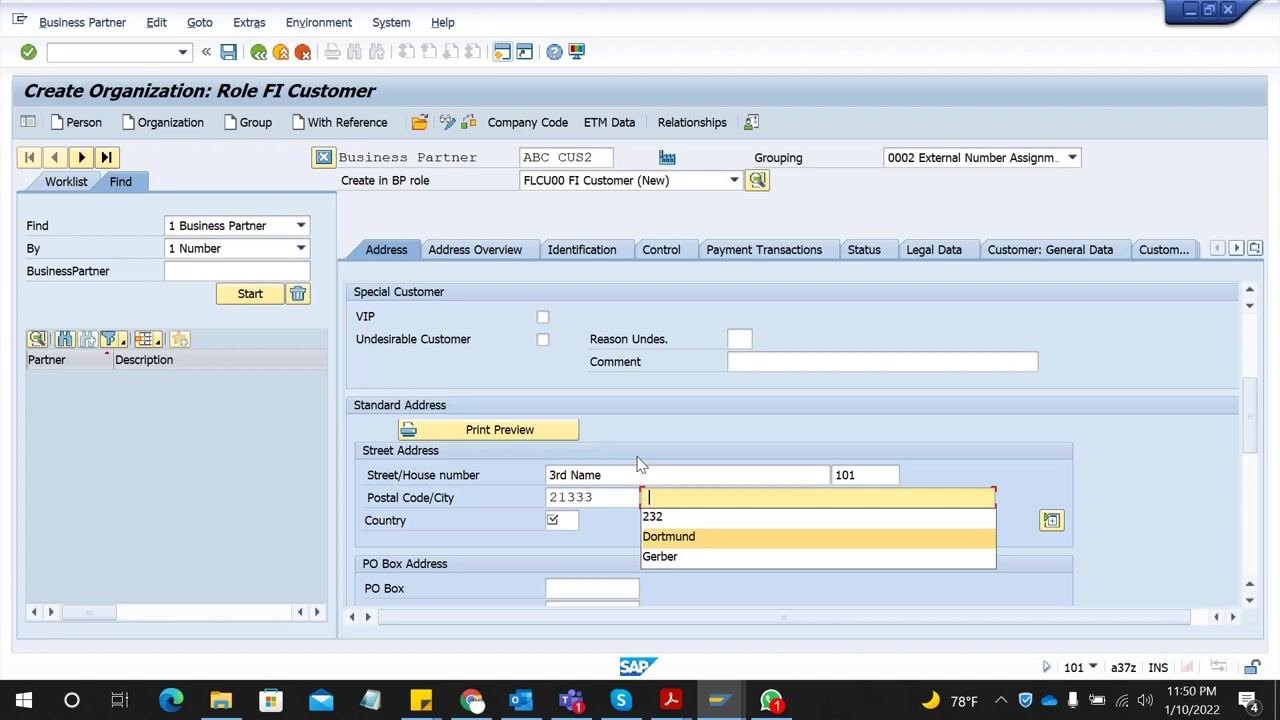
Enter address details
In the Standard Address section, provide the street, postal code, city, and country:
- Street/House number – e.g.,
3rd Name,101. - Postal Code/City – e.g.,
21333,Dortmund. - Country – e.g.,
DEfor Germany.
Only fill in the fields you know; the rest remain optional unless your system marks them as mandatory.
Enter communication details
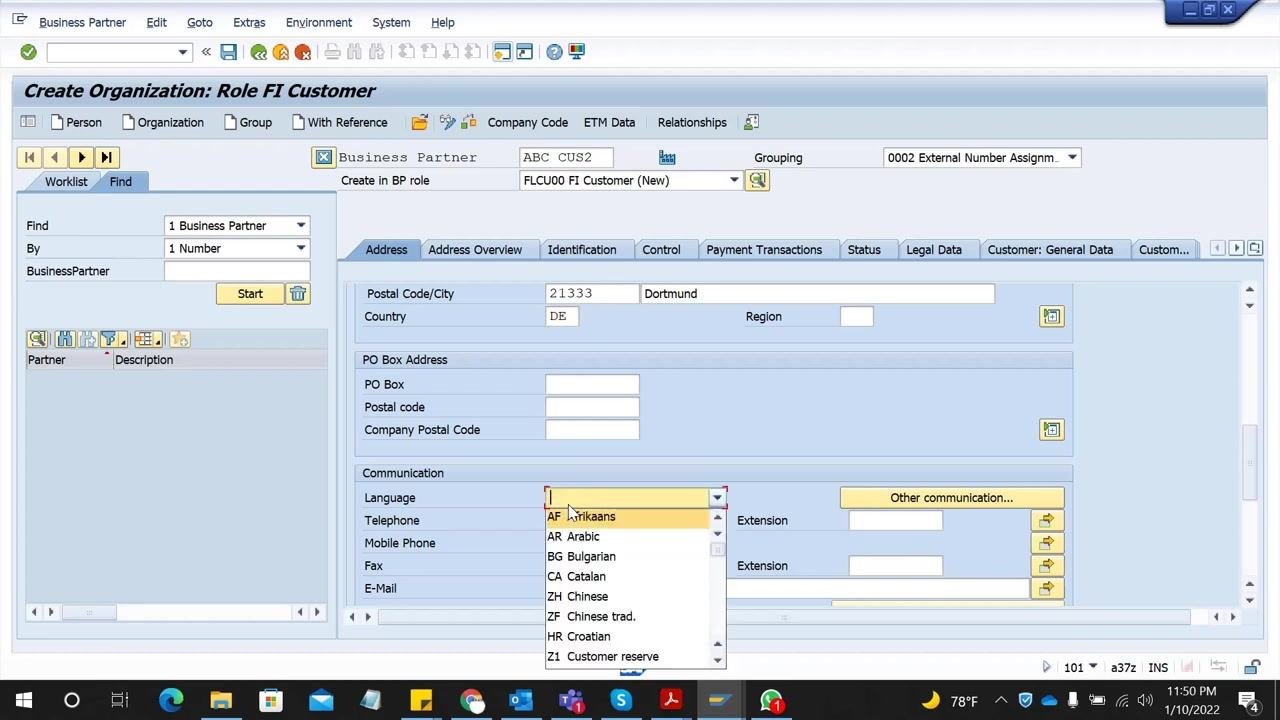
Scroll down to the Communication section and set the Language field, which is mandatory (for example, EN for English). You can also enter telephone, mobile phone, fax, and email if this information is available, but these fields are optional.
Complete additional address and communication fields
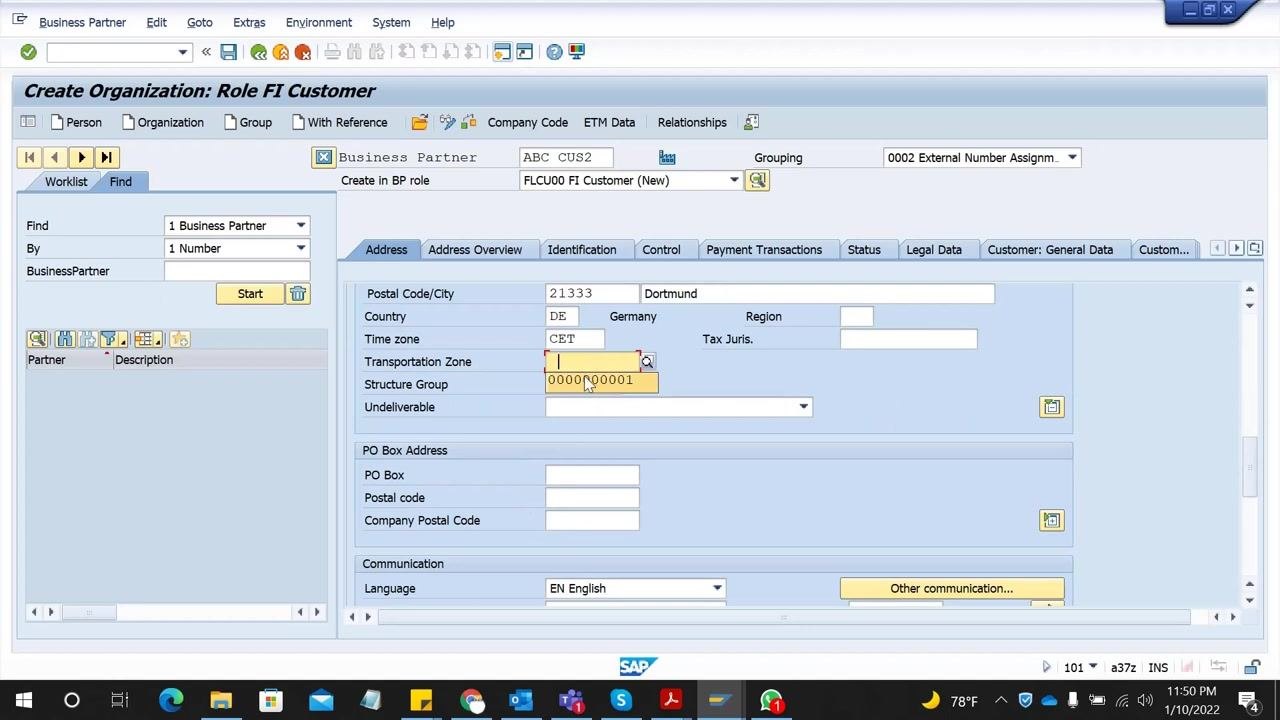
Review the Address tab for further optional fields, and fill them in if applicable:
- Time zone – e.g.,
CET. - Transportation Zone – enter if applicable.
- Structure Group – enter if applicable.
- PO Box Address – fill in if the customer uses a PO box.
You can also add mobile phone, telephone, fax, and email in the Communication section. Only the Language field remains mandatory.
Extend the business partner to a company code
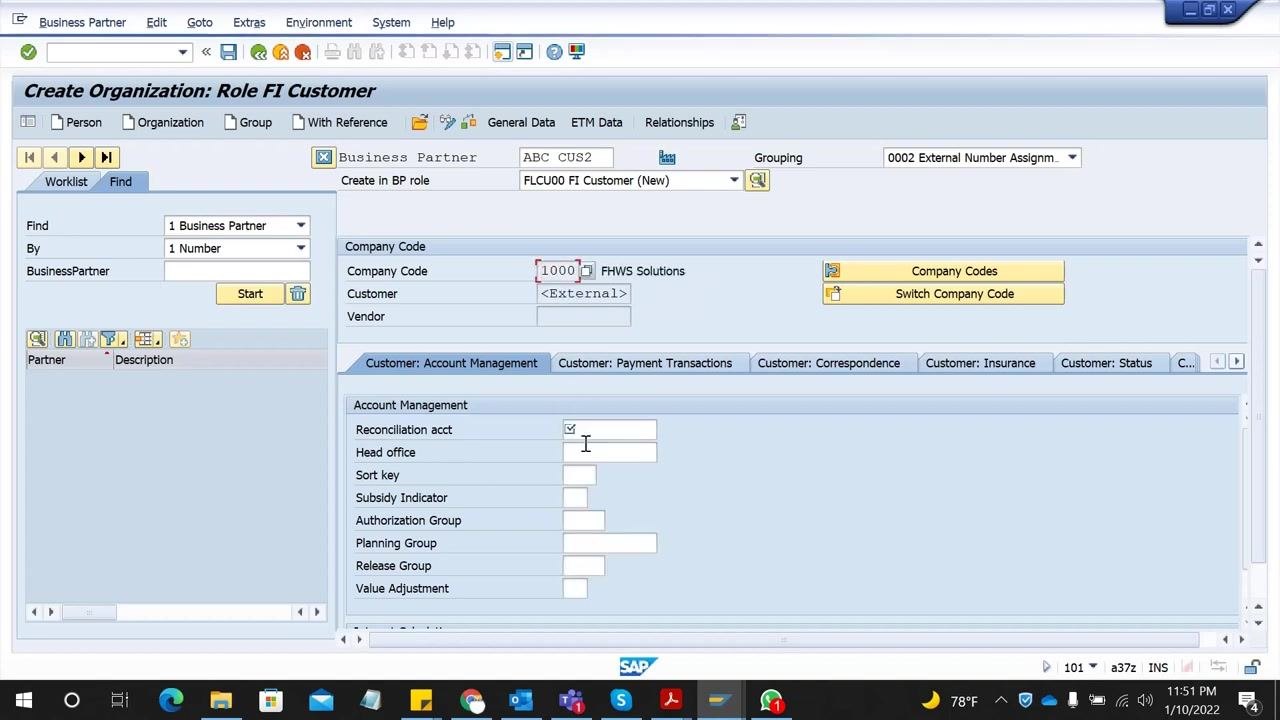
Navigate to the Company Code tab to extend the business partner to a specific company code. Click the Company Codes button if you need to select from available codes, then enter your company code, e.g., 1000. The company code name (for example, FHWS Solutions) appears next to the code you entered.
Enter the reconciliation account
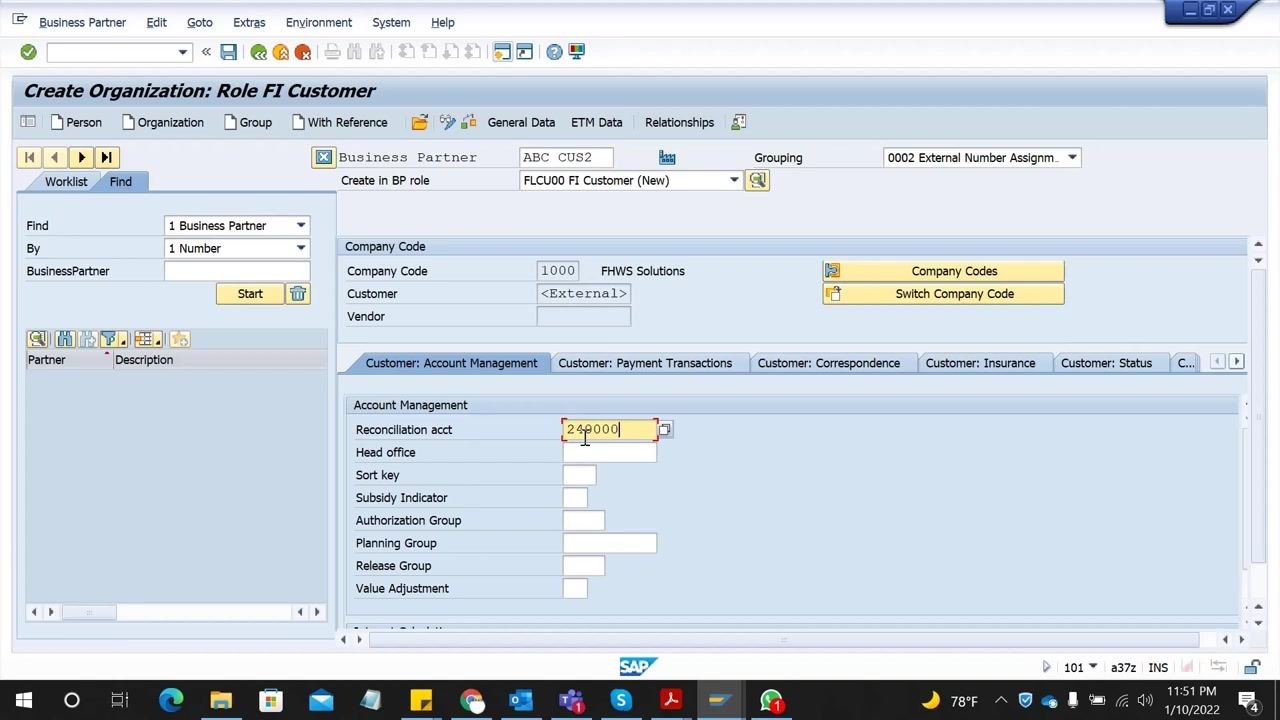
In the Customer: Account Management section, enter the Reconciliation acct number, e.g., 240000. If you do not know the correct reconciliation account, consult your FI consultant, since this account is critical for financial postings and month-end bank reconciliations.
Enter additional account management data (optional)
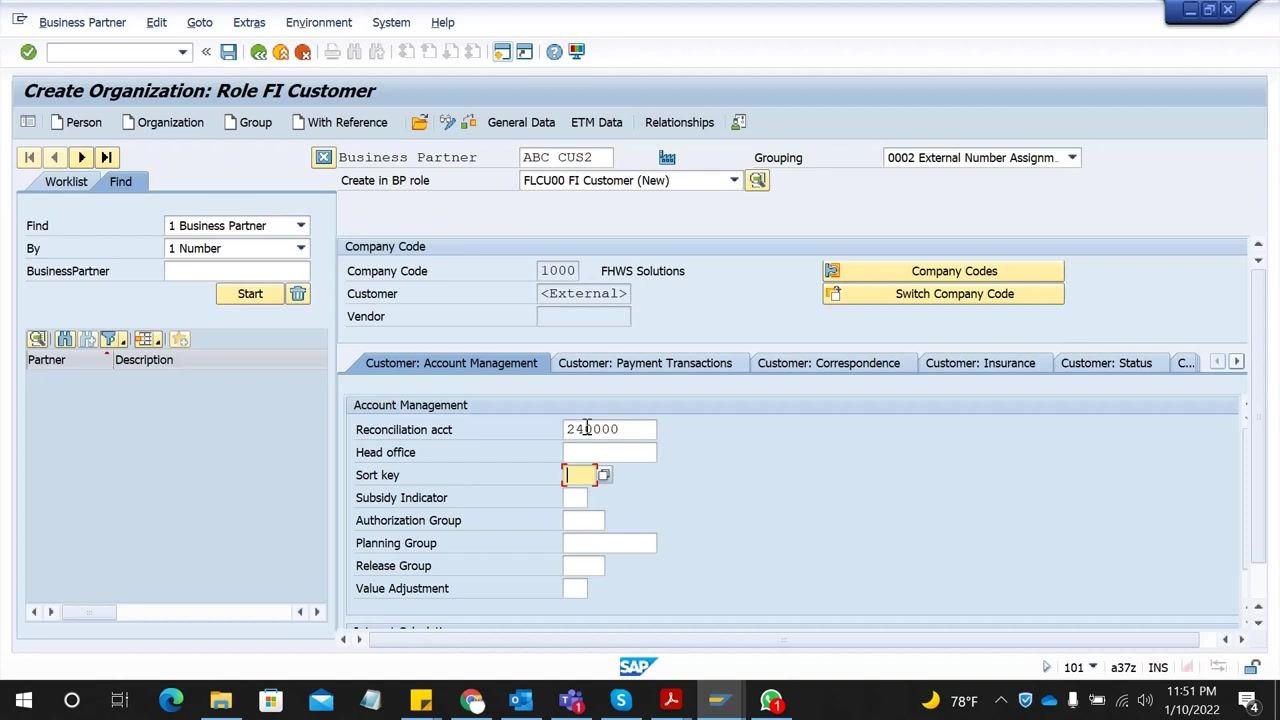
You can complete other fields in the Account Management section if your process requires them:
- Head office – enter if applicable.
- Sort key – e.g.,
001. - Subsidy Indicator, Authorization Group, Planning Group, Release Group, Value Adjustment – enter if needed.
These fields are not mandatory but can be filled in when the information is available.
Enter payment transaction data
Switch to the Customer: Payment Transactions tab and enter the Payment Terms, e.g., 0001. You can also complete related fields such as Credit Memo Payment Term, Tolerance Group, B/Ex. Charges Terms, Check Cashing Time, Known/Negotiat.Leave, and Record Payment History, as required by your organization.
Review additional company code data
If needed, review or complete fields under Additional Company Code Data and Payment Advice Notes, such as AR Pledging Indicator, Alternative Payer, Reason Code Conversion, and Selection Rule. This step is optional and depends on your organization's requirements.
Confirm the business partner role before saving
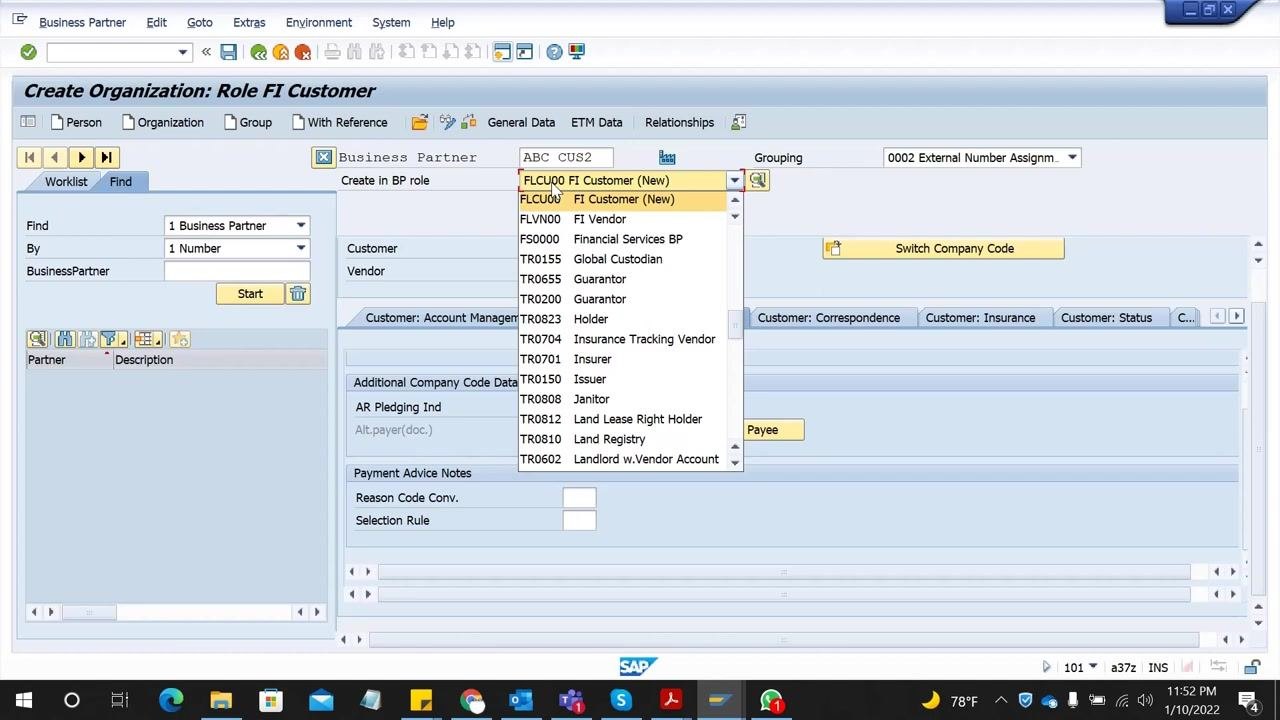
Before saving, make sure you are in the correct BP role. Use the dropdown in the Create in BP role field to confirm or switch roles as needed, for example to FLCU00 FI Customer (New). The dropdown also lists other roles such as FI Vendor.
Save the customer master record
Once all required and relevant optional fields are complete, click the Save button (green checkmark or disk icon) at the top of the screen. This creates the customer master record in SAP S/4HANA, extended to the specified company code with all the data you entered. Check the confirmation message at the bottom of the screen to verify the save was successful, and consult your FI consultant for any company-specific requirements you are unsure about.
Respond to the role change prompt for the customer role
To extend the business partner to the sales-relevant Customer role, the system prompts:
"Do you want to create business partner ABC CUS2 in BP role 'Customer' or do you want to save it first in BP role 'FI Customer' and then change it? Data already entered is not saved during creation."
Click Create to proceed with creating the business partner directly in the Customer role, or choose Save or Cancel as needed.
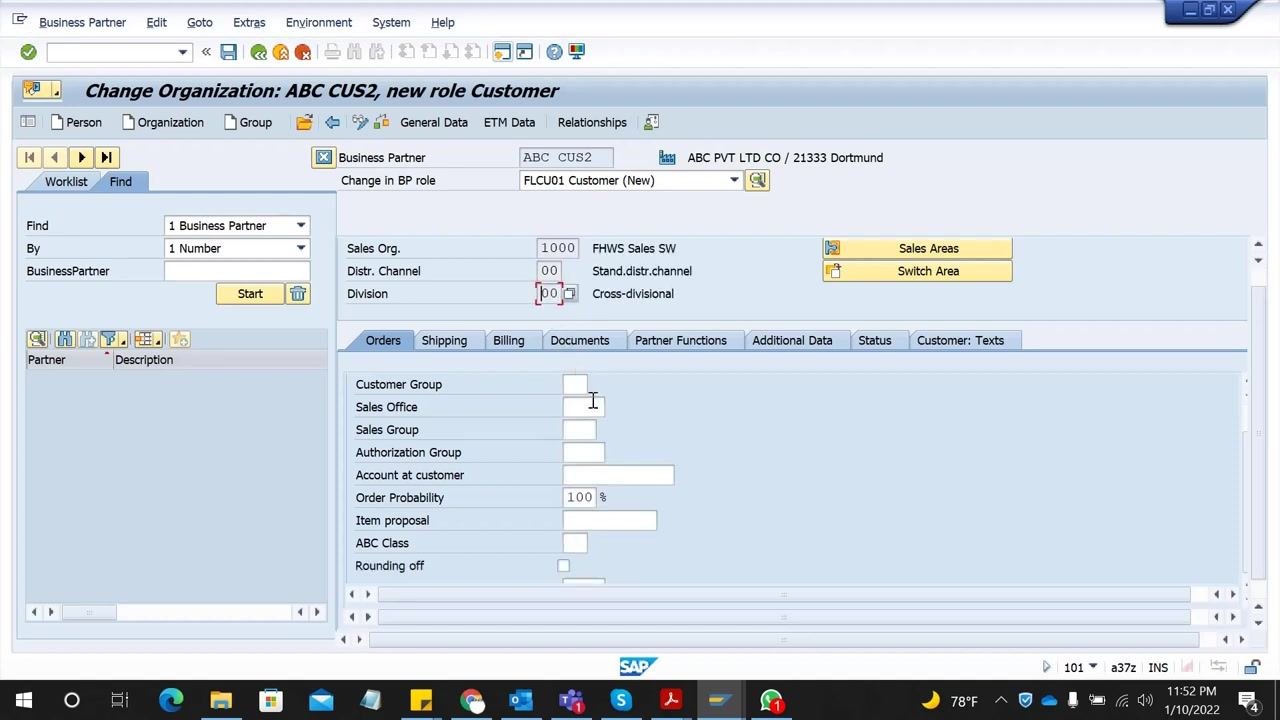
Verify the business partner details in the customer role
After confirming, verify that the business partner has been created in the new role. The screen displays:
- Title: "Change Organization: ABC CUS2, new role Customer"
- Business Partner: ABC CUS2
- Name: ABC PVT LTD CO
- Search Term 1/2: 1234
- Special Customer: VIP
Navigate to Sales and Distribution
Click the Sales and Distribution tab at the top of the screen. This tab lets you enter the sales-specific data required to complete the customer role extension.
Enter sales area data
In the Sales Area section, enter your sales organization, distribution channel, and division, then press Enter to proceed:
- Sales Org.:
1000(FHWS Sales SW) - Distr. Channel:
00(Stand.distr.channel) - Division:
00(Cross-divisional)
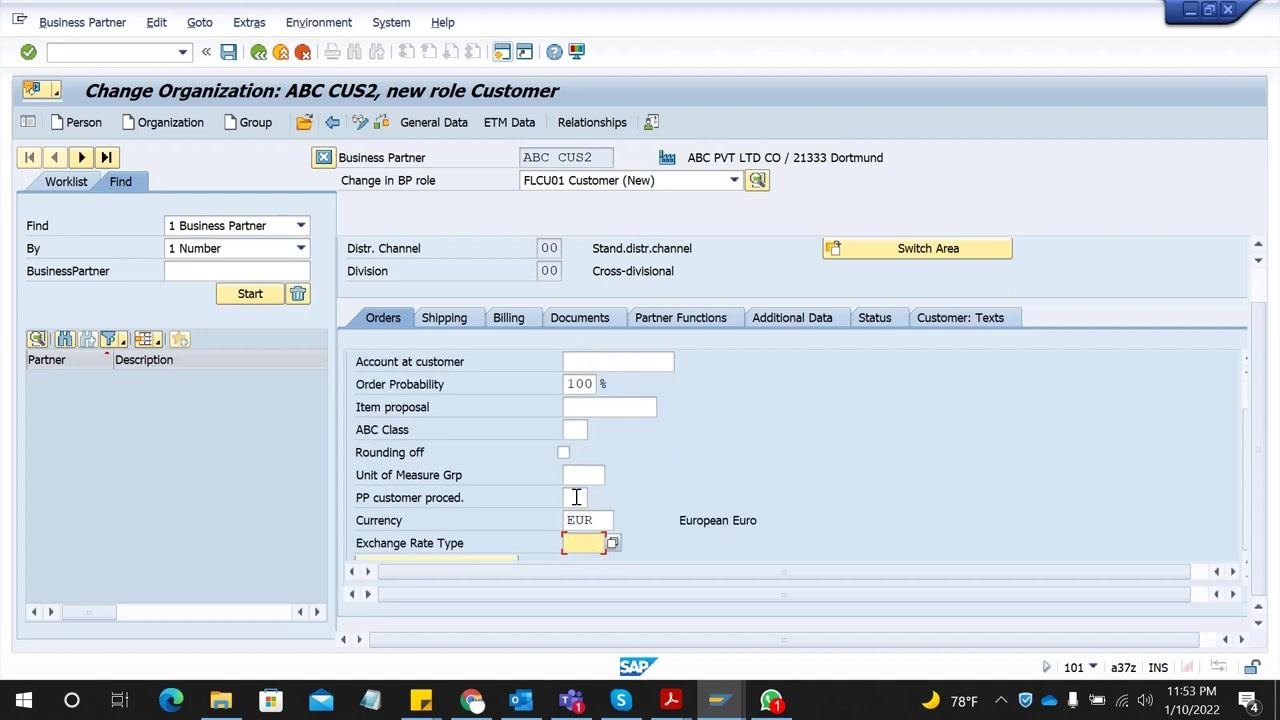
Fill in order data
In the Orders tab, enter or verify the following:
- Order Probability:
100% - Currency:
EUR(European Euro) – this is a mandatory field. - Customer Pricing Procedure: enter as required.
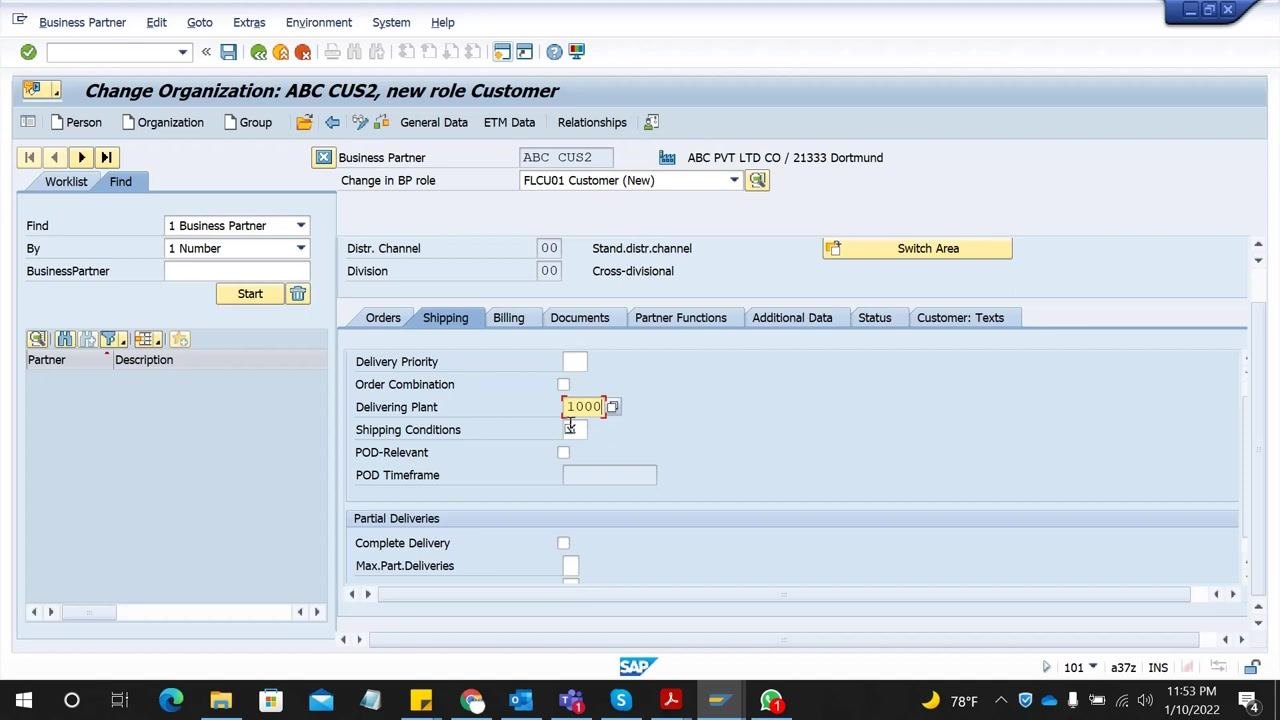
Enter shipping and delivery data
Switch to the Shipping tab and enter:
- Delivering Plant:
1000 - Shipping Conditions: enter as required.
- Max. Part. Deliveries: enter as required.
Enter billing and payment terms
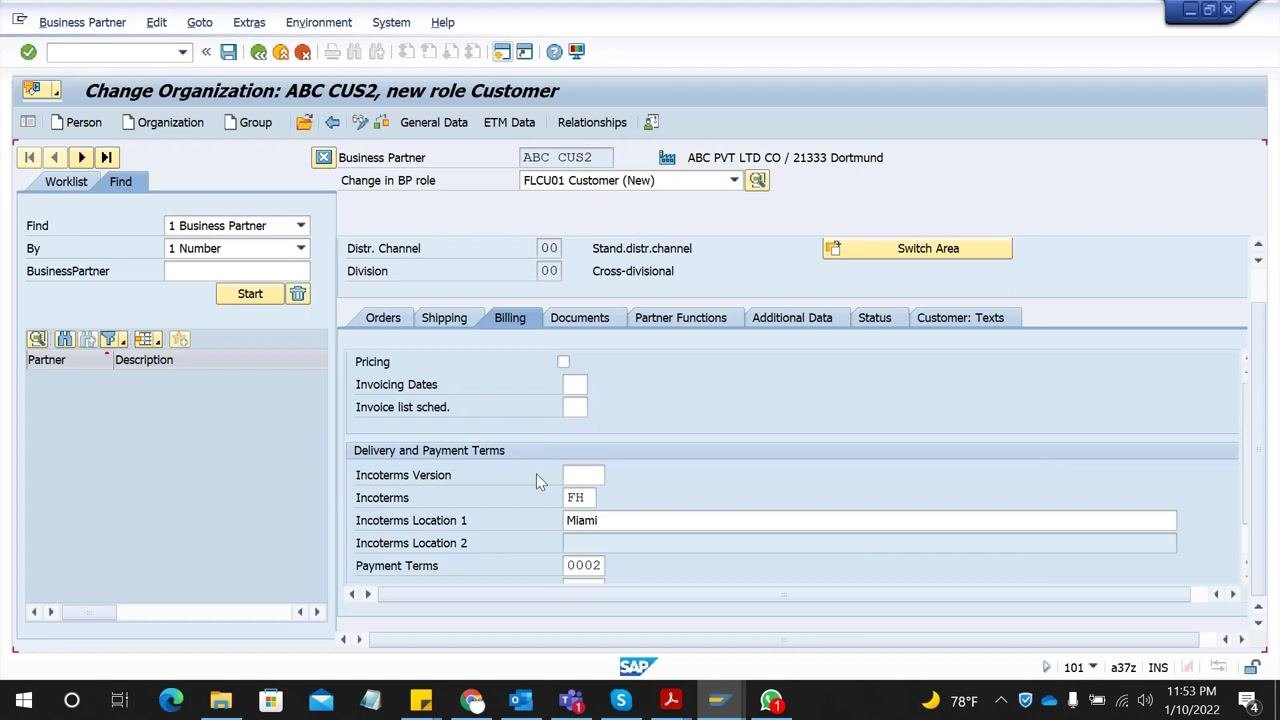
Go to the Billing tab, and under Delivery and Payment Terms, enter:
- Incoterms Version:
FH - Incoterms Location 1:
Miami - Payment Terms:
0002
Review mandatory data across tabs
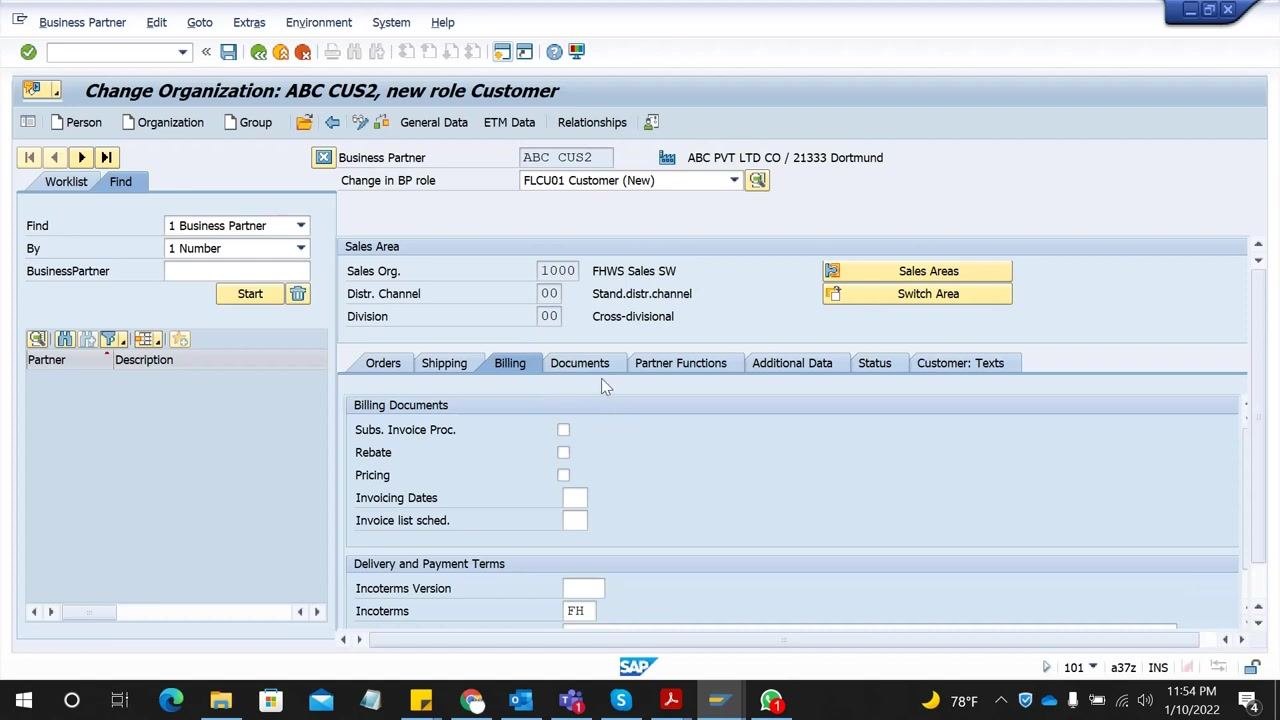
Check that all mandatory fields are filled in across the Orders, Shipping, and Billing tabs. Depending on your system configuration, additional views or data may be required before you can save.
Use field help for detailed descriptions
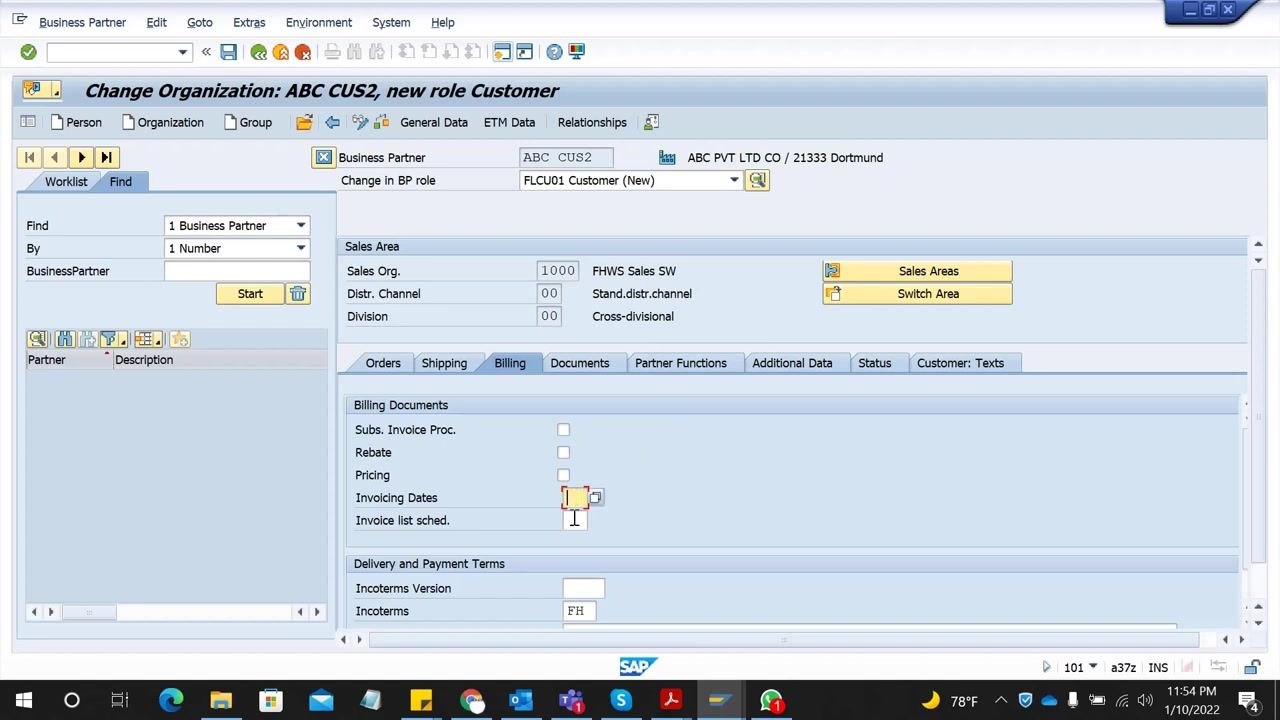
If you are unsure about a specific field, such as Invoicing Dates in the Billing tab, click the field and press F1 on your keyboard. A help window opens with a long description and guidance for that field, which is useful for understanding mandatory fields or special data requirements.
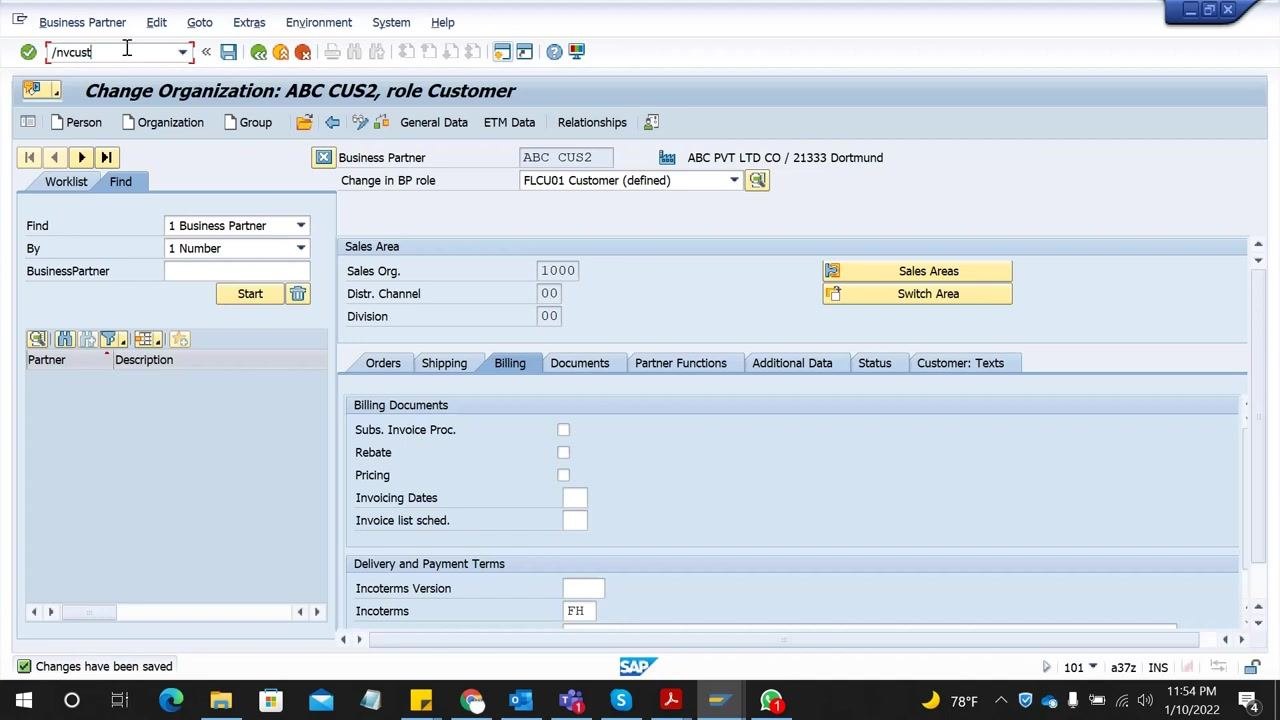
Save the customer data
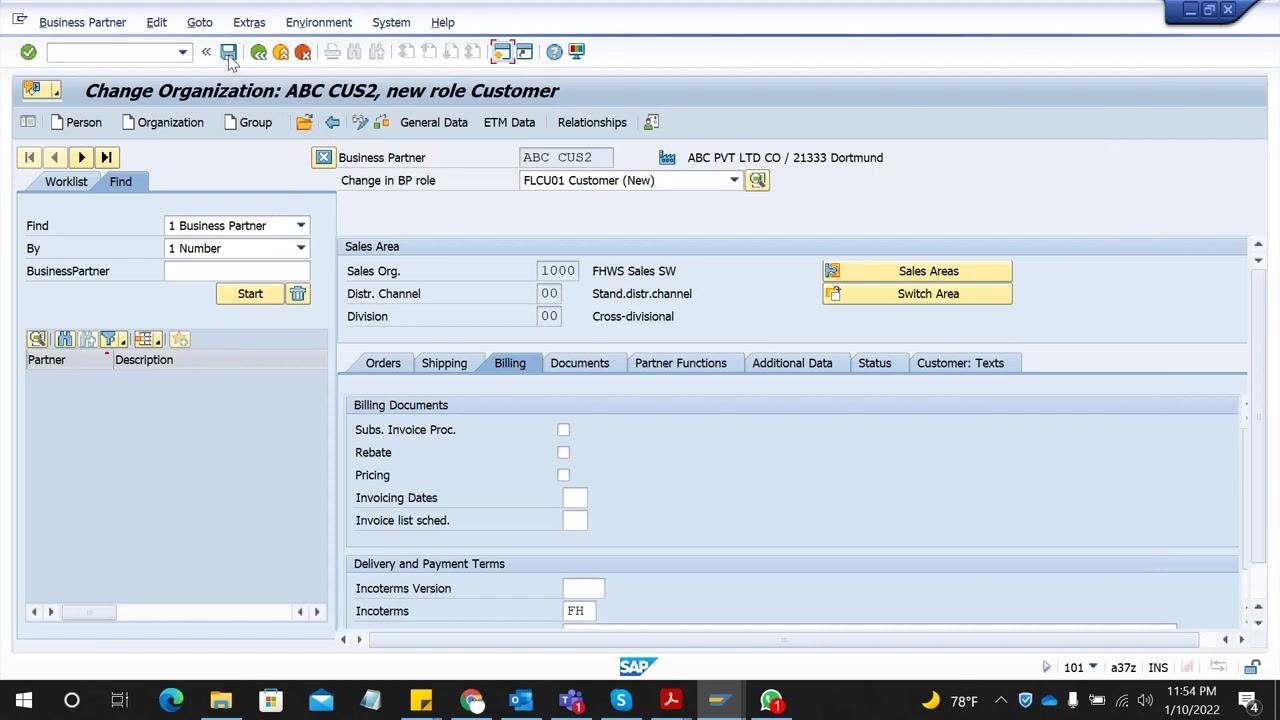
Once all required fields are completed and verified, click the Save icon (floppy disk) in the SAP toolbar at the top of the screen. Wait for the confirmation message at the bottom of the screen indicating that your changes have been saved.
Search for the customer to verify creation
To confirm the customer has been created and is available in the system, enter the customer number (e.g., ABC CUS2) or a known search term (e.g., 1234) in the search field, then click Start to run the search.
Review the customer list
The Customer List screen displays detailed information for the customer(s) found, including customer number, name, address, sales organization, distribution channel, division, and other relevant data. Confirm that your newly created customer (e.g., ABC CUS2) appears with all expected details.
What's next
After confirming the customer record in the Customer List, your business partner is fully extended to the customer role with all required organizational, address, company code, financial, and sales and distribution data. You can now use this customer in SAP Sales and Distribution processes. Remember to use F1 field-level help whenever you need clarification on a specific field, and consult your FI consultant for any company-specific requirements, such as reconciliation accounts, that you are unsure about.
Generation details: cost, quality tiers
Docsie billed 4,000 credits ($2.80) to analyze this 8-minute video at standard quality. The rewrite, template fill and Word/PDF exports were included. The same video at each quality tier:
| Quality | Frames sampled | Credits | Approx. cost |
|---|---|---|---|
| Draft | every 16-30 s | 2,000 | $1.40 |
| Standard (this guide) | every 8-15 s | 4,000 | $2.80 |
| Detailed | every 4-7 s | 8,000 | $5.60 |
| Ultra | every 1-3 s | 16,000 | $11.20 |
Credits priced at $0.70 per 1,000; plans include a monthly allowance. Enterprise customers on on-premise or bring-your-own-model deployments run this on their own inference and pay no per-video credits.
Generated by Docsie Video-to-Docs on 2026-09-08 from a 7-minute video. Screenshots are frames from the source video and belong to their creator, KH Zeeds, whose original is embedded above. If you own this video and want the guide removed or credited differently, contact us and we will act within one business day.