
How to Fill Out a Confined Space Permit
This guide explains how to fill out a confined space permit from start to finish, covering every field, checklist, and signature required to remain compliant with safety and procedural standards. Follow the steps in order to ensure the permit is complete before entry begins and properly closed once the job is finished.
Video: 7 PAA JSA Confined Space Permit step by step RC by Afton Shelton (2015). All credit for the demonstration goes to the creator; watch the original on YouTube. The written guide below was generated from this video by Docsie. Creator? Request a change or removal.
This guide explains how to fill out a confined space permit from start to finish, covering every field, checklist, and signature required to remain compliant with safety and procedural standards. Follow the steps in order to ensure the permit is complete before entry begins and properly closed once the job is finished.
Purpose
This document provides step-by-step instructions for accurately completing a confined space permit, including job details, atmospheric monitoring, safety equipment verification, and final permit closure.
Scope
This procedure applies to anyone responsible for completing, reviewing, or signing a confined space permit, including the Plains Representative, Contractor Representative, Entry Supervisor, Attendants, and the Rescue Crew Company representative.
Required information and roles
Before starting, ensure you have the following available:
- Department contacts for Control Center, Scheduling, Safety, Environmental, Maintenance, Operations, Engineering, Measurement, and SCADA
- Job location details, including division, district, facility, address, and GPS coordinates
- Names, email addresses, and phone numbers for the Plains Representative and Contractor Representative
- Atmospheric monitoring equipment details (manufacturer, serial number, calibration date)
- Access to the Safe Work Plan / JSA for rescue provider and rescue plan information
Complete the top half of the first page
Fill out all fields at the top of the permit, including:
- Department, Person Notified, and Date for each relevant area (e.g., Control Center, Scheduling, Safety, Environmental, Maintenance, Operations, Engineering, Measurement, SCADA)
- Job Location: division, district, facility, address, and GPS coordinates (latitude and longitude)
- Job Description: equipment ID and type of work being performed
- Plains Representative and Contractor Representative: names, email addresses, and phone numbers
Important: Enter the date, permit tracking number, and the time the permit begins in the upper right-hand corner.
Review mandatory requirements on page 2
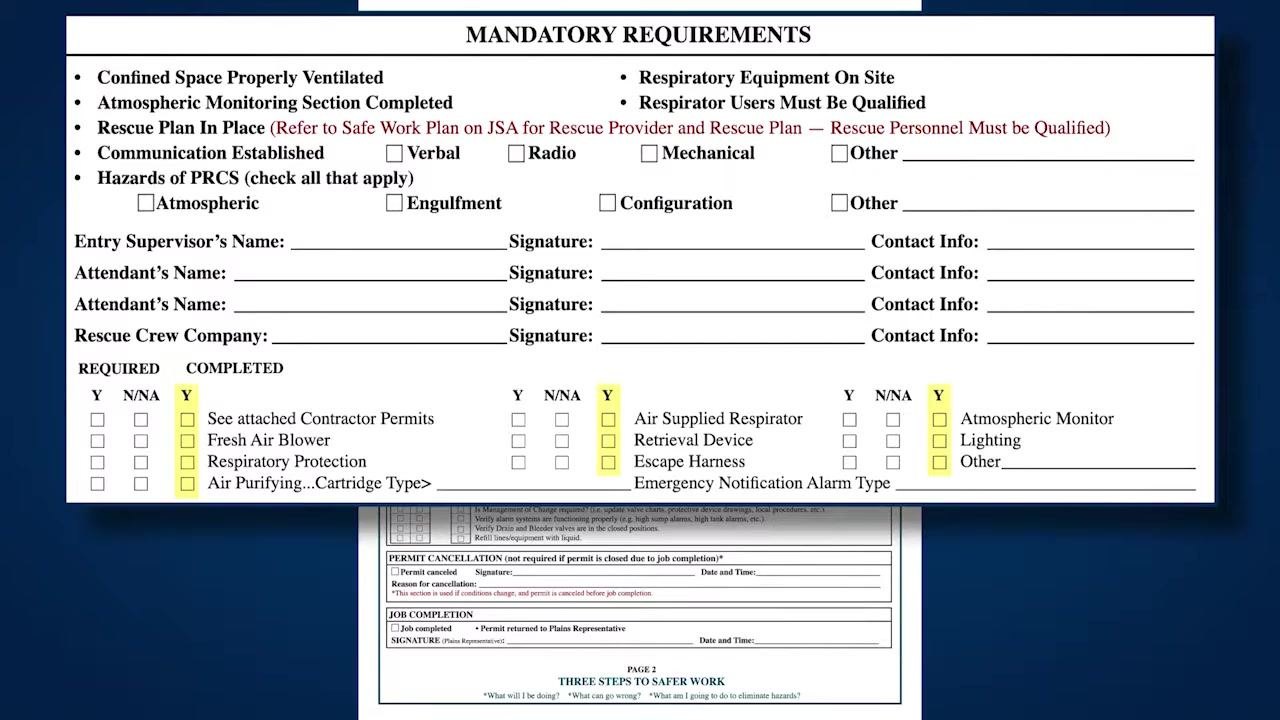
At the top of page 2, review and address all mandatory requirements before proceeding:
- Confirm the confined space is properly ventilated.
- Ensure the atmospheric monitoring section is completed.
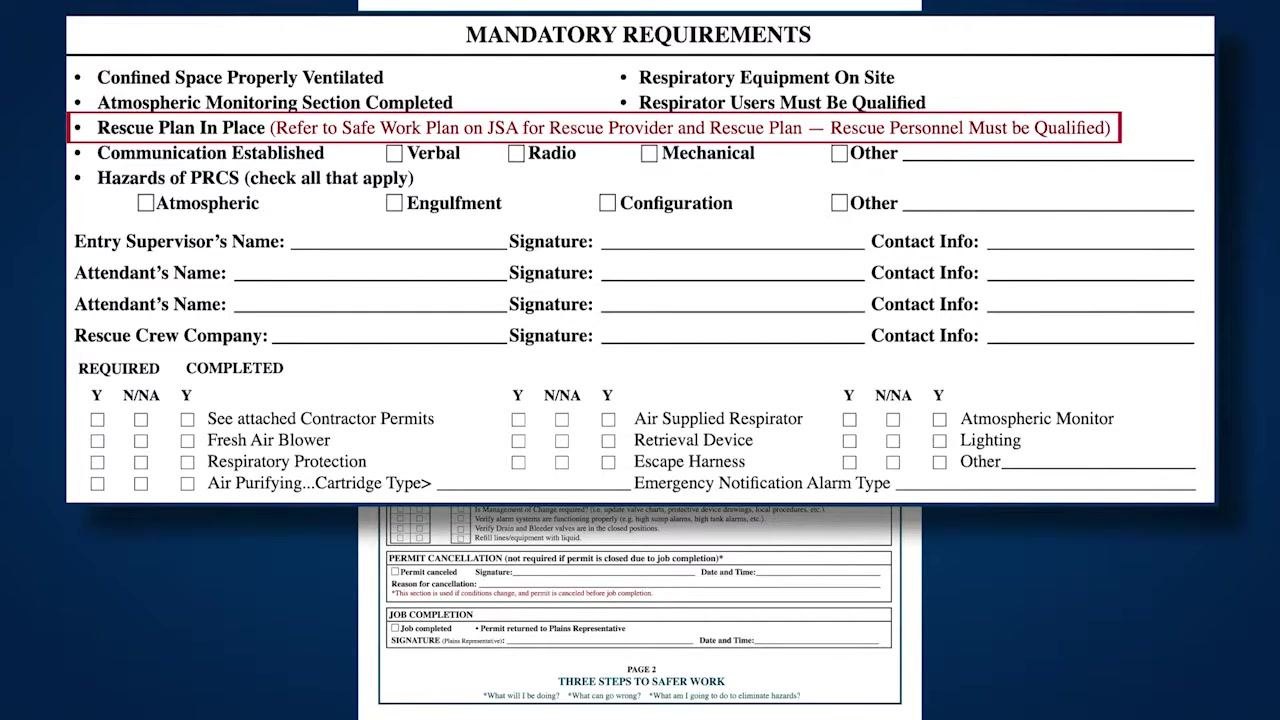
- Verify a rescue plan is in place (refer to the Safe Work Plan on JSA for the rescue provider and rescue plan).
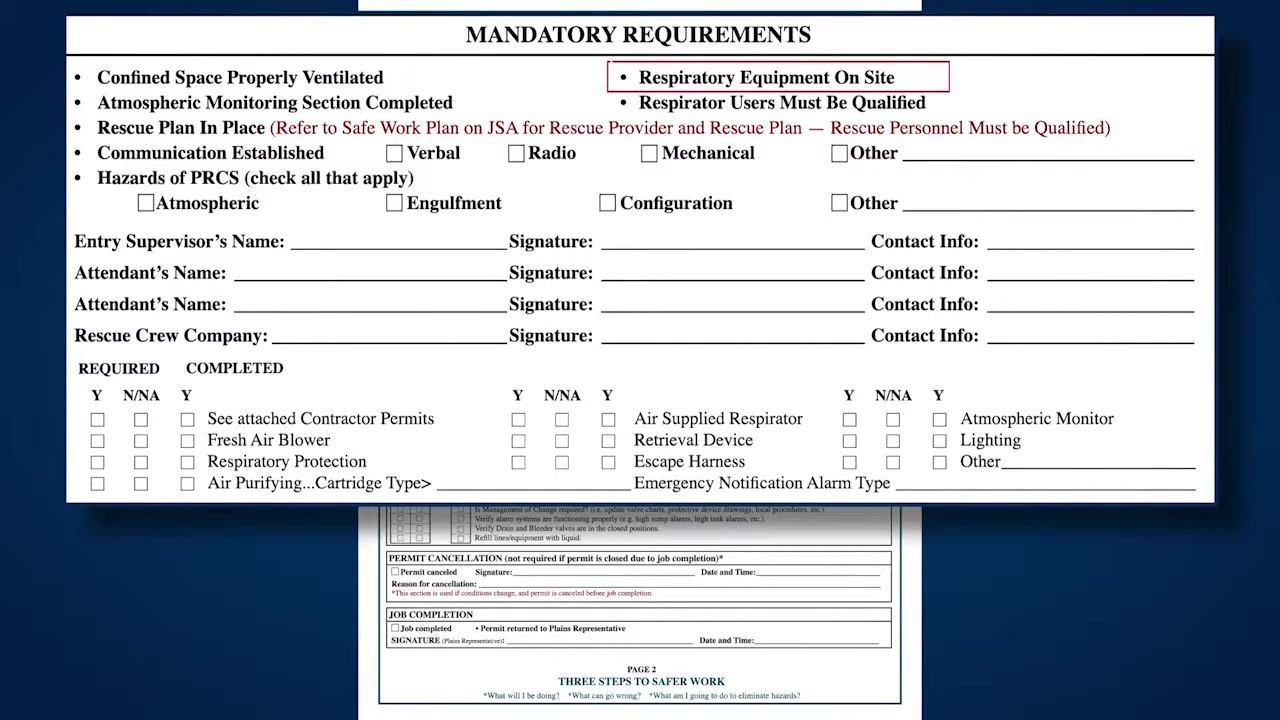
- Confirm respiratory equipment is on site and all respirator users are qualified.
- Establish communication by checking the appropriate box: Verbal, Radio, Mechanical, or Other.
- Identify all hazards of the permit-required confined space (PRCS) by checking all that apply: Atmospheric, Engulfment, Configuration, or Other.
Enter names and signatures
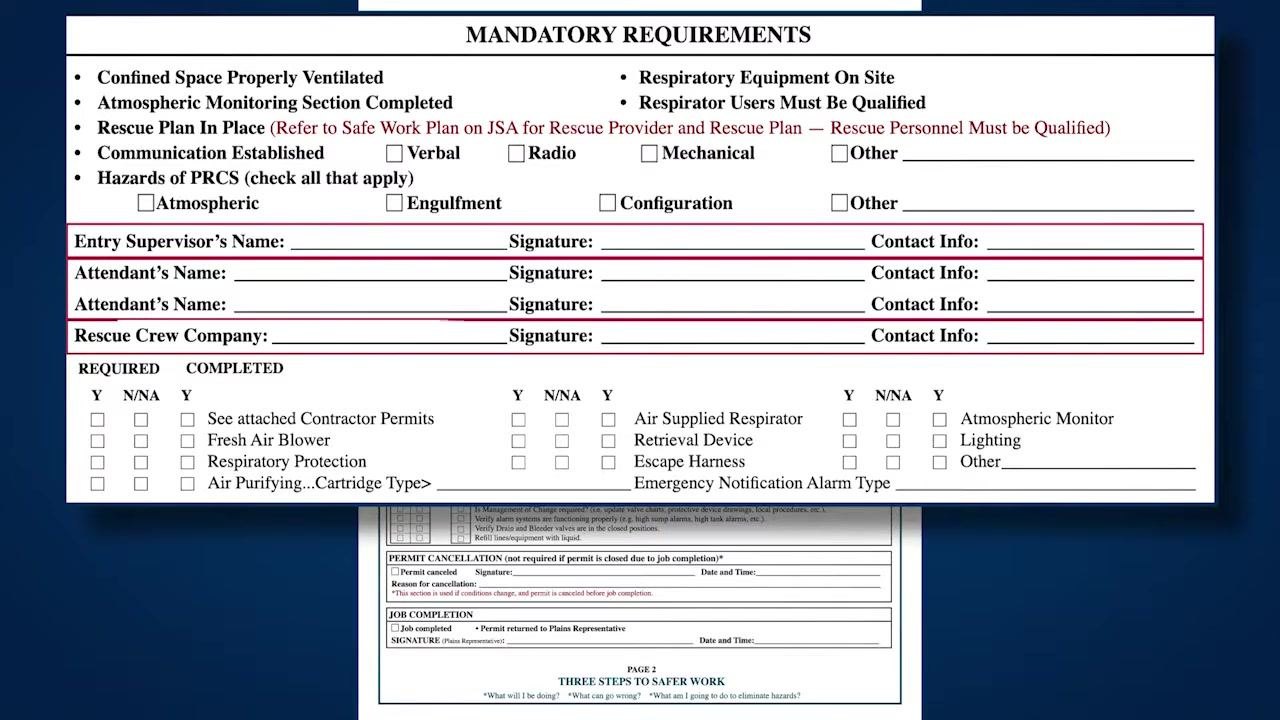
Ensure the following individuals print their names, provide contact information, and sign the permit:
- Entry Supervisor
- All Attendants (list each attendant separately)
- Rescue Crew Company representative
Determine and verify safety equipment
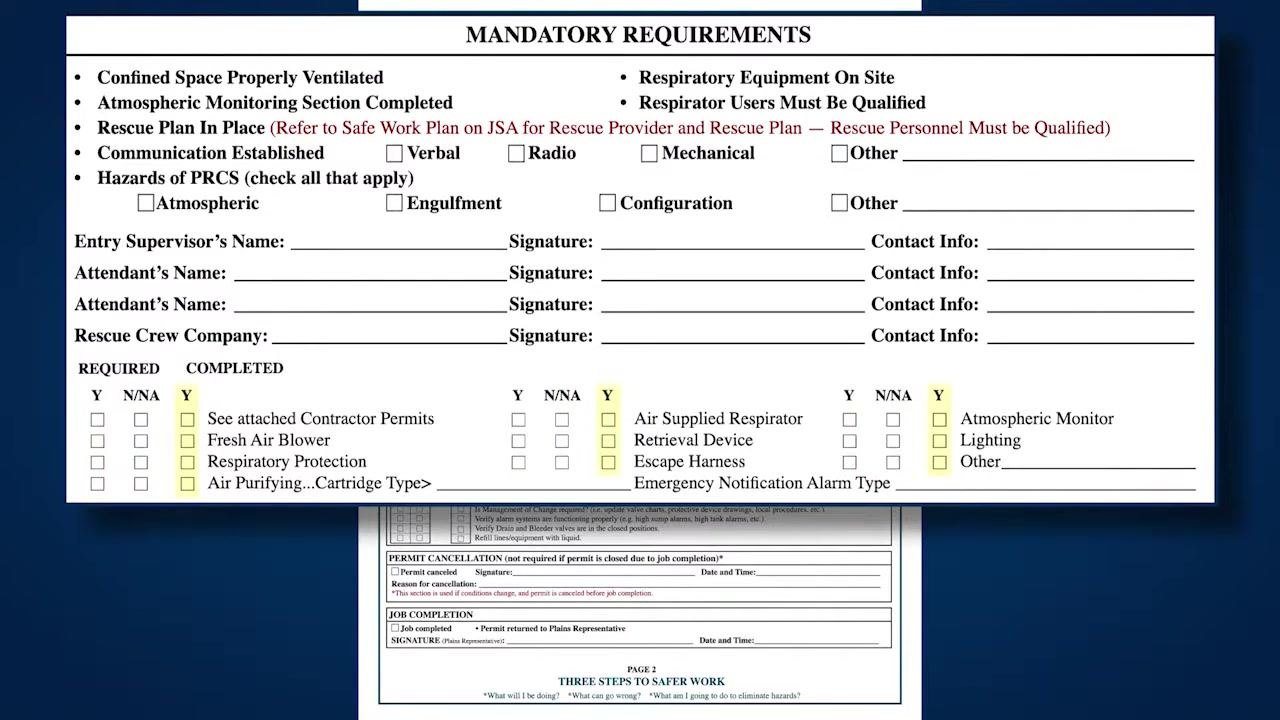
For each safety equipment item listed, check the appropriate column under Required (Y, N/NA) and Completed (Y):
- See attached contractor permits
- Fresh air blower
- Respiratory protection
- Air purifying (specify cartridge type)
- Air supplied respirator
- Retrieval device
- Escape harness
- Emergency notification alarm type (specify)
- Atmospheric monitor
- Lighting
- Other (specify)
Critical safety note: Any item marked "Yes" in the Completed column must be verified as on site and in working condition before checking the box.
Complete the entrant log
Each attendant must:
- Print their name
- Sign the log
- Enter the time in, time out, and date for each entry and exit from the confined space
Use supplemental forms if additional entries are needed.
Complete the job completion checklist
Before closing the permit, review the Job Completion Checklist. For each item, check Required (Y, N/NA) and Completed (Y) as appropriate. Items include:
- Vented air/nitrogen from line
- Pressure bled off
- Vent holes repaired
- Vapor plugs removed/displaced
- Blinds/skillets removed
- Lockout/tagout devices removed
- All affected parties notified job is complete
- All rectifiers turned back on and all bonds connected
- Housekeeping
- Management of change required (update charts, drawings, procedures)
- Alarm systems functioning properly (e.g., high sump alarms, high tank alarms)
- Drain and bleeder valves in closed positions
- Refill lines/equipment with liquid
If any items are required for the project, ensure they are completed and checked off before closing the permit.
Complete the atmospheric monitoring section
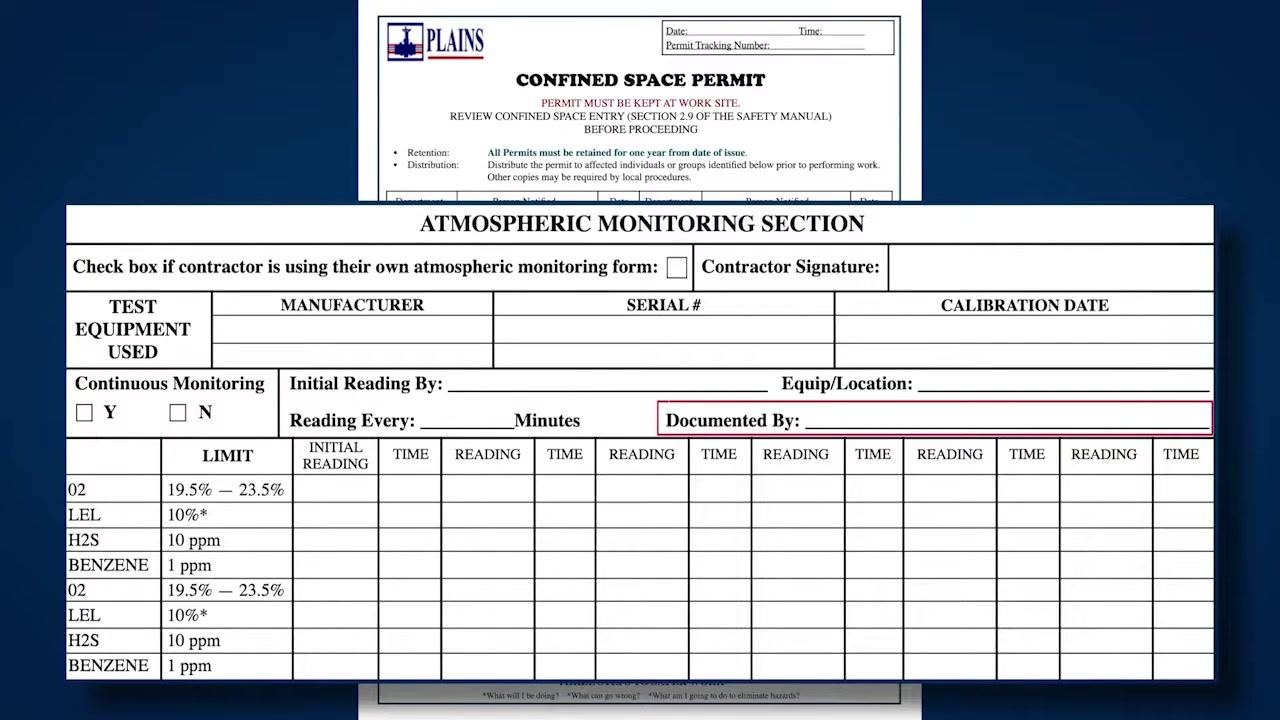
Locate the Atmospheric Monitoring Section on page 1 of the permit.
If the contractor is using their own atmospheric monitoring form:
- Check the box labeled Check box if contractor is using their own atmospheric monitoring form.
- Have the contractor representative sign the permit in the Contractor Signature field.
If using the Plains permit for atmospheric monitoring, enter the following details for each instrument used:
- Manufacturer of the test equipment
- Serial number of the instrument
- Calibration date of the instrument
Indicate whether continuous monitoring is required by checking Y (Yes) or N (No) under Continuous Monitoring.
Fill in the following fields:
- Initial Reading By: name of the person who performed the initial atmospheric reading
- Equip/Location: where the monitoring equipment is located
- Reading Every: frequency (in minutes) at which readings should be taken
- Documented By: name of the person responsible for documenting the readings
Record atmospheric readings in the table provided. There is space for up to 12 different readings at the bottom of the page. For each reading, enter the time and the measured values for:
- O₂ (Oxygen): 19.5% – 23.5%
- LEL (Lower Explosive Limit): 10%
- H₂S (Hydrogen Sulfide): 10 ppm
- Benzene: 1 ppm
If more than 12 readings are required, attach an additional form. Ensure all required fields are completed and all readings are accurately documented.
Finalize the permit — permit cancellation or job completion
At the bottom of the permit, locate the Permit Cancellation and Job Completion sections. Only one of these sections should be completed, depending on the outcome of the job.
Permit Cancellation — complete this section only if conditions change and the permit is cancelled before the job is finished:
- Check the Permit canceled box.
- Enter the signature of the person canceling the permit.
- Provide the date and time of cancellation.
- State the reason for cancellation in the space provided.
Job Completion — complete this section if the permitted job is finished as planned:
- Check the Job completed box.
- Ensure the permit is returned to the Plains Representative.
- The Plains Representative must sign and date the form in the spaces provided.
Ensure the appropriate section is fully completed and signed by the person in charge.
Verification and summary
Before the confined space entry begins, confirm that:
- All top-of-page fields, job location, job description, and representative contact details are complete.
- Mandatory requirements on page 2 (ventilation, atmospheric monitoring, rescue plan, respiratory equipment, communication, and hazard identification) are reviewed and addressed.
- The Entry Supervisor, all Attendants, and the Rescue Crew Company representative have printed their names, provided contact information, and signed.
- All required safety equipment items are checked, verified on site, and in working condition.
- The entrant log is filled out completely for every entry and exit.
- The Job Completion Checklist items are reviewed and checked off as required.
- The Atmospheric Monitoring section is fully completed, with all readings documented.
- Either the Permit Cancellation or Job Completion section is completed and signed, depending on the job outcome.
By completing all fields, checklists, and signatures as described, you maintain compliance and safety for all confined space entries.
Generation details: cost, quality tiers
Docsie billed 2,000 credits ($1.40) to analyze this 4-minute video at standard quality. The rewrite, template fill and Word/PDF exports were included. The same video at each quality tier:
| Quality | Frames sampled | Credits | Approx. cost |
|---|---|---|---|
| Draft | every 16-30 s | 1,000 | $0.70 |
| Standard (this guide) | every 8-15 s | 2,000 | $1.40 |
| Detailed | every 4-7 s | 4,000 | $2.80 |
| Ultra | every 1-3 s | 8,000 | $5.60 |
Credits priced at $0.70 per 1,000; plans include a monthly allowance. Enterprise customers on on-premise or bring-your-own-model deployments run this on their own inference and pay no per-video credits.
Generated by Docsie Video-to-Docs on 2026-09-09 from a 3-minute video. Screenshots are frames from the source video and belong to their creator, Afton Shelton, whose original is embedded above. If you own this video and want the guide removed or credited differently, contact us and we will act within one business day.