
How to Do a Job Hazard Analysis
A Job Hazard Analysis (JHA) is a critical component of any workplace safety program. It is one of several risk assessment tools used to identify and control hazards as part of the formal hazard assessment process. Many workplace injuries and fatalities occur because workers are unaware of correct procedures or fail to recognize potential hazards. This documentation explains how to do a job hazard analysis, step by step, so you can establish proper operating procedures and provide recommendations for preventing or eliminating hazards.
Video: Job Hazard Analysis (JHA) | Your ACSA Safety Training by Your ACSA Safety (2014). All credit for the demonstration goes to the creator; watch the original on YouTube. The written guide below was generated from this video by Docsie. Creator? Request a change or removal.
A Job Hazard Analysis (JHA) is a critical component of any workplace safety program. It is one of several risk assessment tools used to identify and control hazards as part of the formal hazard assessment process. Many workplace injuries and fatalities occur because workers are unaware of correct procedures or fail to recognize potential hazards. This documentation explains how to do a job hazard analysis, step by step, so you can establish proper operating procedures and provide recommendations for preventing or eliminating hazards.
Purpose
The purpose of a JHA is to systematically break a job down into its component steps, identify the hazards associated with each step, and recommend controls that prevent or reduce the risk of injury, illness, or environmental harm.
Scope
This procedure applies to any workplace task that requires a formal hazard assessment before it is performed, such as manual lifting and moving of loads. It covers assembling a team, observing and breaking down the job, documenting hazards, assessing risk, recommending controls, and monitoring those controls over time.
Prerequisites
Before you begin, make sure you have the following in place:
- A team of people familiar with the job, including workers who regularly perform it, supervisors, and experts or specialists if applicable
- A standardized JHA form to record steps, hazards, priority rankings, and controls
- Access to the work area where the task is normally performed
Required PPE (example task)
For a manual lifting task, the following PPE is typically required and should be documented on the JHA form:
- Safety boots
- Hard hat
- Gloves
- Safety glasses
Step-by-step procedure
Step 1: Assemble the JHA team
Bring together everyone needed to conduct the analysis: one or more workers familiar with the job, supervisors, and experts or specialists if applicable. Involving the entire team reduces the likelihood of missing steps or hazards. Workers who regularly perform the job are best placed to identify unsafe shortcuts or ways employees may bypass protective devices, and these should be addressed during the analysis.
Step 2: Observe the job or task
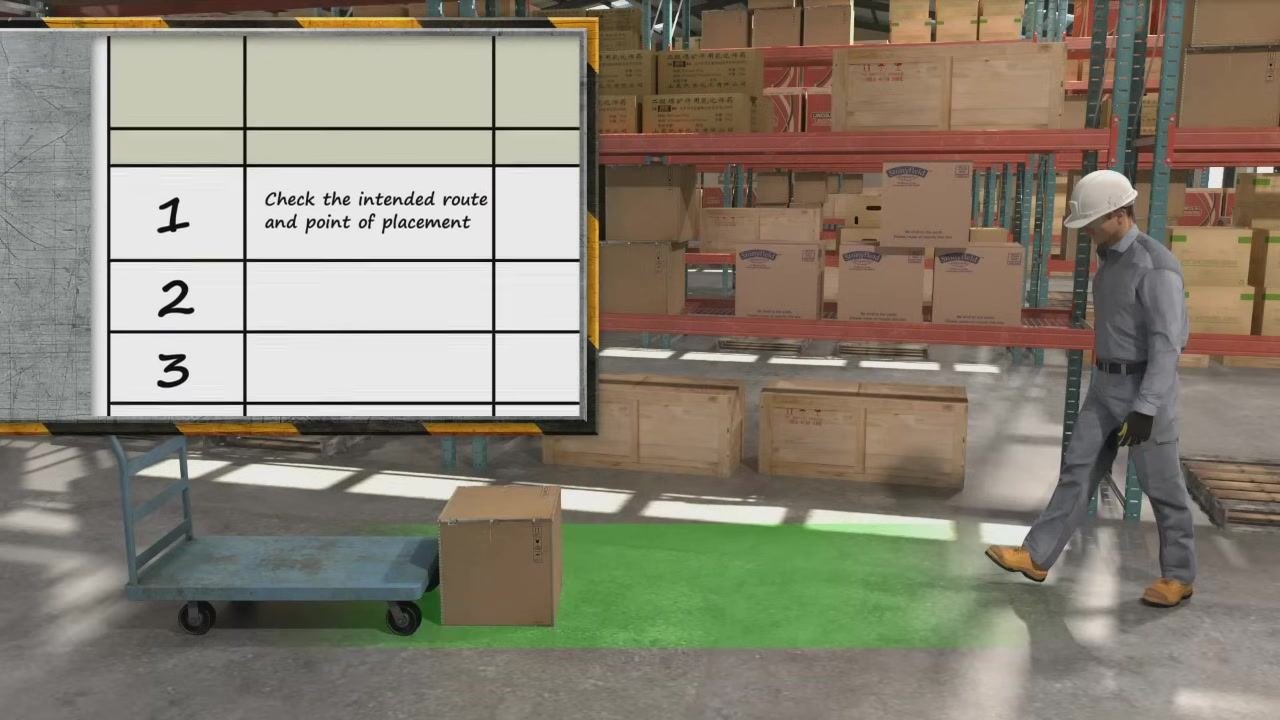
Begin the JHA by observing the job or task to be analyzed. For example, observe the process of lifting and moving a heavy box.
Step 3: Break the job into manageable steps
Break the job down into small, manageable steps, with each step representing a necessary part of the operation that advances the work. Avoid steps that are too general, which may cause you to miss hazards, or too detailed, which results in too many steps. As a guideline, describe the job in fewer than 10 steps. For the lifting example, Step 1 is to check the intended route and point of placement.
Step 4: Continue documenting the remaining steps
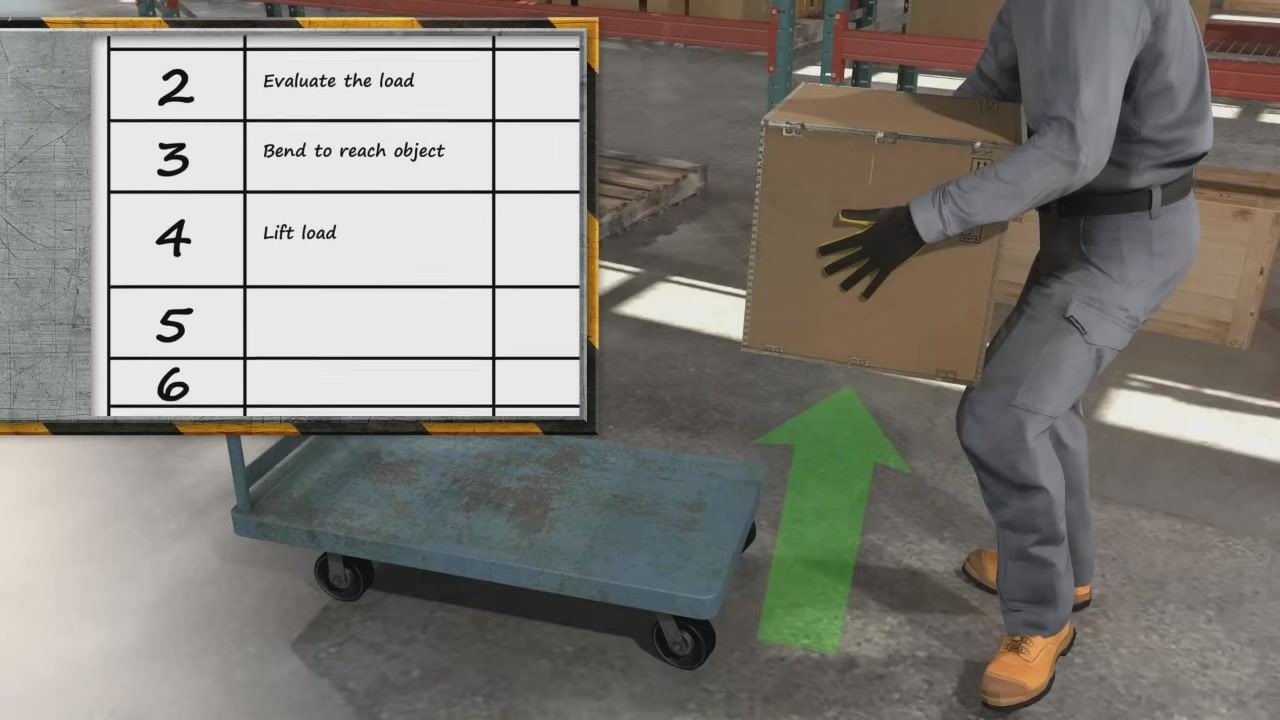
Continue recording each step of the task in sequence. For the lifting example, the next steps are to evaluate the load, bend to reach the object, and lift the load.
Step 5: Document the JHA using a standardized form
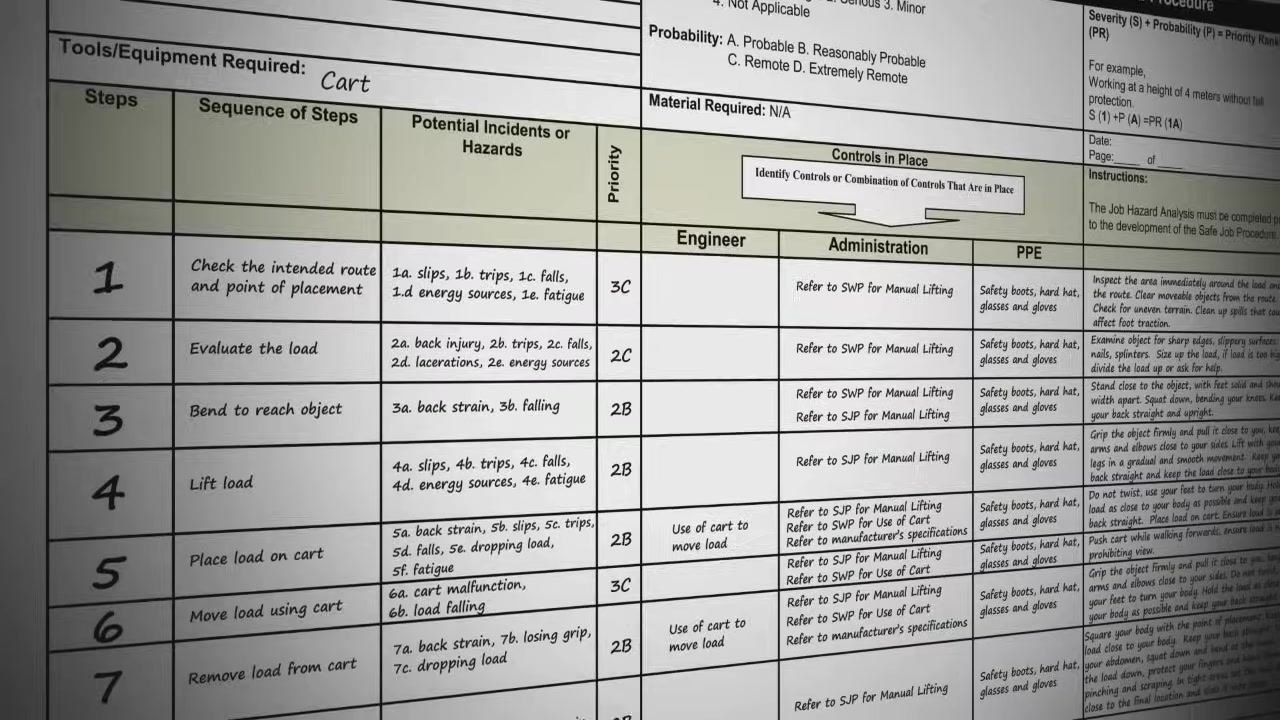
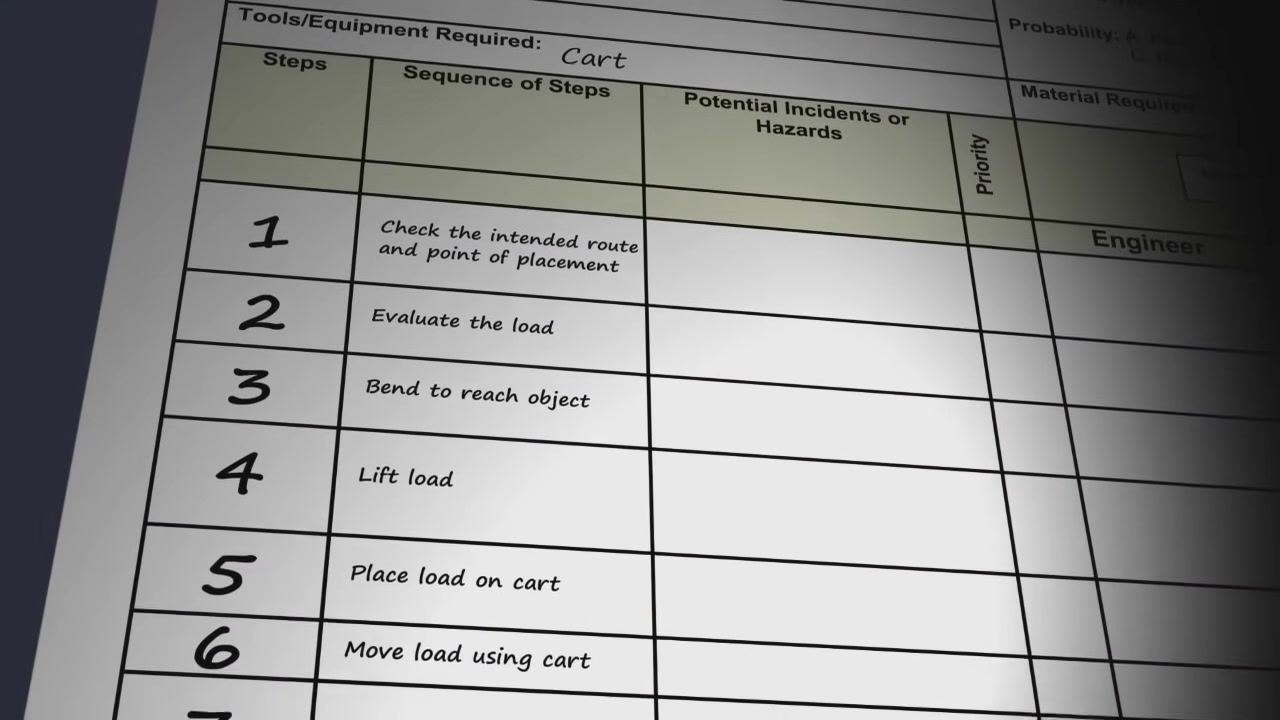
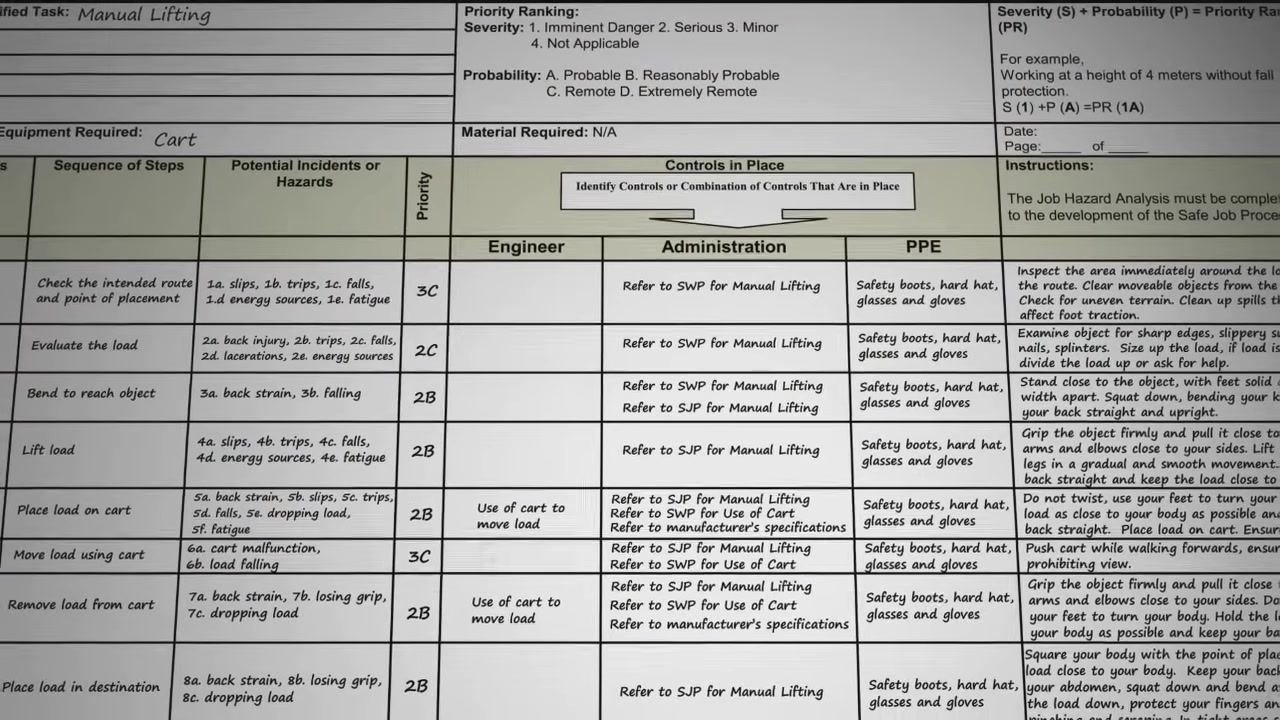
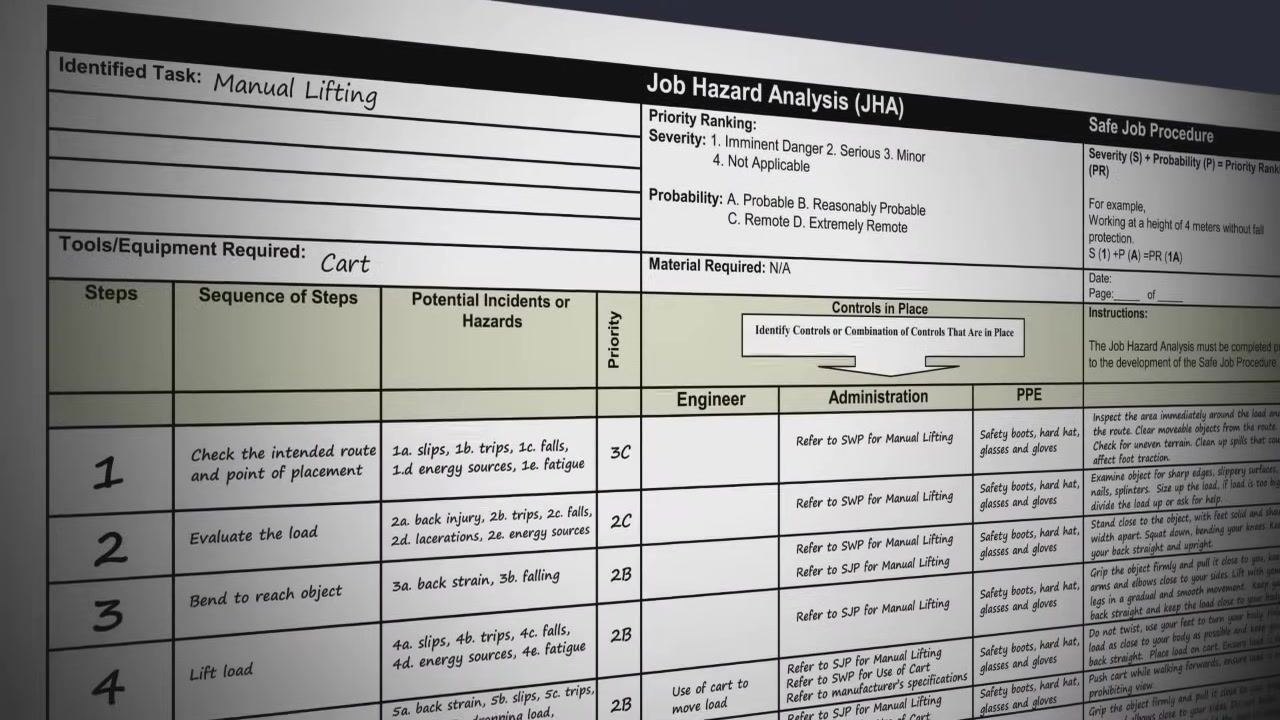
Record the analysis on a standardized JHA form that includes the following sections: Identified Task (e.g., Manual Lifting), Tools/Equipment Required (e.g., Cart), Sequence of Steps (e.g., Check route, Evaluate load, Bend, Lift), Potential Incidents or Hazards (e.g., slips, trips, back injury, fatigue), Priority Ranking (e.g., 3C, 2B), Controls in Place (e.g., use of cart, refer to safe work procedures), Required PPE (e.g., safety boots, hard hat, gloves, glasses), and Administrative and Engineering Controls.
Step 6: List all steps in correct order
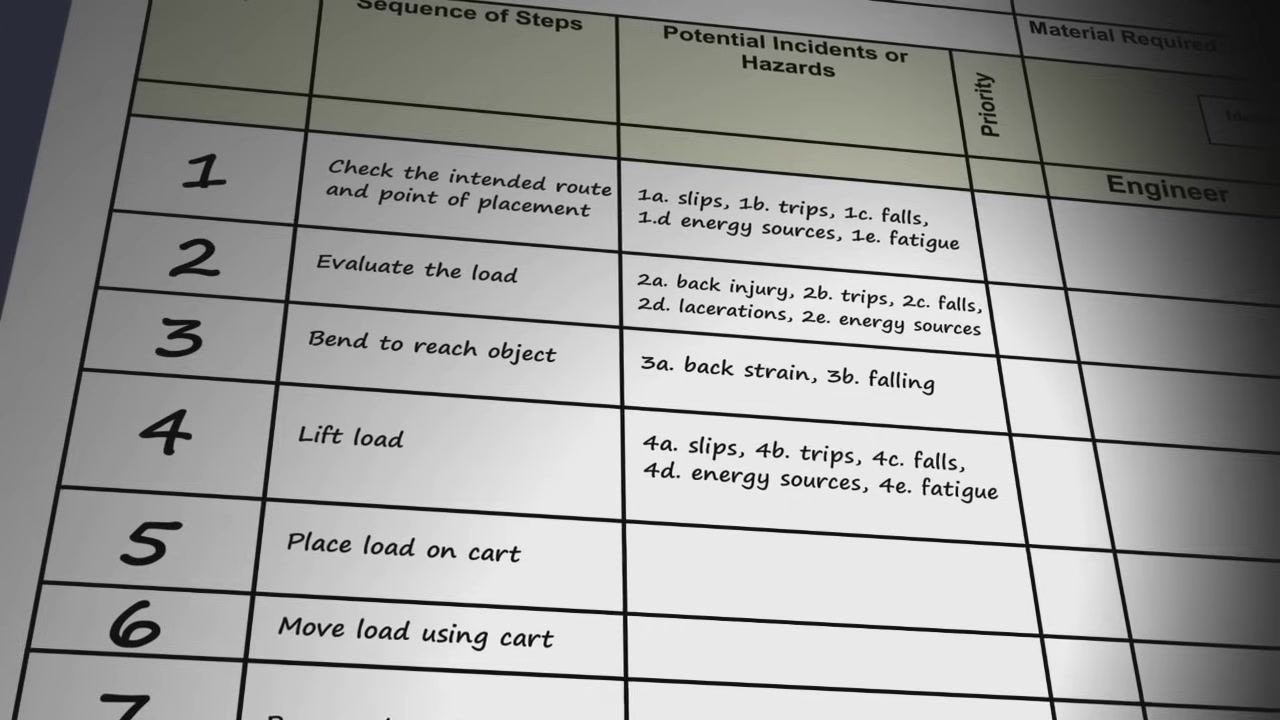
Ensure that every step in the job is listed in its correct sequence on the JHA form. Steps that are out of order may cause you to miss potential hazards or introduce hazards that do not actually exist. For the lifting example, the full sequence is: check the intended route and point of placement, evaluate the load, bend to reach the object, lift the load, place the load on the cart, move the load using the cart, remove the load from the cart, and place the load in its destination.
Step 7: Identify potential hazards for each step
After listing all the steps, identify the potential hazards associated with each one. A hazard is anything that could lead to injury, illness, or environmental harm. For example, while bending to lift a box, a potential hazard is back strain.
Step 8: Classify each hazard as health or safety
Classify each identified hazard as a health hazard or a safety hazard. Health hazards can be physical (e.g., repetitive motion, noise), chemical (e.g., exposure to solvents), biological (e.g., bacteria, viruses), or psychological (e.g., stress, fatigue). Safety hazards include substances, processes, actions, or conditions that may endanger immediate safety, such as slips, trips, and falls.
Step 9: Number hazards according to step
For each step, list and number all identified hazards using the step number as a prefix, for example 1a, 1b, 2a. In the lifting example, Step 1 hazards include slips, trips, falls, energy sources, and fatigue; Step 2 hazards include back injury, trips, falls, lacerations, and energy sources; Step 3 hazards include back strain and falling; and Step 4 hazards include slips, trips, falls, energy sources, and fatigue.
Step 10: Assess the risk of each hazard
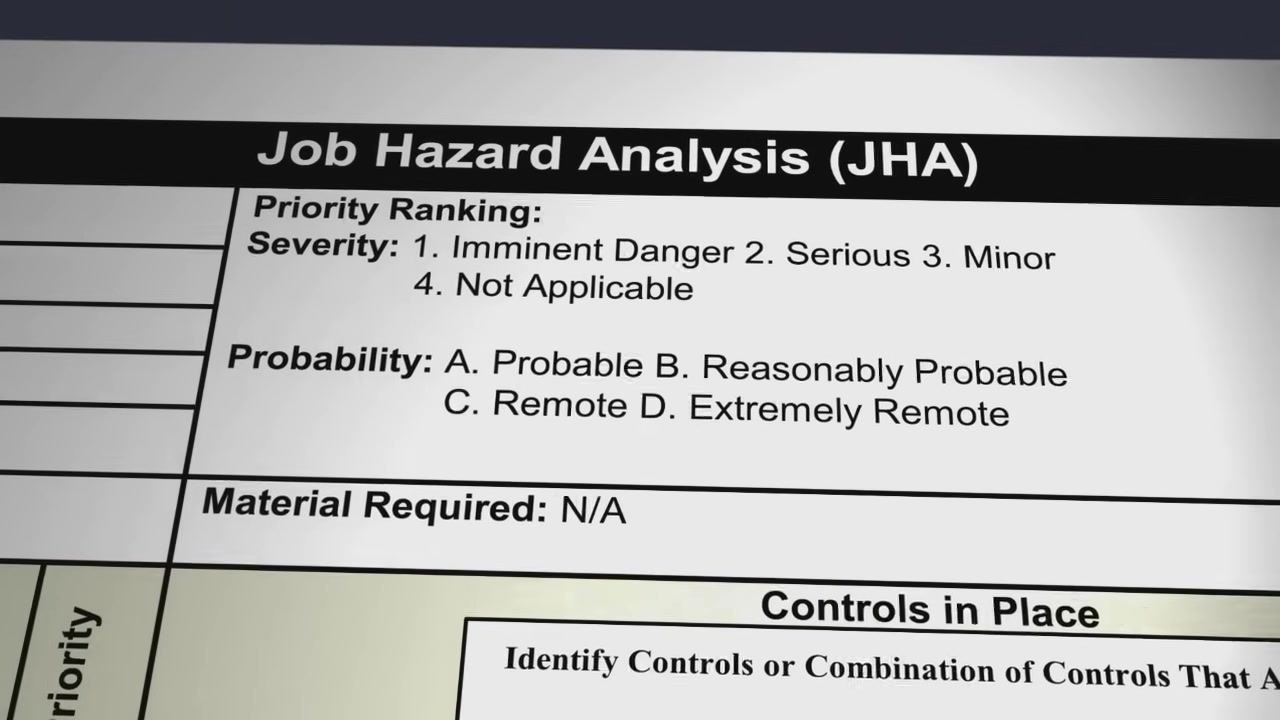
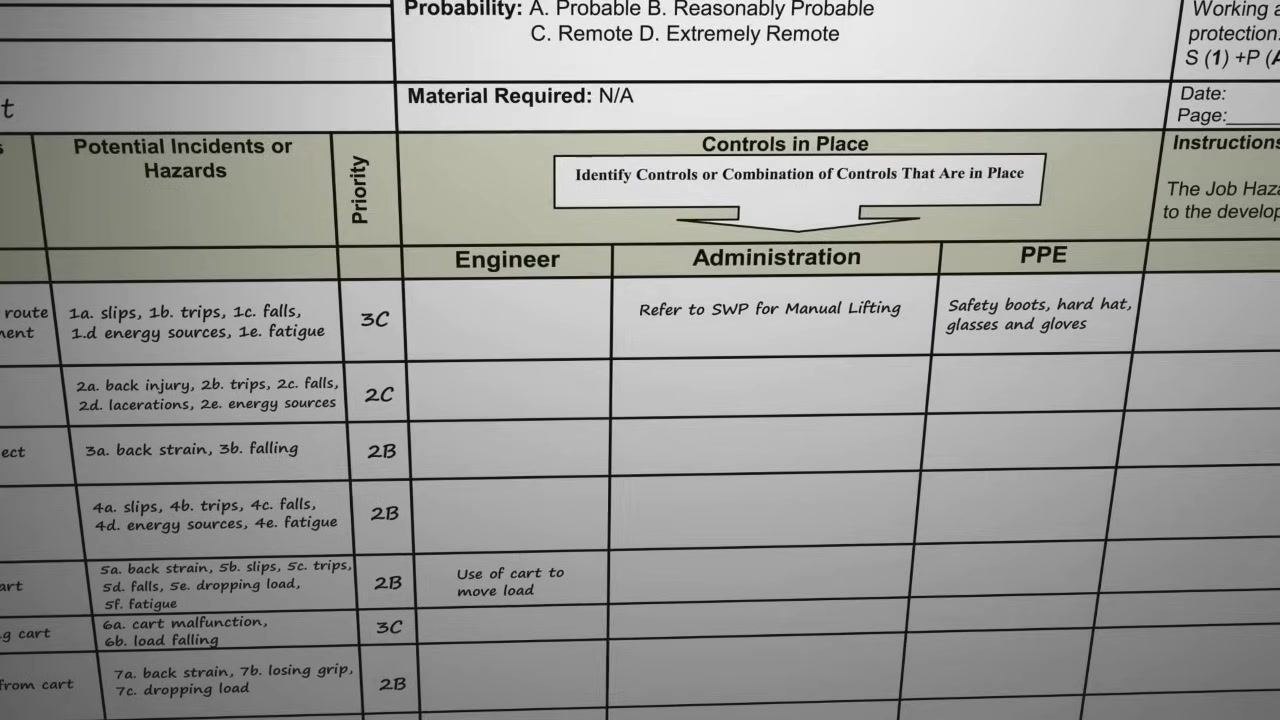
Evaluate each hazard by determining its severity and probability. Rank severity as 1 (Imminent Danger), 2 (Serious), 3 (Minor), or 4 (Not Applicable). Rank probability as A (Probable), B (Reasonably Probable), C (Remote), or D (Extremely Remote).
Step 11: Recommend a control to reduce risk — examine the object
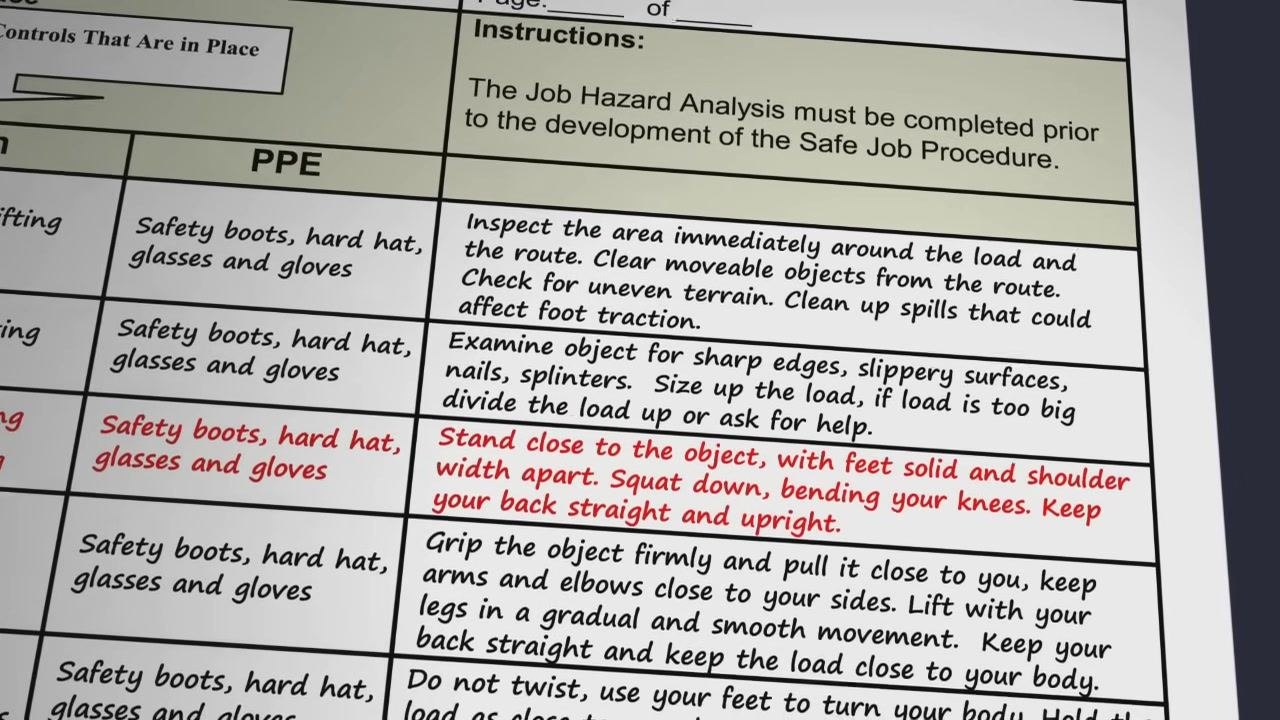
For each hazard, recommend a control to mitigate or eliminate it. Make recommendations immediately while still focused on the work environment to ensure they are practical and effective. For the lifting example, one control is to examine the object before lifting it.
Step 12: Recommend a control to reduce risk — keep back straight
A second control for the same hazard is to keep the back straight and upright while lifting.
Step 13: Document controls in the JHA form
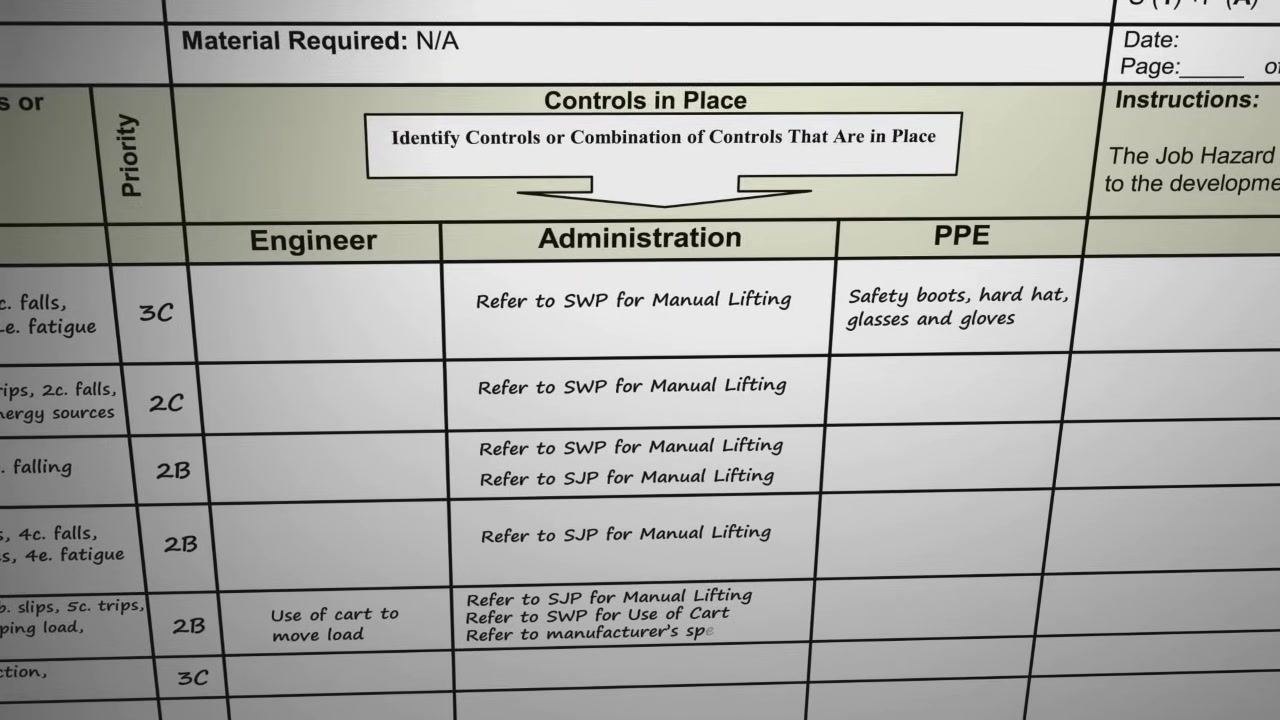
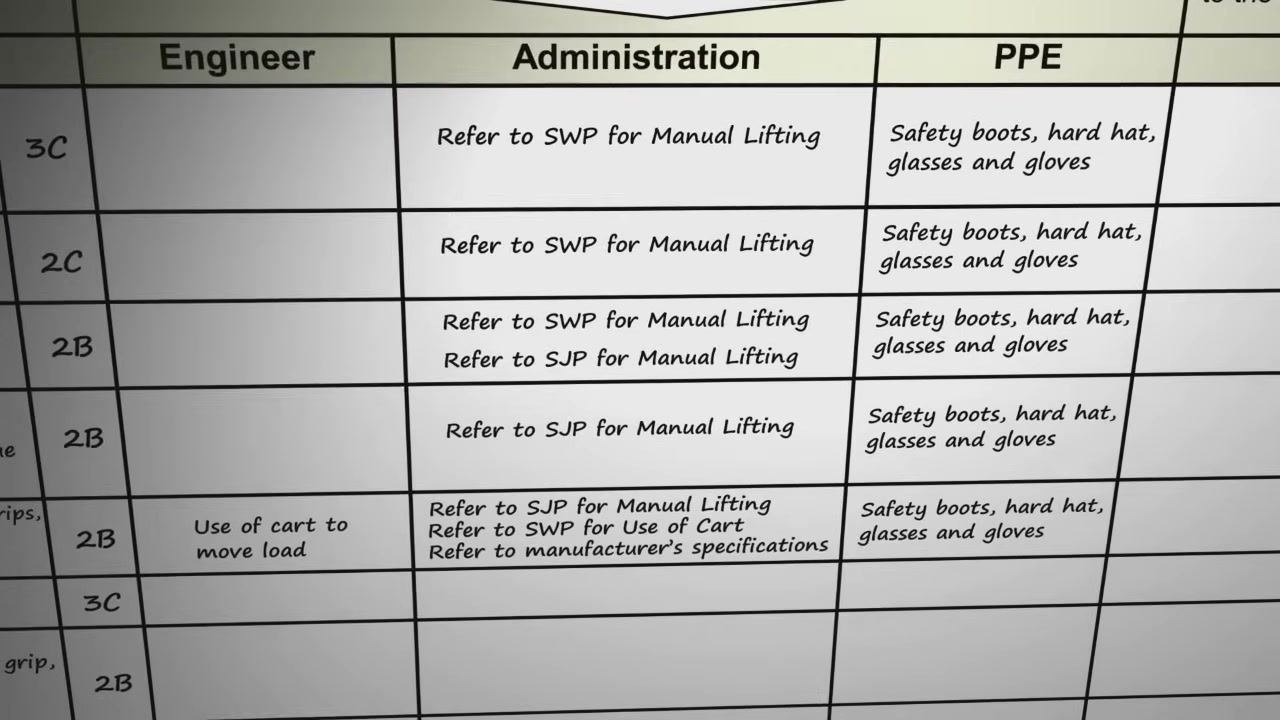
Record each control under its appropriate category on the JHA form: Engineering (e.g., use of a cart to move the load), Administration (e.g., refer to Safe Work Procedures for Manual Lifting), or PPE (e.g., safety boots, hard hat, glasses, gloves). For example, Step 1 lists Administration control "Refer to SWP for Manual Lifting" along with required PPE, and Step 6 lists the Engineering control "Use of cart to move load."
Step 14: Consider all types of hazard controls
If eliminating a hazard is not possible, recommend controls that reduce the risk. Consider all three types of controls: Engineering Controls that modify equipment or processes (e.g., use of carts to move loads), Administrative Controls that implement procedures or training (e.g., referring to Safe Work Procedures for Manual Lifting), and Personal Protective Equipment that specifies required gear (e.g., safety boots, hard hat, glasses, gloves). List every feasible recommendation and document it in the JHA form under the appropriate category.
Step 15: Explore multiple control options for each hazard
Investigate as many alternative control methods as possible for each hazard. If a hazard can be controlled in several ways, list each recommendation separately on the form.
Step 16: Use the JHA for communication and training
Use the completed JHA to communicate job hazards and control measures to all employees. Reference it as the foundation for developing safe work practices and job procedures, and use it as a step-by-step training tool for new employees learning the job.
Step 17: Use the JHA to support investigations and reminders
If an injury or illness occurs, use the JHA as a starting point for the investigation. Refer to it as needed to remind employees of the safe operating procedures for the task.
Step 18: Monitor implementation of the recommended controls
Continually monitor the task to confirm that the recommended control methods have been implemented and are effective.
Step 19: Confirm safe practices are being followed
Observe the task in progress to verify workers are following the documented controls, such as using proper posture and required PPE, while a supervisor confirms compliance.
Step 20: Review and update the JHA regularly
Conduct a JHA for each new task, and review existing JHAs at regular intervals or whenever the task changes. Confirm that all steps, hazards, and controls remain up to date and relevant. Performing JHAs regularly helps keep employees safe and reduces the chances of injury, illness, and environmental damage.
Summary
By following this process, you systematically identify hazards, implement controls, and ensure safer work procedures through a comprehensive Job Hazard Analysis. Each step of the job is listed in order, its hazards are identified, classified, and numbered, its risk is assessed for severity and probability, and controls are recommended, documented, and monitored. Reviewing and updating the JHA whenever a task changes ensures hazard controls remain effective and the workplace stays safe.
Generation details: cost, quality tiers
Docsie billed 2,500 credits ($1.75) to analyze this 5-minute video at standard quality. The rewrite, template fill and Word/PDF exports were included. The same video at each quality tier:
| Quality | Frames sampled | Credits | Approx. cost |
|---|---|---|---|
| Draft | every 16-30 s | 1,250 | $0.88 |
| Standard (this guide) | every 8-15 s | 2,500 | $1.75 |
| Detailed | every 4-7 s | 5,000 | $3.50 |
| Ultra | every 1-3 s | 10,000 | $7.00 |
Credits priced at $0.70 per 1,000; plans include a monthly allowance. Enterprise customers on on-premise or bring-your-own-model deployments run this on their own inference and pay no per-video credits.
Generated by Docsie Video-to-Docs on 2026-09-09 from a 4-minute video. Screenshots are frames from the source video and belong to their creator, Your ACSA Safety, whose original is embedded above. If you own this video and want the guide removed or credited differently, contact us and we will act within one business day.