
How to Schedule an ESS Job in Oracle Fusion
This guide explains how to schedule an ESS job in Oracle Fusion using the Scheduled Processes tool. You will learn how to access the scheduling interface, configure a new job with recurring run times, monitor its progress, edit an existing schedule, and cancel a job if needed.
Video: Oracle Fusion #64: How to Schedule the ESS job and how to change Schedule for ESS Job. by Technical Talk's (2023). All credit for the demonstration goes to the creator; watch the original on YouTube. The written guide below was generated from this video by Docsie. Creator? Request a change or removal.
This guide explains how to schedule an ESS job in Oracle Fusion using the Scheduled Processes tool. You will learn how to access the scheduling interface, configure a new job with recurring run times, monitor its progress, edit an existing schedule, and cancel a job if needed.
Prerequisites
- Access to your Oracle Fusion Cloud Applications instance with valid login credentials.
- Permissions to access the Scheduled Processes tool and submit ESS jobs.
Accessing scheduled processes
Step 1: Access your Oracle Fusion instance
Open your web browser and navigate to your Oracle Fusion Cloud Applications instance. Log in with your credentials if prompted.
Step 2: Open the Navigator menu
Find the Navigator icon (three horizontal lines or a menu icon) in the upper left corner of the Oracle Fusion interface. Click the Navigator icon to open the navigation menu.
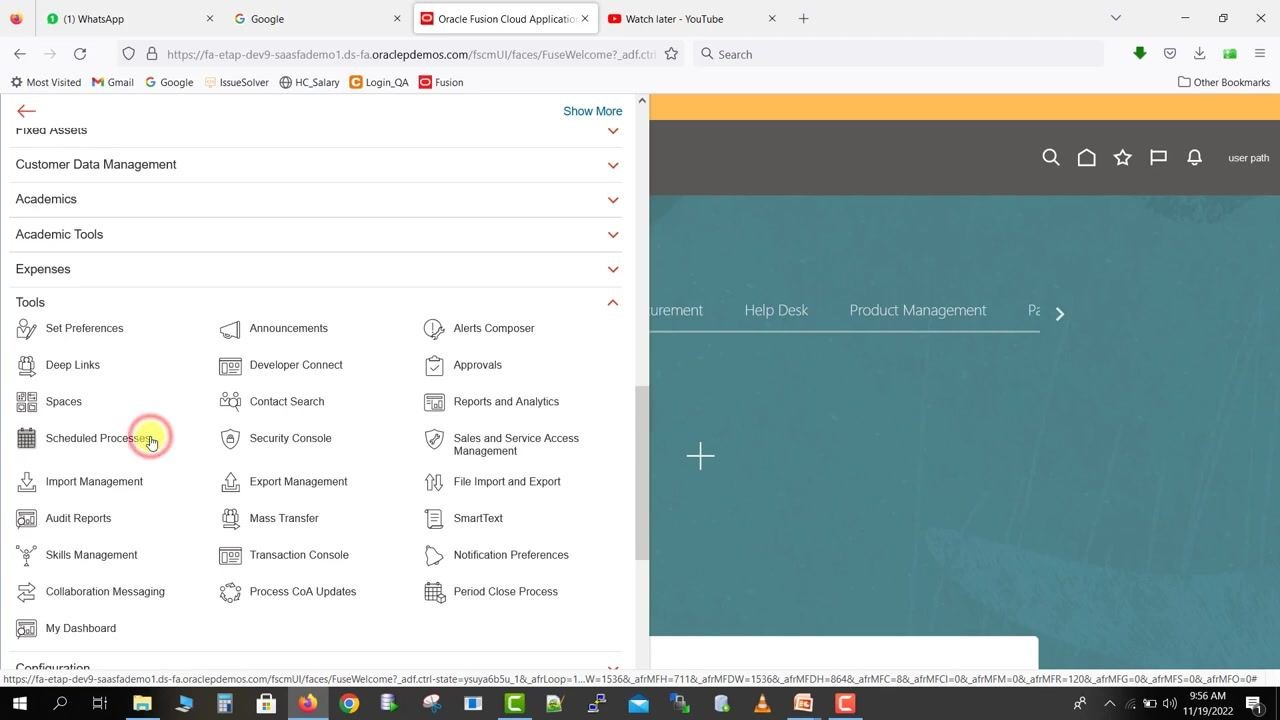
Step 3: Expand Tools and select Scheduled Processes
Scroll down the navigation menu until you see the Tools section, and click to expand it if it is not already expanded. In the Tools section, locate Scheduled Processes (the icon with a calendar and clock) and click it to proceed to the ESS job scheduling interface.
The system redirects you to the Monitor Processes - Scheduled Processes page. This page displays a list of previously scheduled jobs, with columns for Name, Process ID, Status, Scheduled Time, Submission Time, Start Time, and Completion Time. The Schedule New Process button appears above the job list.
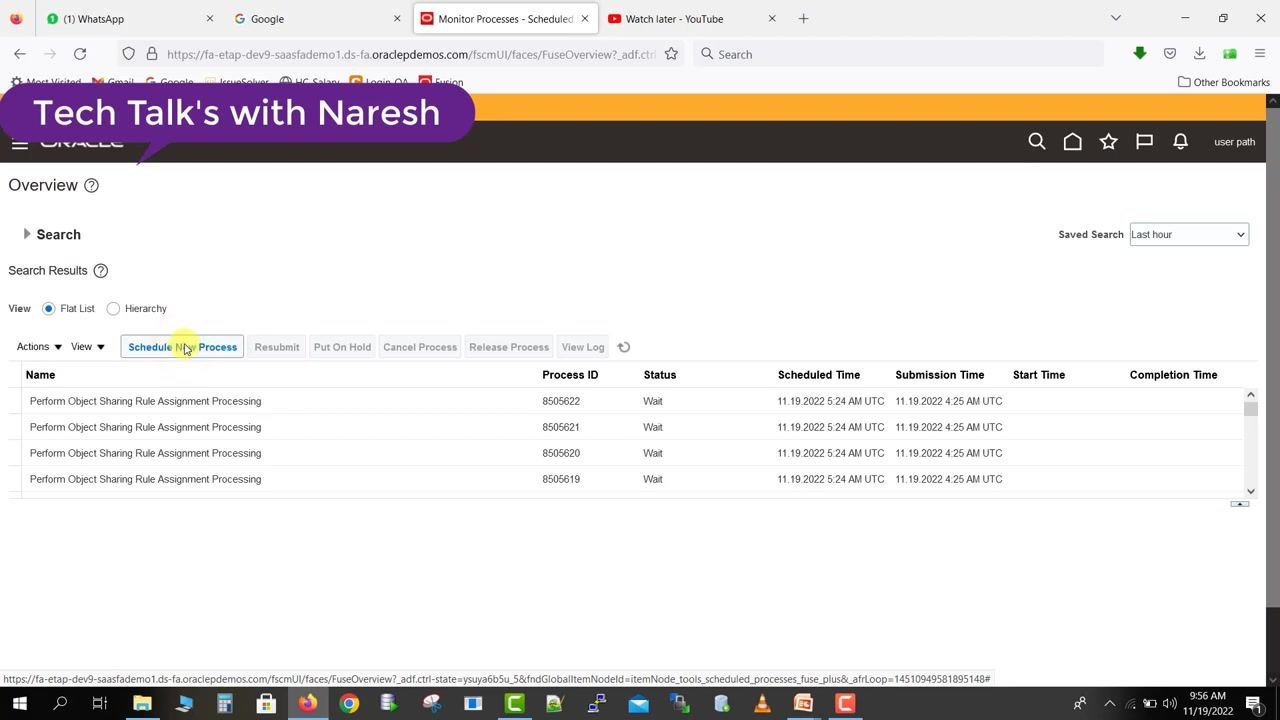
Scheduling a new ESS job
Step 4: Select the job type and name
Click Schedule New Process to begin. In the Schedule New Process dialog, ensure Type is set to "Job" (not "Job Set"). In the Name field, enter the job name or a short name — for example, Refresh%Start%Order% — then press Tab. The system auto-completes and displays the full program name if it exists, such as "Refresh and Start the Order Promising Server". The Description field auto-populates with text describing the job, for example: "Refresh the data used by the Oracle Fusion Global Order Promising server and start the order promising server."
Step 5: Copy the job name (optional)
If you want a record of the job name, highlight the full name in the Name field, right-click and select "Copy" (or use Ctrl+C), and paste it into a text editor labeled "ESS job name" for future reference.
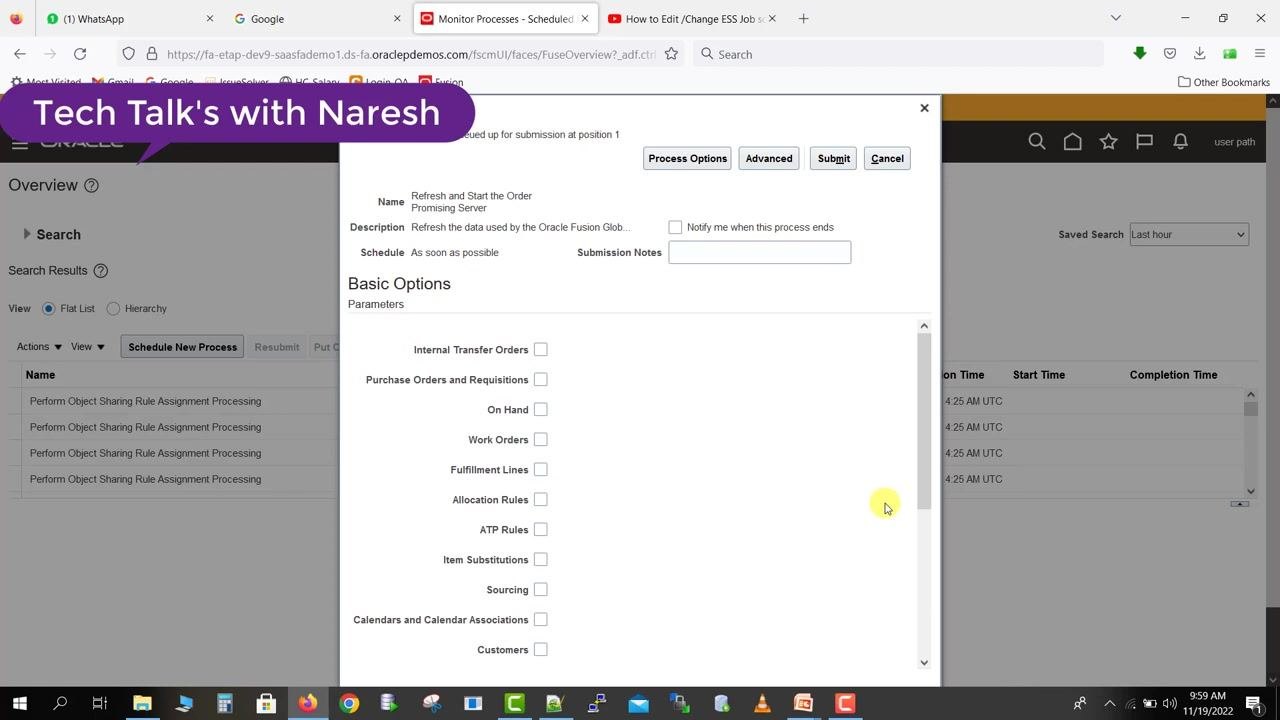
Click OK in the dialog to proceed. The system then displays the job submission window with additional options and parameters.
Step 6: Choose job parameters
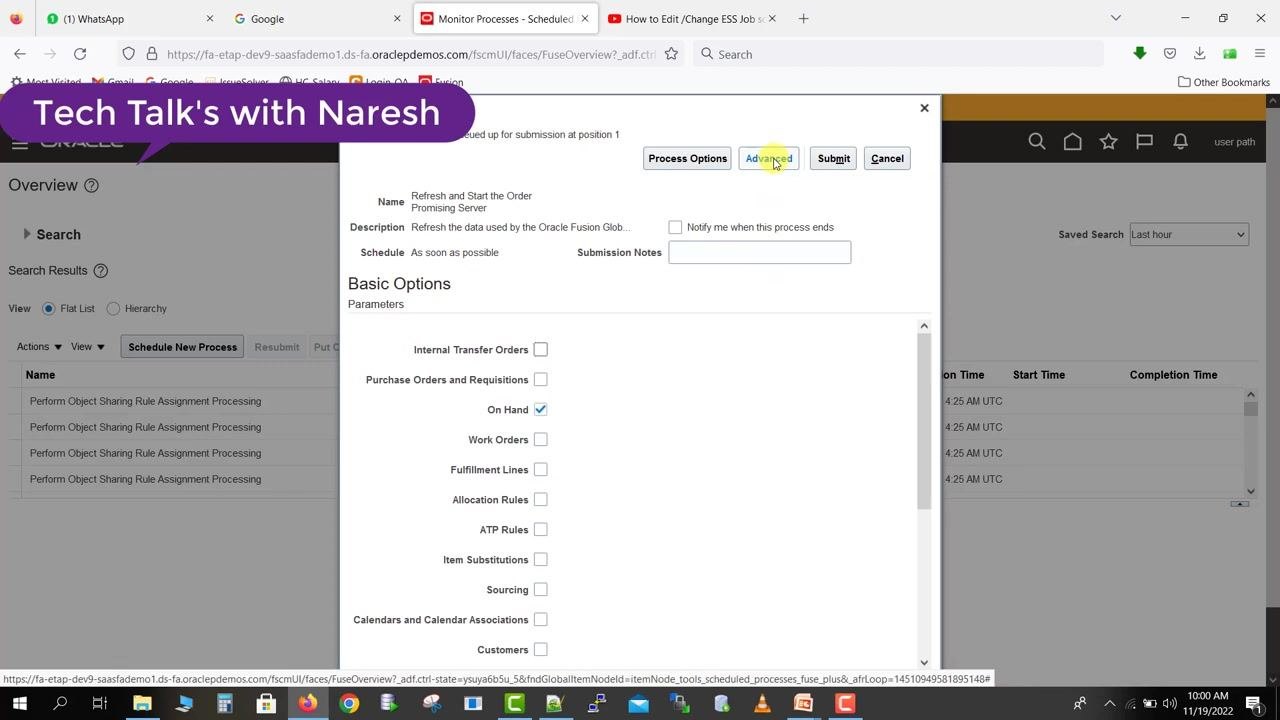
The job submission window shows the job name, description, and scheduling options at the top. Under Basic Options and Parameters, you see checkboxes for different job parameters, including:
- Internal Transfer Orders
- Purchase Orders and Requisitions
- On Hand
- Work Orders
- Fulfillment Lines
- Allocation Rules
- ATP Rules
- Item Substitutions
- Sourcing
- Calendars and Calendar Associations
- Customers
Step 7: Select parameters to schedule
Check the boxes for the parameters you want included in the job. For example, check Internal Transfer Orders and On Hand. You can select multiple parameters as needed for your job requirements.
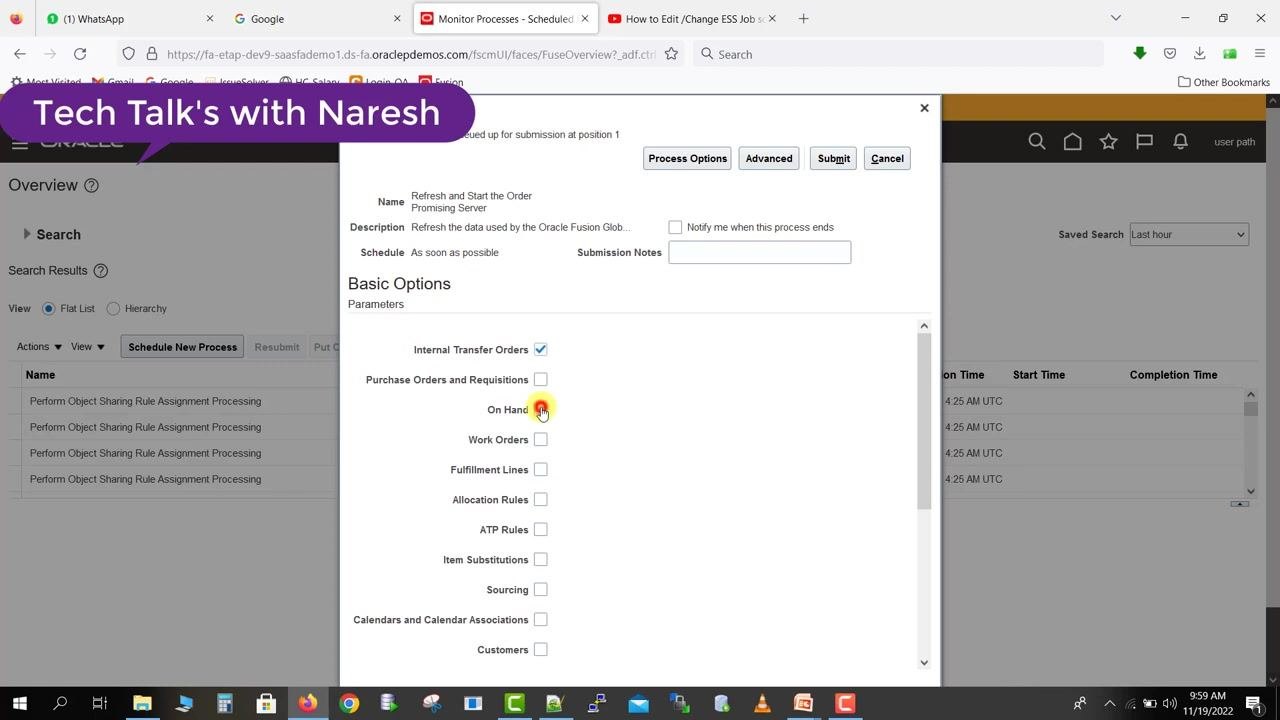
Step 8: Open advanced scheduling options
Click Advanced at the top of the job submission window to access additional scheduling and notification options.
Step 9: Open the Schedule tab
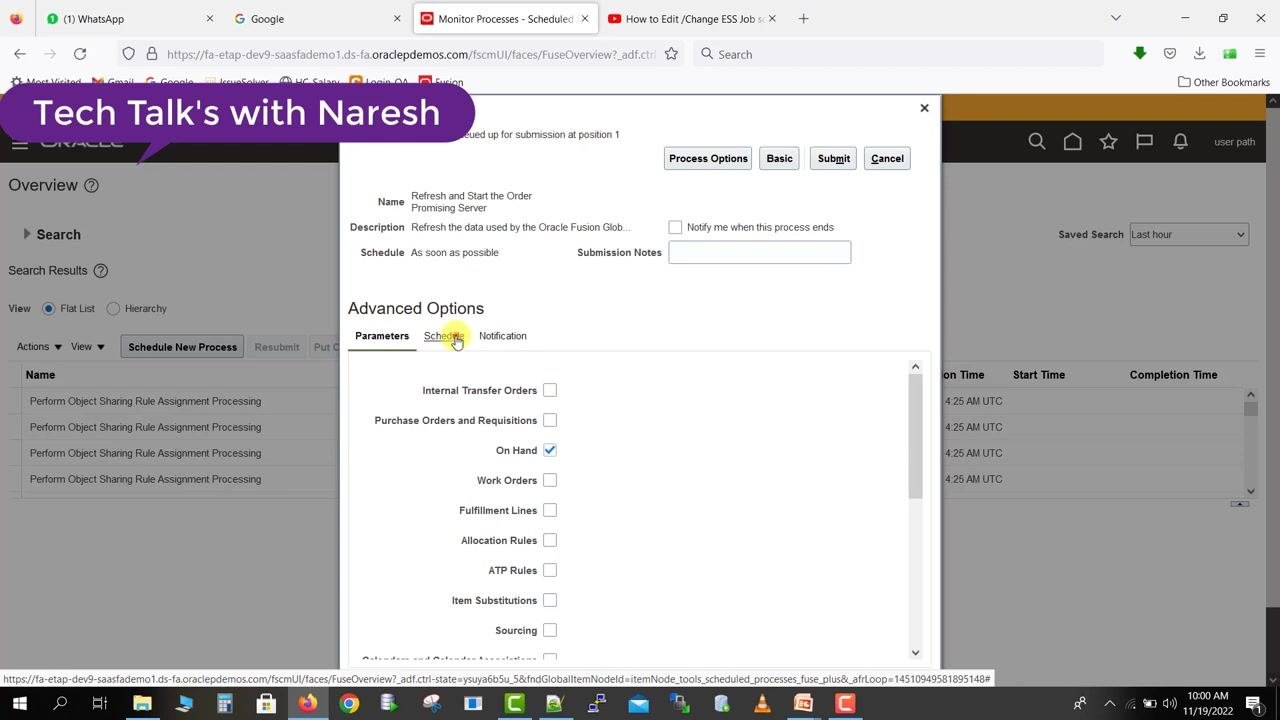
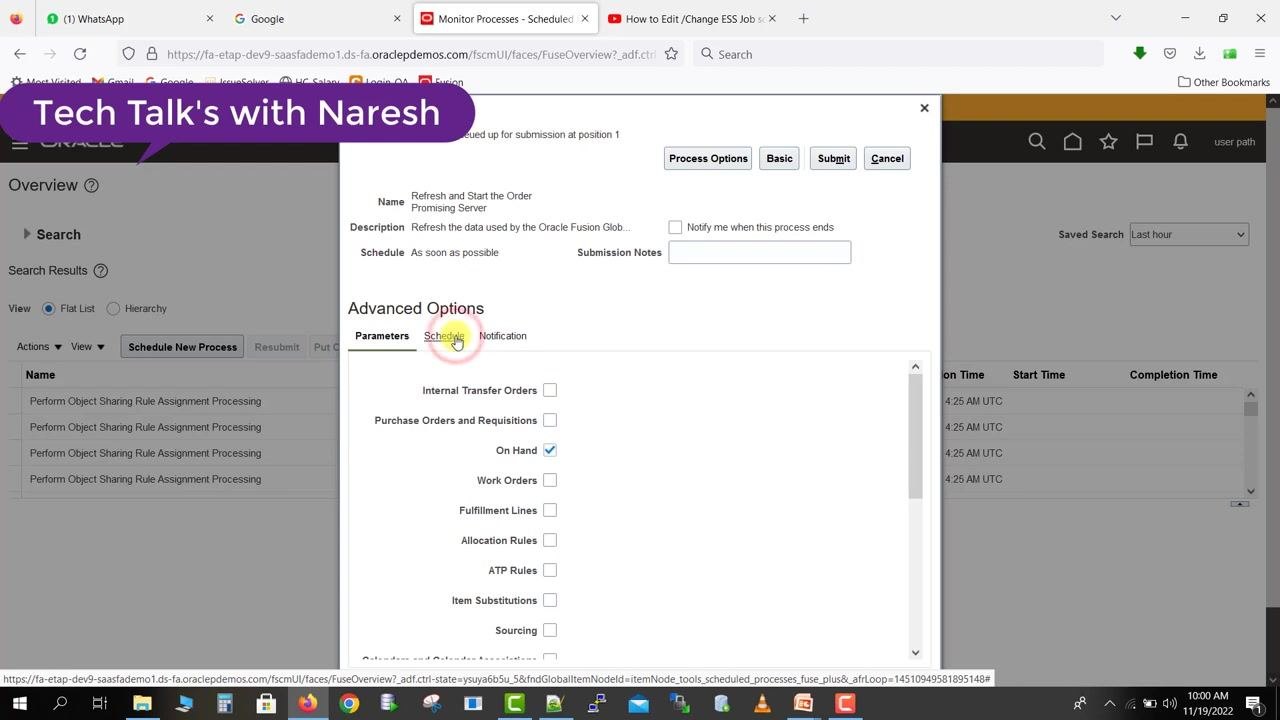
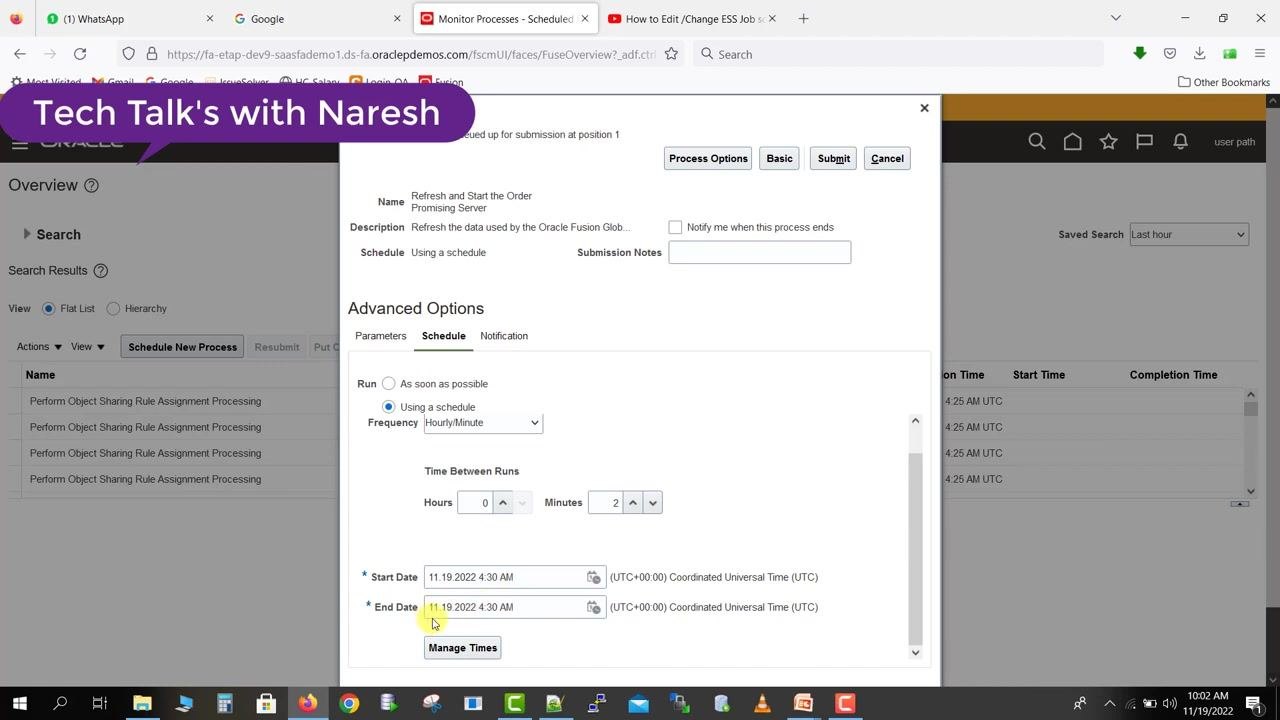
In the Advanced Options section, click the Schedule tab. This tab lets you configure when and how often the job runs.
Step 10: Enable scheduling
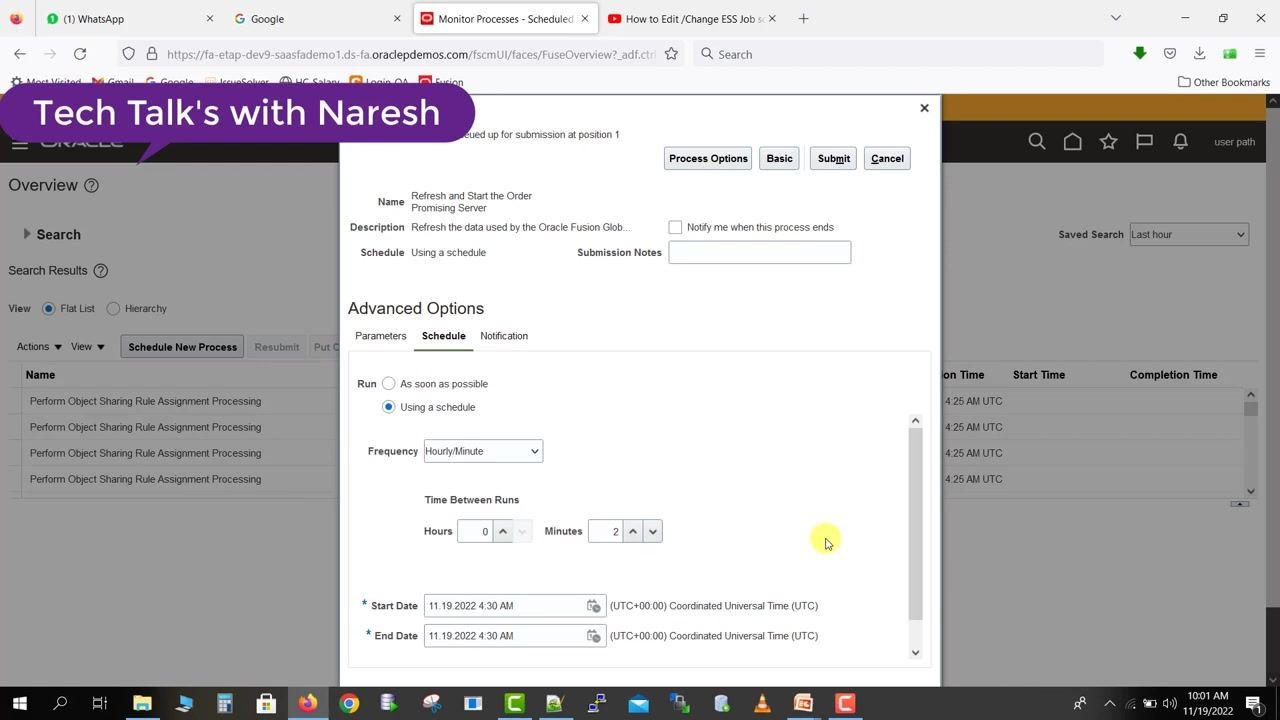
Under the Schedule tab, select the Using a schedule radio button to enable scheduling options. The default option is "As soon as possible," but for recurring or timed jobs, choose "Using a schedule."
Step 11: Choose a frequency
Review the available options in the Frequency dropdown:
- Once
- Hourly/Minute
- Daily
- Weekly
- Monthly
- Yearly
- User-Defined
- Use a Saved Schedule
Select Hourly/Minute to schedule the job at a specific interval.
Step 12: Set the time between runs
Enter 0 in the Hours field and 2 in the Minutes field. This schedules the job to run every 2 minutes.
Step 13: Set the start and end dates
The Start Date defaults to the current date and time (for example, 11/19/2022 4:30 AM UTC). Set the End Date to a future date/time, such as one day later, depending on your requirements. Note that the time zone displayed is the server's UTC time zone, not your local system time zone.
Step 14: Customize run times (optional)
Click Manage Times if you need to further customize the schedule or add specific run times.
Step 15: Submit the process
Set the process to run for one day with a frequency of every 2 minutes, then click Submit. A confirmation message indicates that the process was submitted, and a Process ID is displayed. Copy the Process ID if you need it for tracking, then click OK to return to the main process monitoring page.
Monitoring the scheduled process
Step 16: View the process in the monitor list
Return to the Monitor Processes page and locate your job in the list (for example, "Refresh and Start the Order Promising Server"). Check the Status column — initially it may show as Wait.
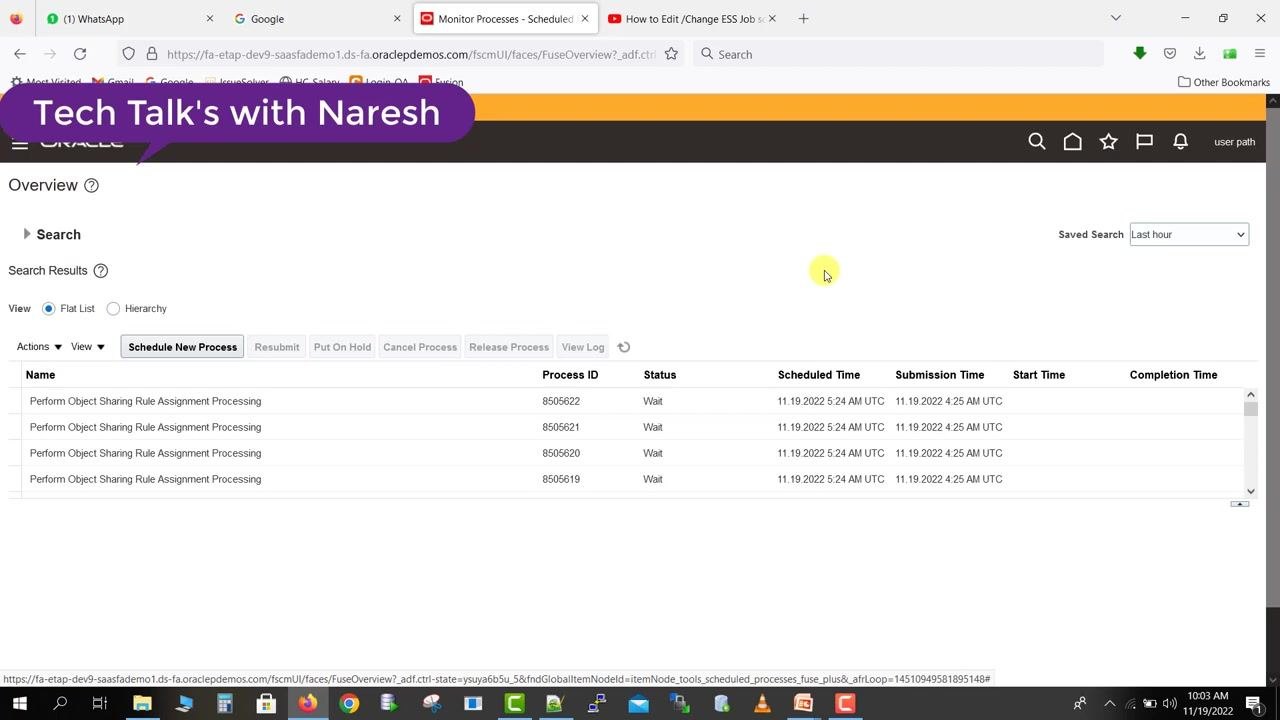
Step 17: Refresh the process list
Click the Refresh button above the process list and watch for your job to appear with an updated status and times.
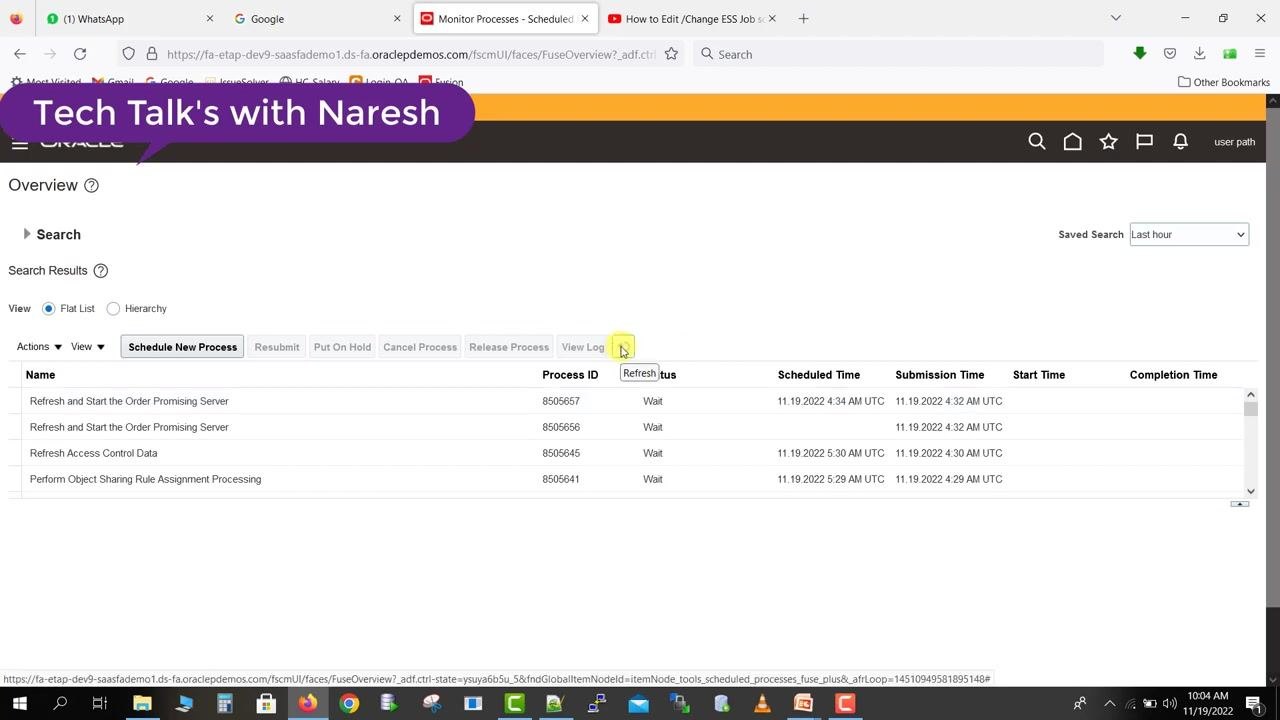
Step 18: Confirm the process is running
After refreshing, verify that the Status for your job changes to Running and that the Start Time matches the scheduled time.
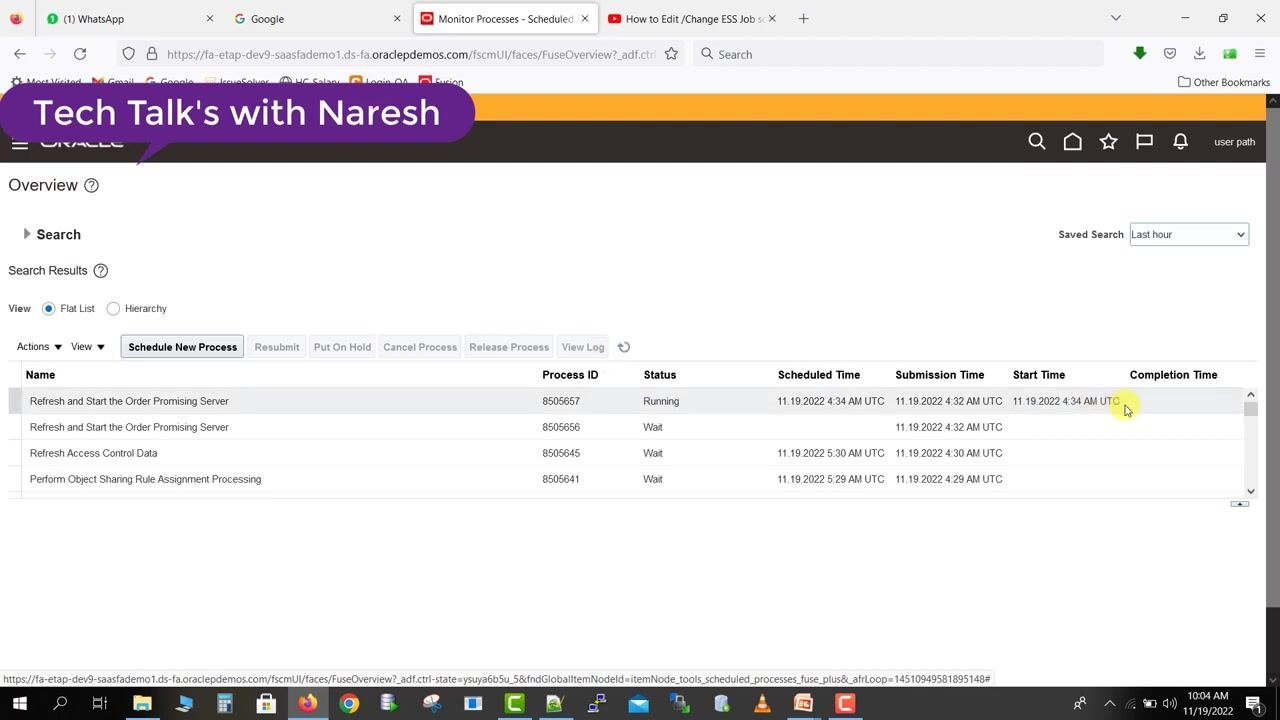
Step 19: Wait for process completion
The process may trigger additional (child) jobs as part of its execution. Continue to refresh the page periodically to monitor progress.
Step 20: Review completed and child jobs
Once the main process completes, its Status updates (for example, to Paused or Succeeded). Child jobs — such as "Generate Global Order Promising Data Store Files" — may also appear in the list with their own statuses.
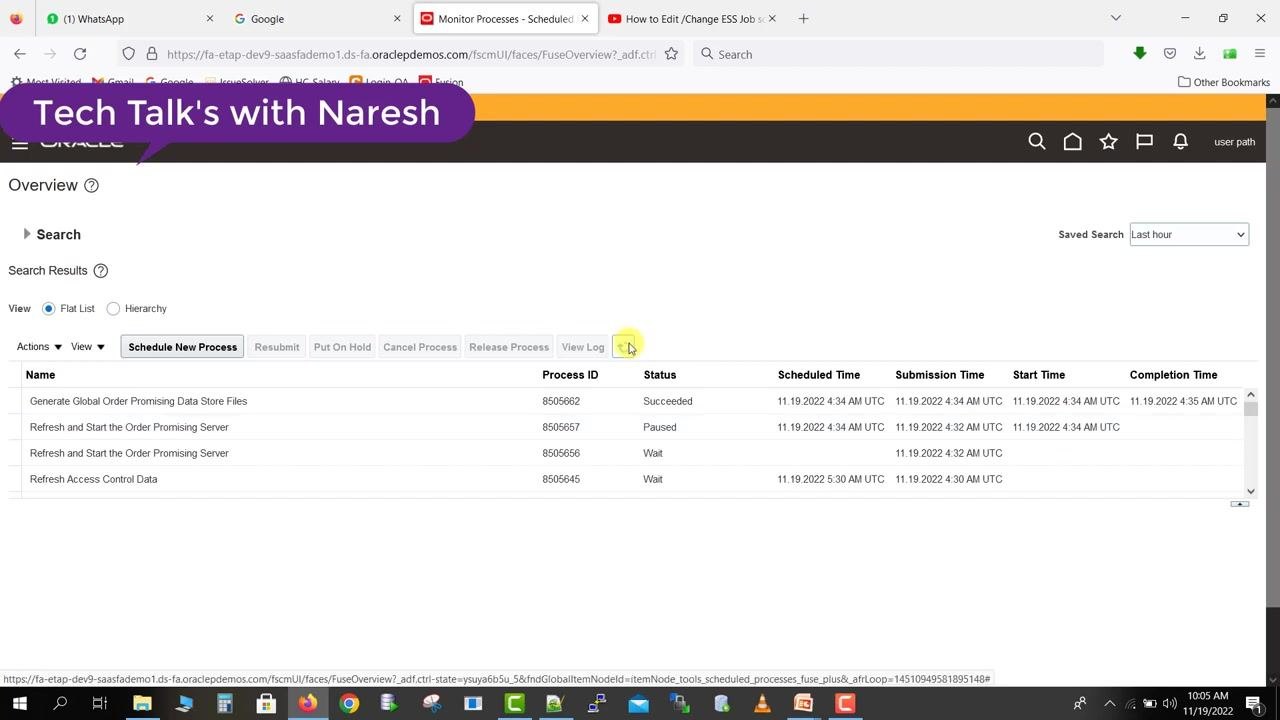
Step 21: Filter the process list
Use the Search and Saved Search options to filter jobs by time period (for example, "Last hour"), and review the list to confirm all intended jobs have run and completed as expected.
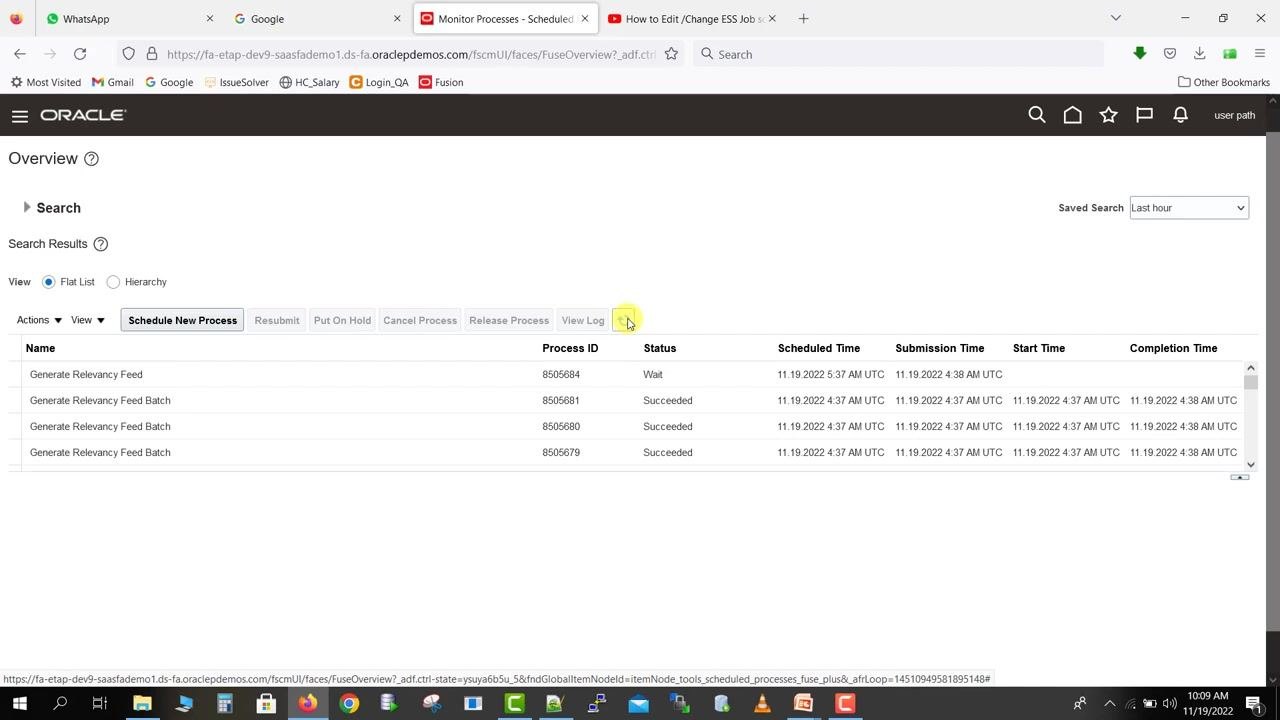
Step 22: Drill into process details
Click a process name (for example, "Refresh and Start the Order Promising Server") to view additional details or logs if troubleshooting is required. Use the View Log button for in-depth diagnostics if a job fails or does not complete as expected.
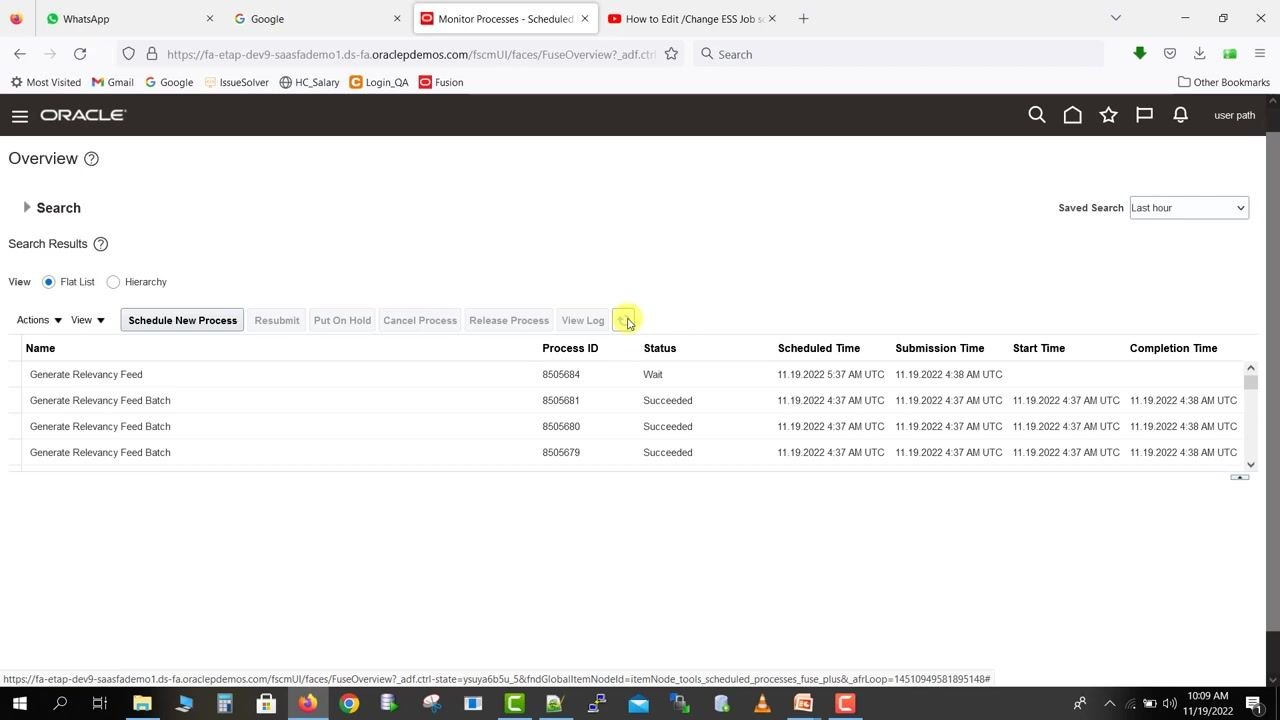
Step 23: Expand parent-child processes
Click the arrow next to the process name (for example, "Refresh and Start the Order Promising Server" with Process ID 8505676, Status Running) to view the child request (for example, "Generate Global Order Promising Data Store Files") and its status (for example, Succeeded). Use this view to track the progress and dependencies of parent and child jobs.
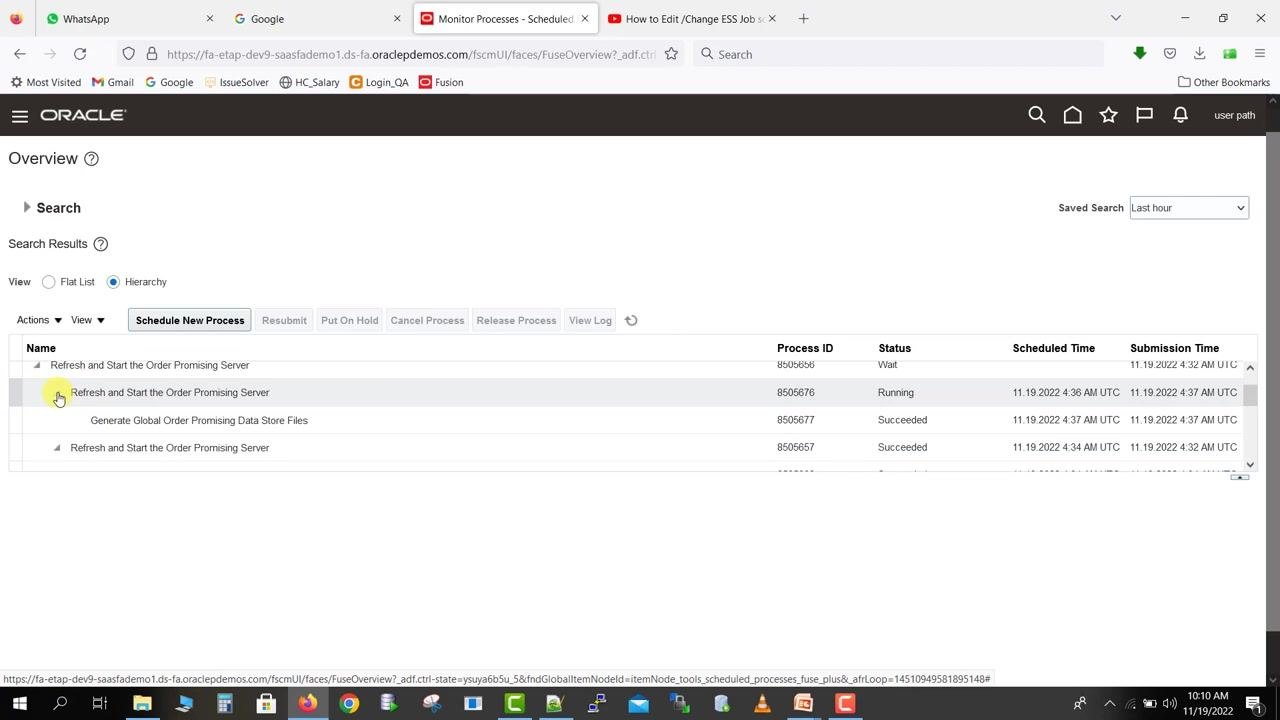
Editing a job schedule
Step 24: Select the process
Click the main process row (for example, "Refresh and Start the Order Promising Server" with Process ID 8505656, Status Wait). The row is highlighted, and additional action buttons — Put On Hold, Cancel Process, View Log — become available, preparing the process for further management actions.
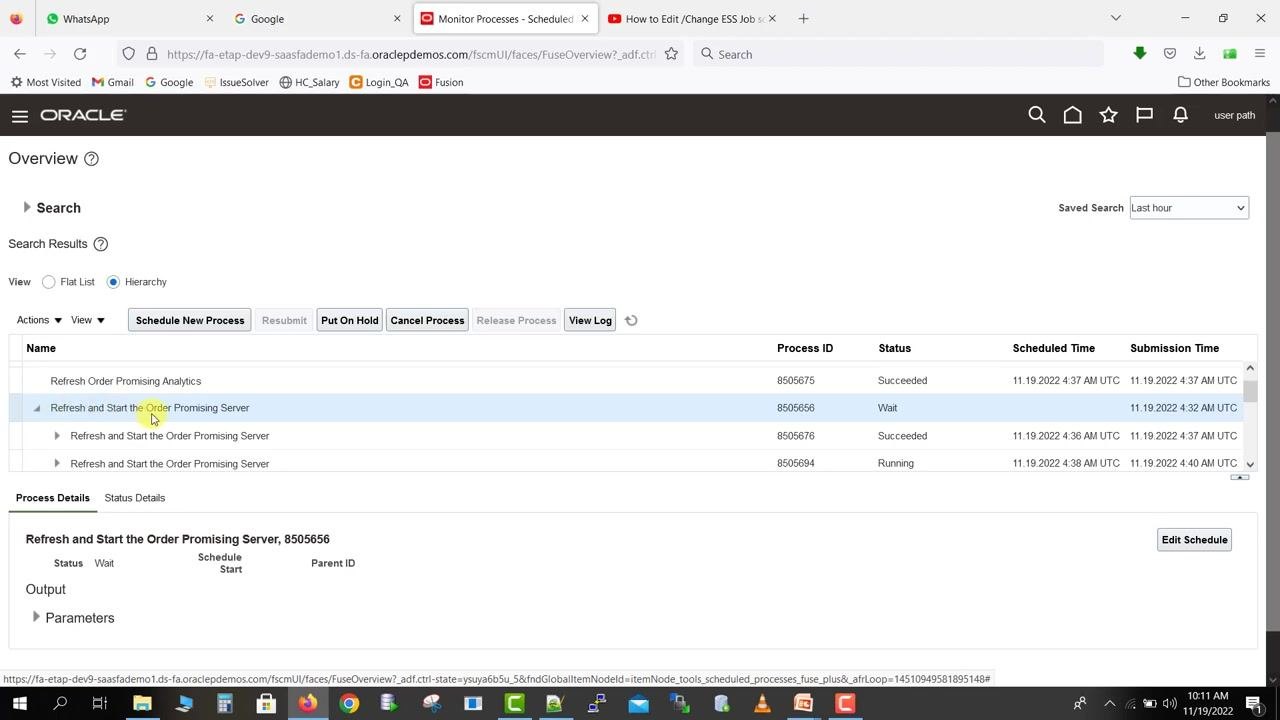
Step 25: Review process details
With the process selected, review the Process Details and Status Details tabs at the bottom of the screen. Confirm the current status (for example, Wait) and review parameters or output as needed to determine whether the process requires editing or cancellation.
Step 26: Open Edit Schedule
Click Edit Schedule in the Process Details section. The Edit Schedule window opens, displaying the frequency, start and end times, and all calculated schedule times — for example, Frequency: Every 2 minutes, Start Date: 11/19/22 4:32:00 AM, End Date: 11/20/22 4:30:00 AM. Scroll through the list to view all scheduled occurrences.
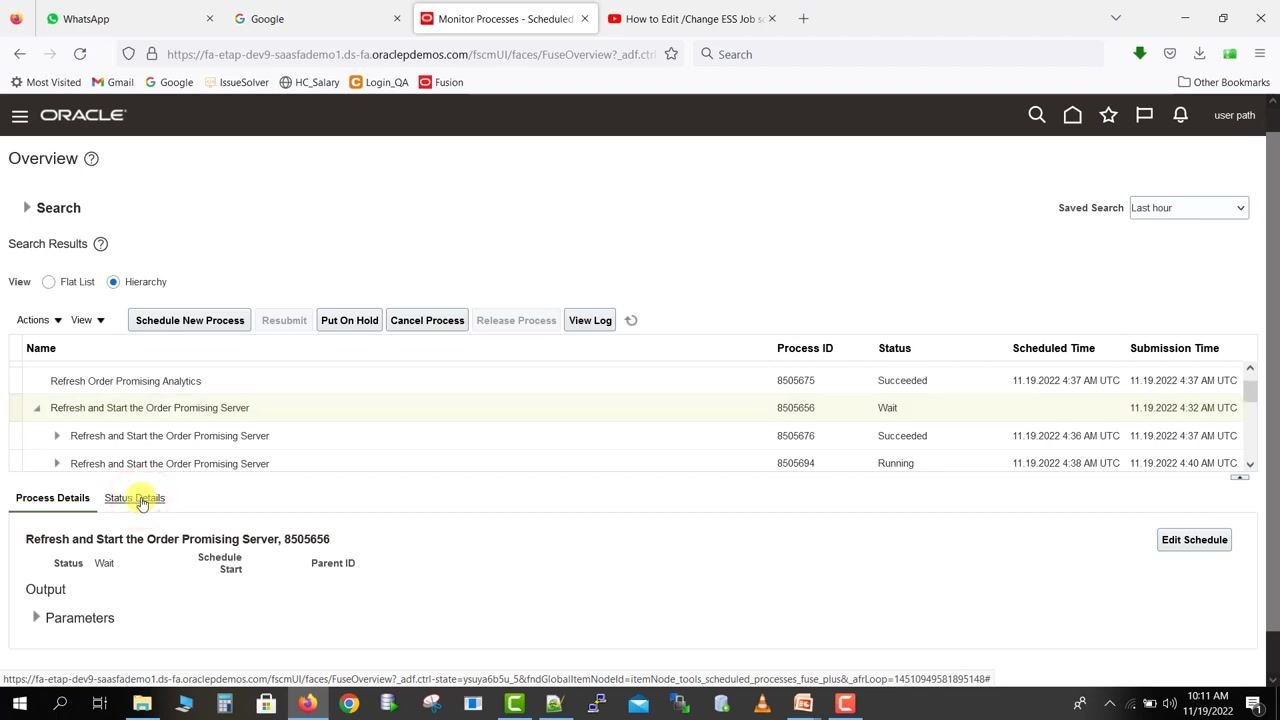
Step 27: Adjust the schedule and confirm the update
In the Edit Schedule window, click Change Frequency to adjust how often the process runs, or use Remove Time or Cancel to cancel future runs as appropriate. To update the schedule directly, set the Frequency to "Hourly/Minute", enter the interval as "Every 0 Hour(s) 2 Minute(s)", set the Time Zone to "(UTC+00:00) Coordinated Universal Time (UTC)", specify the Start Date as "11/19/22 4:32:00 AM", ensure Use End Date is checked, and set the End Date as "11/20/22 4:30:00 AM". Click OK to save the schedule.
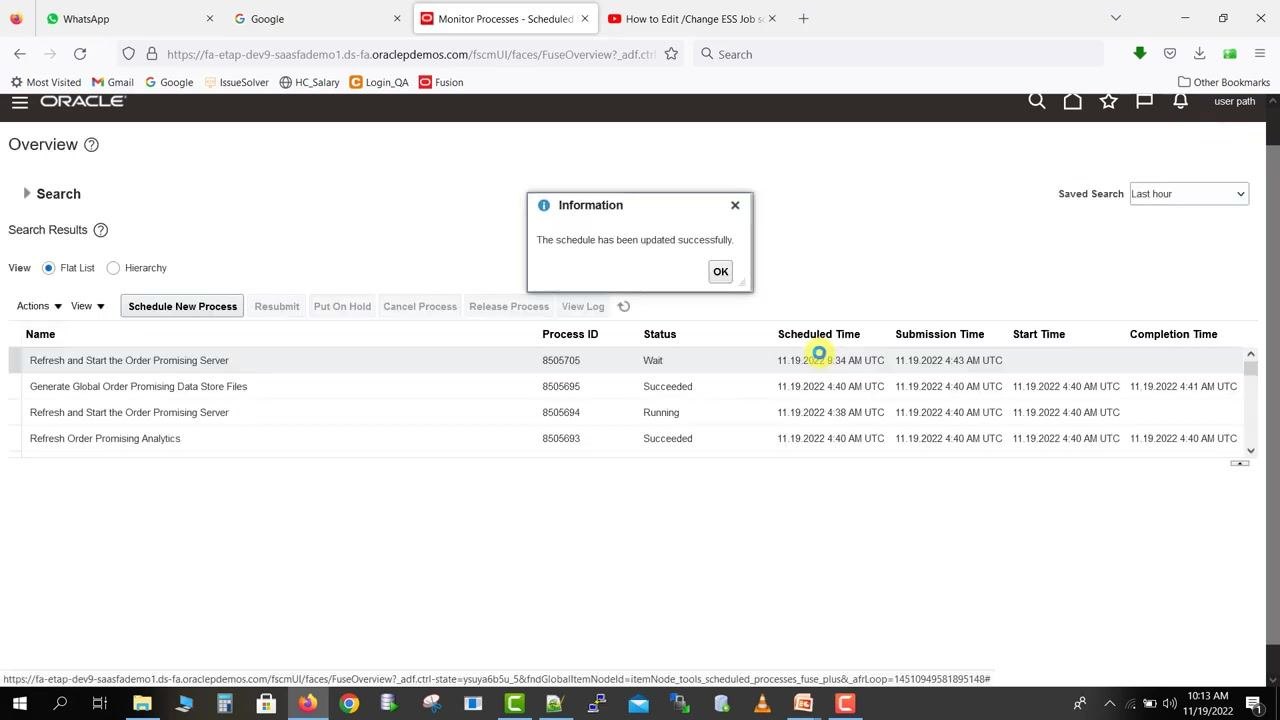
After clicking OK, a dialog confirms: "The schedule has been updated successfully." Click OK in the dialog to acknowledge the update.
Managing scheduled jobs
Step 28: Access job actions
Select your scheduled job in the list and click the Actions dropdown menu to reveal options such as:
- Put On Hold
- Cancel Process
- Edit Schedule
- Edit Output
- Force Cancel
- Refresh
- Cancel Processes In Bulk
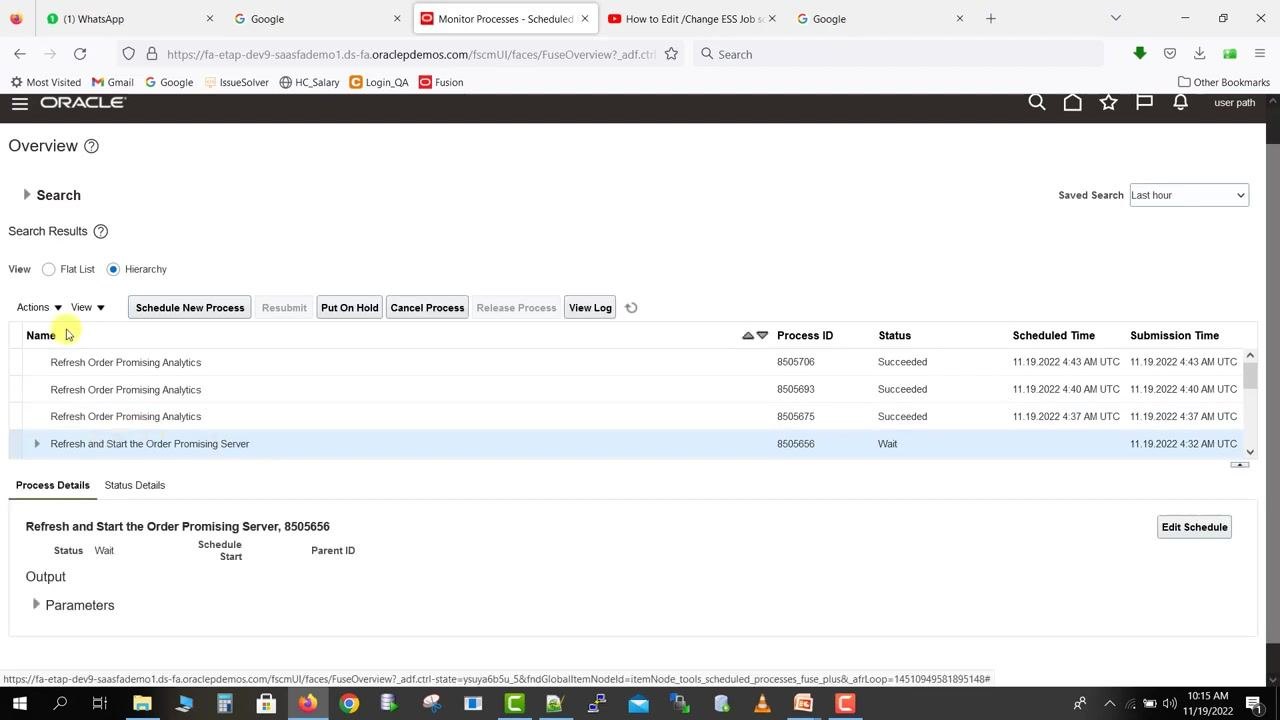
Use these options as required for your workflow — for example, select Put On Hold to pause the job, Cancel Process to cancel it, or Edit Schedule to revise its timing again.
Cancelling a scheduled job
Step 29: Initiate job cancellation
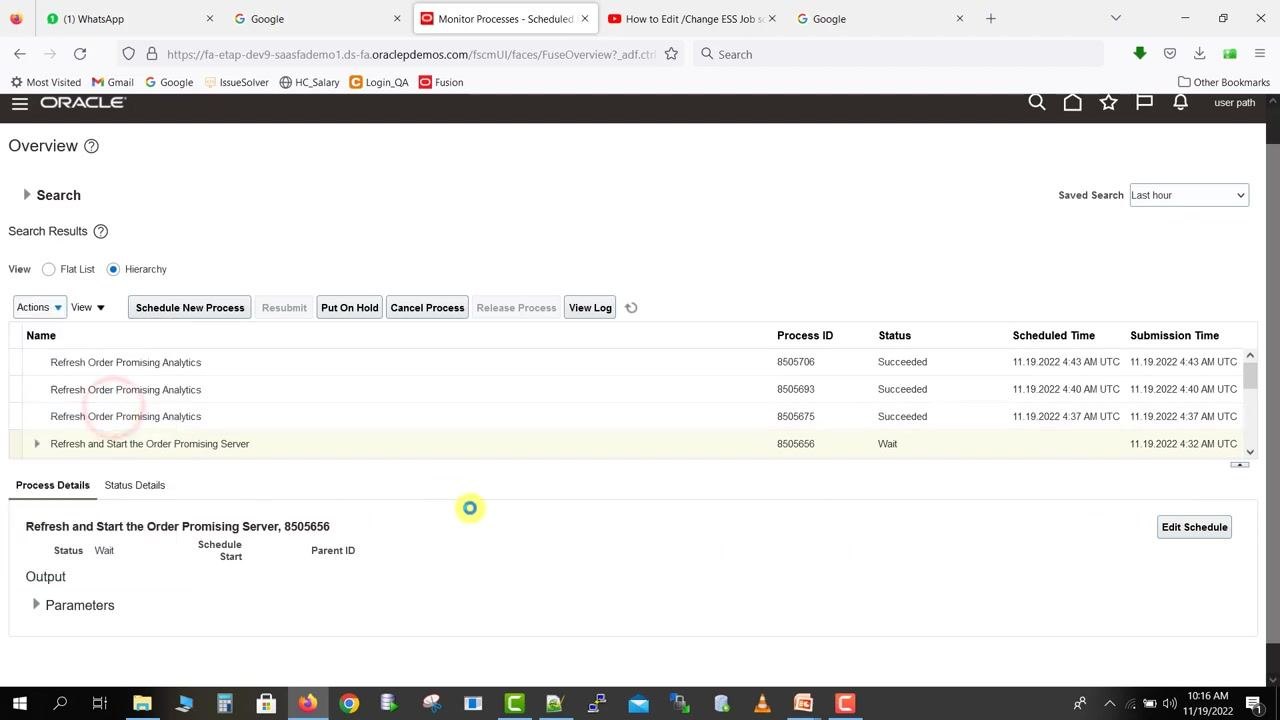
In the Overview screen, locate the scheduled job you wish to cancel (for example, "Refresh and Start the Order Promising Server") and ensure it is highlighted in the list. Click Cancel Process above the job list. The system begins processing the cancellation request.
Step 30: Monitor cancellation progress
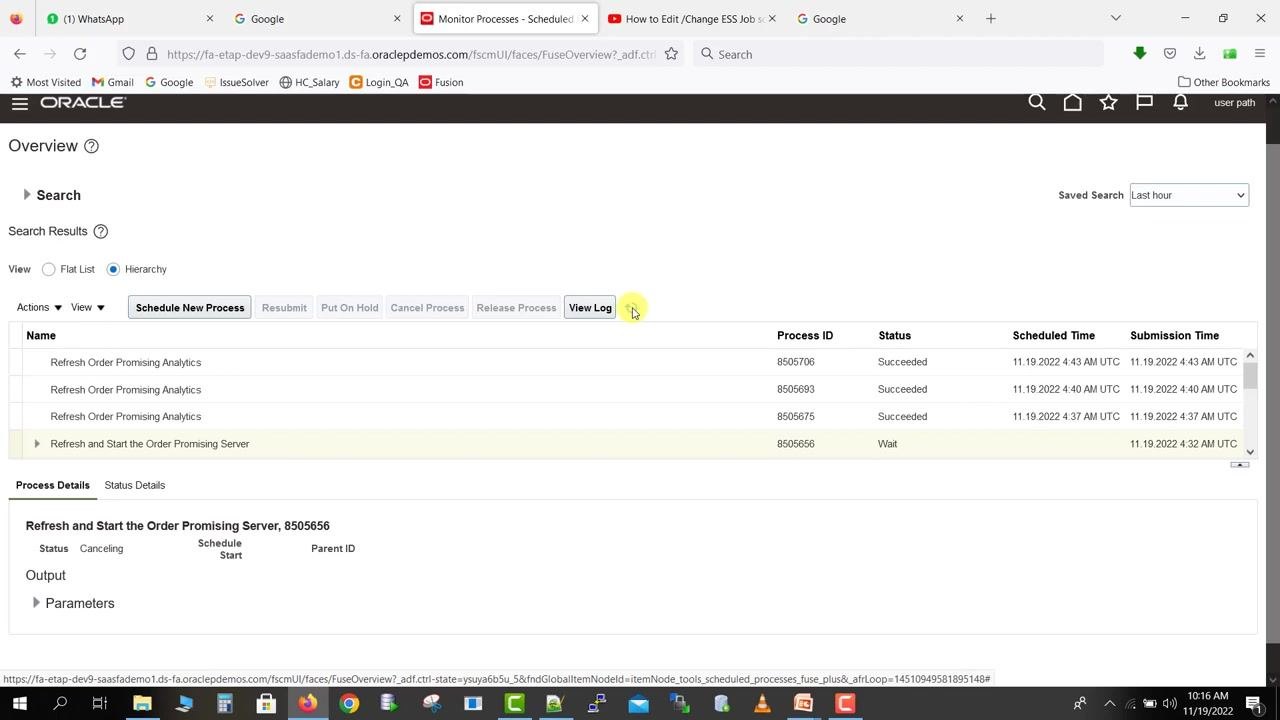
Observe the Process Details section for the selected job. The Status field updates to Canceling to indicate that the cancellation is in progress. The main job list continues to display the job with its current status until the cancellation completes.
Step 31: Verify job cancellation
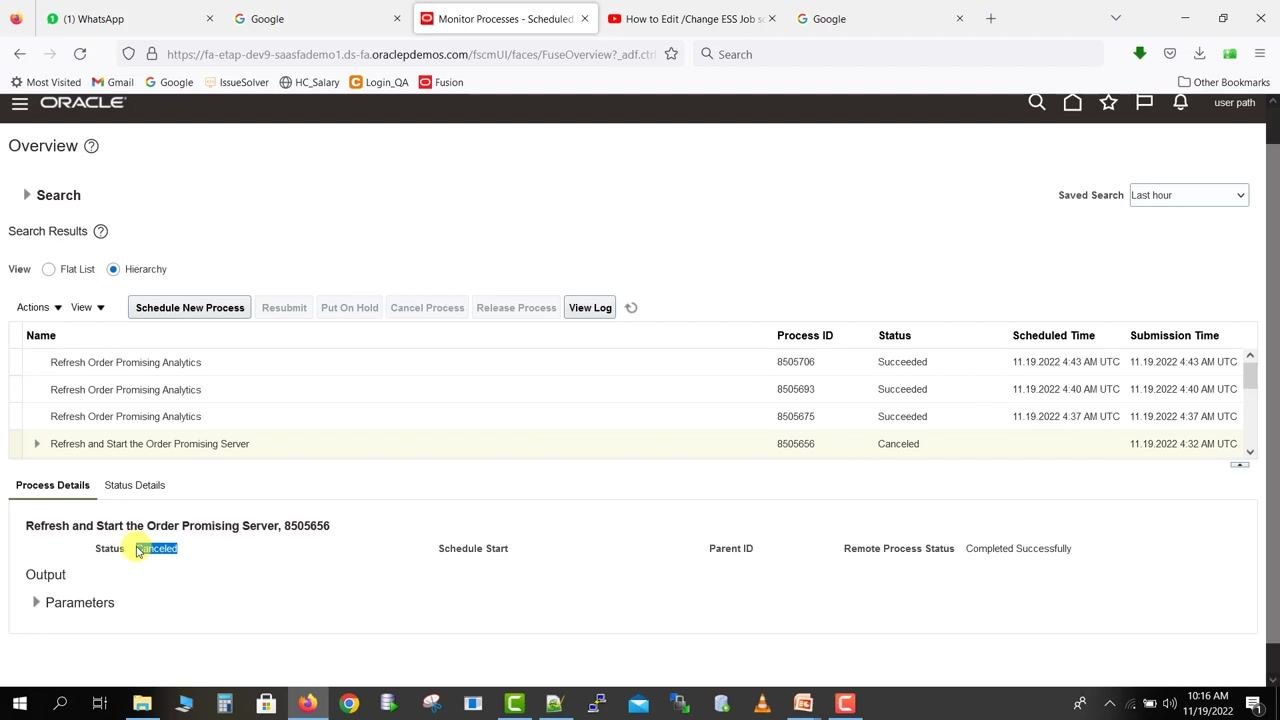
Wait for the system to update the job status. Once cancellation is processed, the Status field changes to Canceled in both the main job list and the Process Details section, and the Remote Process Status displays "Completed Successfully" to confirm the cancellation was executed.
Summary
- You scheduled a recurring ESS job with specific start/end times and a frequency.
- You submitted the process and noted the Process ID.
- You monitored the process status, refreshing the list as needed, and observed the transition from Wait → Running → Paused/Succeeded.
- You identified and tracked child jobs triggered by the main process.
- You edited an existing job's schedule, changing frequency, start/end times, or cancelling future runs.
- You managed a scheduled job through the Actions menu and cancelled a job, verifying the cancellation status.
What's next
With these steps, you can efficiently schedule, monitor, edit, and cancel ESS job schedules in Oracle Fusion, ensuring your scheduled processes run according to your business requirements.
Generation details: cost, quality tiers
Docsie billed 6,500 credits ($4.55) to analyze this 13-minute video at standard quality. The rewrite, template fill and Word/PDF exports were included. The same video at each quality tier:
| Quality | Frames sampled | Credits | Approx. cost |
|---|---|---|---|
| Draft | every 16-30 s | 3,250 | $2.27 |
| Standard (this guide) | every 8-15 s | 6,500 | $4.55 |
| Detailed | every 4-7 s | 13,000 | $9.10 |
| Ultra | every 1-3 s | 26,000 | $18.20 |
Credits priced at $0.70 per 1,000; plans include a monthly allowance. Enterprise customers on on-premise or bring-your-own-model deployments run this on their own inference and pay no per-video credits.
Generated by Docsie Video-to-Docs on 2026-10-14 from a 12-minute video. Screenshots are frames from the source video and belong to their creator, Technical Talk's, whose original is embedded above. If you own this video and want the guide removed or credited differently, contact us and we will act within one business day.