
How to Hire an Employee in Oracle Fusion HCM
This guide walks you through the complete process of how to hire an employee in Oracle Fusion HCM, from entering identification details through final submission. You will see each screen of the Hire an Employee flow, including Identification, Person Information, Employment Information, Roles, and Review, along with the exact fields and values you need to complete at each stage.
Video: Hire an Employee in Oracle Fusion HCM by apps2fusion (2015). All credit for the demonstration goes to the creator; watch the original on YouTube. The written guide below was generated from this video by Docsie. Creator? Request a change or removal.
This guide walks you through the complete process of how to hire an employee in Oracle Fusion HCM, from entering identification details through final submission. You will see each screen of the Hire an Employee flow, including Identification, Person Information, Employment Information, Roles, and Review, along with the exact fields and values you need to complete at each stage.

Prerequisites
Before you begin, make sure you have the following information ready:
- The employee's personal details (name, date of birth, gender, national identifier)
- Home address and contact details (phone number, email address)
- Legislative information (marital status, ethnicity, country)
- Employment details (business unit, job, department, location, grade)
- Salary information (salary basis, currency, and amount)
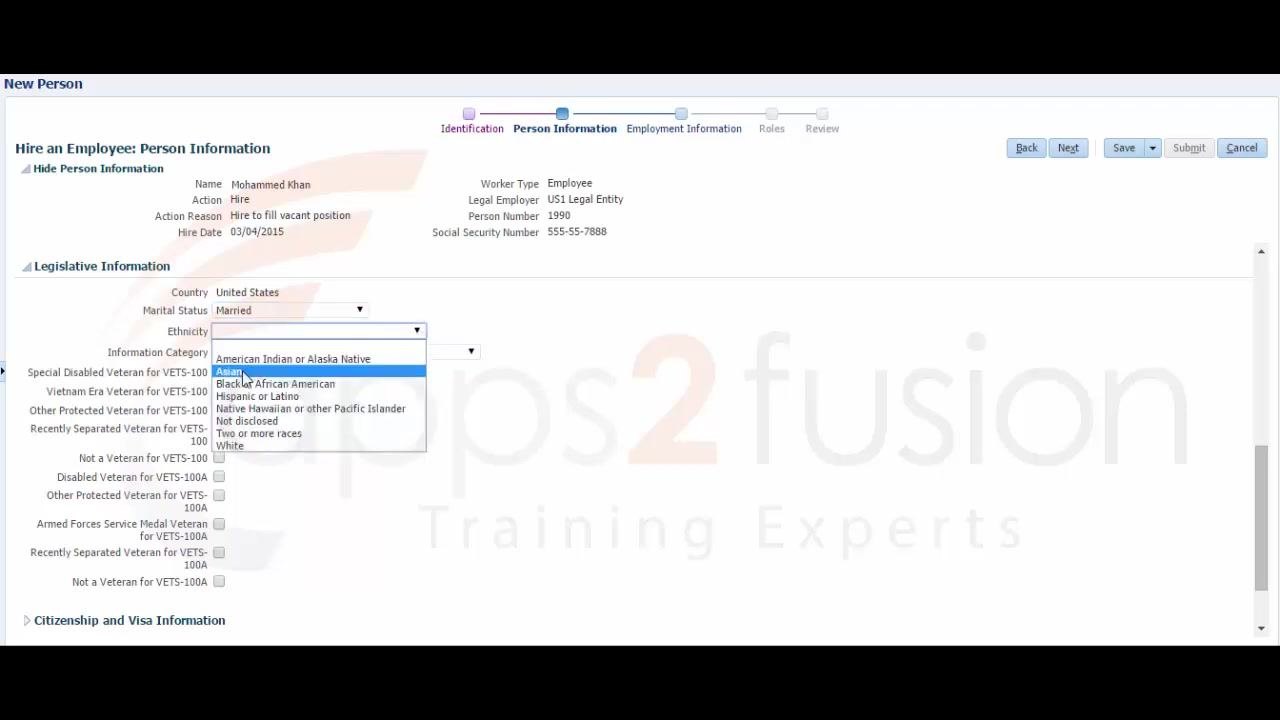
Start the identification step
Open the New Person window to begin the hire process. The process flow at the top shows Identification as the current step, followed by Person Information, Employment Information, Roles, and Review.
The Hire an Employee: Identification section is divided into three parts:
- Basic Details: Hire Date (03/04/2015), Hire Action (Hire), Hire Reason (Hire to fill vacant position), Legal Employer (not yet selected), Worker Type (Employee)
- Personal Details: Person Number (generated automatically), Global-Name Language (American English), and empty fields for Last Name, First Name, Title, Middle Name, Gender, and Date of Birth
- National Identifiers: No data yet
Position the cursor on the Legal Employer dropdown to proceed to the next action.
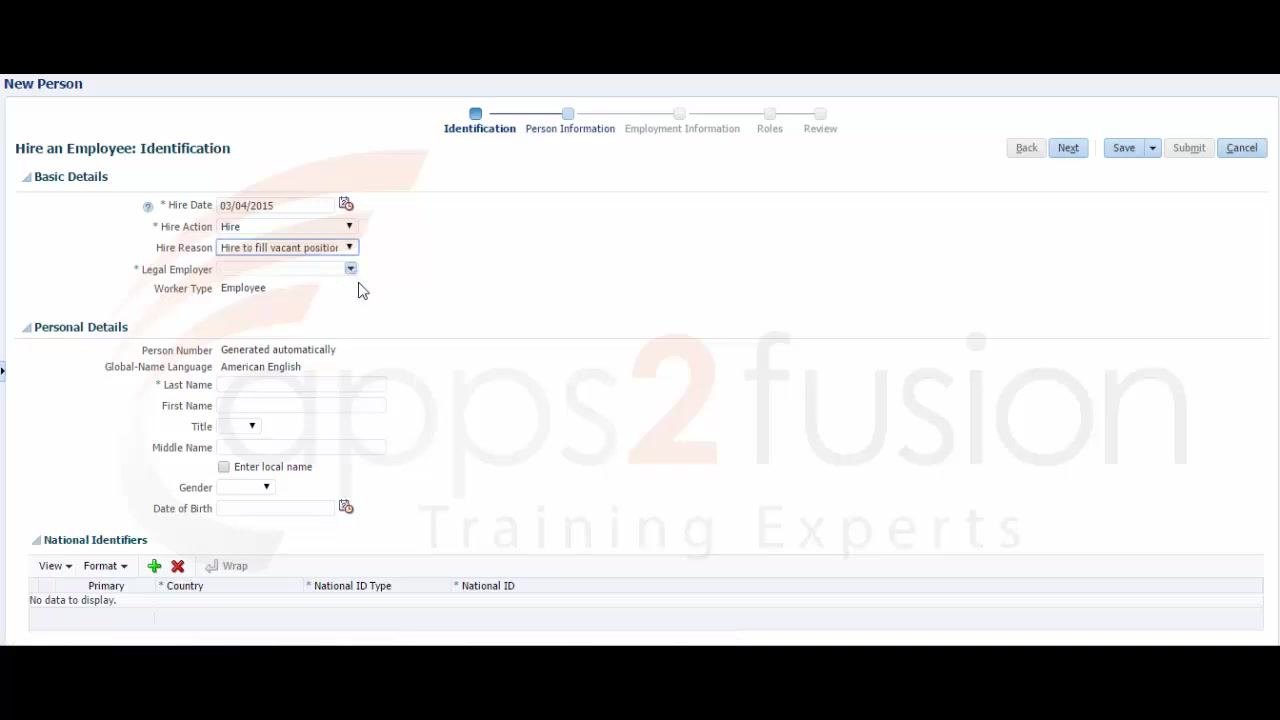
Select the legal employer
Open the Legal Employer dropdown to view the available options:
- US1 Legal Entity (US)
- US2 Legal Entity (US)
- UK Legal Entity (GB)
- France Legal Entity (FR)
- Italy Legal Entity (IT)
- Russia Legal Entity (RU)
- Germany Legal Entity (DE)
- Netherlands Legal Entity (NL)
- Saudi Arabia Legal Entity (SA)
- Spain Legal Entity (ES)
Select US1 Legal Entity to continue.
Enter personal details
Fill in the employee's personal information:
- Last Name: Khan
- First Name: Mohammed
- Gender: Male
- Date of Birth: 12/12/1969
The Date of Birth field shows an example format of 11/29/1998 as a guide. Other fields such as Title, Prefix, Suffix, Middle Name, Honors, Preferred Name, and Previous Last Name remain empty, and the National Identifiers section still shows no data.
Add a national identifier
In the National Identifiers section, add a new row with the following values:
- Country: United States
- National ID Type: Social Security Number
- National ID: 555-557-888
All other fields remain as previously entered.
Begin the person information step
Move to the Person Information step, which the process flow now highlights. The top of the screen summarizes what you have entered so far:
- Name: Mohammed Khan
- Action: Hire
- Action Reason: Hire to fill vacant position
- Hire Date: 03/04/2015
- Worker Type: Employee
- Legal Employer: US1 Legal Entity
- Person Number: 1990
- Social Security Number: 555-55-7888
In the Home Address section, enter Country as United States and Address Line 1 as 111 Street. Address Line 2 and 3 remain empty, and City, State, ZIP Code, Tax District, and County are still dropdowns waiting to be filled. Position the cursor on the Tax District dropdown to search for a value. The Phone Details section is present but still empty.
Wait for address fields to load
After selecting the address details, a loading indicator appears while the system processes the additional address data. No new information needs to be entered at this point.
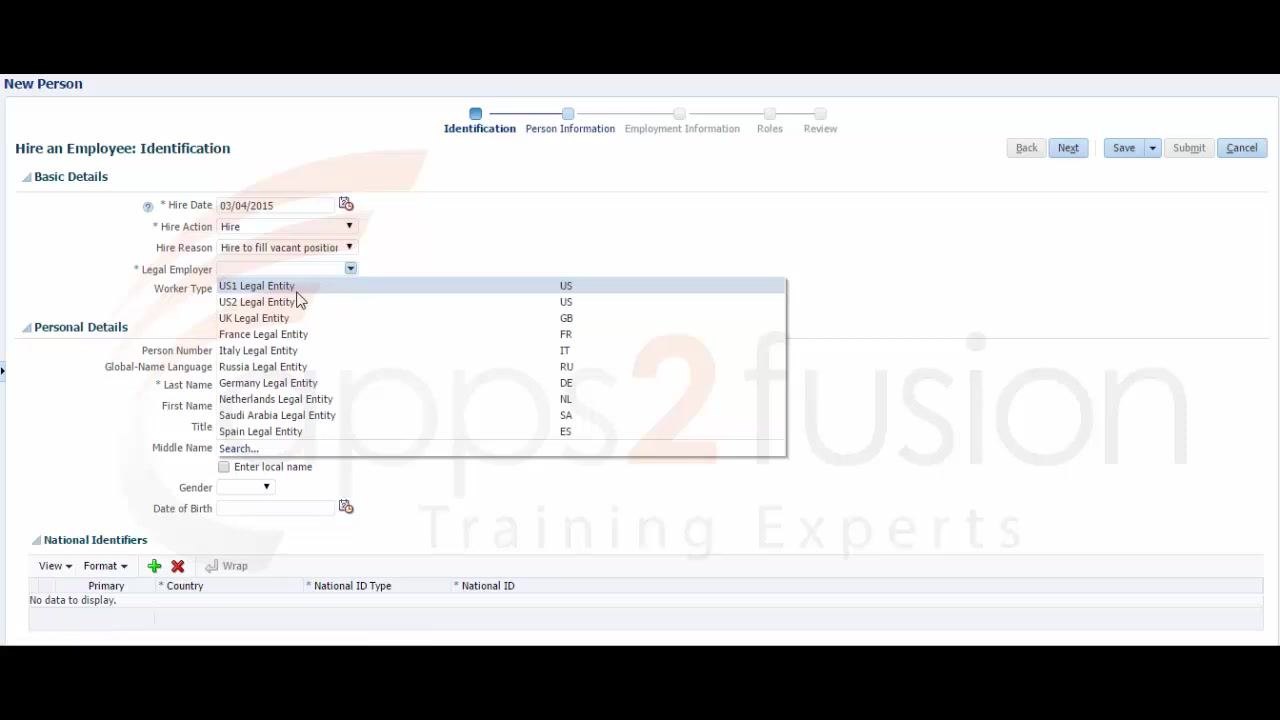
Enter phone details
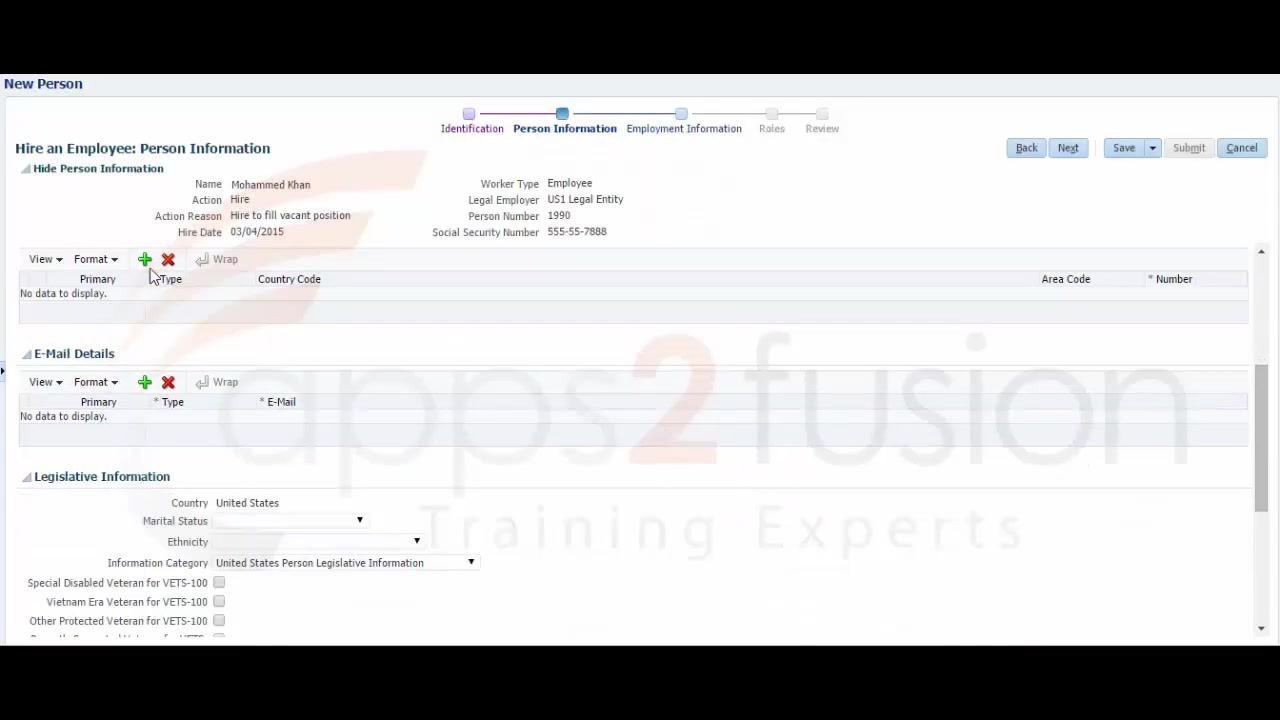
In the Phone Details section, set the Type field to Home Phone. Open the Country Code dropdown to see the list of countries and codes, such as Afghanistan (93), Aland Islands (358), and Albania (355). The Area Code and Number fields remain empty at this point, and the E-Mail Details section is not yet filled. The Legislative Information section appears at the bottom with fields for Marital Status, Ethnicity, and Information Category.
Set the phone type and country code
Set Type to Home Phone and Country Code to United States 1. Leave the Area Code and Number fields empty for now. The E-Mail Details and Legislative Information sections remain visible but unfilled.
Complete the phone number
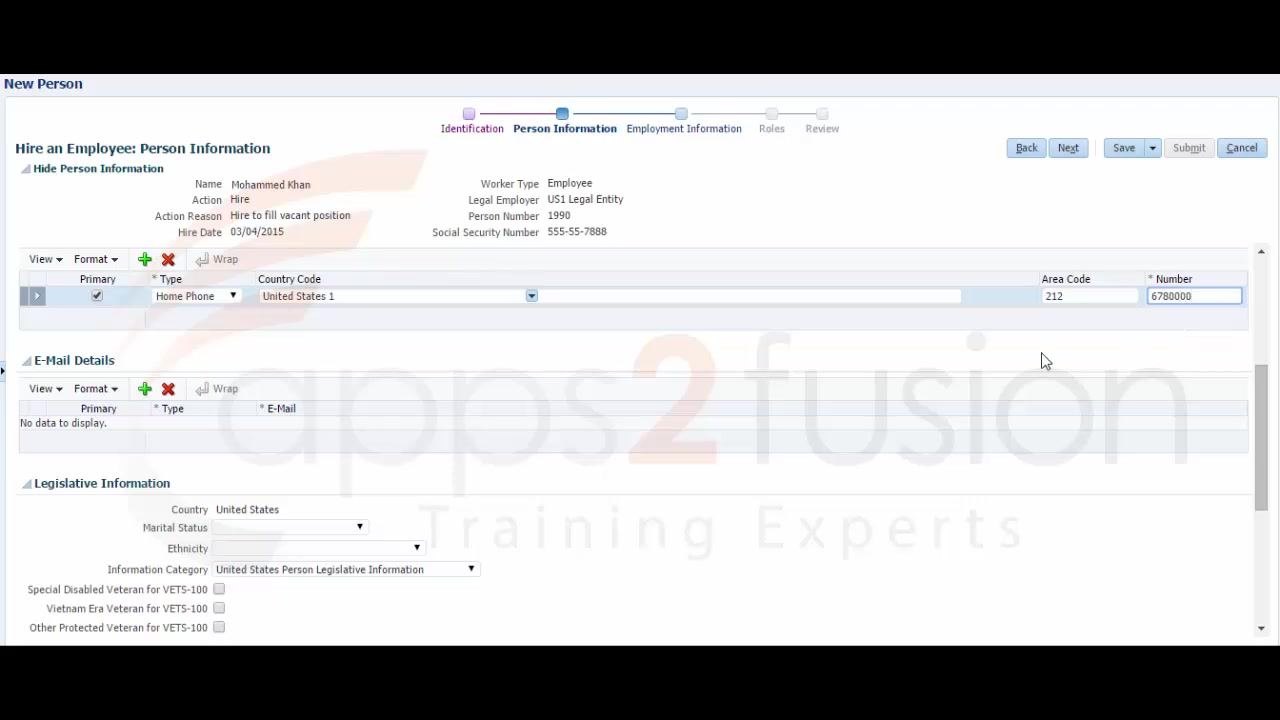
Enter the remaining phone details:
- Area Code: 212
- Number: 6780000
The E-Mail Details section remains empty, and the Legislative Information section is still unfilled.
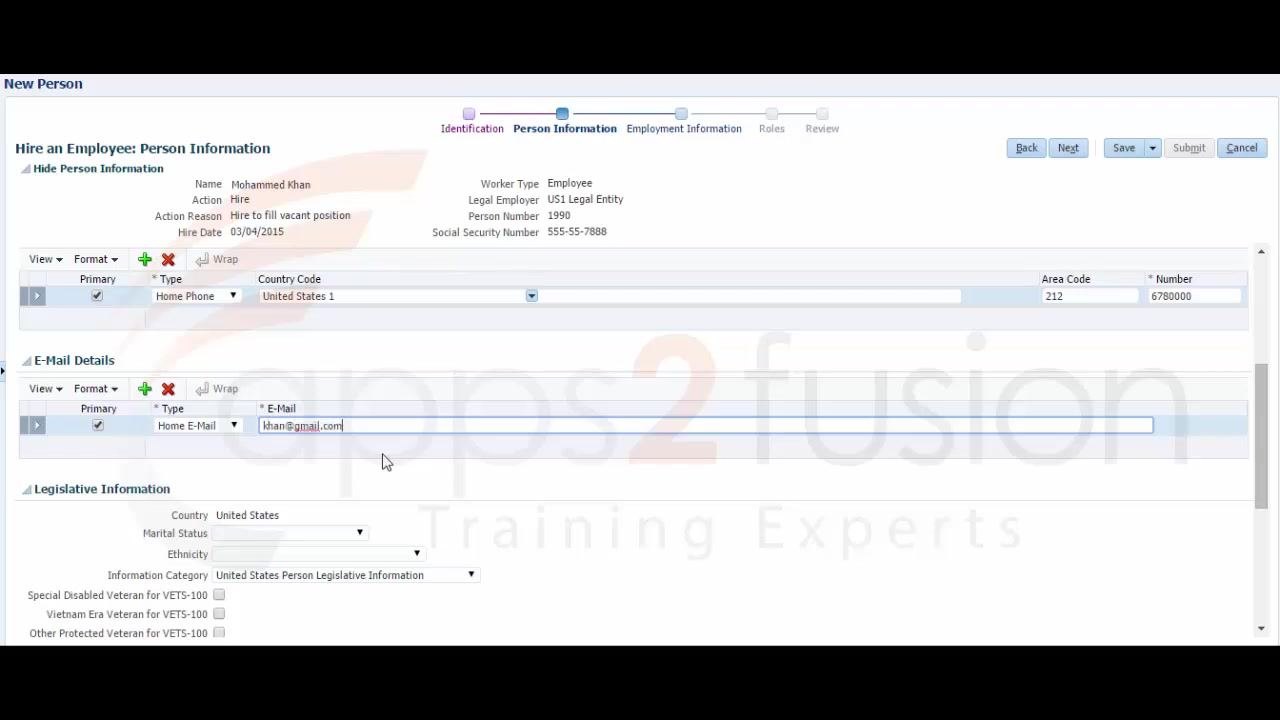
Enter the email address
In the E-Mail Details section, set Type to Home E-Mail and enter the address khan@gmail.com. The Phone Details section remains as previously entered.
Fill in legislative information
In the Legislative Information section, complete the following:
- Country: United States
- Marital Status: Married
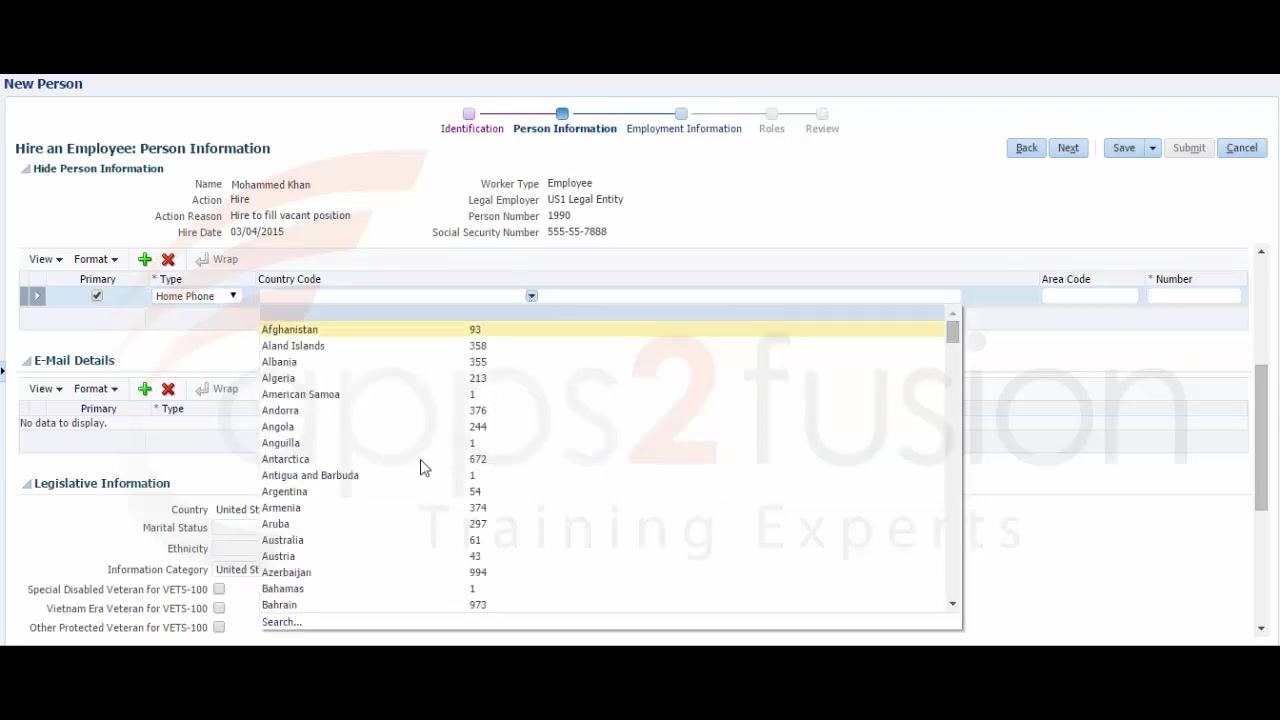
- Ethnicity: Asian, selected from the dropdown options (American Indian or Alaska Native, Asian, Black or African American, Hispanic or Latino, Native Hawaiian or other Pacific Islander, Not disclosed, Two or more races, White)
- Information Category: United States Person Legislative Information
The veteran status checkboxes are visible but not selected.
Wait for the system to process legislative information
After selecting Asian for Ethnicity, a loading indicator appears while the system processes the entry. All other legislative fields remain as previously entered.
Begin the employment information step
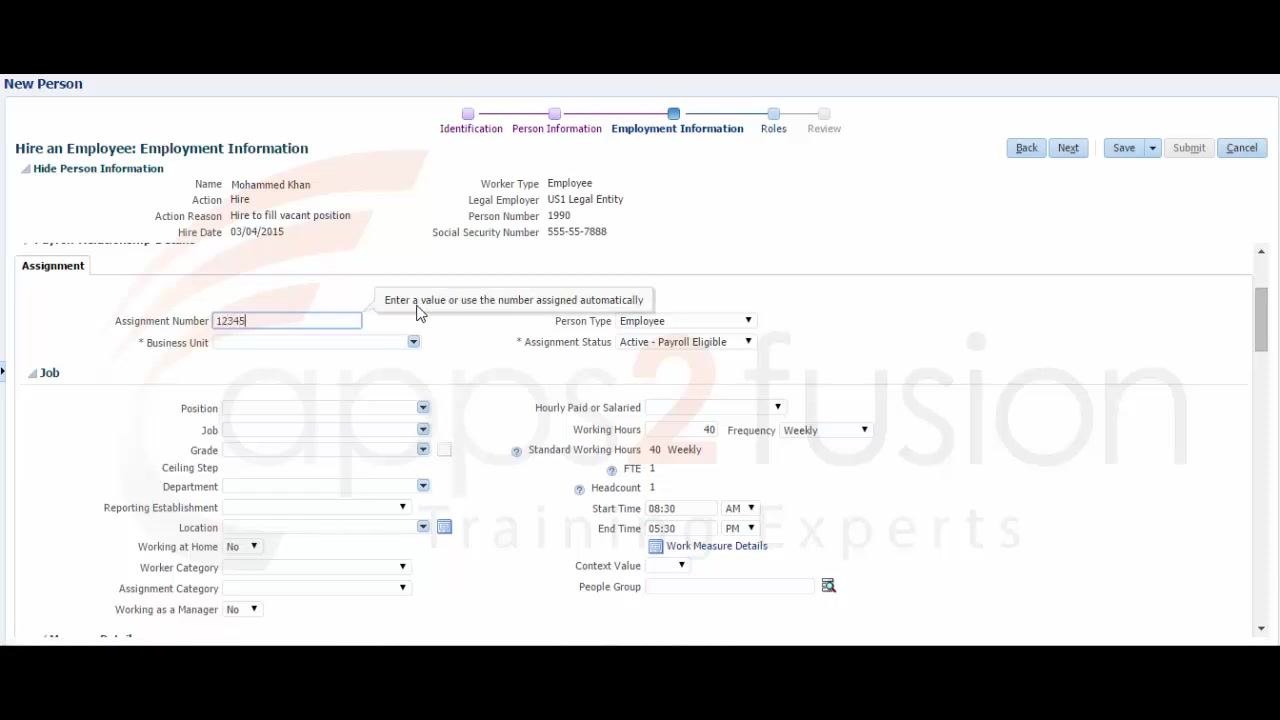
Move to the Employment Information step, now highlighted in the process flow. In the Assignment section, enter:
- Assignment Number: 12345
- Person Type: Employee
- Assignment Status: Active - Payroll Eligible
The Job section is visible but not yet filled.
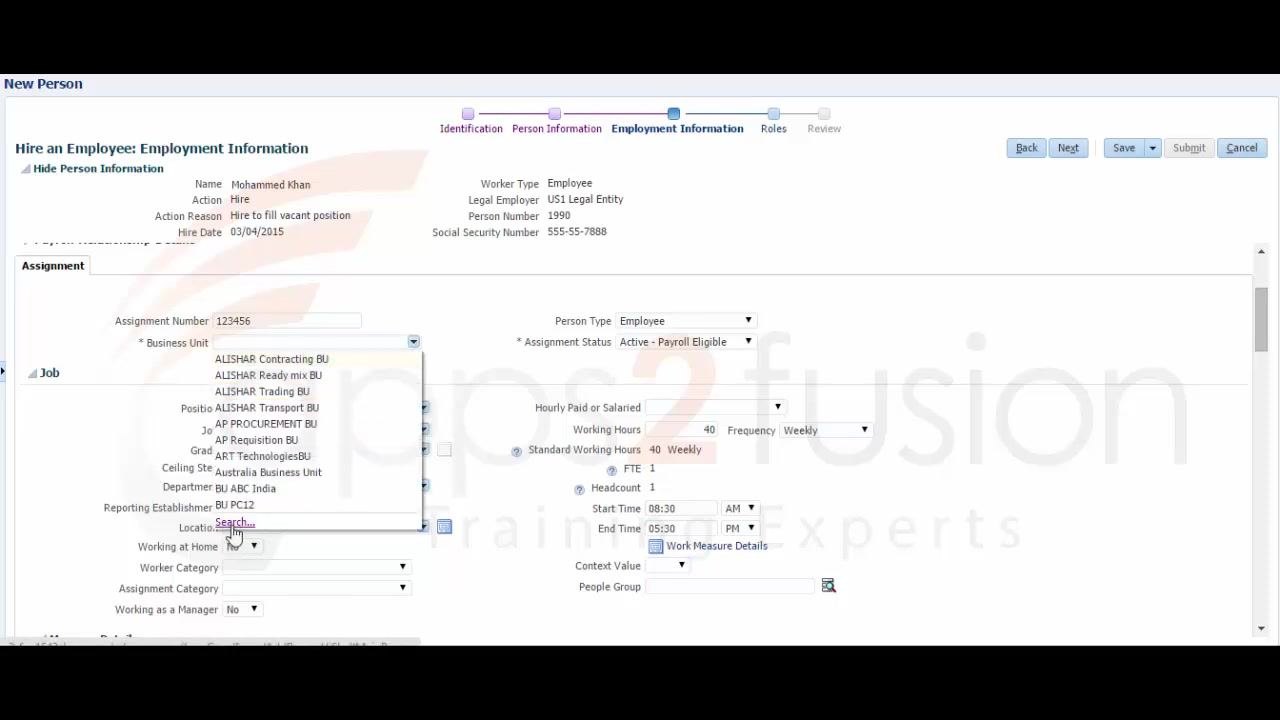
Select the business unit
Update the Assignment Number to 123456, then open the Business Unit dropdown to view the available options, including:
- ALISHAR Contracting BU
- ALISHAR Ready mix BU
- ALISHAR Trading BU
- ALISHAR Transport BU
- AP PROCUREMENT BU
- AP Requisition BU
- ART Technologies BU
- Australia Business Unit
- BU ABC India
- BU PC12
Enter job details
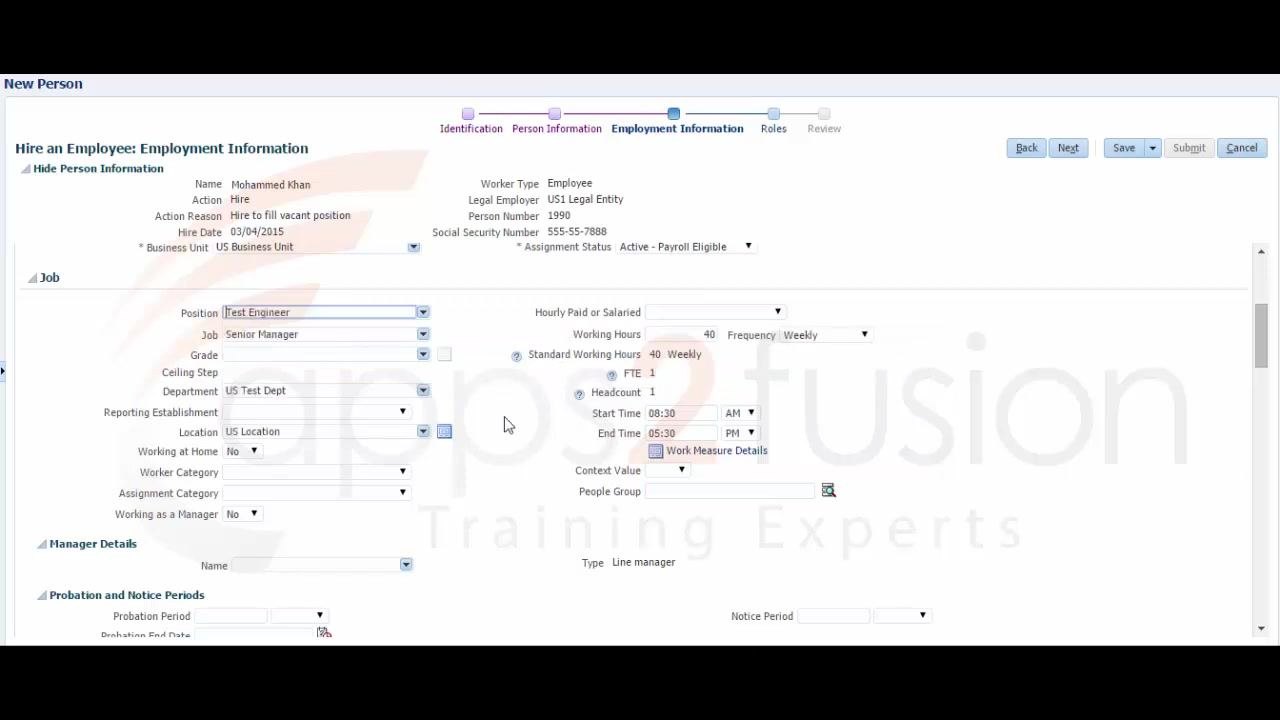
In the Job section, complete the following fields:
- Business Unit: US Business Unit
- Position: Test Engineer
- Job: Senior Manager
- Department: US Test Dept
- Location: US Location
- FTE (Full-Time Equivalent): 1
- Headcount: 1
- Start Time: 08:30 AM
- End Time: 05:30 PM
Check Work Measure Details, and set both Working at Home and Working as a Manager to No. In the Manager Details section, set Type to Line manager. The Probation and Notice Periods section is visible but not yet filled.
Enter the grade
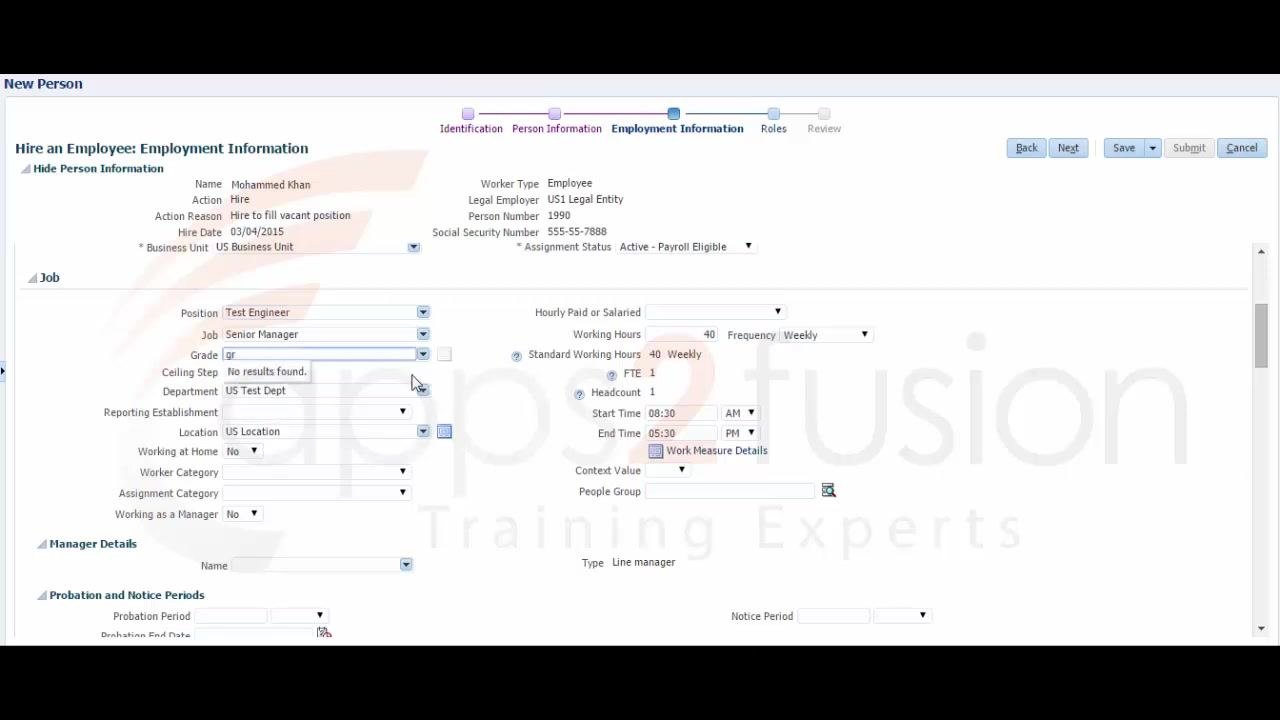
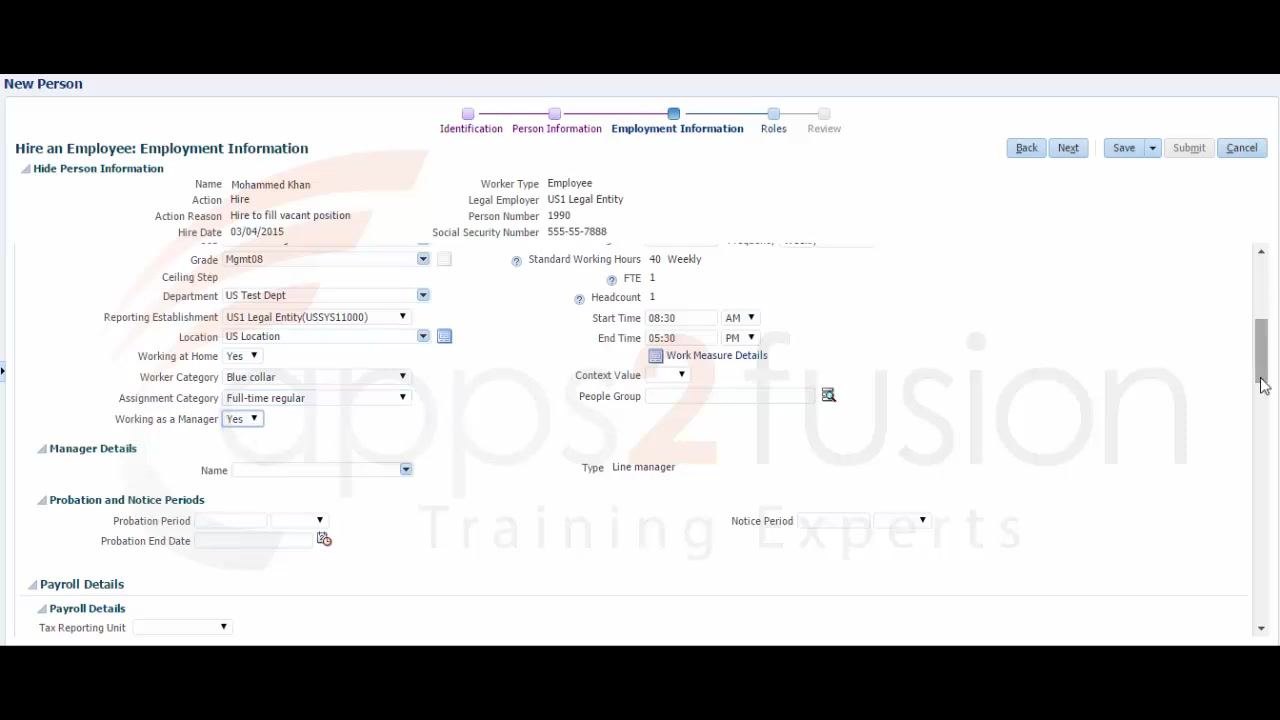
Enter Grade as Mgmt08, and set Reporting Establishment to US1 Legal Entity (USSYS11000). All other fields remain as previously entered.
Set the assignment category and manager status
Set Assignment Category to Full-time regular from the available options (Full-time regular, Full-time temporary, Part-time regular, Part-time temporary), and set Working as a Manager to Yes. Worker Category is set to Blue collar. The Manager Details section is visible but not yet filled.
Enter the probation period
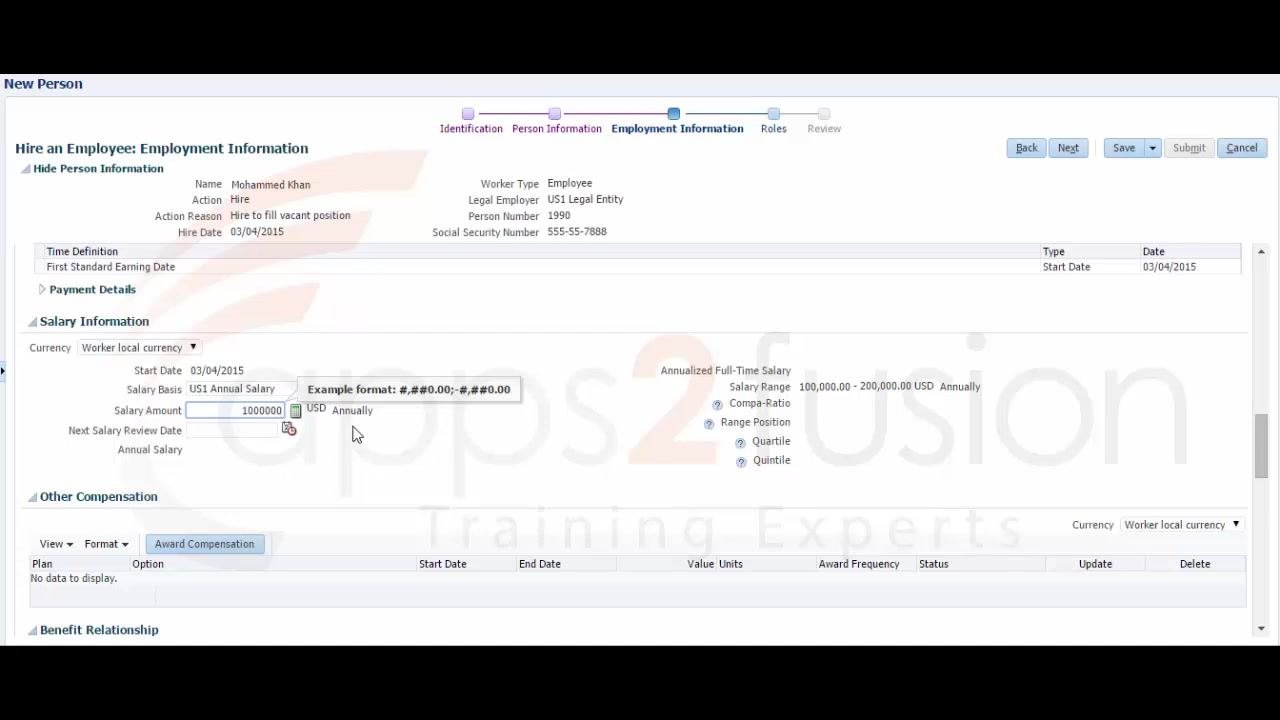
In the Probation and Notice Periods section, enter Probation Period as 6 and select Months from the dropdown options (Hours, Days, Months, Weeks, Years). The Probation End Date is automatically calculated as 09/03/2015. The Notice Period field is visible but not yet filled.
Enter the notice period
Enter Notice Period as 1 and select Months from the dropdown options (Hours, Days, Months, Weeks, Years). All other fields remain as previously entered.
Set the salary basis
Scroll to the Salary Information section and set:
- Currency: Worker local currency
- Start Date: 03/04/2015
- Salary Basis: US1 Annual Salary, selected from the dropdown options (US1 Annual Salary, US1 Hourly Rate, US_Test)
Enter the salary amount
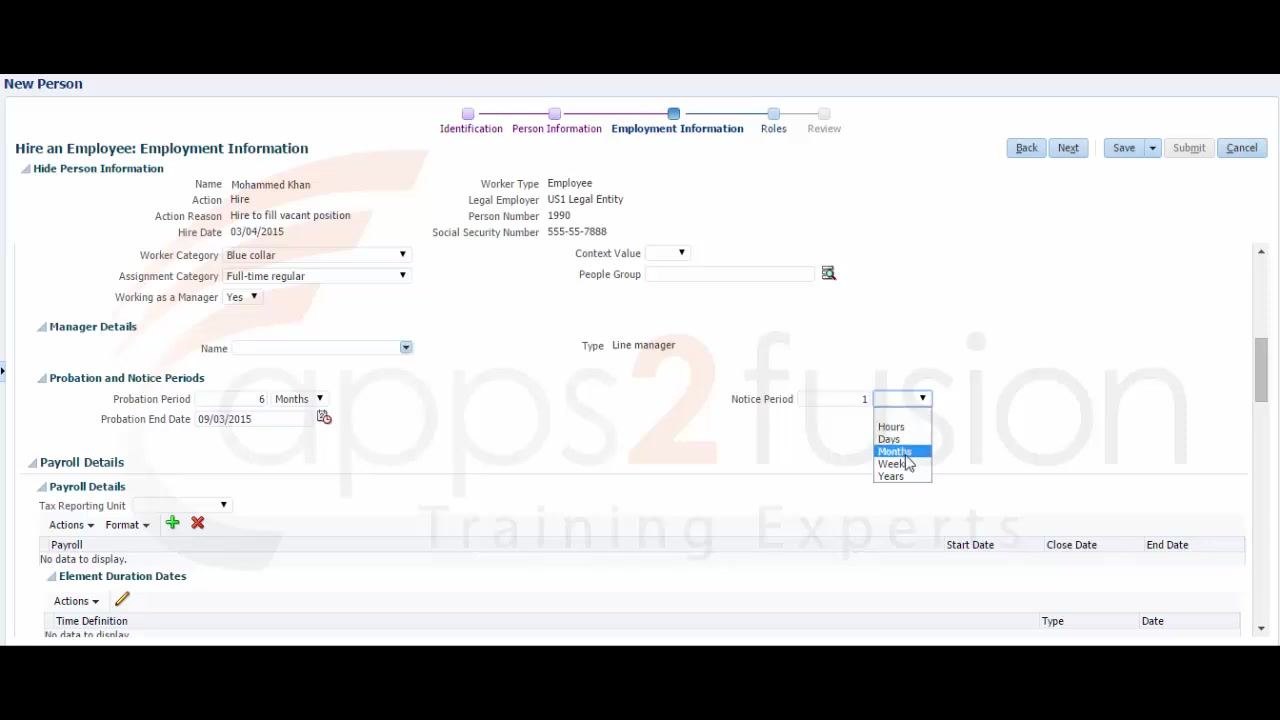
Enter Salary Amount as 1,000,000. The currency is set to USD and the frequency to Annually. The Next Salary Review Date field is visible but not yet filled. The system displays the following calculated values:
- Annualized Full-Time Salary: 1,000,000.00 USD
- Salary Range: 100,000.00 - 200,000.00 USD Annually
- Compa-Ratio: 666.67
- Range Position: 900
- Quartile: Above Range
- Quintile: Above Range
Enter the next salary review date
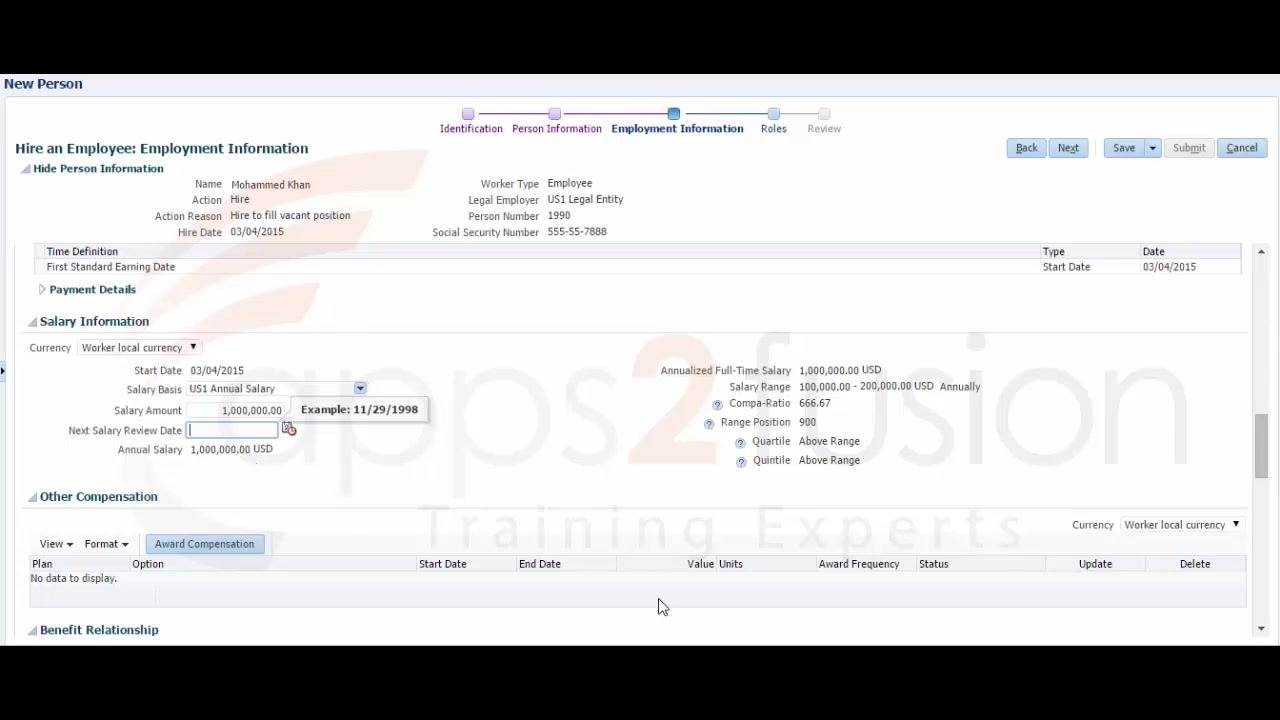
Enter Next Salary Review Date as 11/29/1998, as shown in the example tooltip. Confirm that Annual Salary displays 1,000,000.00 USD.
Assign roles
Move to the Roles step, now highlighted in the process flow. In the Role Requests section, the Employee role is listed with:
- Status: Add Requested
- From Date: 03/04/2015
- Provisioning Method: Automatic
Use the Add Role button if you need to add additional roles.
Review the entered information
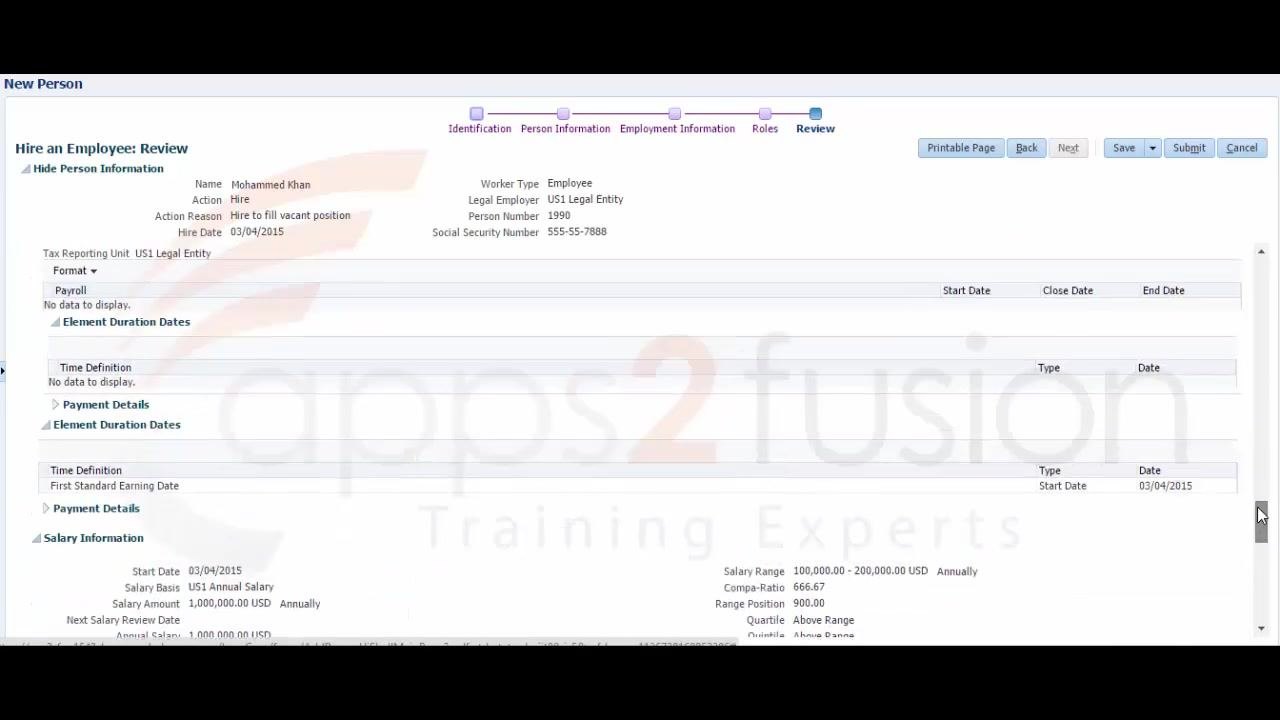
Move to the Review step, now highlighted in the process flow. The summary displays all previously entered details, including:
- Tax Reporting Unit: US1 Legal Entity
- Salary Basis: US1 Annual Salary
- Salary Amount: 1,000,000.00 USD Annually
- Salary Range: 100,000.00 - 200,000.00 USD Annually
- Compa-Ratio: 666.67
- Range Position: 900
- Quartile: Above Range
- Quintile: Above Range
- Start Date: 03/04/2015
Use the Printable Page, Back, Next, Save, Submit, and Cancel buttons as needed to finalize or adjust the entry.
Perform the final review
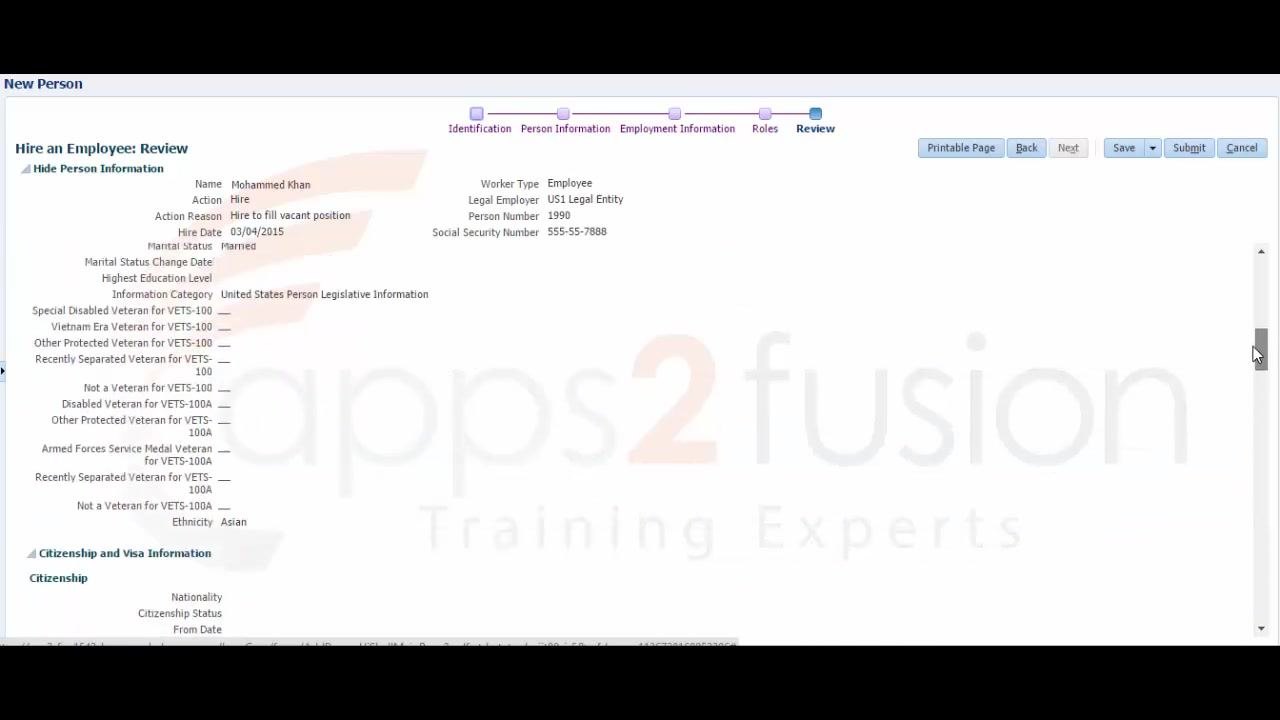
On the Hire an Employee: Review page, the process flow highlights Review, while Identification, Person Information, Employment Information, and Roles are shown as completed. The summary includes:
- Name: Mohammed Khan
- Action: Hire
- Action Reason: Hire to fill vacant position
- Hire Date: 03/04/2015
- Marital Status: Married
- Worker Type: Employee
- Legal Employer: US1 Legal Entity
- Person Number: 1990
- Social Security Number: 555-55-7888
- Information Category: United States Person Legislative Information
- Ethnicity: Asian
Most veteran status fields have no value entered. The Citizenship and Visa Information section is visible but not expanded. Scroll down to review any remaining details.
Action buttons available at the top right include:
- Printable Page
- Back
- Next (disabled)
- Save
- Submit
- Cancel
Complete or adjust the hire process
Review all information for accuracy before finalizing. Depending on what you need to do next:
- Click Back to return to previous steps and edit details.
- Click Save to save your progress without submitting.
- Click Submit to finalize the hiring process.
- Click Cancel to cancel the process.
- Click Printable Page to generate a print-friendly summary of the entered information.
Summary
You have now completed the full workflow for how to hire an employee in Oracle Fusion HCM: entering identification and personal details, selecting the legal employer, adding a national identifier, completing person information (address, phone, email, and legislative details), filling in employment information (assignment, job, grade, probation, notice period, and salary), assigning roles, and reviewing all details before submission.
What's next
After submitting the hire, verify that the new employee record appears correctly in the system with all assigned roles, salary details, and employment information. If any information needs correction, use the Back button from the Review step to make adjustments before final submission.
Generation details: cost, quality tiers
Docsie billed 3,000 credits ($2.10) to analyze this 6-minute video at standard quality. The rewrite, template fill and Word/PDF exports were included. The same video at each quality tier:
| Quality | Frames sampled | Credits | Approx. cost |
|---|---|---|---|
| Draft | every 16-30 s | 1,500 | $1.05 |
| Standard (this guide) | every 8-15 s | 3,000 | $2.10 |
| Detailed | every 4-7 s | 6,000 | $4.20 |
| Ultra | every 1-3 s | 12,000 | $8.40 |
Credits priced at $0.70 per 1,000; plans include a monthly allowance. Enterprise customers on on-premise or bring-your-own-model deployments run this on their own inference and pay no per-video credits.
Generated by Docsie Video-to-Docs on 2026-09-08 from a 5-minute video. Screenshots are frames from the source video and belong to their creator, apps2fusion, whose original is embedded above. If you own this video and want the guide removed or credited differently, contact us and we will act within one business day.