
How to Extract Data from Oracle Fusion Cloud
This guide explains how to extract data from Oracle Fusion Cloud using Oracle Integration Cloud (OIC). It walks through building a scheduled integration that triggers an export job in Oracle Fusion ERP Cloud, and a companion app-driven integration that receives the completed file and writes it to an FTP directory. Following these steps, you can set up a repeatable, automated process to export bulk data from Oracle Fusion ERP Cloud on a schedule.
Video: How to export bulk data from Oracle Fusion Cloud ERP with OIC Integration ? (Method 1) by BEENUM LEARNING (2022). All credit for the demonstration goes to the creator; watch the original on YouTube. The written guide below was generated from this video by Docsie. Creator? Request a change or removal.
This guide explains how to extract data from Oracle Fusion Cloud using Oracle Integration Cloud (OIC). It walks through building a scheduled integration that triggers an export job in Oracle Fusion ERP Cloud, and a companion app-driven integration that receives the completed file and writes it to an FTP directory. Following these steps, you can set up a repeatable, automated process to export bulk data from Oracle Fusion ERP Cloud on a schedule.
Prerequisites
Before you begin, make sure you have:
- Access to Oracle Fusion ERP Cloud with permissions to view ESS job definitions and Setup and Maintenance.
- An Oracle Integration Cloud (OIC) instance with the ERP adapter and a SOAP connection configured.
- An FTP directory target to receive the exported files.
- The ERP Integration Service WSDL URL for your Fusion environment.
Overview of the two export methods
There are two approaches for exporting bulk data from Oracle Fusion ERP Cloud using OIC:
- Method 1: Combines a scheduled integration with an app-driven integration exposed over SOAP/HTTPS. This method is covered in this guide.
- Method 2: A separate approach, covered elsewhere.
Method 1 uses a scheduled integration to trigger the export job, and a callback (app-driven) integration to retrieve the resulting file once the job completes.
Part 1: Plan the integration design
Review the two-part integration approach
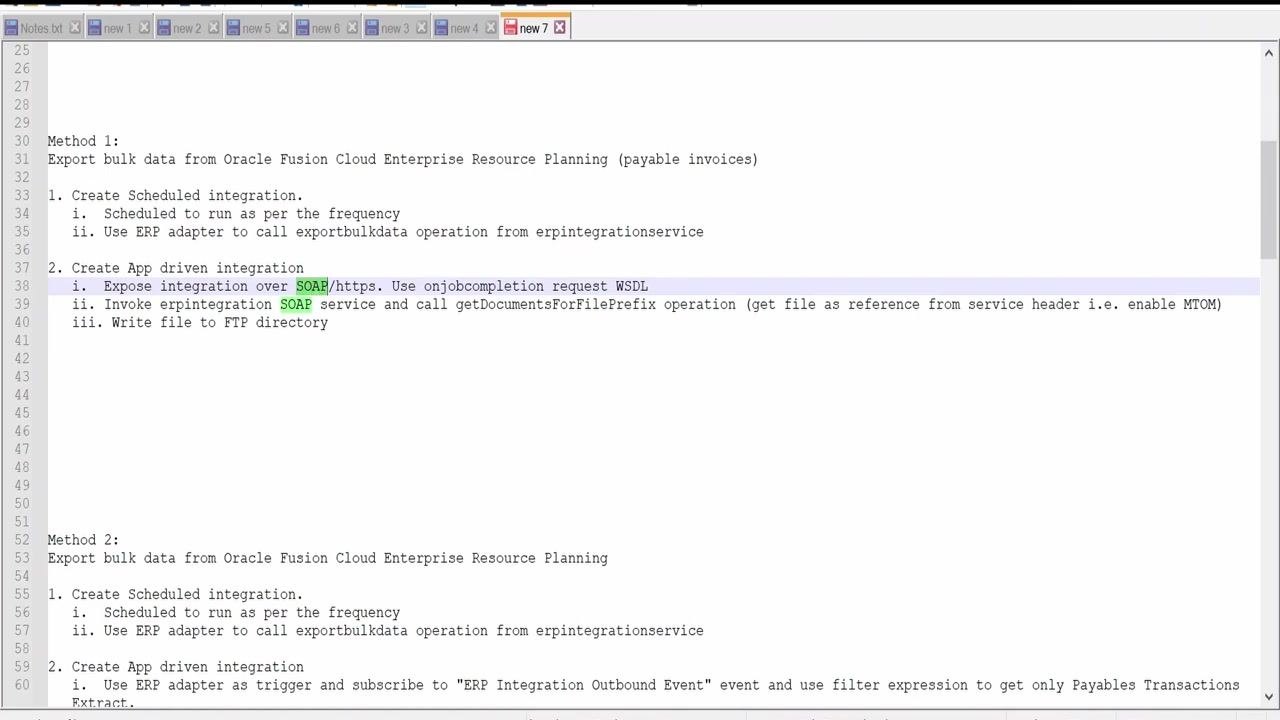
Design a scheduled integration in OIC that runs at the frequency you require (for example, daily or hourly). This integration uses the ERP adapter to call the exportbulkdata operation from the erpintegrationservice.
You then expose a second integration over SOAP/HTTPS using the onjobcompletion request WSDL. When the scheduled integration completes the export, Fusion invokes this app-driven integration as a callback and passes a document ID. This callback integration uses a SOAP connection (not the ERP adapter) to call the erpintegration SOAP service and its getDocumentsForFilePrefix operation, retrieving the file as a reference from the service header with MTOM enabled, and writing it to an FTP directory.
Enable MTOM for document retrieval
Use the getDocumentsForFilePrefix operation in the SOAP service to fetch documents from UCM (Universal Content Management). Enable MTOM (Message Transmission Optimization Mechanism) when calling this operation so that large files can be received as references in the service header. After fetching the file, write it to an FTP directory. If your use case requires syncing data with other applications, adapt this file-handling step accordingly.
Review the Extract Bulk Data recipe documentation
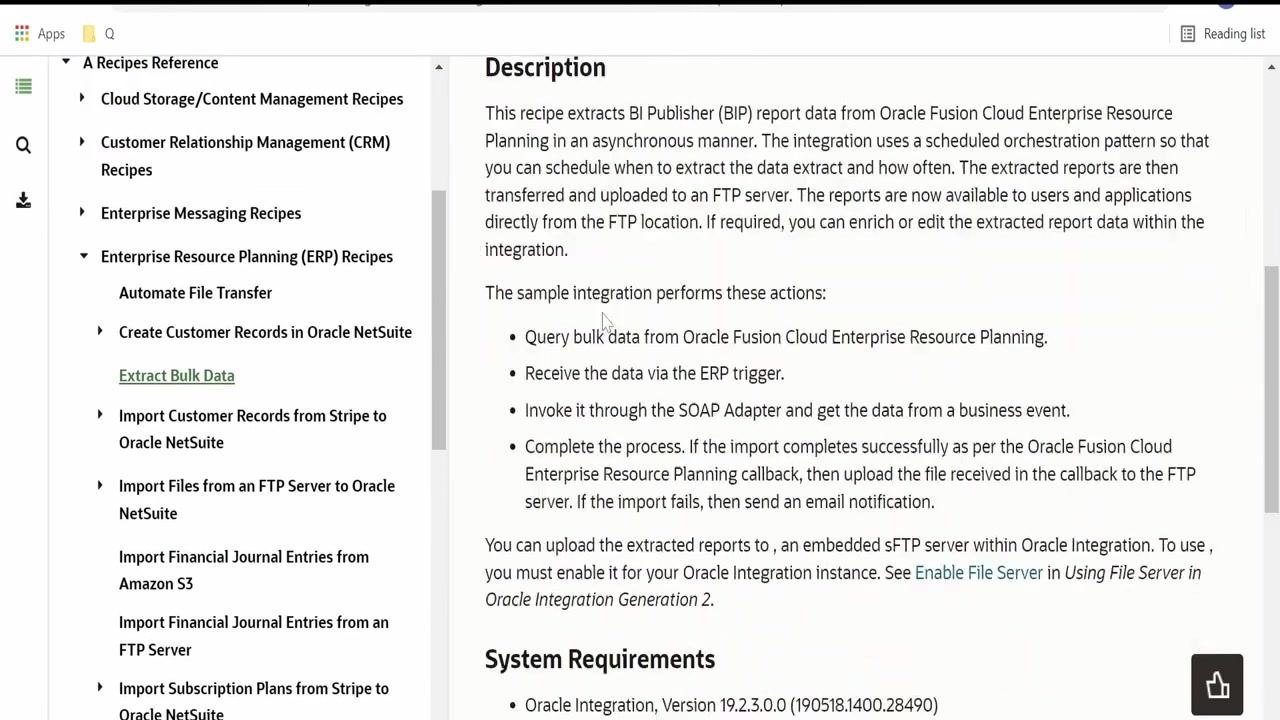
Refer to Oracle's official documentation for step-by-step instructions on building this integration, including how to configure the ERP Cloud Adapter for both trigger and callback scenarios, how to generate the WSDL for the ERP Integration Service, and the required hostnames and available operations.
Configure the ERP Cloud Adapter trigger
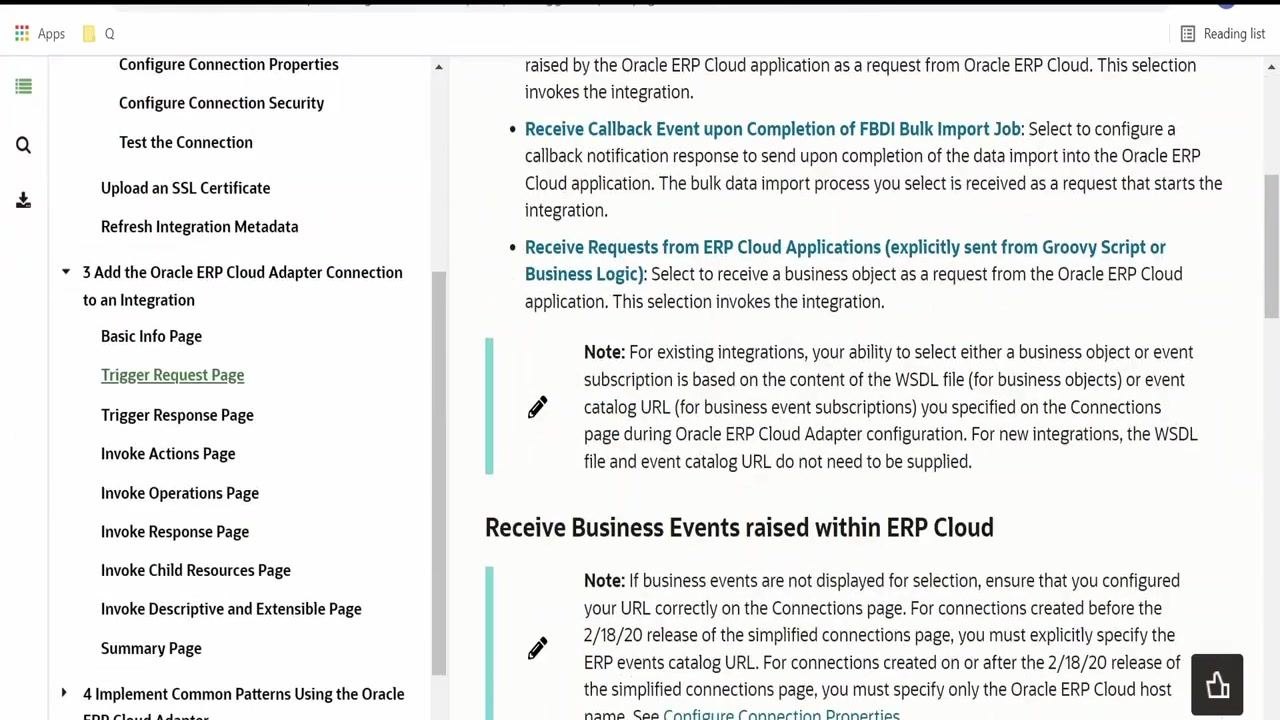
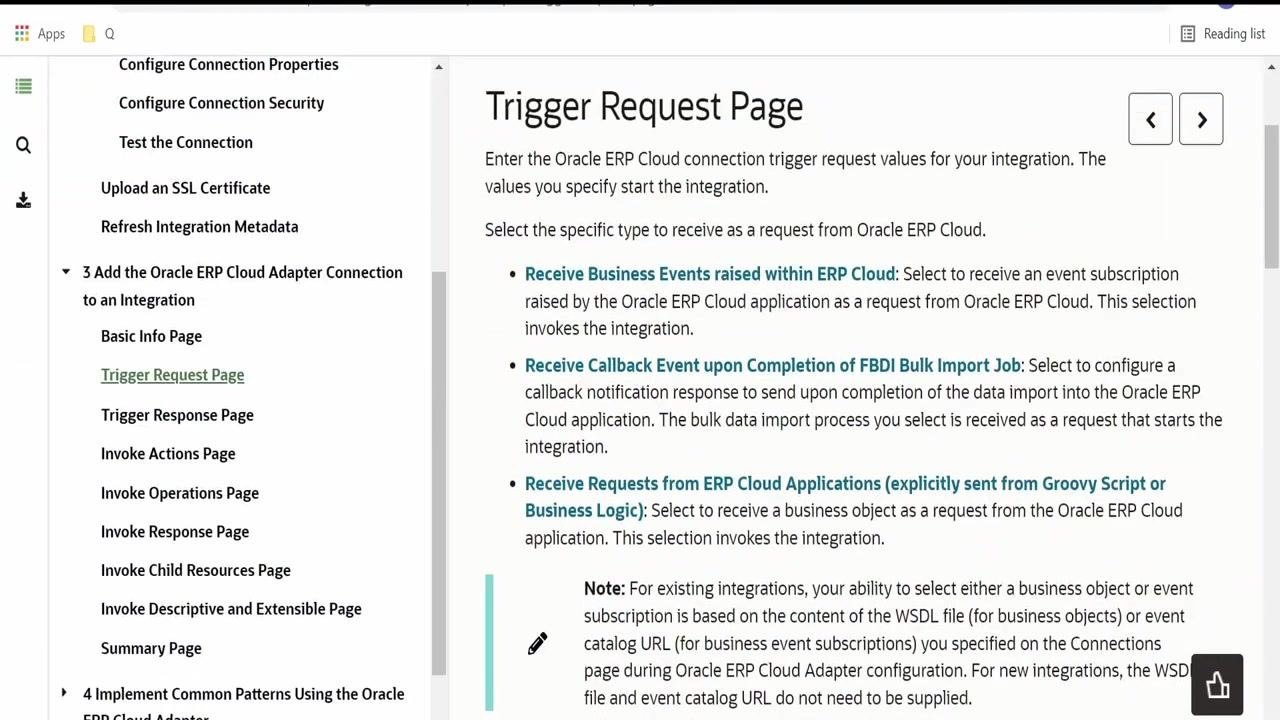
Follow the documentation to set up connection properties and security, test the connection, and upload SSL certificates if required. Add the adapter to your integration and configure the Trigger Request Page, choosing the appropriate trigger type such as business event, callback event, or explicit request.
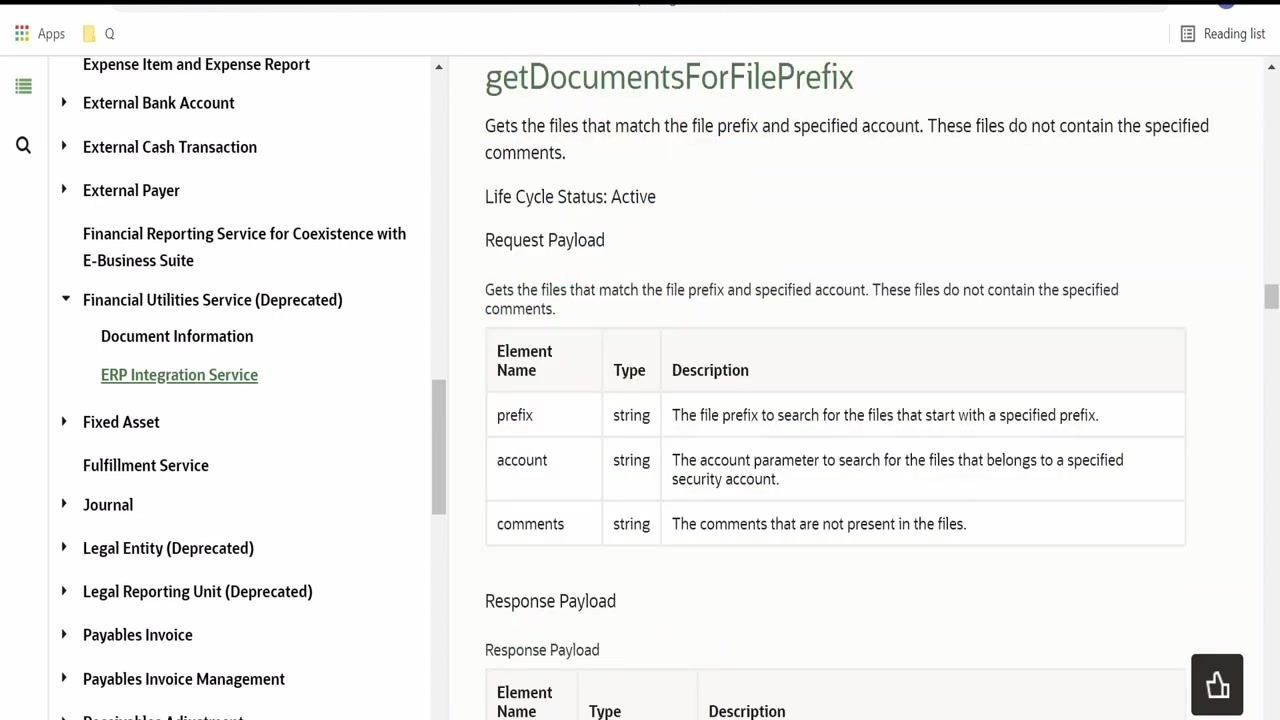
Review the getDocumentsForFilePrefix request payload
The getDocumentsForFilePrefix operation retrieves files matching a specified prefix and account. The request payload includes a prefix (string) to search for, an account (string) for the security account, and comments (string) that are not present in the files. Review the documentation for the expected request and response payloads.
Part 2: Build the scheduled integration
Create the scheduled orchestration and select the export operation
In Oracle Integration Cloud, create a Scheduled Orchestration for the ERP bulk extract. Configure the Oracle ERP Cloud Endpoint by selecting the ErpIntegrationService as the service and the exportBulkData operation. Confirm the operation is active and review its description for context.
Locate the exportBulkData operation in the ERP adapter
In the integration designer, select the ERP adapter and find the exportBulkData operation. Review the business object and operation details listed for your selected object, such as Payable Transactions.
Map the required fields in the mapper
In the mapping step, provide values for each required field in the exportBulkData request:
- Job Name: the ESS job package and definition name.
- Parameter List: the parameters required by the ESS job.
- Job Options: options such as file type.
- Callback URL: the URL of your OIC app-driven integration.
- Notification Code: the code for your required notifications (for example, "30" for email and bell notification).
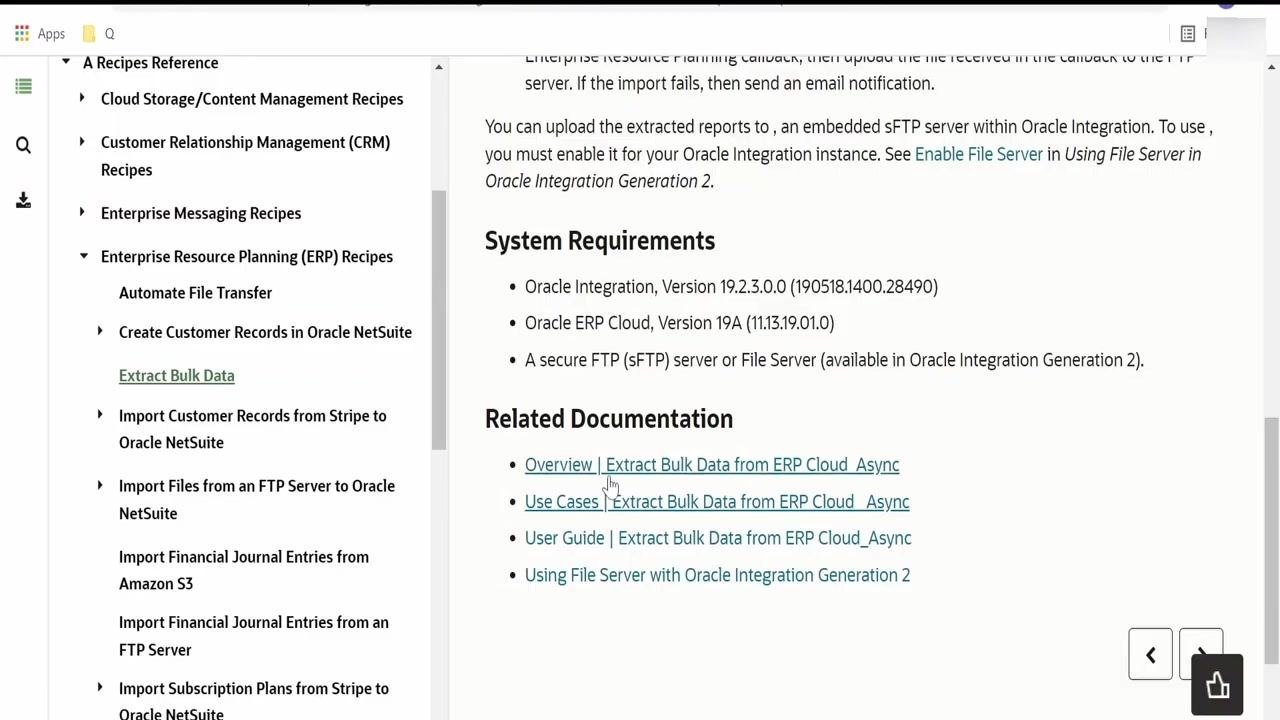
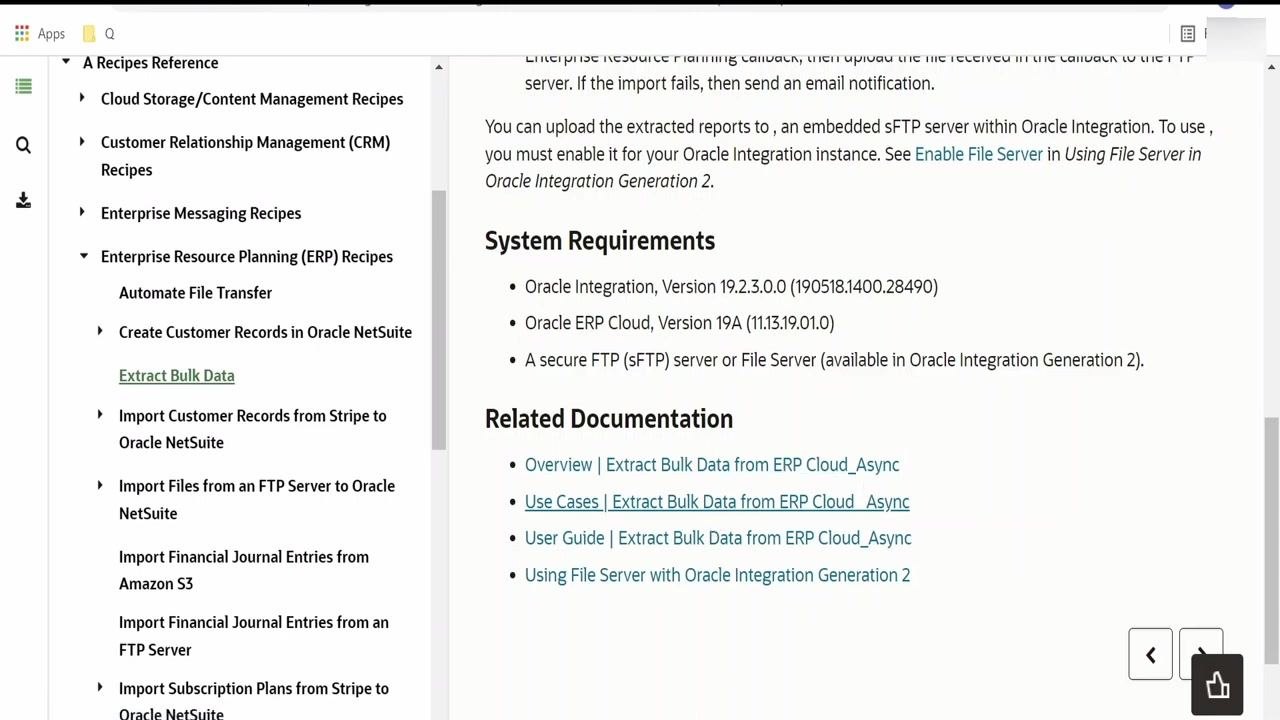
Reference the use case document for job name and parameters
Access the use case document linked under Related Documentation and follow its instructions to navigate to Setup and Maintenance in Oracle ERP Cloud.
Search for the ESS job definition
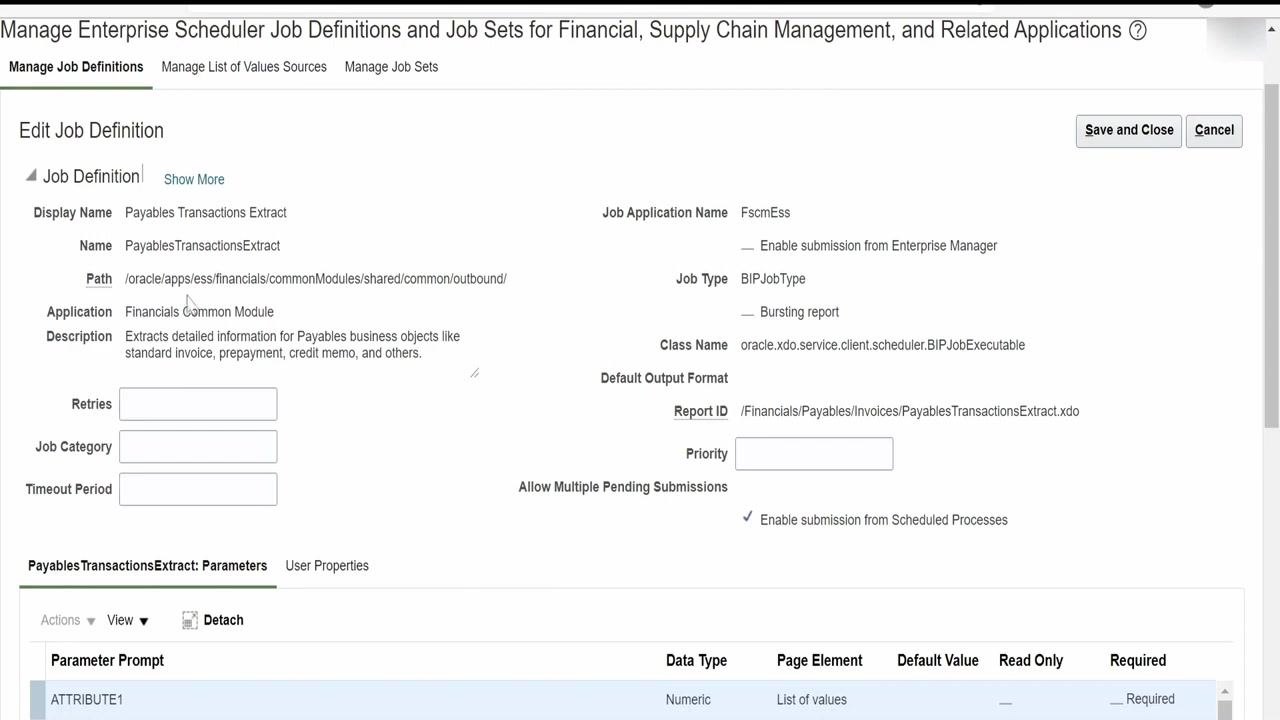
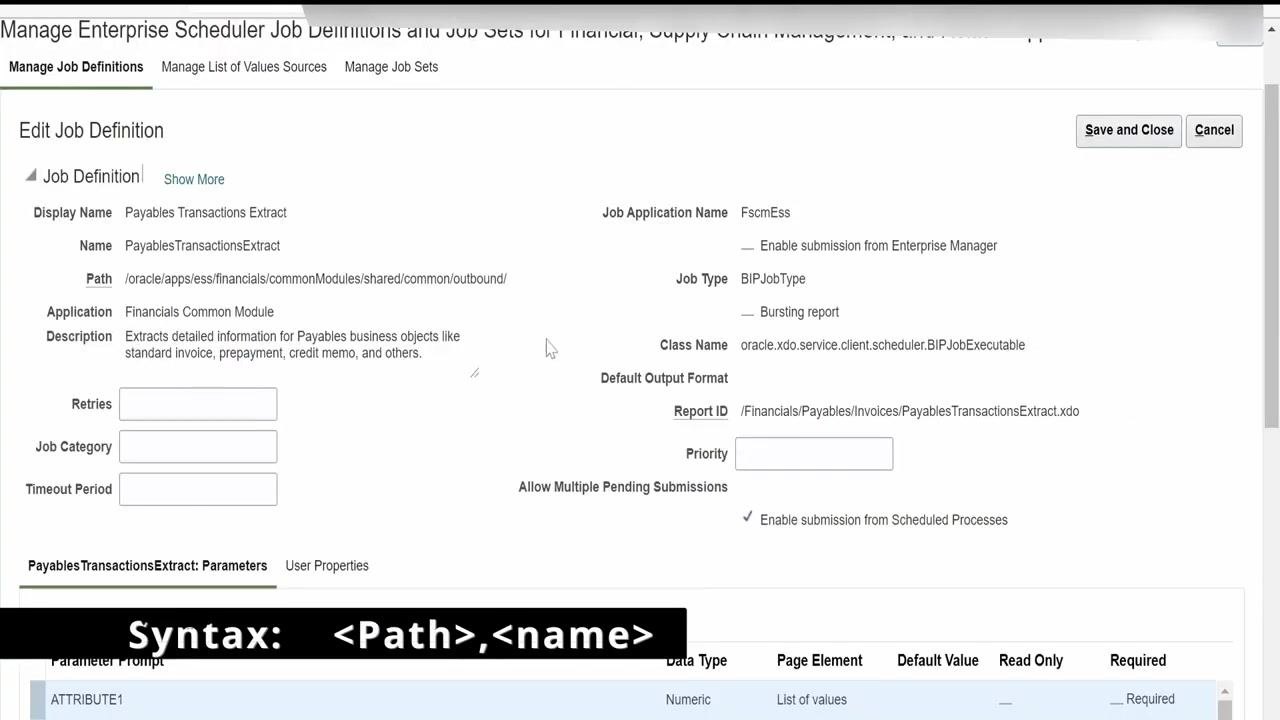
In Oracle ERP Cloud, go to Setup and Maintenance and search for Manage Enterprise Scheduler Job Definitions for Financial, Supply Chain, and Related Applications. Locate the job definition for your business object, such as Payables Transactions Extract.
Copy the path and name for the job name field
In the job definition details, note the Path and Name fields. Use the syntax <Path>,<Name> for the Job Name field in your integration mapping. For example: /oracle/apps/ess/financials/commonModules/shared/common/outbound/,PayablesTransactionsExtract.
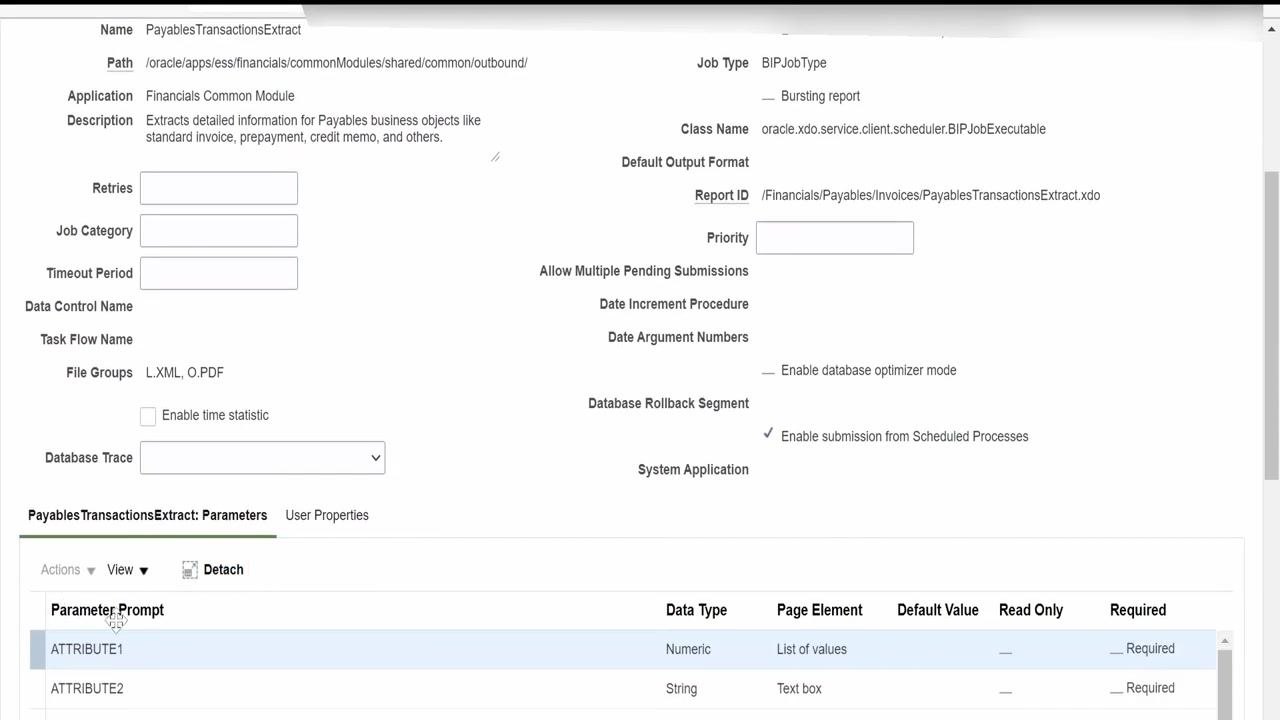
Review and provide the parameter list
Scroll to the Parameters section of the job definition and review the Parameter Prompt, Data Type, and Required fields. Enter the required parameters in the Parameter List field of your integration mapping. For more detail, check the parameter prompts or review existing scheduled process instances for sample values.
Set job options and the callback URL
In the Job Options mapping, enter the required options, such as ExtractFileType="ALL". For Callback URL, provide the URL of your OIC app-driven integration so it can receive job completion notifications.
Configure the notification code
The notification code is made up of two digits. The first digit controls the notification channel: 1 for email, 2 for bell, and 3 for both email and bell. The second digit controls the trigger condition: 0 to send in any case, 1 to send on success, and 2 to send on failure. For example, to send an email only when the job fails, combine 1 (email) with 2 (on failure) for a code of 12.
Enter the notification code
In the Notification Code field, enter the appropriate value. For example, 30 means email and bell notification sent in any case, while 31 sends the notification only on success.
Part 3: Build the callback integration
Prepare the WSDL file for the callback integration
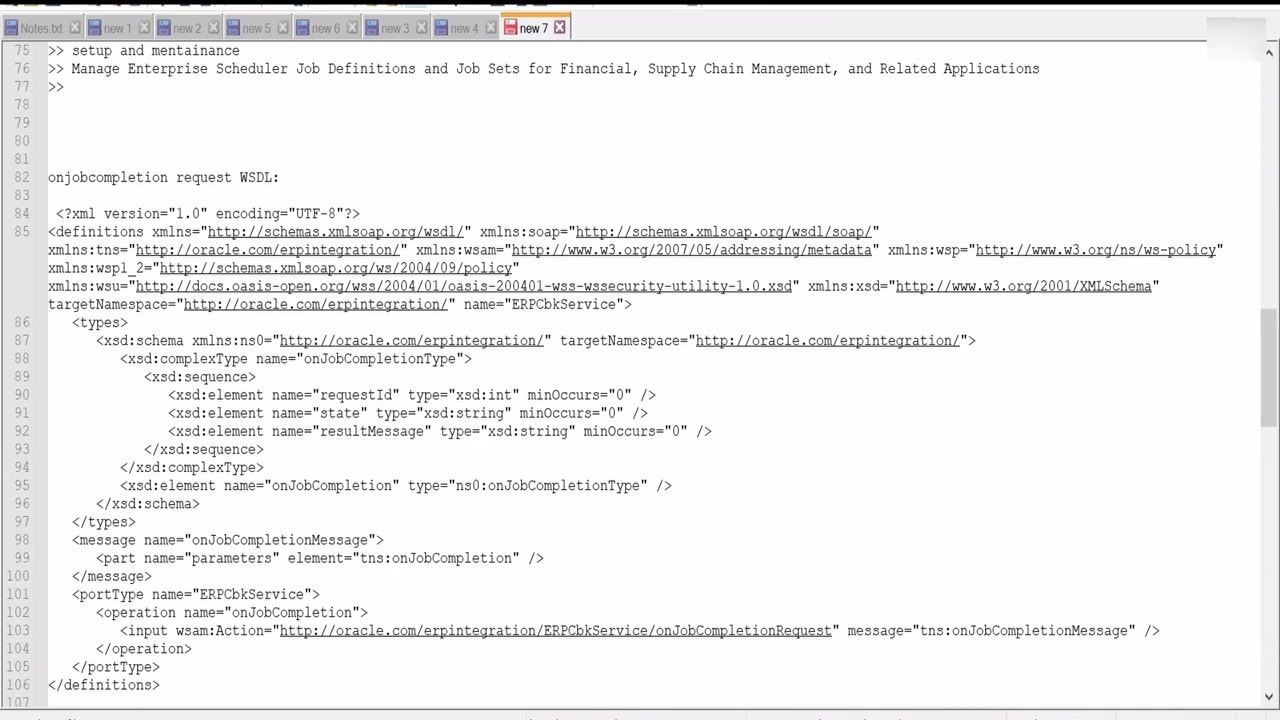
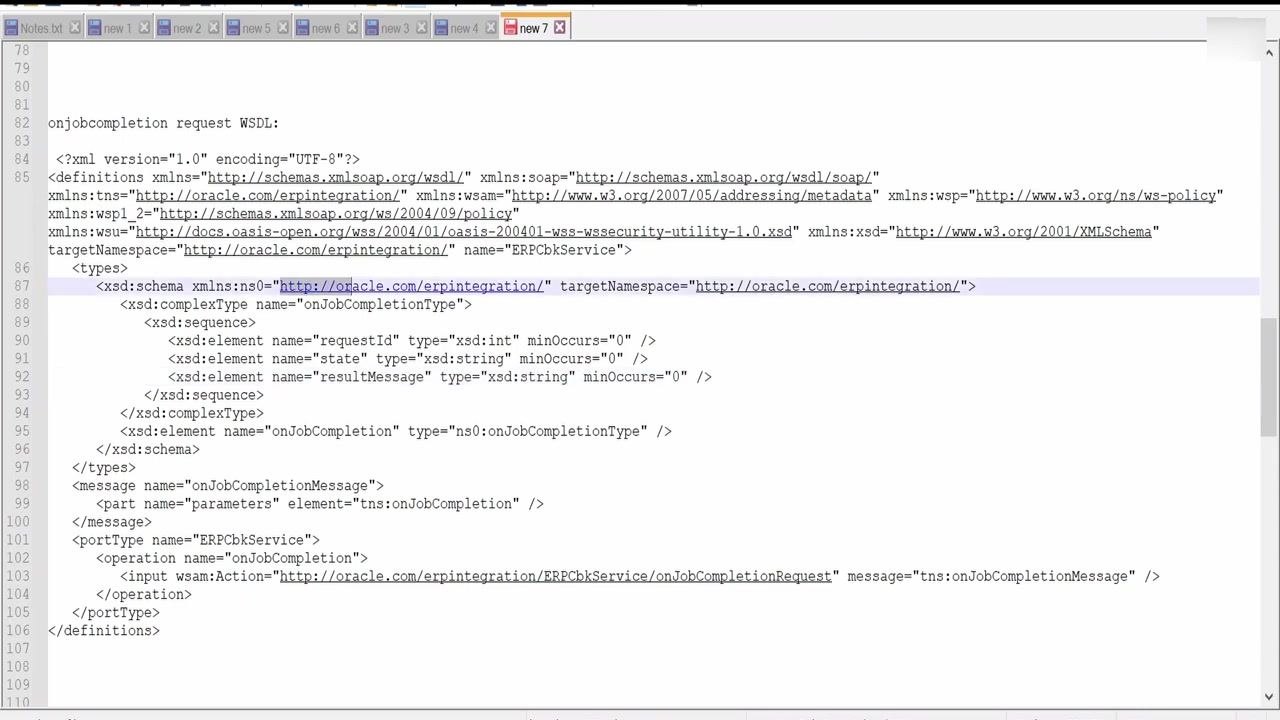
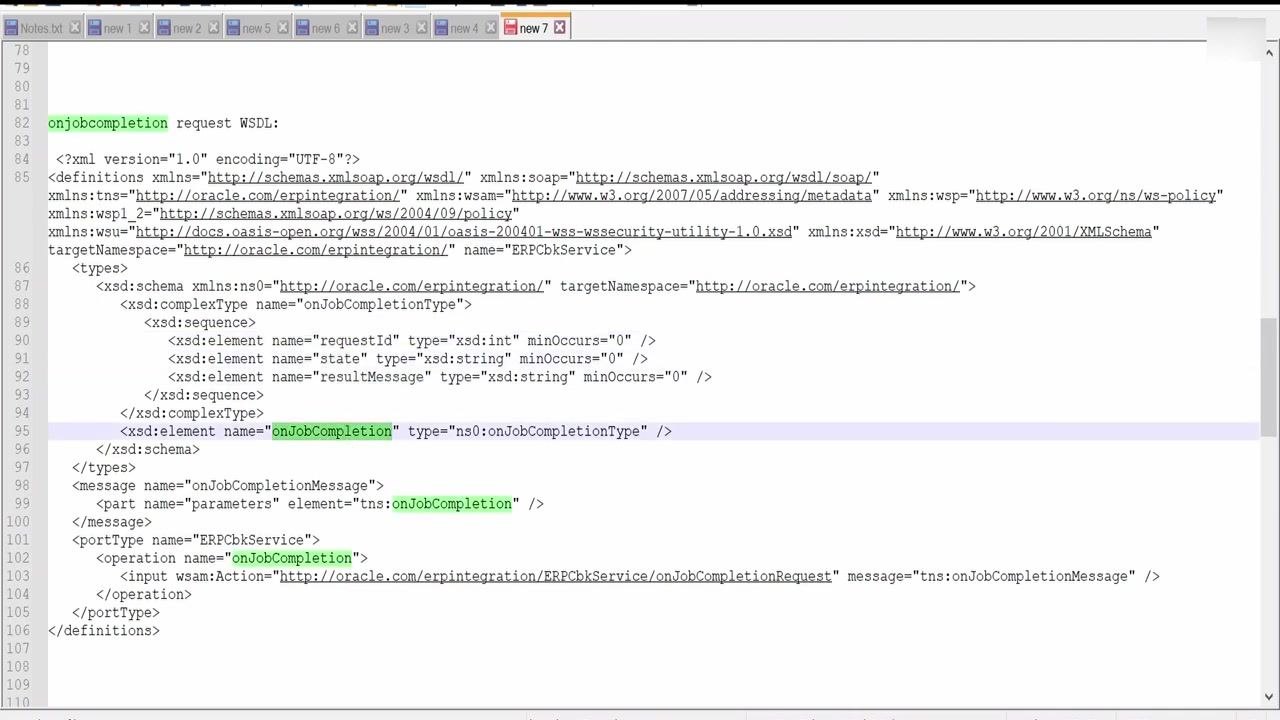
The WSDL (Web Services Description Language) file defines the structure and operations for the callback SOAP service. It includes a complex type for job completion data (requestId, state, resultMessage) and defines the onJobCompletion operation. Make sure the targetNamespace matches your integration requirements.
Identify the key WSDL elements
Confirm the key elements in your WSDL: requestId, state, resultMessage, and the onJobCompletion operation.
Locate your integration in the OIC dashboard
Open the Oracle Integration Cloud dashboard and navigate to the Integrations section from the left sidebar. Search for your integration by name, then locate the one you want to configure, such as ERP Bulk Extract Callback TEST01. Click the integration name to open its configuration details.
Configure the SOAP endpoint headers
Begin configuring the SOAP endpoint for your callback integration. In the Configure Headers step, under Configure MTOM Attachment Options, check Accept attachments in response and leave Send attachments in request unchecked. Under Configure Headers, leave the option as No unless your application requires custom headers, then click Next.
Obtain the ERP Integration Service WSDL URL
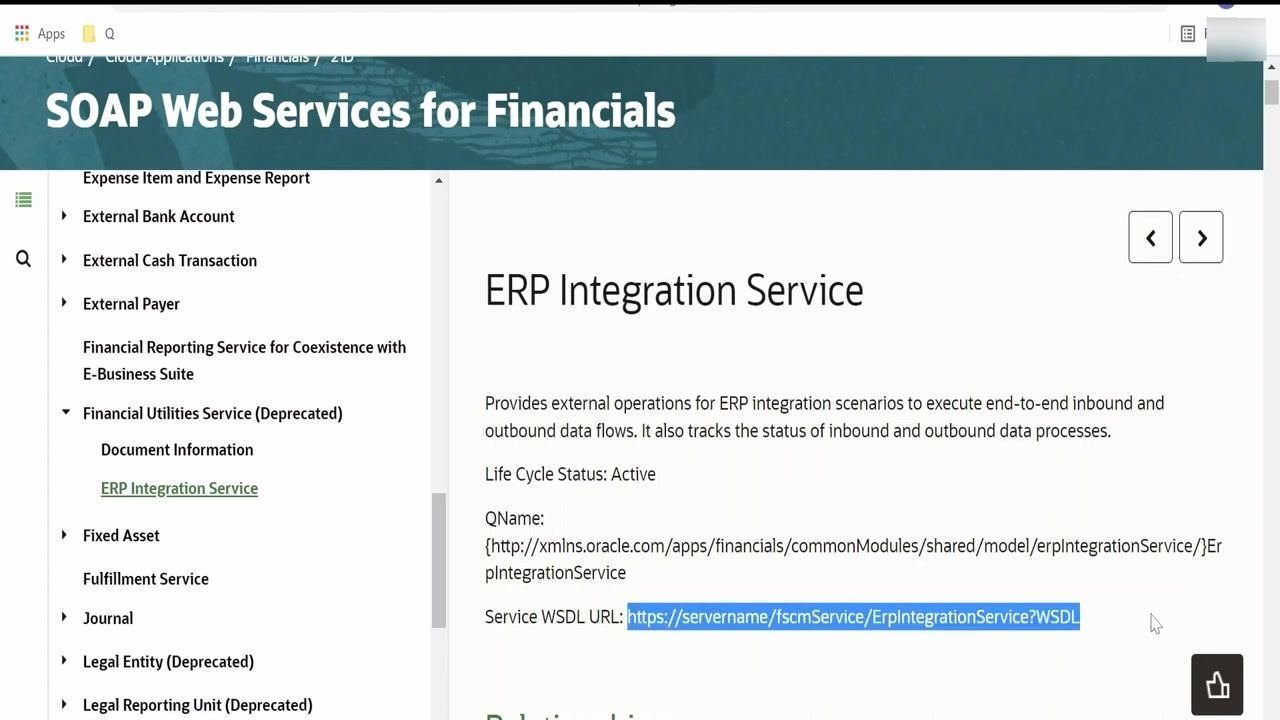
Navigate to the ERP Integration Service documentation within Oracle ERP Cloud and locate the Service WSDL URL field. Replace servername in the URL with your actual host name, then copy the full WSDL URL (for example, https://yourhost/fscmService/ErpIntegrationService?WSDL). Paste this URL into your browser to verify access and retrieve the WSDL definition.
Map source fields to target fields
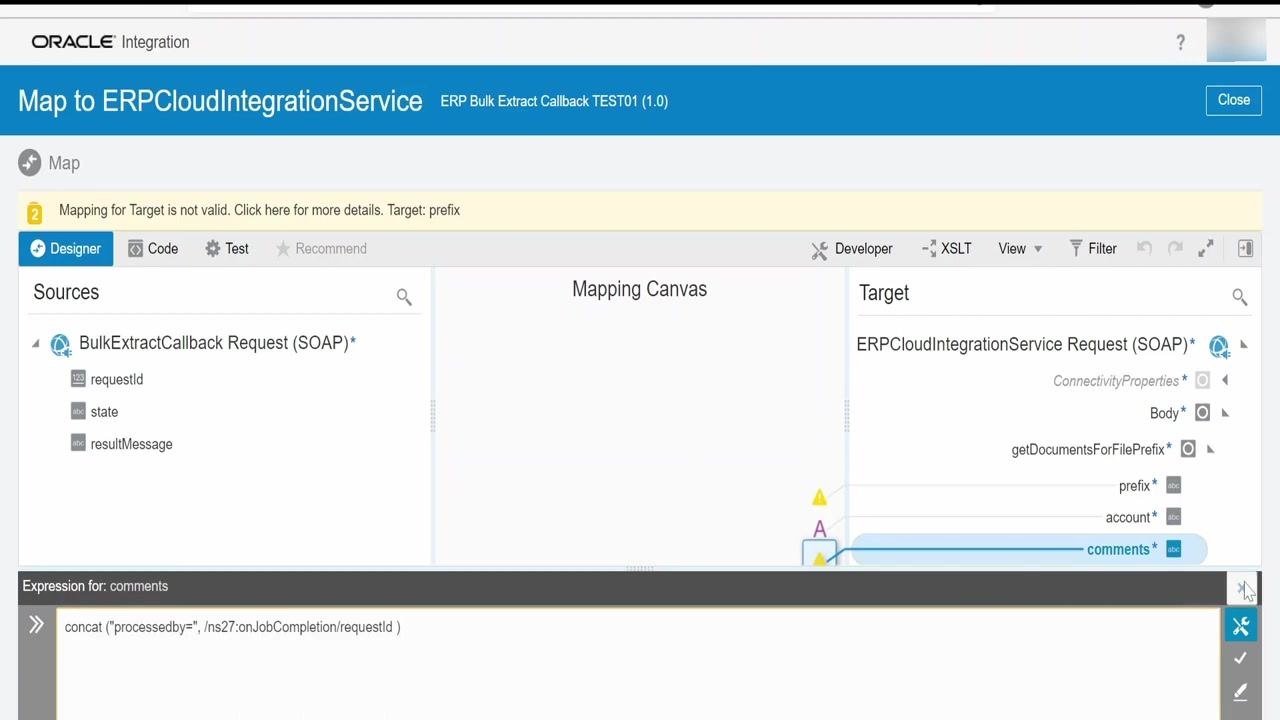
In the mapping designer, map fields from the BulkExtractCallback Request (SOAP) source to the ERPCloudIntegrationService Request (SOAP) target. The key source fields are requestId, state, and resultMessage, and the target operation is getDocumentsForFilePrefix. For the prefix field, use a value such as _<requestId>_VIP_REPORT01, where <requestId> is mapped dynamically. This prefix is used as the file prefix in your UCM system.
Set expressions for target fields
For the comments field in the target, use an expression to concatenate a label with the request ID, for example: concat("processedby=", /ns27:onJobCompletion/requestId). This ensures traceability in your integration logs and output files.
Review the integration orchestration flow
Confirm that your integration flow includes the following steps, in order: BulkExtractCallback (trigger), Map to ERPCloudIntegrationService, ERPCloudIntegrationService (SOAP call), Map to WriteExtract, and WriteExtract (writes the file to FTP or another target). Confirm the flow is activated and ready for execution.
Part 4: Track and verify the integration
Track integration instances and retrieve the request ID
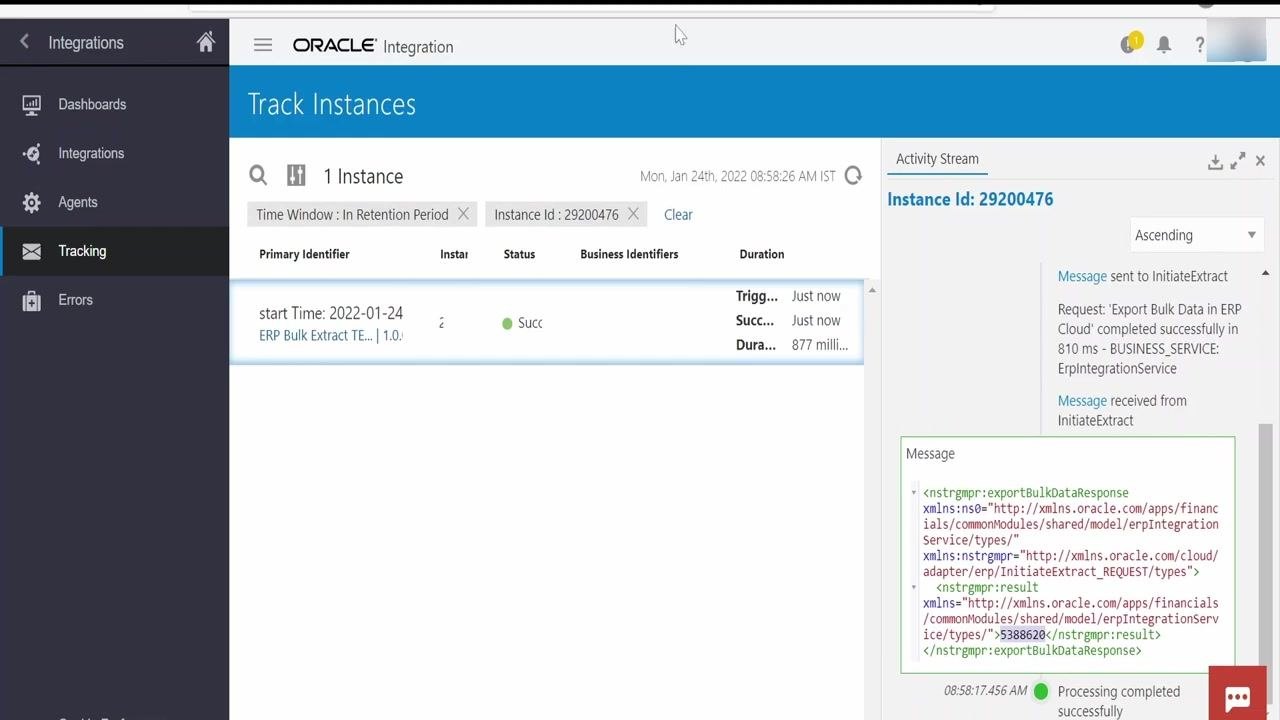
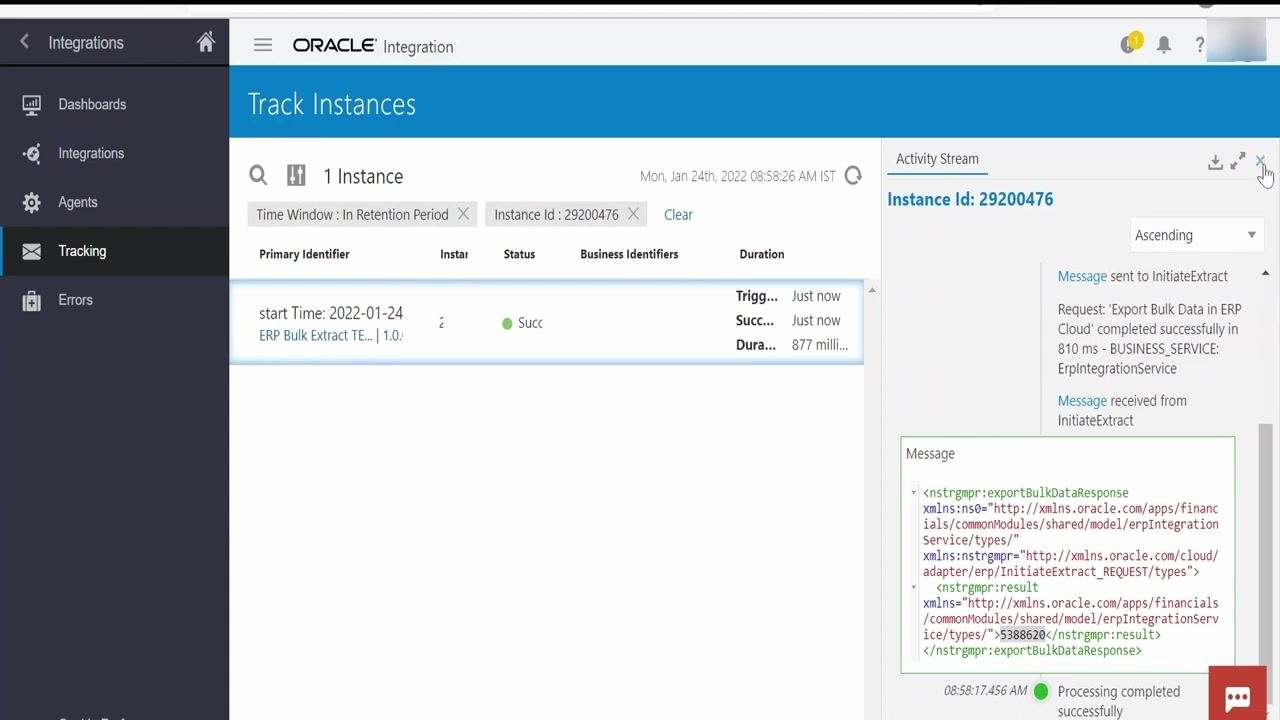
Go to the Tracking section in Oracle Integration Cloud and locate the instance of your integration run by Instance Id or start time. Review the Activity Stream for the instance to see each step's status, and copy the request ID generated by Fusion for reference or troubleshooting.
(Optional) Search for request status in Fusion
If needed, use the request ID to search for the process status in the Scheduled Processes section of Oracle Fusion. This step is optional.
Wait for the callback invocation
After submitting the request, wait a few minutes for Oracle Fusion to call your callback integration. Monitor the integration instance for the callback execution and confirm the process completes successfully.
Search and verify the integration instance using the request ID
Open the Oracle Integration Cloud dashboard and navigate to the Tracking section from the left sidebar. In the Track Instances screen, enter the request ID you copied earlier (for example, 5388620) into the search bar. Confirm that the matching instance appears, check that the Status column shows Succeeded, review the Received and Succeeded timestamps to confirm recent execution, and note the Duration of the run.
Review the activity stream for file write completion
Click the instance row to open the Activity Stream panel. Verify that the following steps completed successfully: instance created and enqueued for processing, Trigger BulkExtractCallback processed, data mapping completed, Invoke ERPCloudIntegrationService executed, and Invoke WriteExtract executed. Look for a message confirming the file was written to the SFTP server in binary format, note the file name (for example, PayablesExtract.xml), and confirm all steps show green status indicators.
Summary
To extract data from Oracle Fusion Cloud using OIC with Method 1, you:
- Copy and verify the ERP Integration Service WSDL URL.
- Configure the SOAP endpoint, including MTOM and header options.
- Map source fields to target fields, using dynamic expressions where needed.
- Review and activate the orchestration flow.
- Track integration runs and use the request ID for monitoring and troubleshooting.
- Wait for the callback to be invoked by Fusion, confirming end-to-end integration.
This completes the setup for consuming the SOAP connection as a trigger and handling the callback integration in Oracle Integration Cloud.
What's next
With the scheduled integration and callback integration both configured and verified, your bulk data extract from Oracle Fusion ERP Cloud will run automatically at the frequency you set, delivering files to your FTP directory each time the export job completes.
Generation details: cost, quality tiers
Docsie billed 5,000 credits ($3.50) to analyze this 10-minute video at standard quality. The rewrite, template fill and Word/PDF exports were included. The same video at each quality tier:
| Quality | Frames sampled | Credits | Approx. cost |
|---|---|---|---|
| Draft | every 16-30 s | 2,500 | $1.75 |
| Standard (this guide) | every 8-15 s | 5,000 | $3.50 |
| Detailed | every 4-7 s | 10,000 | $7.00 |
| Ultra | every 1-3 s | 20,000 | $14.00 |
Credits priced at $0.70 per 1,000; plans include a monthly allowance. Enterprise customers on on-premise or bring-your-own-model deployments run this on their own inference and pay no per-video credits.
Generated by Docsie Video-to-Docs on 2026-10-14 from a 9-minute video. Screenshots are frames from the source video and belong to their creator, BEENUM LEARNING, whose original is embedded above. If you own this video and want the guide removed or credited differently, contact us and we will act within one business day.