
How to Enable Redwood in Oracle Fusion
Enabling Redwood in Oracle Fusion (Oracle Cloud ERP) involves assigning the correct security roles, creating implementation users, configuring procurement preferences, and opening application pages in Visual Builder Studio for customization. This guide walks through each step, from role assignment to accessing the Page Designer for further page edits.
Video: A Guide to Enabling the Redwood Feature in Oracle Fusion Cloud ERP by Oracle ERP, Finance HCM & SCM Insights (2025). All credit for the demonstration goes to the creator; watch the original on YouTube. The written guide below was generated from this video by Docsie. Creator? Request a change or removal.
Enabling Redwood in Oracle Fusion (Oracle Cloud ERP) involves assigning the correct security roles, creating implementation users, configuring procurement preferences, and opening application pages in Visual Builder Studio for customization. This guide walks through each step, from role assignment to accessing the Page Designer for further page edits.
Prerequisites
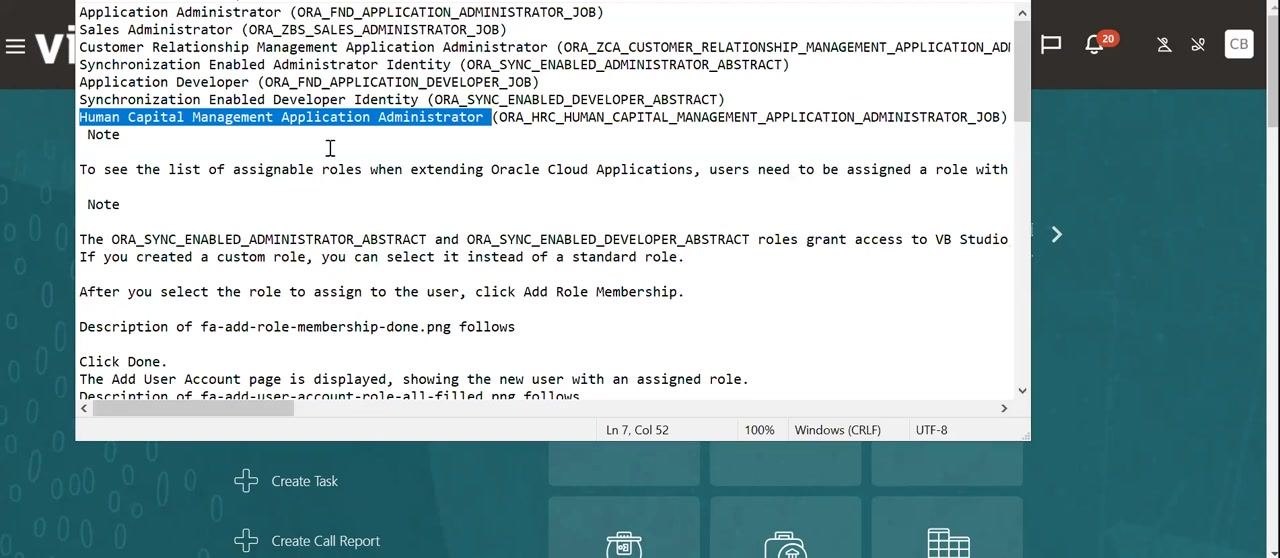
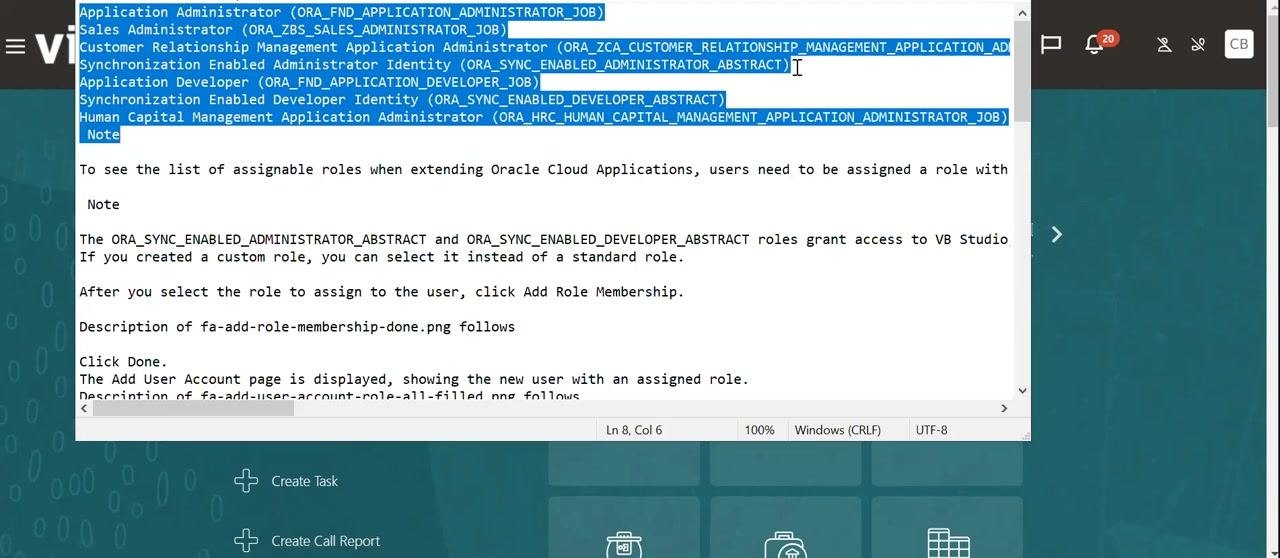
Before you enable Redwood in Oracle Fusion, confirm that your user account has the following roles assigned:
- Application Administrator (
ORA_FND_APPLICATION_ADMINISTRATOR_JOB) - Sales Administrator (
ORA_ZBS_SALES_ADMINISTRATOR_JOB) - Customer Relationship Management Application Administrator (
ORA_ZCA_CUSTOMER_RELATIONSHIP_MANAGEMENT_APPLICATION_ADMINISTRATOR_JOB) - Synchronization Enabled Administrator Identity (
ORA_SYNC_ENABLED_ADMINISTRATOR_ABSTRACT) - Application Developer (
ORA_FND_APPLICATION_DEVELOPER_JOB) - Synchronization Enabled Developer Identity (
ORA_SYNC_ENABLED_DEVELOPER_ABSTRACT) - Human Capital Management Application Administrator (
ORA_HRC_HUMAN_CAPITAL_MANAGEMENT_APPLICATION_ADMINISTRATOR_JOB)
Assign the required roles
Assign these roles to your user account as described in Oracle documentation. After selecting the role to assign, click Add Role Membership, then click Done. The Add User Account page displays the new user with the assigned role.
Create implementation users in Vision
Navigate to the Vision home page and open Setup and Maintenance
Go to the Vision environment home page and locate the Self Service Procurement dashboard. Use the search bar or navigation menu as needed to reach it.
From the Vision dashboard, click Setup and Maintenance, found under the Settings and Actions menu or main navigation.
Open the Initial Users functional area
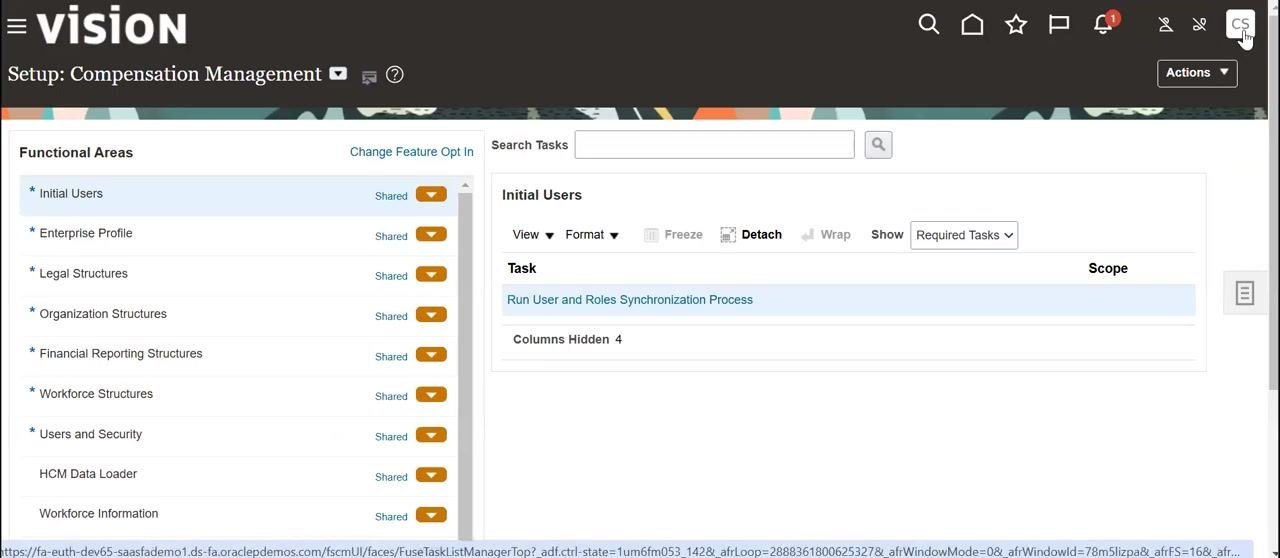
In the Setup: Compensation Management area, locate the Functional Areas panel on the left and select Initial Users. In the Tasks panel, confirm you can see tasks such as "Run User and Roles Synchronization Process."
Show all tasks and create an implementation user
Change the Show dropdown to All Tasks to display additional options, then locate and select Create Implementation Users.
Search for the implementation user
In the User Accounts section, use the search bar to find the user (for example, CRM Student04). Enter at least three characters of the user name to search. If no data appears, verify your search criteria.
Once the user appears in the search results, click the user name to open the account details.
Reset the implementation user's password
Review the account and start the reset
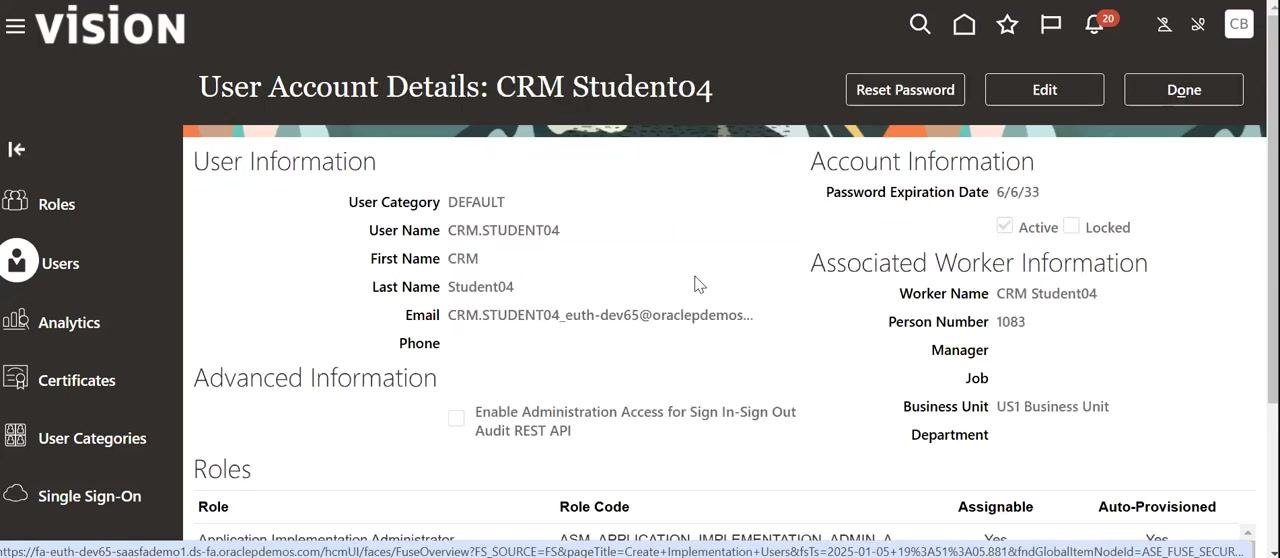
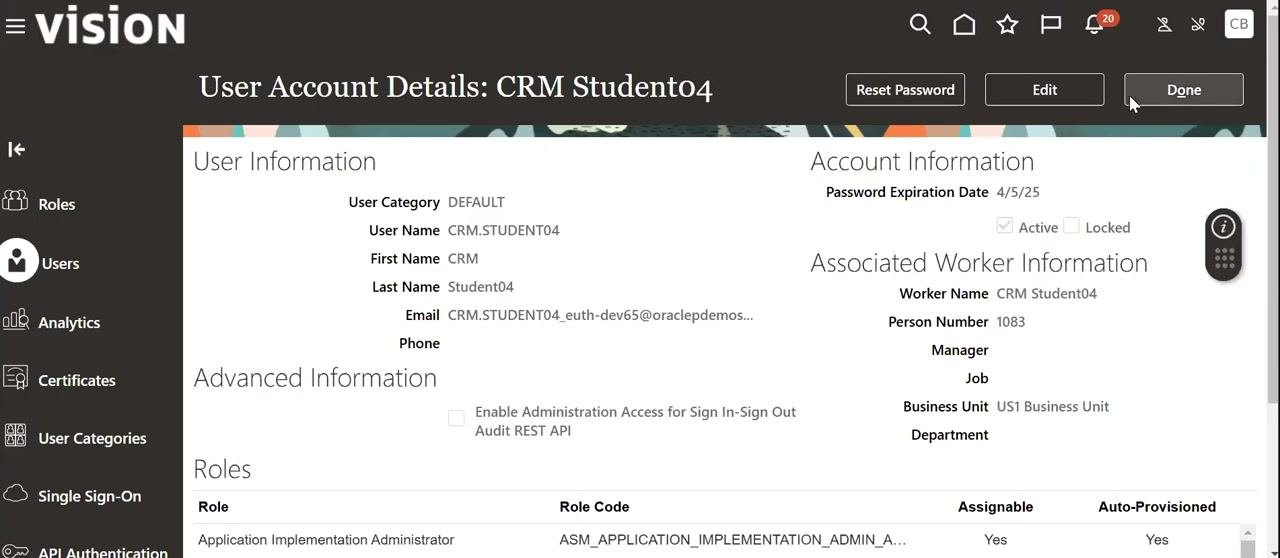
In the User Account Details screen, review the user information:
- User Category: DEFAULT
- User Name: CRM.STUDENT04
- First Name: CRM
- Last Name: Student04
- Email: CRM.STUDENT04_euth-dev65@oraclep...
Click Reset Password at the top right.
Confirm the new password
If prompted, enter and confirm the new password manually, ensuring it meets Oracle Cloud security requirements. Click Done to save your changes.
Sign in with the updated credentials
Navigate to the Oracle Applications Cloud sign-in page, enter the User ID crm.student04, and enter the new password you just set. Click Sign In to access the system.
Note: Always confirm you are working in the correct environment (Vision or production), and only reset passwords for users you are authorized to manage. If you have trouble signing in, verify that the user status is "Active" and not "Locked."
Configure procurement preferences
Open the Redwood-enabled Purchase Requisitions app
From the Oracle Cloud ERP home page, select the Procurement tab from the top navigation menu.
In the Procurement section, locate and select Purchase Requisitions (New) under the APPS area. This tile represents the Redwood-enabled version of the Purchase Requisitions application.
Update your delivery preferences
In the Self Service Procurement area, open the Preferences panel, typically accessible via a gear icon or user menu. Under "Requisitioning BU," confirm the Business Unit (for example, US1 Business Unit).
In the "Delivery" section, click the Deliver to Location dropdown and type seat to filter locations. Select the appropriate location from the filtered list (for example, "02Seattle," "Seattle," or "Store 102 - Downtown Seattle"), then click Update to save your preferences.
Edit the page in Visual Builder Studio
Open Visual Builder Studio from the page menu
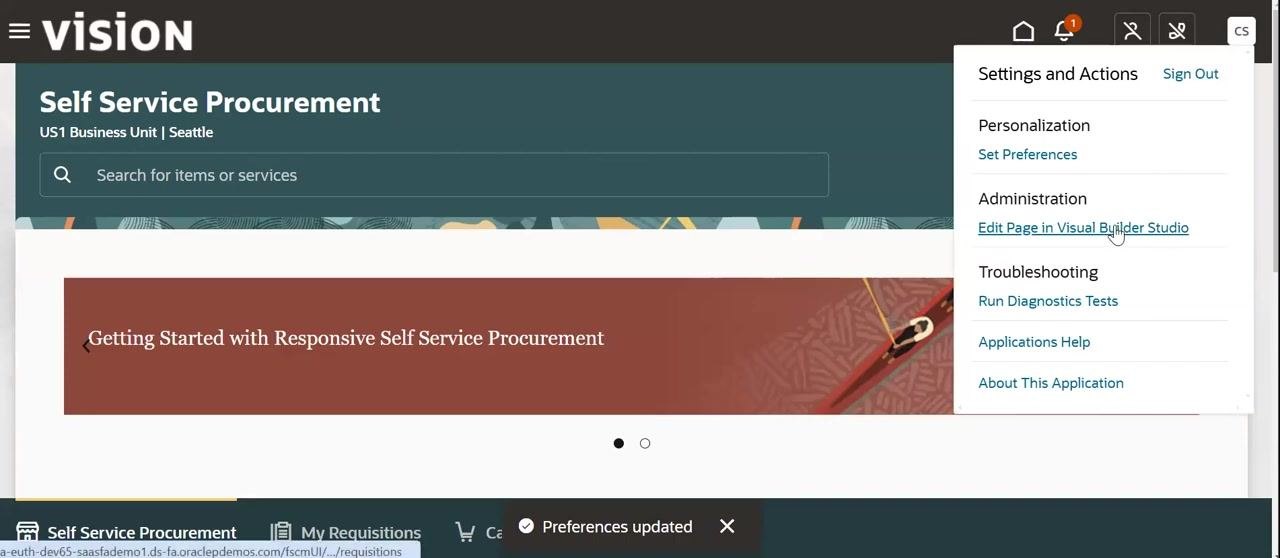
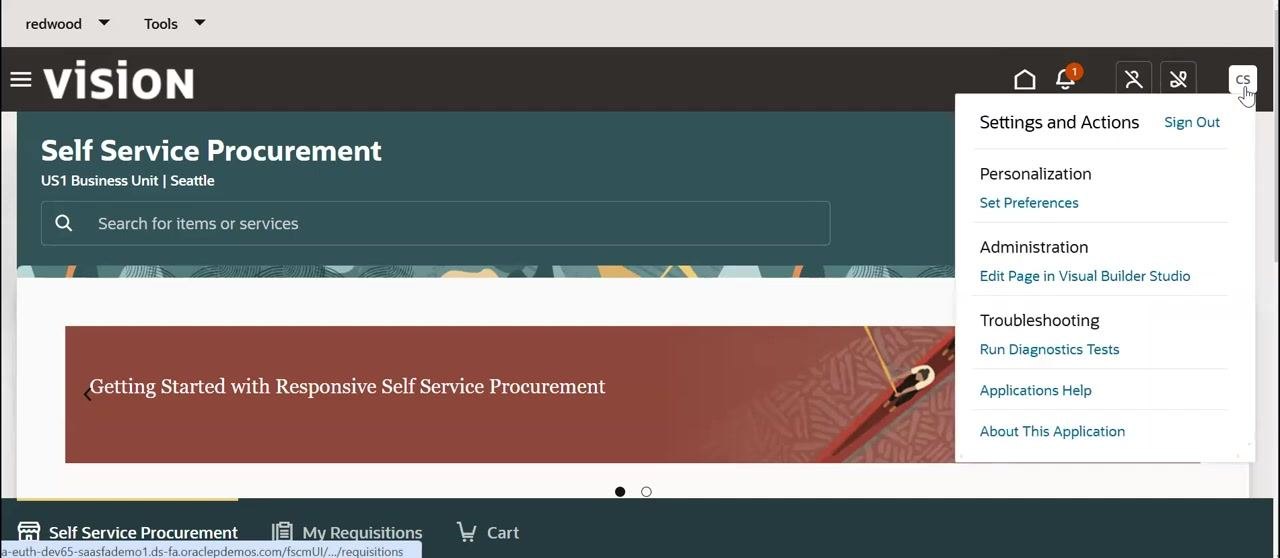
Open the Settings and Actions menu at the top right, under your user initials. Under Administration, select Edit Page in Visual Builder Studio.
Wait for the workspace to load
A loading screen appears, reading "Looking for workspaces in project: Application Extensions." Wait for the progress bar to complete.
The Oracle Visual Builder Studio splash screen then displays while the system retrieves properties and prepares the environment. Loading may continue for a few moments.
If a message appears such as "Beginning Catalog Cache Reset for [environment details]," wait for the process to finish.
Arrive at the Page Editor
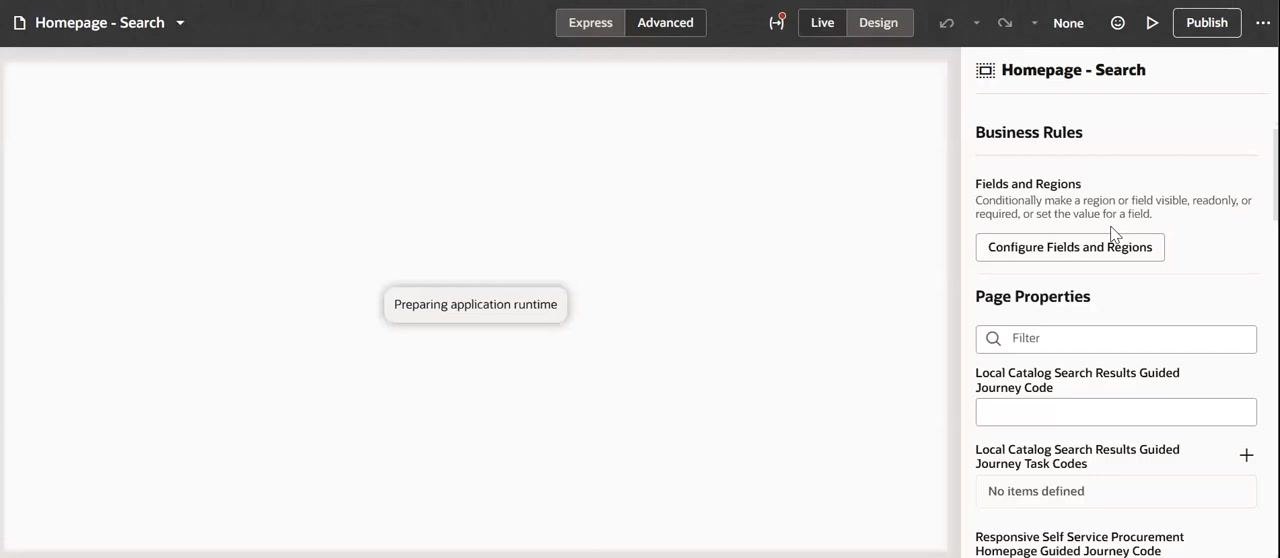
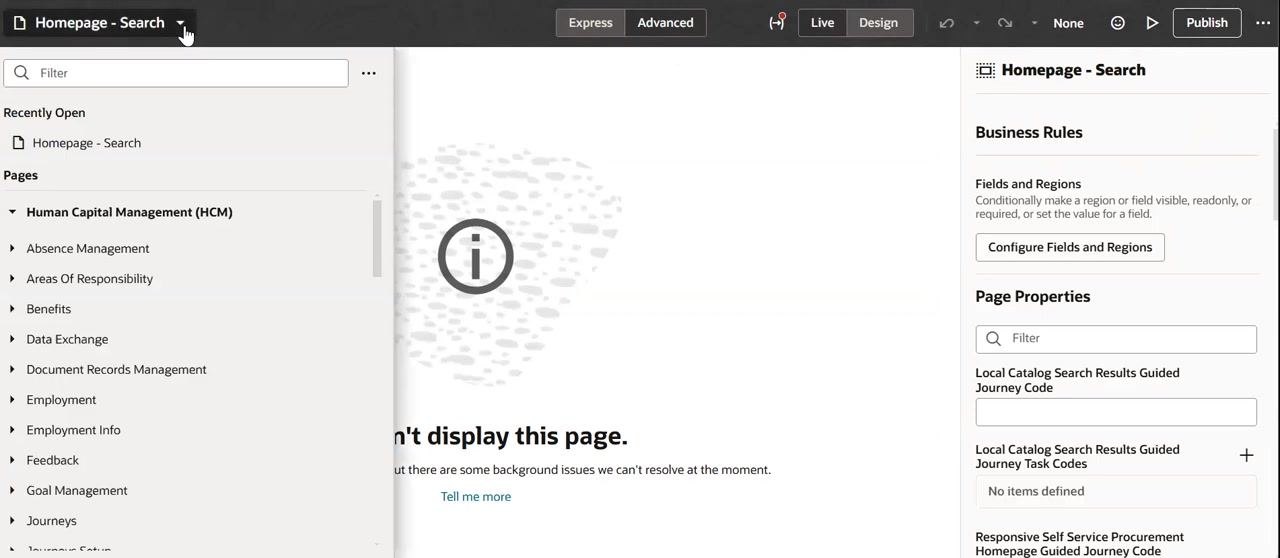
Once loaded, the Visual Builder Studio interface appears. The page editor displays "Homepage - Search" at the top, and the center panel may show "Preparing application runtime." On the right, you see options for Business Rules (such as Configure Fields and Regions) and Page Properties (such as Local Catalog Search Results Guided Journey Code).
Note: Ensure you have the necessary permissions to access Visual Builder Studio and edit pages. Always save your changes and test them in a non-production environment before deploying to production.
Request project membership (if needed)
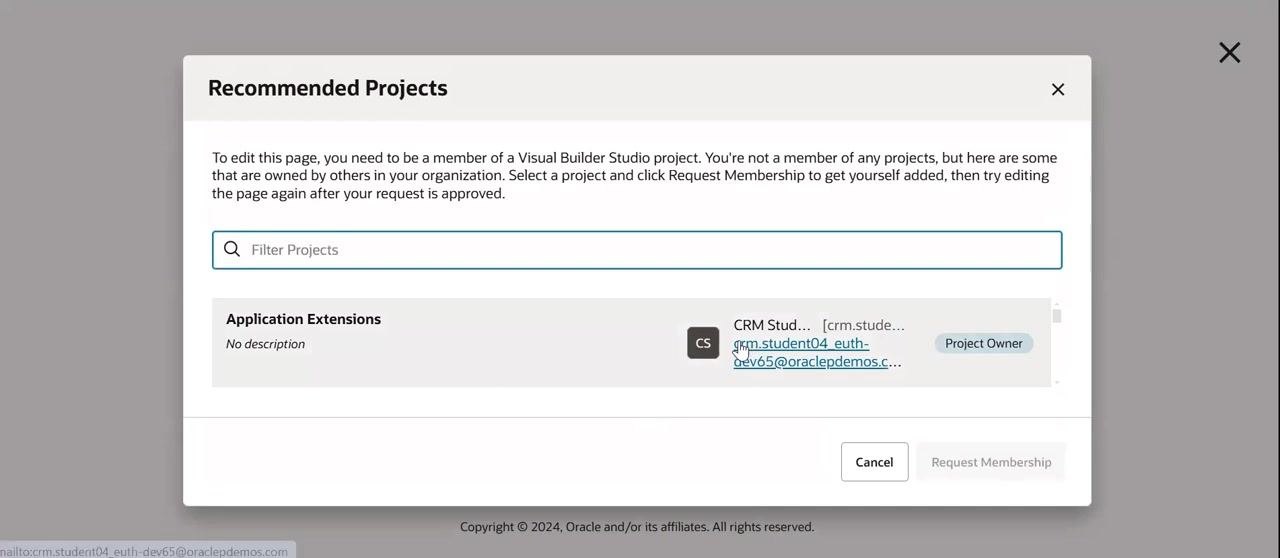
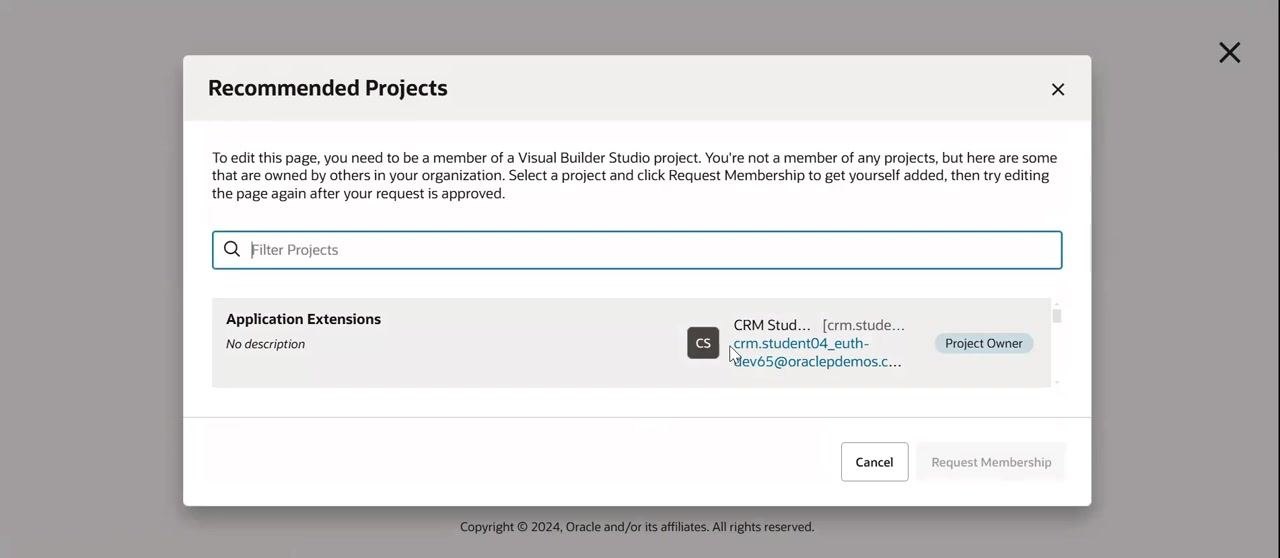
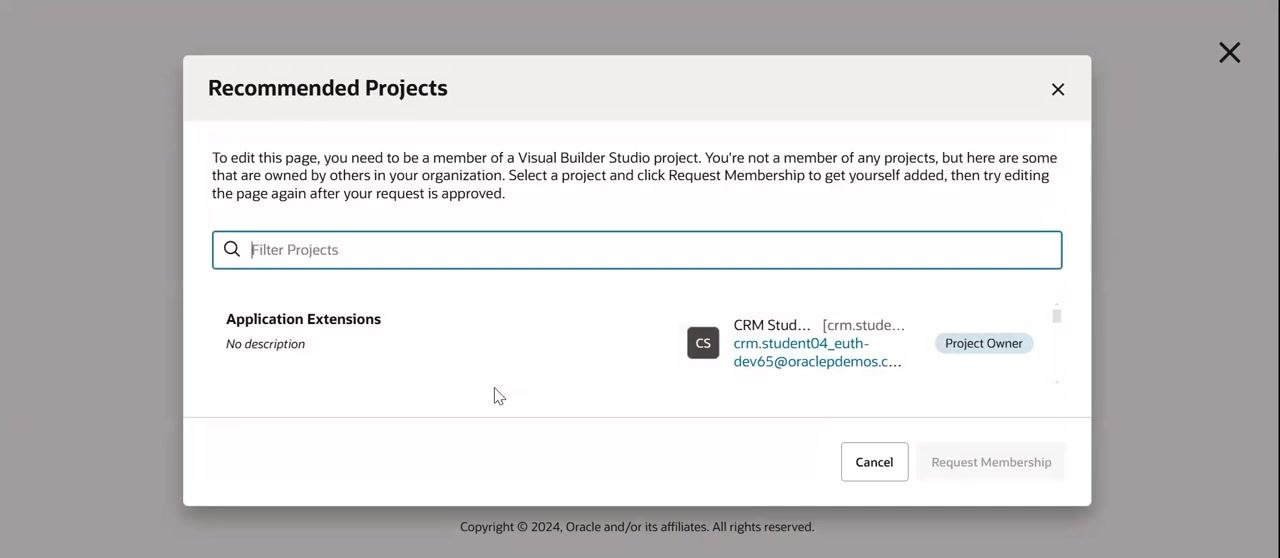
If you do not have access to edit the application extension, a dialog lists the available Visual Builder Studio projects. The project owner for the required application extension is shown (for example, crmstudent01). If you are not a member, select the project and click Request Membership.
If you need editing access and are not the project owner, sign in with the project owner account (for example, crmstudent01).
Note: Always confirm you have the correct roles assigned before attempting to enable Redwood or edit application pages.
Manage the project team
Open Project Home and locate the Team tab
If the homepage becomes inaccessible, click the dropdown next to "Homepage - Search" in the top left to open the navigation panel. This panel lists "Recently Open" items and various sections under Human Capital Management (HCM), such as Absence Management, Benefits, and Data Exchange, letting you navigate to other modules.
If the homepage remains inaccessible, return to the Project Home dashboard. The left sidebar includes navigation options: Organization, Project Home, Workspaces, Git, Merge Requests, Maven, NPM, Docker, Builds, and Releases. The main area displays "Recent Activities - December 2024" with a list of recent actions, such as pipeline creation and configuration changes. The right panel provides information about NPM and Docker, including a prompt to link a Docker registry.
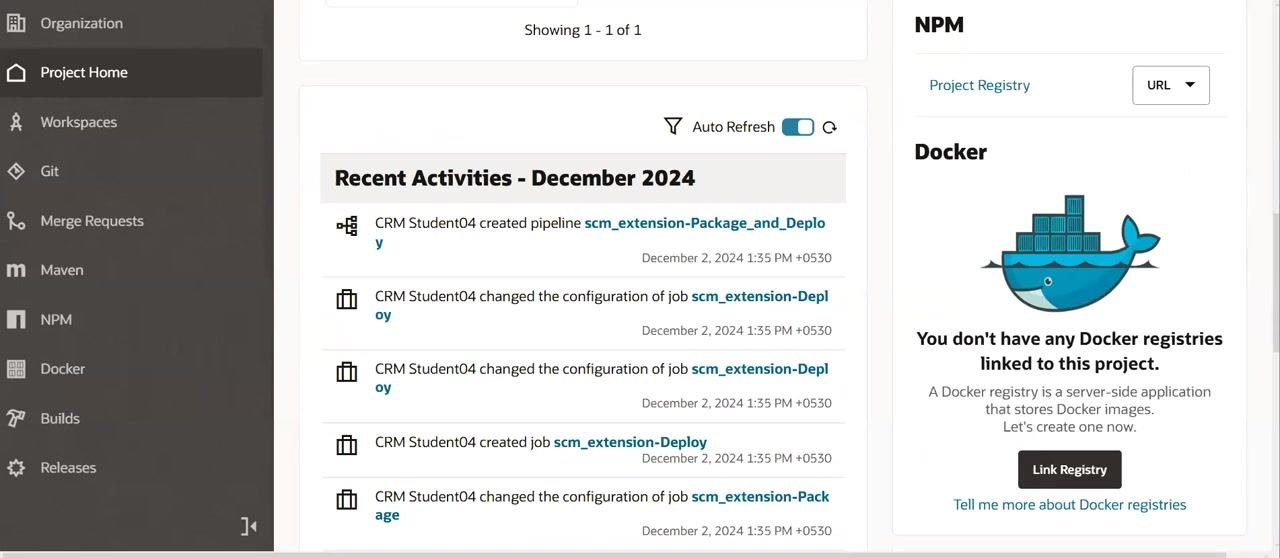
In the Project Home dashboard, locate the Team tab on the right panel and click it to view and manage team members.
Add a new team member
Click + Add Member again. In the "Add Member" dialog, the system now recognizes "Chandrasekhar Byna [sekhar.byna]" as a selectable user. Select the user from the dropdown, ensure Project Owner is selected as the membership type, and click Add to finalize.
Verify that the user now appears in the Team panel as a team member, with the role displayed as "Developer." The search field still contains "sekhar.byna," and the user appears in the filtered results.
Sign out and sign in as the new team member
Navigate to the top right corner of the application interface and click the user initials button (for example, "CS") to open the Settings and Actions menu. Select Sign Out to log out.
On the Oracle Applications Cloud "Sign In" page, enter the User ID "sekhar.byna," enter the corresponding password, and click Sign In.
Open Procurement pages in Page Designer
Open Purchase Requisitions (New) after signing in
On the Oracle Applications Cloud home page, confirm you are greeted with "Good evening, Chandrasekhar Byna." Click the Procurement tab in the main navigation bar, then locate the Purchase Requisitions (New) tile under the APPS section and click it.
Open the page for editing
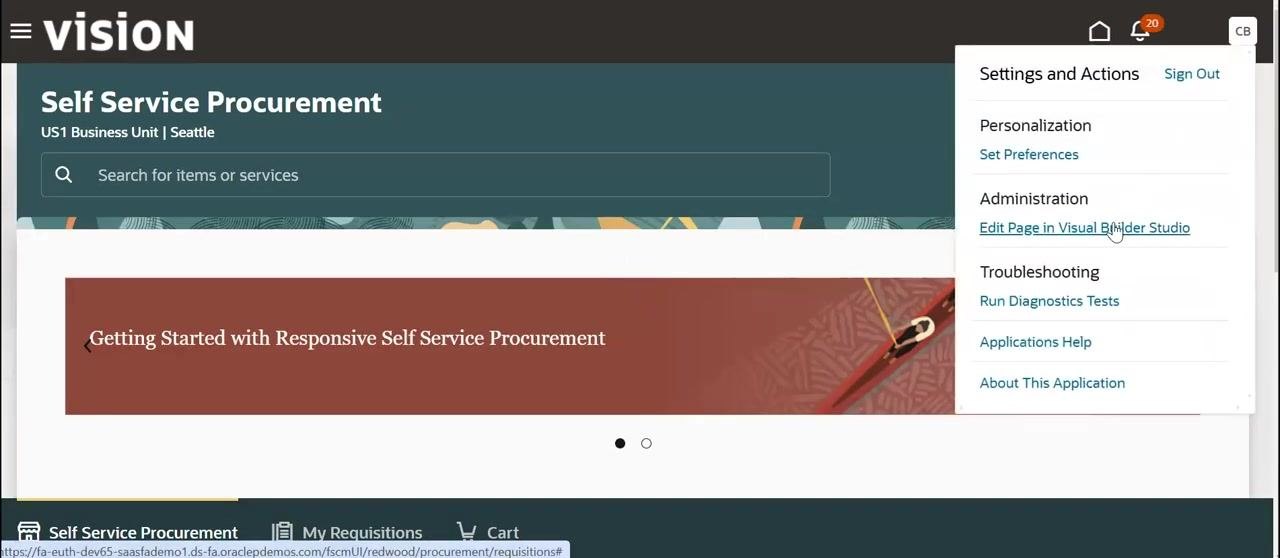
On the "Self Service Procurement" page, click the user initials button ("CB") at the top right to open the Settings and Actions menu. Under Administration, select Edit Page in Visual Builder Studio.
Wait for the new workspace to initialize
Observe the progress indicator showing the setup steps: "Clone Repository," "Create Workspace," and "Open workspace." The system displays "Creating new workspace: Workspace PRC."
The progress bar updates to "Preparing workspace: Workspace PRC." Wait for the process to finish before proceeding.
The Oracle Visual Builder Studio splash screen then appears with a progress bar and the message "Beginning Catalog Cache Reset for [environment details]."
Review the Page Designer
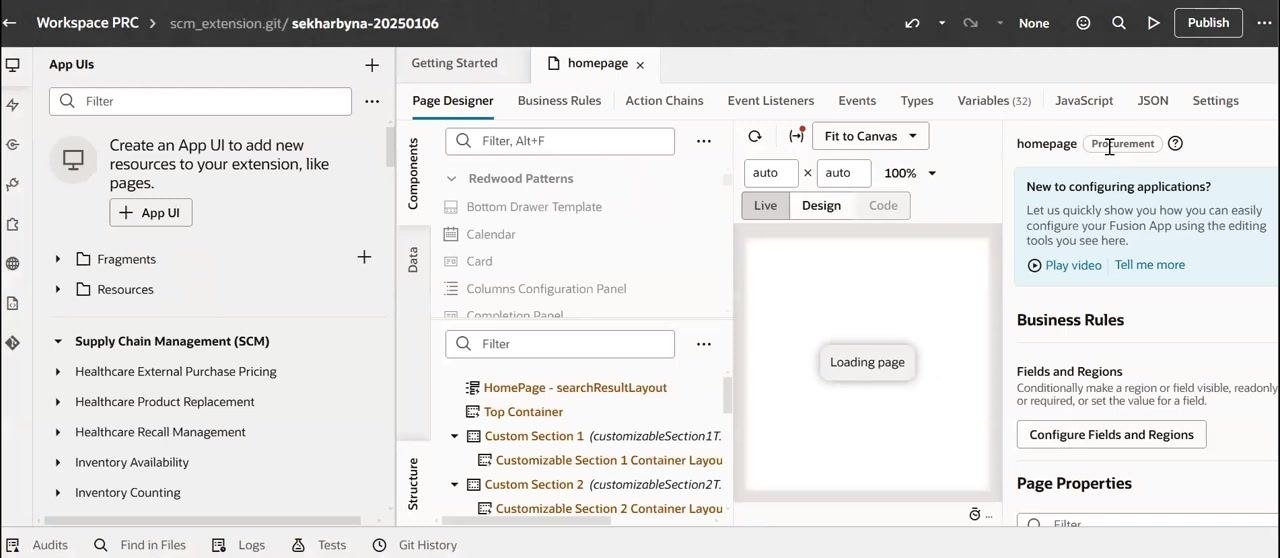
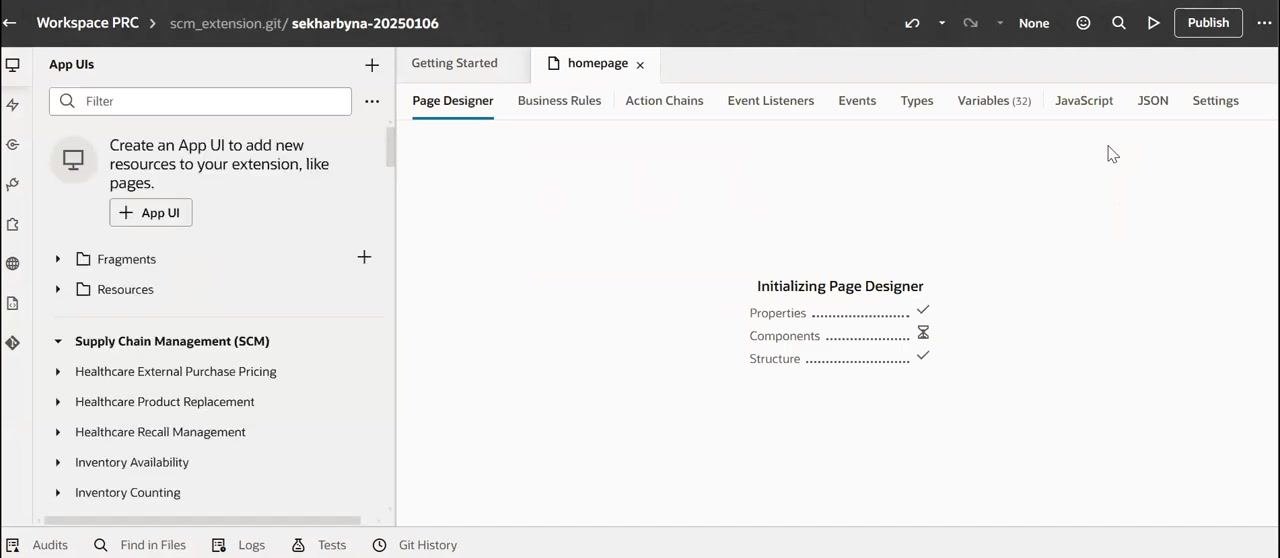
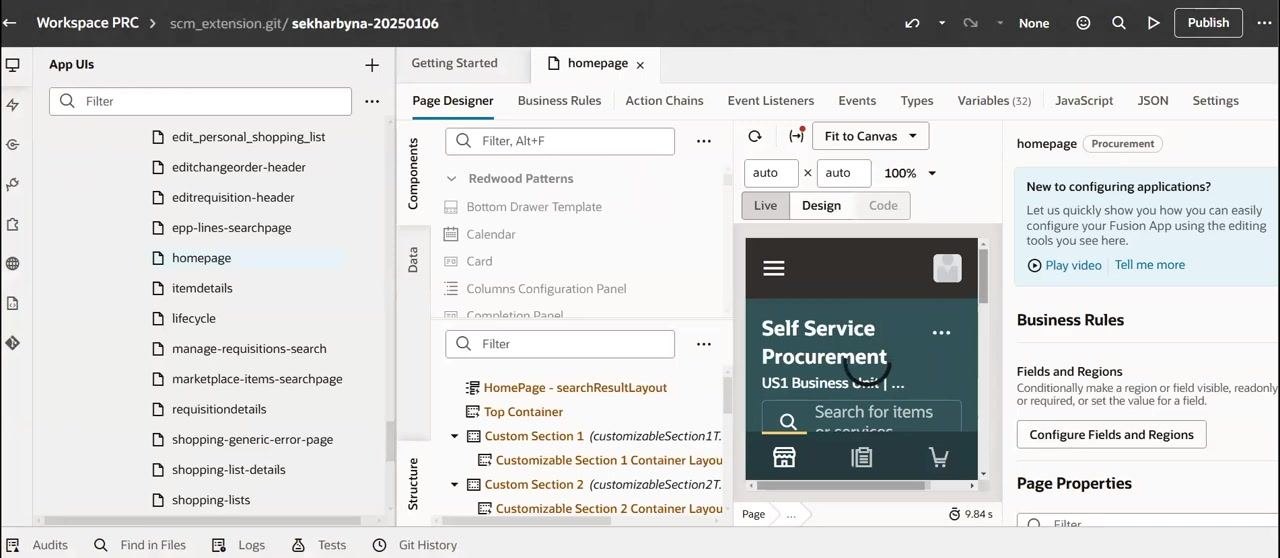
The workspace "Workspace PRC" opens, showing the Page Designer tab. The "Initializing Page Designer" message appears, with status indicators for Properties, Components, and Structure. The left panel lists "App UIs," "Fragments," "Resources," and "Supply Chain Management (SCM)" modules.
Confirm the "homepage" tab is active in the Page Designer. The left panel lists available UI files, including "homepage" and "itemdetails." The center panel displays a preview of the Self Service Procurement page, and the right panel provides configuration options for Business Rules, Fields and Regions, and Page Properties. The "Procurement" tag is visible above the configuration panel, indicating the context.
Summary
By completing these steps, you have enabled Redwood in Oracle Fusion by assigning the required roles, creating and configuring an implementation user, setting procurement preferences, and opening the Self Service Procurement page in Visual Builder Studio for customization. The workspace and Page Designer are now ready for further configuration.
What's next
- Continue customizing fields, regions, and business rules in the Page Designer as needed for your organization.
- Test any page changes in a non-production environment before deploying to production.
- Ensure team members have the correct project roles (such as Project Owner or Developer) before granting access to Visual Builder Studio workspaces.
Generation details: cost, quality tiers
Docsie billed 5,000 credits ($3.50) to analyze this 10-minute video at standard quality. The rewrite, template fill and Word/PDF exports were included. The same video at each quality tier:
| Quality | Frames sampled | Credits | Approx. cost |
|---|---|---|---|
| Draft | every 16-30 s | 2,500 | $1.75 |
| Standard (this guide) | every 8-15 s | 5,000 | $3.50 |
| Detailed | every 4-7 s | 10,000 | $7.00 |
| Ultra | every 1-3 s | 20,000 | $14.00 |
Credits priced at $0.70 per 1,000; plans include a monthly allowance. Enterprise customers on on-premise or bring-your-own-model deployments run this on their own inference and pay no per-video credits.
Generated by Docsie Video-to-Docs on 2026-10-14 from a 9-minute video. Screenshots are frames from the source video and belong to their creator, Oracle ERP, Finance HCM & SCM Insights, whose original is embedded above. If you own this video and want the guide removed or credited differently, contact us and we will act within one business day.