
How to Create an HCM Extract in Oracle Fusion
This guide walks you through how to create an HCM extract in Oracle Fusion, from understanding the System Extract tool to configuring, delivering, submitting, and reviewing the output of your extract. You will build a full employee data extract step by step, using the Oracle HCM Data Exchange module.
Video: Oracle Fusion HCM Extracts Beginner Lesson 1: My First Extract Setup by Tilak (2024). All credit for the demonstration goes to the creator; watch the original on YouTube. The written guide below was generated from this video by Docsie. Creator? Request a change or removal.
This guide walks you through how to create an HCM extract in Oracle Fusion, from understanding the System Extract tool to configuring, delivering, submitting, and reviewing the output of your extract. You will build a full employee data extract step by step, using the Oracle HCM Data Exchange module.
Understanding System Extract
System Extract is essential for techno-functional consultants because of its customization capabilities. You can write formulas and tailor extracts to specific business needs, making the tool valuable for both reporting and data transmission between Oracle HCM modules or external systems.
In Oracle Fusion, System Extract is built on Fast Formula and processed by the payroll engine. In ERP, System Extract is based on the benefits engine, which marks a key difference in architecture and use case between the two.
Prerequisites
- Access to the Oracle HCM home screen with the My Client Groups tab available.
- Permissions to create, edit, and submit extract definitions in Data Exchange.
- Familiarity with the business objects (such as Person, Person Name, and E-Mail) you plan to include in your extract.
Review the Oracle HCM home screen
The main dashboard displays a welcome message and user information. Navigation tabs include Me, My Team, My Client Groups, Benefits Administration, Workspace, Risk Management, and Partner Management.
Quick Actions are listed on the left, including:
- HCM Experience Design Studio
- Hire an Employee
- Add a Contingent Worker
- Add a Pending Worker
- Add a Nonworker
- Pending Workers
- Document Delivery Preferences
- Mass Download of Document Records
The central area displays application tiles, including Journeys, New Person, Person Management, Person Spotlight, Absences, Time Management, Compensation, Goals, Performance, Profiles, Career Development, Talent Review, Succession Plans, and Workforce Structures.
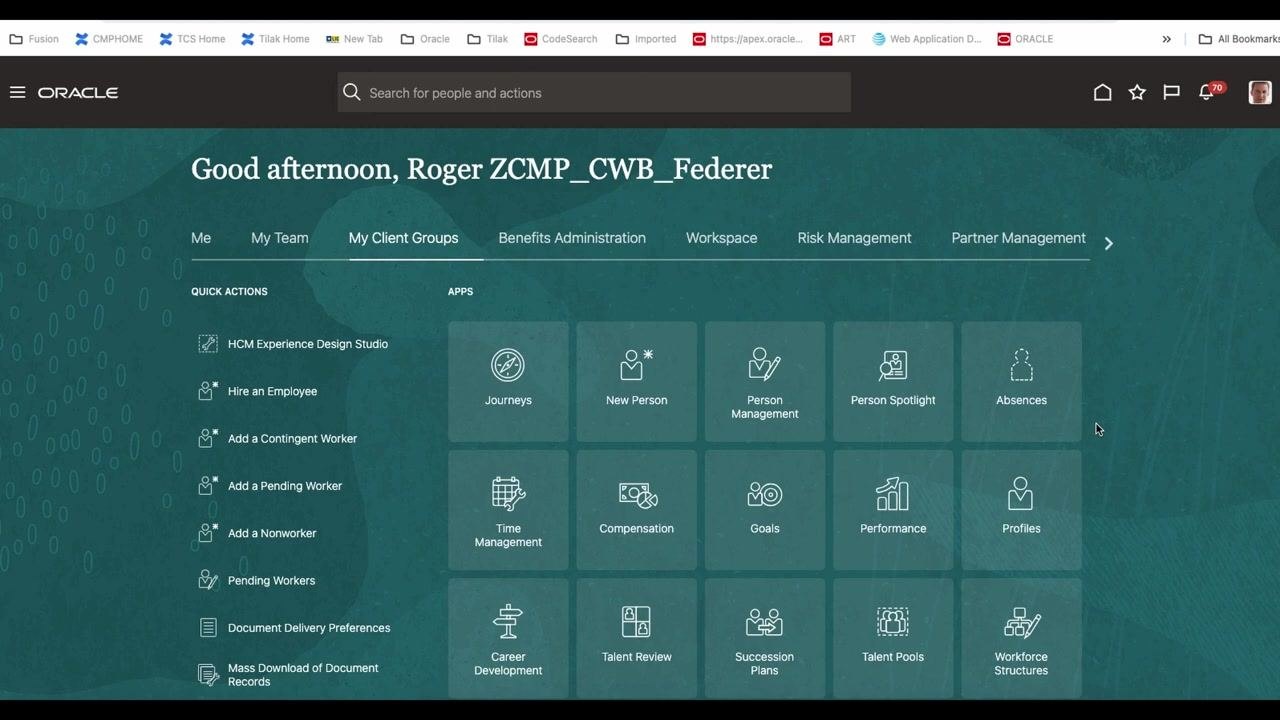
Navigate to My Client Groups
From the main navigation bar at the top, click My Client Groups. This tab provides access to various HR-related modules and actions.
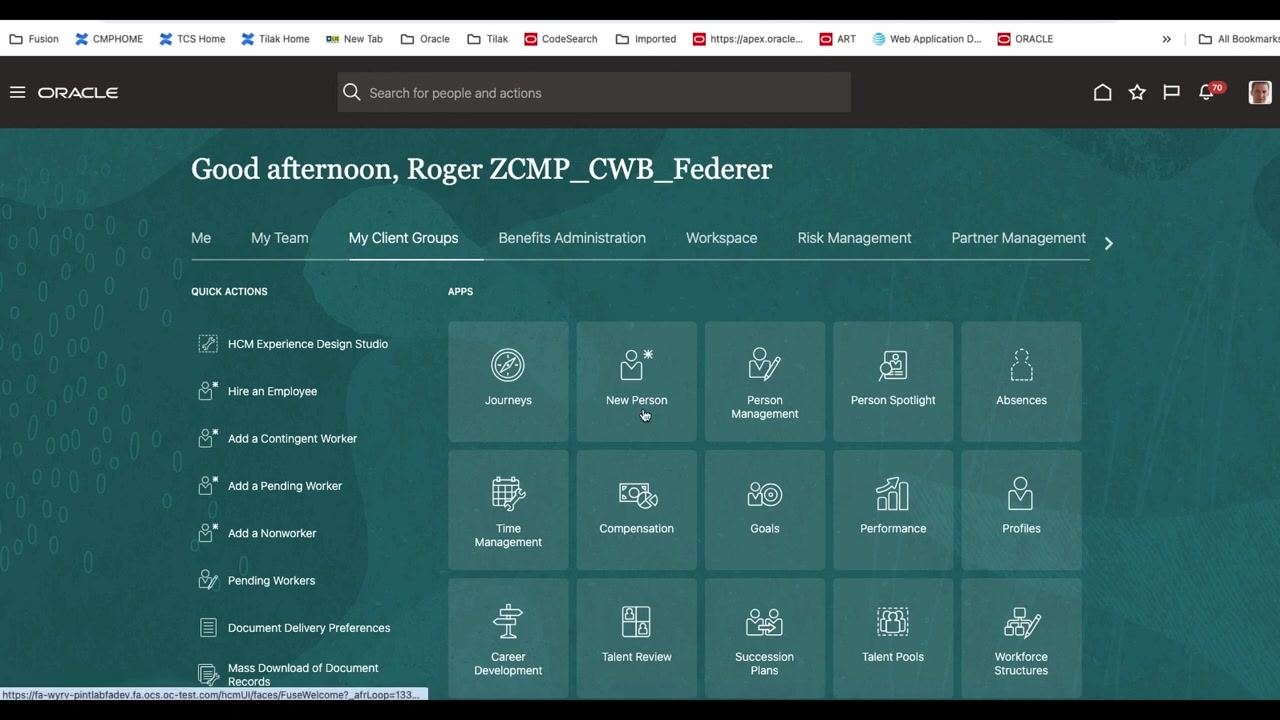
Open Data Exchange
Scroll through the application tiles under My Client Groups and click the Data Exchange tile, located at the bottom right of the app grid.
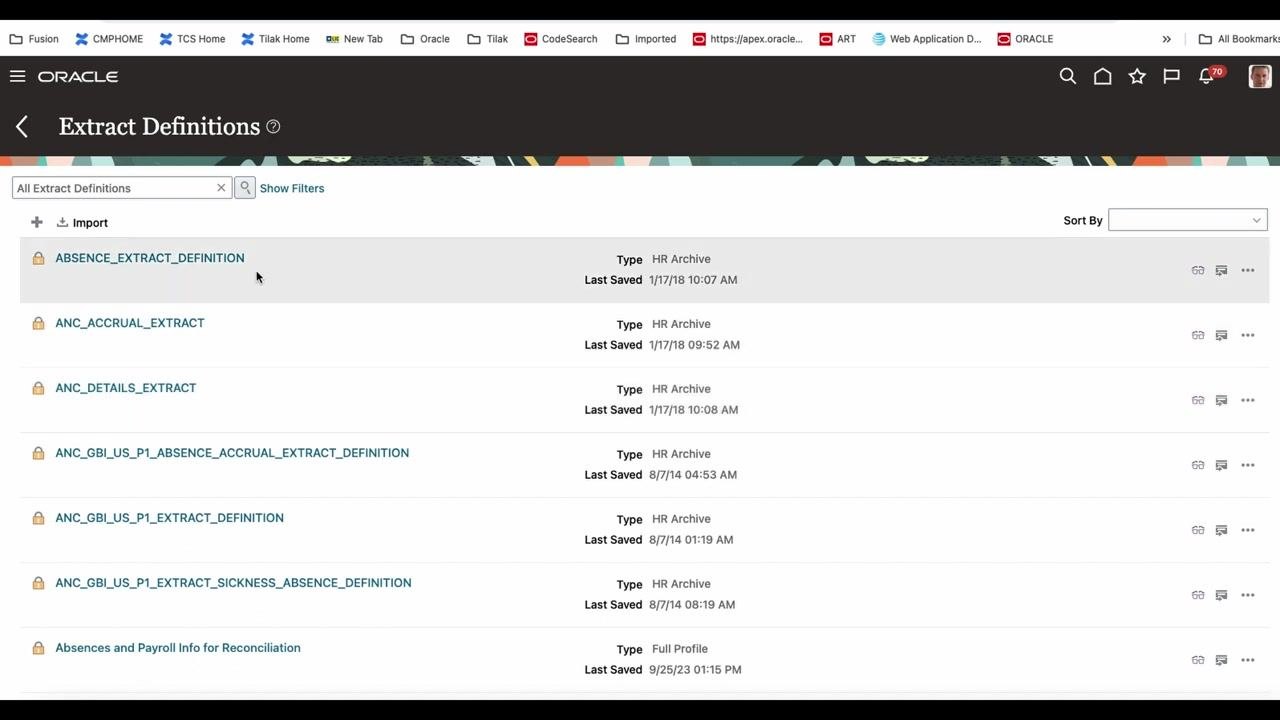
Access Extract Definitions
The system displays the Extract Definitions page. Here you can view all previously created extract definitions, including their names, types (for example, HR Archive or Full Profile), and last saved dates.
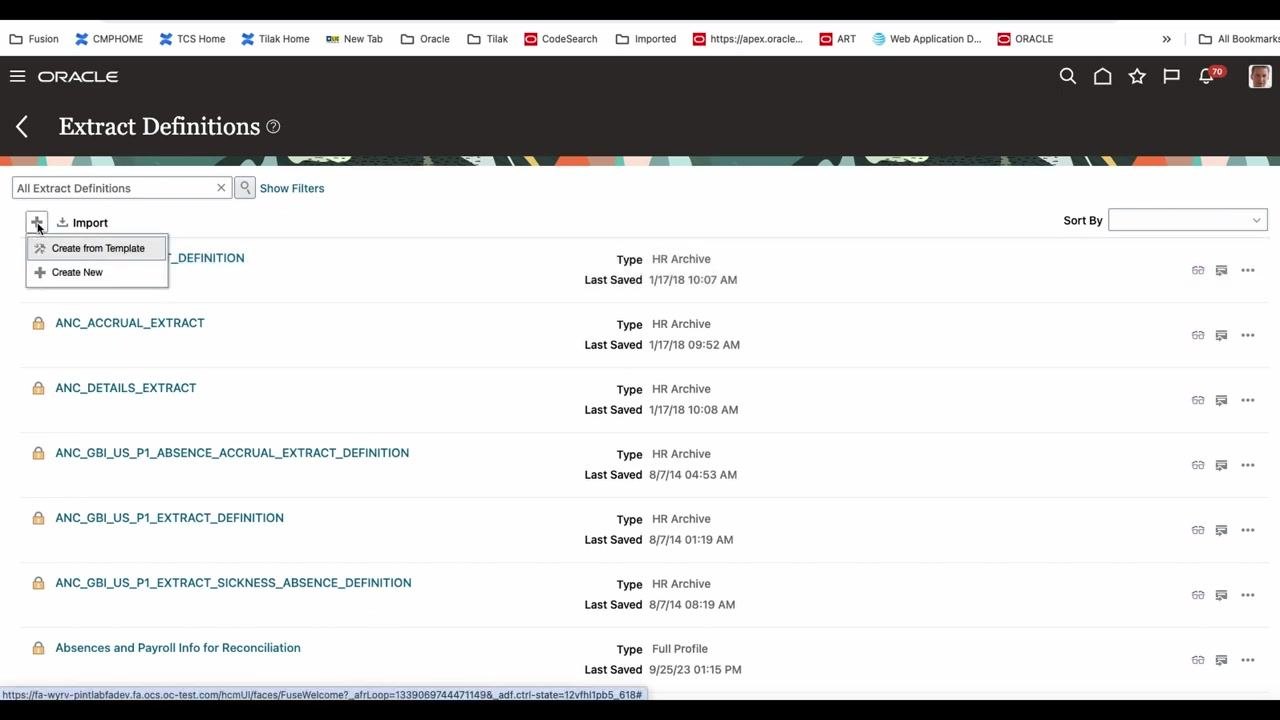
Create a new extract definition from a template
Click the plus (+) Import button, then select Create from Template in the dropdown. Using a pre-defined template simplifies setup, especially if you are new to building extracts.
Choose the source template
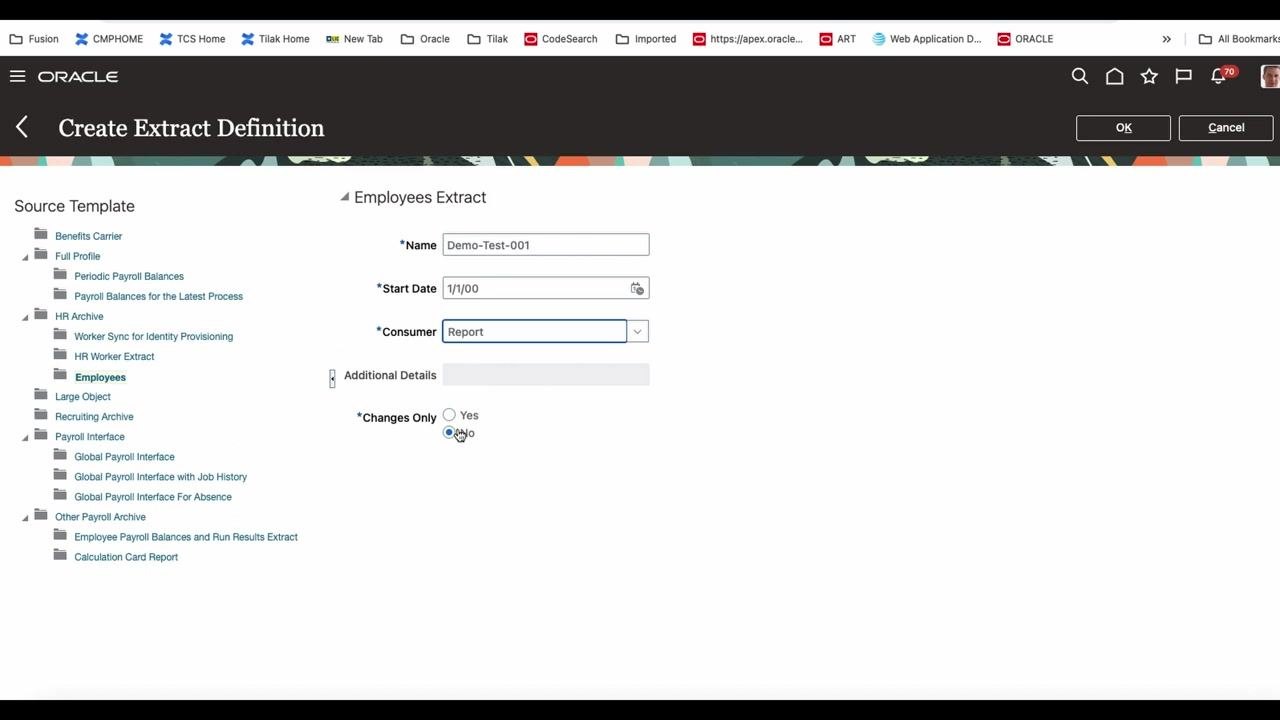
In the Create Extract Definition window, a list of source templates appears on the left. Expand the HR Archive section and select Employees to use the employee extract template.
Configure the extract definition details
Fill in the required fields for your new extract:
- Name: Enter
Demo-Test-001. - Start Date: Enter
1/1/00. - Consumer: Select
Reportfrom the dropdown. - Changes Only: Select
No(the default, which produces a full extract;Yeswould limit results to changed records only).
You can leave the remaining fields blank for this basic setup.
Using a template is recommended if you are new to this tool, since it pre-populates many settings. Report is the default and most common Consumer choice, while Undefined is rarely used. Selecting No for Changes Only ensures a full data extract.
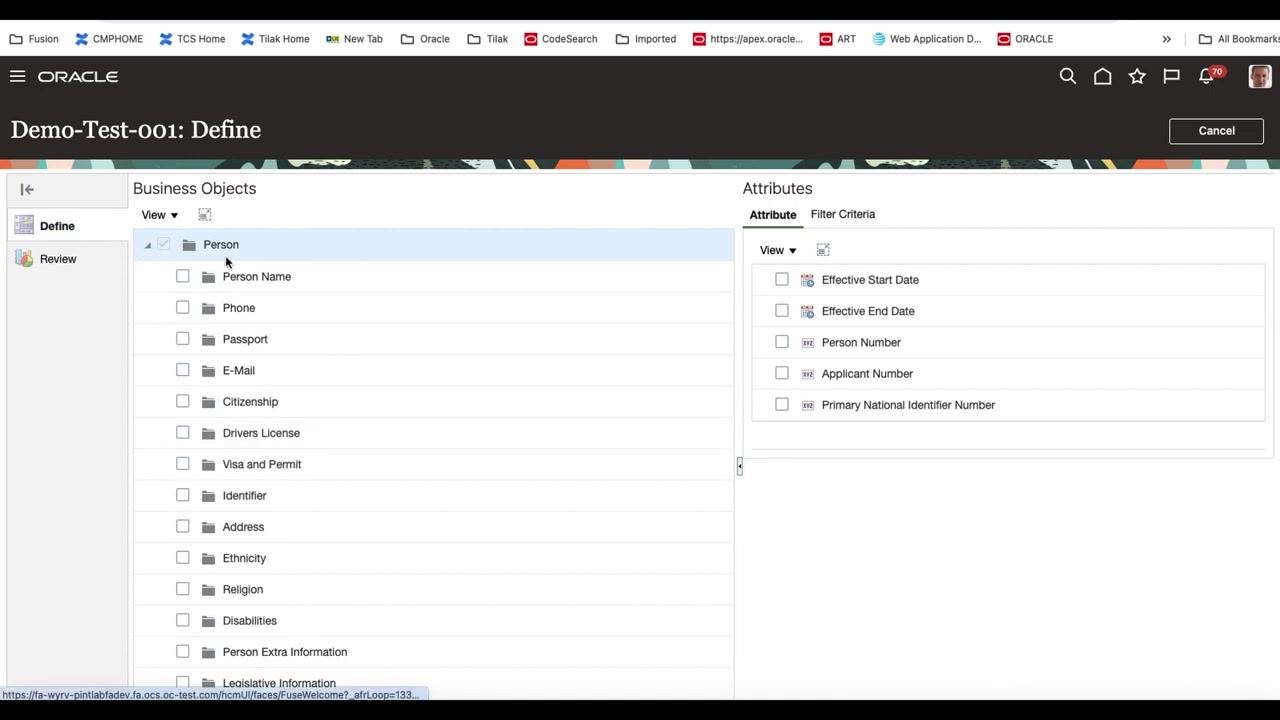
Expand the Person business object
In the Define tab, locate the Business Objects panel. Click the arrow next to Person to expand its available sub-objects and attributes.
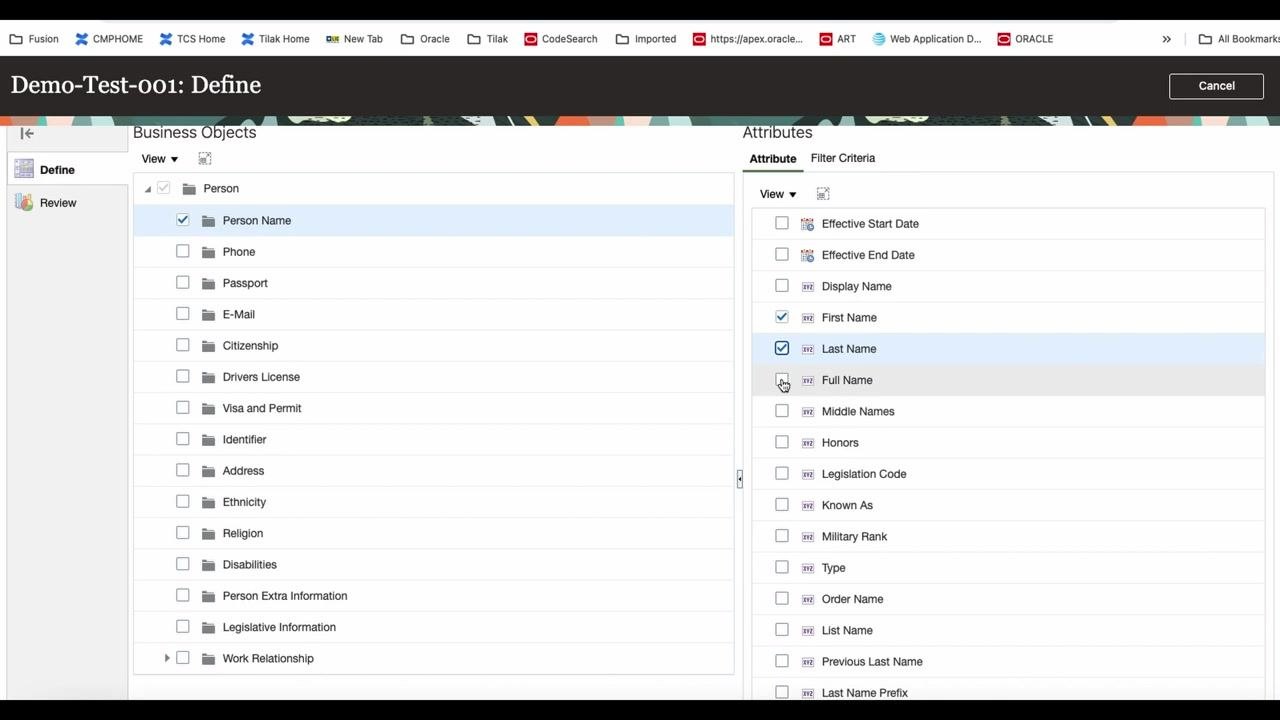
Select Person Name and choose required attributes
Click the checkbox next to Person Name under the Person object. The Attributes panel on the right then displays all available attributes for Person Name.
Do not select the top-level checkbox unless you want to include all attributes. Instead, individually select only the required attributes:
- First Name
- Last Name
- Full Name
- Type
- Effective Start Date
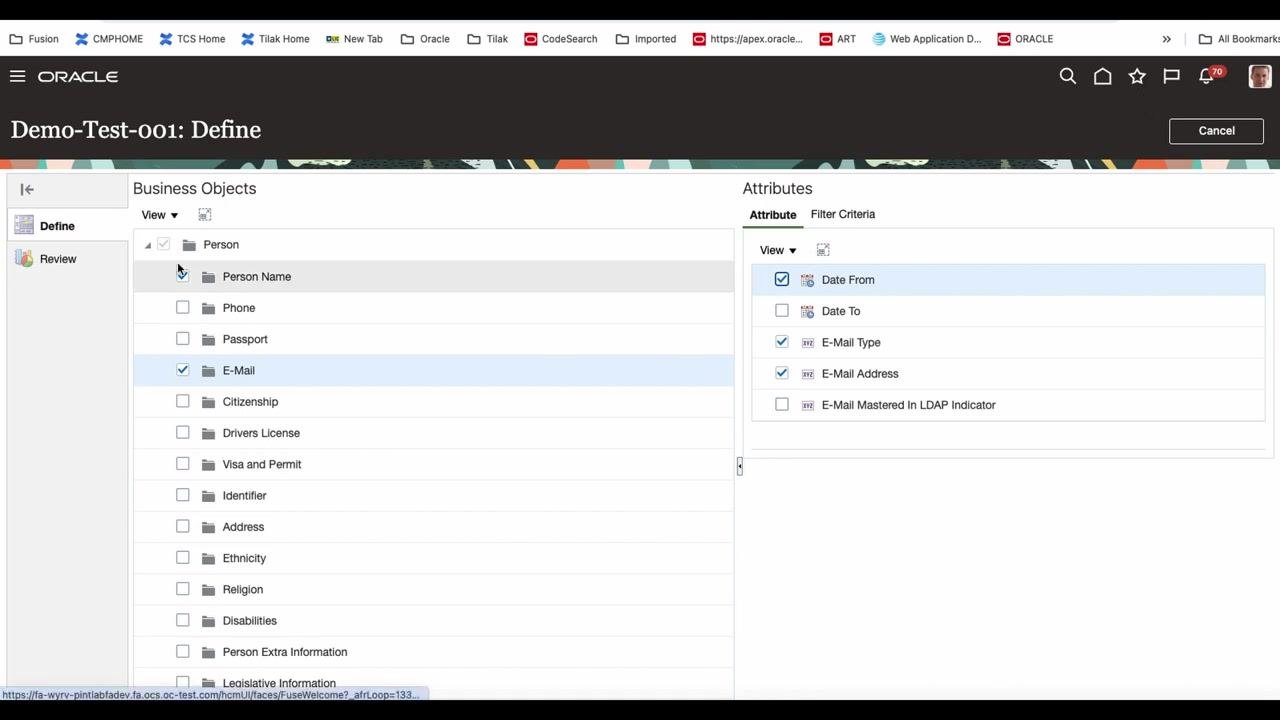
Select E-Mail and choose required attributes
In the Business Objects panel, check the box next to E-Mail. In the Attributes panel, select the following attributes:
- Date From
- E-Mail Type
- E-Mail Address
Review your attribute selections
Once you have selected all required attributes, click the Review tab on the left sidebar. This displays a summary of your selected data groups and attributes. Confirm that the following are listed:
- Under Person Name: Effective Start Date, First Name, Last Name, Full Name, Type
- Under E-Mail: Date From, E-Mail Type, E-Mail Address
Save the extract definition
Click the Save button in the top right corner. A confirmation dialog appears, asking: "The changes will be submitted. Do you want to continue?" Click Yes to confirm and save your extract definition.
Verify the extract definition status
After saving, the system displays the Review screen with your selected attributes and a status indicator, such as "In Progress." Ensure all selected fields are correctly listed under their respective data groups.
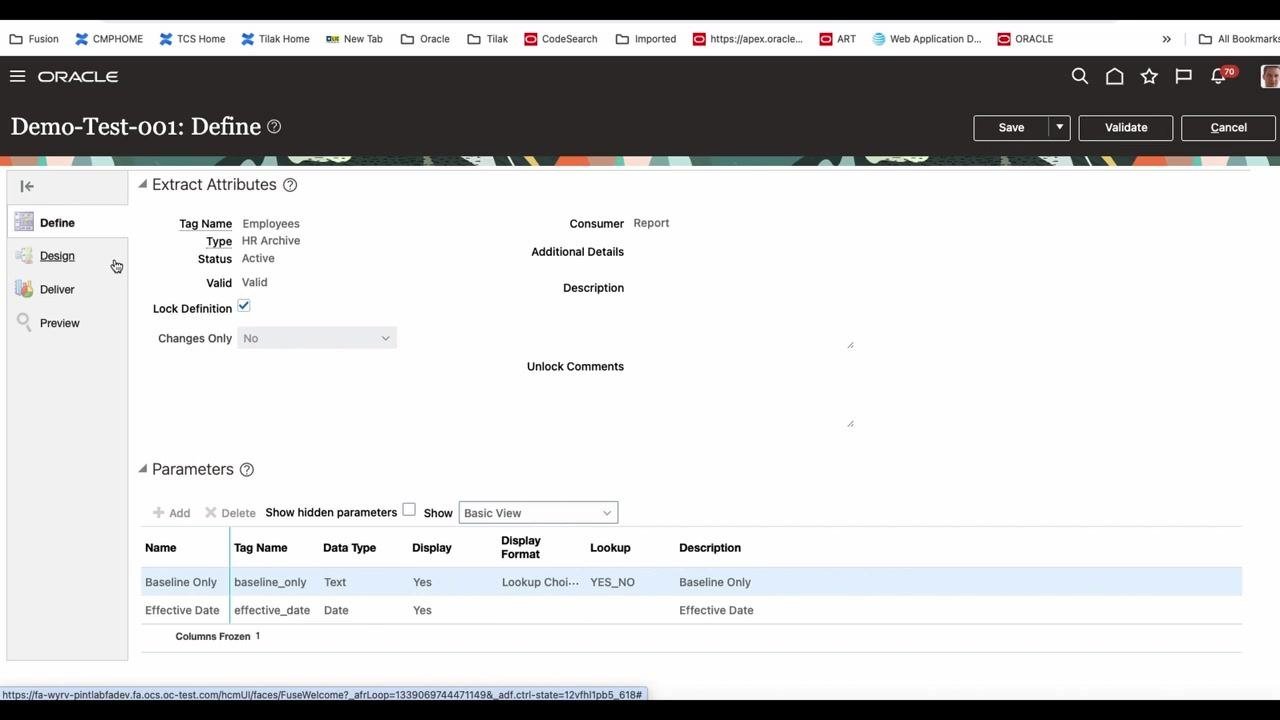
Review the Extract Attributes section
In the Define tab, locate the Extract Attributes panel at the top of the screen. Confirm the following details:
- Tag Name: Employees
- Type: HR Archive
- Status: Active
- Valid: Valid
- Consumer: Report
- Lock Definition: Checked (enabled)
- Changes Only: No (dropdown disabled)
Additional fields such as Additional Details, Description, and Unlock Comments are present but not filled in for this example.
Verify the Parameters section
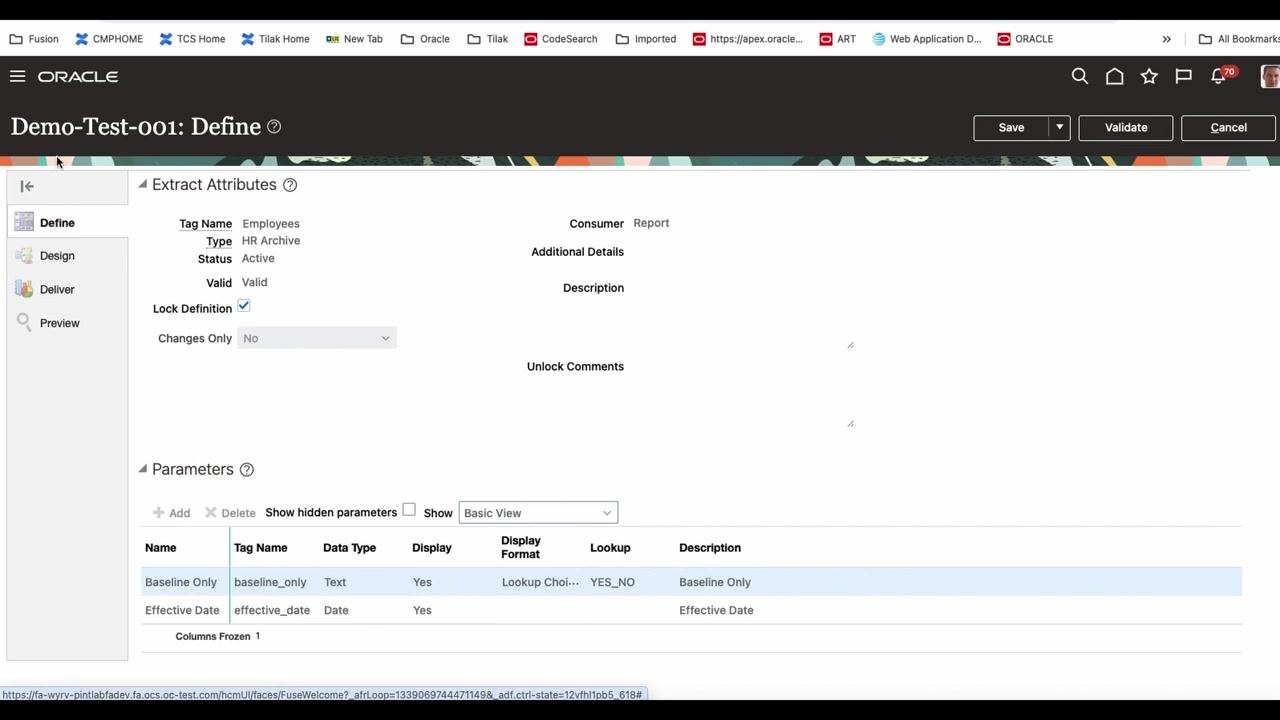
Scroll down to the Parameters panel and ensure the following parameters are listed:
- Baseline Only — Tag Name: baseline_only, Data Type: Text, Display: Yes, Display Format: Lookup Choice, Lookup: YES_NO, Description: Baseline Only
- Effective Date — Tag Name: effective_date, Data Type: Date, Display: Yes, Description: Effective Date
Confirm that both parameters are visible and set to display.
Validate or edit as needed
If any details are incorrect, use the Edit options to make changes. Use the Validate button in the top right to check for errors in your extract definition. Use the Save button to save any further changes, or Cancel to discard them.
Double-check all attribute values for accuracy before proceeding, and ensure all required parameters are present and correctly configured. When Lock Definition is checked, it prevents further changes unless unlocked. Always validate your extract before moving to delivery or scheduling.
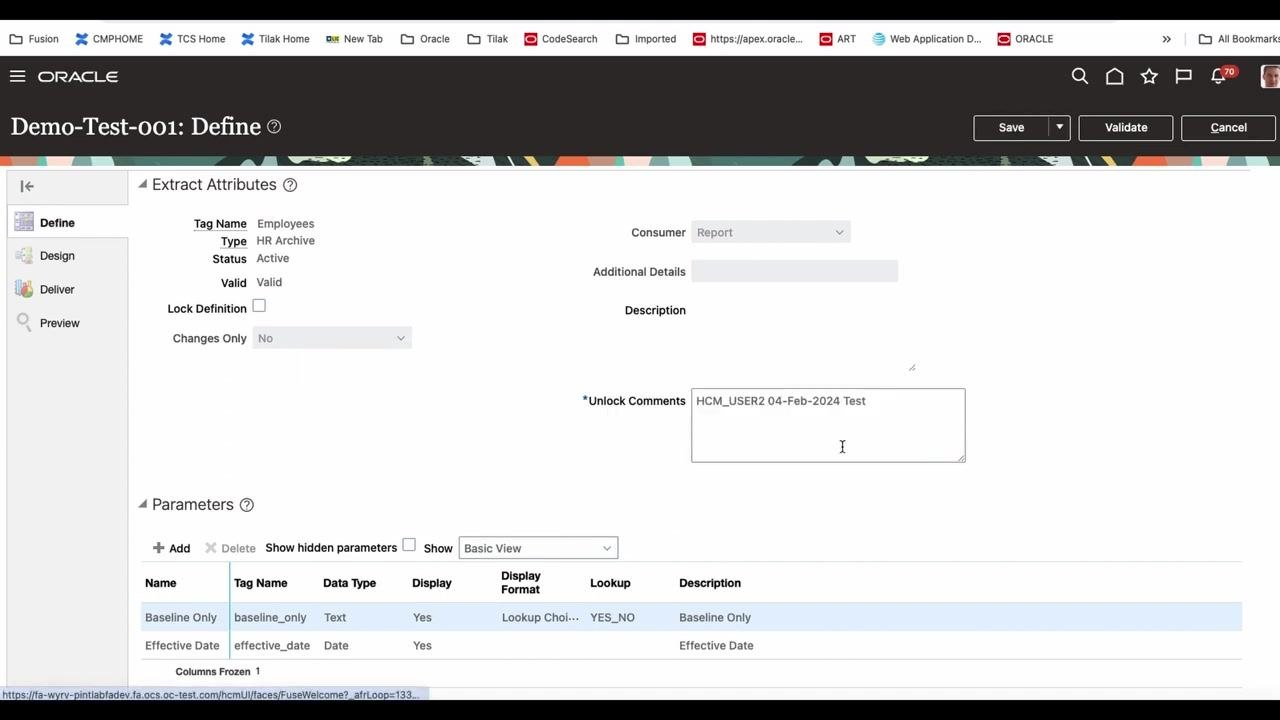
Update the Unlock Comments field
Enter a descriptive value in the Unlock Comments field, for example HCM_USER2 04-Feb-2024 Test. This field is now populated with the user and date information.
Review the Person object in the Design section
Select Design from the left navigation menu. The Design section displays a list of objects, such as Person, E-Mail, Person Name, and Person Name Details.
With the Person object selected, its properties display as follows:
- Name: Person
- Tag Name: Person
- User Entity: PER_EXT_SEC_PERSON_UE
- Threading Database Item: Extract Person ID
- Threading Action Type: Object actions
- Description: Person Data Group
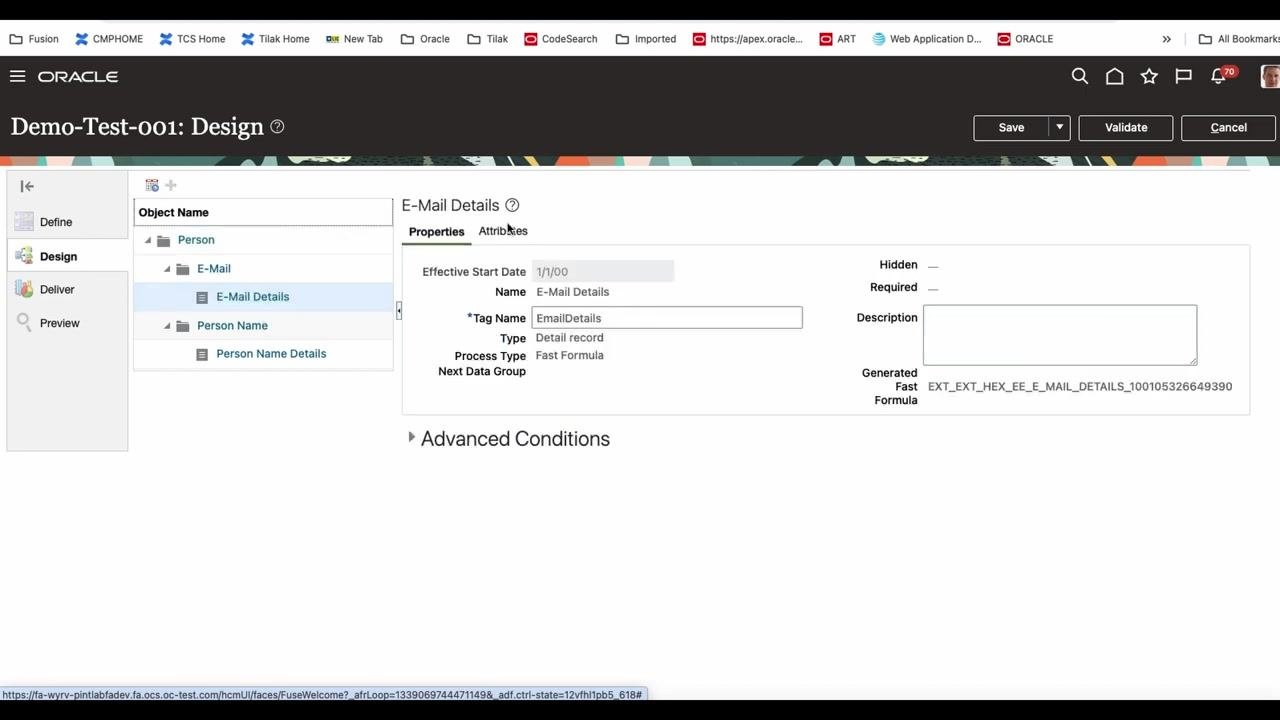
Review E-Mail Details properties
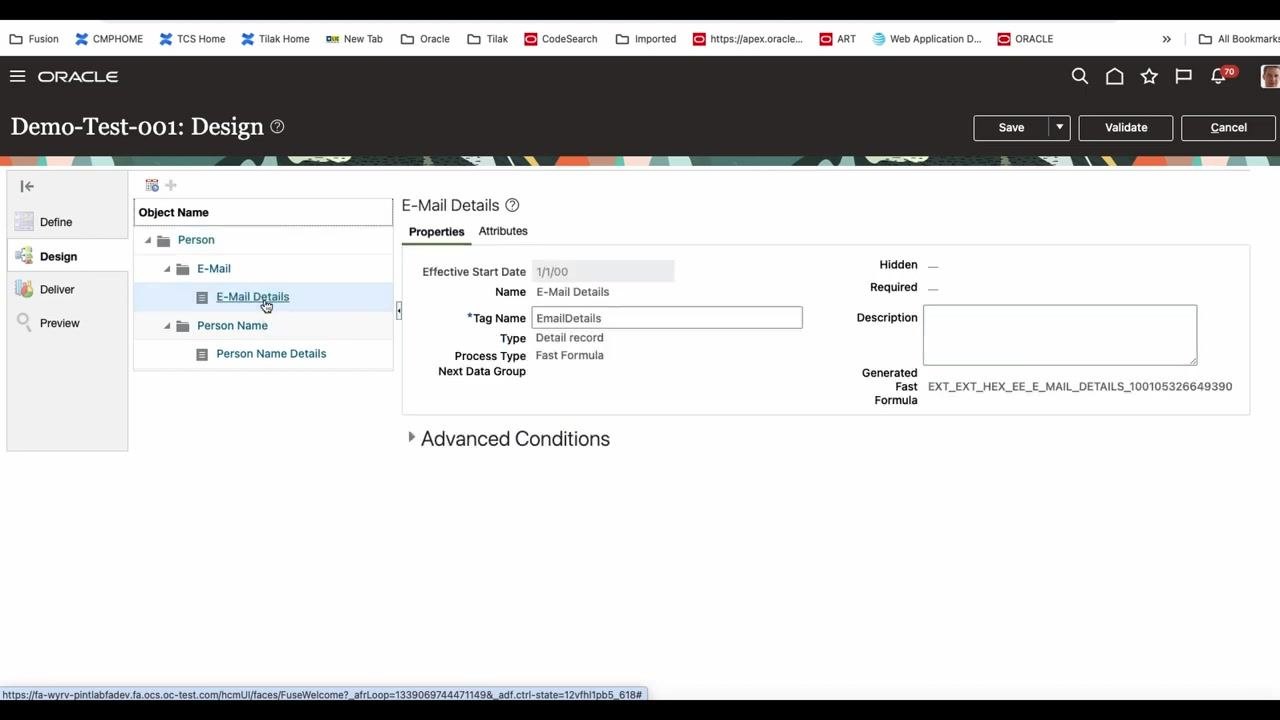
Click E-Mail Details under the E-Mail object in the Design section. The properties display as follows:
- Effective Start Date: 1/1/00
- Name: E-Mail Details
- Tag Name: EmailDetails
- Type: Detail record
- Process Type: Fast Formula
- Next Data Group: (blank)
- Description: (blank)
- Generated Fast Formula: EXT_EXT_HEX_EE_E_MAIL_DETAILS_100105326649390
Confirm the E-Mail Details properties and attributes
Review the Effective Start Date, Tag Name, and other details to confirm they are correct.
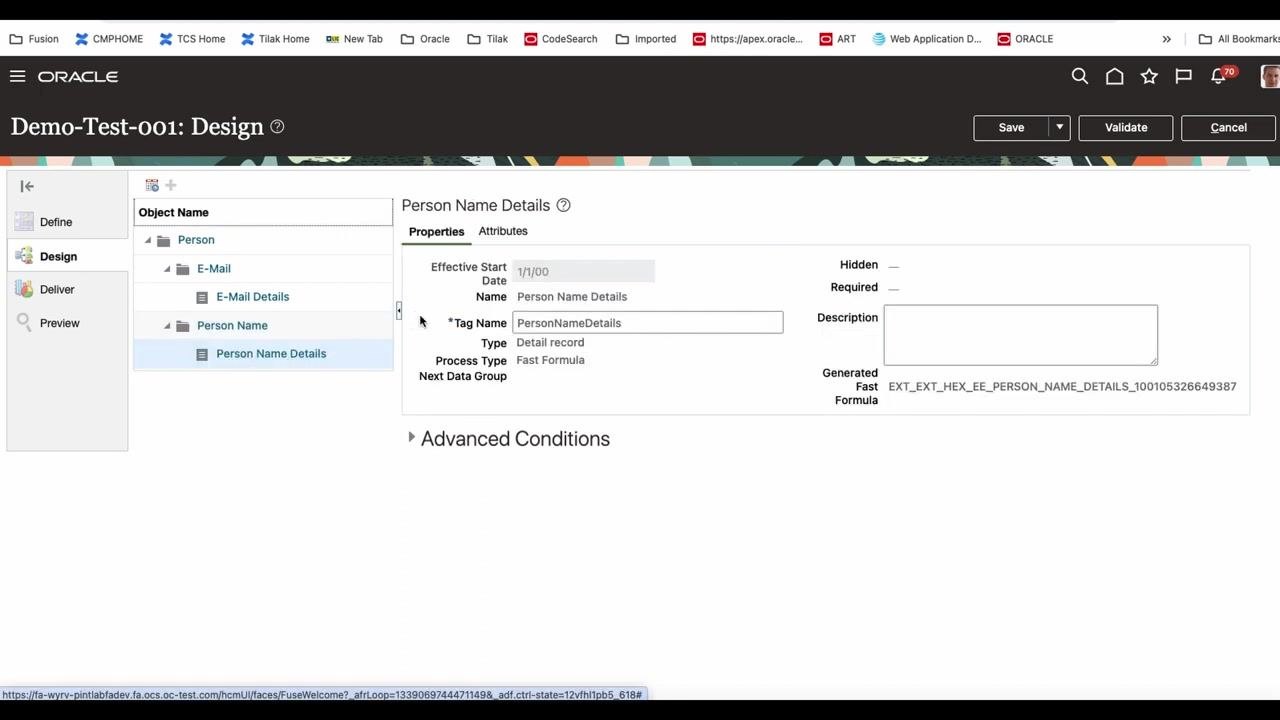
Review Person Name Details properties
Select Person Name Details under the Person Name object in the Design section. The properties display as follows:
- Effective Start Date: 1/1/00
- Name: Person Name Details
- Tag Name: PersonNameDetails
- Type: Detail record
- Process Type: Fast Formula
- Next Data Group: (blank)
- Description: (blank)
- Generated Fast Formula: EXT_EXT_HEX_EE_PERSON_NAME_DETAILS_100105326649387
View Person Name Details attributes
Click the Attributes tab for Person Name Details to view its attributes:
- Effective Start Date (Type: Database item group)
- Person Name Id (Type: Database item group, Key Attribute)
- First Name (Type: Database item group)
- Last Name (Type: Database item group)
- Full Name (Type: Database item group)
- Type (Type: Database item group)
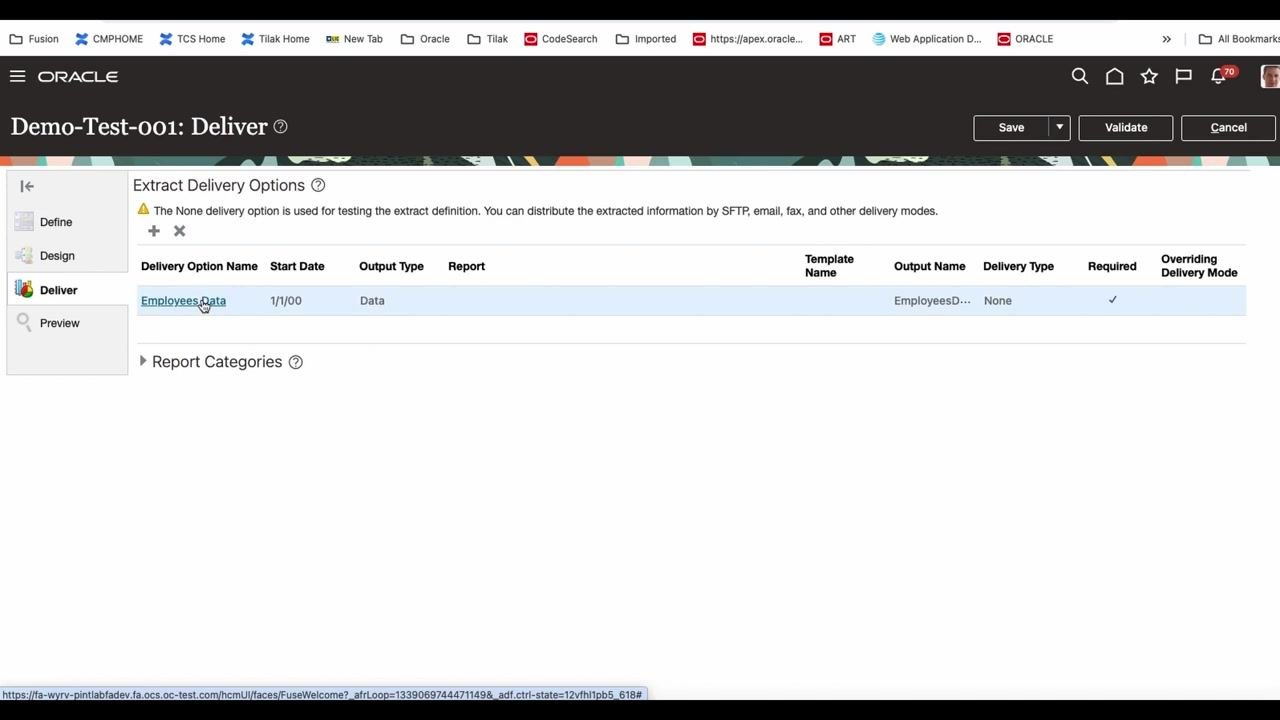
Navigate to the Deliver section
Select Deliver from the left navigation menu. The Extract Delivery Options screen displays the delivery option Employees Data with the following details:
- Start Date: 1/1/00
- Output Type: Data
- Report: (blank)
- Template Name: (blank)
- Output Name: EmployeesData
- Delivery Type: None
- Required: Checked
- Overriding Delivery Mode: (blank)
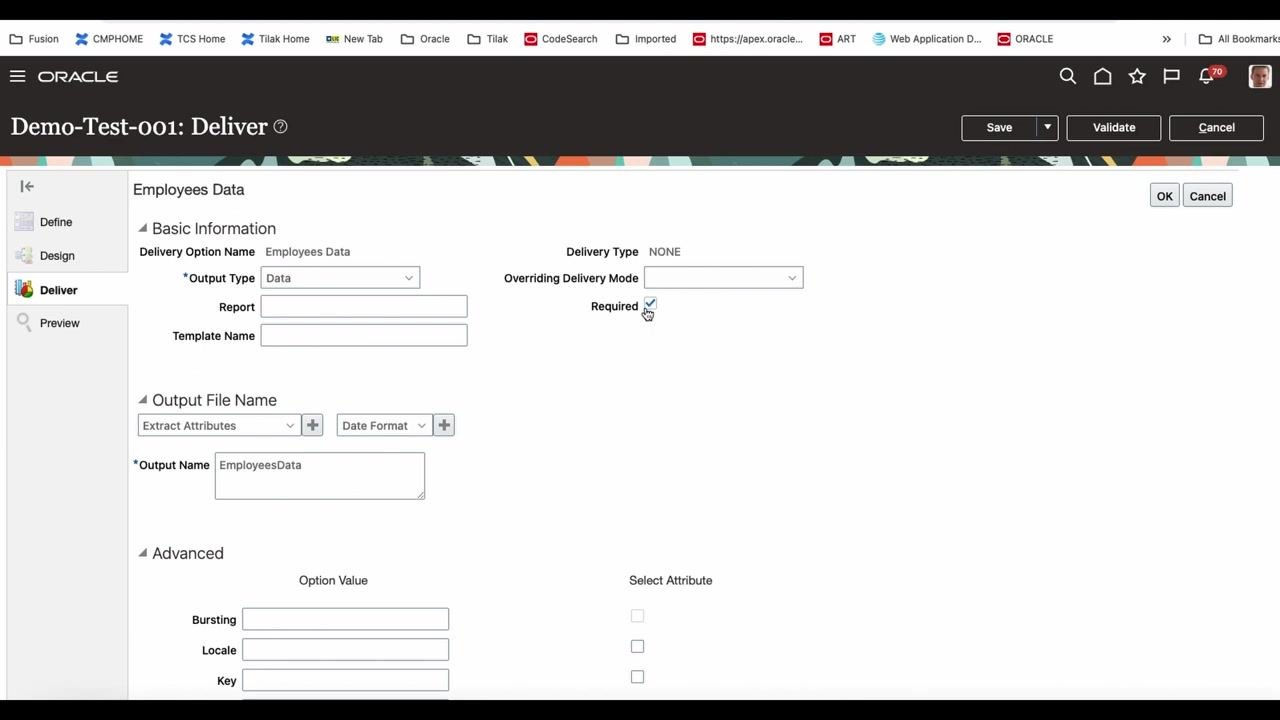
Review the Employees Data delivery option details
Click Employees Data to view or edit its details:
- Output Type: Data
- Report: (blank)
- Template Name: (blank)
- Output Name: EmployeesData
- Delivery Type: NONE
- Overriding Delivery Mode: (blank)
- Required: Checked
- Advanced options: Bursting, Locale, Key, and Select Attribute fields are available.
Update the delivery option details
In the Deliver section, confirm and update the following fields:
- Output Type: Data
- Delivery Type: NONE
- Overriding Delivery Mode: leave blank or select as needed
- Required: Checked
- Output Name: EmployeesData_001
Optionally, configure advanced options such as Bursting, Locale, and Key if required.
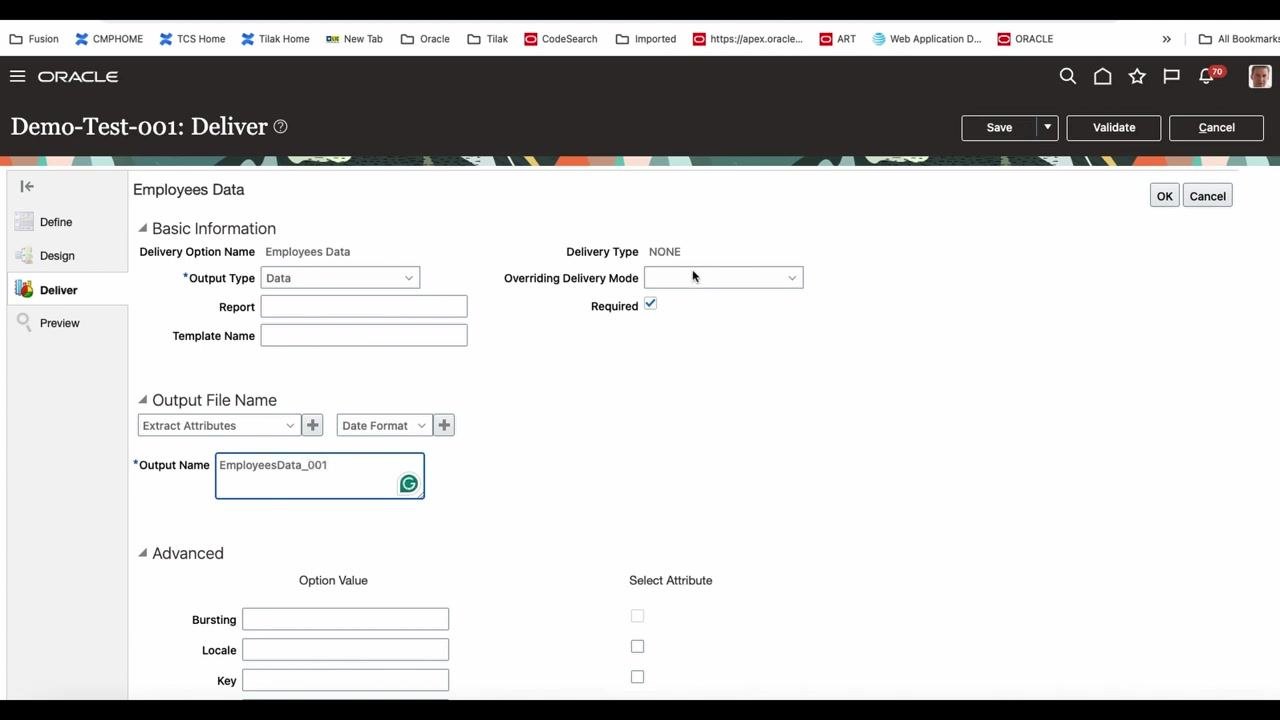
Access the Preview functionality
Click Preview in the left navigation menu to access the preview functionality. This allows you to run the extract for a single person in debug or regular mode.
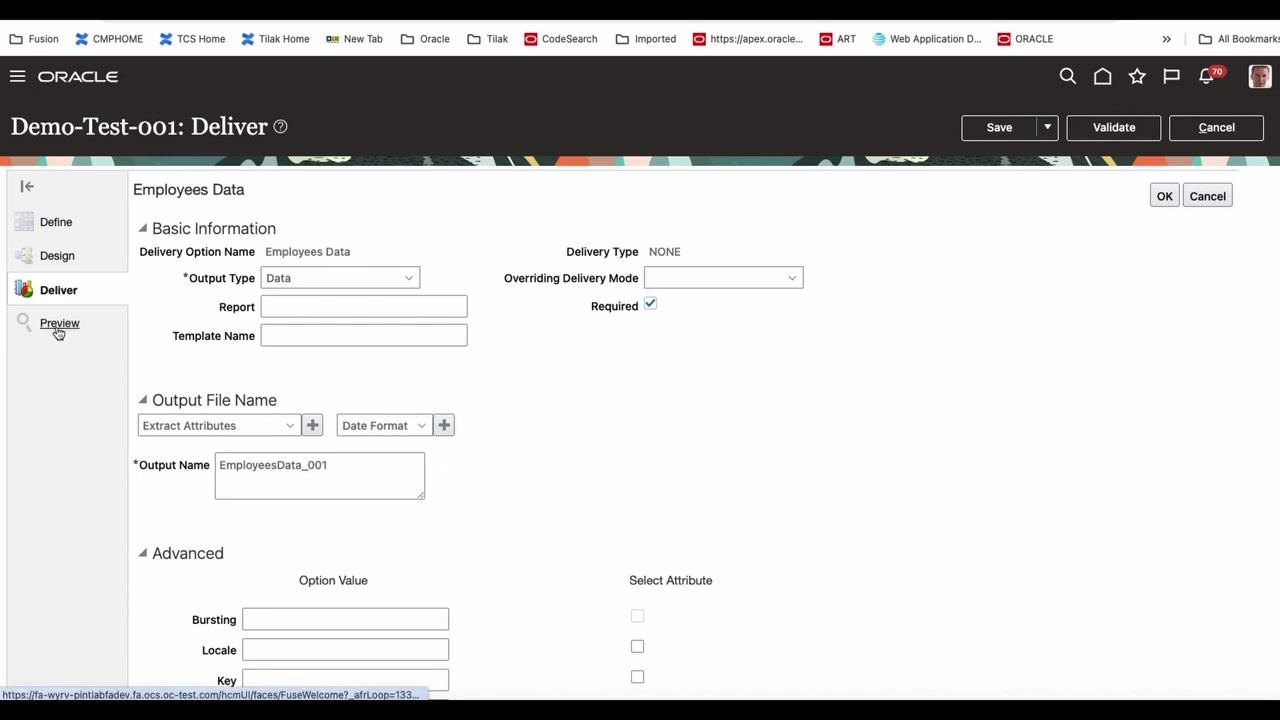
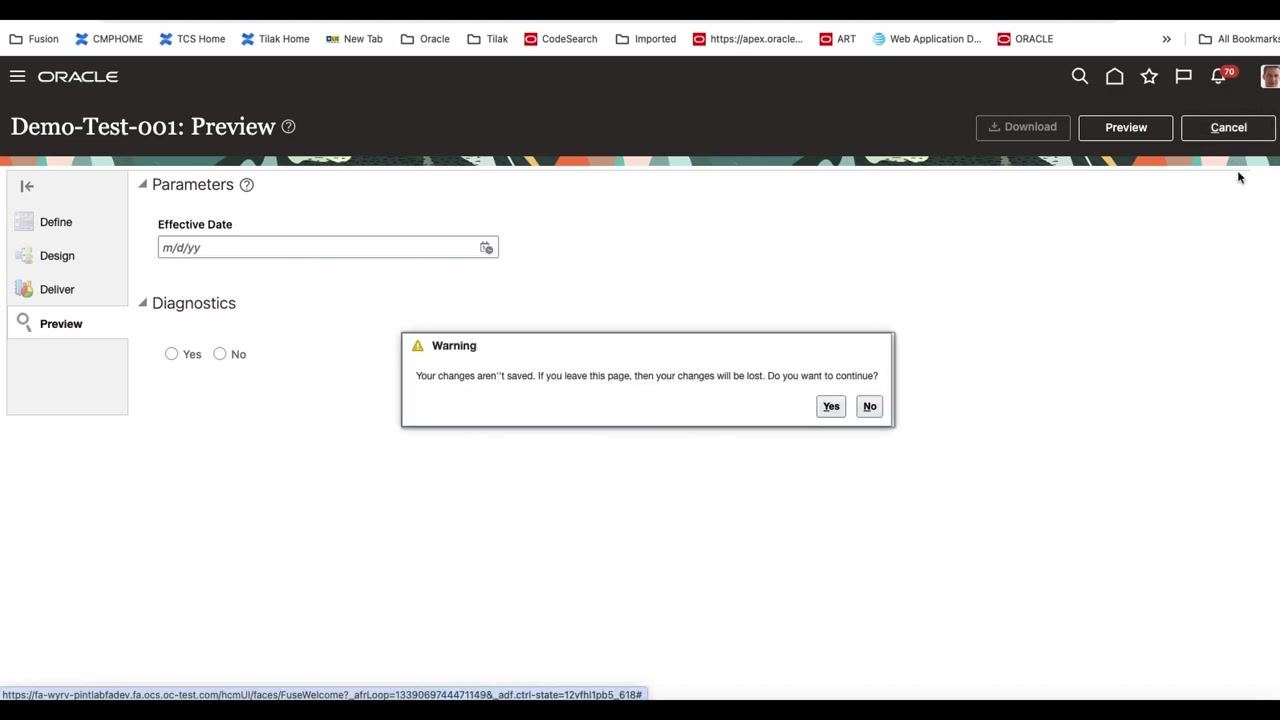
Confirm the unsaved changes warning
If prompted with a warning dialog stating "Your changes aren't saved. If you leave this page, then your changes will be lost. Do you want to continue?", choose Yes to proceed to the Preview screen.
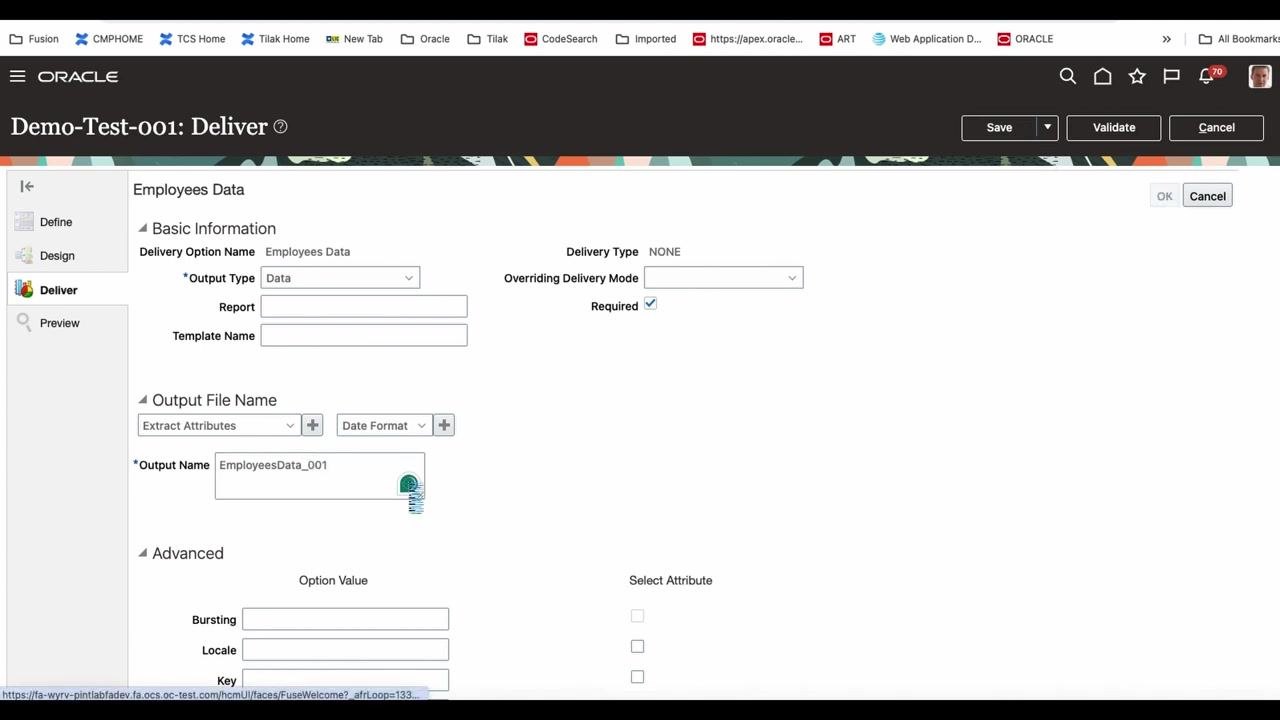
Review the Preview parameters
On the Preview screen, enter the Effective Date in the format m/d/yy. Optionally, enter a value for Threading Object ID if required for your extract, and select Yes or No for Diagnostics as needed.
Return to the Extract Definitions overview
Locate your extract (for example, Demo-Test-001) in the Extract Definitions list. Click the three-dot menu on the right to access additional actions, including:
- Hierarchy (view the extract hierarchy)
- Export Extract
- Delete
- Copy or Rename
View the extract hierarchy
Select Hierarchy from the actions menu to display the structure and relationships within the extract definition.
Manage, export, or duplicate the extract
Use the corresponding options in the actions menu to move, delete, copy, or rename the extract:
- Select Export Extract to export the definition.
- Select Delete to remove the extract (after moving the product, if needed).
- Select Copy or Rename to duplicate or rename the extract.
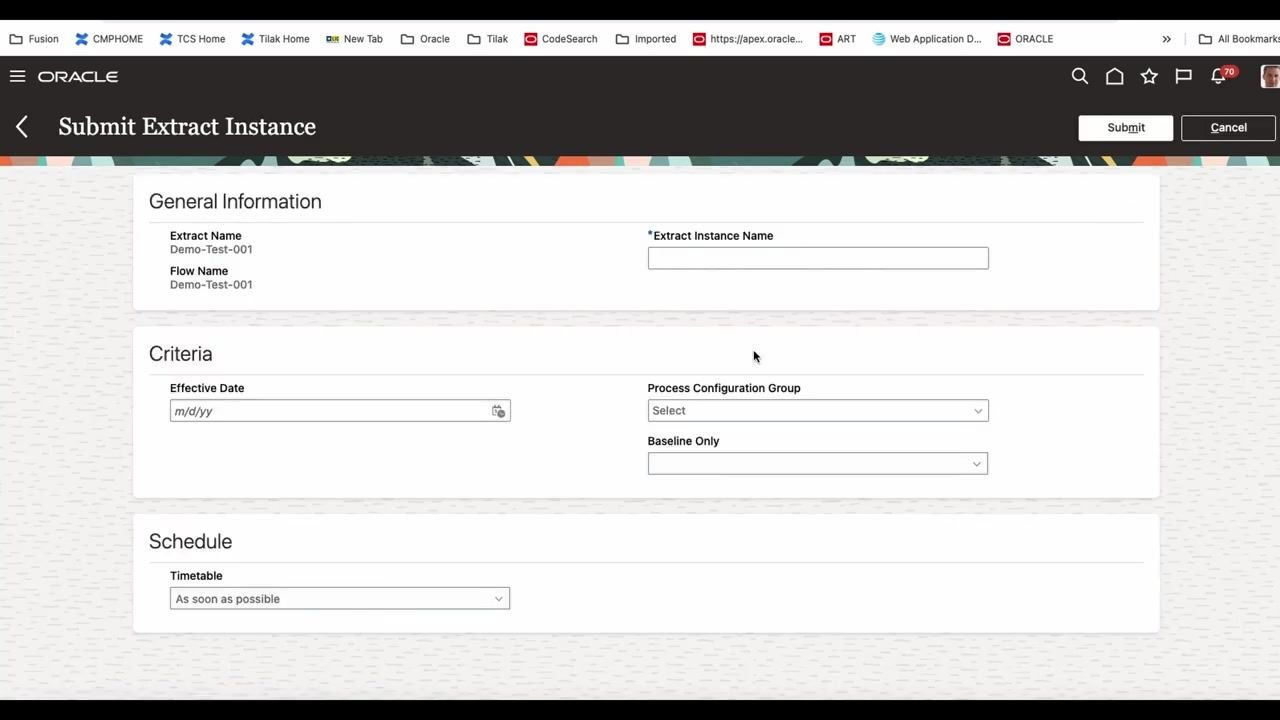
Submit the extract instance
To run the extract, proceed to the Submit Extract Instance screen. Enter the following under General Information:
- Extract Name: Demo-Test-001
- Flow Name: Demo-Test-001
- Extract Instance Name: enter a unique name, for example Demo-Test-001-02040416, using the date and time for uniqueness
Under Criteria, enter the Effective Date (m/d/yy), select the Process Configuration Group as needed, and set Baseline Only as required.
Under Schedule, select a Timetable such as As soon as possible, or another schedule as needed.
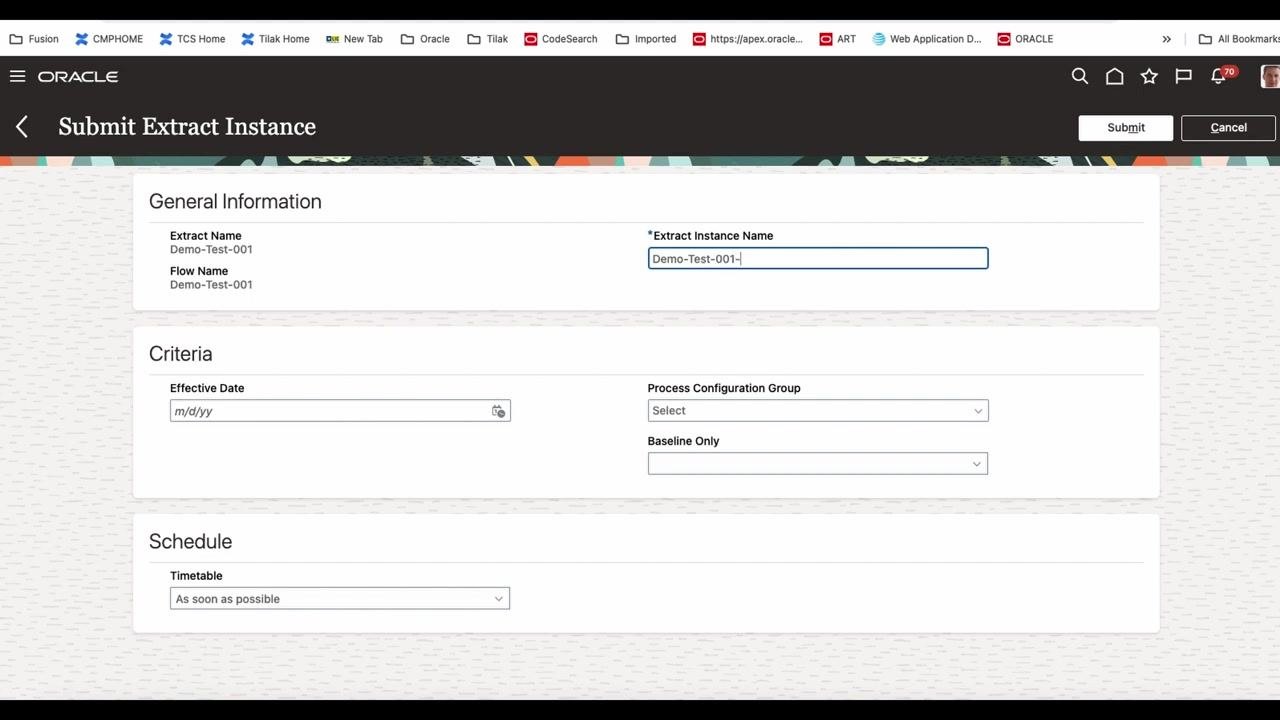
Enter the extract instance name and open the date picker
In the Extract Instance Name field, enter Demo-Test-001-0204:16. Under Criteria, click the calendar icon in the Effective Date field to open the date picker.
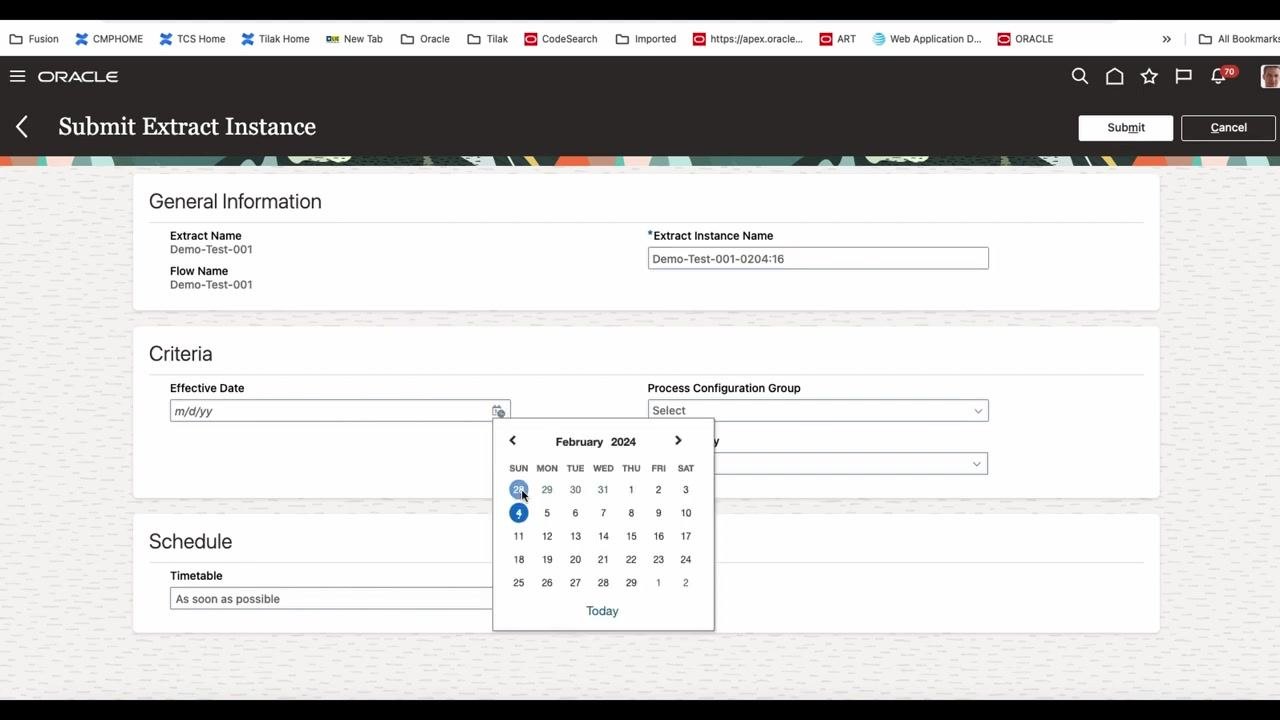
Select the effective date and baseline only option
In the date picker, choose February 4, 2024 (2/4/24) as the effective date; the selected date populates the Effective Date field. Leave Process Configuration Group as "Select" unless a specific group is required.
For Baseline Only, click the dropdown and select either Yes or No as needed for your extract.
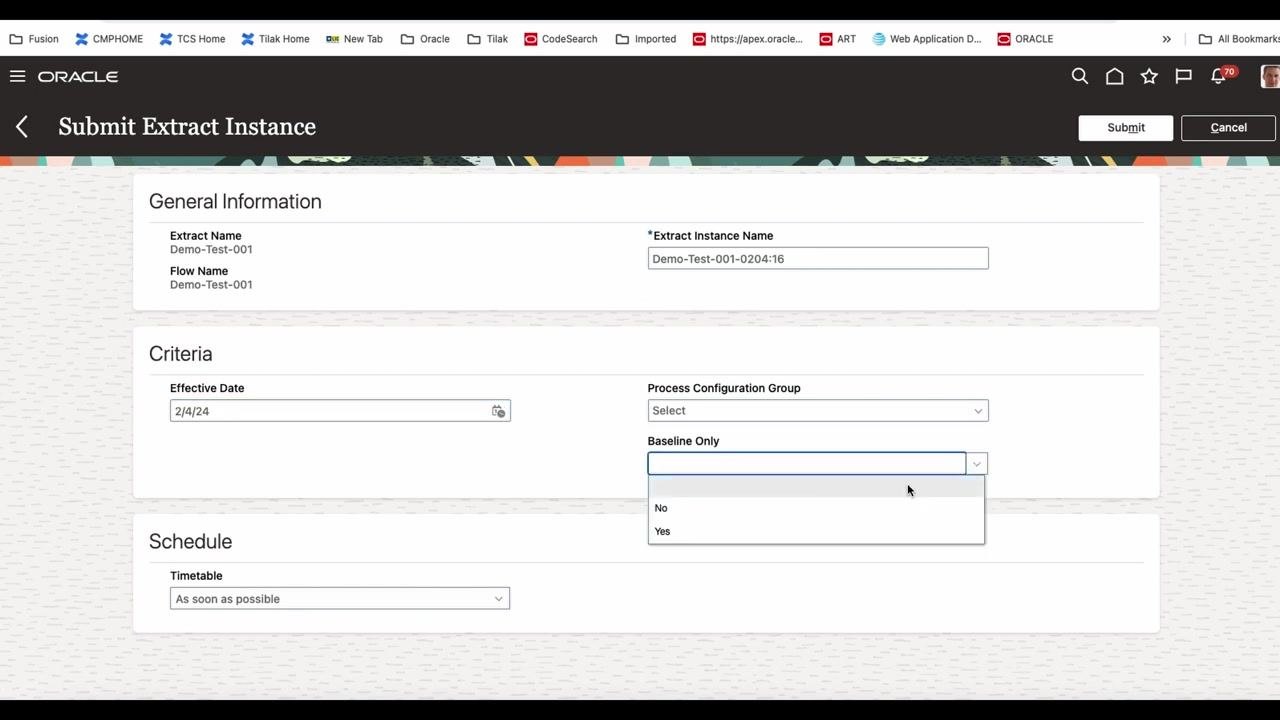
Review all entered information
Before submitting, confirm the following values:
- Extract Name: Demo-Test-001
- Flow Name: Demo-Test-001
- Extract Instance Name: Demo-Test-001-0204:16
- Effective Date: 2/4/24
- Process Configuration Group: leave as needed
- Baseline Only: select Yes or No as required
- Timetable: As soon as possible
Submit and view the extract results
Click the Submit button in the upper right to submit the extract instance for processing. You are then redirected to the View Extract Results screen, where the new extract instance appears in the Extract Instances list with the following details:
- Instance Name: Demo-Test-001-0204:16
- Extract Name: Demo-Test-001
- Flow Name: Demo-Test-001
- Submitted On: timestamp appears after processing
The status of the instance updates as it processes.
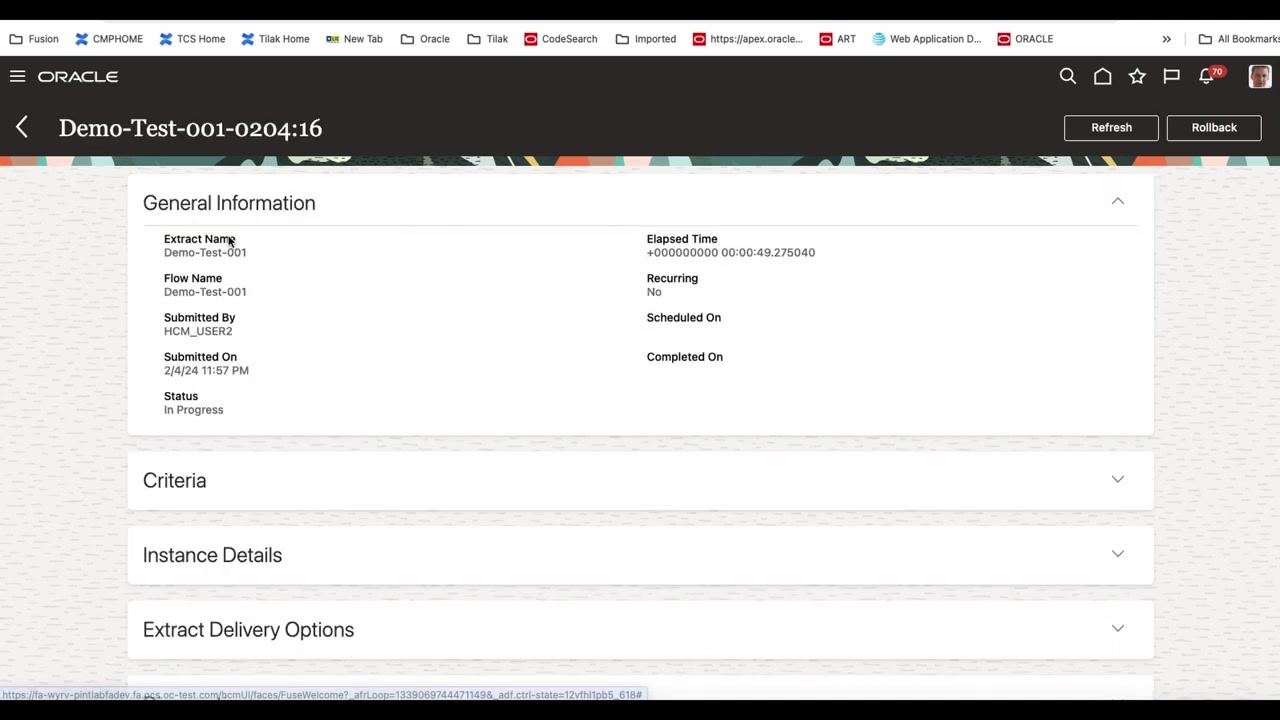
Monitor the extract instance status
Click the instance name (Demo-Test-001-0204:16) in the Extract Instances list to open the instance details page, which displays:
- General Information: Extract Name, Flow Name, Submitted By, Submitted On, Status (for example, In Progress), Elapsed Time, Recurring, Scheduled On, Completed On
- Expandable sections for Criteria, Instance Details, and Extract Delivery Options
Review the extract run summary
On the Demo-Test-001-0204:16 summary page, locate the General Information section and confirm the following details:
- Extract Name: Demo-Test-001
- Flow Name: Demo-Test-001
- Submitted By: HCM_USER2
- Submitted On: 2/4/24 11:57 PM
- Status: Completed
- Elapsed Time: 00:00:49.361000
- Recurring: No
- Completed On: 2/4/24 11:58 PM
Review the Instance Details section for process status:
- Extract Run: Process ID 78003, Status: Running
- ElevatedFlowEssJobDefn: Process ID 78004, Status: Succeeded
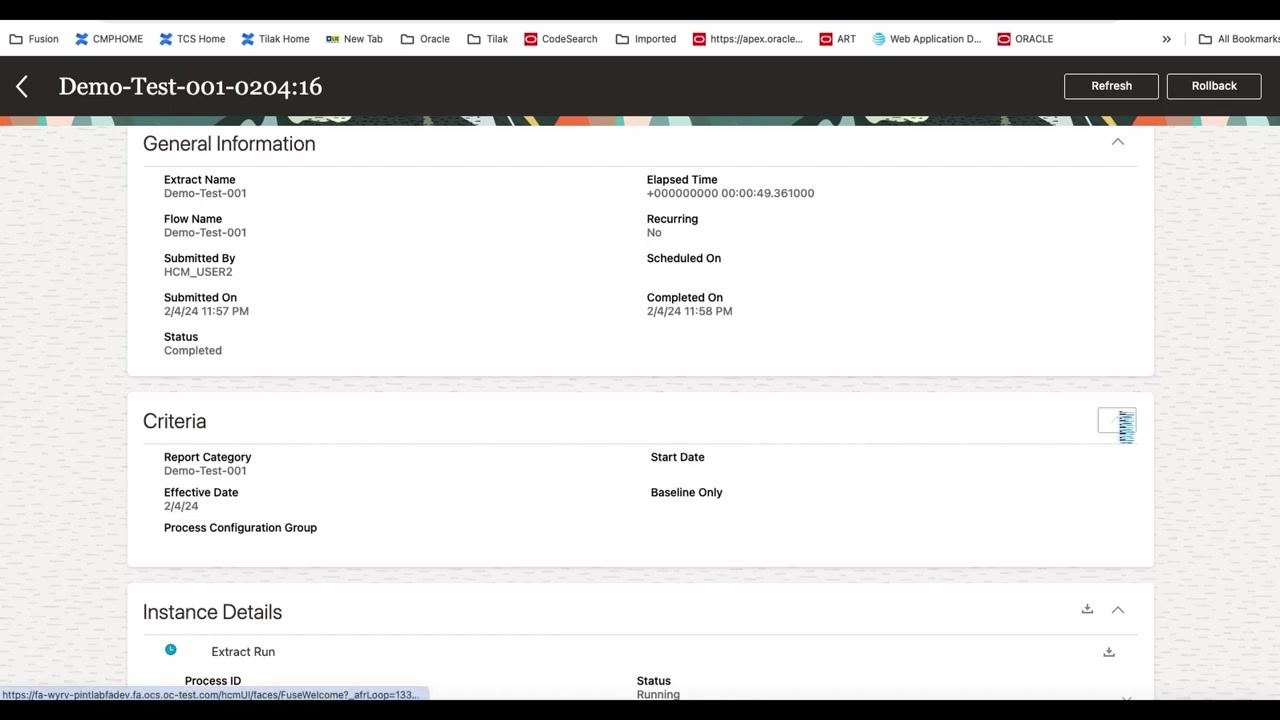
Review the criteria used for the extract
Expand the Criteria section to view the report parameters:
- Report Category: Demo-Test-001
- Effective Date: 2/4/24
- Process Configuration Group: value not shown
- Start Date: Baseline Only
Check diagnostics and extract run analysis
Expand the Diagnostics and Extract Run Analysis sections if troubleshooting is required. If there are no errors or issues, these sections may be empty or display a zero error count.
Access and open the output file
Download the XML output file (for example, ESS_ARCHIVE_300100591776995_OP) from the Output Files - Others section, then open it using a compatible application such as a web browser or text editor.
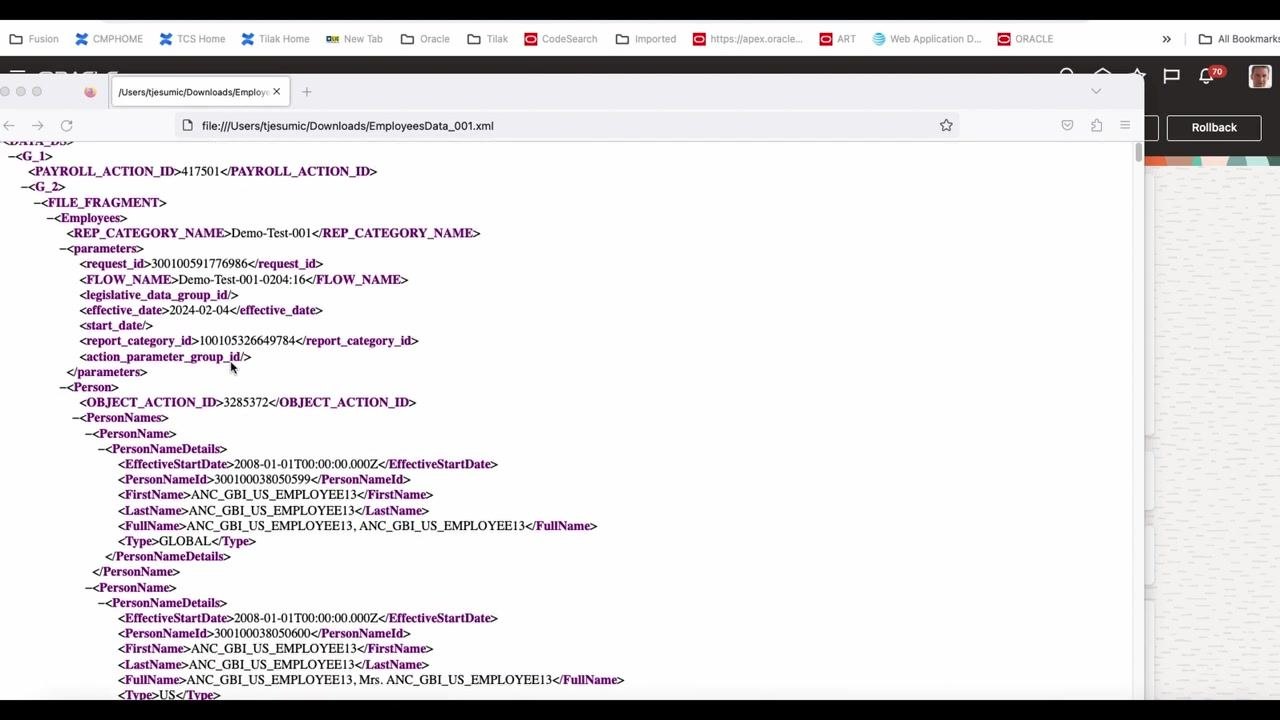
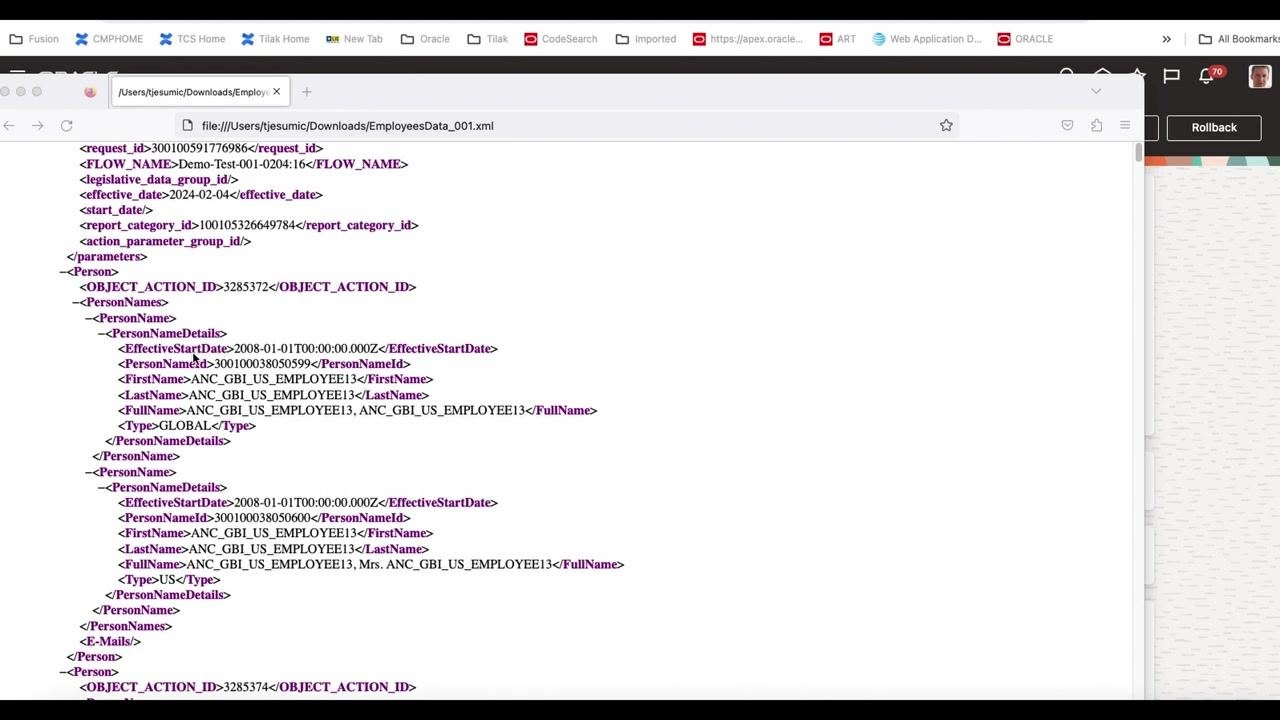
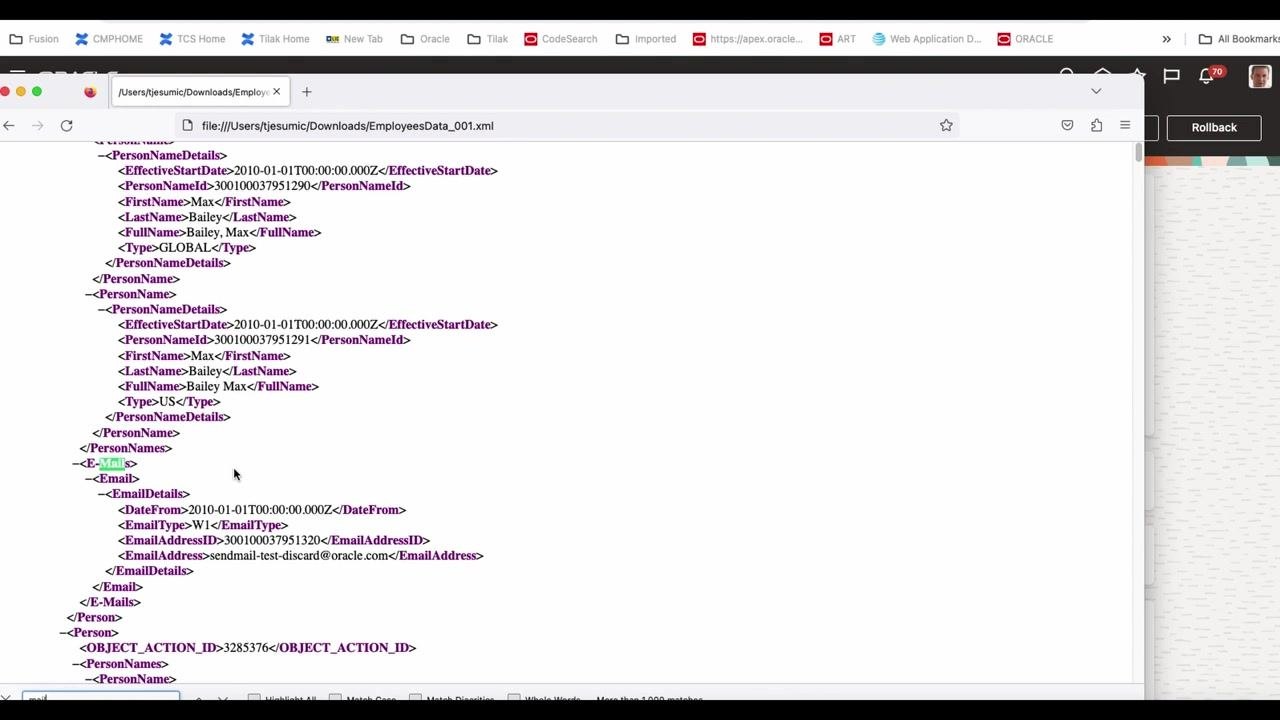
Review the XML output structure
Examine the XML file for the following key elements:
: Demo-Test-001: Demo-Test-001-0204:16: 2024-02-04: 100105326649784: 3285372 (and others): contains details such as EffectiveStartDate, PersonNameId, FirstName, LastName, FullName, and Type
Each <Person> entry contains nested <PersonNames> and <PersonNameDetails> elements with employee data.
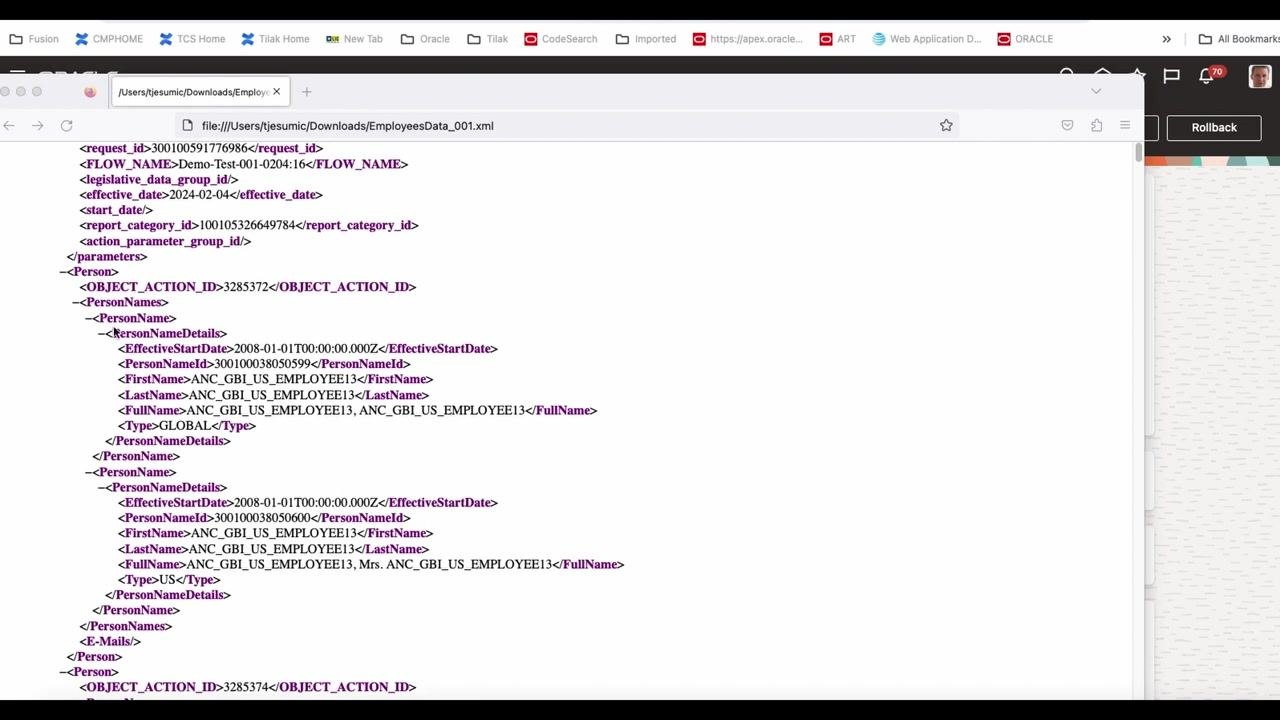
Interpret the XML data
For each <Person>, review the <PersonNameDetails>:
- EffectiveStartDate: 2008-01-01T00:00:00.000Z
- PersonNameId: 300100038050599 (example)
- FirstName/LastName/FullName: ANC_GBI_US_EMPLOYEE13
- Type: GLOBAL or US
Multiple <Person> entries may be present, each representing a different employee or record.
Analyze name types and record duplication
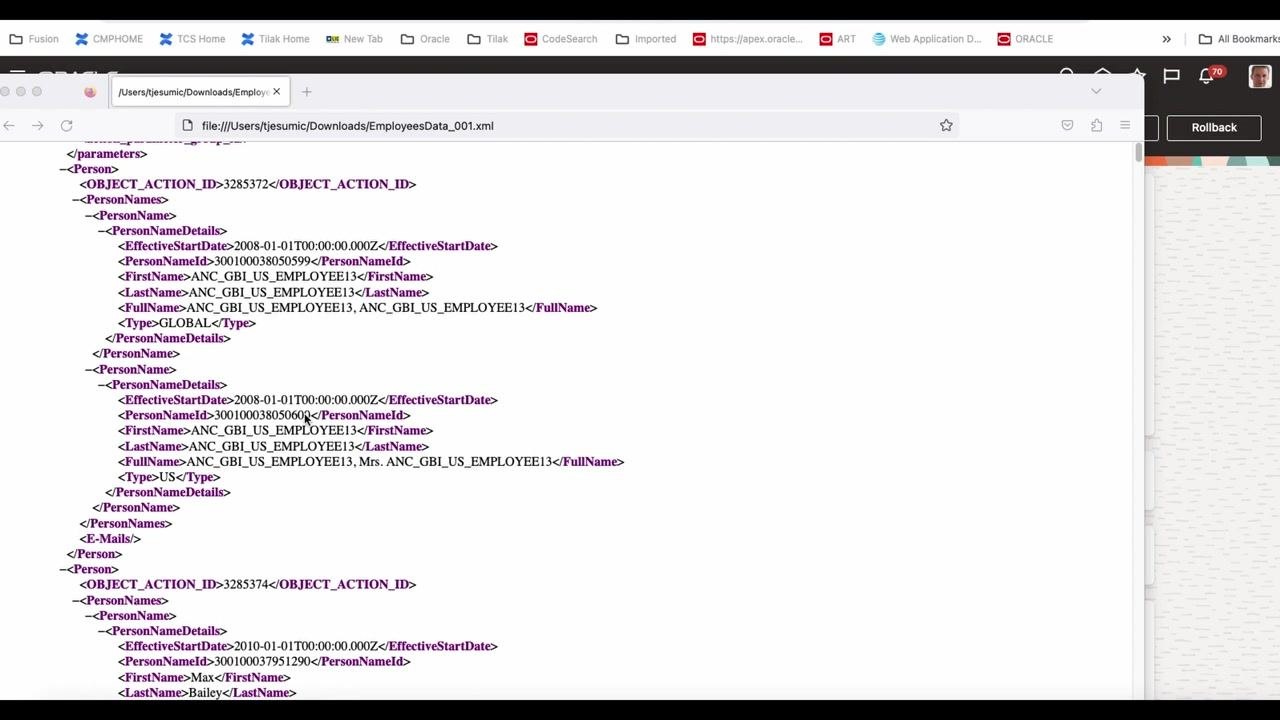
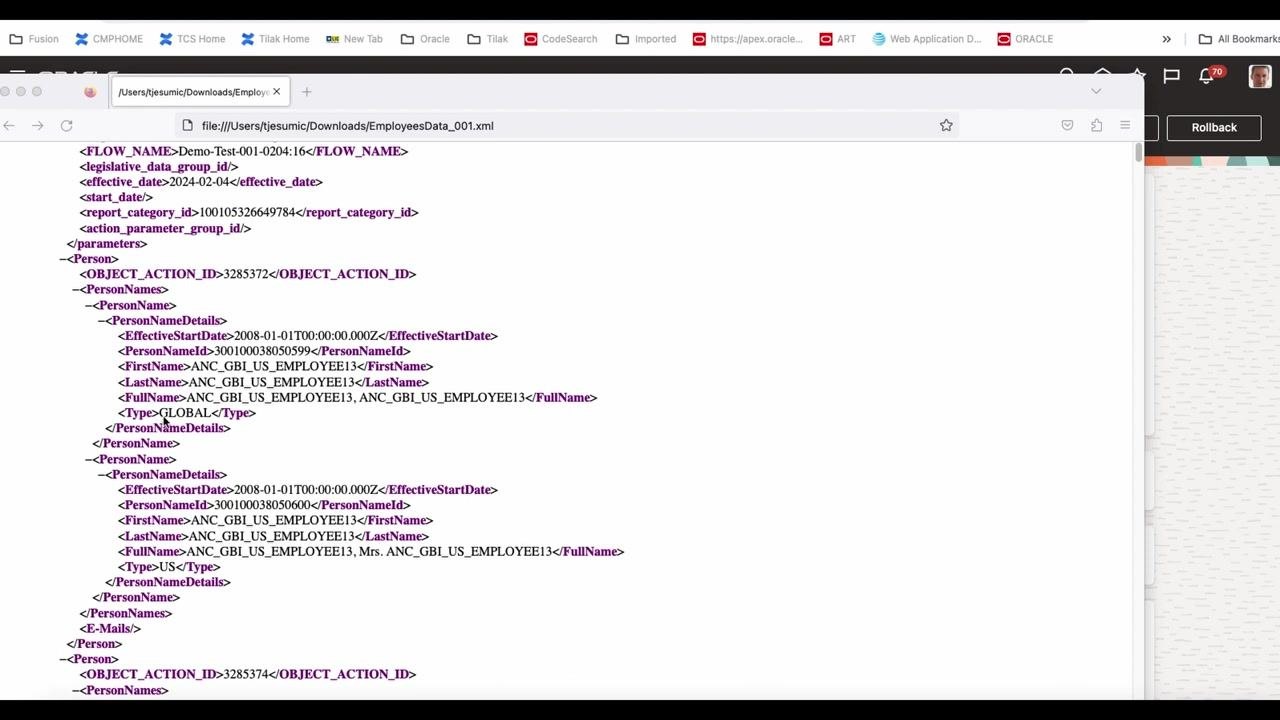
Review the XML output for employee records with multiple <PersonNameDetails> entries. Observe that the employee with FirstName = ANC_GBI_US_EMPLOYEE13 and LastName = ANC_GBI_US_EMPLOYEE13 appears twice: one entry has <Type>GLOBAL</Type> and another has <Type>US</Type>.
Both entries share the same EffectiveStartDate = 2008-01-01T00:00:00.000Z but have different PersonNameId values. This duplication occurs because the same person has multiple name types (for example, GLOBAL and US), which results in multiple records for that employee.
Apply filtering options for name types
You can filter records later based on the <Type> field (for example, GLOBAL or US) to avoid duplication or to focus on a specific name type. Keep this in mind for your analysis or reporting.
Locate and review email information
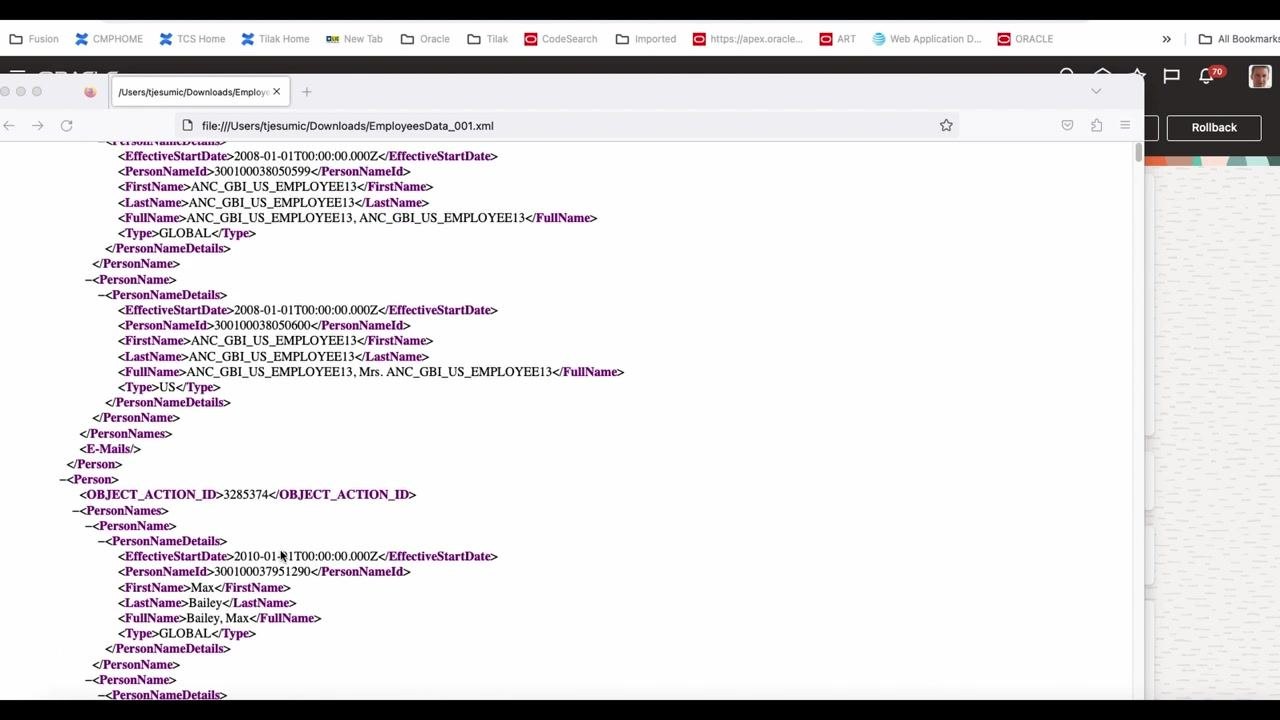
Scroll to the <E-Mails> section within each <Person> entry to identify which employees have associated email addresses. For example, the employee with FirstName = Max and LastName = Bailey has an <Email> entry.
Review the <EmailDetails>:
- DateFrom: 2010-01-01T00:00:00.000Z
- EmailType: W1 (likely indicating a work email)
- EmailAddressID: 300100037951320
- EmailAddress: sendmail-test-discard@oracle.com
Note that not all employees may have an email address listed.
Consider output formatting and conversion options
The XML output can be processed further:
- Apply a BIP (BI Publisher) template to format the data as needed.
- Convert the XML data into RTF (Rich Text Format) or Excel for easier analysis or reporting.
Choose the output format that best suits your reporting requirements.
Summary
You have now learned how to create an HCM extract in Oracle Fusion from start to finish: building the extract definition from a template, selecting business objects and attributes, reviewing the Design and Deliver sections, previewing the extract, submitting an extract instance, and reviewing the resulting XML output. You have also reviewed the extract run summary, criteria, and output delivery options, and examined the structure and content of the XML file to identify key employee data fields such as name types and email addresses.
What's Next
Continue to apply the filtering options discussed for name types, and consider converting your XML output using a BIP template into RTF or Excel format for further analysis or reporting.
Generation details: cost, quality tiers
Docsie billed 7,000 credits ($4.90) to analyze this 14-minute video at standard quality. The rewrite, template fill and Word/PDF exports were included. The same video at each quality tier:
| Quality | Frames sampled | Credits | Approx. cost |
|---|---|---|---|
| Draft | every 16-30 s | 3,500 | $2.45 |
| Standard (this guide) | every 8-15 s | 7,000 | $4.90 |
| Detailed | every 4-7 s | 14,000 | $9.80 |
| Ultra | every 1-3 s | 28,000 | $19.60 |
Credits priced at $0.70 per 1,000; plans include a monthly allowance. Enterprise customers on on-premise or bring-your-own-model deployments run this on their own inference and pay no per-video credits.
Generated by Docsie Video-to-Docs on 2026-10-14 from a 13-minute video. Screenshots are frames from the source video and belong to their creator, Tilak, whose original is embedded above. If you own this video and want the guide removed or credited differently, contact us and we will act within one business day.