
How to Create a Journal Entry in Oracle Fusion
This guide walks you through the complete process of creating a manual journal entry in Oracle General Ledger, from accessing the Navigator menu to entering journal lines and posting the final entry. The example used throughout is a revenue accrual transaction.
Video: Create Journal Entry in Oracle Cloud ERP | General Ledger | Oracle Fusion | TutorAlly by Blue Sky Consulting (formerly TutorAlly) (2020). All credit for the demonstration goes to the creator; watch the original on YouTube. The written guide below was generated from this video by Docsie. Creator? Request a change or removal.
This guide walks you through the complete process of creating a manual journal entry in Oracle General Ledger, from accessing the Navigator menu to entering journal lines and posting the final entry. The example used throughout is a revenue accrual transaction.
Prerequisites
- You must be logged into Oracle with access to the main dashboard.
- You need access permissions for General Accounting and Journals in the General Ledger (GL) module.
- Confirm you know the correct accounting period for your entry (e.g., March 2020).
Access the Oracle home page
Ensure you are logged into Oracle and on the main dashboard. The dashboard displays a welcome message, navigation tabs (Sales, Service, Me, My Team, Procurement, Help Desk, Product Management), and app tiles (Workspace, Assets, Price Books, Competitors, Business Plans). Your username appears in the top right corner.
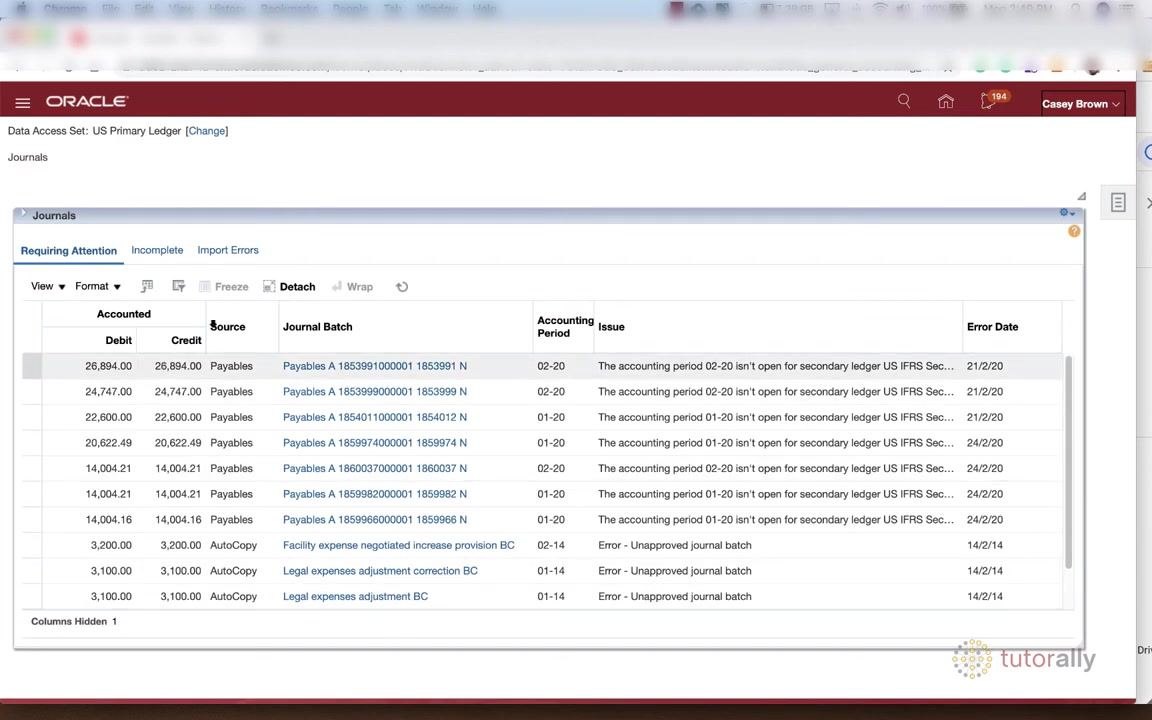
Open the Navigator menu
Locate and click the Navigator button (three horizontal lines or a similar icon) in the upper left corner, next to the Oracle logo.
Navigate to General Accounting
In the Navigator menu, scroll down and select General Accounting. Under General Accounting, click Journals.
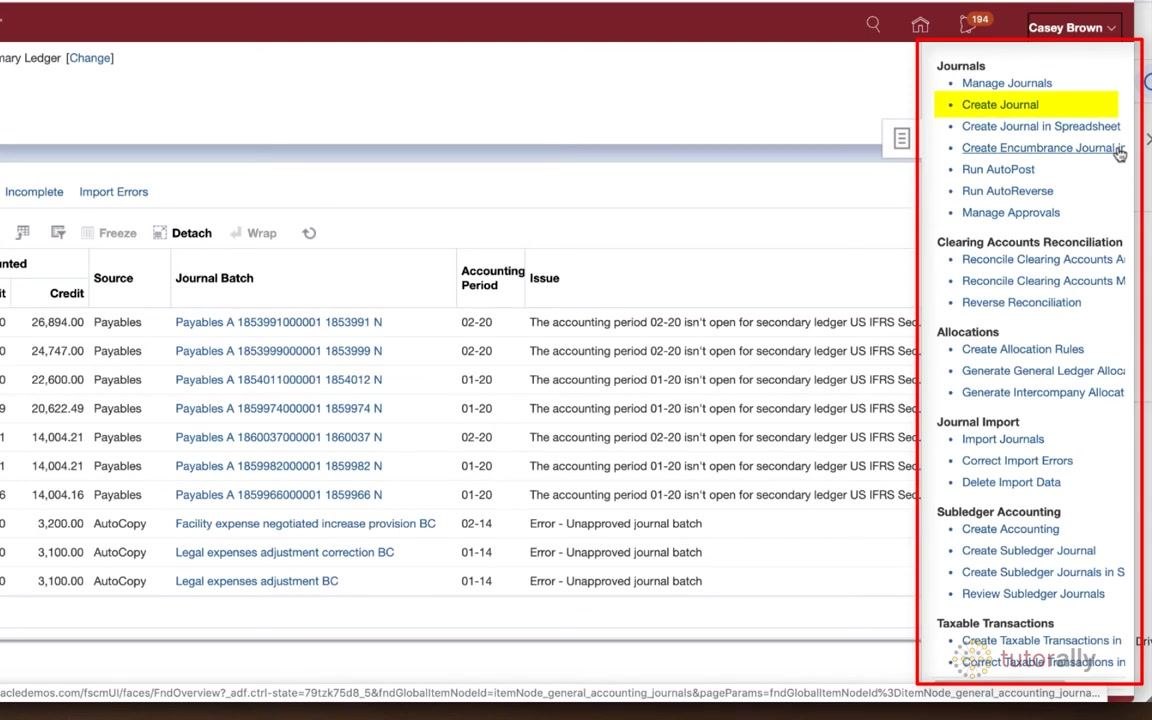
Open the Journals task pane
On the Journals page, locate the Tasks icon (usually a small icon on the right or top of the screen) and click it to open the list of available functions in General Ledger (GL).
Select "Create Journal"
In the Tasks pane, find and click Create Journal under the Journals section. This opens the Create Journal form.
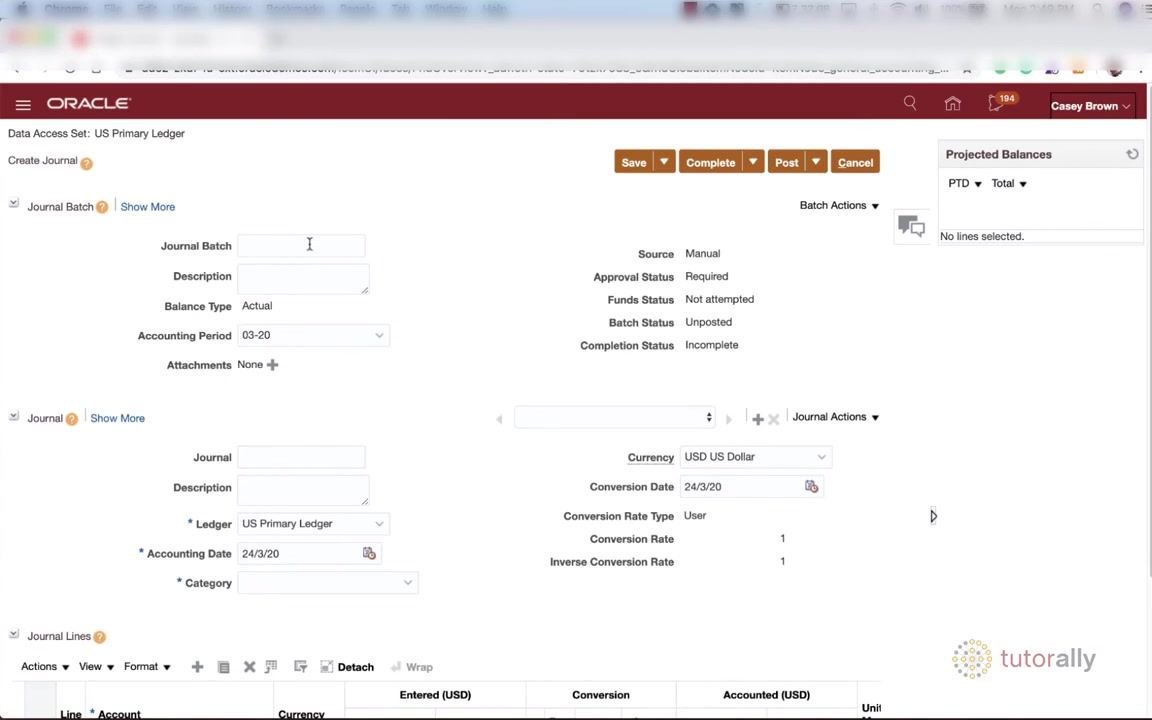
Enter journal header information
In the Create Journal form, fill in the required header fields:
- Journal Batch: Leave blank to let Oracle auto-generate the batch name, unless your organization requires a specific naming convention. If so, enter the batch name according to your organization's standards.
- Description: Enter a description summarizing the purpose of the entire batch.
- Balance Type: Set to "Actual."
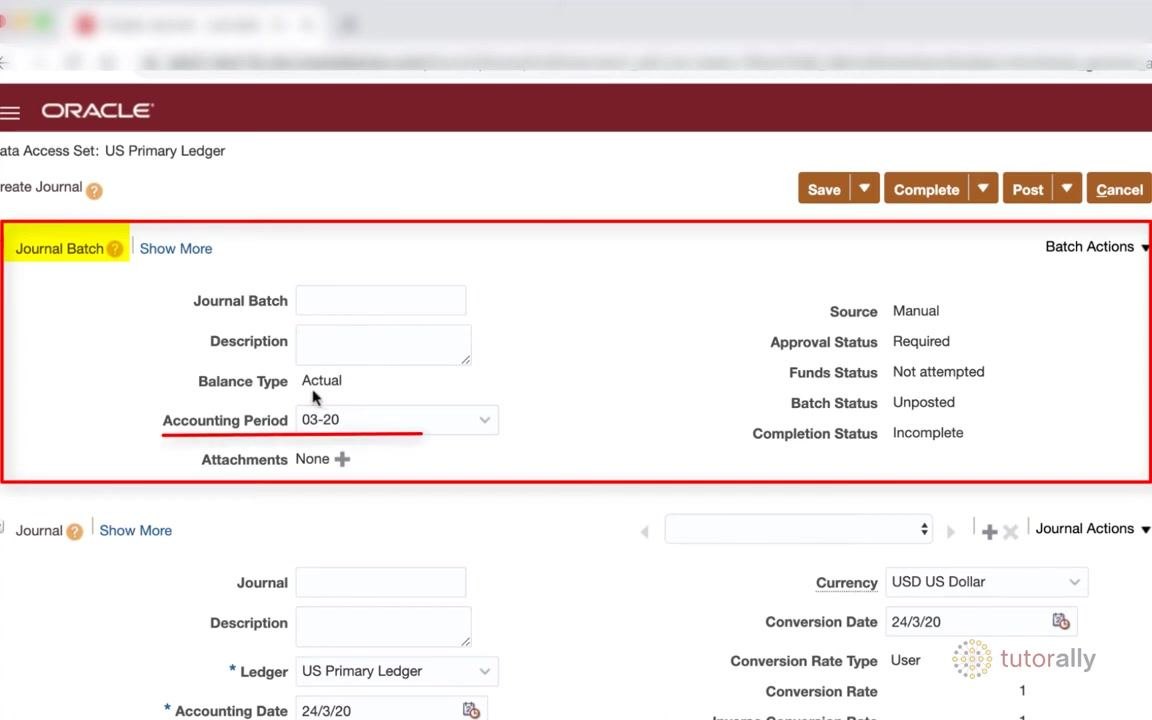
- Accounting Period: Set to "03-20" (March 2020).
- Attachments: Add relevant attachments if needed.
Confirm the following statuses on the right side of the form:
- Source: Manual
- Approval Status: Required
- Funds Status: Not attempted
- Batch Status: Unposted
- Completion Status: Incomplete
Follow organizational naming conventions
If your organization has specific naming conventions for journal batches, follow them. Otherwise, leave the Journal Batch field blank so Oracle generates it automatically.
Verify the source and accounting period
Confirm that Source is set to "Manual," indicating you are manually creating a journal entry in the General Ledger (GL). Also confirm the Accounting Period is set to "03-20."
At this point, you have started the journal entry with all required header information entered according to best practices and organizational standards.
Enter journal details
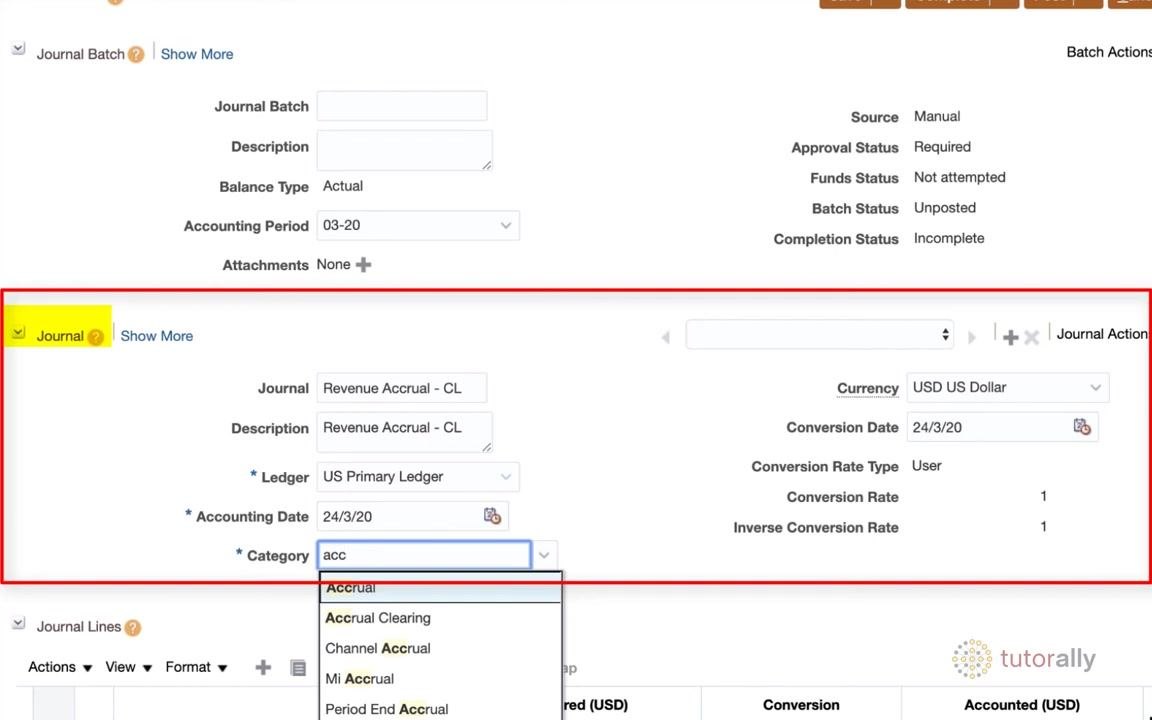
In the Journal section, fill in the following fields:
- Journal: Enter a descriptive name, for example
Revenue Accrual - CL(where "CL" represents your initials). - Description: Optionally enter a description. If left blank, the journal name defaults into this field. Whatever you enter here also defaults onto each journal line, though you can change it later for individual lines.
- Ledger: Leave at the default value (e.g.,
US Primary Ledger) unless you need to select a different ledger. - Accounting Date: Defaults to the current date (e.g.,
24/3/20). If you change it, ensure the date falls within the accounting period specified in the journal header (e.g., between1/3/20and31/3/20). - Category: Specify the type of journal entry. For an accrual, type
accrualand select Accrual from the filtered list.
The currency defaults to USD US Dollar, and conversion details auto-populate unless you need to adjust them.
Tips: - Use the Tab key to move quickly between fields. - You can add notes to individual journal lines after completing the header. - Always ensure the accounting date matches the period in the journal header to avoid errors.
Review currency and conversion settings
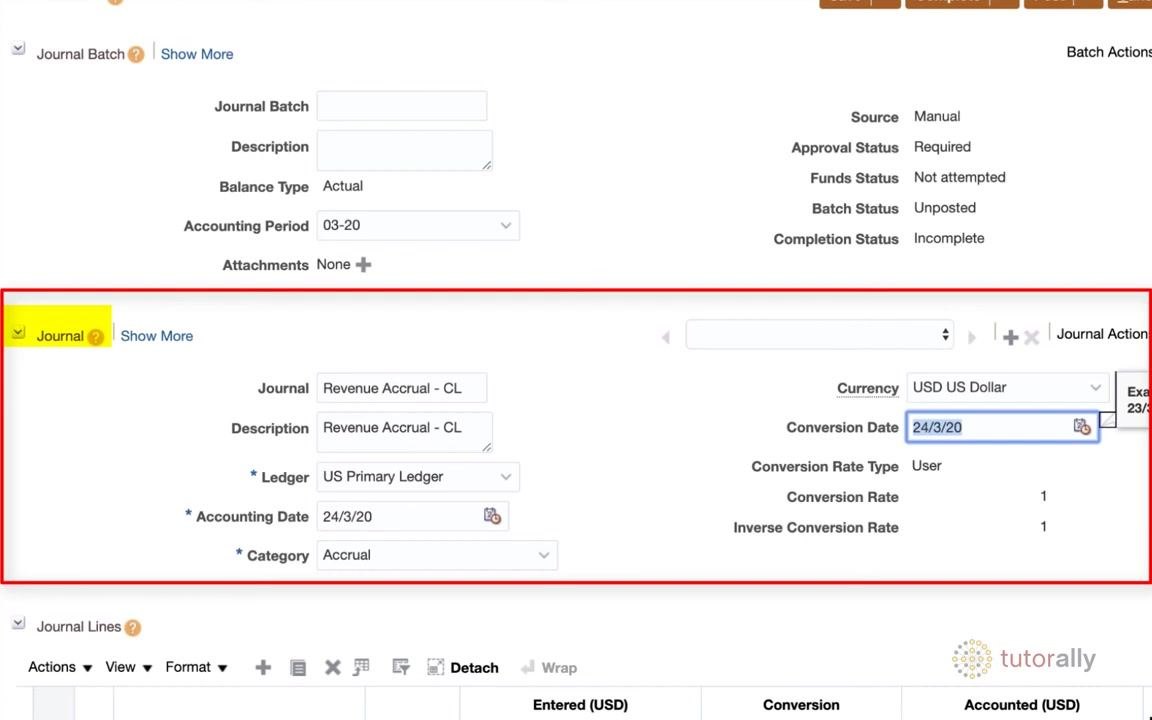
The Currency field defaults to the operational currency of your ledger (e.g., USD US Dollar). Only change the currency if you are entering a foreign currency journal entry. If you do change it:
- Conversion Date defaults to the current date (e.g.,
24/3/20). - Conversion Rate Type defaults to
User. - Conversion Rate and Inverse Conversion Rate are calculated automatically.
If your ledger and journal entry use the same currency (e.g., USD), no conversion adjustments are needed.
Begin entering journal lines
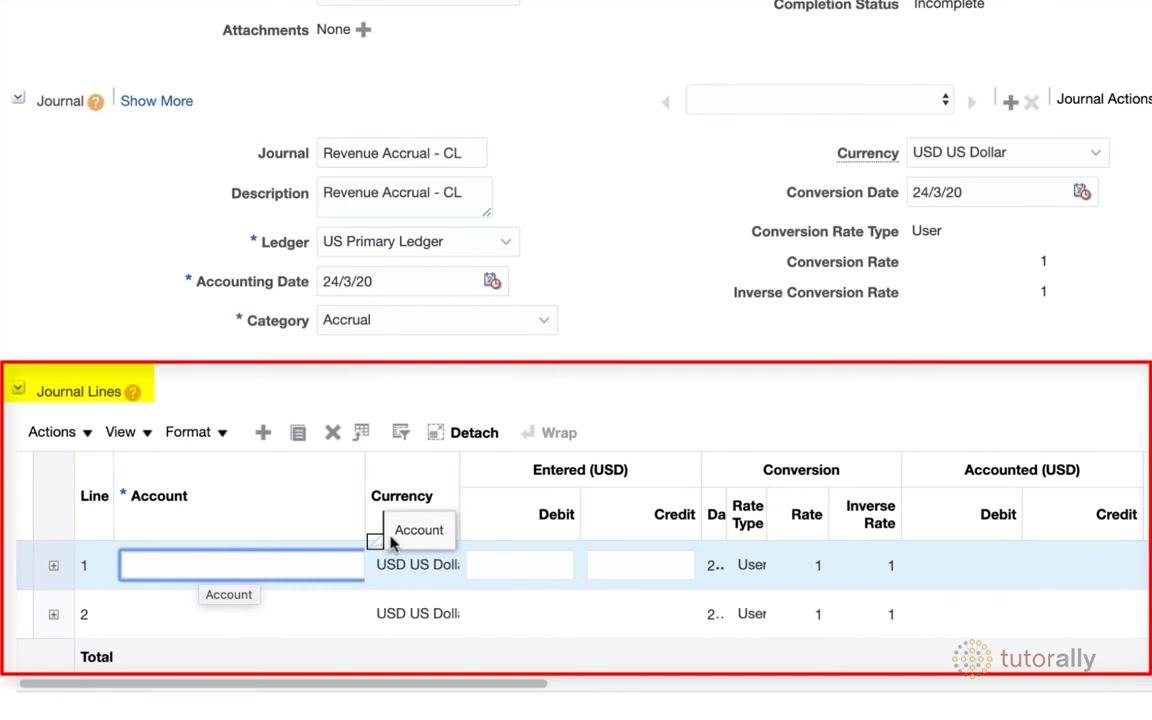
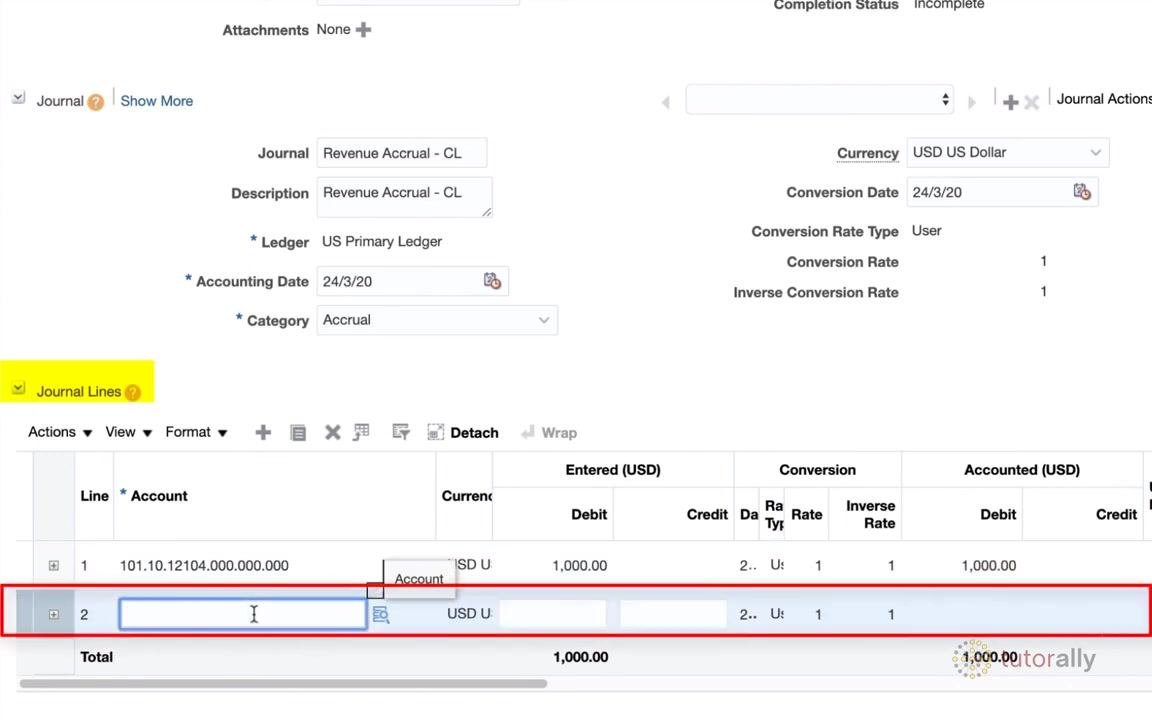
Scroll down to the Journal Lines section and click into the first blank line under the Account column. If needed, resize the columns to the right to reveal the Account selection icon (a magnifying glass or list icon), then click it to open the account code combination selector.
Select or enter an account code combination
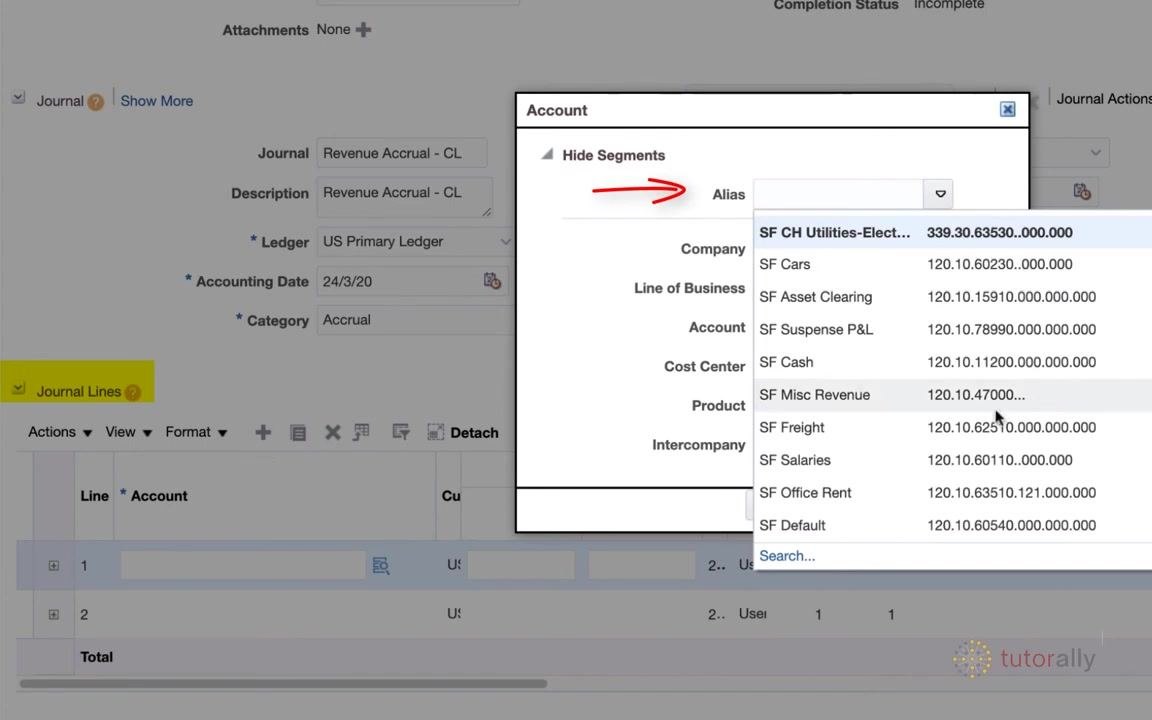
In the account code selector dialog, you have two options:
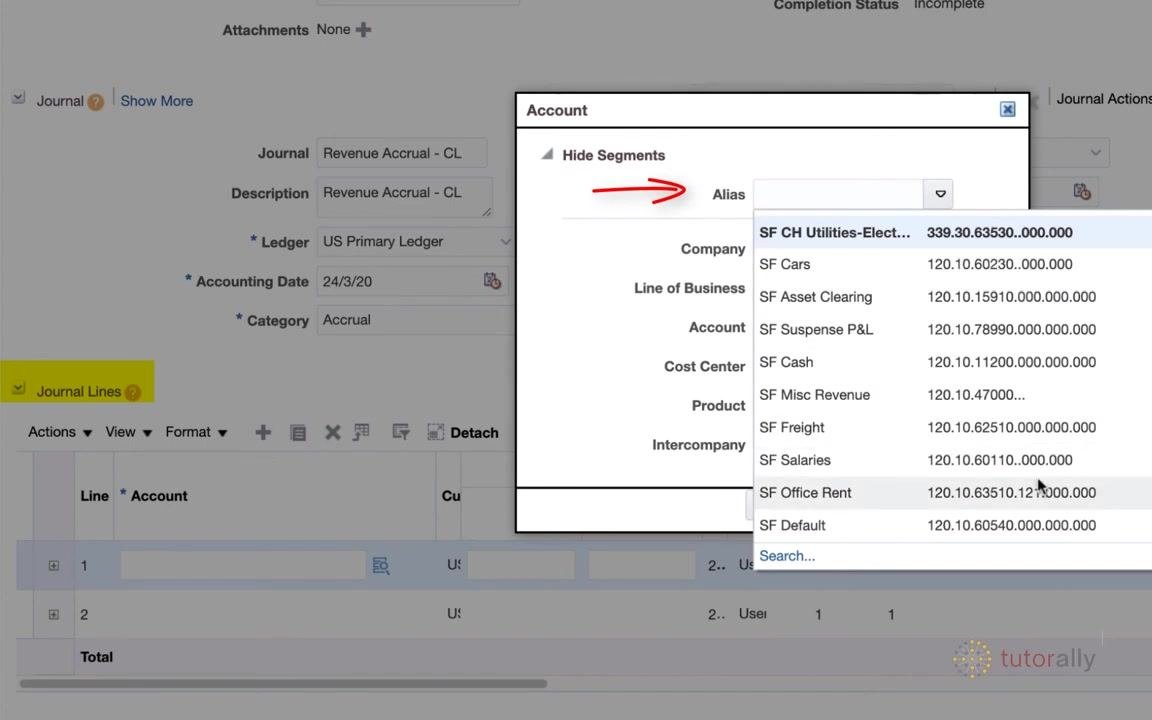
- Select a pre-created alias: Use the dropdown to choose from frequently used code combinations, such as
SF CH Utilities-Elect...,SF Cars,SF Asset Clearing, orSF Misc Revenue. - Manually enter account details: Leave the alias field blank and manually enter the required account segments (Company, Line of Business, Account, Cost Center, Product, Intercompany).
Use the Search option at the bottom of the selector to find a specific code combination if needed.
Understand account aliases
The Account code selector displays a list of available aliases—frequently used or pre-created account code combinations that speed up manual entry and reduce errors. Examples include:
SF CH Utilities-Elect...(code: 339.30.63530..000.000)SF Cars(code: 120.10.60230..000.000)SF Asset Clearing(code: 120.10.15910..000.000)SF Suspense P&L(code: 120.10.78990..000.000)SF Cash(code: 120.10.11200..000.000)SF Misc Revenue(code: 120.10.47000..000.000)SF Freight(code: 120.10.62510..000.000)SF Salaries(code: 120.10.60110..000.000)SF Office Rent(code: 120.10.63510.12000.000.000)SF Default(code: 120.10.60540.000.000.000)
To use an alias, click the dropdown under the Alias field and select the desired alias to automatically populate all account segment fields (Company, Line of Business, Account, Cost Center, Product, Intercompany). If the required alias is not listed, use the Search... option at the bottom of the list. This feature is especially useful for manual journal entries that repeat frequently.
Search for the debit account
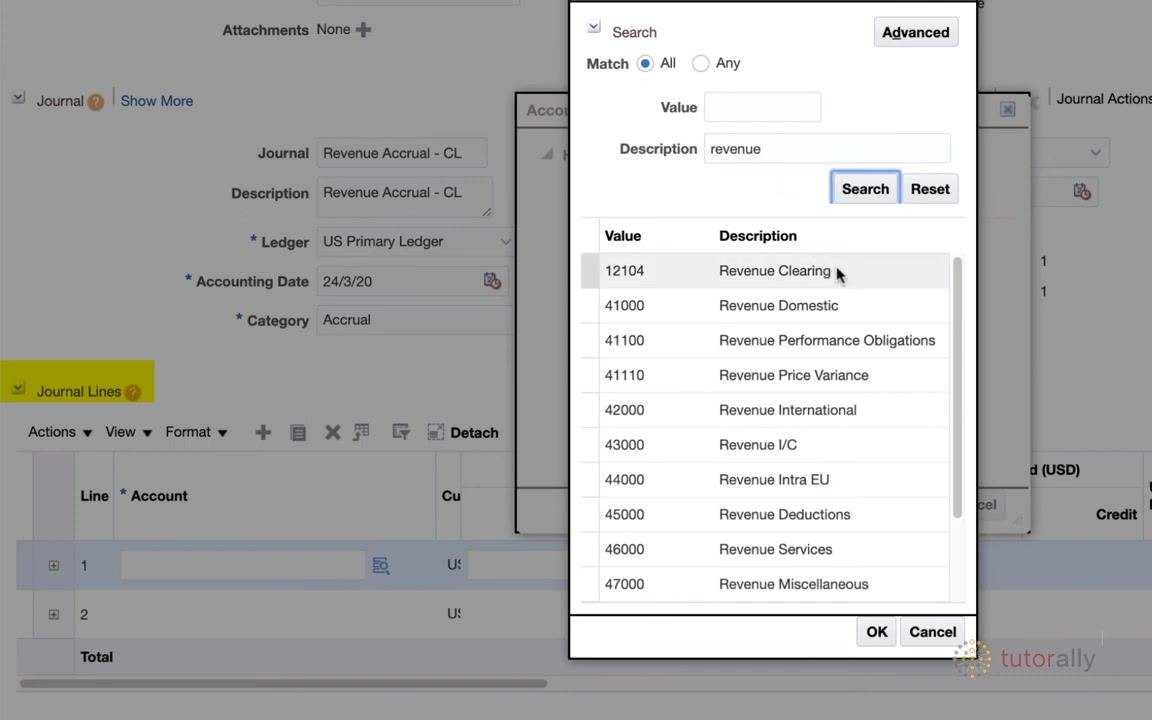
In the Journal Lines section, click the account search icon for the first line. In the search dialog, enter revenue in the Description field and click Search to display all accounts containing "revenue" in the description, including:
- 12104: Revenue Clearing
- 41000: Revenue Domestic
- 41100: Revenue Performance Obligations
- 41110: Revenue Price Variance
- 42000: Revenue International
- 43000: Revenue I/C
- 44000: Revenue Intra EU
- 45000: Revenue Deductions
- 46000: Revenue Services
- 47000: Revenue Miscellaneous
Double-click 12104 Revenue Clearing to select it.
Enter the debit amount
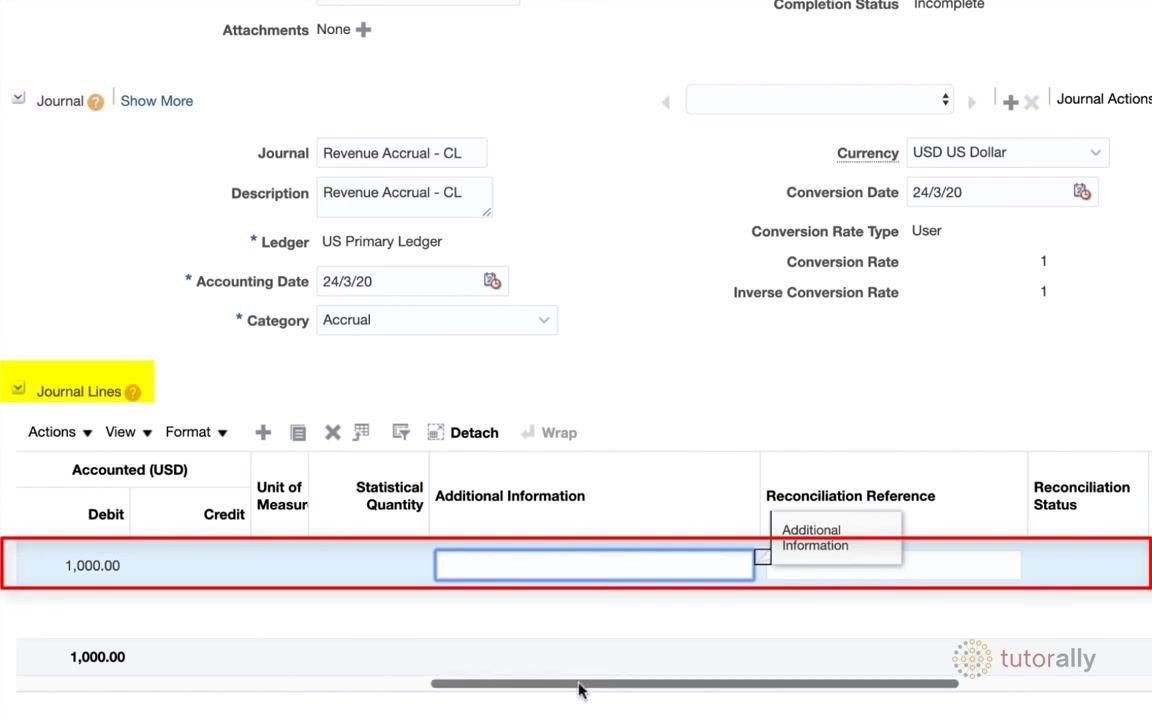
The selected account (101.10.12104.000.000.000) populates the Account field for line 1. In the Entered (USD) Debit field, enter 1,000.00. You may leave the Additional Information field blank or add a note if needed.
Add optional notes for the debit line
If required, add relevant notes in the Additional Information field for the journal line. This field can be left blank if no additional details are necessary.
Select the account for the credit line
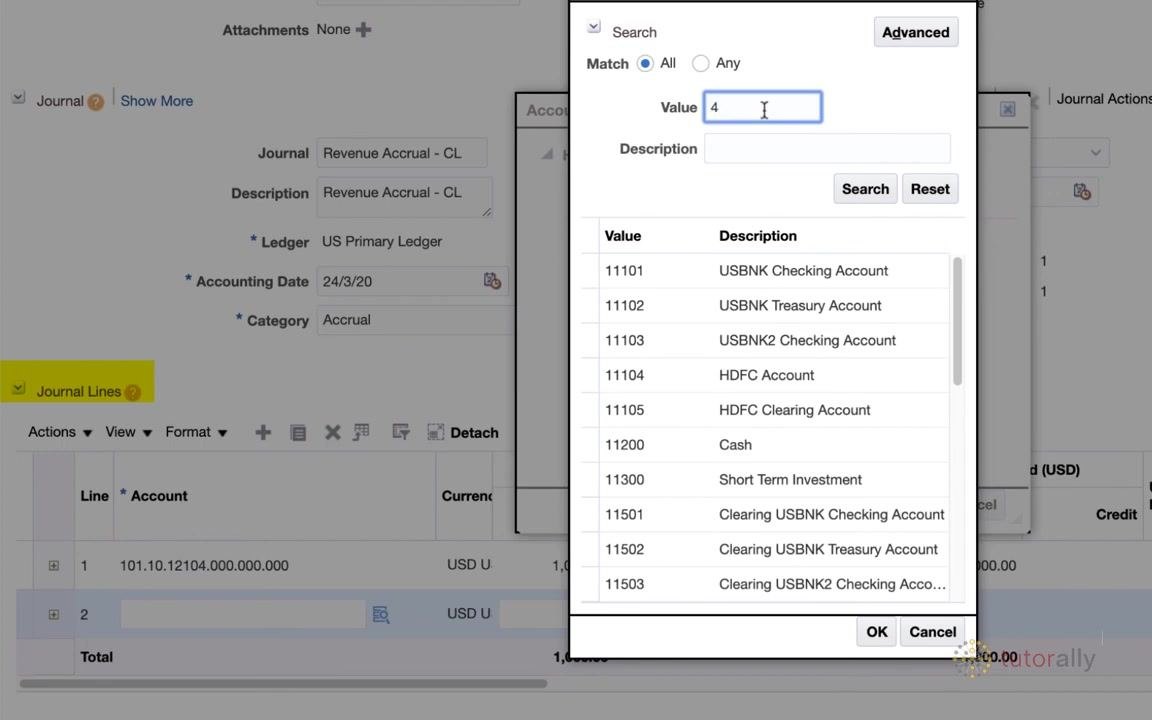
Click the Account field for line 2 (the credit line), then click the account search icon to open the list of values.
Search for the credit account
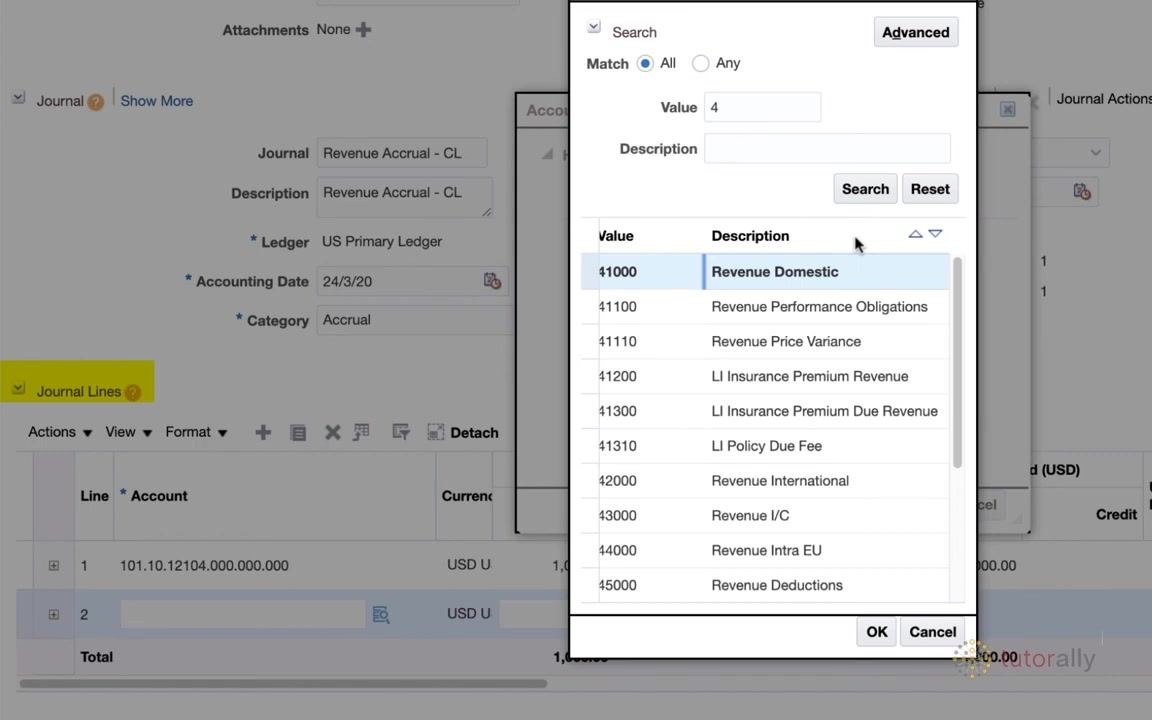
In the search dialog, enter 4 in the Value field to filter accounts starting with 4, then click Search. The filtered list displays accounts such as:
- 41000: Revenue Domestic
- 41100: Revenue Performance Obligations
- 41110: Revenue Price Variance
- 41200: LI Insurance Premium Revenue
- 41300: LI Insurance Premium Due Revenue
- 42000: Revenue International
- 43000: Revenue I/C
- 44000: Revenue Intra EU
- 45000: Revenue Deductions
Select the Revenue Domestic account
From the filtered list, select 41000 Revenue Domestic and click OK to confirm.
Enter the credit amount
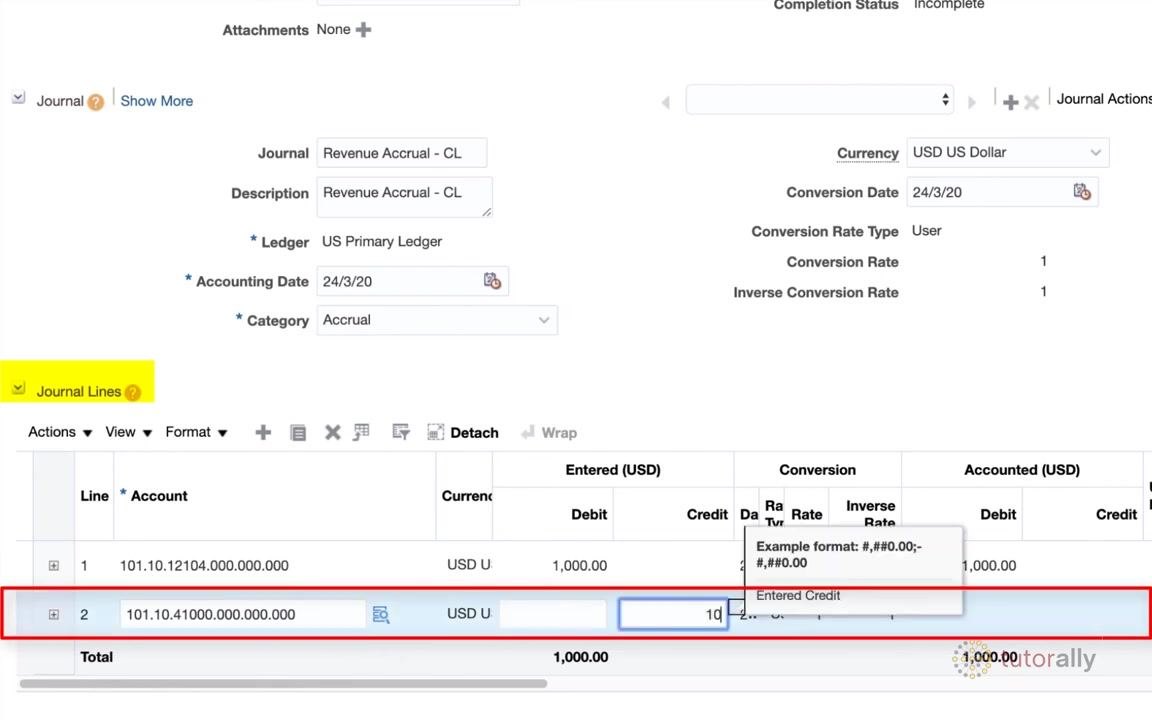
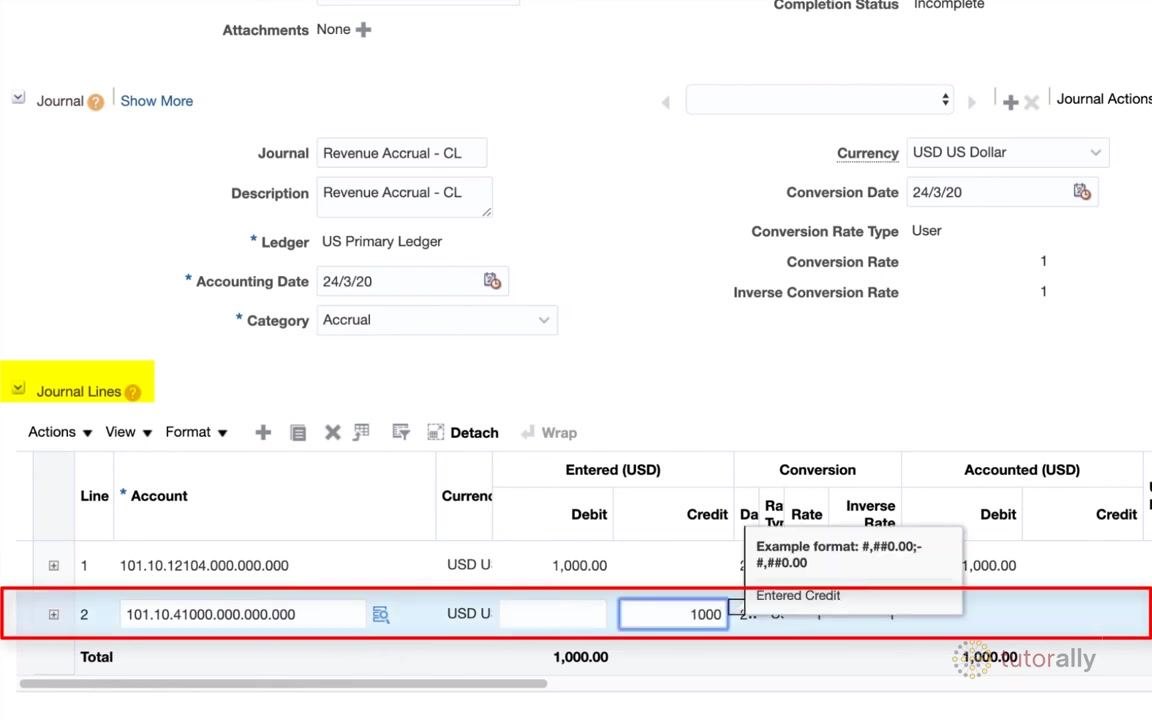
The selected account (101.10.41000.000.000.000) populates the Account field for line 2. In the Entered (USD) Credit field, enter 1,000.00.
Add optional notes for the credit line
If prompted, enter additional information for the credit line. This field can be left blank if no further details are required.
At this point, both the debit and credit lines for the revenue accrual journal entry are correctly entered with the appropriate accounts and amounts.
Save the journal entry
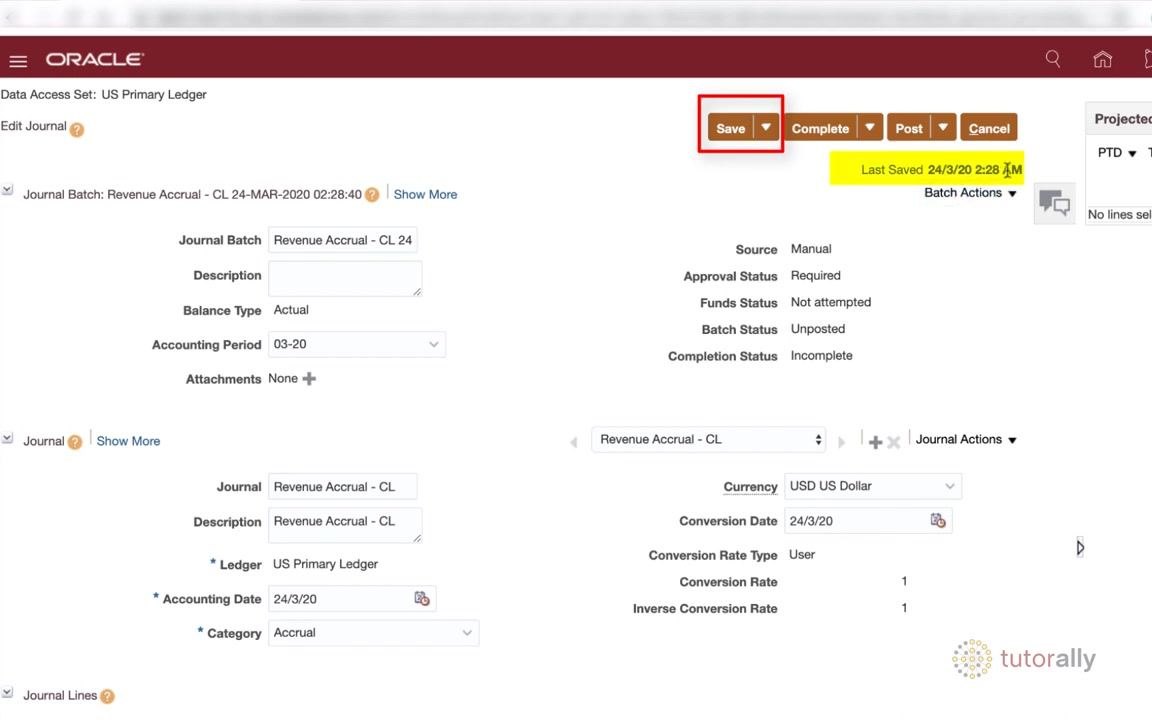
Click Save at the top right of the screen. After saving, a "Last Saved" timestamp appears on the screen confirming the save action (e.g., "Last Saved 24/3/20 2:28 AM"). The journal batch name updates to include the save timestamp (e.g., "Revenue Accrual - CL 24-MAR-2020 02:28:40"). The Completion Status will still show "Incomplete" at this stage.
Complete the journal entry
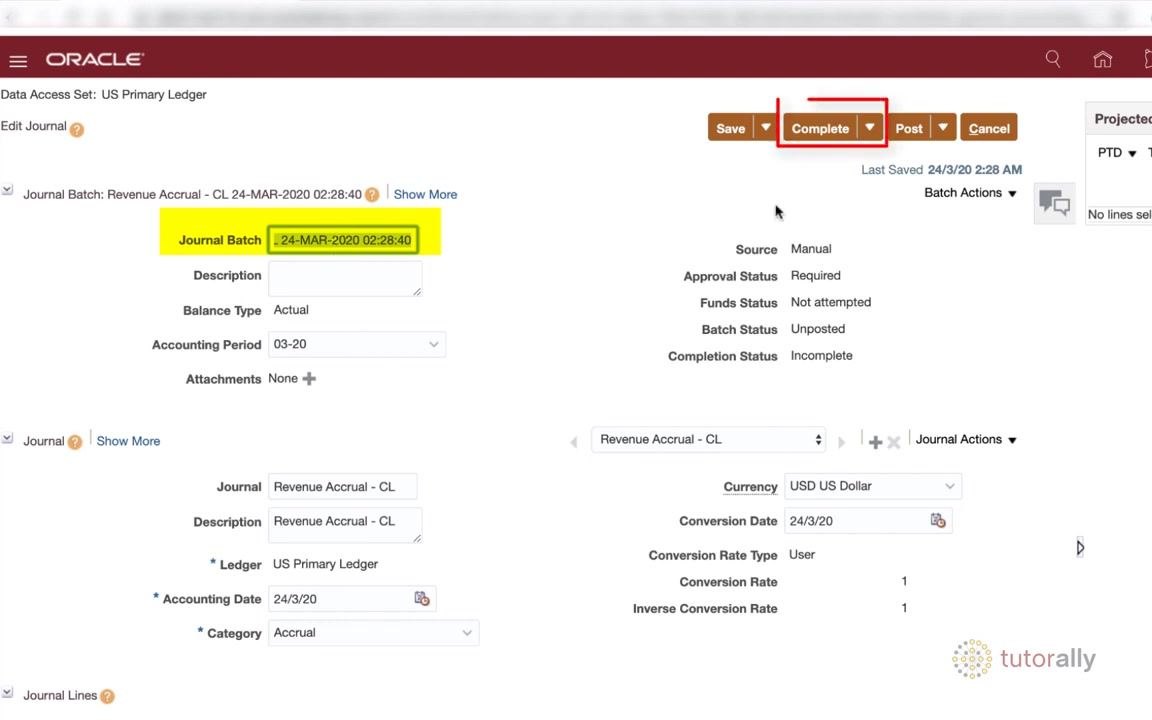
Click Complete next to the Save button to mark the journal entry as complete. Verify that the Completion Status field updates to "Complete" on the right side of the screen. Ensure the Batch Status remains "Unposted" and the Approval Status is "Required" (if applicable).
Review the completion status
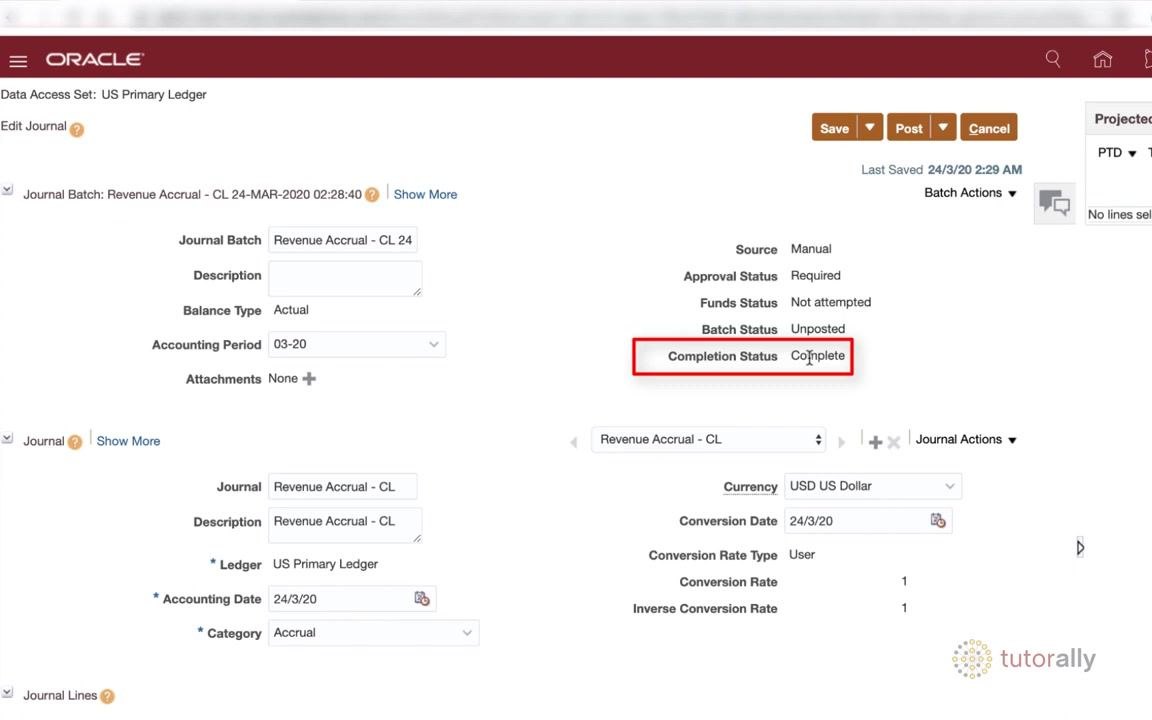
Confirm the Completion Status now displays "Complete" in the status section. The journal entry is ready for posting.
Post the journal entry
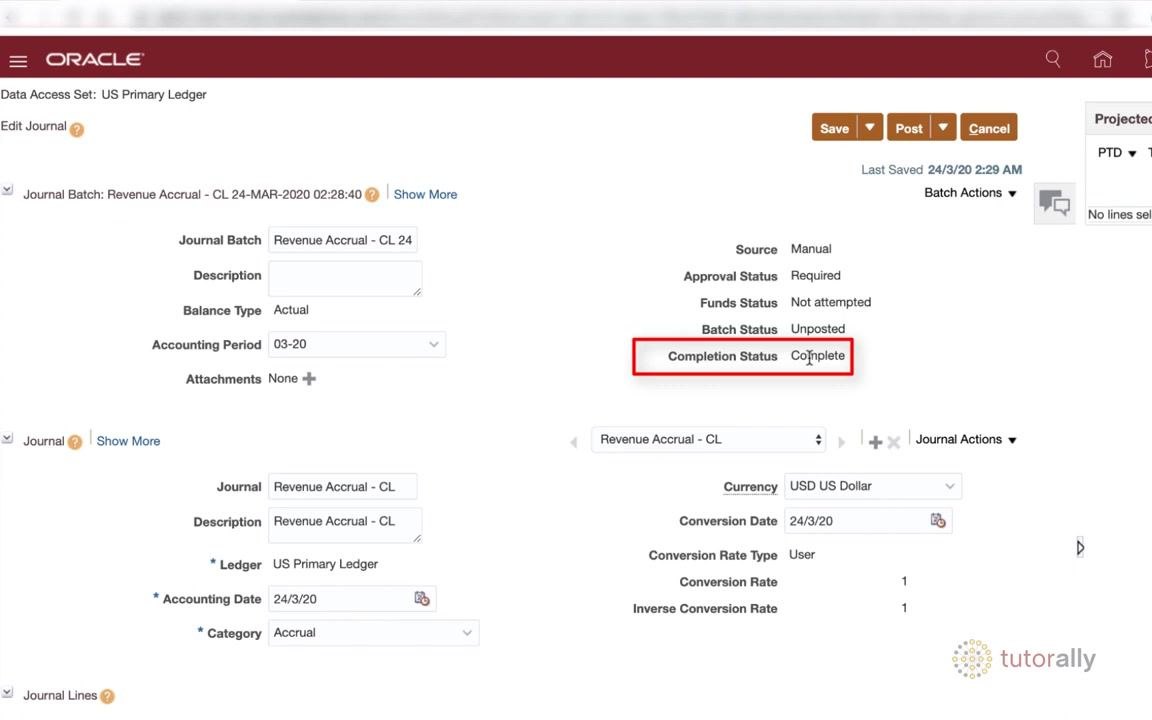
Click Post at the top right of the screen to finalize and post the journal entry. This submits the journal for posting in the ledger, completing the revenue accrual process.
Summary
By following these steps, you have created a journal entry in Oracle, entered the header information and journal lines for a revenue accrual, and saved, completed, and posted the entry to the ledger—finalizing the transaction in Oracle General Ledger.
Generation details: cost, quality tiers
Docsie billed 4,000 credits ($2.80) to analyze this 8-minute video at standard quality. The rewrite, template fill and Word/PDF exports were included. The same video at each quality tier:
| Quality | Frames sampled | Credits | Approx. cost |
|---|---|---|---|
| Draft | every 16-30 s | 2,000 | $1.40 |
| Standard (this guide) | every 8-15 s | 4,000 | $2.80 |
| Detailed | every 4-7 s | 8,000 | $5.60 |
| Ultra | every 1-3 s | 16,000 | $11.20 |
Credits priced at $0.70 per 1,000; plans include a monthly allowance. Enterprise customers on on-premise or bring-your-own-model deployments run this on their own inference and pay no per-video credits.
Generated by Docsie Video-to-Docs on 2026-09-08 from a 7-minute video. Screenshots are frames from the source video and belong to their creator, Blue Sky Consulting (formerly TutorAlly), whose original is embedded above. If you own this video and want the guide removed or credited differently, contact us and we will act within one business day.