
How to Create a Custom Role in Oracle Fusion
Oracle Fusion provides a set of predefined (seeded) roles that cover most standard job functions, but many organizations need to adjust the menus and privileges attached to these roles to match their own business requirements. This guide walks you through how to create a custom role in Oracle Fusion by copying a standard role through the Security Console, modifying its privileges and data security policies, configuring its role hierarchy, assigning it to users, and verifying the results.
Video: Oracle Fusion Role types and creation of Custom roles by Oracle Ebiz and Fusion Videos (2020). All credit for the demonstration goes to the creator; watch the original on YouTube. The written guide below was generated from this video by Docsie. Creator? Request a change or removal.
Oracle Fusion provides a set of predefined (seeded) roles that cover most standard job functions, but many organizations need to adjust the menus and privileges attached to these roles to match their own business requirements. This guide walks you through how to create a custom role in Oracle Fusion by copying a standard role through the Security Console, modifying its privileges and data security policies, configuring its role hierarchy, assigning it to users, and verifying the results.
Prerequisites
Before you begin, make sure you understand the following:
- Oracle provides many seeded roles, but you should never edit these standard roles directly.
- To meet specific business requirements, you must copy a standard role and tailor the copy instead.
- You will need access to the Security Console in Oracle Applications.
- You should identify in advance which standard role you want to base your custom role on, and which menus or privileges need to be removed or modified.
Understanding Fusion role types
Review the four main types of roles available in Oracle Fusion
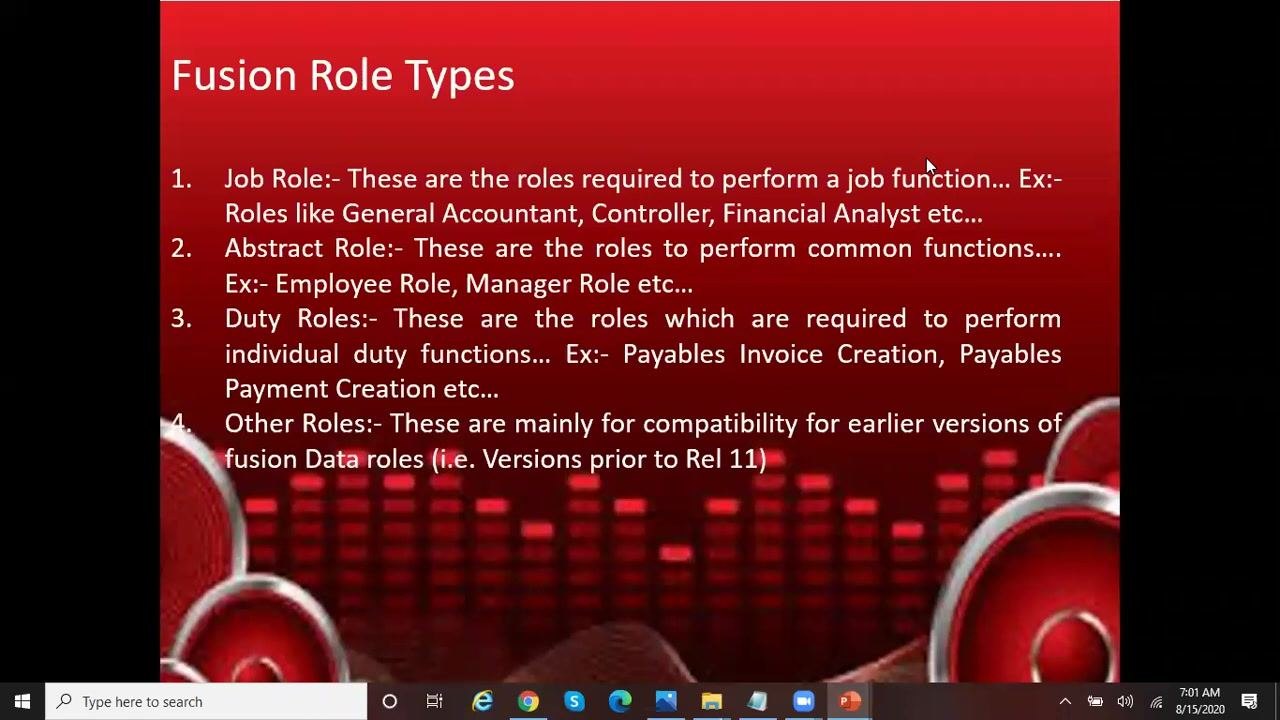
Oracle Fusion organizes security around four role types:
- Job Role: Required to perform a specific job function. Example roles include General Accountant, Controller, and Financial Analyst.
- Abstract Role: Used to perform common functions across the organization. Example roles include Employee Role and Manager Role.
- Duty Role: Required to perform individual duty functions. Example duties include Payables Invoice Creation and Payables Payment Creation.
- Other Roles: Mainly provided for compatibility with earlier versions of Fusion Data roles (prior to Release 11).
Prepare to create a custom role
Before opening the Security Console, identify the standard role you want to base your custom role on. Then determine which menus or privileges need to be removed or modified to meet your business requirements.
Accessing the Security Console
Access the main navigation menu
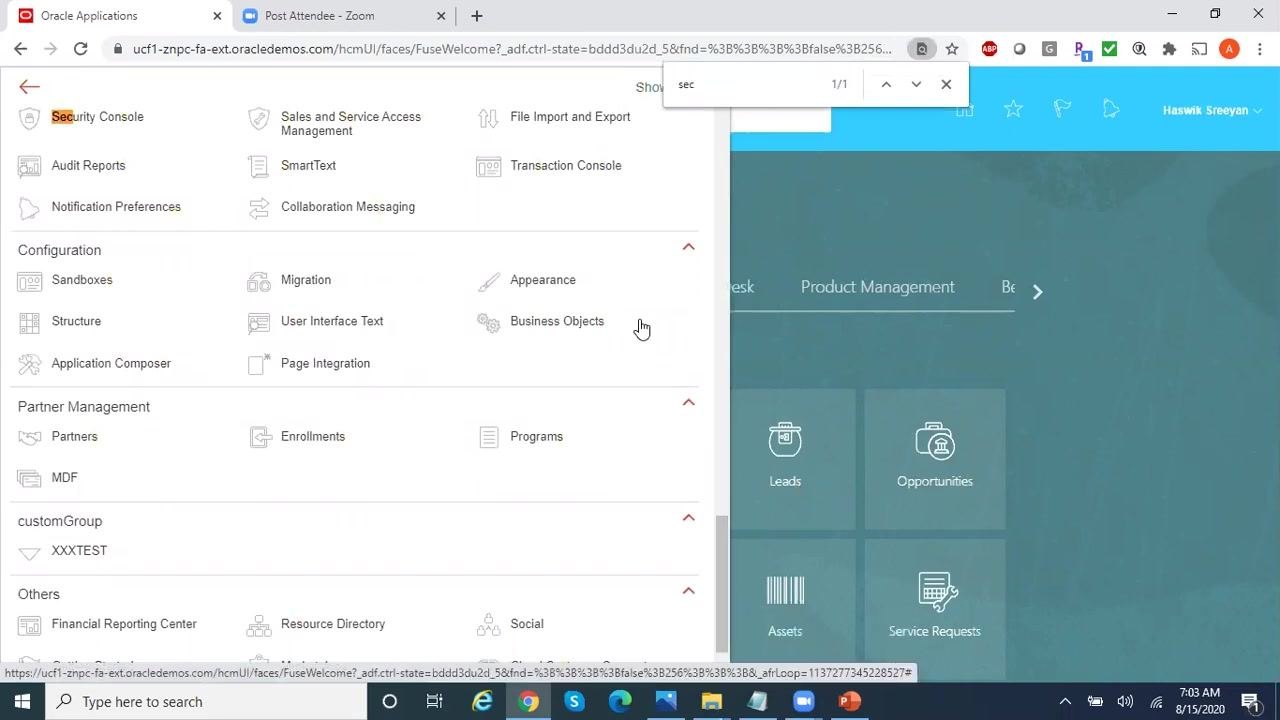
Open Oracle Applications and access the main navigation menu. Scroll through the menu to locate the Security Console option.
If you cannot find the Security Console by scrolling, use the search function instead:
- Click into the search bar at the top of the menu.
- Type "Security Console" to filter and locate the option.
The Security Console is found under the section with options like "Audit Reports," "Notification Preferences," and "Configuration."
Click on Security Console to open it.
Open the Roles tab
In the Security Console, select the Roles tab from the left sidebar.
Filter the roles list
Use the search and filter options to view different types of roles:
- Click the filter dropdown next to the search bar.
- Ensure that Job roles, Duty roles, Abstract roles, and Other roles are checked.
- You can also filter by Privileges and Aggregate privileges if needed.
Search for the standard role to base your custom role on
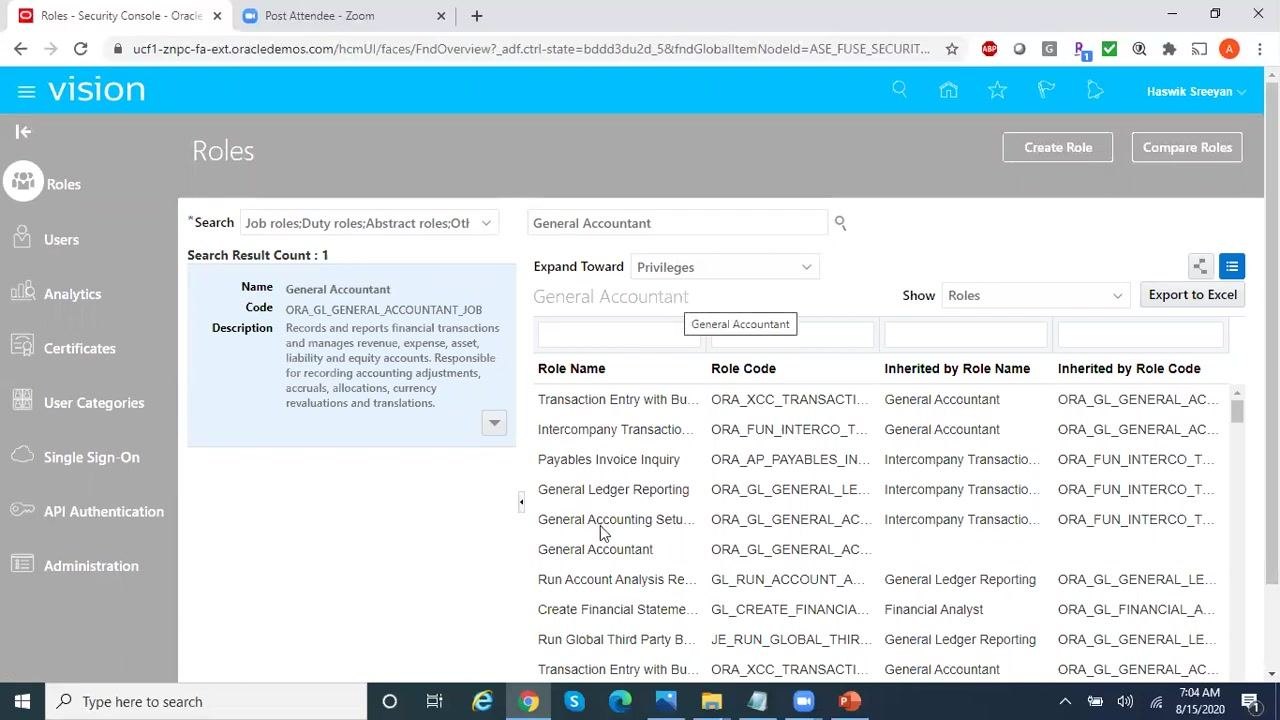
In the search bar, enter the name of the standard role you want to use as a starting point. For this example, type General Accountant and select the matching role from the search results under Job Roles.
Review the standard role's details
Confirm the Name (General Accountant), Code (ORA_GL_GENERAL_ACCOUNTANT_JOB), and Description. Review the list of privileges and inherited roles associated with this role.
Copying the standard role
Copy the role instead of editing it
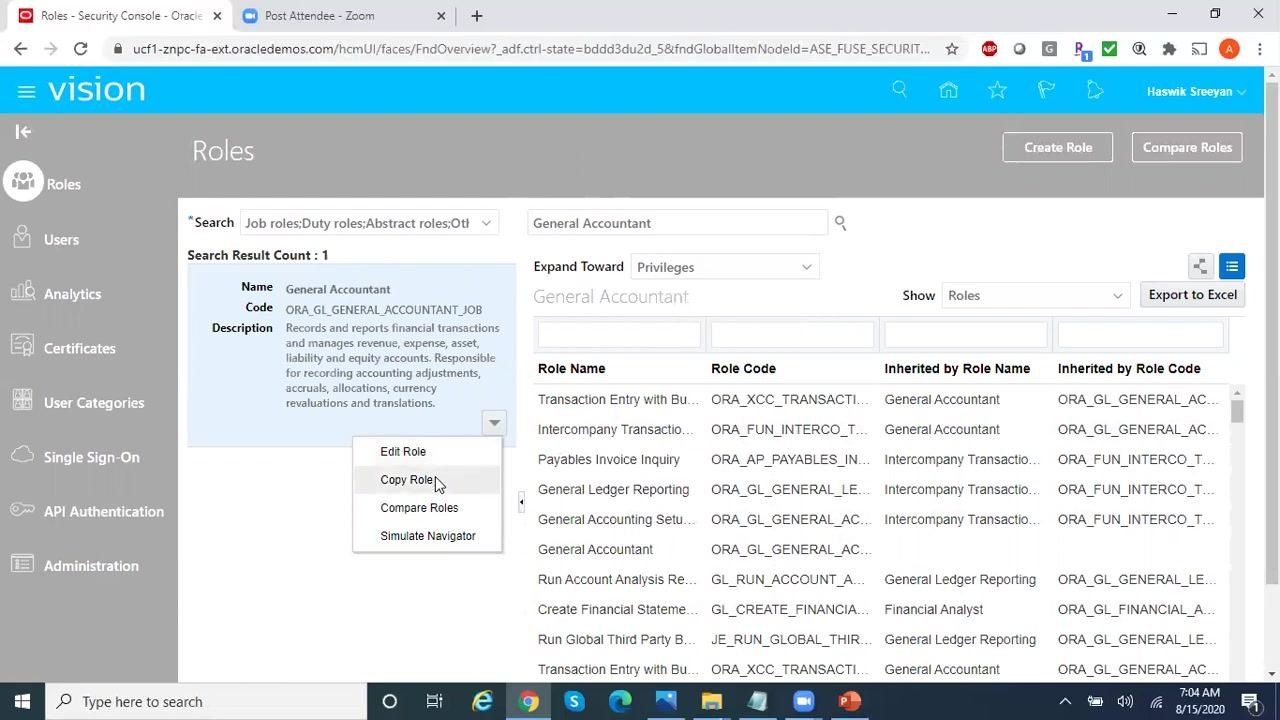
Business requirements may require you to remove certain menus or privileges from a standard role. Because standard roles should never be edited directly, you instead copy the role and create a custom version tailored to your needs, then assign that custom role to users as required.
To start, click the dropdown arrow next to the standard role's name and select Copy Role from the menu.
Do not select "Edit Role" for standard roles — always use Copy Role to create a custom version.
Enter the custom role's basic details
In the Copy Role wizard, enter the following details:
- Role Name: Reliance_General AccountantGSE
- Role Code: RELIANCE_GL_GENERAL_ACCOUNTANT_JOB_GSE
- Role Category: Financials - Job Roles (auto-filled)
- Predefined Role: Leave this checkbox unchecked, since this is a custom role rather than a predefined one.
- Description: Auto-filled from the standard role, though you may edit it as needed. For example: "Records and reports financial transactions and manages revenue, expense, asset, liability and equity accounts. Responsible for recording accounting adjustments, accruals, allocations, currency revaluations and translations."
Verify that the Predefined Role checkbox remains unchecked to confirm you are creating a custom role, not a seeded one. The fields should display the Role Name, Role Code, Role Category, and Description shown above.
Click Next to proceed to the Function Security Policies step.
Adjusting function security policies
Review the inherited privileges
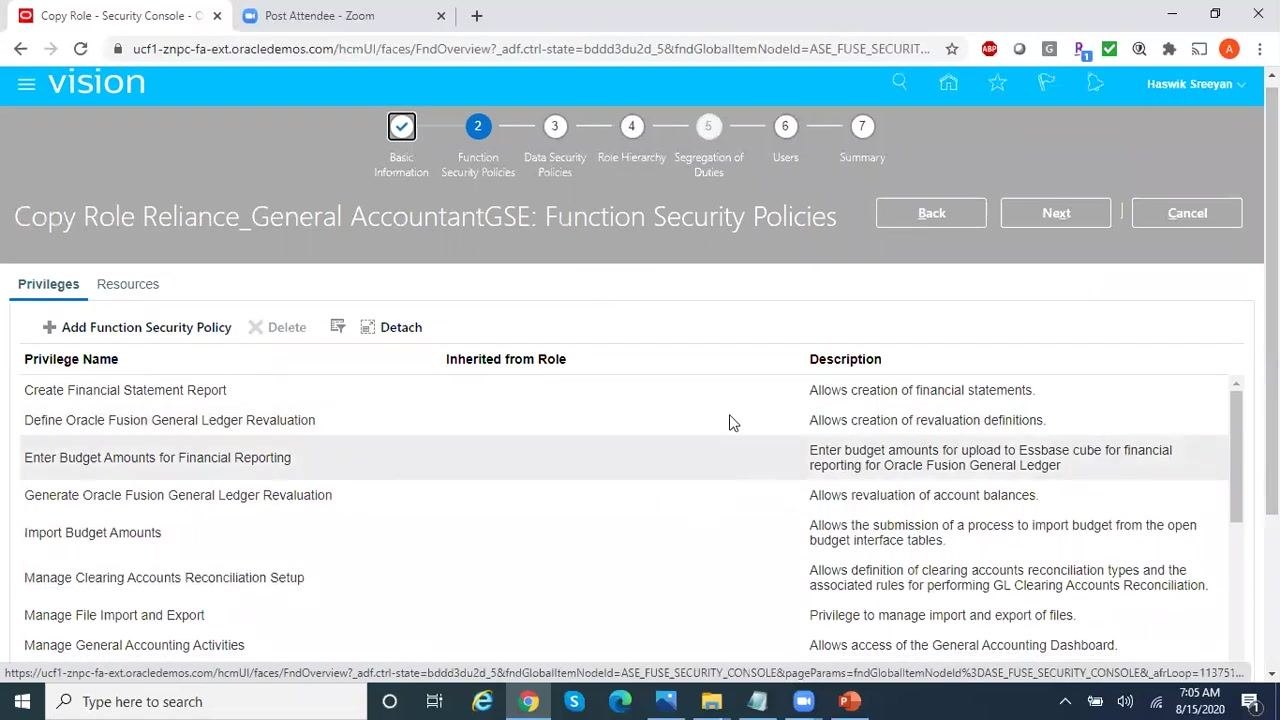
The Function Security Policies page lists all privileges inherited from the standard "General Accountant" role, including:
- Create Financial Statement Report
- Define Oracle Fusion General Ledger Revaluation
- Enter Budget Amounts for Financial Reporting
- Generate Oracle Fusion General Ledger Revaluation
- Import Budget Amounts
- Manage Clearing Accounts Reconciliation Setup
- Manage File Import and Export
- Manage General Accounting Activities
Remove budget-related privileges
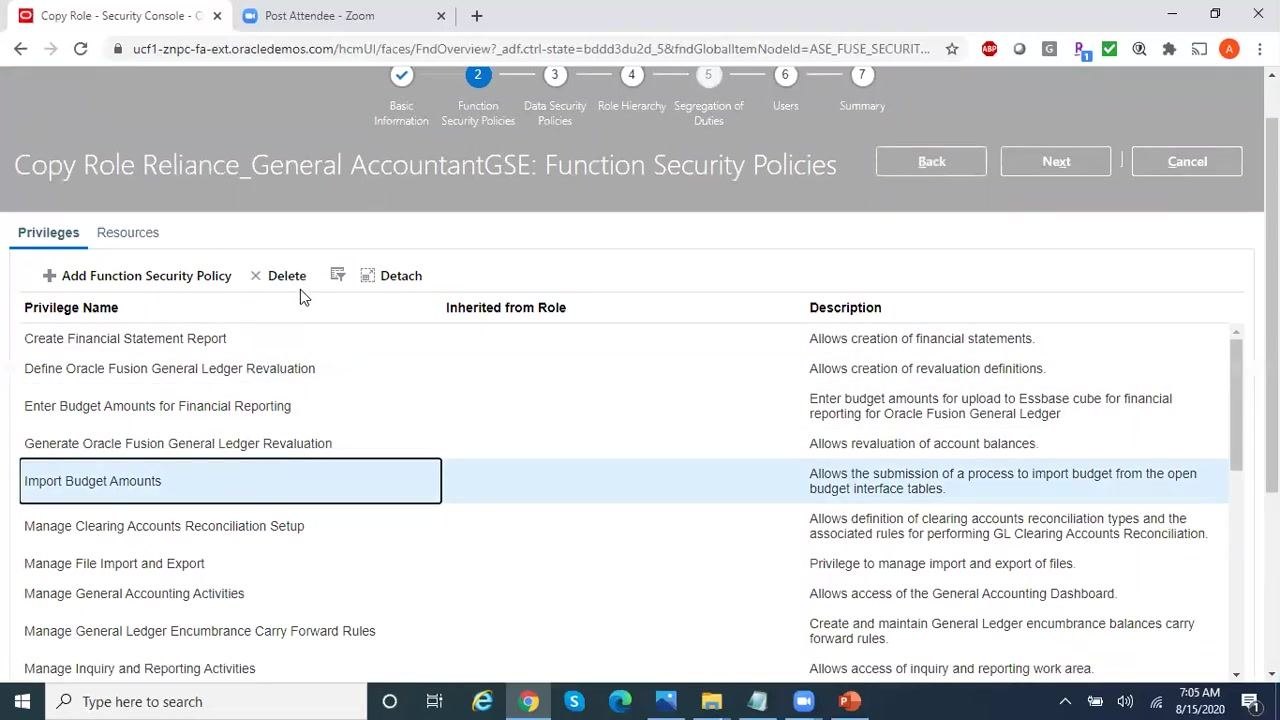
Identify privileges related to budgets, such as Enter Budget Amounts for Financial Reporting and Import Budget Amounts. Select each budget-related privilege by clicking on it, then click the Delete button to remove it.
Remove component functionality privileges
Scroll through the list and identify any privileges related to component functionalities that should not be included. Select the privilege — for example, "Run Encumbrance Year End Carry Forward Program in Final Mode" — and click Delete to remove it.
Click Next to proceed to the Data Security Policies step.
Adjusting data security policies
Review the inherited data security policies
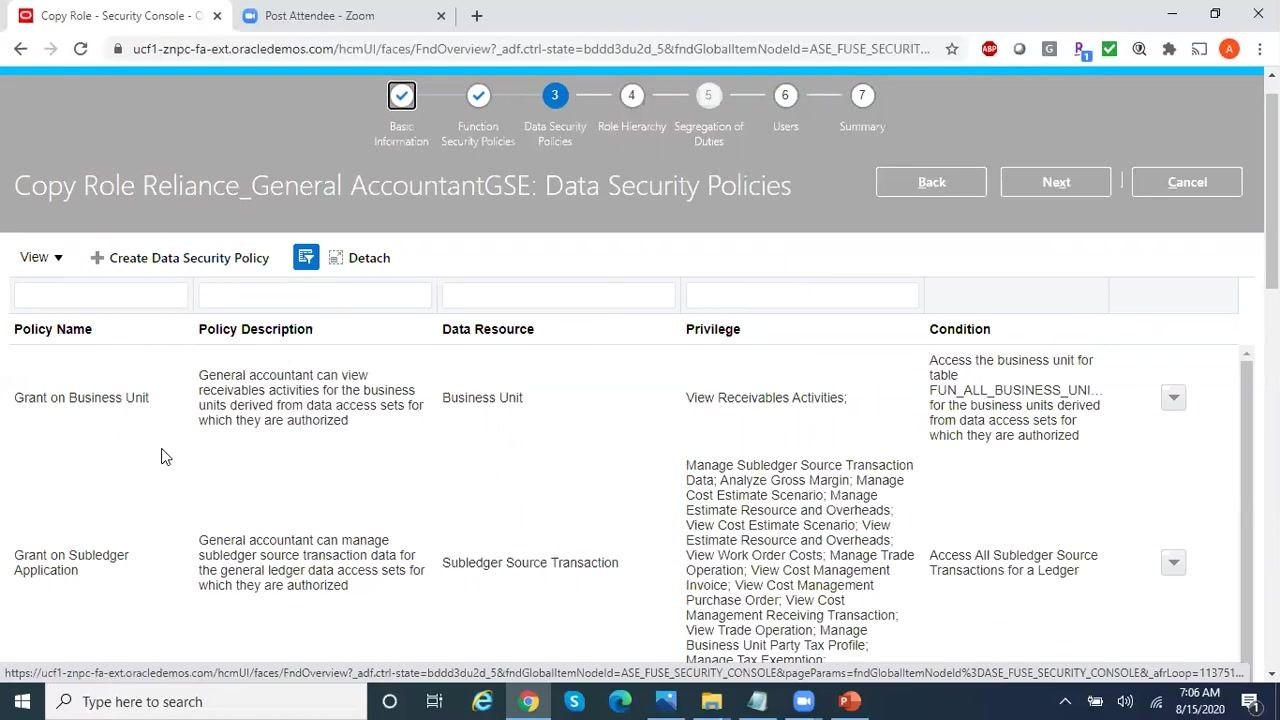
The Data Security Policies page lists policies such as:
- Grant on Business Unit: General accountant can view receivables activities for the business units derived from data access sets for which they are authorized.
- Grant on Subledger Application: General accountant can manage subledger source transaction data for the general ledger data access sets for which they are authorized.
The table columns include Policy Name, Policy Description, Data Resource, Privilege, and Condition.
Remove unwanted data security policies
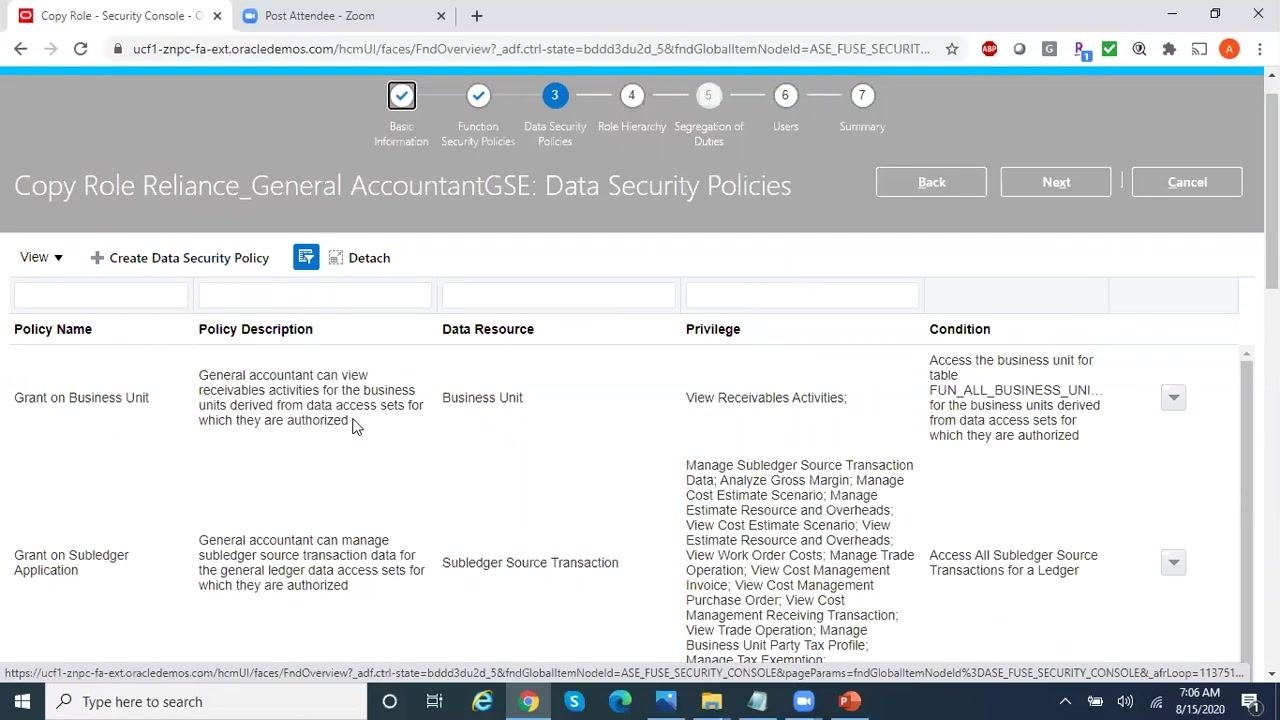
If you do not want the custom role to have access to a specific data security policy — for example, "View Receivables Activities" for business units — select the relevant policy. Click the Delete or Remove Data Security Policy button, then confirm the deletion when prompted by clicking Yes.
Locate a data security policy to edit
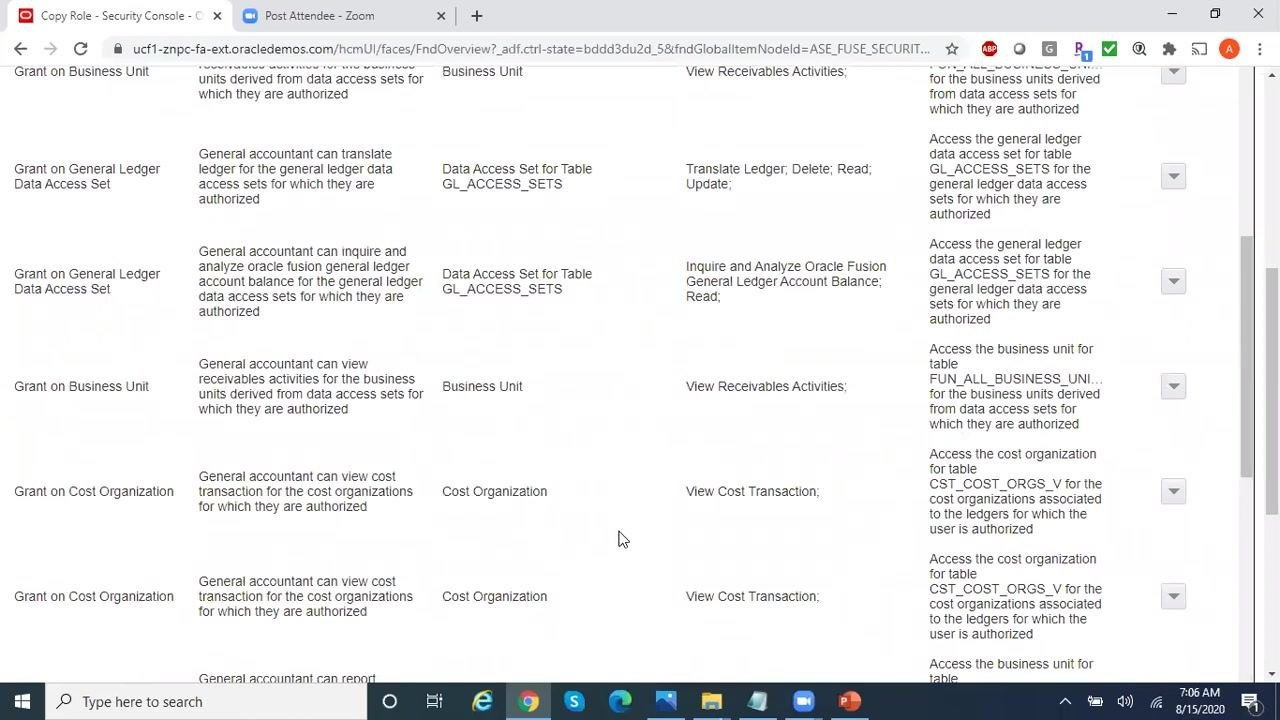
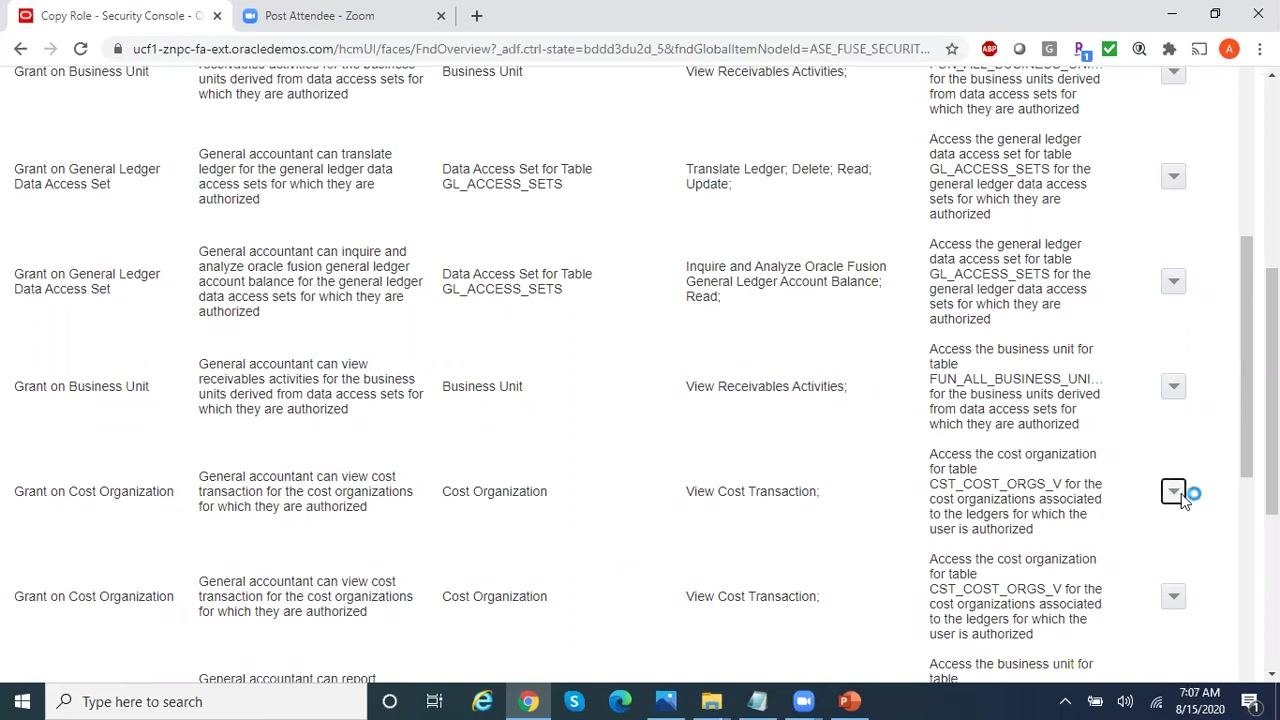
Scroll through the list of data security policies to identify the one you want to edit. For example, locate the "Grant on Cost Organization" policy, which allows a general accountant to view cost transactions for authorized cost organizations. The policy details appear in columns for Policy Name, Policy Description, Data Resource, Privilege, and Condition.
Click the edit icon next to the policy you want to modify. The Edit Data Security Policy dialog opens, showing the current privileges — for example, the "Actions" dropdown may show "View Cost Transaction." The dialog also includes options for selecting additional privileges such as "View Estimate Costs," "View Planning Cost Organizations," and "View Standard Costs."
Add additional privileges to the policy
In the Edit Data Security Policy dialog, scroll through the list of available privileges and select the ones you need. For example, check both "View Cost Transaction" and "View Item Cost" to allow the role to view both types of data. Make sure the "Policy Description" field accurately reflects the updated privileges, then click OK to save your changes.
Confirm the updated policy
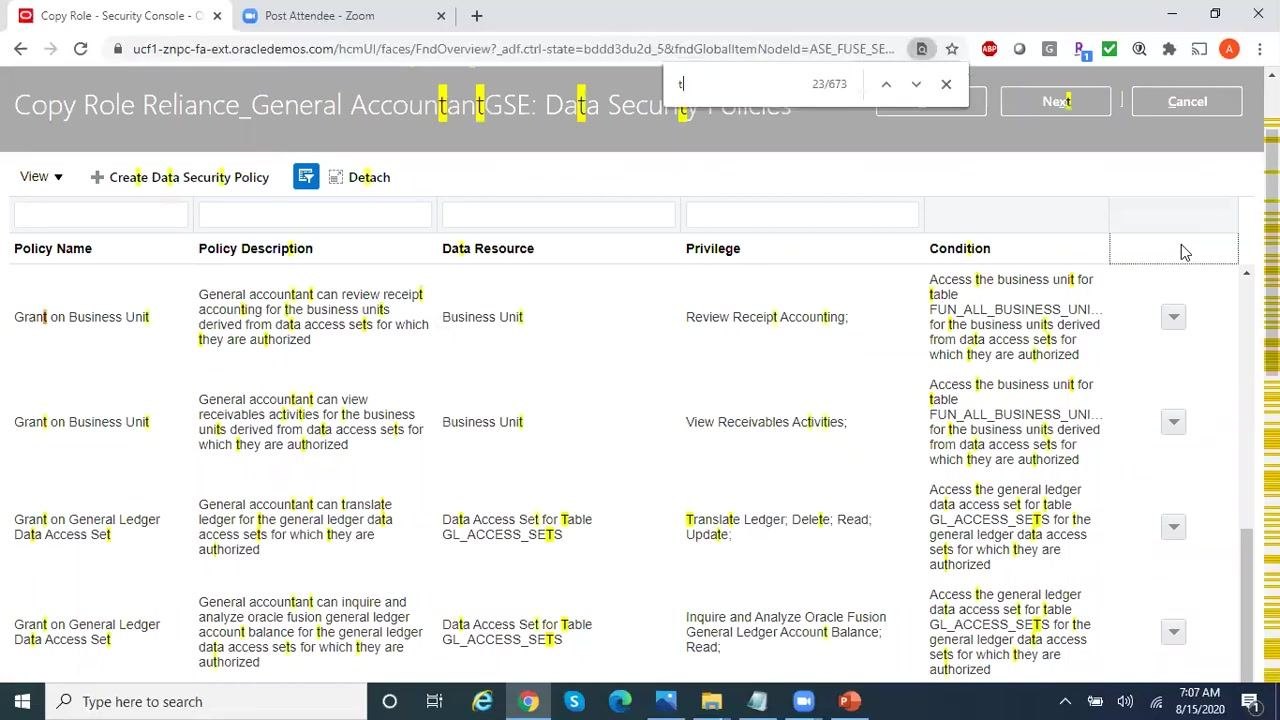
After saving, the updated policy appears in the list. Confirm that the new privileges are reflected under the "Privilege" column for the edited policy. You can use the search or filter fields at the top to quickly locate specific policies or privileges.
Edit privileges for other policies (optional)
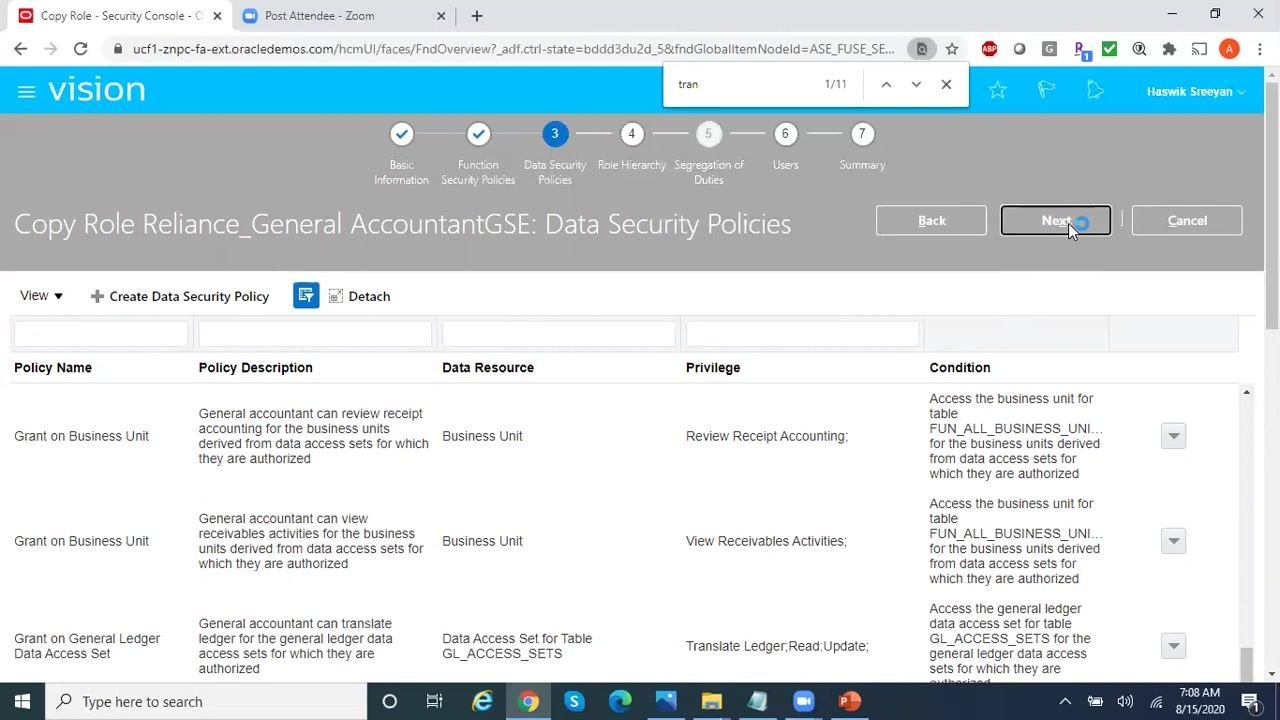
If you need to modify privileges for other policies — for example, removing the "Delete" privilege from a translation data policy — locate the relevant policy. Click the edit icon and uncheck the "Delete" privilege, leaving only "Read" and "Update" if required. Save your changes and verify the update in the policy list.
Once all necessary edits and additions are complete, click the Next button at the top right to continue to the next step in the role setup process.
Configuring role hierarchy
Review the role hierarchy screen
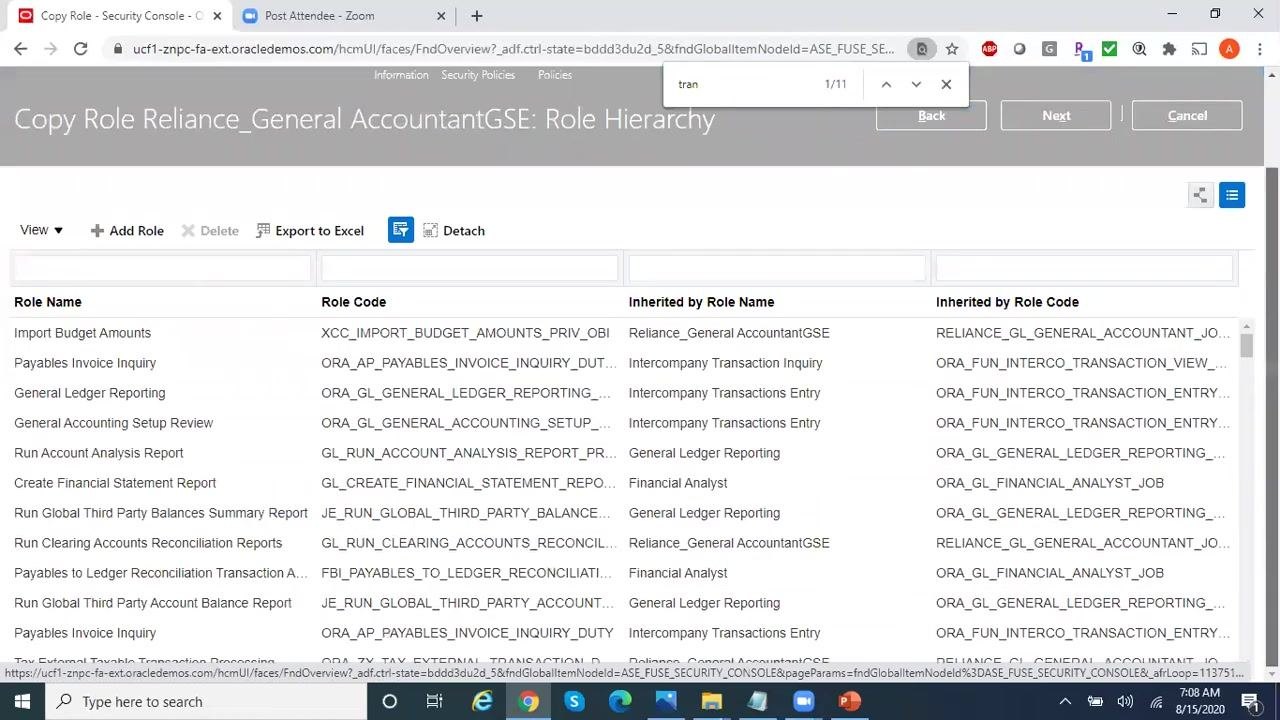
On the "Copy Role Reliance_General AccountantGSE: Role Hierarchy" screen, you see a list of roles with columns for Role Name, Role Code, Inherited by Role Name, and Inherited by Role Code. Common actions available include Add Role, Delete, Export to Excel, and Detach.
Add an additional role to the hierarchy
Click the Add Role button to open the "Add Role Membership" dialog. In the search box, type the name of the role you want to add — for example, "payables." The system displays matching duty roles and other roles, such as "Payables Administration" (ORA_AP_PAYABLES_ADMINISTRATION_DUTY). Select the role you want from the list.
Proceed to the next step
After selecting the additional role, return to the Role Hierarchy screen and click the Next button at the top right to continue.
Assigning the custom role to users
Open the Add User dialog
On the "Copy Role Reliance_General AccountantGSE: Users" screen, the user assignment table is initially empty, with columns for User Login, Display Name, and Description. Click the Add User button on the right.
Search for and select the user
In the "Add User" dialog, enter the user's name or login — for example, "HSre." The system displays matching users, such as "Haswik Sreeyan" with user login "hsreeyan1." Select the appropriate user from the list.
Review the summary of changes
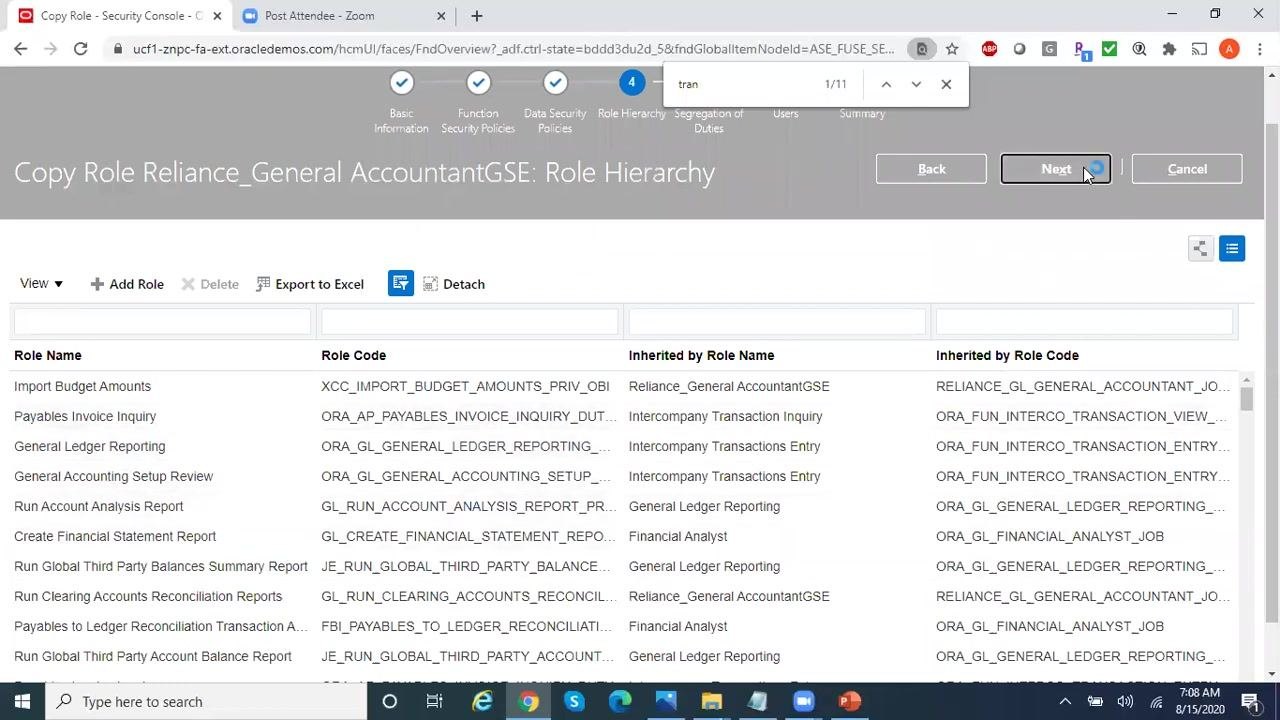
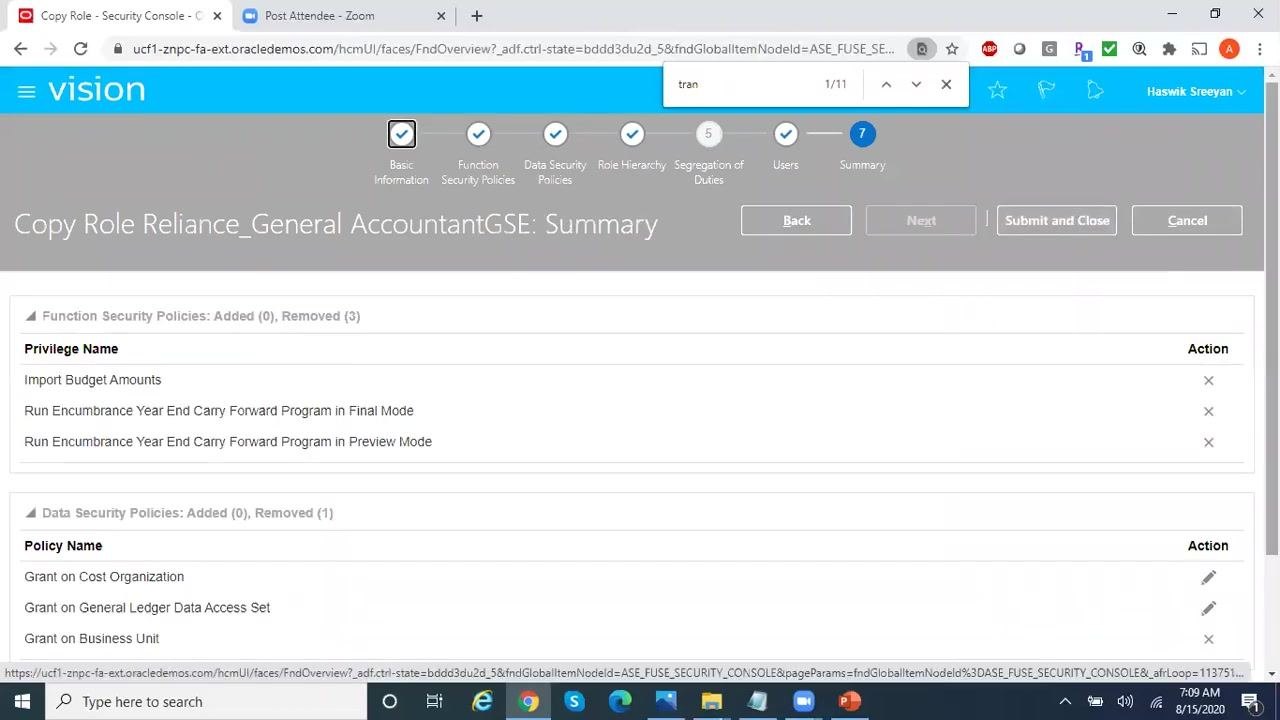
After assigning the user, the "Copy Role Reliance_General AccountantGSE: Summary" screen appears, displaying:
- Function Security Policies: Added or removed privileges.
- Data Security Policies: Added or removed policies.
- Role Hierarchy: Added or removed roles.
- Users: Added or removed users.
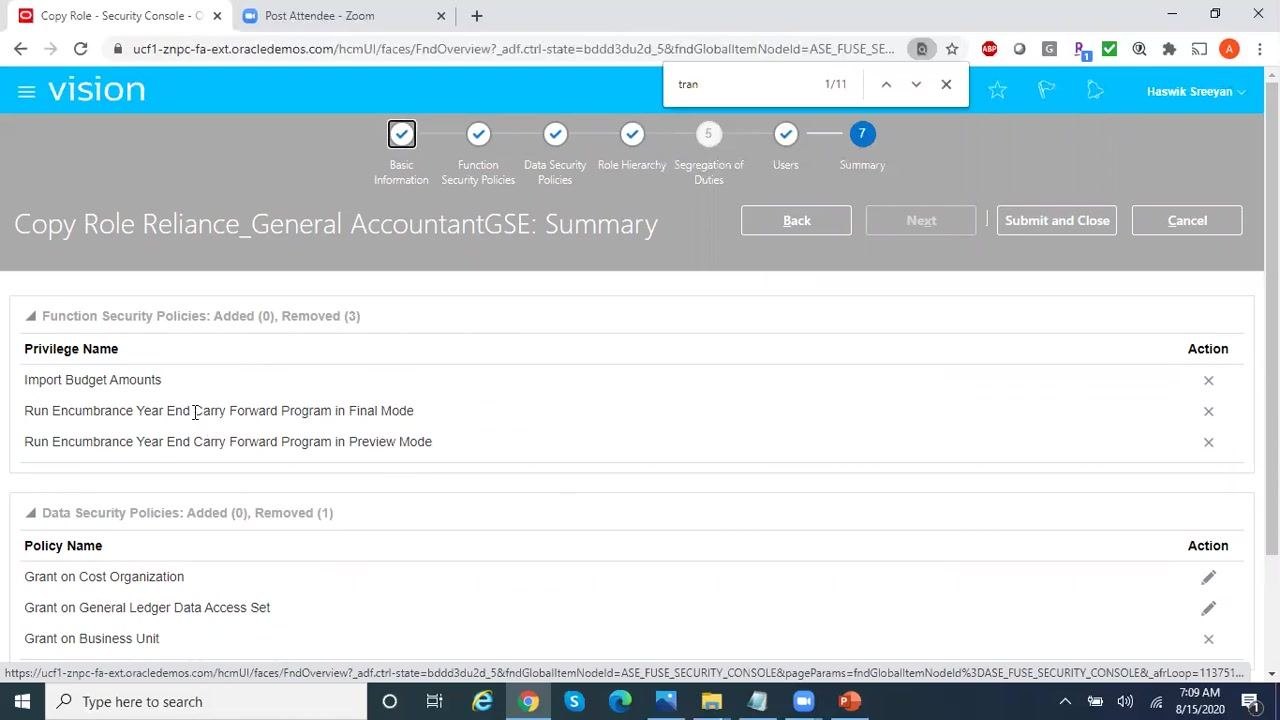
Review the listed changes, such as removed privileges like "Import Budget Amounts" and "Run Encumbrance Year End Carry Forward Program in Final Mode," data security policies like "Grant on Cost Organization" and "Grant on General Ledger Data Access Set," the "Payables Administration" role added to the hierarchy, and the selected user added.
Submit and close
Once you have reviewed all changes and confirmed their accuracy, click the Submit and Close button to finalize the role configuration and assignments.
Monitoring and verifying the role copy process
Confirm the role copy submission
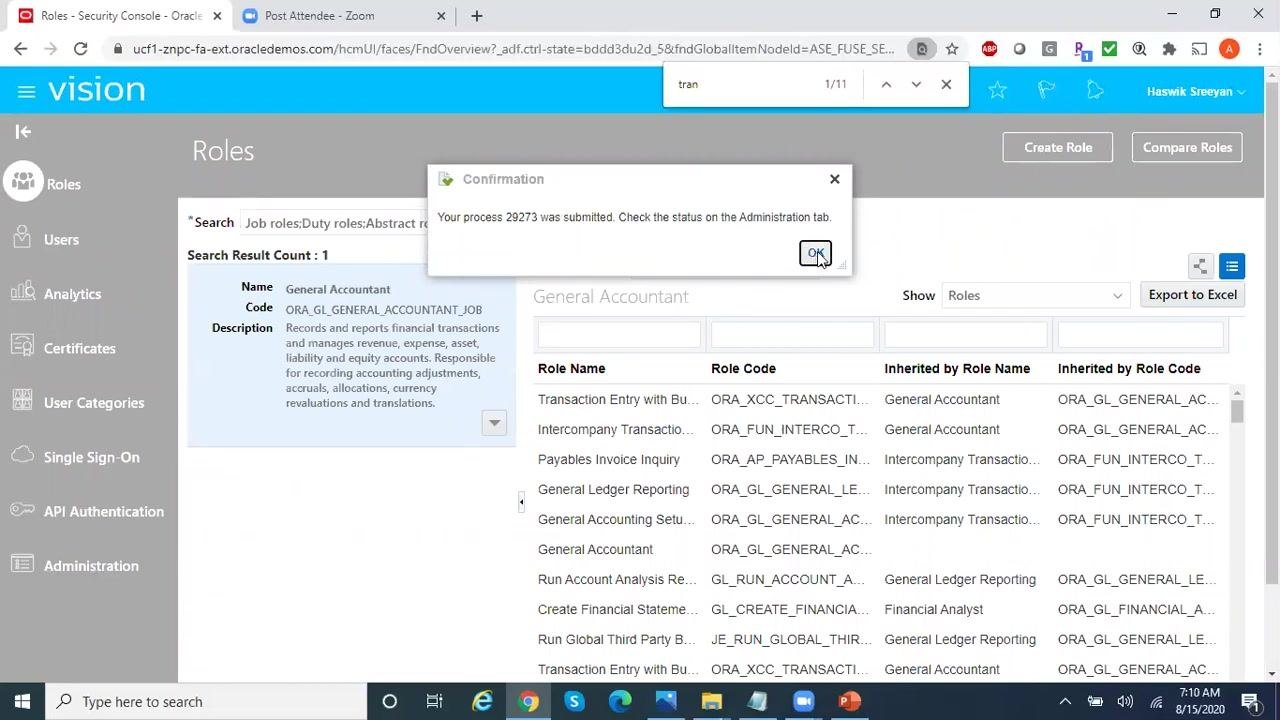
After submitting your changes, a Confirmation dialog appears, displaying a message such as: "Your process 29273 was submitted. Check the status on the Administration tab." Click the OK button to close the dialog.
Verify completion of the role copy process
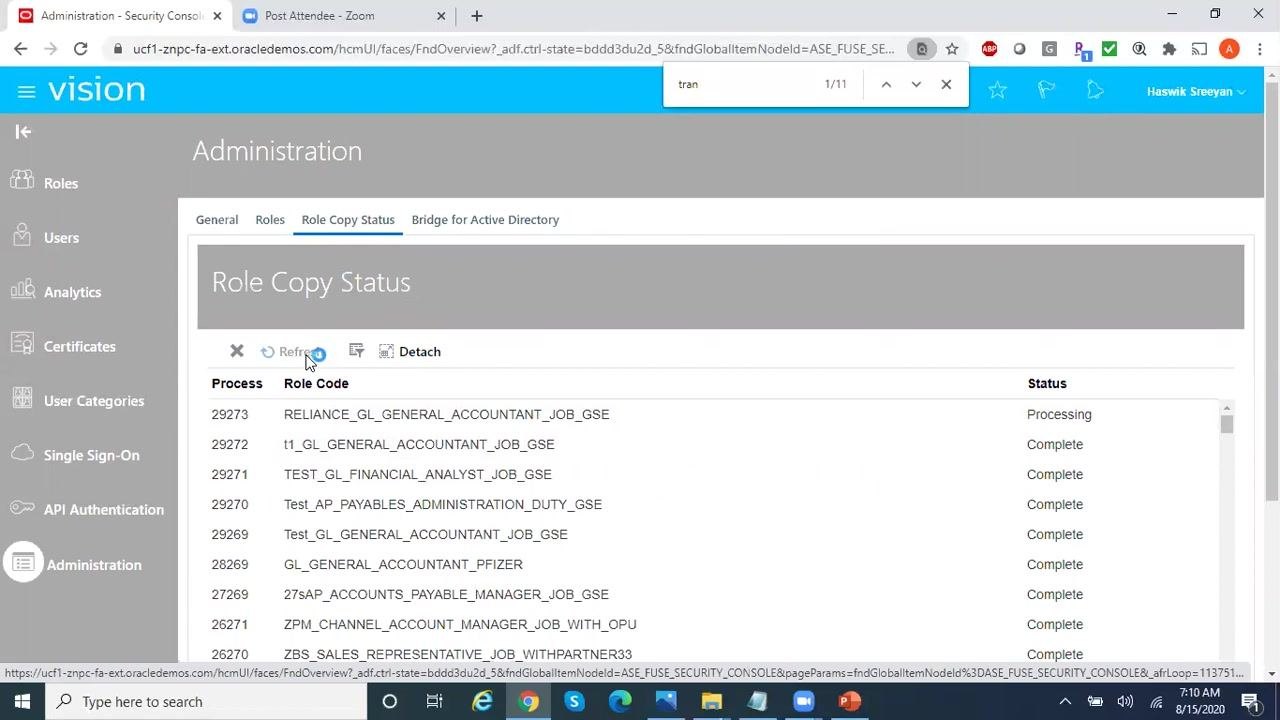
Wait for the status of your process (for example, 29273) to change from Processing to Complete. Confirm that the process for your role code is now marked as Complete in the status column.
Search for users and manage user accounts
To verify user assignments or manage user accounts, click Users in the left navigation pane. The User Accounts screen appears. Use the search bar to enter at least 3 characters and search for a user by display name or user ID. The search results display matching users, their status, and available actions.
Editing or comparing roles after creation
Edit the custom role
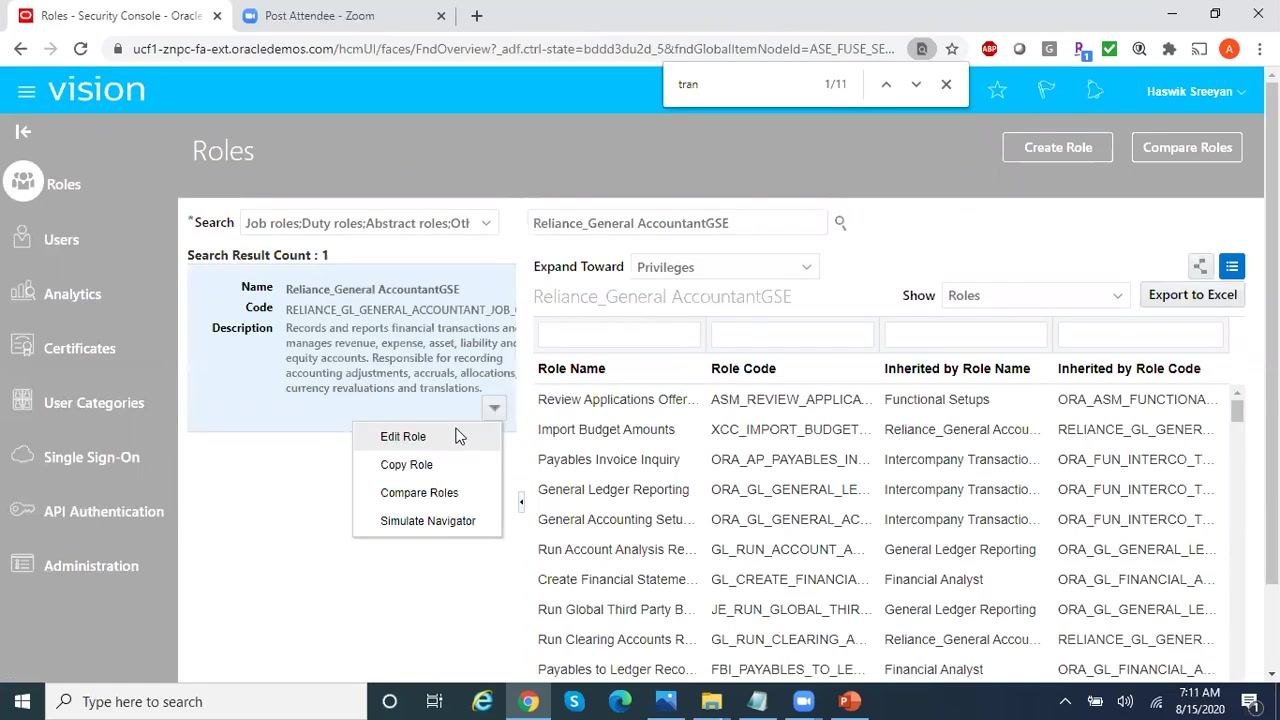
To make further changes to a role, return to the Roles section and search for the desired role — for example, Reliance_General AccountantGSE. Click the dropdown arrow next to the role name and select Edit Role.
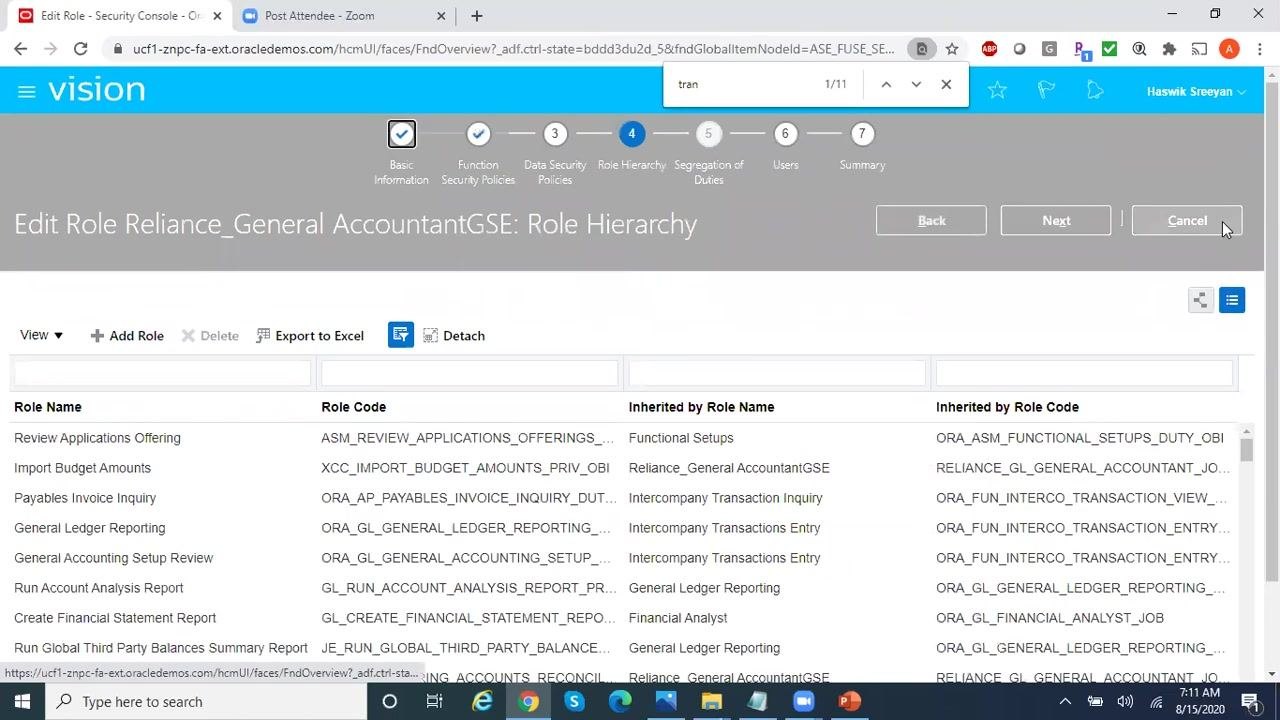
The Edit Role wizard opens, where you can review and modify Function Security Policies (privileges and resources), and navigate through steps such as Data Security Policies, Role Hierarchy, Segregation of Duties, Users, and Summary. Use the Back, Next, or Cancel buttons to navigate or exit.
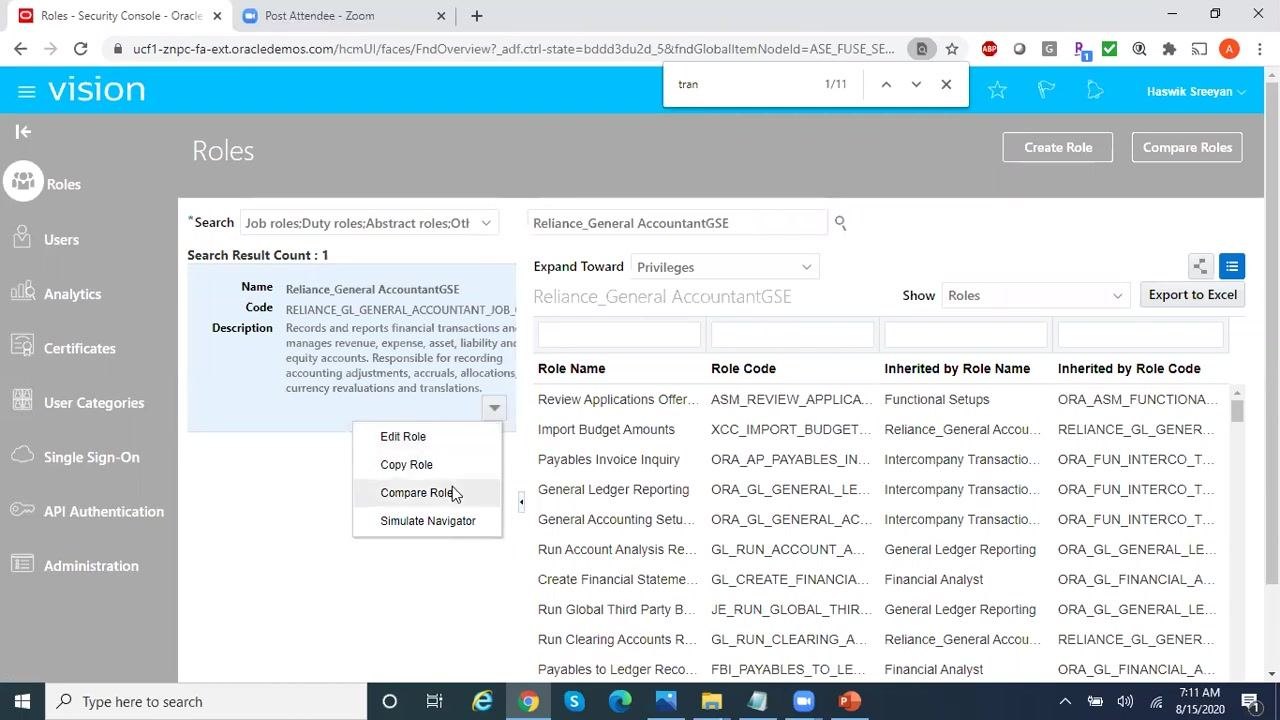
To compare the current role with another, select Compare Roles from the dropdown menu instead.
Review and modify the role hierarchy
In the Edit Role wizard, navigate to the Role Hierarchy step to review the list of inherited roles, their codes, and relationships. Use options such as Add Role, Delete, Export to Excel, or Detach as needed.
Comparing roles
Search for the role to compare
In the "Roles" section, use the search bar to enter the role name, for example Reliance_General AccountantGSE. Review the search results, which display the role's Name, Code, and Description. Click the dropdown arrow next to the role name and select Compare Role from the context menu.
Select a second role for comparison
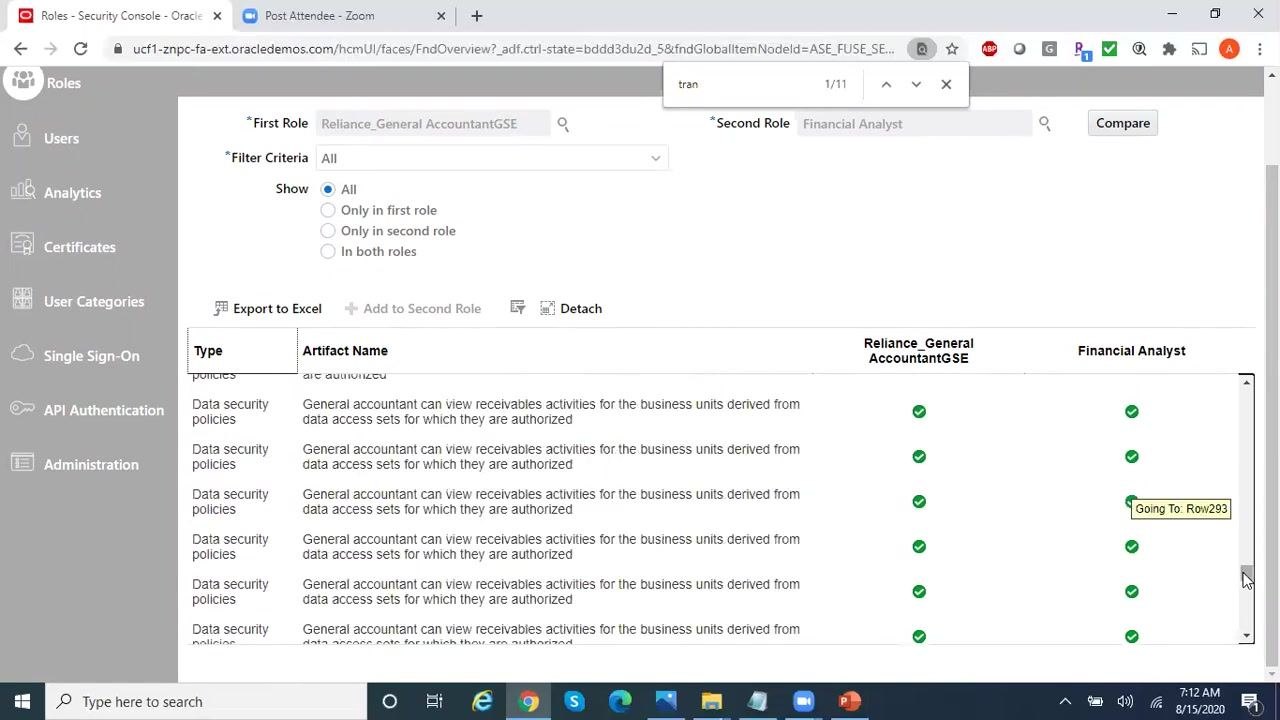
On the "Compare Roles" screen, the selected role (Reliance_General AccountantGSE) is set as the First Role. In the Second Role field, start typing the name of the role you want to compare — for example, Financial. A dropdown list of matching roles appears; select Financial Analyst from the list.
Configure the comparison criteria
Under Filter Criteria, ensure "All" is selected to compare all available policies and roles. Under Show, you can choose:
- All (default): Shows all policies and roles.
- Only in first role: Shows items unique to the first role.
- Only in second role: Shows items unique to the second role.
- In both roles: Shows items common to both roles.
Use the checkboxes to include or exclude function security policies, data security policies, and inherited roles. Make sure all checkboxes are selected for a comprehensive comparison.
Review the comparison results
The results table displays the comparison between the two roles, with columns for:
- Type: The type of policy or role (for example, Function security policies, Data security policies, Inherited roles).
- Artifact Name: The specific privilege or policy.
- Reliance_General AccountantGSE: Indicates whether the artifact is present in this role (green checkmark for present, red minus for absent).
- Financial Analyst: Indicates whether the artifact is present in this role (green checkmark for present, red minus for absent).
Scroll through the list to analyze which policies and roles are available in each role.
Analyze detailed privileges
Continue scrolling to view more detailed data security policies and inherited roles. Use the "Export to Excel" button if you need to analyze the results outside the application. The table updates as you scroll, showing additional privileges and their availability in each role.
Complete the comparison
Once you have finished reviewing the comparison, click Done to exit the comparison screen. You can use the comparison results to help create a custom role or assign roles to users as appropriate.
What's next
By following these steps, you have learned how to create a custom role in Oracle Fusion by copying a standard role, adjusting its function and data security policies, configuring its role hierarchy, and assigning it to users. You can now use the Administration tab to monitor role copy status, the User Accounts screen to manage user assignments, and the Compare Roles feature to validate your custom role against other roles as your organization's security requirements evolve.
Generation details: cost, quality tiers
Docsie billed 6,000 credits ($4.20) to analyze this 12-minute video at standard quality. The rewrite, template fill and Word/PDF exports were included. The same video at each quality tier:
| Quality | Frames sampled | Credits | Approx. cost |
|---|---|---|---|
| Draft | every 16-30 s | 3,000 | $2.10 |
| Standard (this guide) | every 8-15 s | 6,000 | $4.20 |
| Detailed | every 4-7 s | 12,000 | $8.40 |
| Ultra | every 1-3 s | 24,000 | $16.80 |
Credits priced at $0.70 per 1,000; plans include a monthly allowance. Enterprise customers on on-premise or bring-your-own-model deployments run this on their own inference and pay no per-video credits.
Generated by Docsie Video-to-Docs on 2026-10-14 from a 11-minute video. Screenshots are frames from the source video and belong to their creator, Oracle Ebiz and Fusion Videos, whose original is embedded above. If you own this video and want the guide removed or credited differently, contact us and we will act within one business day.