
How to Create a Context-sensitive DFF in Oracle Fusion
This guide walks you through how to create a context-sensitive DFF in Oracle Fusion, from locating the Manage Descriptive Flexfields task to defining a new context, adding a context-sensitive segment, deploying the flexfield, and entering data against the new segment in a business object.
Video: How to create context based descriptive flex fields in oracle fusion? by Fusion Nexgen Learning (2021). All credit for the demonstration goes to the creator; watch the original on YouTube. The written guide below was generated from this video by Docsie. Creator? Request a change or removal.
This guide walks you through how to create a context-sensitive DFF in Oracle Fusion, from locating the Manage Descriptive Flexfields task to defining a new context, adding a context-sensitive segment, deploying the flexfield, and entering data against the new segment in a business object.
Prerequisites
- Access to an Oracle Fusion Applications environment with a valid user login.
- Privileges to access Setup and Maintenance and the Manage Descriptive Flexfields task.
- Knowledge of the flexfield you intend to configure (for example, Subinventories) and its flexfield code.
Locating the descriptive flexfield
Access Oracle Fusion Applications
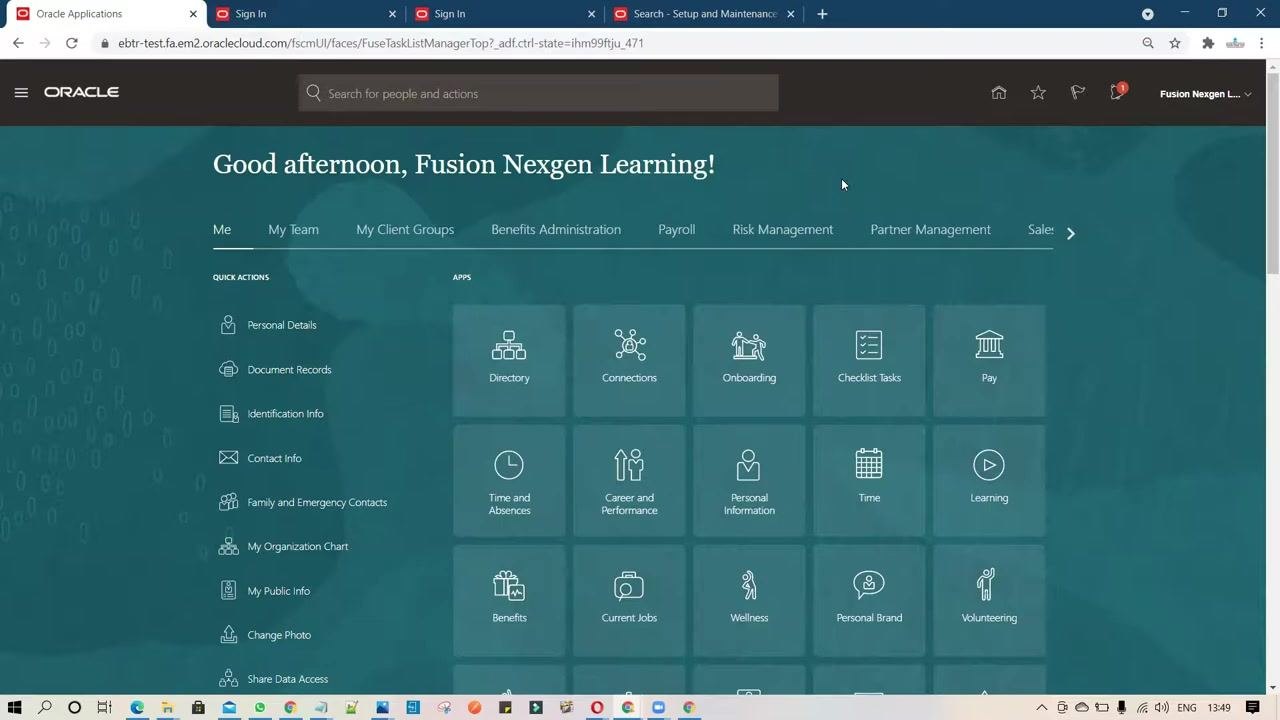
Log in to your Oracle Fusion Applications environment. Once signed in, you land on the homepage, which displays a welcome message (for example, "Good afternoon, Fusion Nexgen Learning!") along with application tiles such as Directory, Connections, Onboarding, Checklist Tasks, and Pay.
Navigate to Setup and Maintenance
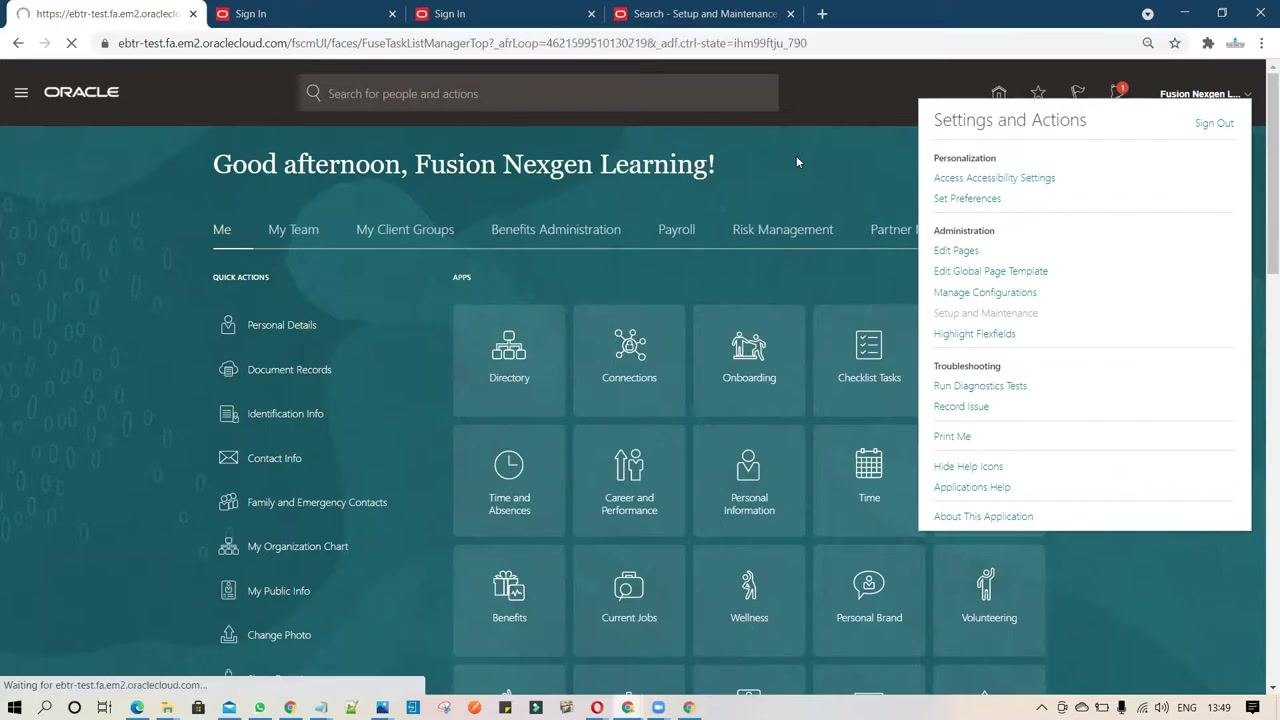
Click your user profile or the settings icon in the top-right corner. From the dropdown menu, select Setup and Maintenance under the Administration section.
Open the task list
In the Setup and Maintenance area, locate the right-hand panel and click Task List to expand the available options.
Search for the Manage Descriptive Flexfields task
In the Task List, click Search, then enter Manage Descriptive Flexfields in the search bar. Click the matching result to open the Manage Descriptive Flexfields page.
Search for the flexfield code
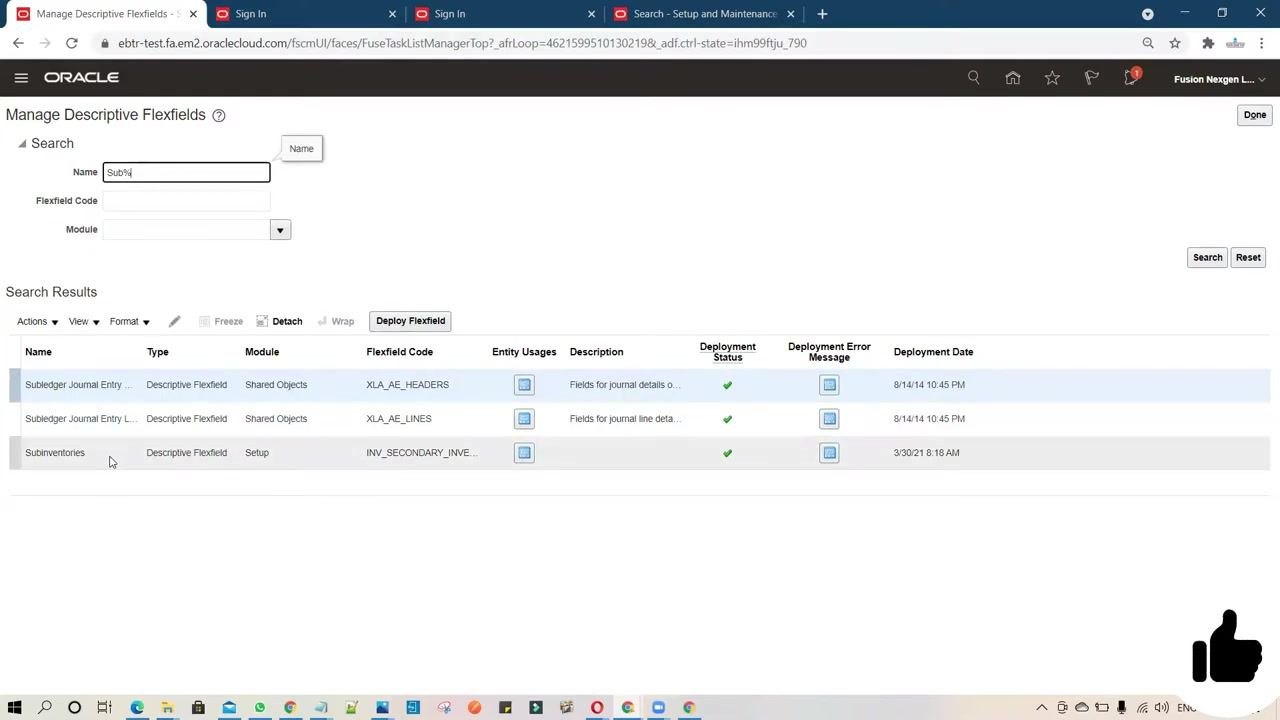
On the Manage Descriptive Flexfields page, use the search fields at the top. In the Name field, enter a partial value such as Sub% to filter the relevant flexfields, then review the results for the flexfield you want to configure (for example, Subinventories).
Configuring the context and context-sensitive segments
Select the flexfield to edit
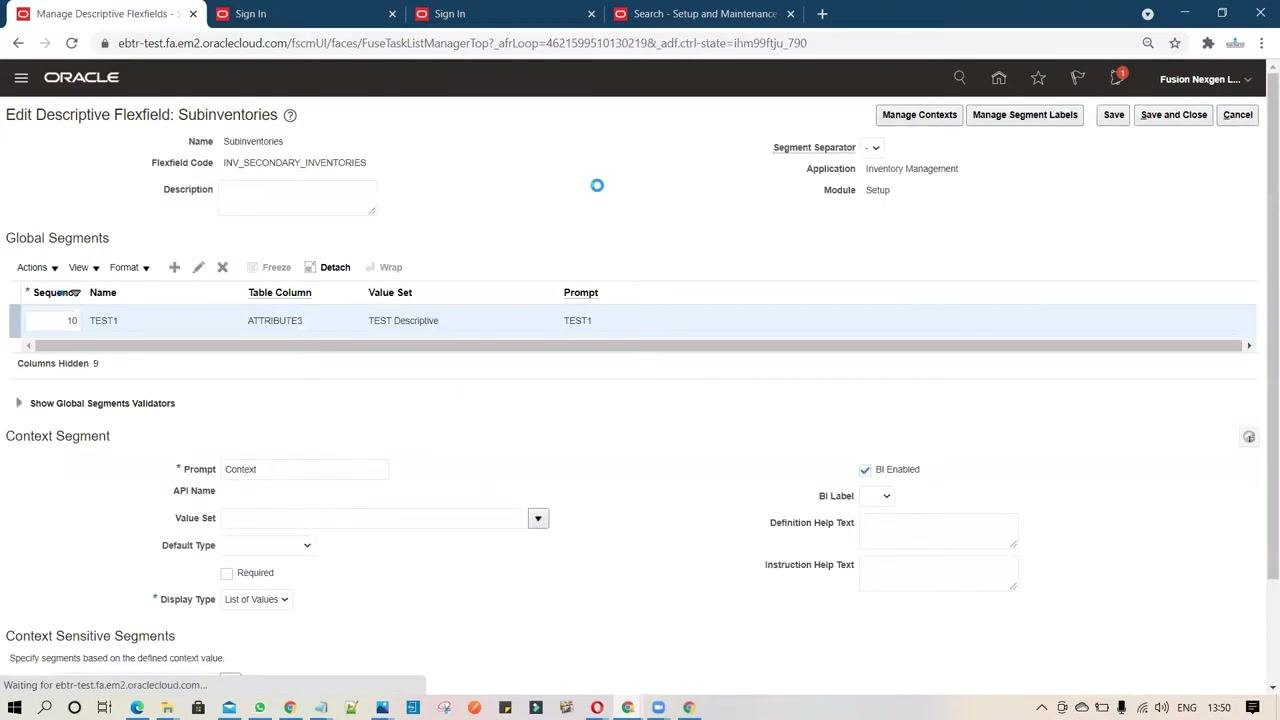
In the Manage Descriptive Flexfields list, click the flexfield you want to configure (for example, Subinventories). The Edit Descriptive Flexfield: Subinventories page opens, displaying the global segments and context segment options.
Open Manage Contexts
At the top right of the Edit Descriptive Flexfield page, click Manage Contexts. This lets you define new contexts for your flexfield.
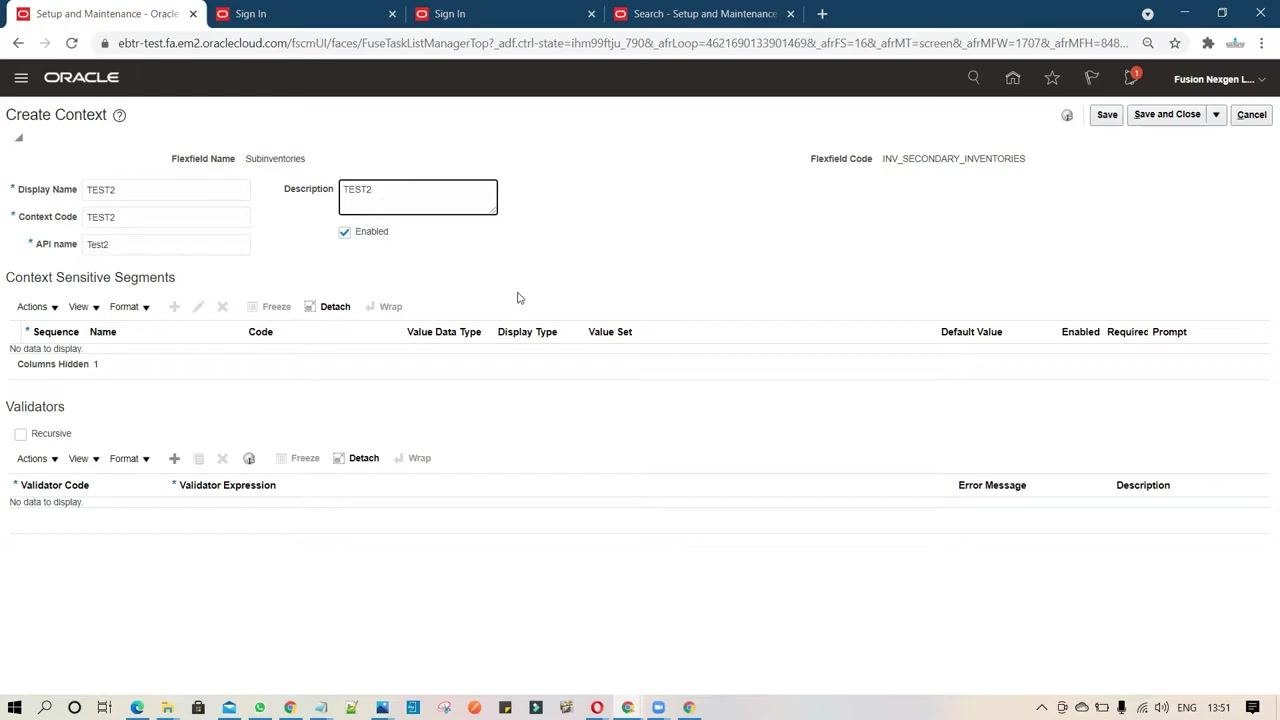
Create a new context
Click Add (or Create) to start a new context. In the Create Context window, enter:
- Display Name:
TEST2 - Context Code:
TEST2 - API Name:
Test2 - Description:
TEST2 - Confirm the Enabled checkbox is selected.
Click Save to save the new context.
Create the context-sensitive segment
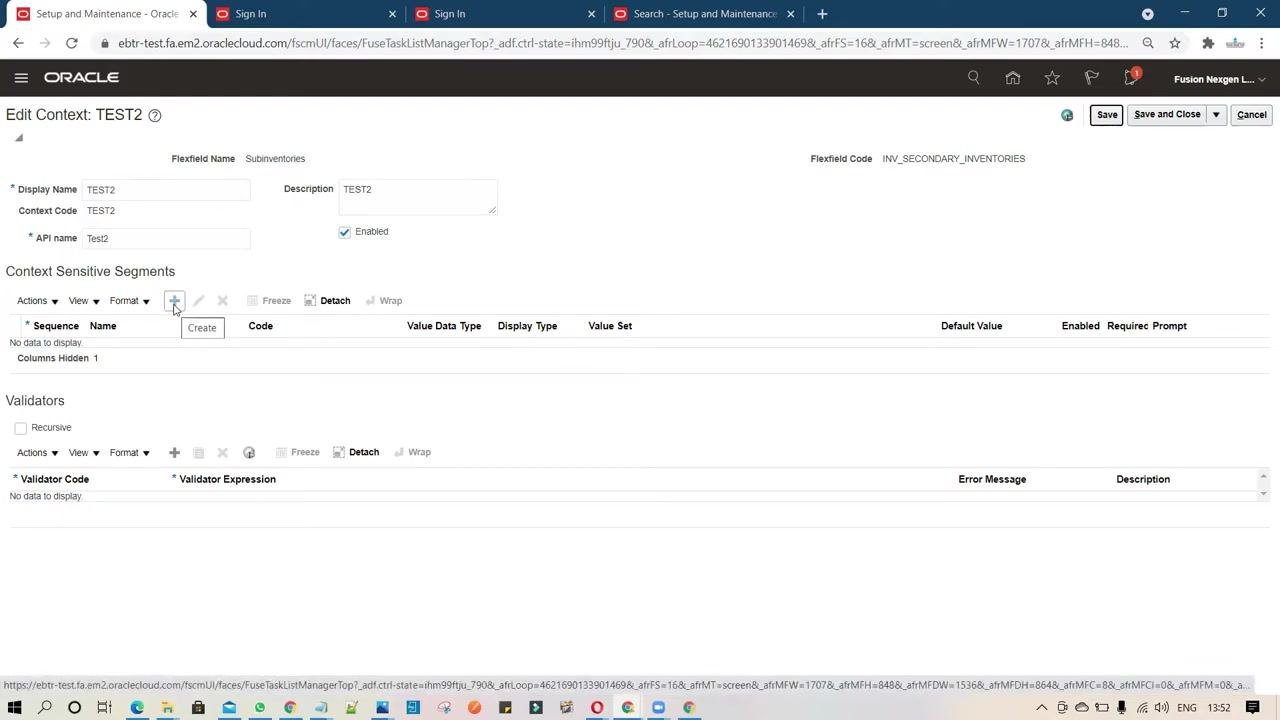
Under Context Sensitive Segments, click the Create (plus) button to add a new segment.
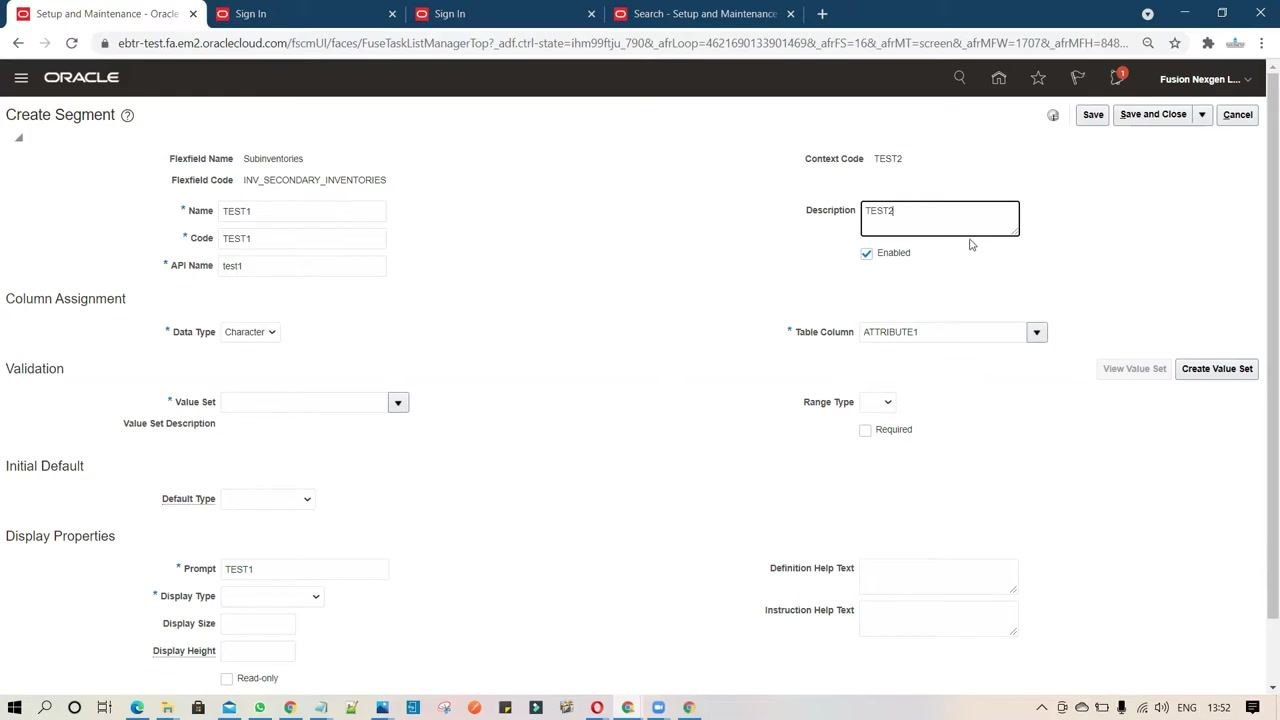
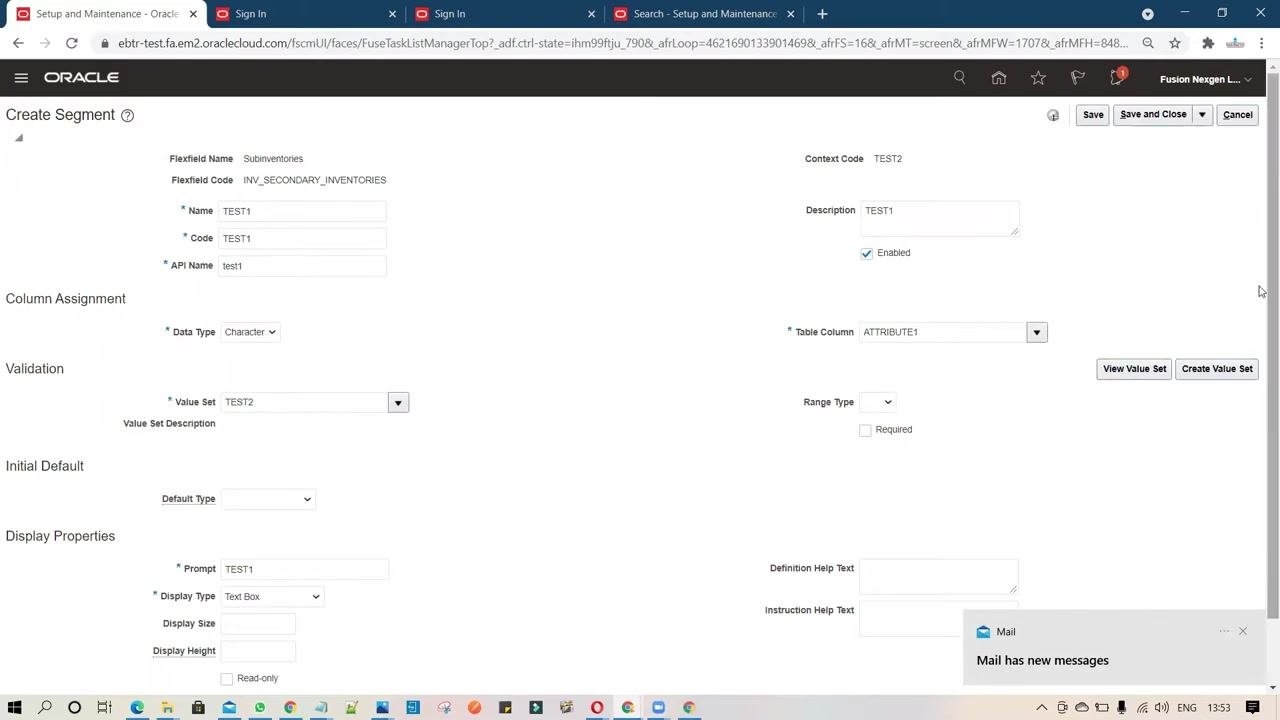
In the Create Segment window, enter:
- Name:
TEST1 - Code:
TEST1 - API Name:
test1 - Description:
TEST2 - Data Type:
Character - Table Column:
ATTRIBUTE1 - Prompt:
TEST1 - Confirm the Enabled checkbox is selected.
Leave the remaining fields at their defaults unless your business scenario requires changes.
Create a value set for the segment
In the Validation section, click Create Value Set. In the Create Value Set window, enter:
- Value Set Code:
TEST1 - Description: optional, as needed
- Module: confirm
Inventory Managementis selected - Validation Type and Value Data Type: set as required for your scenario
If you see the error "The value set code TEST1 already exists. Enter a unique value set code. (FND-2820)," enter a different, unique value set code, such as TEST2.
Next, set the value set format and length:
- Validation Type:
Format Only - Value Data Type:
Character - Value Subtype:
Text - Maximum Length:
50
This allows the value set to accept up to 50 characters.
Save the value set
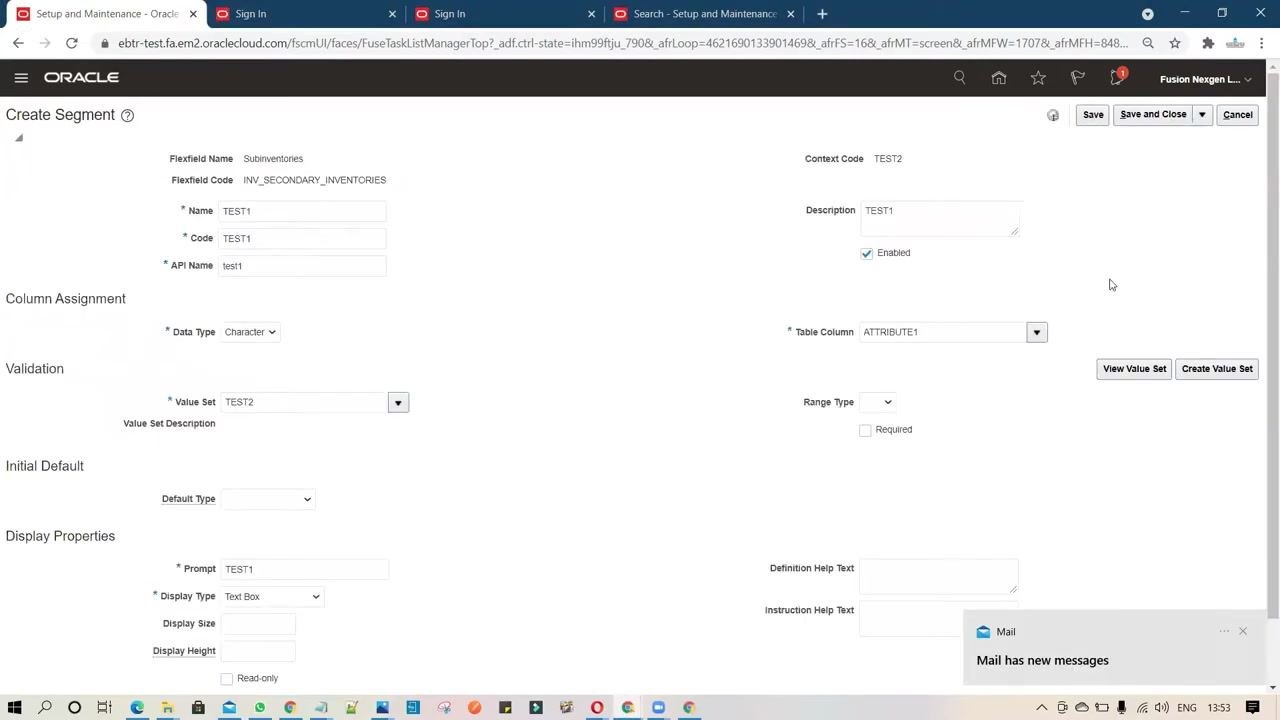
Click Save and Close to save the value set, then confirm that TEST2 is now selected in the segment configuration.
Configure the segment's display properties
In the Create Segment window, under Display Properties, set:
- Display Size:
20 - Display Height:
1
These values control the size of the segment's input box.
Add help text for user guidance
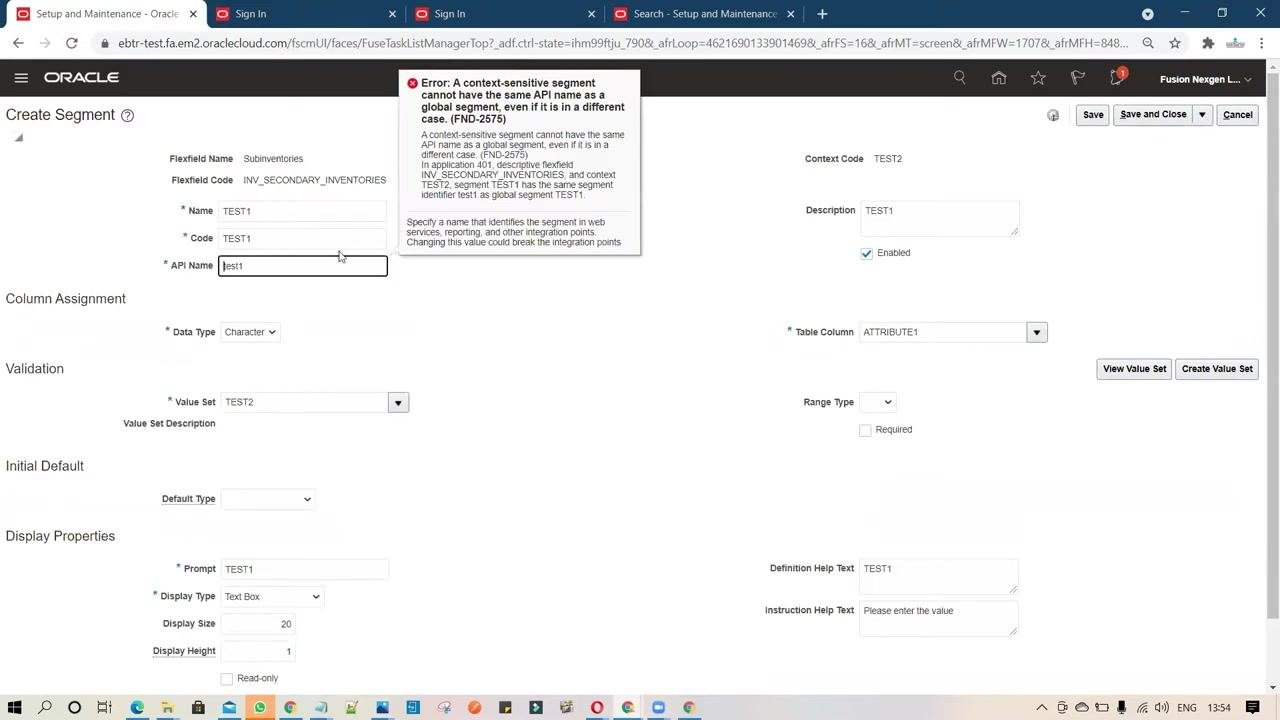
In the Definition Help Text field, enter TEST1. In the Instruction Help Text field, enter Please enter the value. This provides guidance to users when they enter data in the segment.
Enable BI reporting for the segment
Select the BI Enabled checkbox to make the segment available for use in BI reports, ensuring the data entered here is available for analytics.
Resolve duplicate segment or API name errors
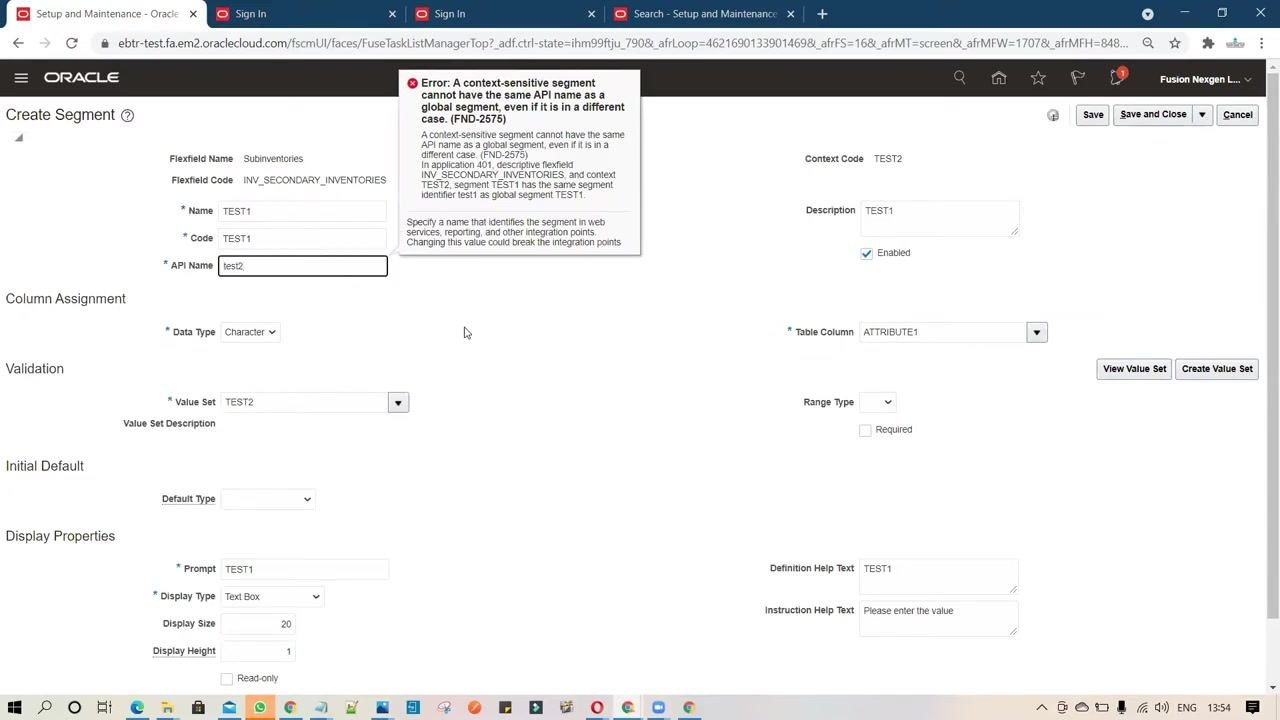
If you reuse a segment or API name that already exists (for example, TEST1), the system displays the error: "A context-sensitive segment cannot have the same API name as a global segment, even if it is in a different case. (FND-2575)." Change the API Name to a unique value, such as test2, to resolve it.
Save the segment and context
After resolving all errors and confirming all fields are correctly filled, click Save and Close to finalize the segment and context.
Verify the segment configuration
In the Edit Context: TEST2 screen, confirm the context-sensitive segment appears with these details:
- Name:
TEST1 - Code:
TEST2 - Value Data Type:
Character - Display Type:
Text Box - Value Set:
TEST2 - Enabled: checked
- Prompt:
TEST1
Ensure every detail matches your configuration before continuing.
Making the segment available to the PIF
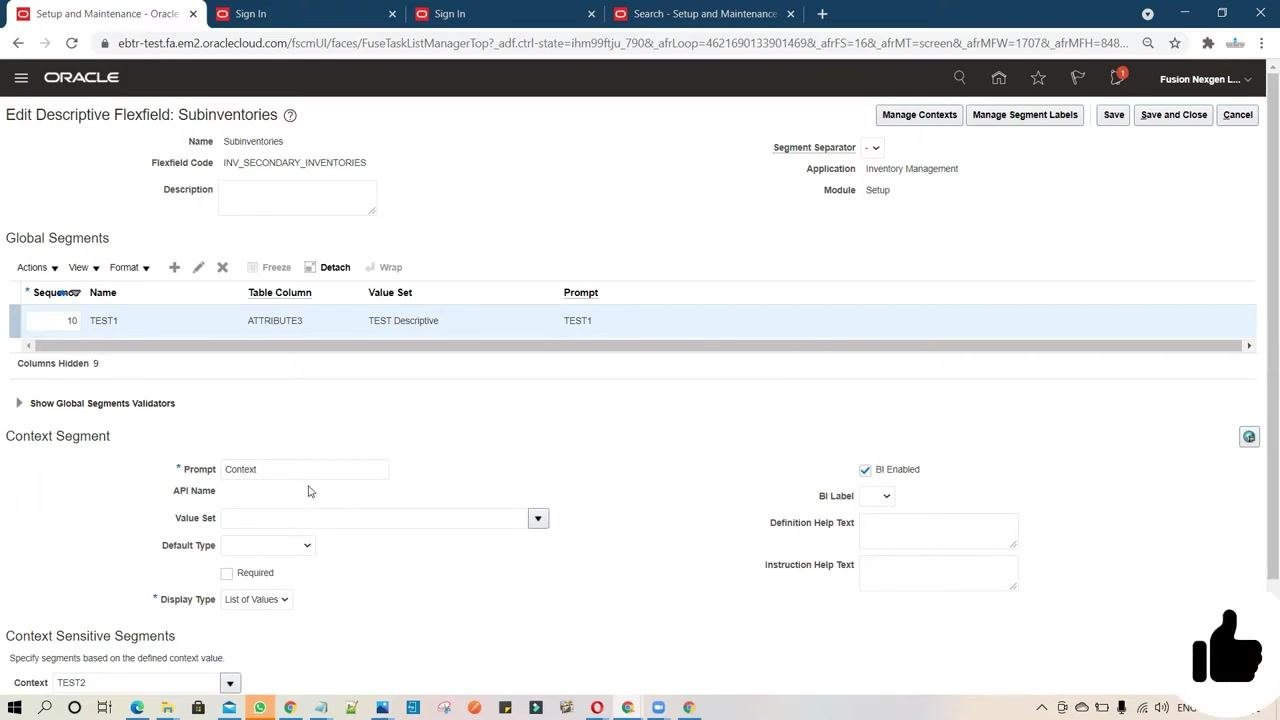
Set the display type for the context segment
In the Context Segment section, set the Display Type to List of Values and confirm the BI Enabled checkbox is selected. Leave other fields (API Name, Value Set, Default Type, BI Label, Definition Help Text, Instruction Help Text) as required, or blank if not specified.
Verify the segment's availability in the descriptive flexfield
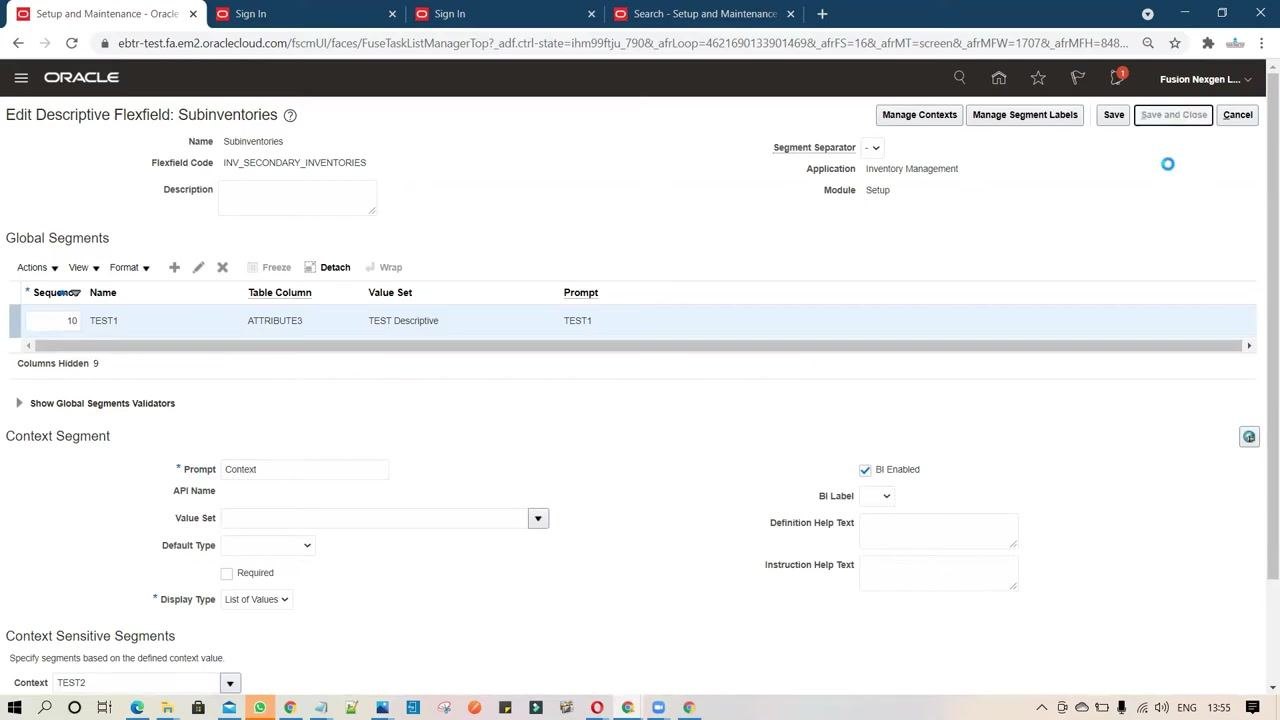
Go to the Edit Descriptive Flexfield: Subinventories screen and confirm your segment (for example, TEST1) is listed under Global Segments with:
- Table Column:
ATTRIBUTE3 - Value Set:
TEST Descriptive - Prompt:
TEST1
In the Context Segment section, confirm:
- Prompt:
Context - BI Enabled: checked
- Display Type:
List of Values
Under Context Sensitive Segments, verify that the context (for example, TEST2) and the segment you created (TEST1, with Table Column ATTRIBUTE1 and Value Set TEST2) are both visible. This confirms the based segment is available to the PIF.
Apply and save your changes
Once all segments and settings are confirmed, click Apply to save your changes and wait for the system to process the update.
Deploy the flexfield
Return to the Manage Descriptive Flexfields screen and locate your flexfield (for example, Subinventories, with Flexfield Code INV_SECONDARY_INVENTORIES). Click Deploy Flexfield to activate your changes and wait for deployment to complete.
Click Done to exit the deployment screen.
Entering and using the segment in Subinventory
Validate the segment in the business object
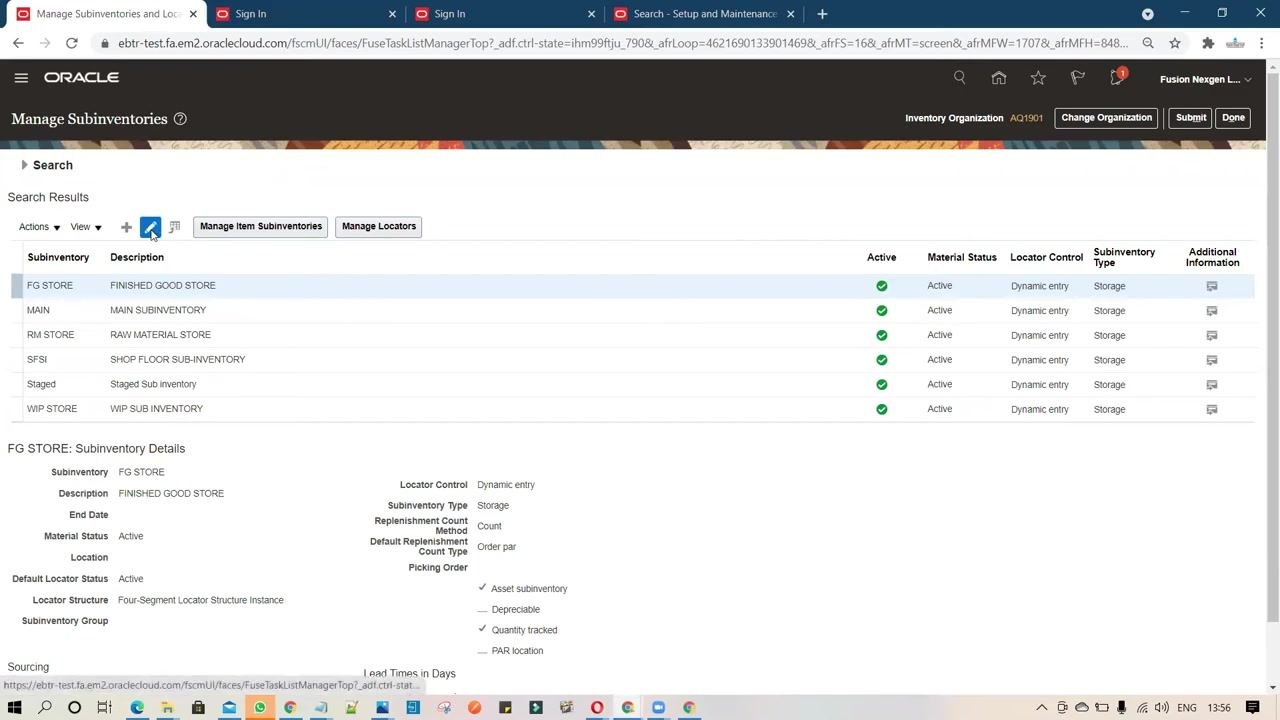
In Setup and Maintenance, use the search bar to type "sub inventory" to locate the relevant business object, then select the appropriate task from the results.
Access the Edit Subinventory screen
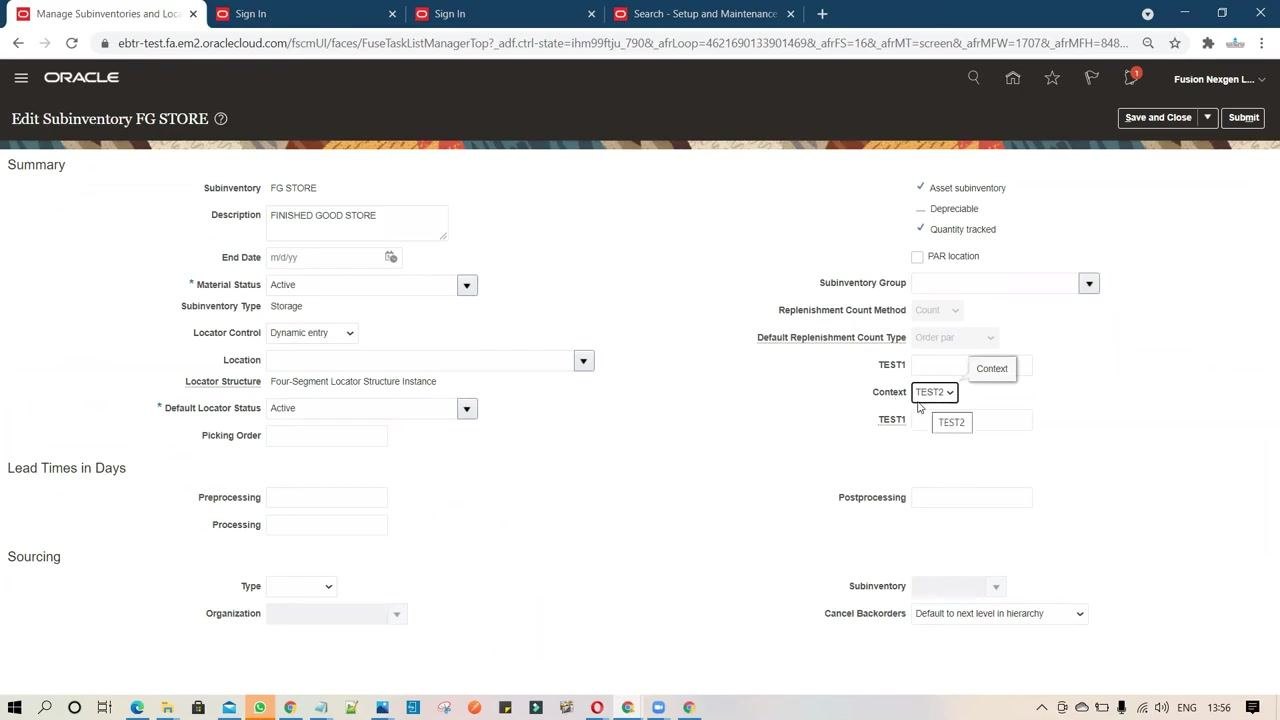
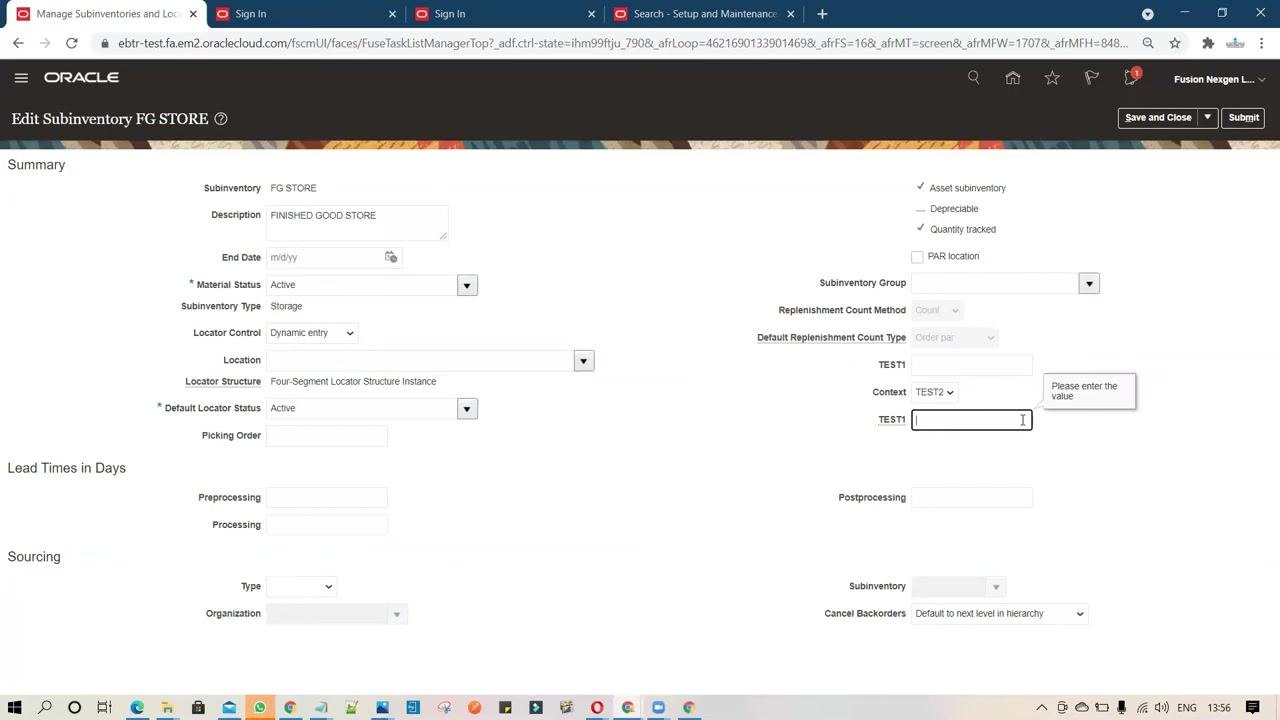
Go to the Manage Subinventories and Locators screen and select the subinventory you want to edit (for example, FG STORE). The Edit Subinventory FG STORE screen opens, displaying fields such as:
- Subinventory:
FG STORE - Description:
FINISHED GOOD STORE - Material Status:
Active - Subinventory Type:
Storage - Locator Control:
Dynamic entry - Default Locator Status:
Active - Checkboxes for Asset subinventory, Depreciable, and Quantity tracked
- A Context dropdown (for example,
TEST2) - The TEST1 field (the based segment)
On the right, under the Context section, confirm the context (for example, TEST2) is selected. The based segment field (for example, TEST1) becomes enabled for data entry.
Enter data in the based segment field
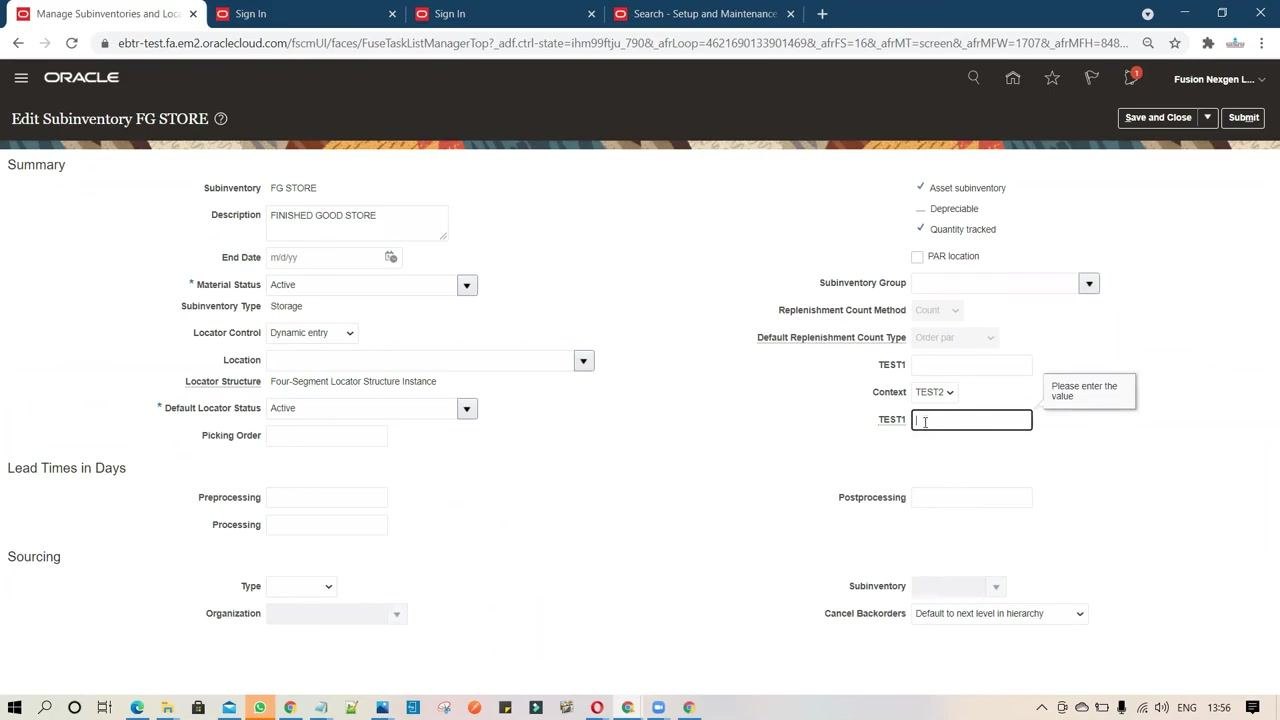
In the TEST1 field (or your segment's prompt), enter the required value. A tooltip such as "Please enter the value" may appear if the field is mandatory. Use this field to capture additional information according to your business requirements — for example, enter I or any other relevant value.
This based segment field can capture any information specific to your organization's needs. Use it whenever your business process requires storing additional attributes at the subinventory level.
Save the subinventory details
After entering the required value in the based segment field, review all other details for accuracy, then click Save and Close or Submit at the top right to save your changes.
Summary
- Locate the Manage Descriptive Flexfields task through Setup and Maintenance and find the target flexfield (for example, Subinventories).
- Create a new context and add a context-sensitive segment with its own value set, display properties, and help text.
- Enable BI reporting and resolve any duplicate value set or API name errors by entering unique values.
- Make the segment available to the PIF, apply your changes, and deploy the flexfield.
- Enter data against the new segment within the relevant business object (for example, Edit Subinventory) and save your changes.
What's next
With the flexfield deployed and the segment validated, you can repeat this process to add further context-sensitive segments or configure additional contexts as new business requirements arise.
Generation details: cost, quality tiers
Docsie billed 4,000 credits ($2.80) to analyze this 8-minute video at standard quality. The rewrite, template fill and Word/PDF exports were included. The same video at each quality tier:
| Quality | Frames sampled | Credits | Approx. cost |
|---|---|---|---|
| Draft | every 16-30 s | 2,000 | $1.40 |
| Standard (this guide) | every 8-15 s | 4,000 | $2.80 |
| Detailed | every 4-7 s | 8,000 | $5.60 |
| Ultra | every 1-3 s | 16,000 | $11.20 |
Credits priced at $0.70 per 1,000; plans include a monthly allowance. Enterprise customers on on-premise or bring-your-own-model deployments run this on their own inference and pay no per-video credits.
Generated by Docsie Video-to-Docs on 2026-10-14 from a 7-minute video. Screenshots are frames from the source video and belong to their creator, Fusion Nexgen Learning, whose original is embedded above. If you own this video and want the guide removed or credited differently, contact us and we will act within one business day.