
How to Register a Form in Oracle EBS
Registering a custom form in Oracle E-Business Suite involves several stages: transferring the form file to the application server, compiling it, and then registering the form, its function, menu, and responsibility within Oracle Applications. This guide walks you through how to register a form in Oracle EBS from start to finish, using a sample custom form (XXTEST2) as an example.
Video: How to Register New Custom Form Oralce EBS R12 by Sami Yassin (2015). All credit for the demonstration goes to the creator; watch the original on YouTube. The written guide below was generated from this video by Docsie. Creator? Request a change or removal.
Registering a custom form in Oracle E-Business Suite involves several stages: transferring the form file to the application server, compiling it, and then registering the form, its function, menu, and responsibility within Oracle Applications. This guide walks you through how to register a form in Oracle EBS from start to finish, using a sample custom form (XXTEST2) as an example.
Prerequisites
Before you begin, make sure you have:
- SSH access to the application server (for example, via Xshell).
- FTP access to the server (for example, via Xftp) to transfer the form file.
- The custom form file (
.fmb) ready on your local machine. - Login credentials for Oracle Applications with the SYSADMIN user or equivalent access to Application Developer responsibilities.
Transfer the custom form to the application server
Connect to the application server
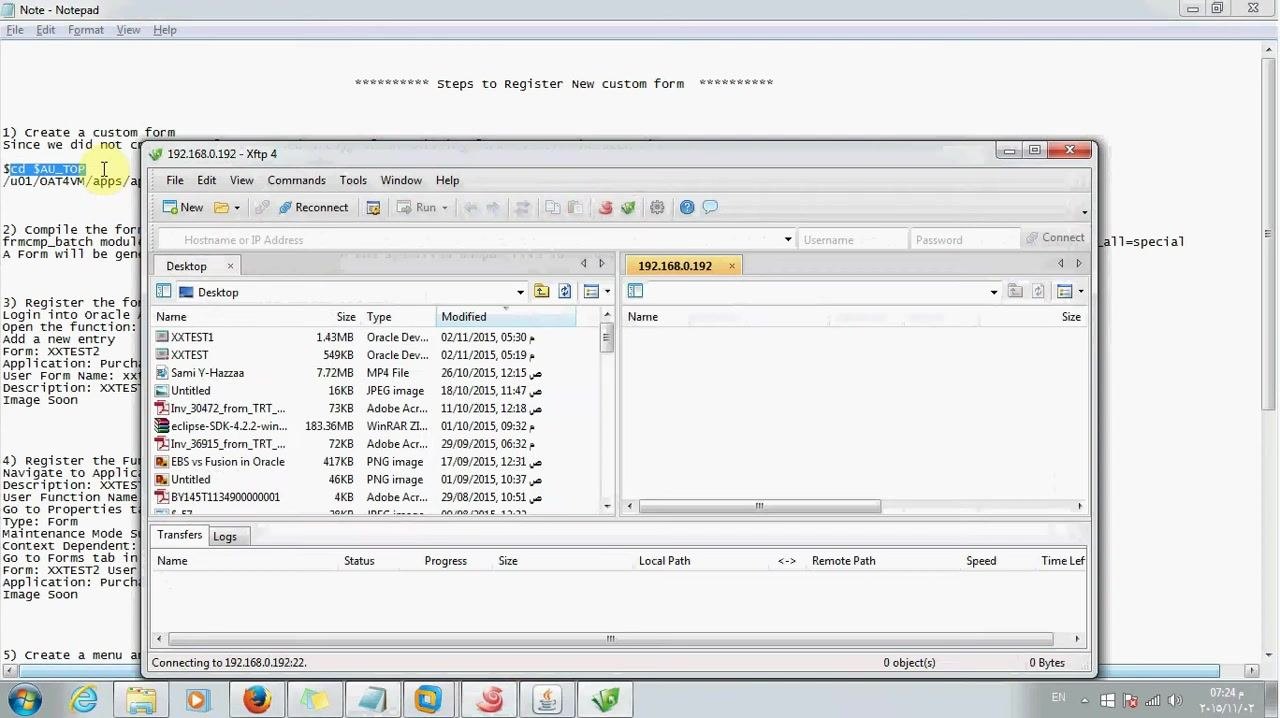
Open an SSH terminal emulator and connect to the application server (for example, 192.168.0.192). Navigate to the forms directory using the following commands:
cd $AU_TOP— changes to the application top directory.cd forms— changes to the forms directory.cd US— changes to the US subdirectory.
The terminal prompt confirms you are in the correct directory.
Select and transfer the custom form file
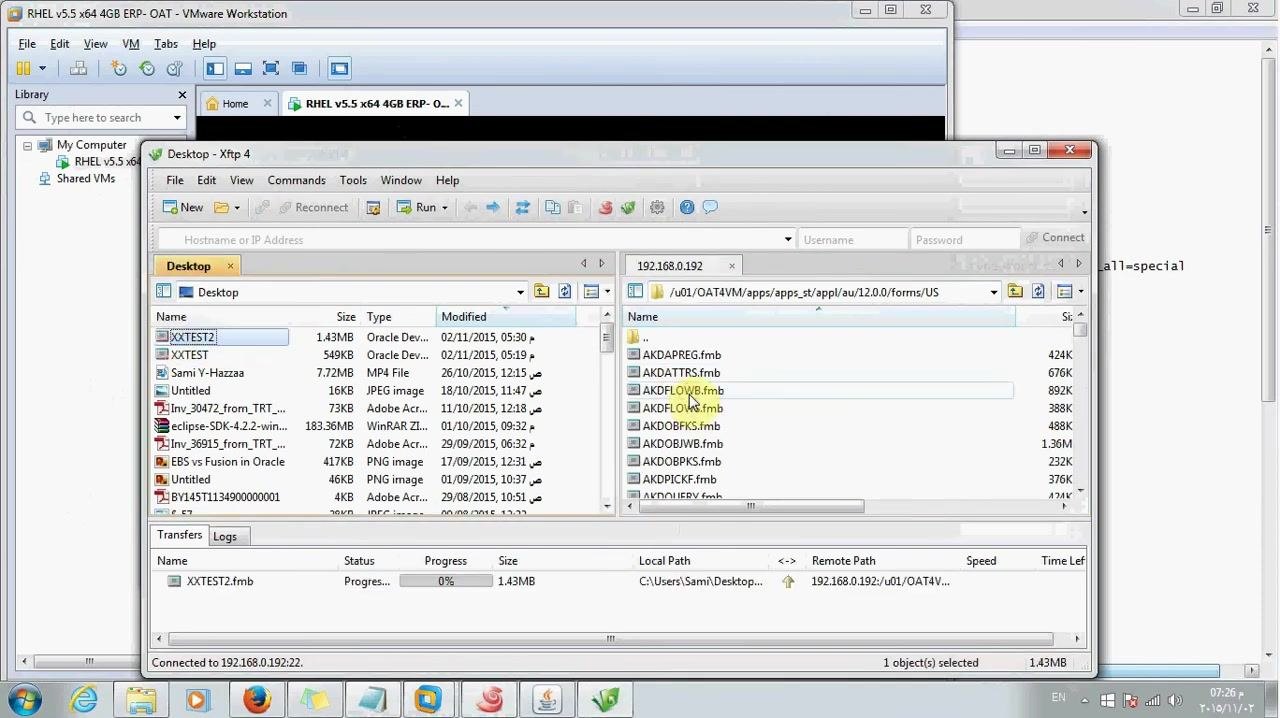
In your FTP client, select the custom form file in the local pane (for example, XXTEST2.fmb). Drag and drop it, or initiate a transfer, to the remote directory /u01/OAT4VM/apps/apps_st/appl/au/12.0.0/forms/US.
You can monitor the transfer progress at the bottom of the FTP window, which shows the file name, size, and both the local and remote paths.
Confirm the file transferred successfully
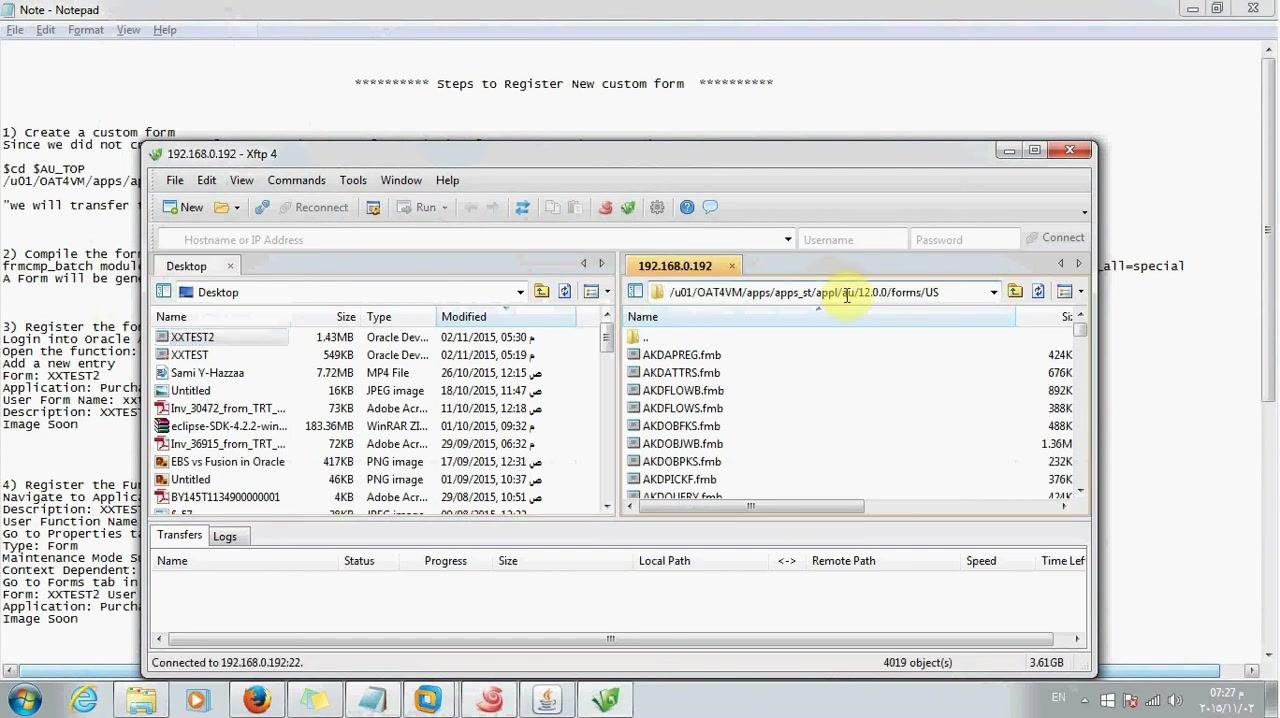
In the FTP client, check the remote directory /u01/OAT4VM/apps/apps_st/appl/au/12.0.0/forms/US to confirm that the transferred form file (for example, XXTEST2.fmb) now appears alongside the other .fmb files on the server.
Compile the custom form
Review the compilation command
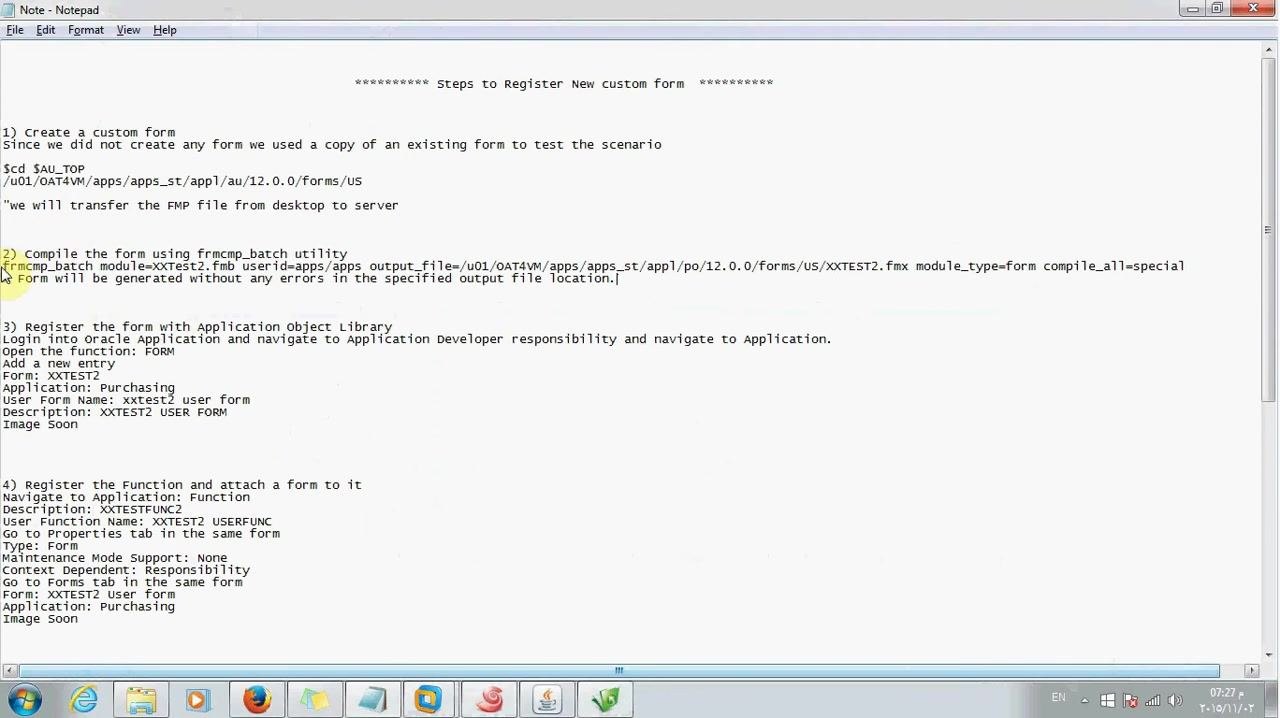
Before compiling, review the instructions for the frmcmp_batch utility, which compiles the form. The command used is:
frmcmp_batch module=XXtest2.fmb userid=apps/apps output_file=/u01/OAT4VM/apps/apps_st/appl/po/12.0.0/forms/US/XXTEST2.fmx module_type=form compile_all=special
This command generates the form at the specified output file location without errors.
Enter the compilation command in the terminal
In your SSH terminal, connected to the application server and navigated to the correct directory (cd $AU_TOP, then cd forms), type or paste the compilation command exactly as shown:
frmcmp_batch module=XXtest2.fmb userid=apps/apps output_file=/u01/OAT4VM/apps/apps_st/appl/po/12.0.0/forms/US/XXTEST2.fmx module_type=form compile_all=special
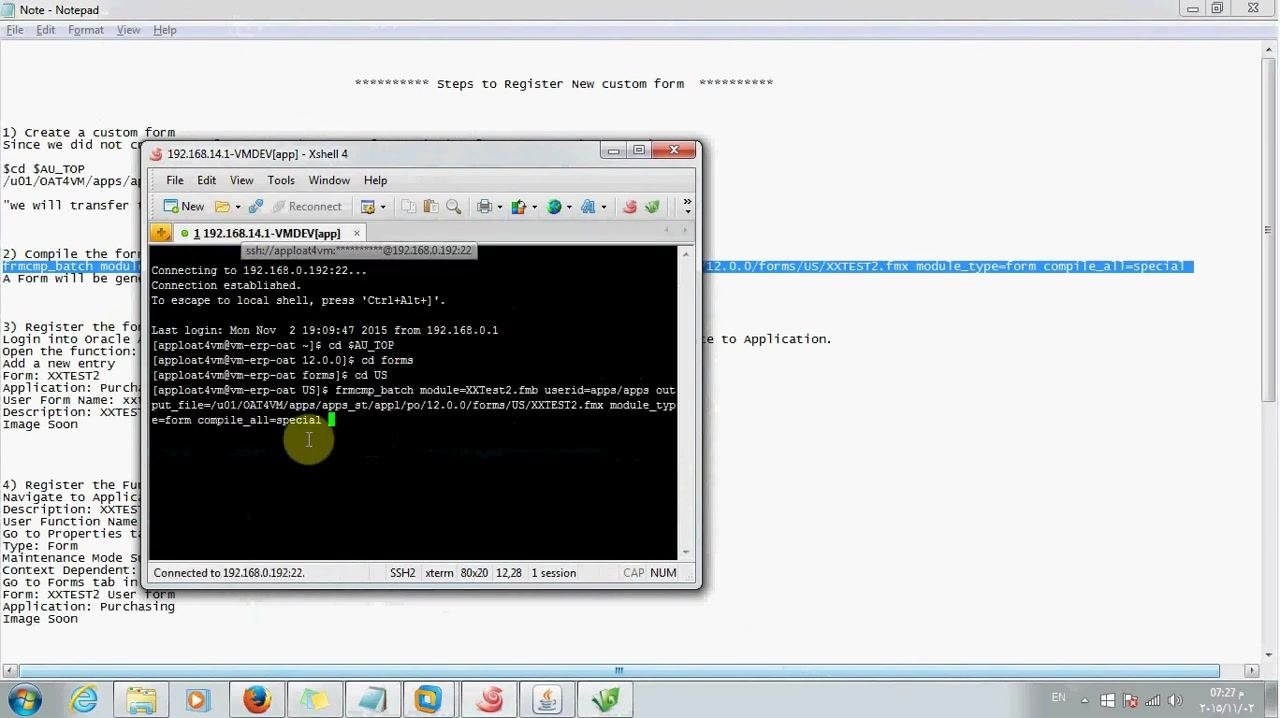
Run the compilation command
Press Enter to execute the frmcmp_batch command. The cursor moves to the next line as the command begins processing, and you can wait for the compilation to complete.
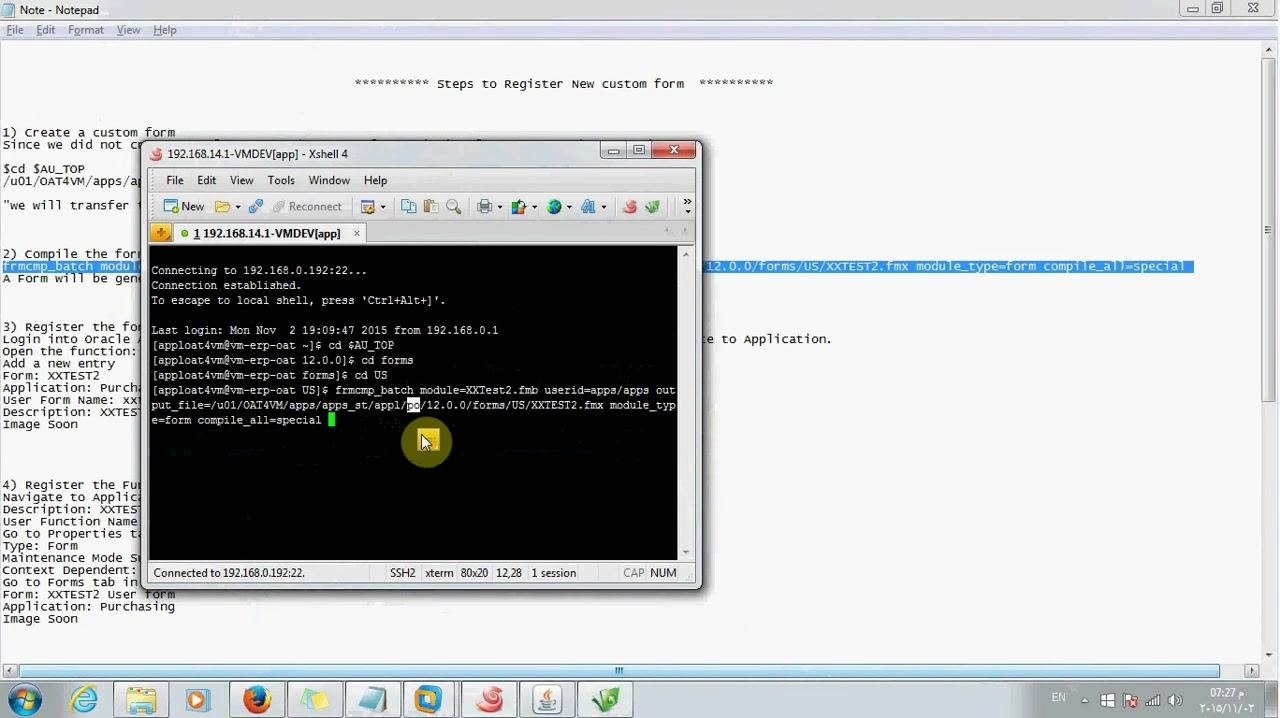
Monitor the compilation progress
Watch the terminal output as the form compiles. You should see messages such as:
- "Compiling PRE-INSERT trigger on PROCUREMENT_PLAN_INFORMATIONS data block..."
- "No compilation errors."
Similar messages appear for each trigger and block, confirming the form is compiling without issues.
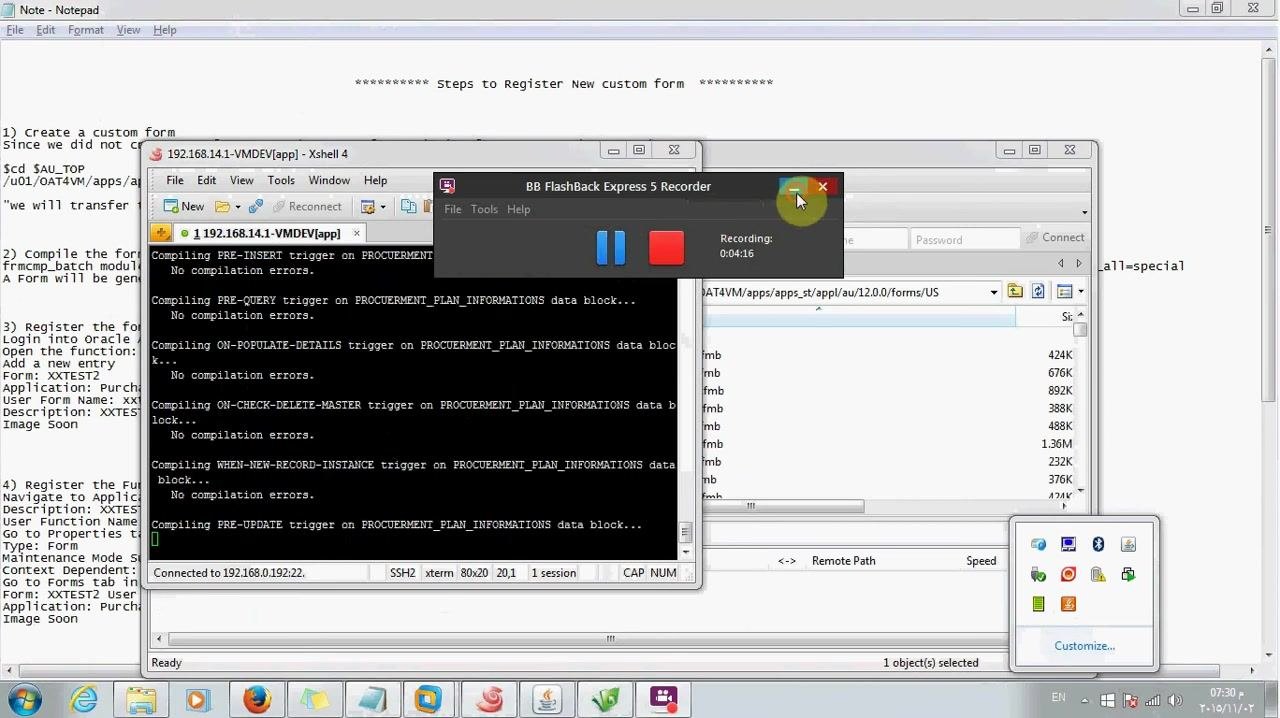
Confirm the compilation completed successfully
At the end of the process, the terminal displays a confirmation message:
Created form file /u01/OAT4VM/apps/apps_st/appl/po/12.0.0/forms/US/XXTEST2.fmx
The command prompt returns, confirming the .fmx file has been generated and the form is ready for registration.
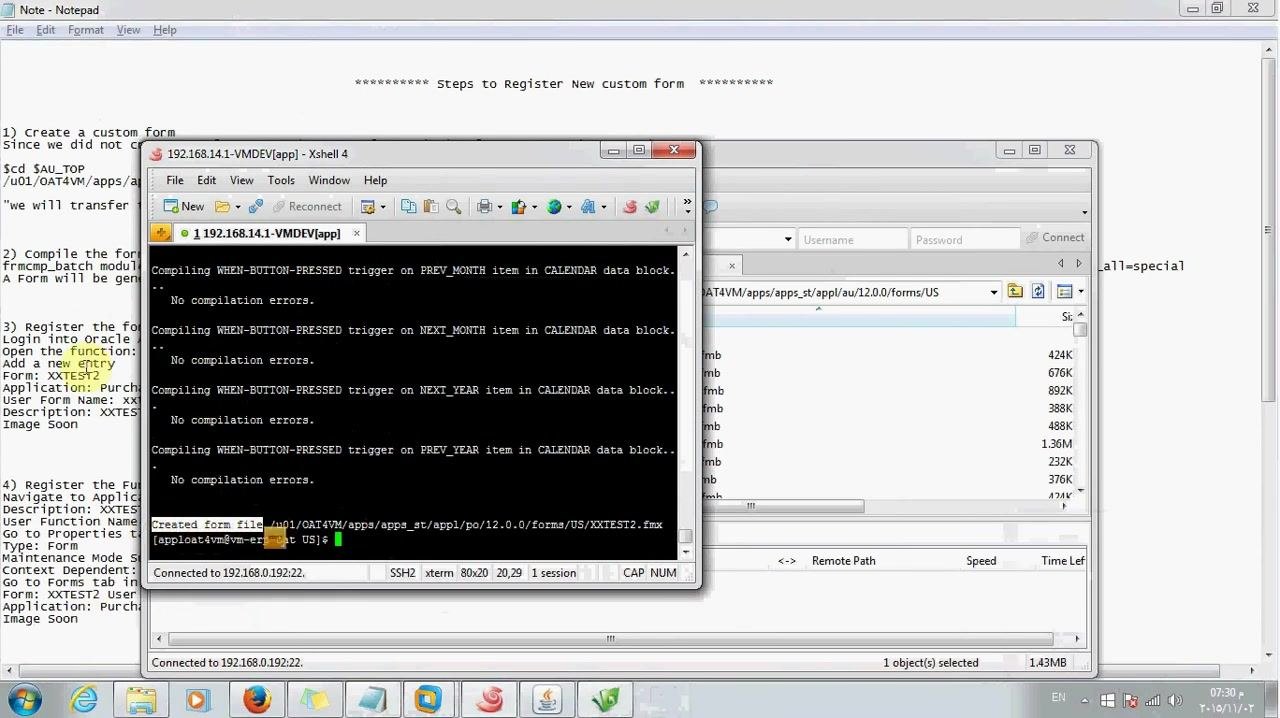
Register the form with Application Object Library
Open the Register option
Under Application Developer, locate and select the Register submenu to proceed with registering the form.
Register the form with Application Object Library
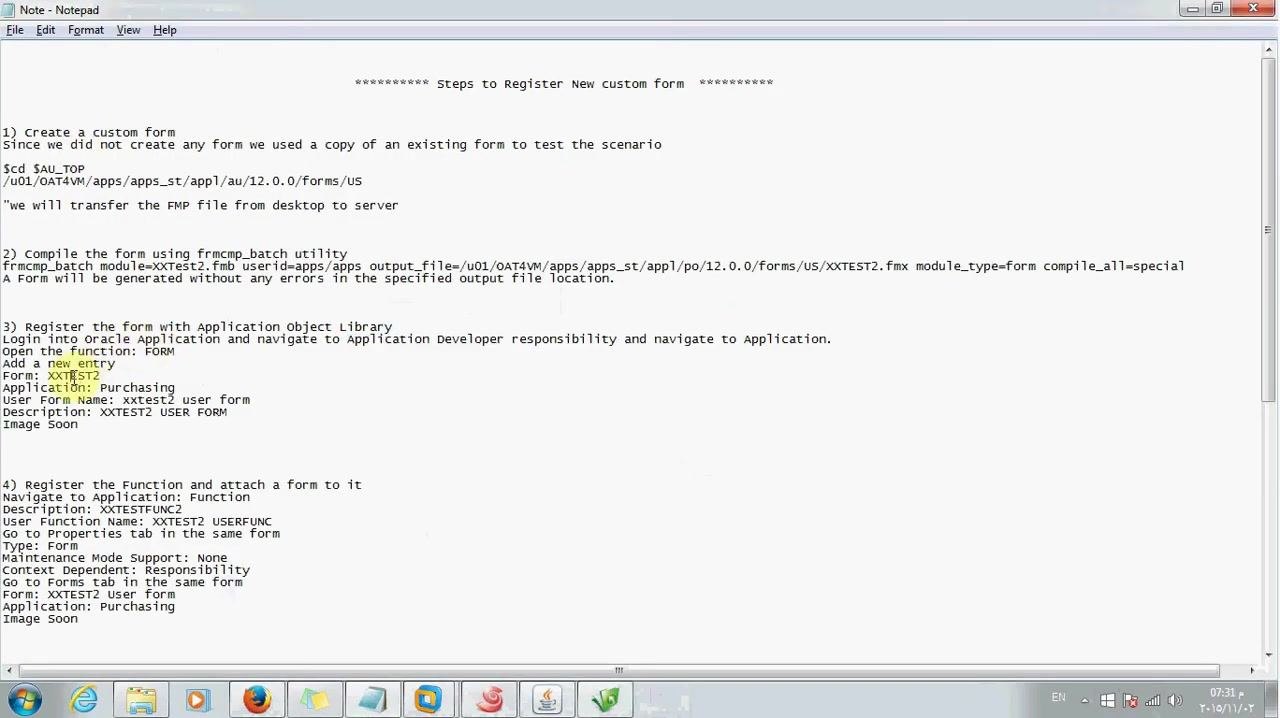
Navigate to the Application Developer responsibility, then go to the Application section and open the Form function. Add a new entry with the following details:
- Form: XXTEST2
- Application: Purchasing
- User Form Name: xxtest2 user form
- Description: XXTEST2 USER FORM
Register the function and attach the form
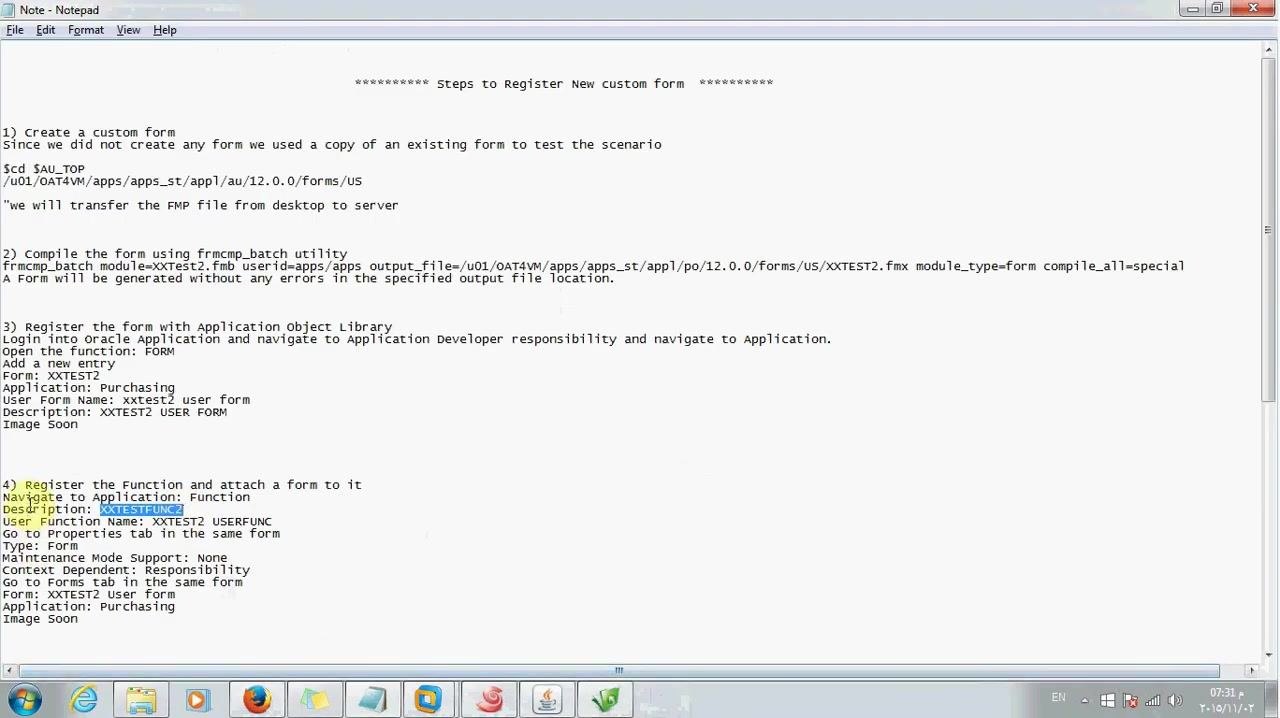
Navigate to Application: Function and enter the following details:
- Description: XXTESTFUNC2
- User Function Name: XXTEST2 USERFUNC
On the Properties tab of the same form, set:
- Type: Form
- Maintenance Mode Support: None
- Context Dependent: Responsibility
On the Forms tab of the same form, enter:
- Form: XXTEST2 user form
- Application: Purchasing
Create a menu and add the function
Create a new menu
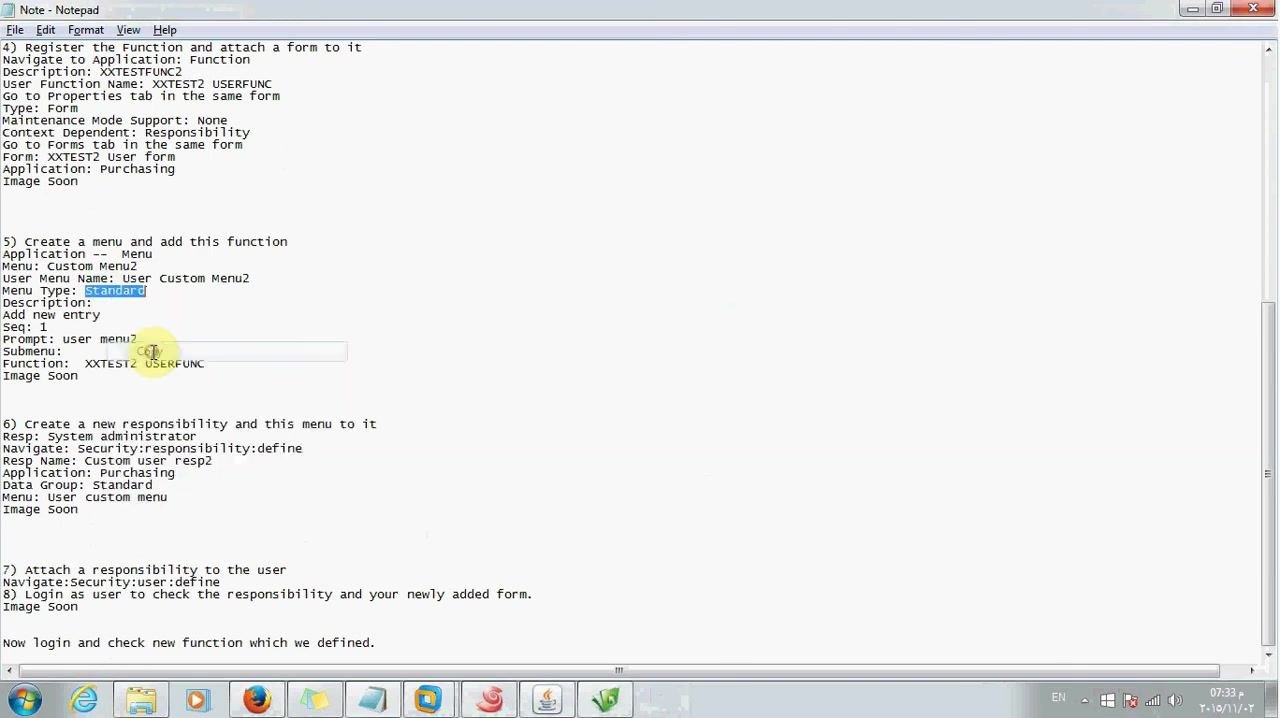
Navigate to the Application section and select Menu. Create a new menu with the following details:
- Menu: Custom Menu2
- User Menu Name: User Custom Menu2
- Menu Type: Standard
Add a new entry to the menu:
- Seq: 1
- Prompt: user menu2
- Function: XXTEST2 USERFUNC
Create a responsibility and assign the menu
Create a new responsibility
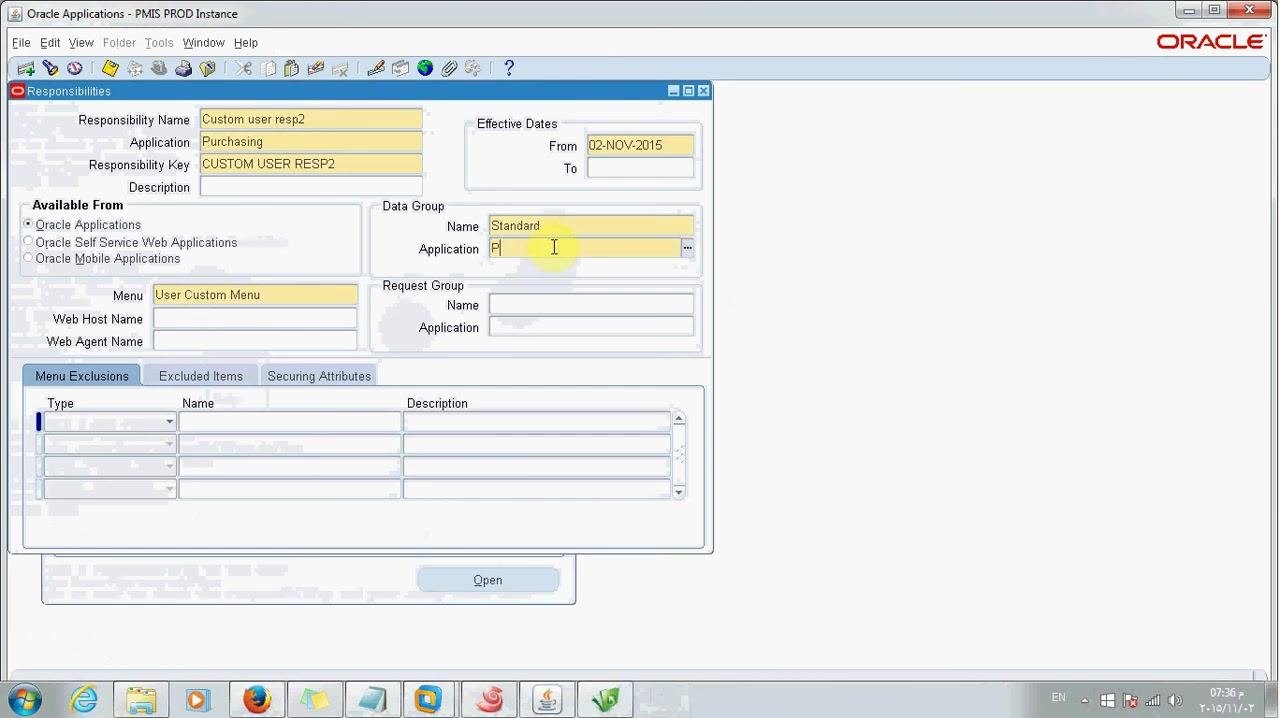
Navigate to the Responsibilities form in Oracle Applications and enter the following details:
- Responsibility Name: Custom user resp2
- Application: Purchasing
- Responsibility Key: CUSTOM USER RESP2
- Effective Dates: From 02-NOV-2015
- Data Group Name: Standard
- Menu: User Custom Menu
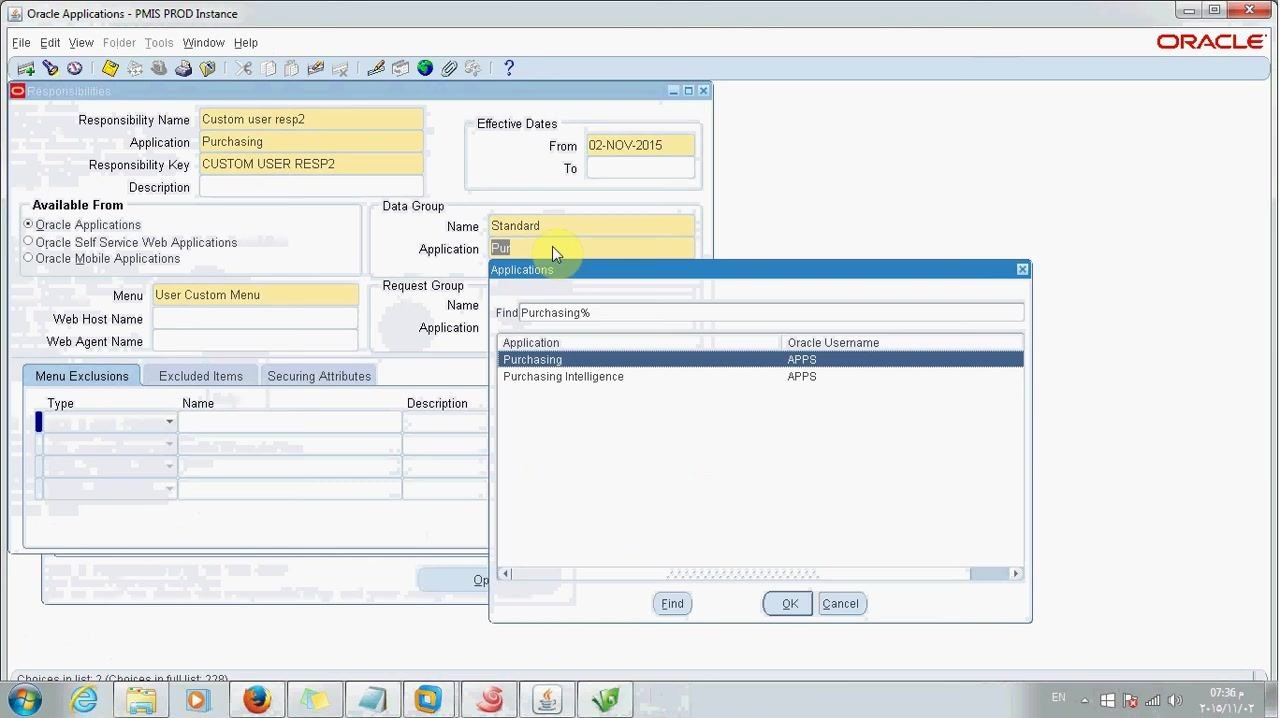
Select the Data Group Application
In the Data Group Application field, type "Pur" to filter the list of applications. In the pop-up window, select Purchasing, then click OK to confirm the selection.
Save the new responsibility
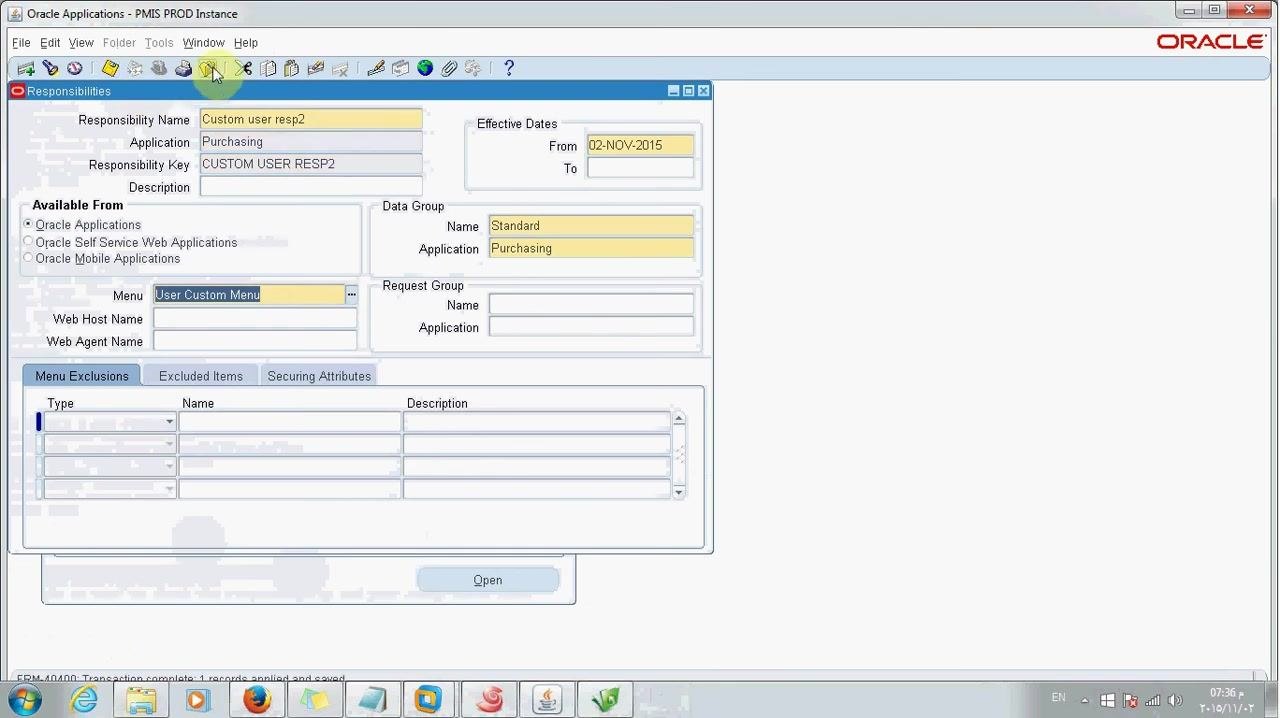
Confirm that all fields are correctly filled in:
- Responsibility Name: Custom user resp2
- Application: Purchasing
- Data Group: Standard / Purchasing
- Menu: User Custom Menu
- Effective Dates: From 02-NOV-2015
Save the record to complete the responsibility setup.
Attach the responsibility to a user
Open the Users form
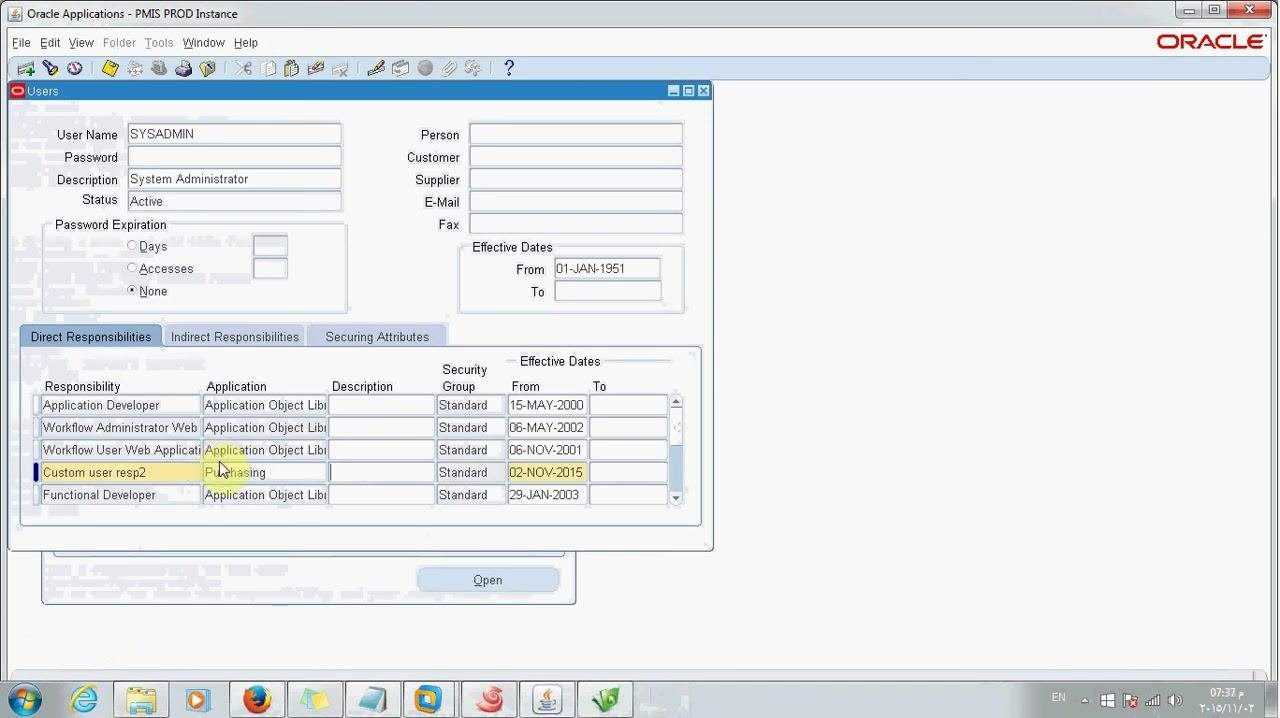
Navigate to the Users form in Oracle Applications. In the User Name field, enter the username (for example, SYSADMIN). Confirm the user details are visible, then go to the Direct Responsibilities tab.
Add the custom responsibility to the user
In the Direct Responsibilities section, add a new row with the following details:
- Responsibility: Custom user resp2
- Application: Purchasing
- Security Group: Standard
- Effective Dates: From 02-NOV-2015
Save the responsibility assignment
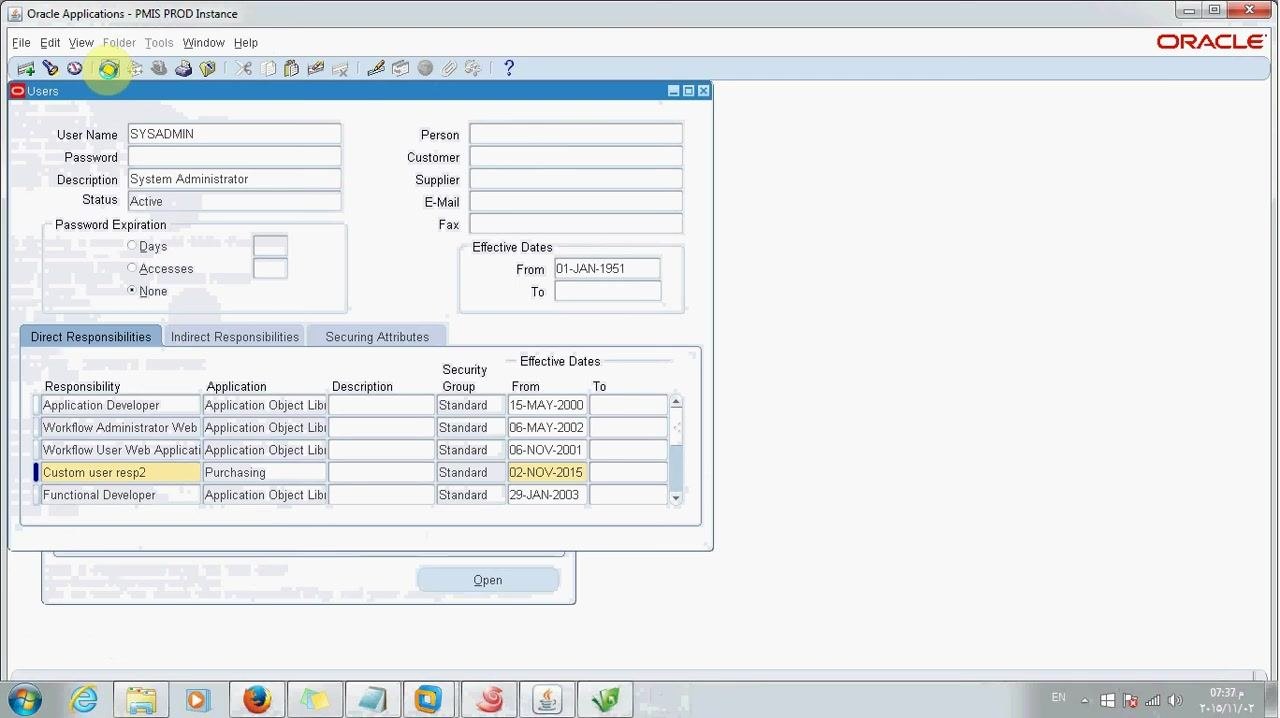
Confirm that Custom user resp2 now appears in the list of direct responsibilities for the user, then save the changes.
Verify the registered form
Verify the responsibility and custom form
Log in as the user to whom you assigned the new responsibility. Check that the new responsibility (Custom user resp2) and the newly registered function (XXTEST2 USERFUNC) are available, and confirm that you can access the custom form through the menu.
Summary
You have now completed the full process of how to register a form in Oracle EBS: transferring the form file to the application server, compiling it with frmcmp_batch, registering the form and its function, creating a menu, assigning the menu to a new responsibility, and attaching that responsibility to a user. Logging in with the assigned responsibility confirms the custom form is accessible and ready for use.
Generation details: cost, quality tiers
Docsie billed 6,500 credits ($4.55) to analyze this 13-minute video at standard quality. The rewrite, template fill and Word/PDF exports were included. The same video at each quality tier:
| Quality | Frames sampled | Credits | Approx. cost |
|---|---|---|---|
| Draft | every 16-30 s | 3,250 | $2.27 |
| Standard (this guide) | every 8-15 s | 6,500 | $4.55 |
| Detailed | every 4-7 s | 13,000 | $9.10 |
| Ultra | every 1-3 s | 26,000 | $18.20 |
Credits priced at $0.70 per 1,000; plans include a monthly allowance. Enterprise customers on on-premise or bring-your-own-model deployments run this on their own inference and pay no per-video credits.
Generated by Docsie Video-to-Docs on 2026-10-14 from a 12-minute video. Screenshots are frames from the source video and belong to their creator, Sami Yassin, whose original is embedded above. If you own this video and want the guide removed or credited differently, contact us and we will act within one business day.