
How to Create a Descriptive Flexfield in Oracle EBS
This guide walks you through how to create a descriptive flexfield in Oracle EBS for Purchase Order headers. You will learn how to prepare a user with the right responsibilities, locate the correct flexfield, add a new segment, and configure its value set, display properties, and default type so it is ready for use on Purchase Orders.
Video: How To Create discriptive flex field (DFF) in Oracle R12 by Softech Solutions. All credit for the demonstration goes to the creator; watch the original on YouTube. The written guide below was generated from this video by Docsie. Creator? Request a change or removal.
This guide walks you through how to create a descriptive flexfield in Oracle EBS for Purchase Order headers. You will learn how to prepare a user with the right responsibilities, locate the correct flexfield, add a new segment, and configure its value set, display properties, and default type so it is ready for use on Purchase Orders.
Prerequisites
- Access to the server where Oracle Applications is installed.
- A system administrator responsibility to create users and assign responsibilities.
- Access to the Purchasing responsibility (for example, "Purchasing - MD1") once the user is set up.
Prepare the server for installation
Before you begin, go to the server where Oracle Applications will be installed and confirm you have access to the desktop and the required installation files. The desktop should display the relevant Oracle folders and shortcuts needed for the configuration.
Create a new user on the server
Step 1: Define the user
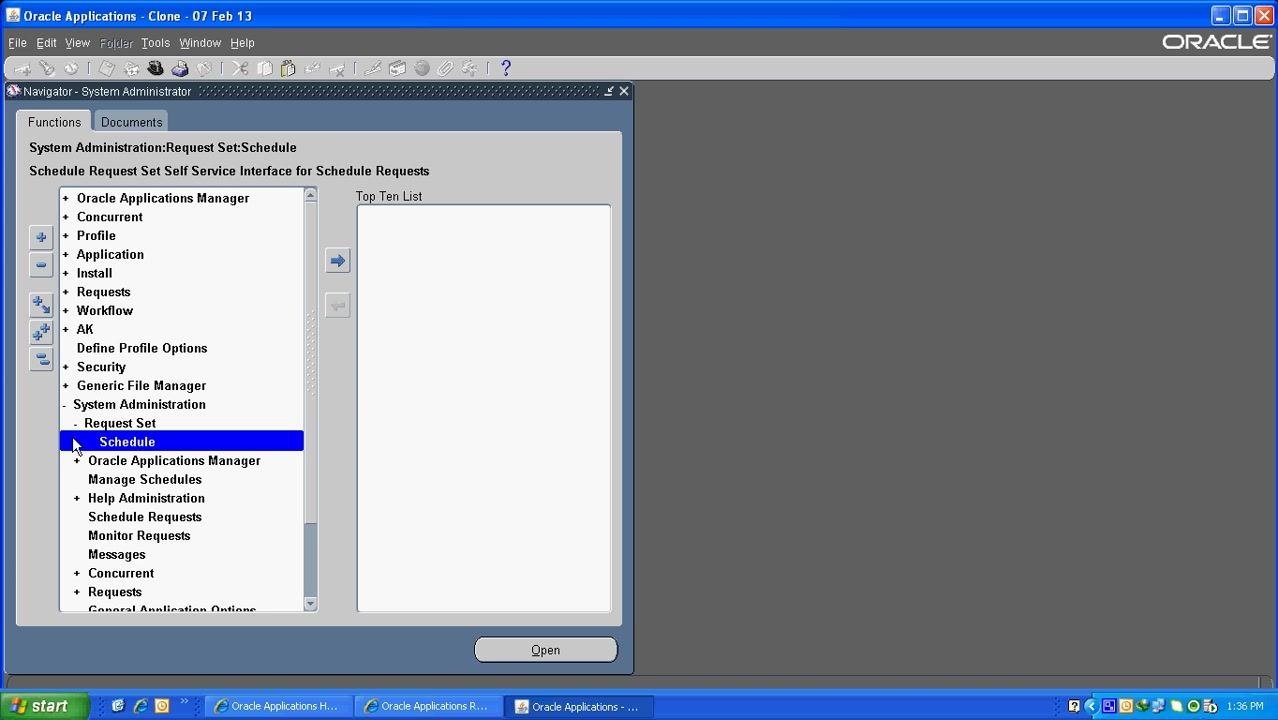
Open Oracle Applications and go to the System Administration responsibility. In the navigation pane, expand Security > User and select Define. Click Open to access the user definition screen.
Step 2: Assign responsibilities to the new user
In the Responsibilities dialog, search for and select the appropriate responsibility for the new user — for example, Purchasing - MD1. Click OK to assign the responsibility to the user.
Open purchase orders
Step 3: Access the Purchase Order Summary
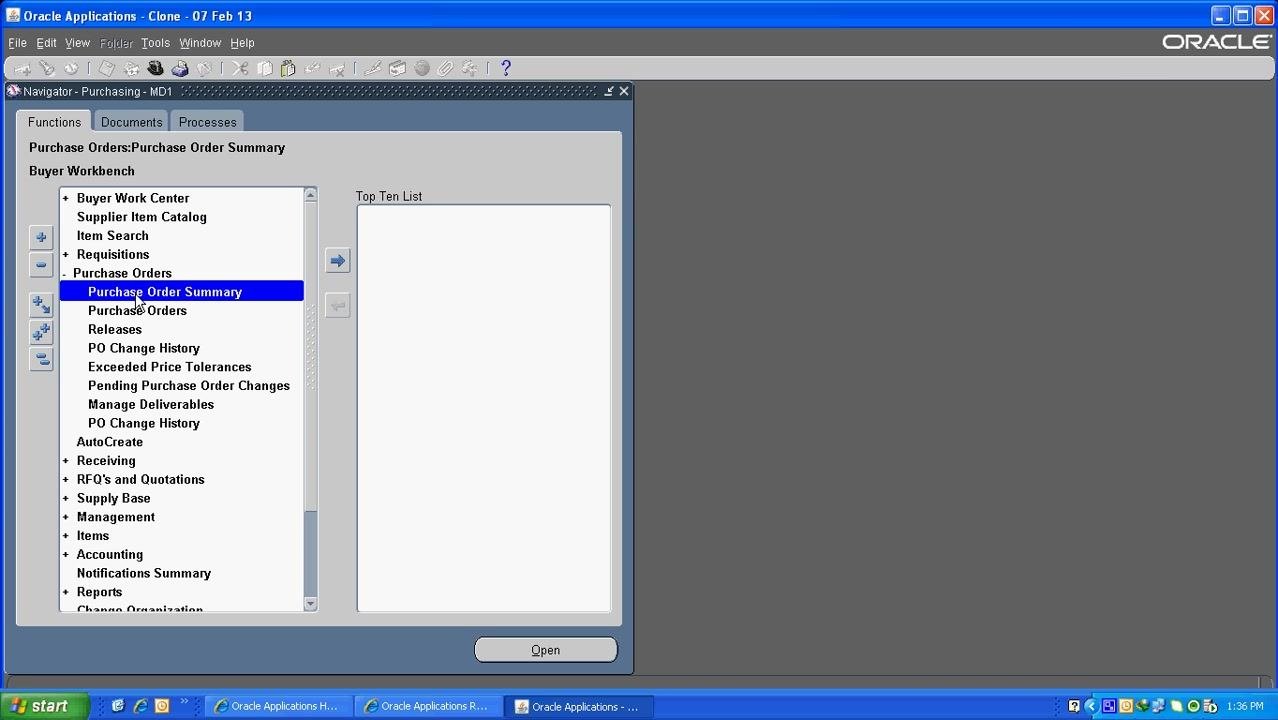
Navigate to the Purchase Orders section in Oracle Applications and select Purchase Order Summary. Click Open to view existing purchase order summaries.
Step 4: Enter purchase order header information
In the Purchase Orders window, complete the header fields, including Operating Unit, Created date, Type (Standard Purchase Order), Site, Ship-To, Bill-To, Buyer, and Status. In the PO Headers dialog, enter values for System Next No., Shipping Instructions, Pricing Terms, Destination, and Context, then click OK to save or Cancel to close the dialog.
Access form functions
Step 5: Open the Form Functions dialog
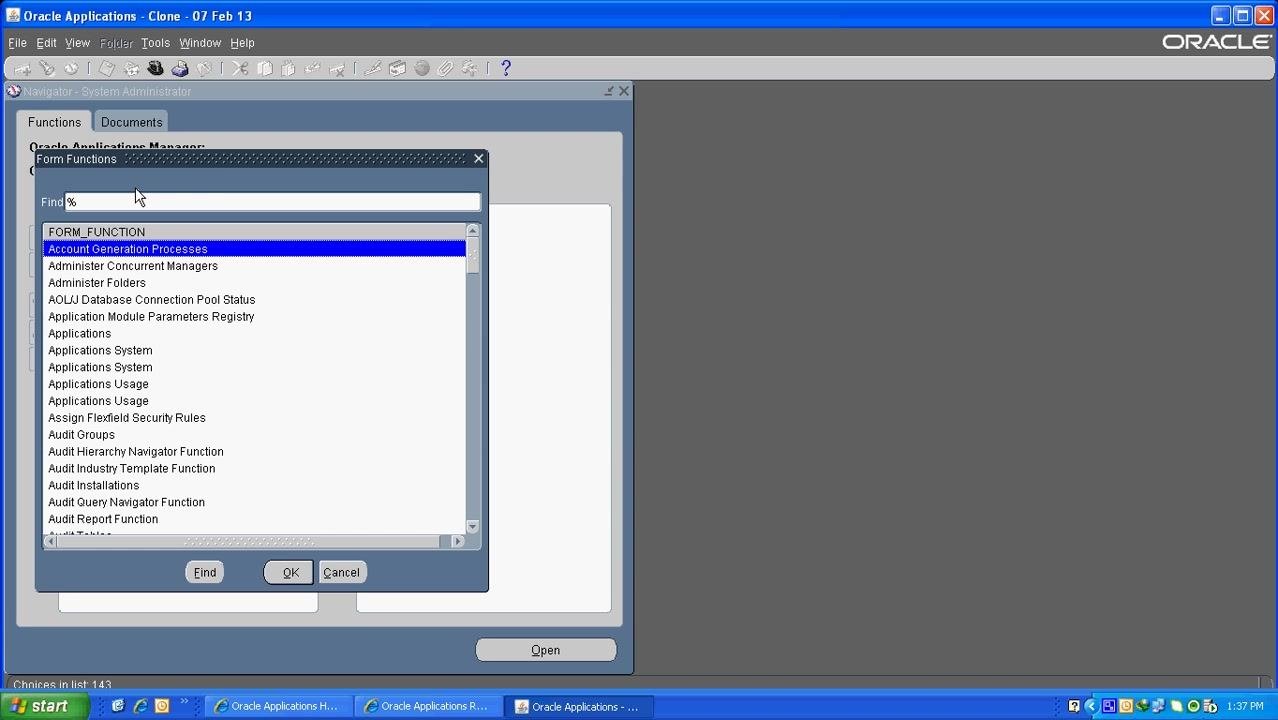
In Oracle Applications Manager, open the Form Functions dialog. In the Find field, enter % to list all available form functions, then select the relevant segment, such as "Account Generation Processes." Click OK to proceed.
Configure descriptive flexfield segments for PO headers
Step 6: Search for descriptive flexfields
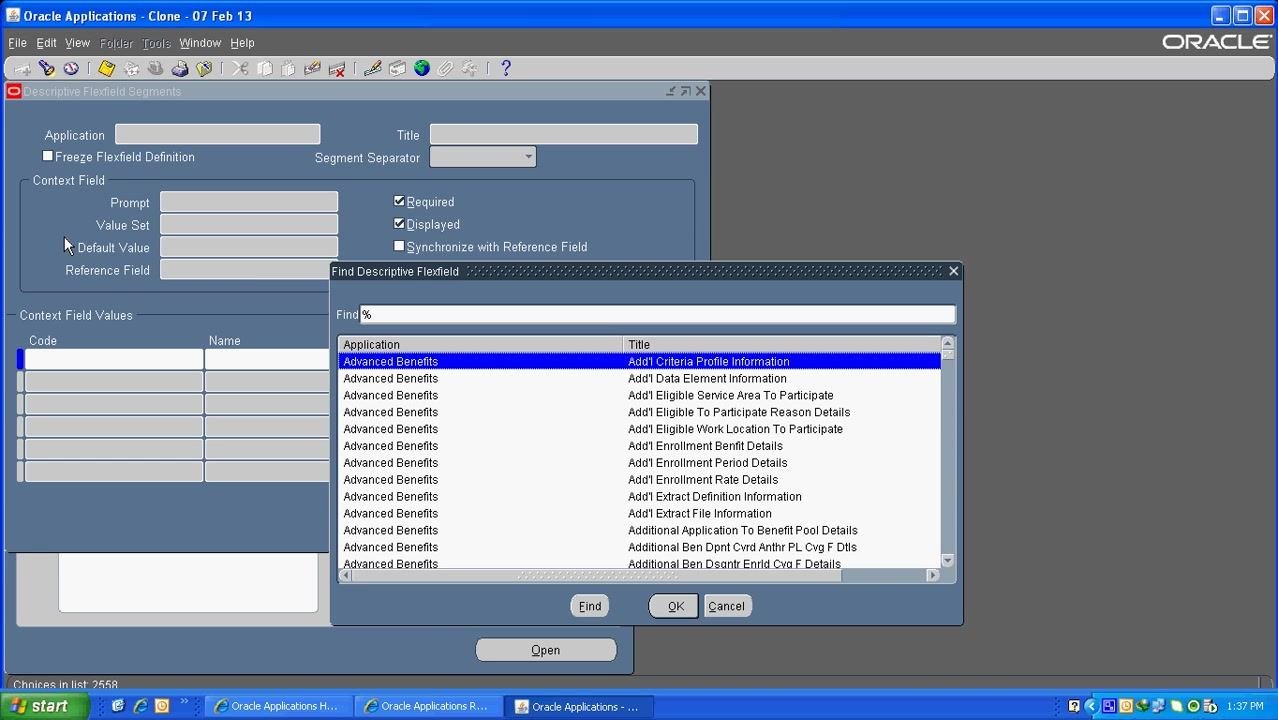
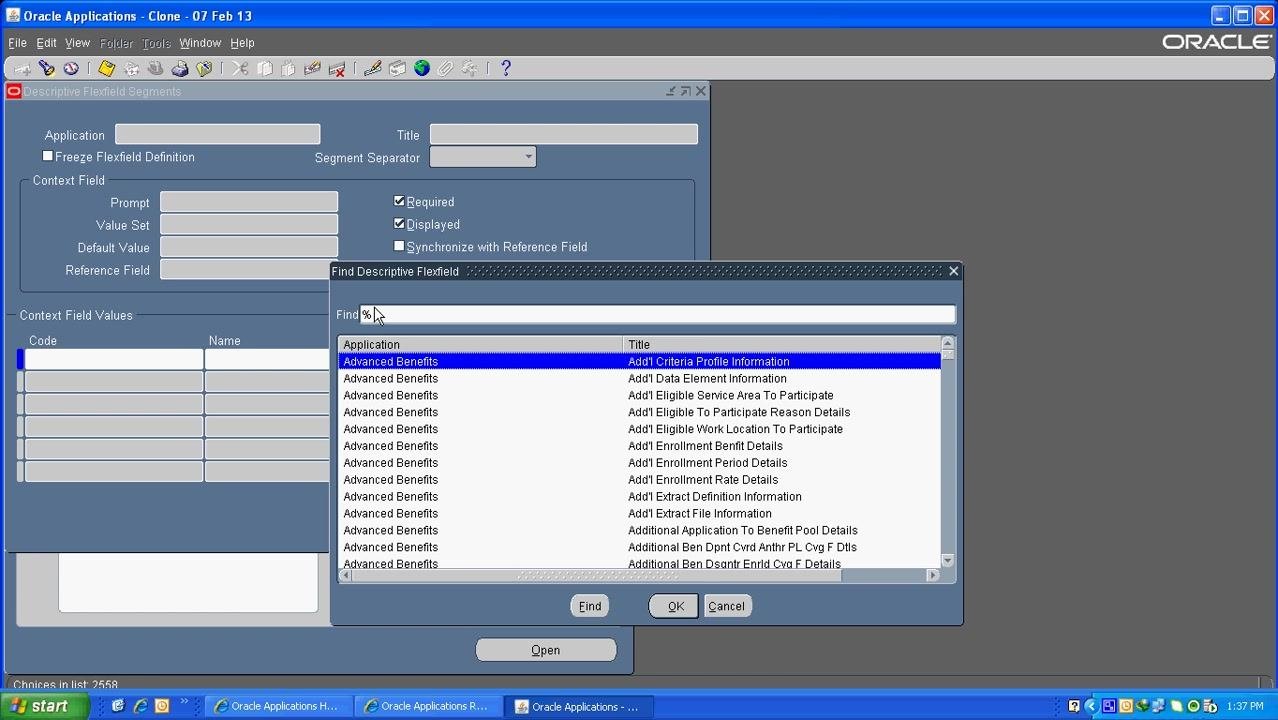
In the Descriptive Flexfield Segments window, open the Find Descriptive Flexfield dialog. Enter % in the Find field to list all available applications and titles, such as "Advanced Benefits" and "Add'l Criteria Profile Information."
Step 7: Locate the Purchase Order flexfield
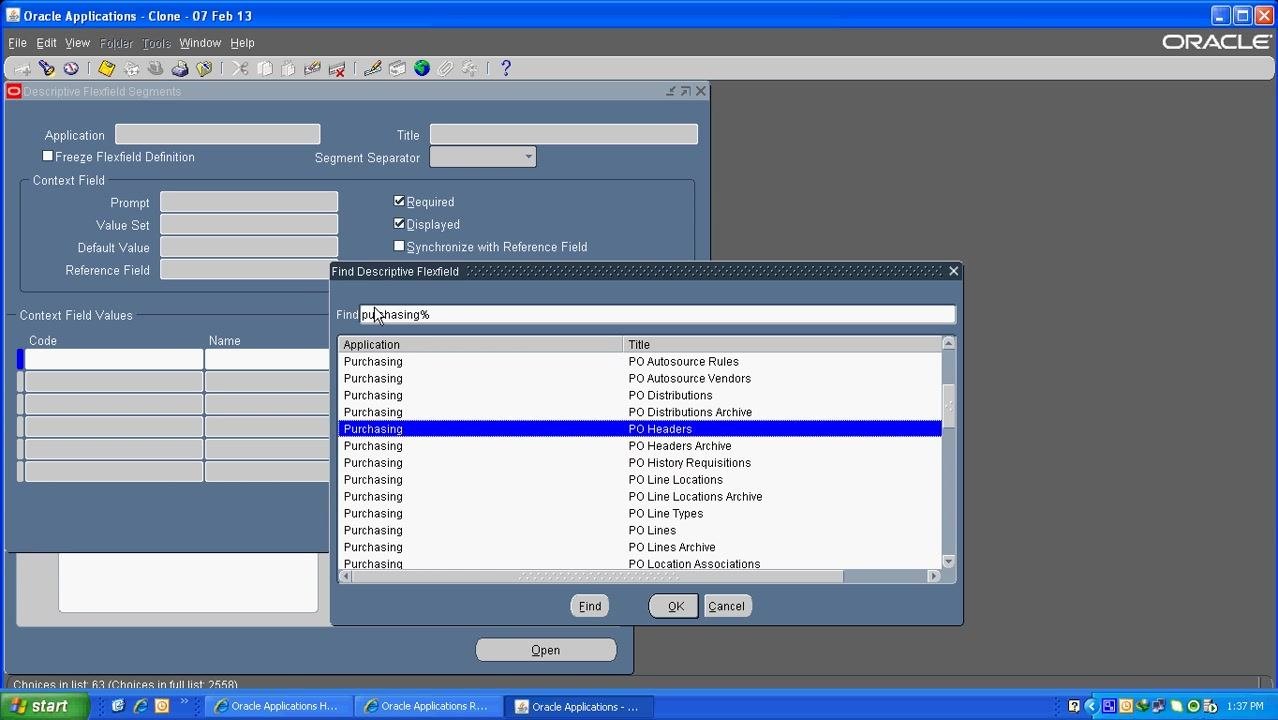
In the Find Descriptive Flexfield dialog, enter purchasing% in the Find field to filter for purchasing-related flexfields. Select the Purchasing application and the PO Headers title, then click OK.
Step 8: Review the PO Headers segments
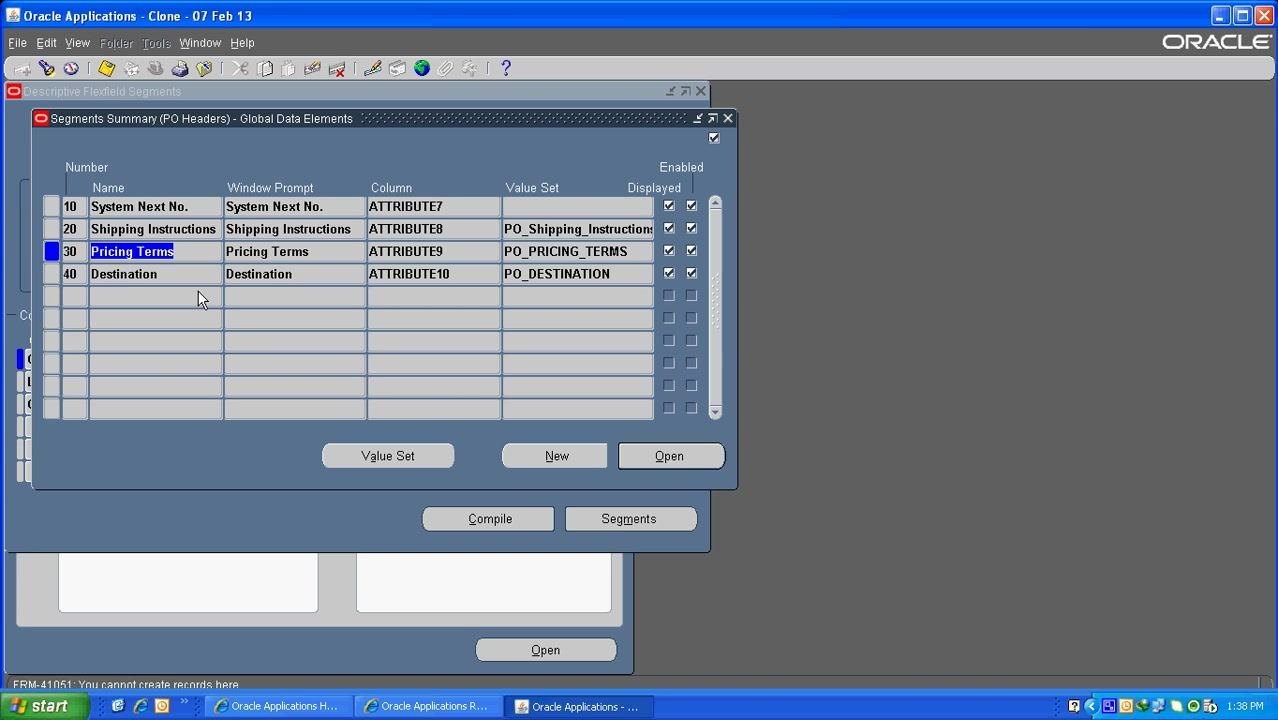
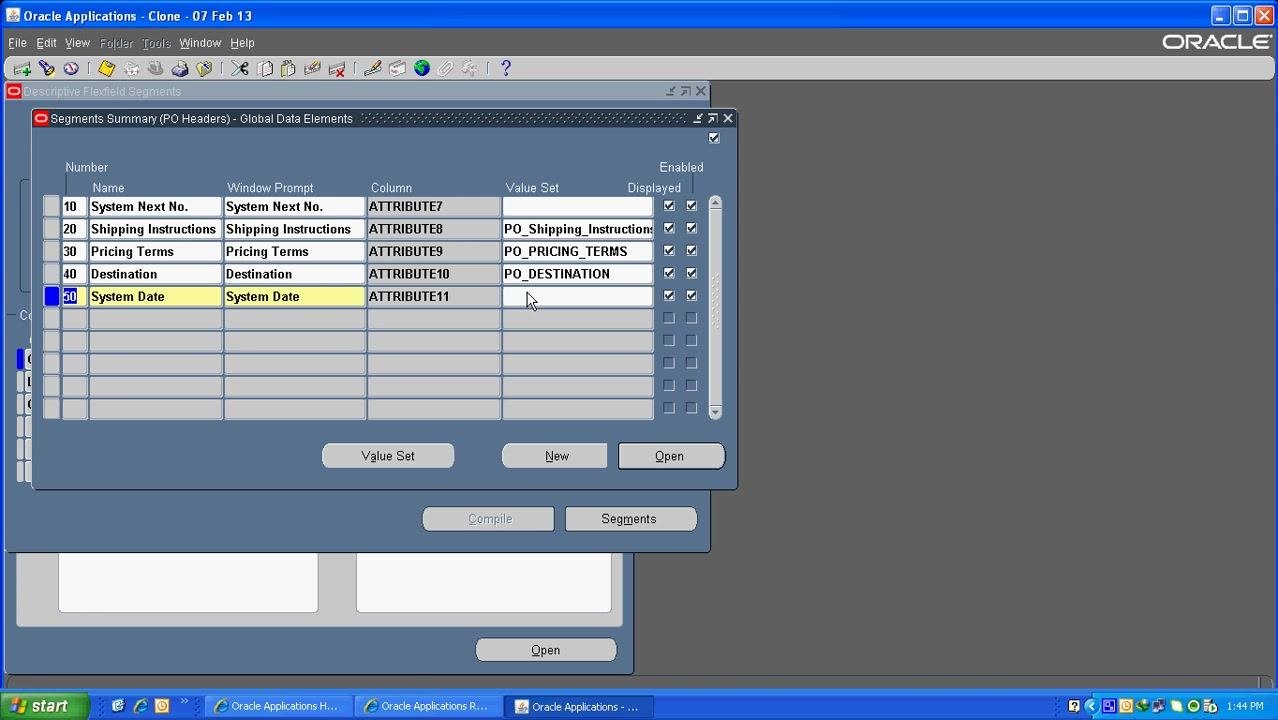
In the Segments Summary (PO Headers) - Global Data Elements window, review the existing segments:
- Number 10, Window Prompt "System Next No.," Column ATTRIBUTE7, no value set
- Number 20, Window Prompt "Shipping Instructions," Column ATTRIBUTE8, Value Set PO_Shipping_Instructions
- Number 30, Window Prompt "Pricing Terms," Column ATTRIBUTE9, Value Set PO_PRICING_TERMS
- Number 40, Window Prompt "Destination," Column ATTRIBUTE10, Value Set PO_DESTINATION
Confirm the Enabled and Displayed checkboxes are selected for each segment as required.
Step 9: Verify segment details
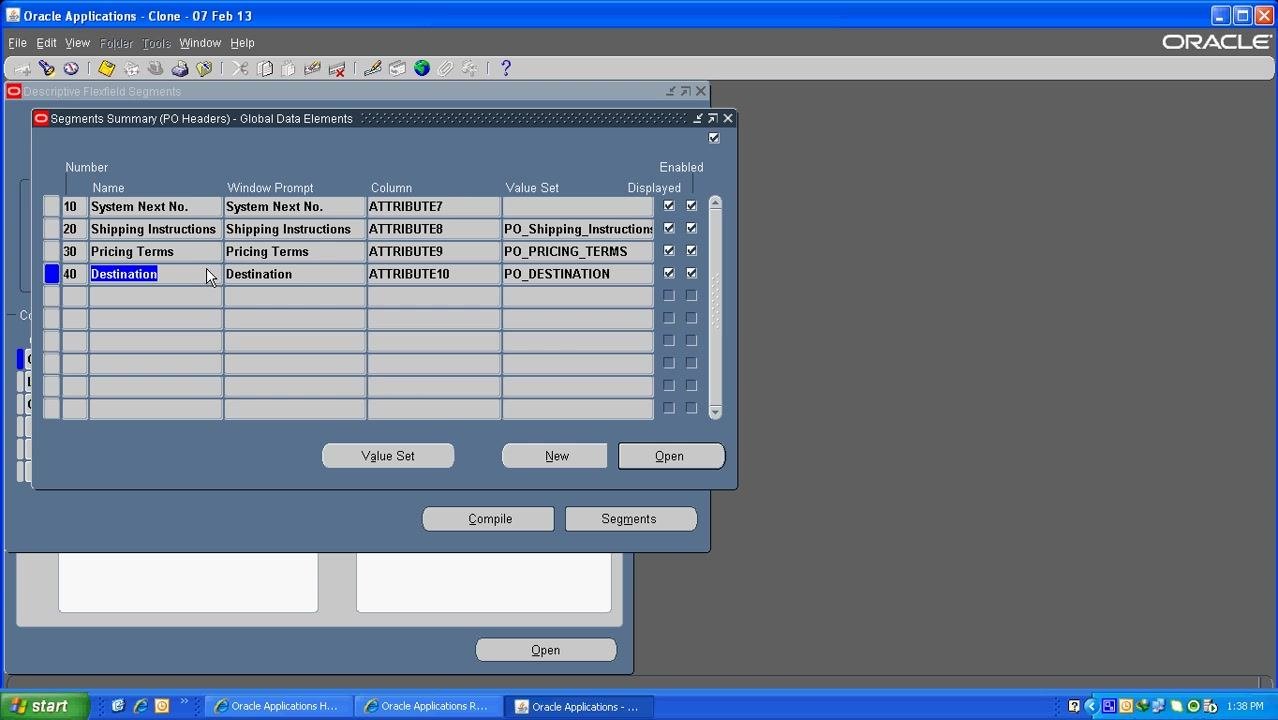
Click on each segment — Shipping Instructions, Pricing Terms, Destination — to review or edit its details, and confirm that the value sets (PO_Shipping_Instructions, PO_PRICING_TERMS, PO_DESTINATION) are correctly mapped.
Step 10: Understand context field values
In the Descriptive Flexfield Segments window, review the Context Field Values section. Note the available context codes, such as Global Data Elements, LC Details, and Other Details — each context value can have its own set of segments.
Step 11: Switch between contexts to view segments
Select a context value, such as Global Data Elements, LC Details, or Other Details, to view its associated segments. Each context may contain a different number of segments. Use the Segments button to open and review the segment definitions for the selected context.
Step 12: Review existing segments for the Other Details context
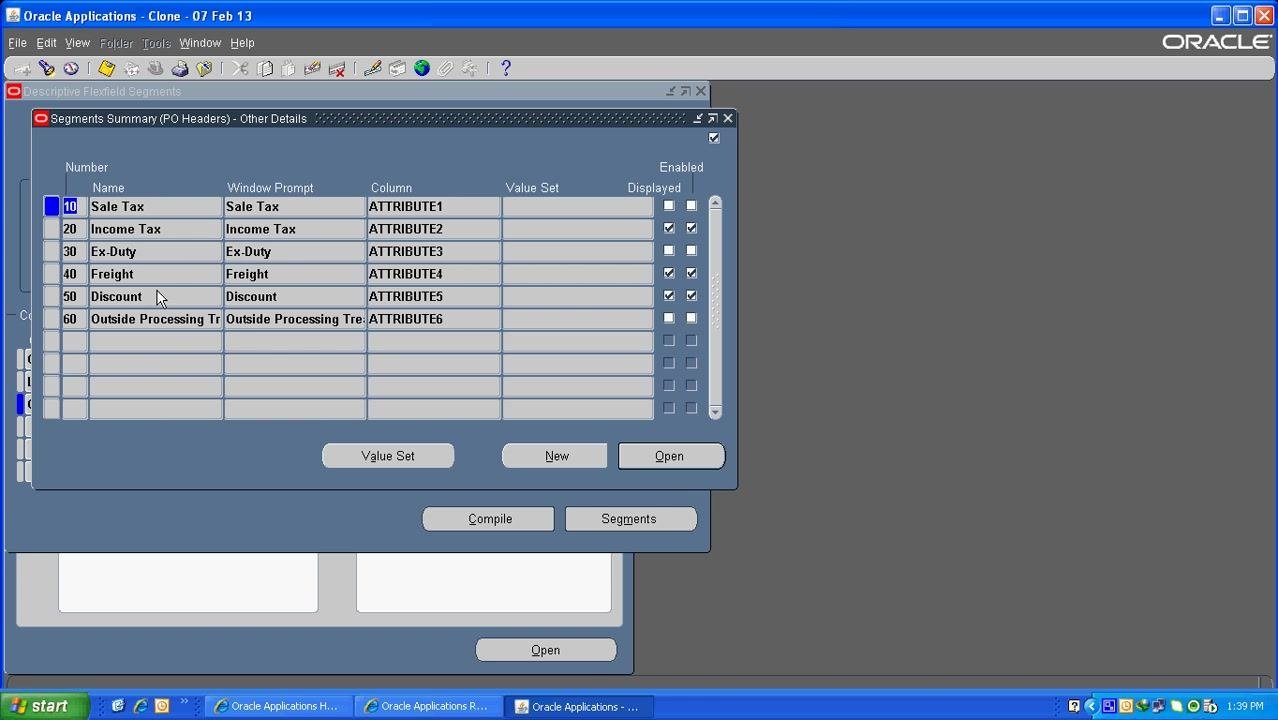
In the Segments Summary (PO Headers) - Other Details window, review the existing segments: Sale Tax (ATTRIBUTE1), Income Tax (ATTRIBUTE2), Ex-Duty (ATTRIBUTE3), Freight (ATTRIBUTE4), Discount (ATTRIBUTE5), and Outside Processing Tr (ATTRIBUTE6). Confirm which segments are enabled and displayed.
Step 13: Open the Global Data Elements segments for editing
Make sure Global Data Elements is highlighted in the context field values, then click the Segments button to open the segment definitions for this context.
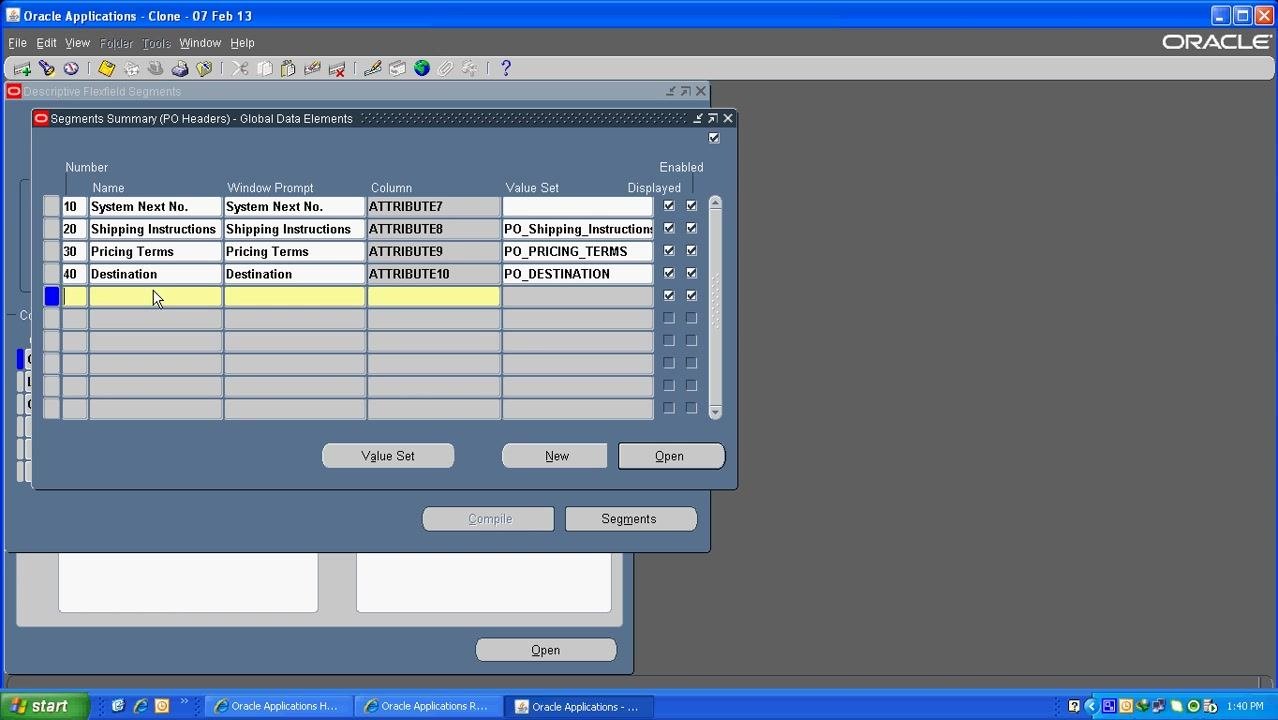
If prompted with a caution dialog about unfreezing the flexfield and affecting existing data validity, click OK to proceed with editing.
Step 14: Add a new segment for System Date
In the Segments Summary (PO Headers) - Global Data Elements window, add a new row with Number 50 and Window Prompt "System Date." Select a column once available, and ensure the Enabled and Displayed checkboxes are selected for this new segment.
Step 15: Assign a database column to the new segment
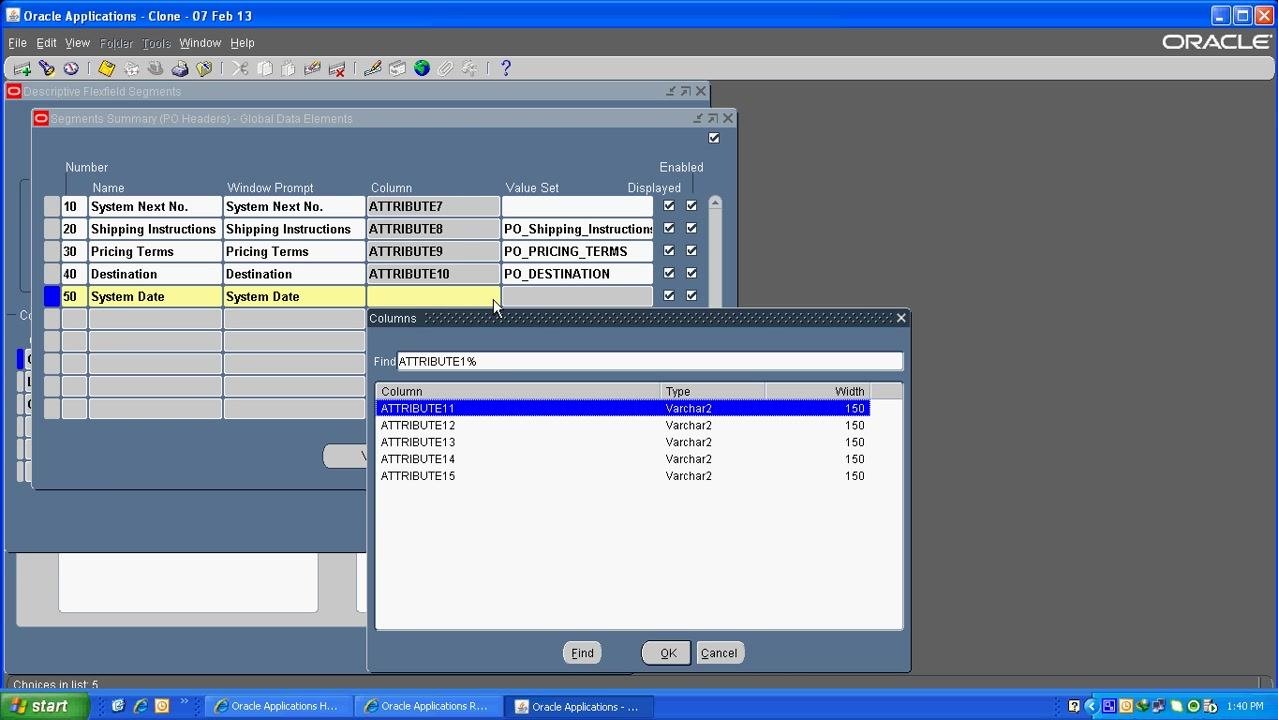
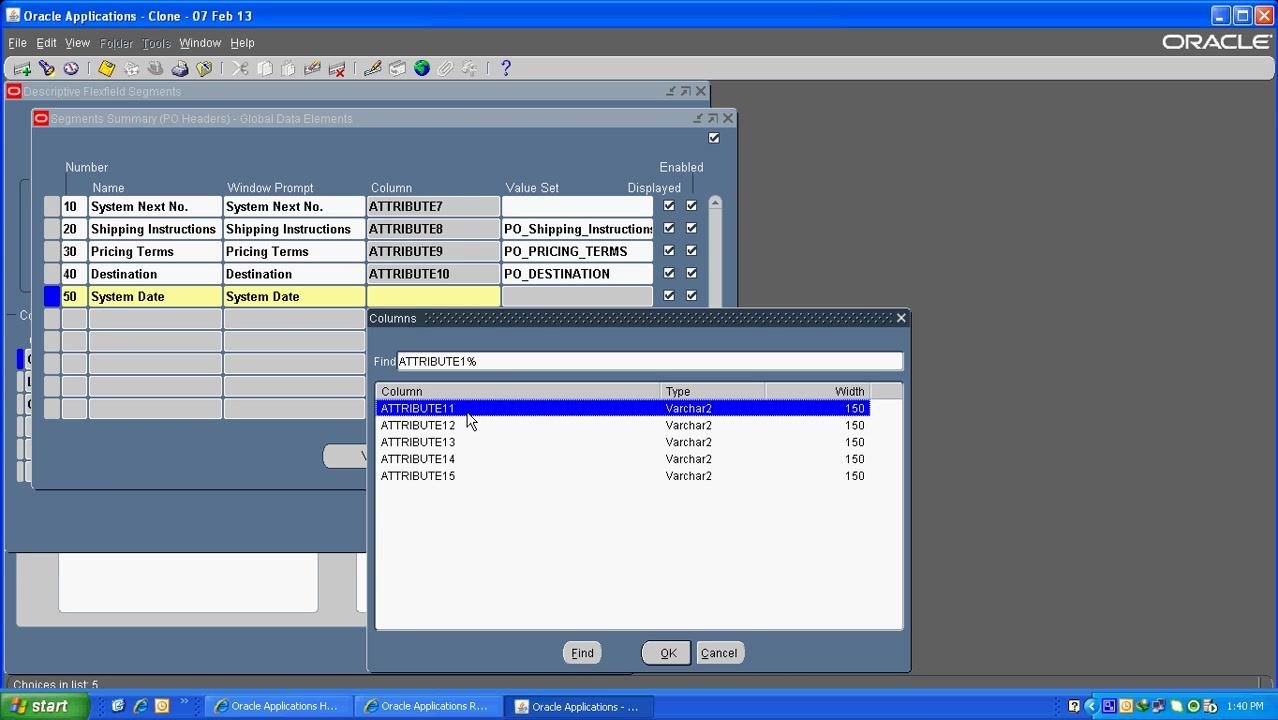
Click in the Column field for the new "System Date" segment. In the Columns dialog, select an available column, such as ATTRIBUTE11, confirm the column type is Varchar2 with a width of 150, and click OK.
Verify that the "System Date" segment now reflects Number 50, Window Prompt "System Date," and Column ATTRIBUTE11.
Step 16: Define the value set for the System Date segment
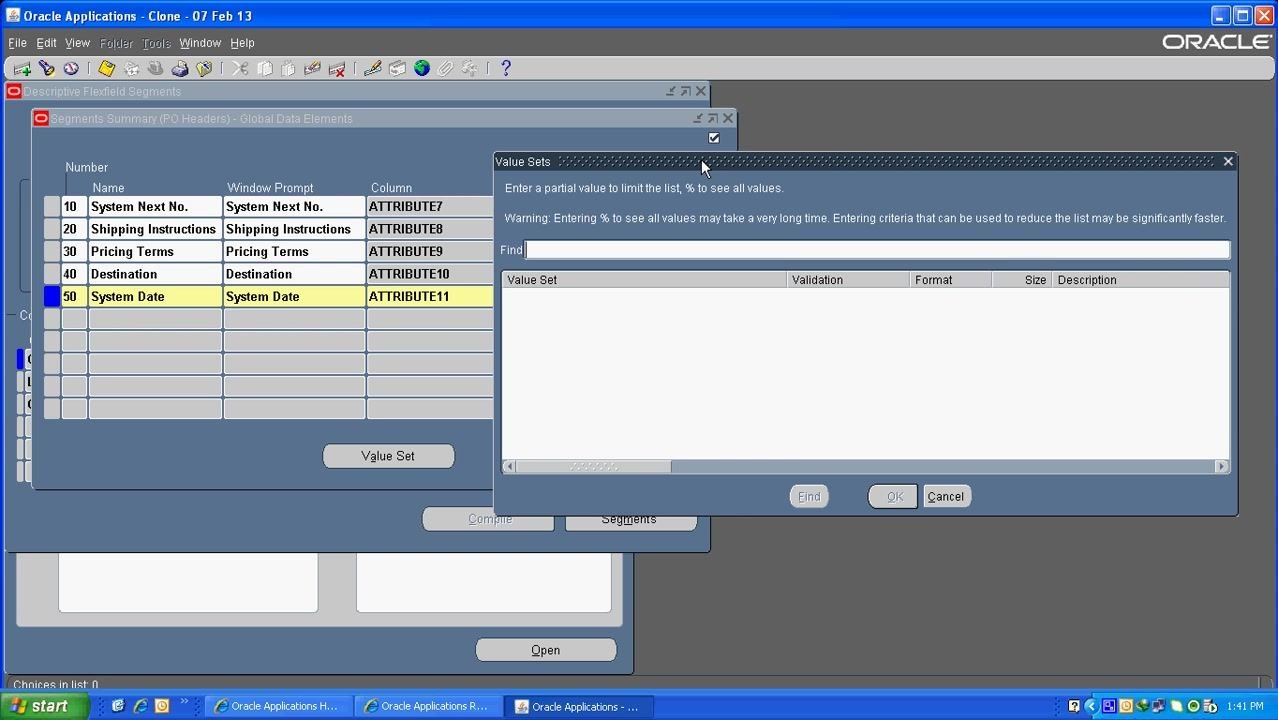
Open the Value Sets dialog to define or select a value set for the "System Date" segment. Use the Find field to enter a partial value or % to list all value sets (note that % may take longer to load). The Value Set Table displays columns for Value Set, Validation, Format, Size, and Description, and the Find, OK, and Cancel buttons appear at the bottom. At this stage no value set is yet selected, while the background Segments Summary window confirms "System Date" is assigned to ATTRIBUTE11 and is enabled and displayed.
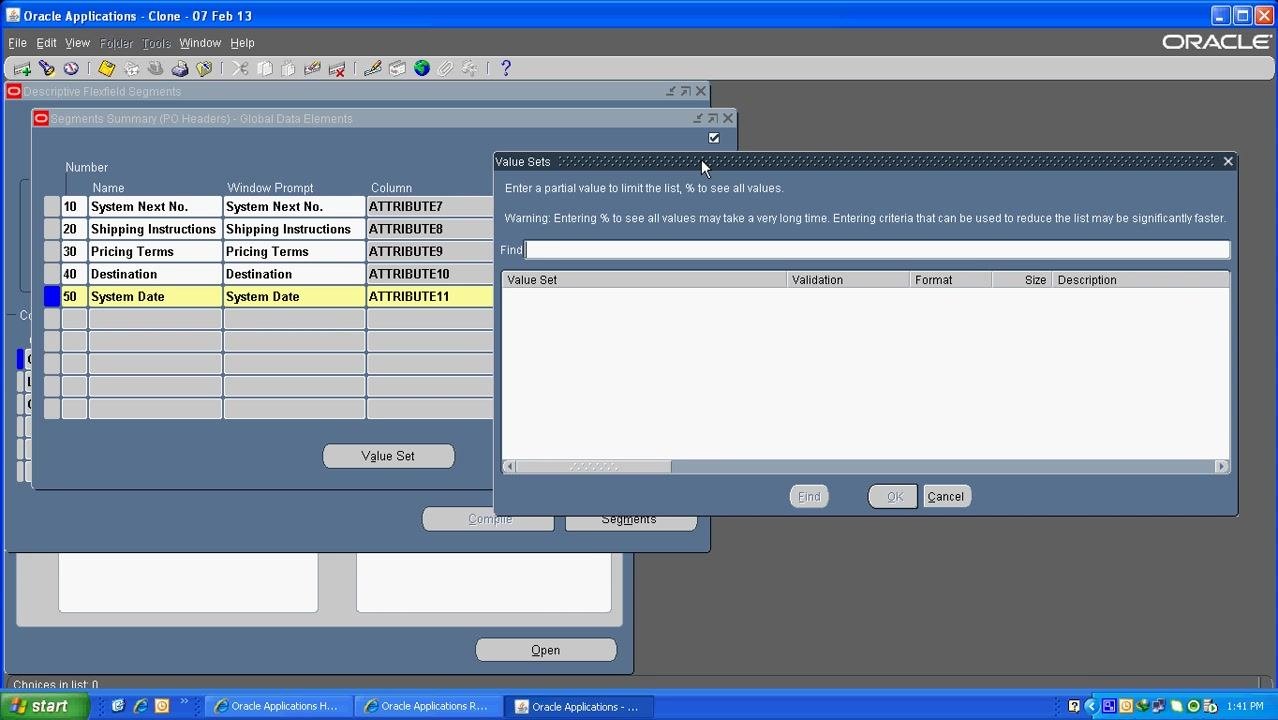
Enter criteria in the Find field to search for an existing value set suitable for date values, or create a new one if none exists. Select the appropriate value set from the list, click OK to assign it, and continue defining validation, format, and other properties as required for your process.
Step 17: Set the display size for the System Date segment
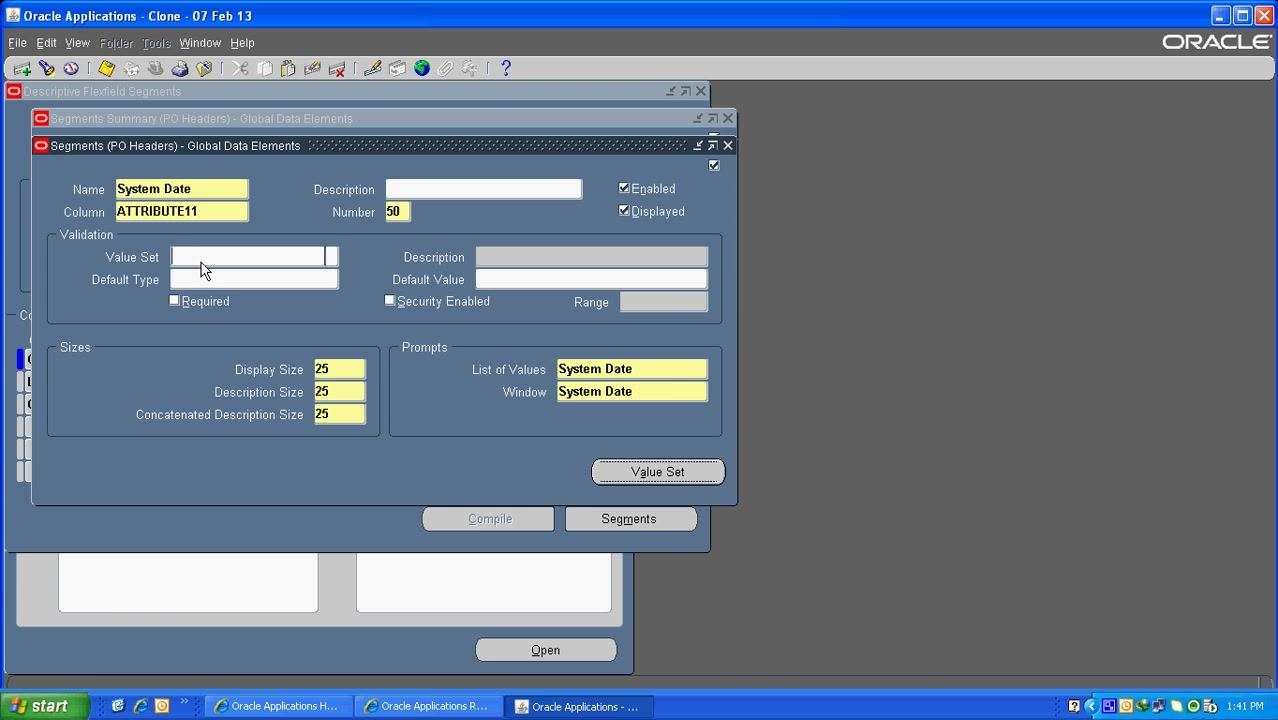
With the "System Date" segment selected, review its Display Size, Description Size, and Concatenated Description Size fields, along with the List of Values, Window prompt, and Required checkbox.
Adjust the Display Size as needed — for example, reduce it from 50 to a smaller value such as 25 for a more compact field. Confirm that Display Size, Description Size, and Concatenated Description Size are all set to 25, with the List of Values and Window prompts remaining set to "System Date."
Step 18: Define or edit the value set
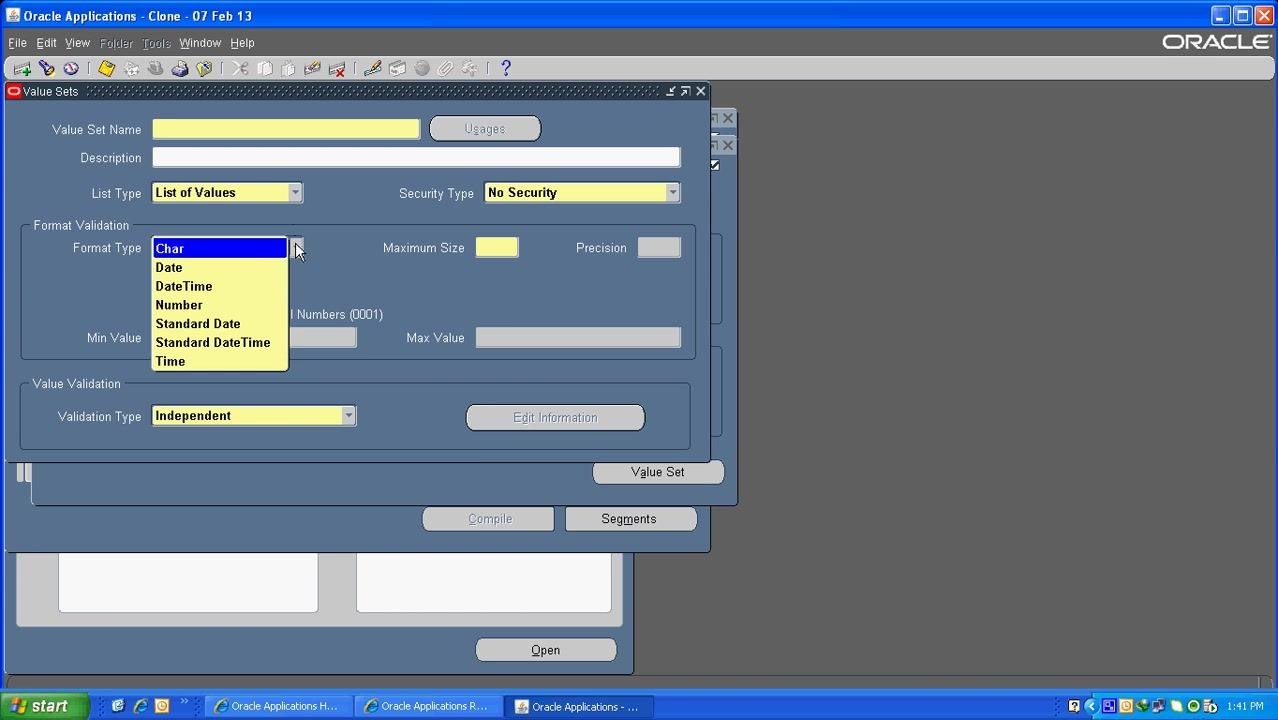
Open the Value Sets window and enter a Value Set Name, such as "Usages." Set List Type to List of Values and Security Type to No Security. In the Format Validation section, select the appropriate Format Type (Char, Date, DateTime, Number, Standard Date, Standard DateTime, or Time), and set Validation Type to Independent.
Step 19: Set the default type for the segment
Open the Default Types dialog and choose from options such as Segment, Constant, Current Date, Field, Profile, SQL Statement, or Current Time. Select the desired default type — for example, Segment — and confirm your selection.
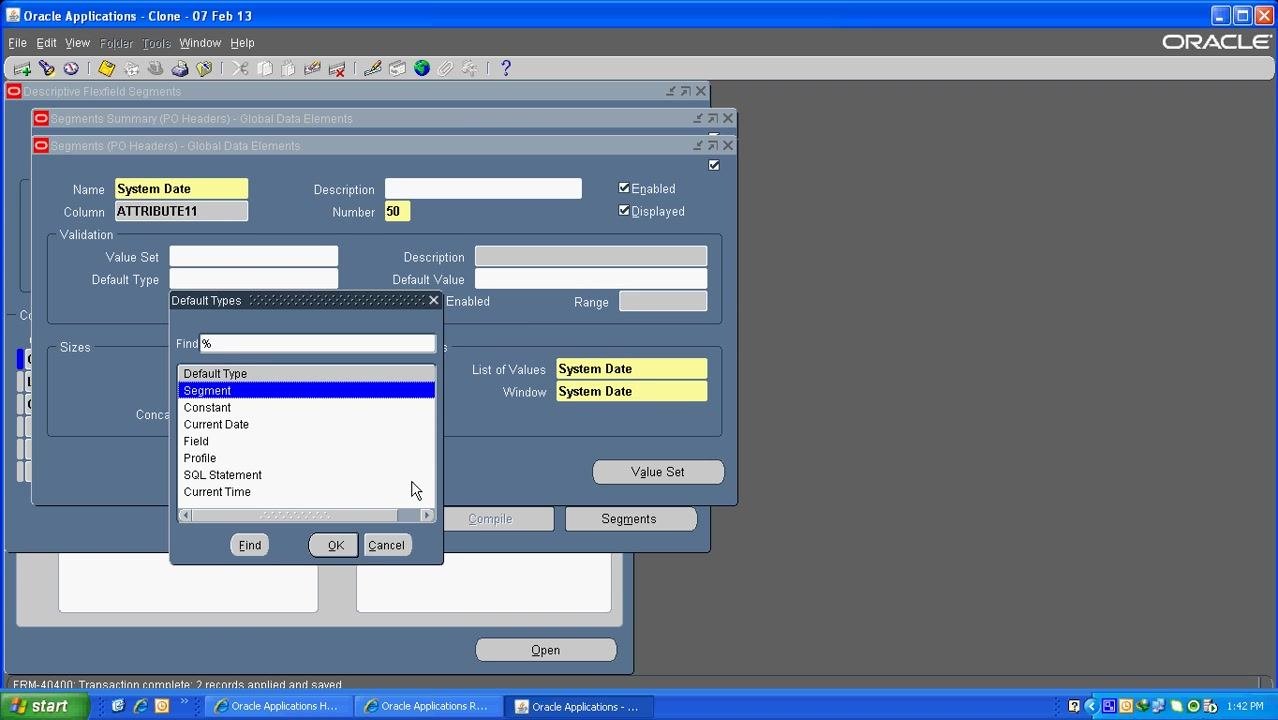
Step 20: Set the default value using Current Date
By default, the "System Date" segment can be set to use the current date. The Default Type field determines how the default value is calculated. Select Current Date in the Default Types dialog so the segment automatically populates with the current system date.
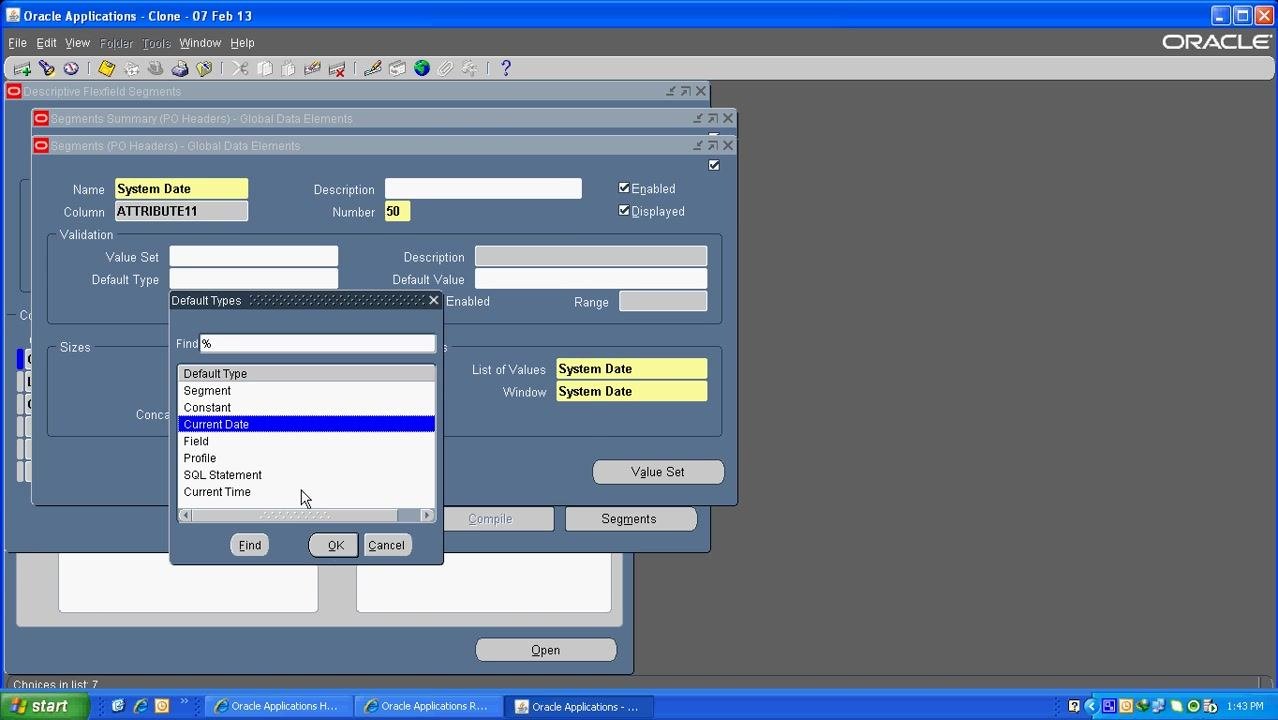
Step 21: Change the default type if needed
If a different default type is required, select from the available options in the Default Types dialog — for example, choose Constant to set a fixed value, or Segment to reference another segment. Your selection updates the Default Type field in the segment properties window.
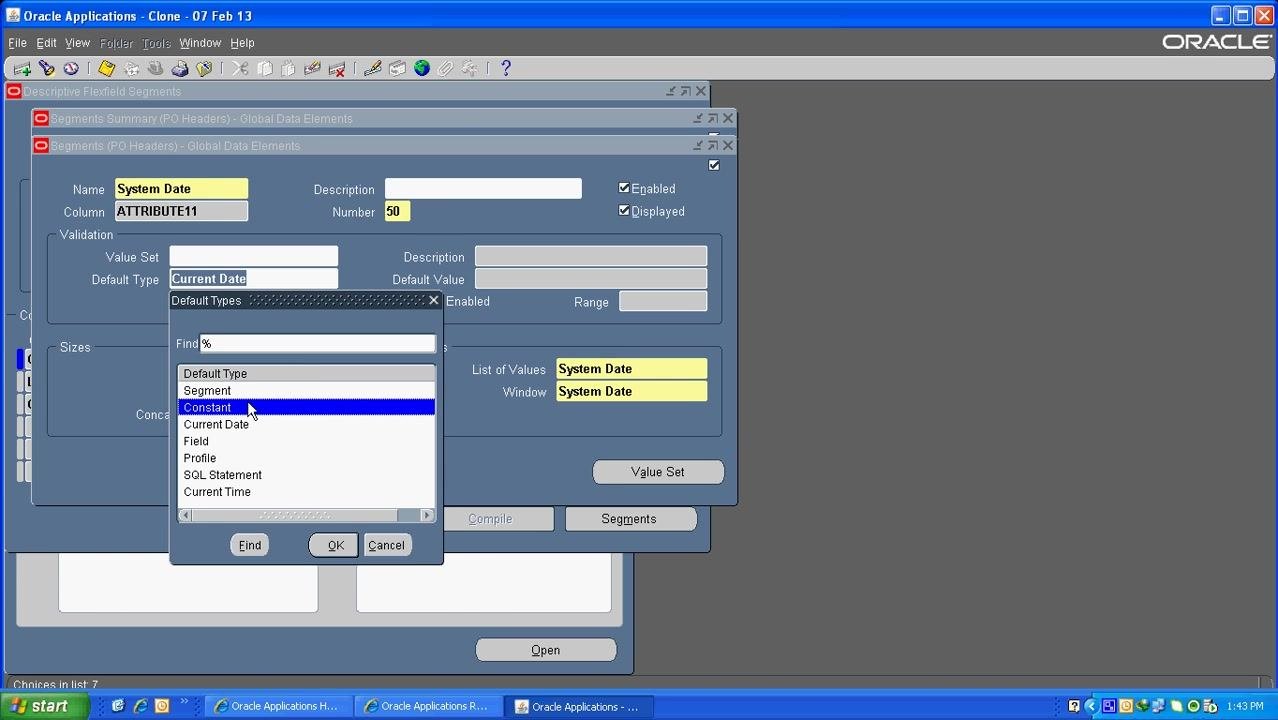
Step 22: Confirm and save the segment configuration
After setting the desired default type and other properties, close the Default Types dialog. The segment properties window reflects the chosen settings — confirm that all required fields are filled and correct before proceeding.
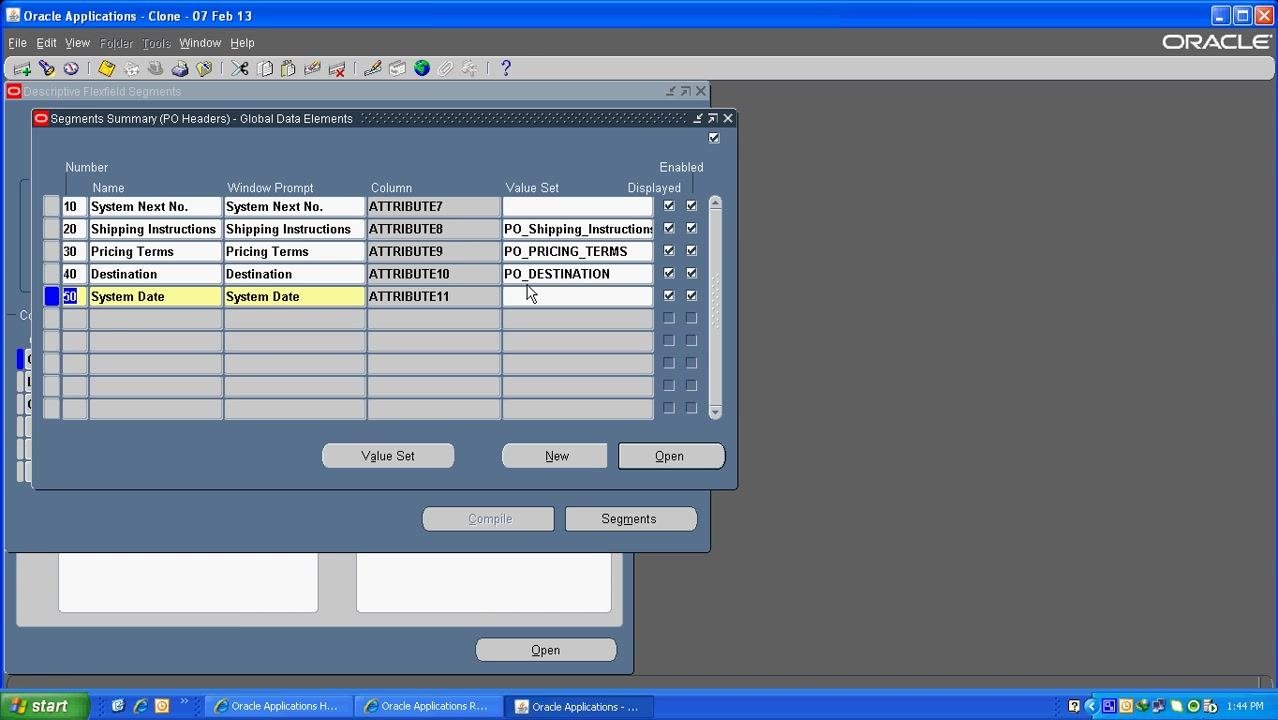
Step 23: Review the Segments Summary
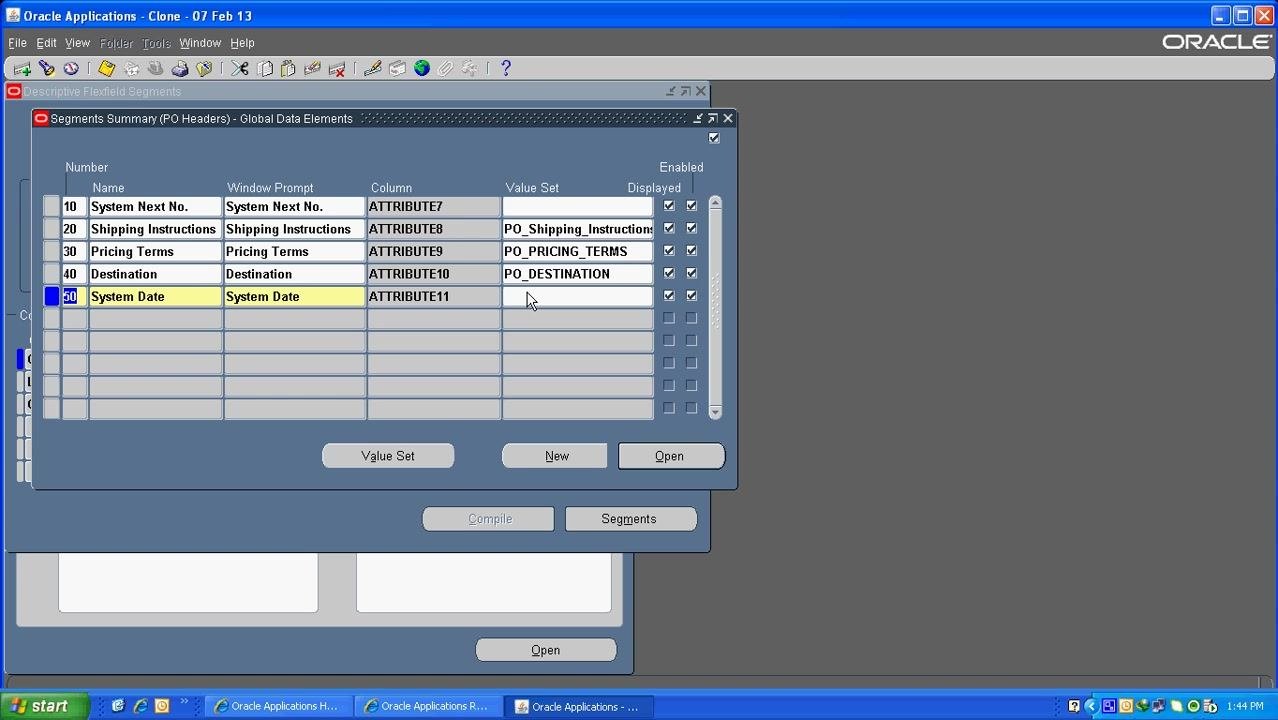
Return to the Segments Summary (PO Headers) - Global Data Elements window and verify that the "System Date" segment (Number 50) is listed with the correct column (ATTRIBUTE11) and prompts. Check that System Next No., Shipping Instructions, Pricing Terms, and Destination are also listed with their respective value sets, and confirm Enabled and Displayed checkboxes are selected for all active segments.
Review the final summary to confirm all segments are listed correctly:
- Number: 10, 20, 30, 40, 50
- Window Prompt: System Next No., Shipping Instructions, Pricing Terms, Destination, System Date
- Column: ATTRIBUTE7, ATTRIBUTE8, ATTRIBUTE9, ATTRIBUTE10, ATTRIBUTE11
- Value Set: PO_Shipping_Instructions, PO_PRICING_TERMS, PO_DESTINATION (System Date has no value set shown in this view)
- Enabled and Displayed checkboxes selected for all segments
Confirm that the "System Date" segment (Number 50) is highlighted for review, and note the available actions at the bottom of the window: Value Set, New, Open, Compile, and Segments.
Step 24: Finalize and validate your configuration
Double-check that all segments have the correct value sets, prompts, and default types, and confirm that the "System Date" segment is properly configured to use the current date or your chosen default type. Use the Compile button to apply changes, or the Open button to review segment details further.
Summary
You have now completed the process of how to create a descriptive flexfield in Oracle EBS for Purchase Order headers. All segments — including System Next No., Shipping Instructions, Pricing Terms, Destination, and the new System Date segment — are listed, enabled, and displayed as required. Your configuration is ready for use, and you can return to the Segments Summary window at any time to make further adjustments using the Value Set, New, Open, Compile, and Segments buttons.
Generation details: cost, quality tiers
Docsie billed 4,500 credits ($3.15) to analyze this 9-minute video at standard quality. The rewrite, template fill and Word/PDF exports were included. The same video at each quality tier:
| Quality | Frames sampled | Credits | Approx. cost |
|---|---|---|---|
| Draft | every 16-30 s | 2,250 | $1.57 |
| Standard (this guide) | every 8-15 s | 4,500 | $3.15 |
| Detailed | every 4-7 s | 9,000 | $6.30 |
| Ultra | every 1-3 s | 18,000 | $12.60 |
Credits priced at $0.70 per 1,000; plans include a monthly allowance. Enterprise customers on on-premise or bring-your-own-model deployments run this on their own inference and pay no per-video credits.
Generated by Docsie Video-to-Docs on 2026-10-11 from a 8-minute video. Screenshots are frames from the source video and belong to their creator, Softech Solutions, whose original is embedded above. If you own this video and want the guide removed or credited differently, contact us and we will act within one business day.