
How to Create a Periodic Alert in Oracle EBS
This guide walks you through how to create a periodic alert in Oracle EBS, from understanding the alert types available to scheduling the alert and confirming it runs at the correct interval. You will configure the alert definition, submit a request for the alert, set up its recurring schedule, and verify that it is running as expected.
Video: How to schedule Oracle Periodic Alerts | Oracle Shooter by Tech Shooter (2019). All credit for the demonstration goes to the creator; watch the original on YouTube. The written guide below was generated from this video by Docsie. Creator? Request a change or removal.
This guide walks you through how to create a periodic alert in Oracle EBS, from understanding the alert types available to scheduling the alert and confirming it runs at the correct interval. You will configure the alert definition, submit a request for the alert, set up its recurring schedule, and verify that it is running as expected.
Prerequisites
Before you begin, you should know that Oracle Applications supports two main types of alerts:
- Periodic Alert: Scheduled to run at regular intervals that you define.
- Event-Based Alert: Triggered automatically by specific events, such as updates or inserts, on a table.

Event-based alerts do not require manual scheduling — they fire automatically whenever the specified event occurs on the relevant table. Periodic alerts, by contrast, must be scheduled based on a defined frequency, such as daily or weekly. This guide focuses on periodic alerts, since they require you to configure the schedule yourself.
Open Alert Manager
Open the Alert Manager in Oracle Applications. In the navigation panel, select Alert from the list on the left, then click Open to proceed.
Query existing alerts
In the Define section, press F11 to query and search for existing alerts. This lets you check whether an alert with the same name already exists before creating a new one.
Configure the periodic alert definition
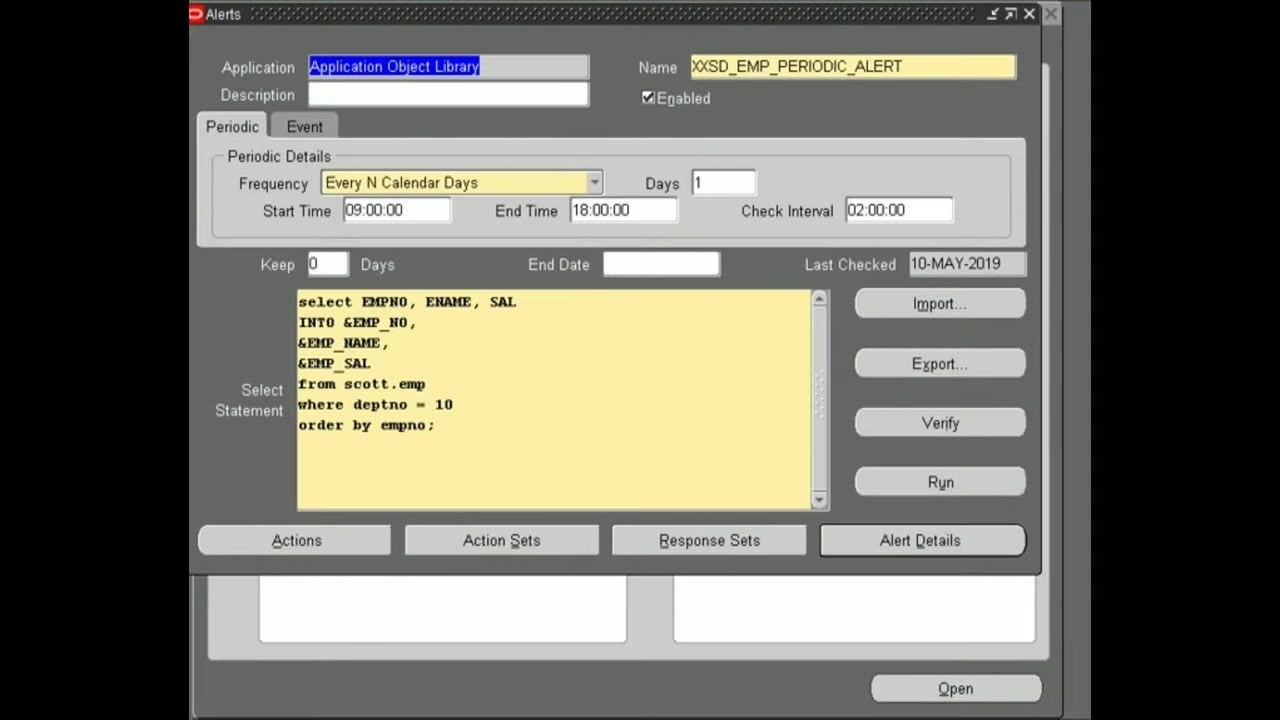
In the alert definition window, configure the following fields to define how and when your periodic alert runs:
- Frequency: choose how often the alert runs, for example "Every N Calendar Days," "Every Day," or "On Day of the Month."
- Start Time and End Time: specify the window during which the alert is active.
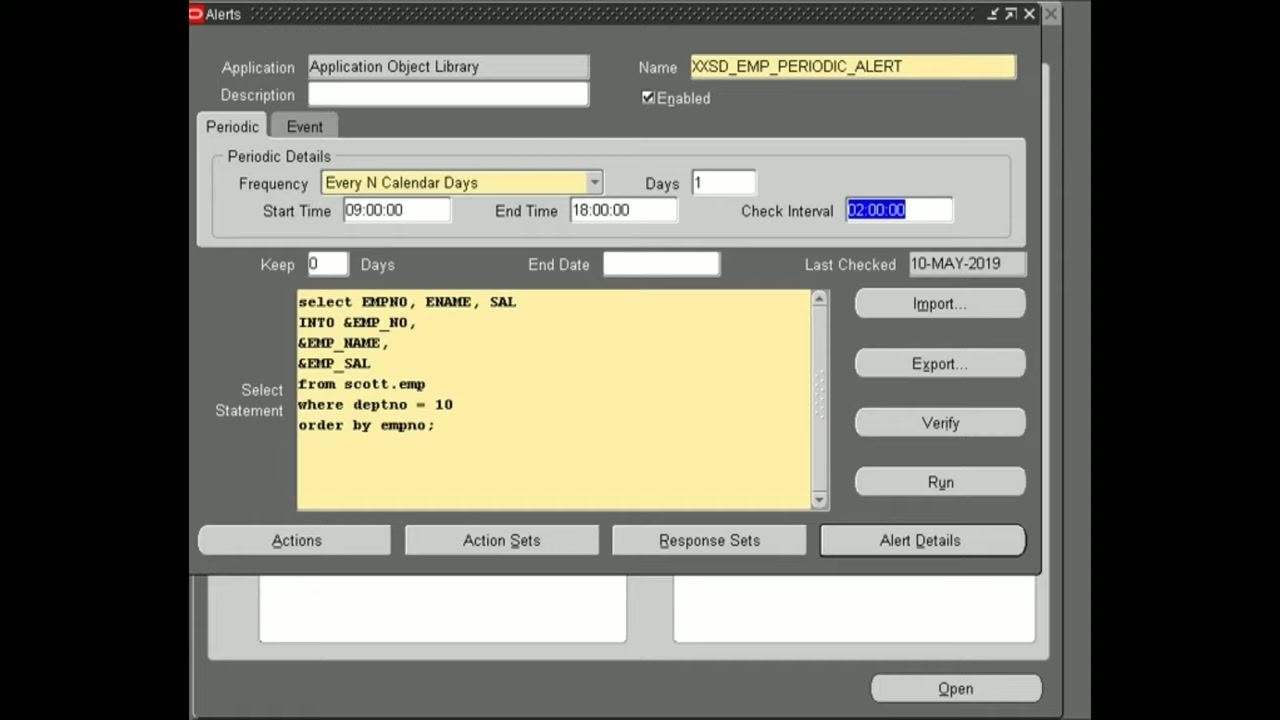
- Check Interval: set how often the alert checks for data, for example "02:00:00" for every 2 hours.
- SQL Select Statement: enter the query that defines the alert's logic, for example
select EMPNO, ENAME, SAL from scott.emp where deptno = 10 order by empno; - Enabled: check this box to activate the alert.
- Keep and End Date: optionally set these if the alert should expire after a certain point.
- Last Checked: review this date to see when the alert last ran.
Example configuration
The following values illustrate a working periodic alert setup:
- Application: Application Object Library
- Name: XXSD_EMP_PERIODIC_ALERT
- Frequency: Every N Calendar Days
- Days: 1
- Start Time: 09:00:00
- End Time: 18:00:00
- Check Interval: 02:00:00
- SQL Statement:
select EMPNO, ENAME, SAL into &EMP_NO, &EMP_NAME, &EMP_SAL from scott.emp where deptno = 10 order by empno; - Enabled: Checked
- Last Checked: 10-MAY-2019
Once configured this way, the alert logic runs at the intervals you define and captures the required data automatically.
Copy the alert name
In the alert definition window, copy the name of your alert, for example XXSD_EMP_PERIODIC_ALERT. You will need this name when submitting the alert request. Once copied, close the alert definition window.
Submit the alert request
Open the Request Periodic Alert Check window and confirm the following fields are populated:
- Application: Application Object Library
- Alert: XXSD_EMP_PERIODIC_ALERT
Set the Start Date using the calendar widget, for example 19-MAY-2019, and set the Request Time, for example 1:00 AM. Click OK to confirm the date and time, then click Submit Request to submit the alert for scheduling.
Verify the alert request status
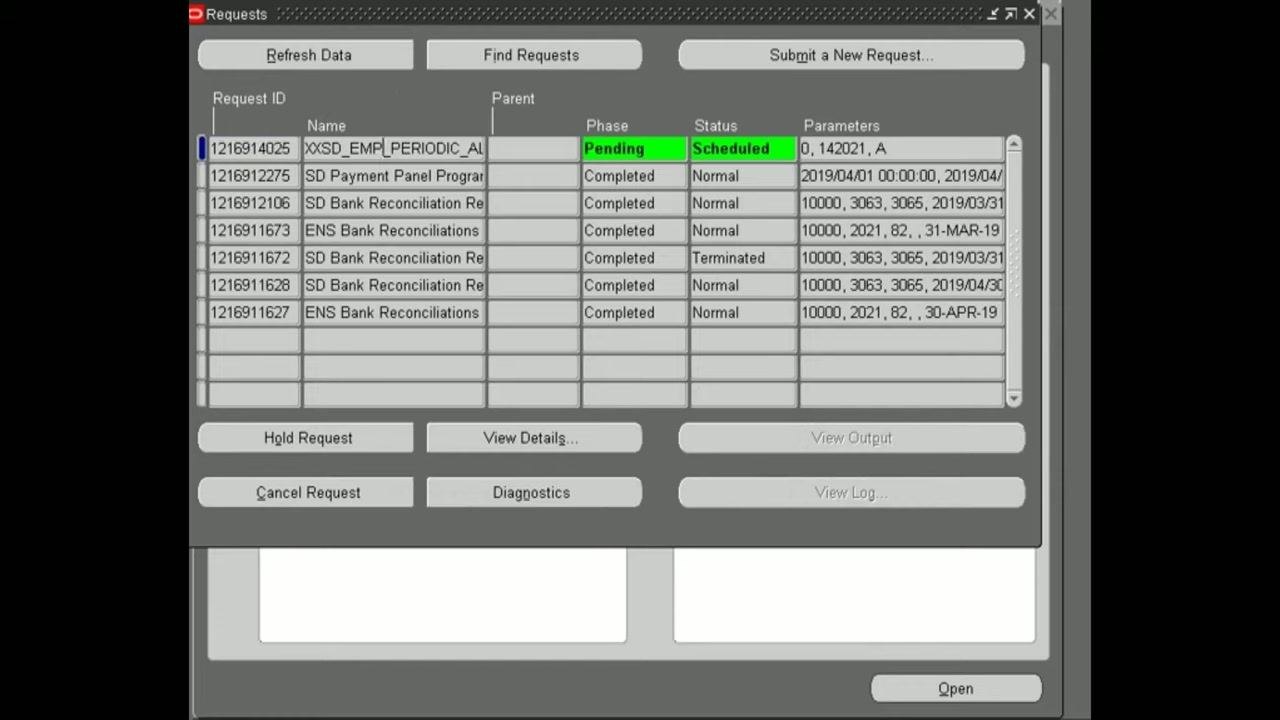
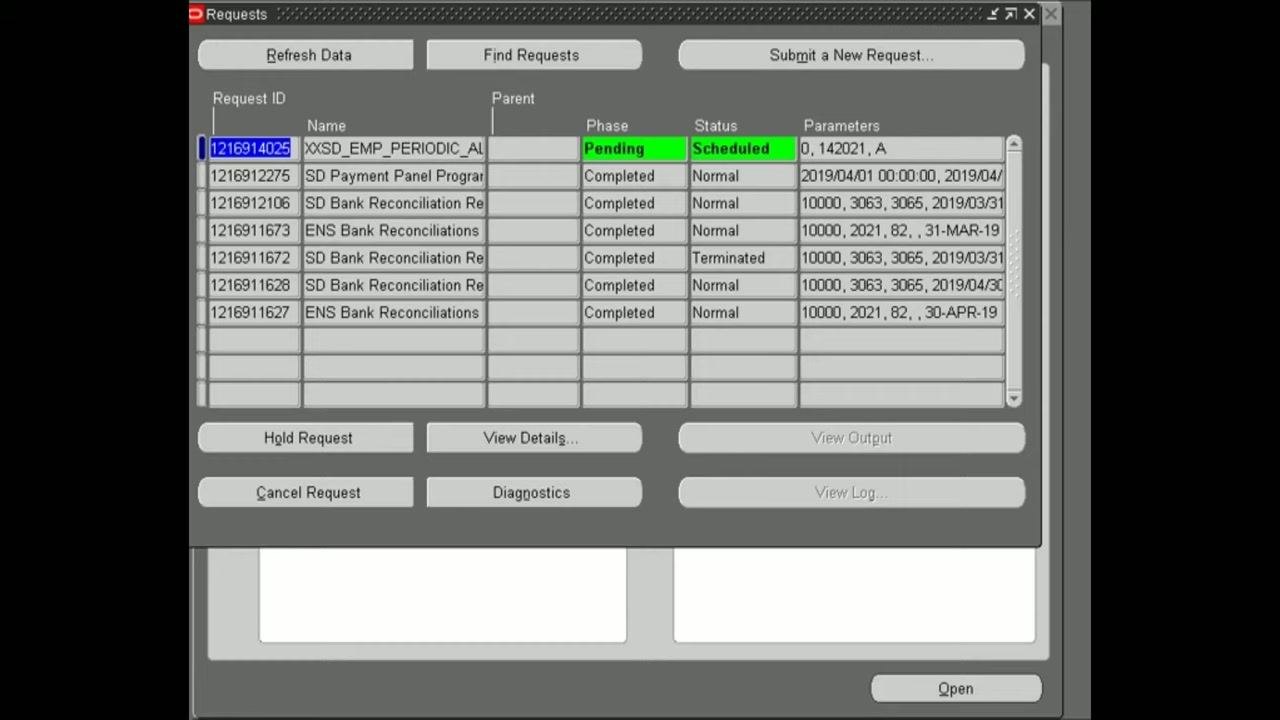
Navigate to the Requests window and locate your alert request by name, for example XXSD_EMP_PERIODIC_ALERT. Confirm that the Phase shows "Pending" and the Status shows "Scheduled," highlighted in green. This confirms the alert is queued and ready for scheduling.
Set the recurring schedule
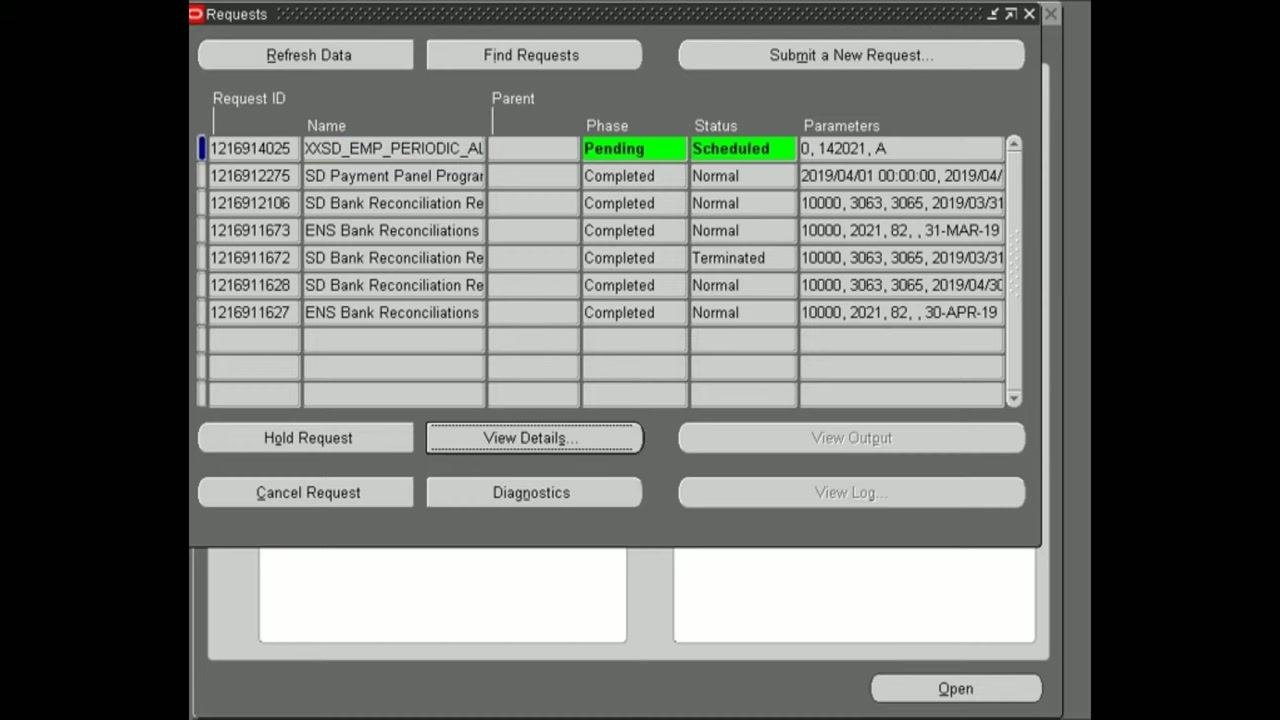
Select your alert request and click View Details. In the details window, go to the Schedule section and choose Periodically under "Run the Job." Configure the following:
- Start At: set the date and time, for example 19-MAY-2019 13:40:00.
- End At: leave blank to allow the alert to run indefinitely.
- Re-run every: enter the frequency, for example 4 hours.
- Choose whether the interval applies from the start or completion of the prior run. The default is "From the Completion of the prior run."
Click OK to save the schedule.
Confirm the scheduling warning
If a caution message appears stating that you have selected a schedule without an end date and that the request will be resubmitted until cancelled, click OK to confirm. This ensures the alert continues running at the specified interval until you manually stop it.
Refresh and confirm the scheduled alert
Return to the Requests window and click Refresh Data to update the status. Verify that your periodic alert remains in the list with Phase as "Pending" and Status as "Scheduled." This confirms your periodic alert is now scheduled and will trigger as configured.
Review the scheduled alert details
Open the Requests window and locate your periodic alert request by name, for example XXSD_EMP_PERIODIC_ALERT. Confirm the following details:
- Phase: "Pending"
- Status: "Scheduled," highlighted in green
- Request ID: for example, 1216914026
- Parameters: for example,
0, 142021, A
This confirms that the alert is successfully scheduled and will execute at the defined interval.
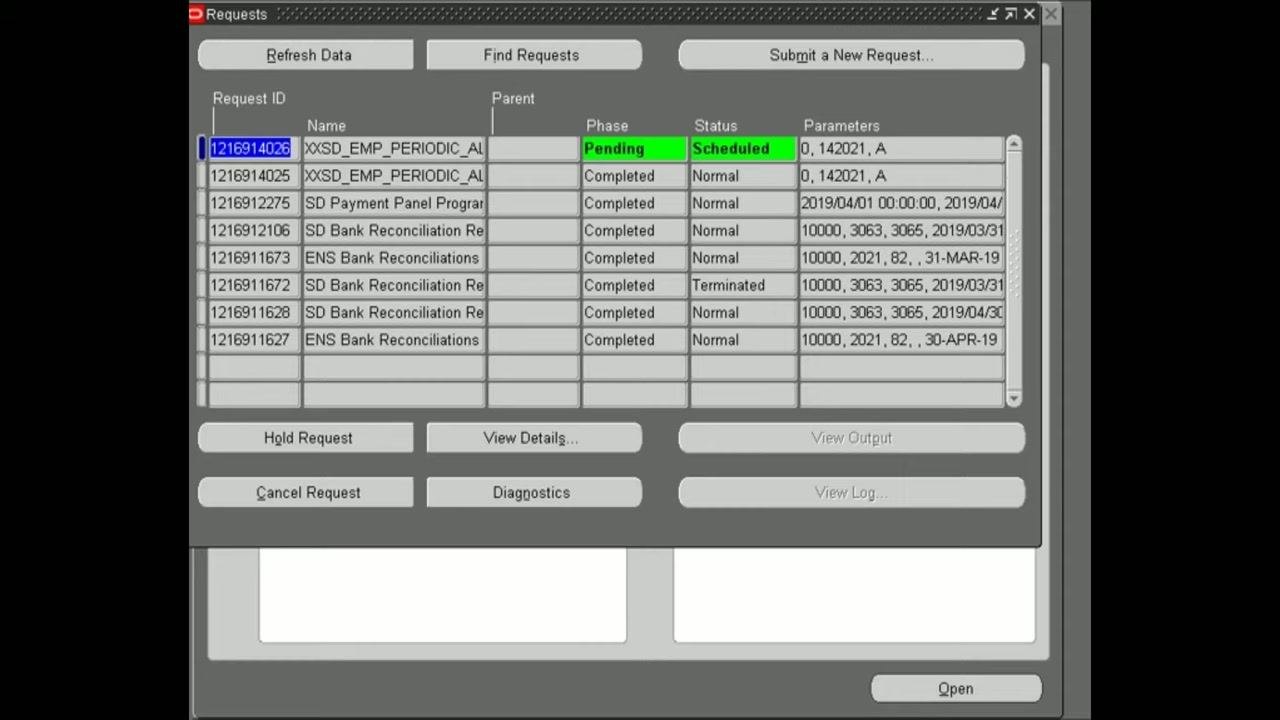
The alert runs periodically based on the frequency you configured, for example every 4 hours. The Start Time or Schedule Time appears in the request details, and the Requests window automatically calculates and displays the next scheduled execution time so you can verify when the alert will fire next.
What's next
Once your periodic alert is running, keep the following practices in mind:
- Regularly monitor the Requests window to confirm your scheduled alerts are running as expected.
- To stop an alert, use the Cancel Request button in the Requests window.
- To modify an existing schedule, select the alert, use View Details, and adjust the frequency or end date as needed.
By following these steps, you have successfully created and scheduled a periodic alert in Oracle EBS that runs at a defined interval, with no end date specified, and will continue to execute until you choose to cancel or modify it.
Generation details: cost, quality tiers
Docsie billed 2,500 credits ($1.75) to analyze this 5-minute video at standard quality. The rewrite, template fill and Word/PDF exports were included. The same video at each quality tier:
| Quality | Frames sampled | Credits | Approx. cost |
|---|---|---|---|
| Draft | every 16-30 s | 1,250 | $0.88 |
| Standard (this guide) | every 8-15 s | 2,500 | $1.75 |
| Detailed | every 4-7 s | 5,000 | $3.50 |
| Ultra | every 1-3 s | 10,000 | $7.00 |
Credits priced at $0.70 per 1,000; plans include a monthly allowance. Enterprise customers on on-premise or bring-your-own-model deployments run this on their own inference and pay no per-video credits.
Generated by Docsie Video-to-Docs on 2026-10-14 from a 4-minute video. Screenshots are frames from the source video and belong to their creator, Tech Shooter, whose original is embedded above. If you own this video and want the guide removed or credited differently, contact us and we will act within one business day.