
How to Create a Value Set in Oracle EBS
Value sets in Oracle E-Business Suite define the list of valid values that can be entered into a field, along with formatting and validation rules. This guide walks you through how to create a value set in Oracle EBS, using the System Administrator responsibility, from accessing the Navigator through saving and closing the configuration.
Video: EBS Essentials Creating Value Sets by Omkar Dhekne. All credit for the demonstration goes to the creator; watch the original on YouTube. The written guide below was generated from this video by Docsie. Creator? Request a change or removal.
Value sets in Oracle E-Business Suite define the list of valid values that can be entered into a field, along with formatting and validation rules. This guide walks you through how to create a value set in Oracle EBS, using the System Administrator responsibility, from accessing the Navigator through saving and closing the configuration.
Prerequisites
- Access to Oracle E-Business Suite with a valid user login.
- The System Administrator responsibility assigned to your user account.
- Familiarity with the required field values for the value set you plan to create (name, description, format, and validation type).
Access Oracle Applications forms
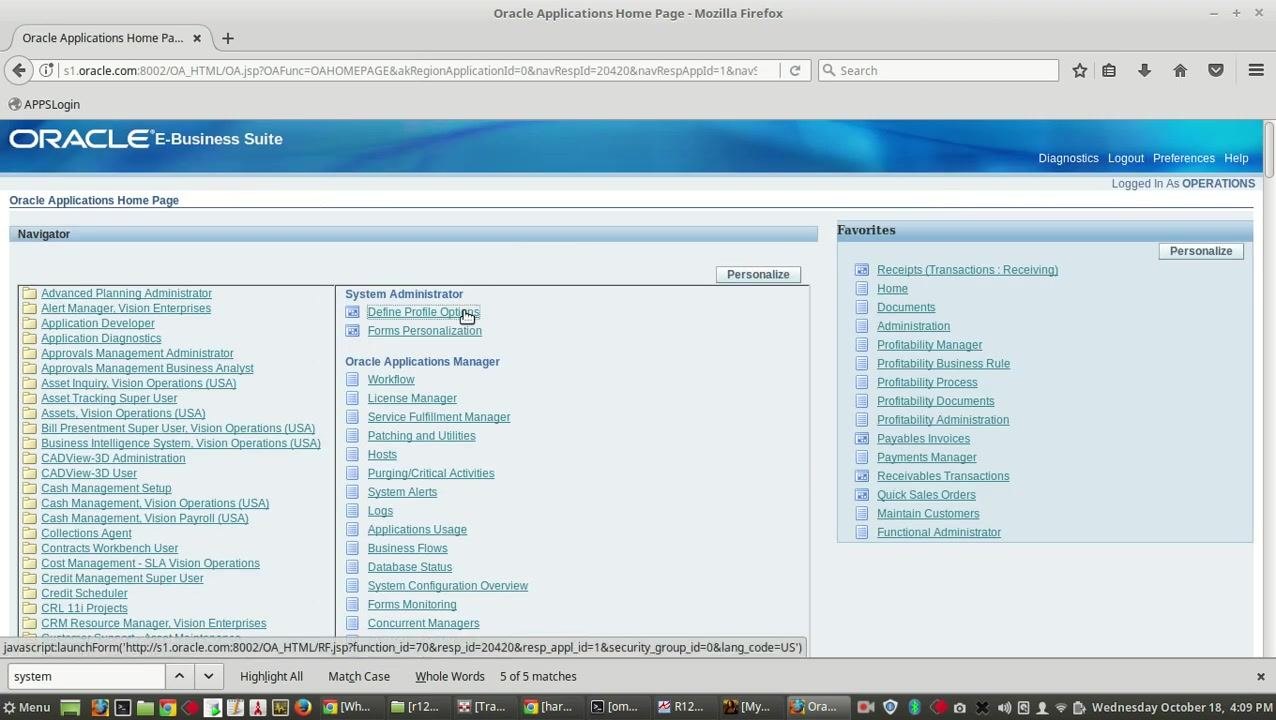
Open a web browser and navigate to the Oracle Applications Home Page. Confirm that you are logged in as the correct user (for example, "Logged In As OPERATIONS"). The dashboard displays two panels: Navigator on the left and Favorites on the right.
In the Navigator panel, locate the list of available responsibilities. Use the search bar or scroll through the list to find System Administrator.
Select the System Administrator responsibility
Click System Administrator in the Navigator panel. The right panel updates to show related options, such as Define Profile Options and Forms Personalization. Confirm that the System Administrator section is expanded and visible before continuing.
Launch Oracle Applications forms
Click a menu item, such as Define Profile Options, to launch Oracle Applications Forms. Wait for the Oracle Applications splash screen to appear, which indicates that the forms are loading.
Once the forms application finishes loading, the NAVIGATOR window appears. It contains tabs for Functions, Documents, and Processes. The Functions tab is active by default, showing a blank list on the left and a Top Ten List on the right. The Oracle Applications logo may still be visible while the application finishes loading.
Open the Value Sets window
In the Oracle Applications interface, navigate to Application > Validation > Set. The Value Sets window opens, ready for data entry. The form includes fields for Value Set Name, Description, List Type, Security Type, Format Validation, and Value Validation.
Review value set attribute definitions
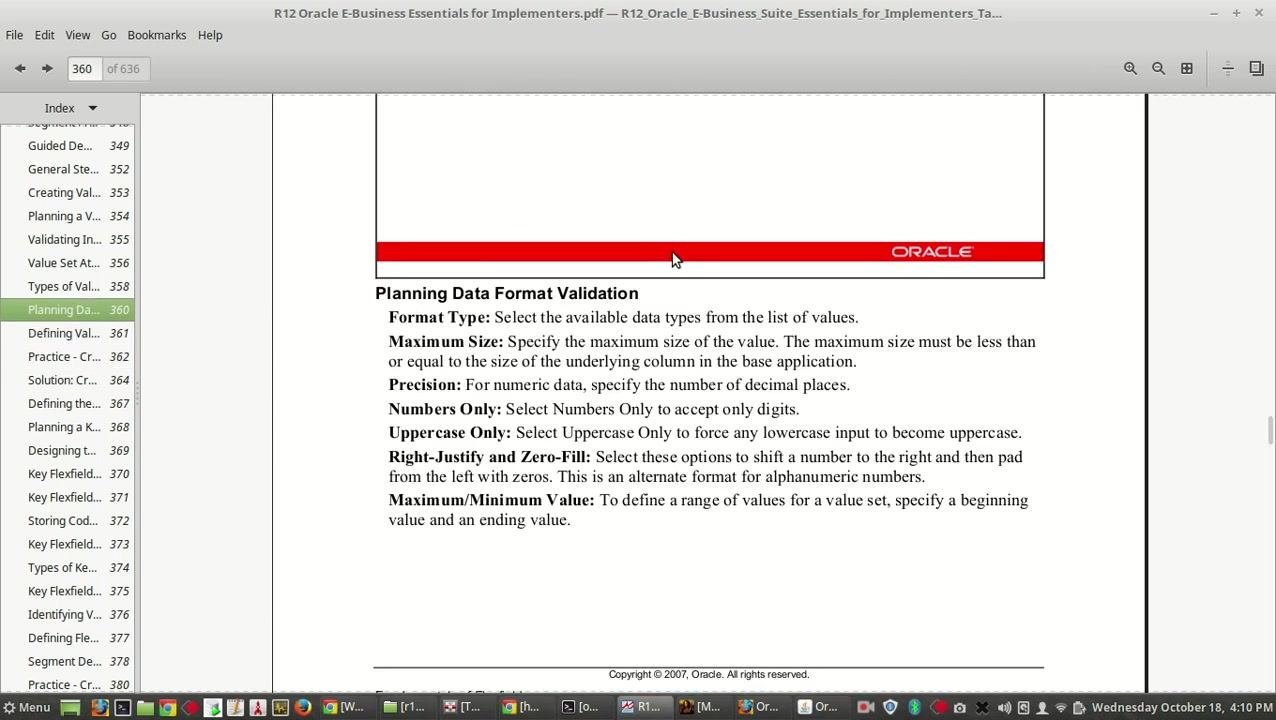
Before entering data, review the key attributes that govern how a value set behaves:
- Name: A unique value set name. Do not use prefixes such as XX-, XX_, XXX-, XXX_, or any Oracle-reserved name.
- Description: Free-form descriptive text.
- List Type: Choose from List of Values, Long List of Values, or Poplist.
- Security Type: Choose from No security, Hierarchical, or Non-hierarchical.
These definitions guide the values you enter into the Oracle application in the following steps.
Prepare the field values for your first value set
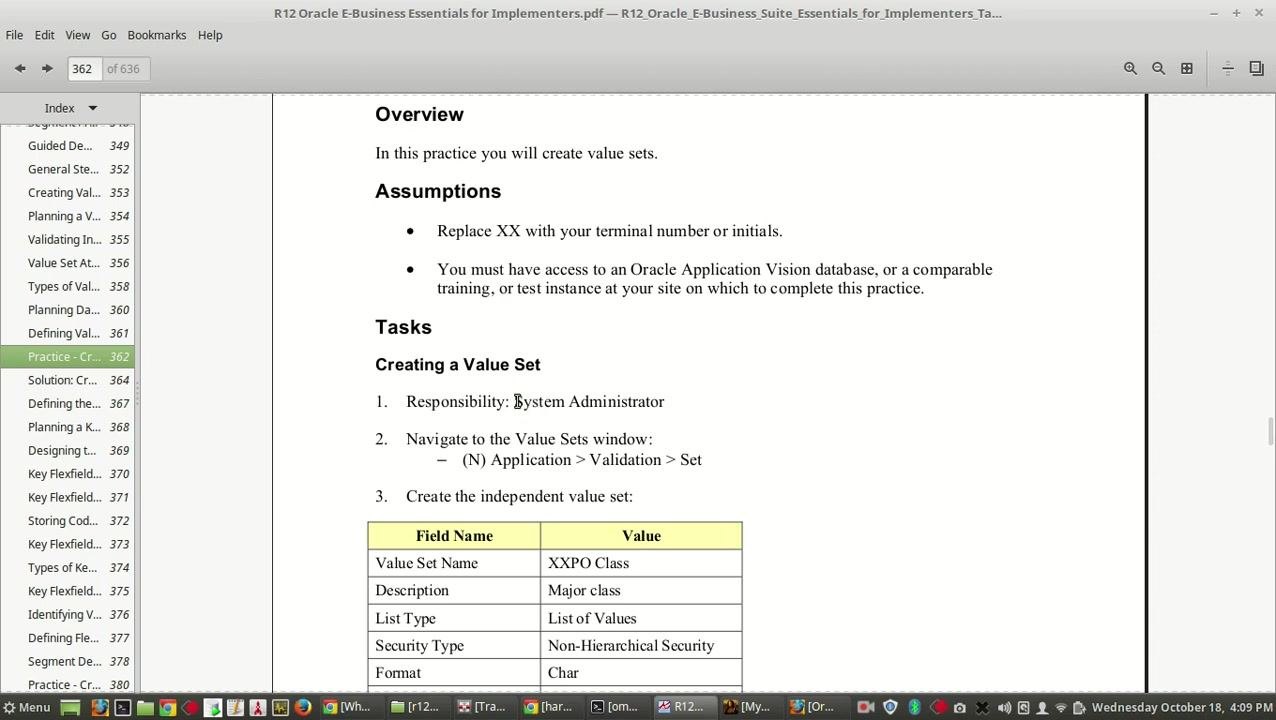
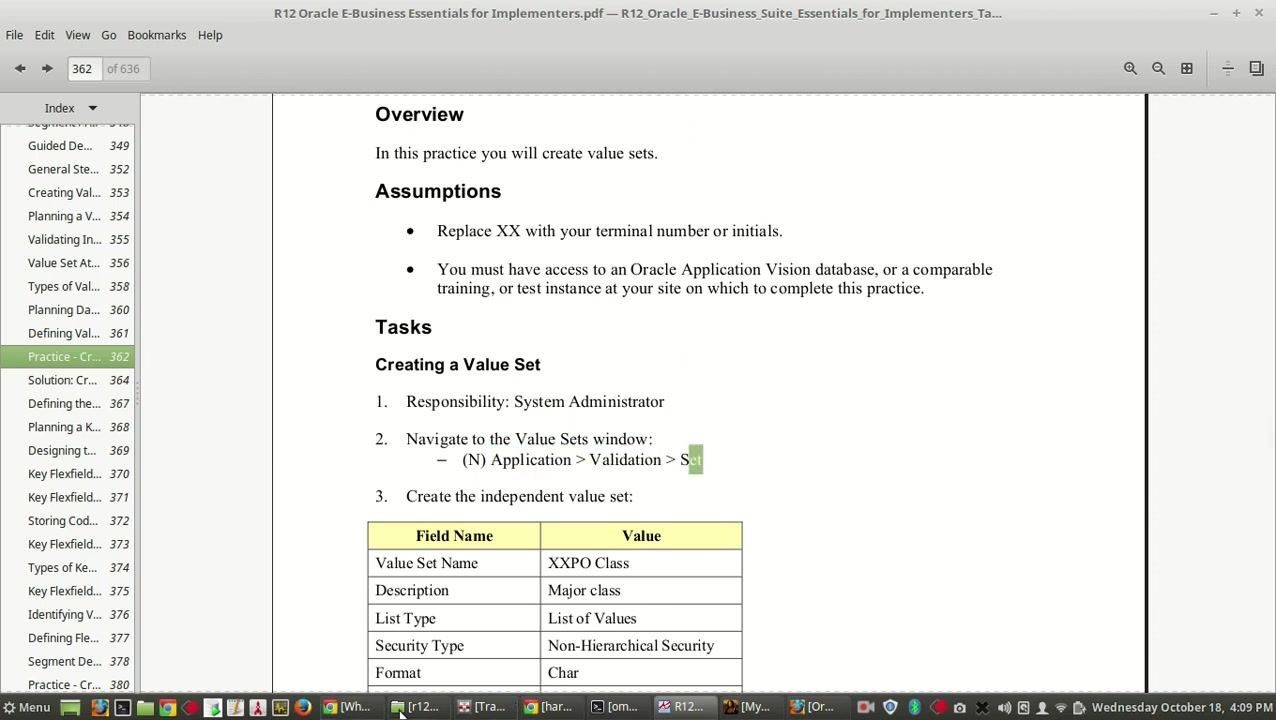
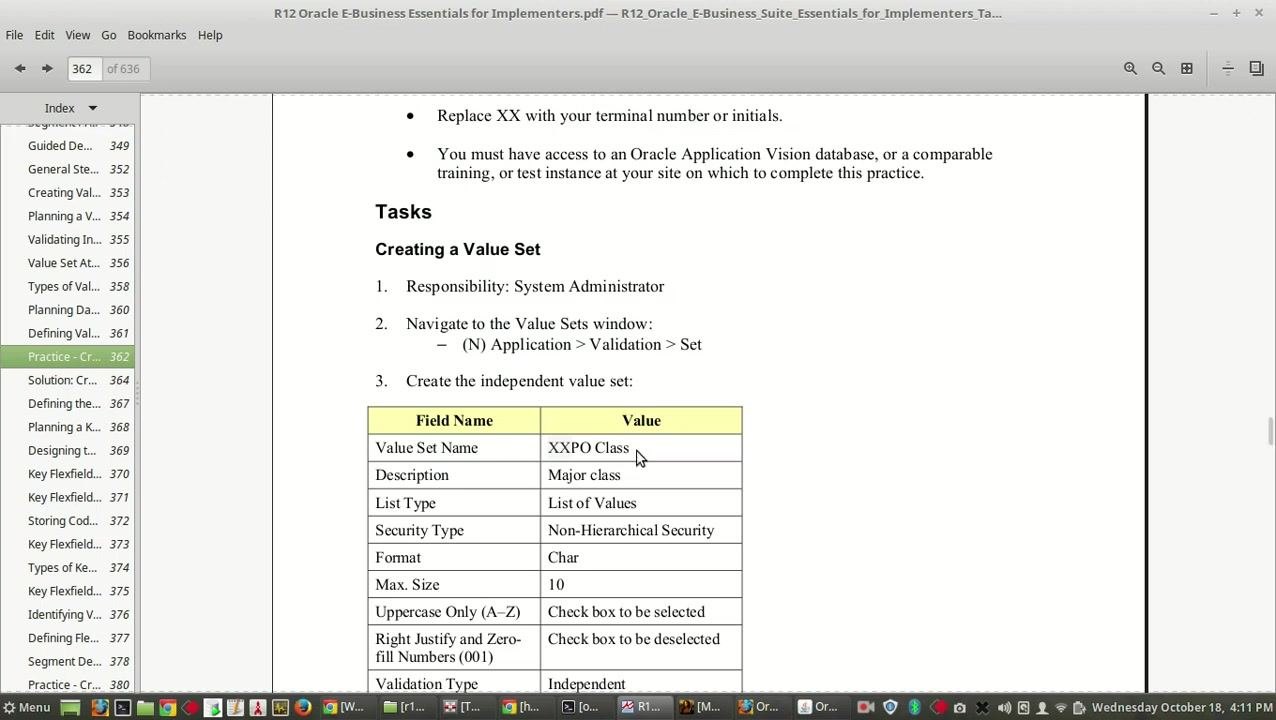
Before entering data, reference the required field values for the value set you are creating. For this example, under the System Administrator responsibility and the Application > Validation > Set navigation path, use the following values:
- Value Set Name: XXPO Class
- Description: Major class
- List Type: List of Values
- Security Type: Non-Hierarchical Security
- Format: Char
- Max. Size: 10
- Uppercase Only (A–Z): Checked
- Right Justify and Zero-Fill Numbers (001): Unchecked
- Validation Type: Independent
Keep this reference visible while you complete the next step.
Enter the value set details
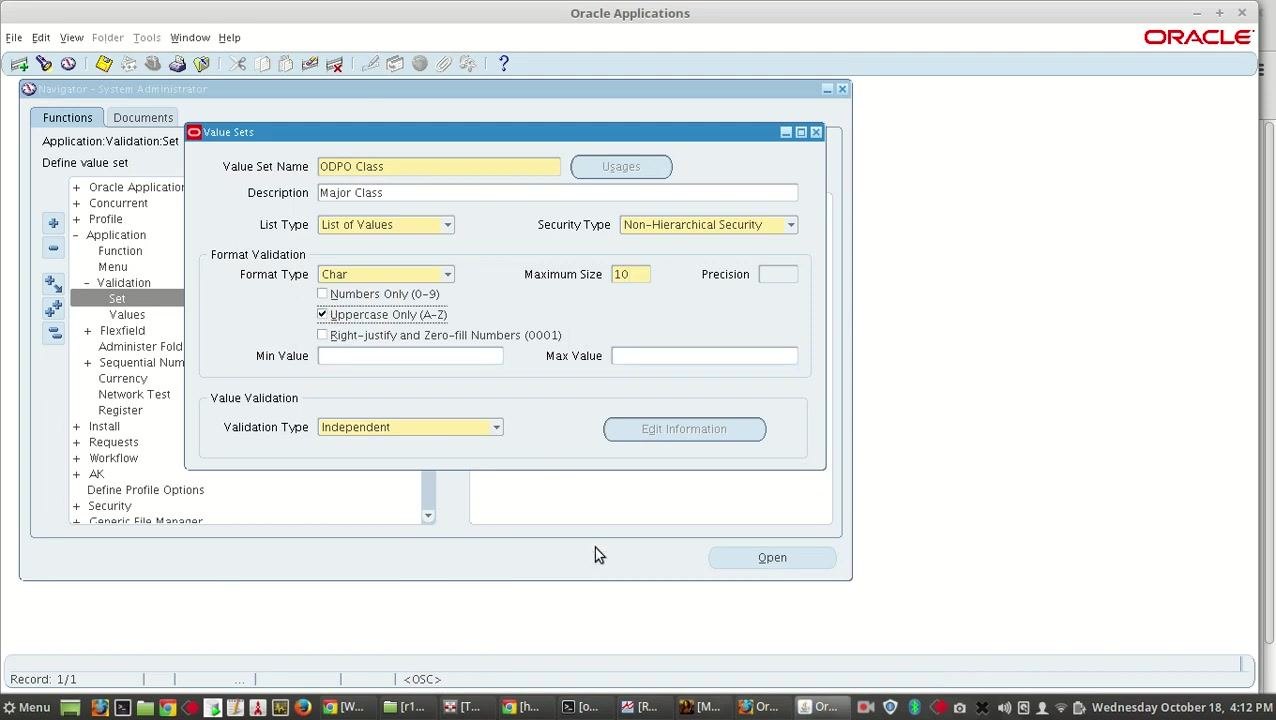
In the Value Sets form, enter the following values into the corresponding fields:
- Value Set Name: XXPO Class
- Description: Major class
- List Type: Select List of Values from the dropdown.
- Security Type: Select Non-Hierarchical Security from the dropdown.
- Format Type: Select Char from the dropdown.
- Maximum Size: Enter 10.
- Uppercase Only (A–Z): Check this box.
- Right-justify and Zero-fill Numbers (0001): Leave this box unchecked.
- Validation Type: Select Independent from the dropdown.
Do not enter values for Min Value, Max Value, or Precision unless specified.
Note: The screen capture for this step shows the Value Set Name entered as "ODPO Class." Use XXPO Class as specified in the reference table.
Verify and save the value set
Double-check all entered values against the reference table. Confirm that:
- Uppercase Only (A–Z) is checked.
- Right-justify and Zero-fill Numbers (0001) is unchecked.
- All dropdowns and text fields match the required values.
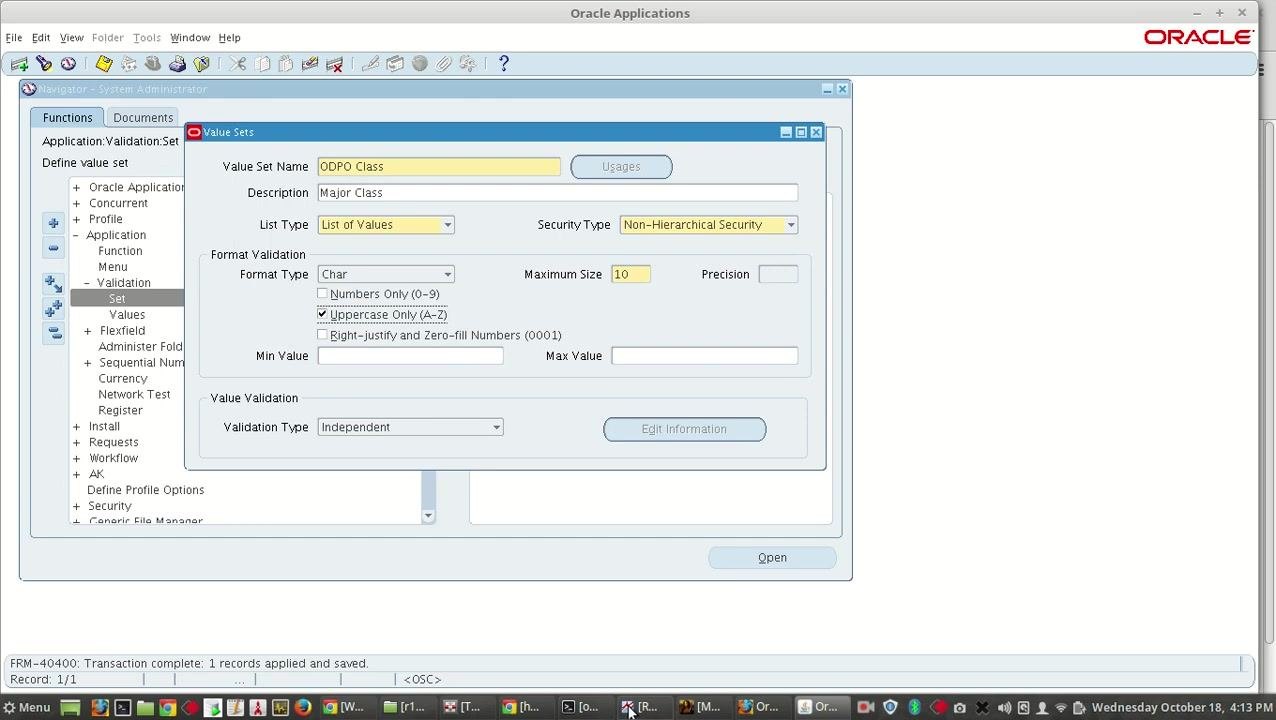
Save the record. A confirmation message appears at the bottom of the screen:
FRM-40400: Transaction complete: 1 records applied and saved.
The form is now ready for you to create additional value sets or continue with further configuration.
Prepare the field values for a dependent value set
To create a second, dependent value set, reference the following required configuration:
- Value Set Name: XXPO Subclass
- Description: Sub class
- List Type: List of Values
- Security Type: Non-Hierarchical Security
- Format: Char
- Maximum Size: 10
- Uppercase Only (A–Z): Selected
- Right Justify and Zero-fill Numbers (001): Deselected
- Validation Type: Dependent
For the Edit Information step, you will also need:
- Independent Value Set Name: XXPO Class
- Value: NONE
- Description: None
Enter the subclass value set details
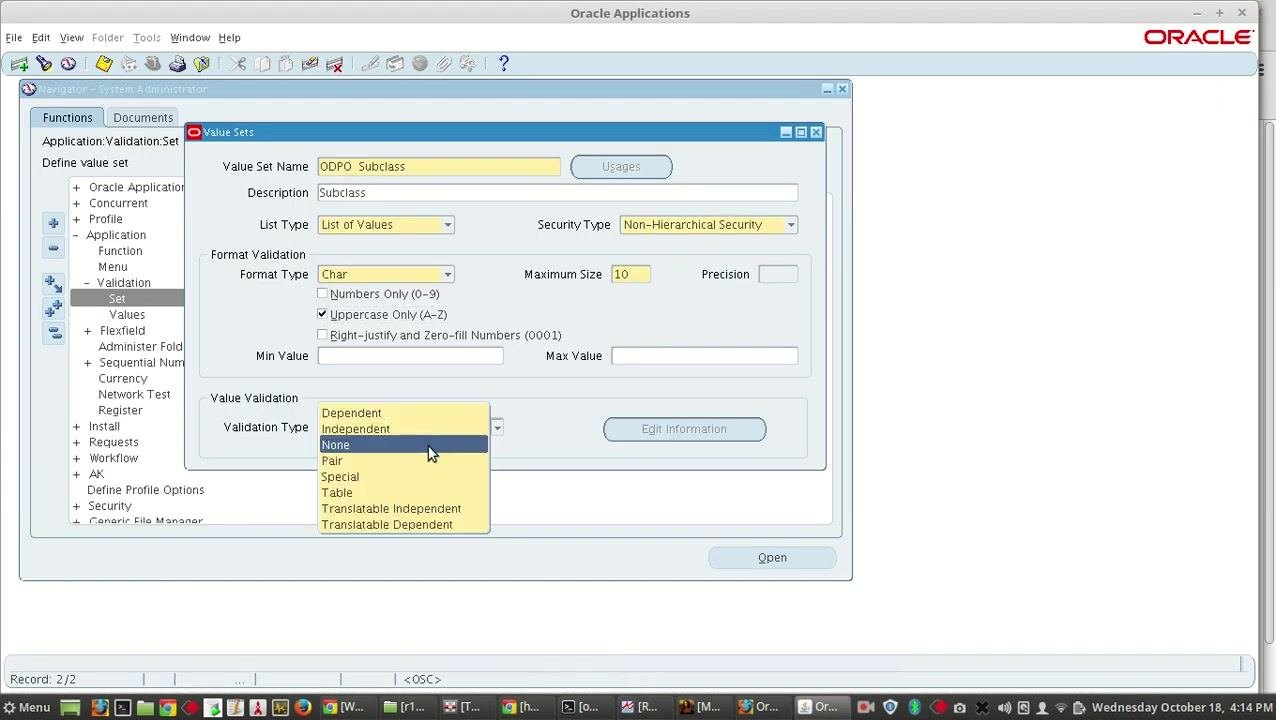
In the Value Sets form, fill in the following fields:
- Value Set Name: Enter XXPO Subclass.
- Description: Enter Subclass.
- List Type: Select List of Values from the dropdown.
- Security Type: Click the dropdown and select Non-Hierarchical Security.
Continue completing the remaining fields:
- Format Type: Select Char.
- Maximum Size: Enter 10.
- Precision: Leave blank.
- Numbers Only (0–9): Leave unchecked.
- Uppercase Only (A–Z): Check this box.
- Right-justify and Zero-fill Numbers (0001): Leave unchecked.
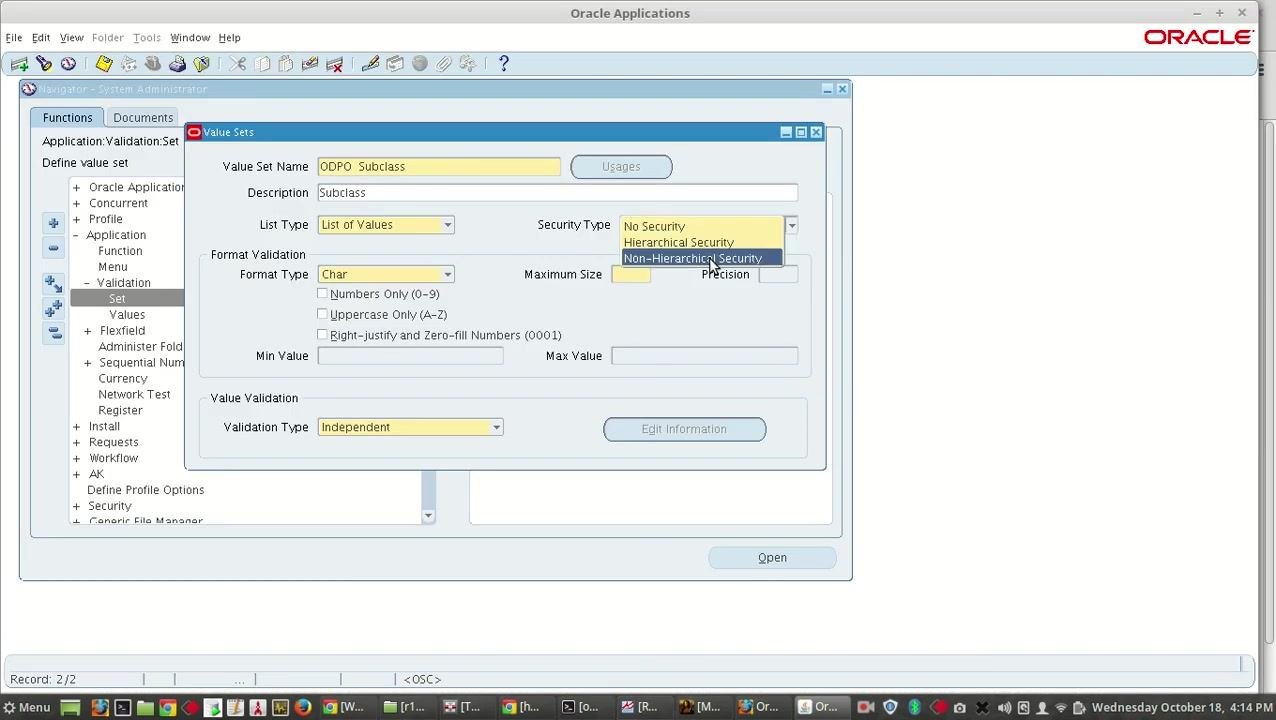
Set the validation type to Dependent
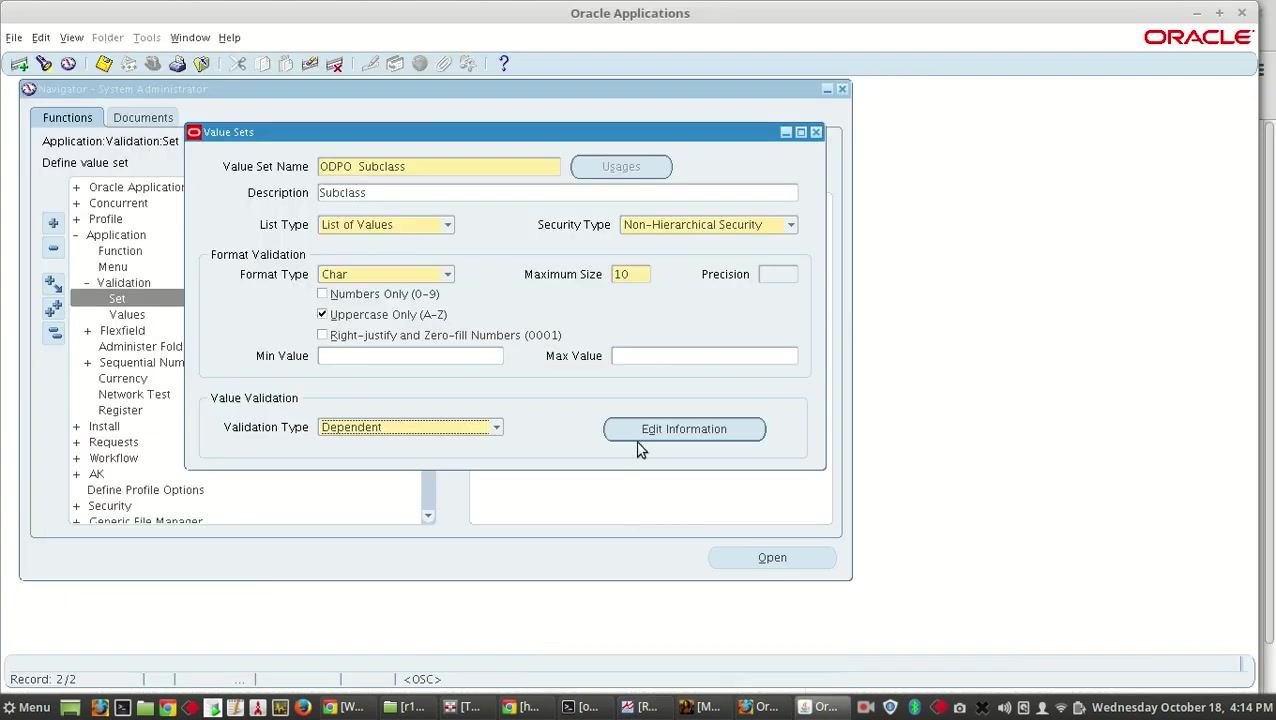
In the Value Validation section, click the Validation Type dropdown and select Dependent from the list of options, which also includes Independent, None, Pair, Special, Table, Translatable Independent, and Translatable Dependent.
Edit the dependent value set information
With Validation Type set to Dependent, click Edit Information.
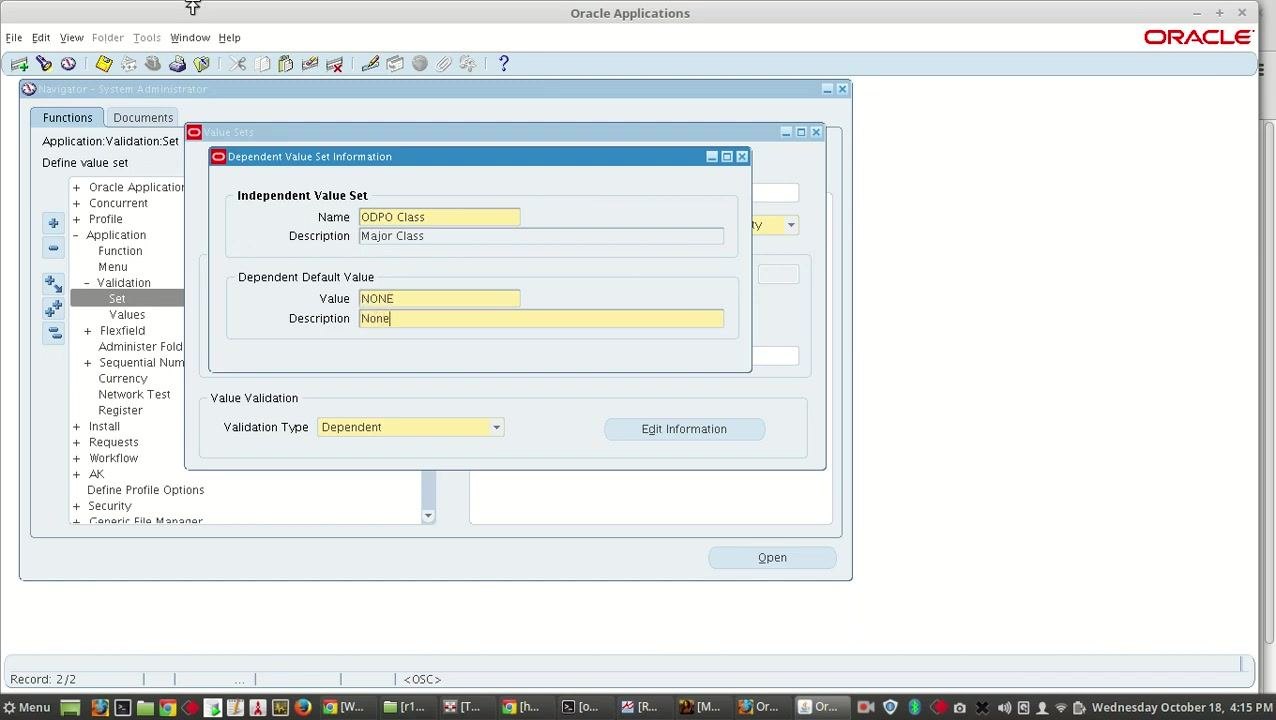
In the Dependent Value Set Information window, fill in the following:
- Independent Value Set Name: Enter XXPO Class.
- Independent Value Set Description: Enter Major Class.
- Dependent Default Value: Enter NONE.
- Dependent Default Value Description: Enter None.
Save the value set configuration
In the Value Sets form, verify that all fields are correctly filled:
- Value Set Name: XXPO Subclass
- Description: Subclass
- List Type: List of Values
- Security Type: Non-Hierarchical Security
- Format Type: Char
- Maximum Size: 10
- Uppercase Only (A–Z): Checked
- Validation Type: Dependent
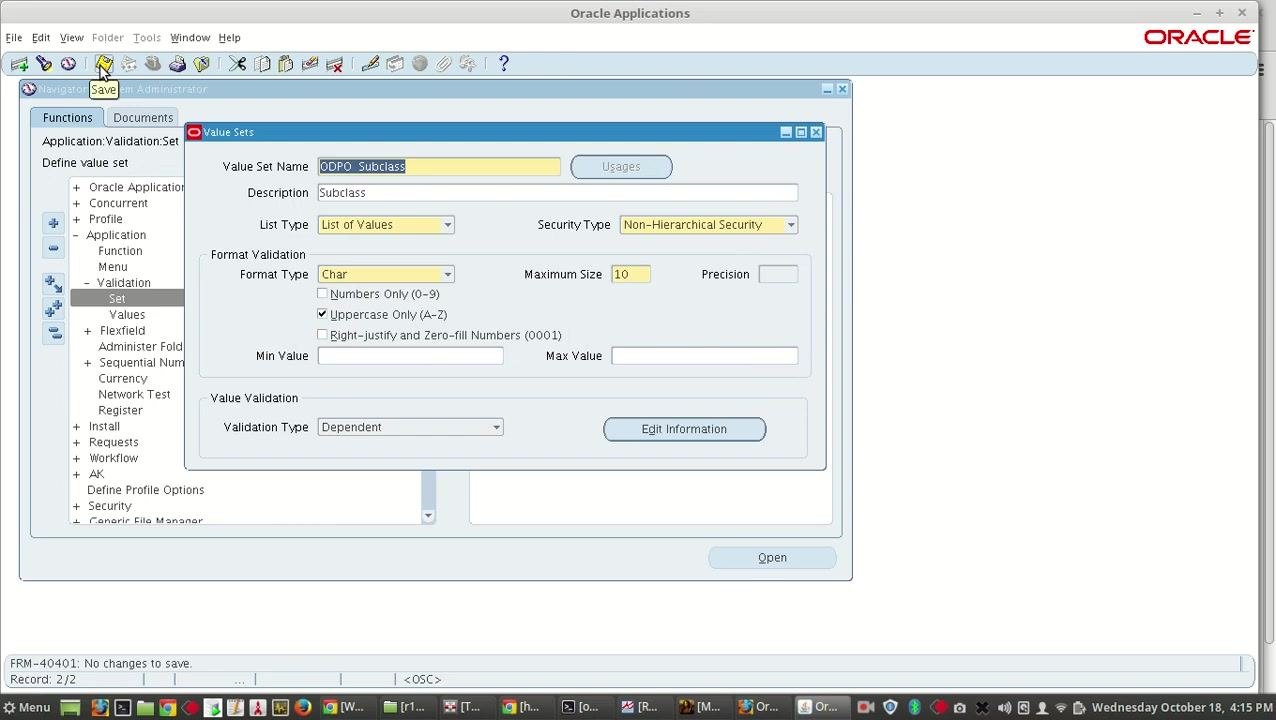
Click the Save icon (floppy disk) in the toolbar at the top of the Oracle Applications window. Confirm that the status bar at the bottom displays:
FRM-40401: No changes to save.
This message indicates that your changes have already been saved successfully. The environment remains in the Navigator – System Administrator window, with the Value Sets form open and no error messages or warnings visible.
Close the Value Sets form
After saving, close the Value Sets form by clicking the close button (red X) in the upper right corner of the form window. The main Navigator – System Administrator window remains open, displaying the menu tree and the Top Ten List panel. The Set menu item under Validation remains selected in the left navigation pane.
What's next
With your value sets created and saved, you can assign them to the relevant flexfield segments or key flexfields where they are needed. You can also return to Application > Validation > Set at any time to review, edit, or create additional value sets using the same process.
Generation details: cost, quality tiers
Docsie billed 4,000 credits ($2.80) to analyze this 8-minute video at standard quality. The rewrite, template fill and Word/PDF exports were included. The same video at each quality tier:
| Quality | Frames sampled | Credits | Approx. cost |
|---|---|---|---|
| Draft | every 16-30 s | 2,000 | $1.40 |
| Standard (this guide) | every 8-15 s | 4,000 | $2.80 |
| Detailed | every 4-7 s | 8,000 | $5.60 |
| Ultra | every 1-3 s | 16,000 | $11.20 |
Credits priced at $0.70 per 1,000; plans include a monthly allowance. Enterprise customers on on-premise or bring-your-own-model deployments run this on their own inference and pay no per-video credits.
Generated by Docsie Video-to-Docs on 2026-10-12 from a 7-minute video. Screenshots are frames from the source video and belong to their creator, Omkar Dhekne, whose original is embedded above. If you own this video and want the guide removed or credited differently, contact us and we will act within one business day.