
How to Create a Purchase Order in NetSuite
This guide walks you through how to create a purchase order in NetSuite, from opening the entry form to entering vendor details, item information, billing terms, and final submission. Follow each step in order to ensure all mandatory fields are completed correctly.
Video: NetSuite | Create Purchase Order In by trustangle Ltd (2021). All credit for the demonstration goes to the creator; watch the original on YouTube. The written guide below was generated from this video by Docsie. Creator? Request a change or removal.
This guide walks you through how to create a purchase order in NetSuite, from opening the entry form to entering vendor details, item information, billing terms, and final submission. Follow each step in order to ensure all mandatory fields are completed correctly.
Prerequisites
- You must be logged into your NetSuite account before starting.
- You should know the vendor, item(s), and department information you plan to enter on the purchase order.
Access the NetSuite home page
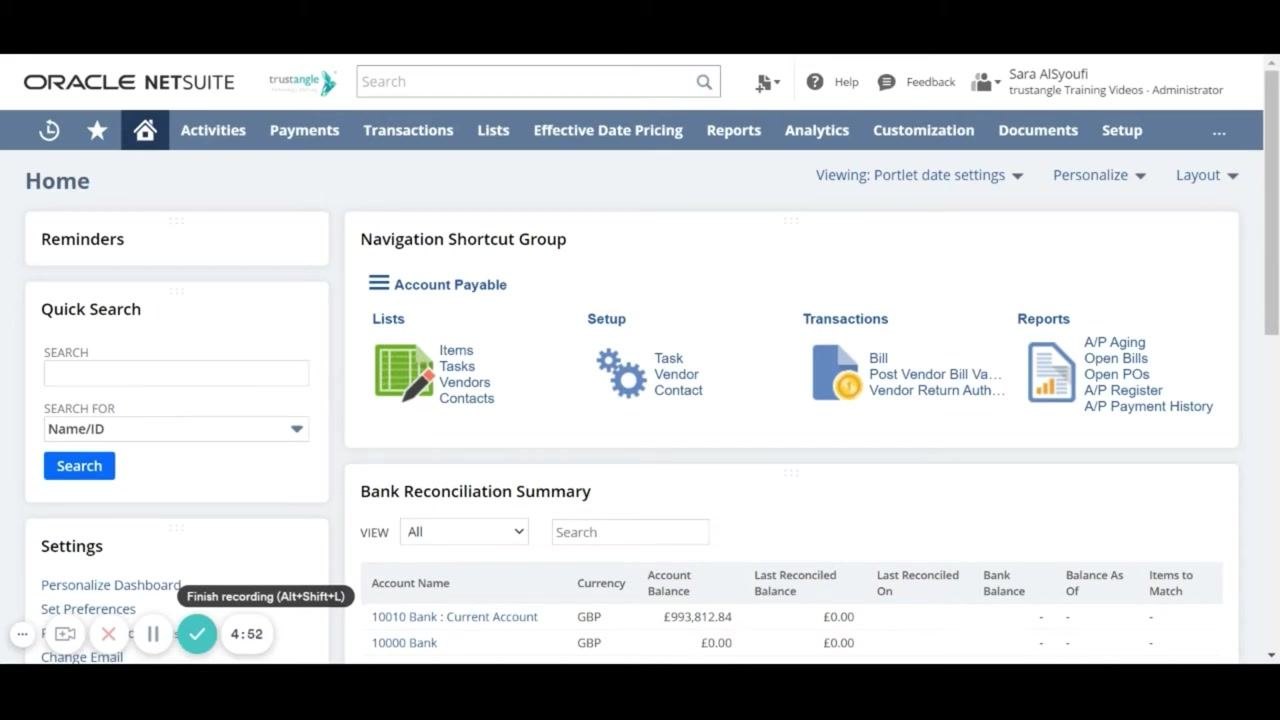
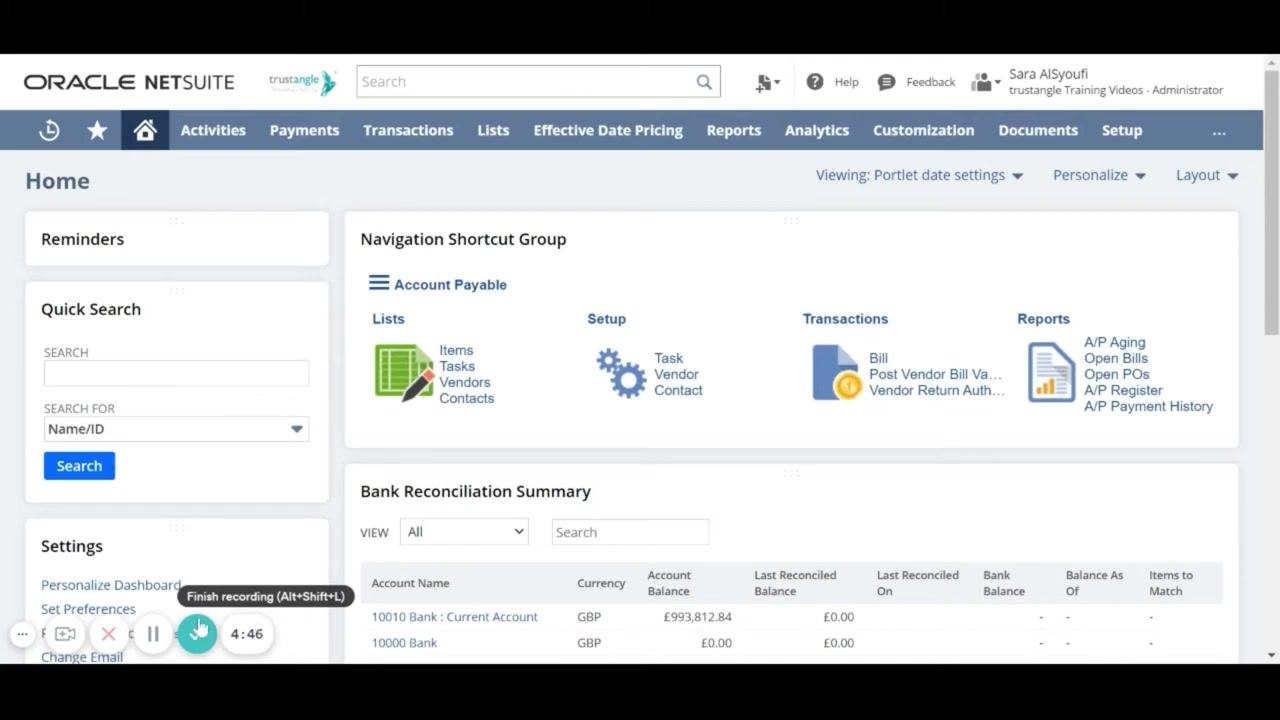
Log in to your NetSuite account to reach the home page. Here you'll find navigation menus at the top, including Activities, Payments, Transactions, Lists, Reports, and more. The left sidebar shows Reminders, Quick Search, and Settings, while the main area displays the Navigation Shortcut Group and Bank Reconciliation Summary.
Navigate to the purchase order entry screen
Hover over or click Transactions in the top navigation bar. From the dropdown, select Purchases/Vendors, then click Enter Purchase Orders in the next submenu.
Understand the purchase order page layout
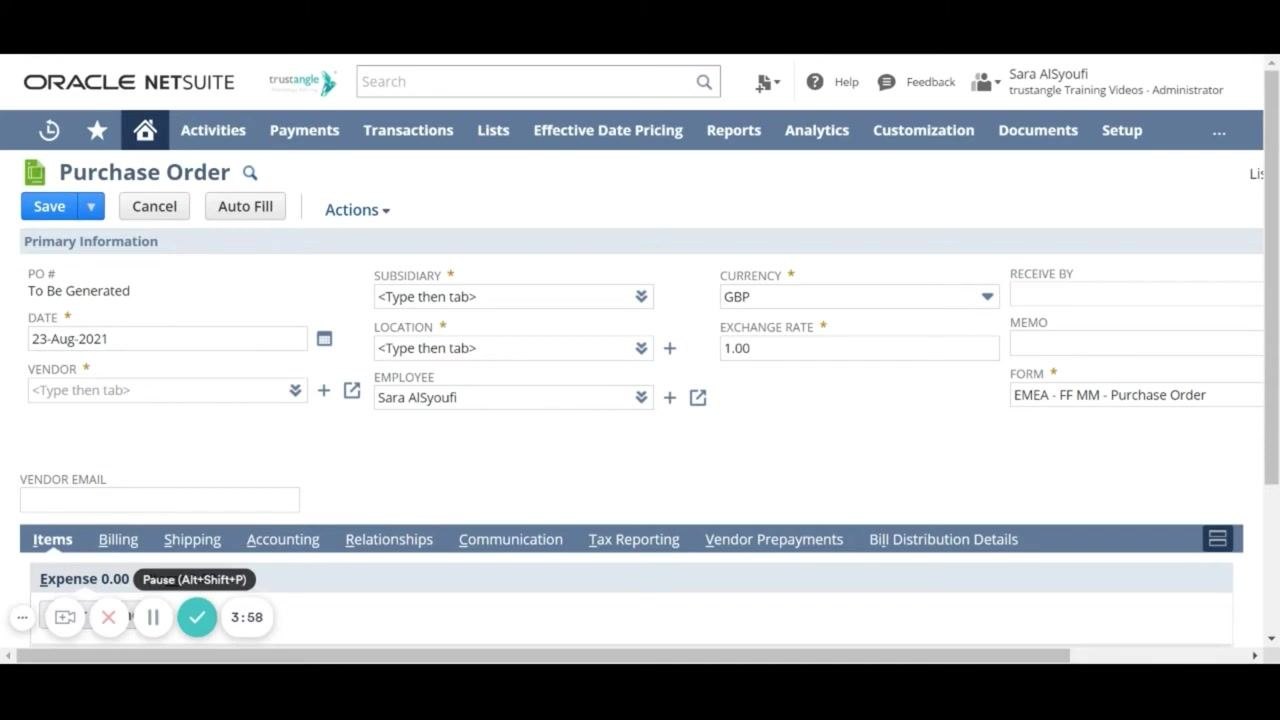
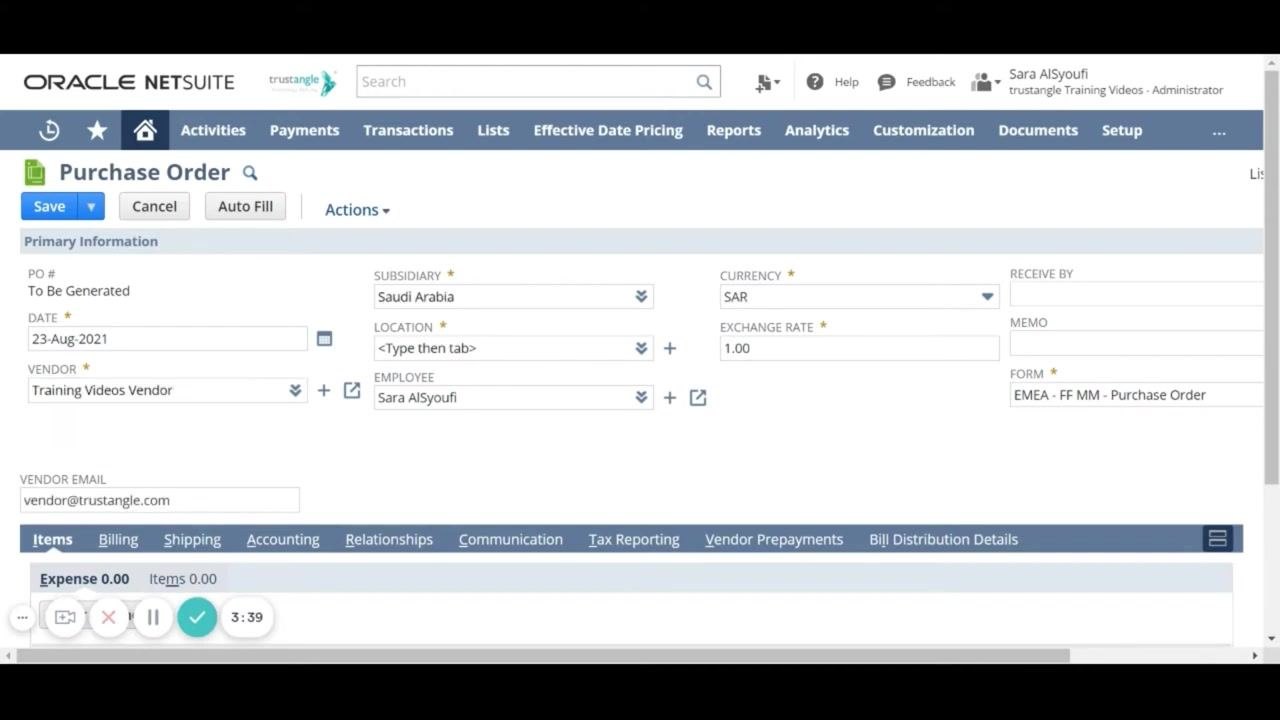
The Purchase Order entry form opens. Mandatory fields are marked with an asterisk (), and you must fill in all required fields before saving. Clicking any field label displays a description of that field. The PO #* field is set to "To Be Generated," meaning the system assigns the number automatically.
Set the purchase order date
The Date field is automatically populated with today's date (for example, 23-Aug-2021). You can type a different date or use the calendar picker to select another posting date if needed.
Select the vendor
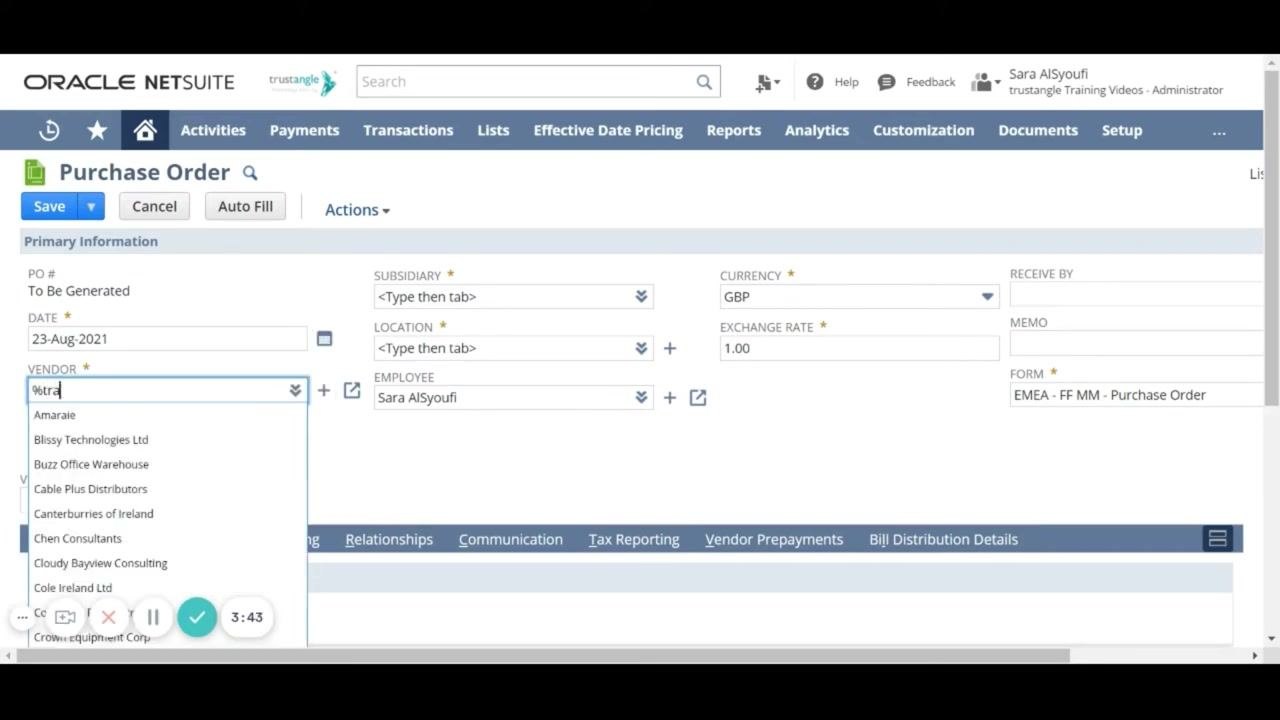
Click the Vendor field and start typing the vendor's name, or use a wildcard (for example, %tra) to search. A dropdown list of matching vendors appears—select the appropriate one from the list.
Review vendor information
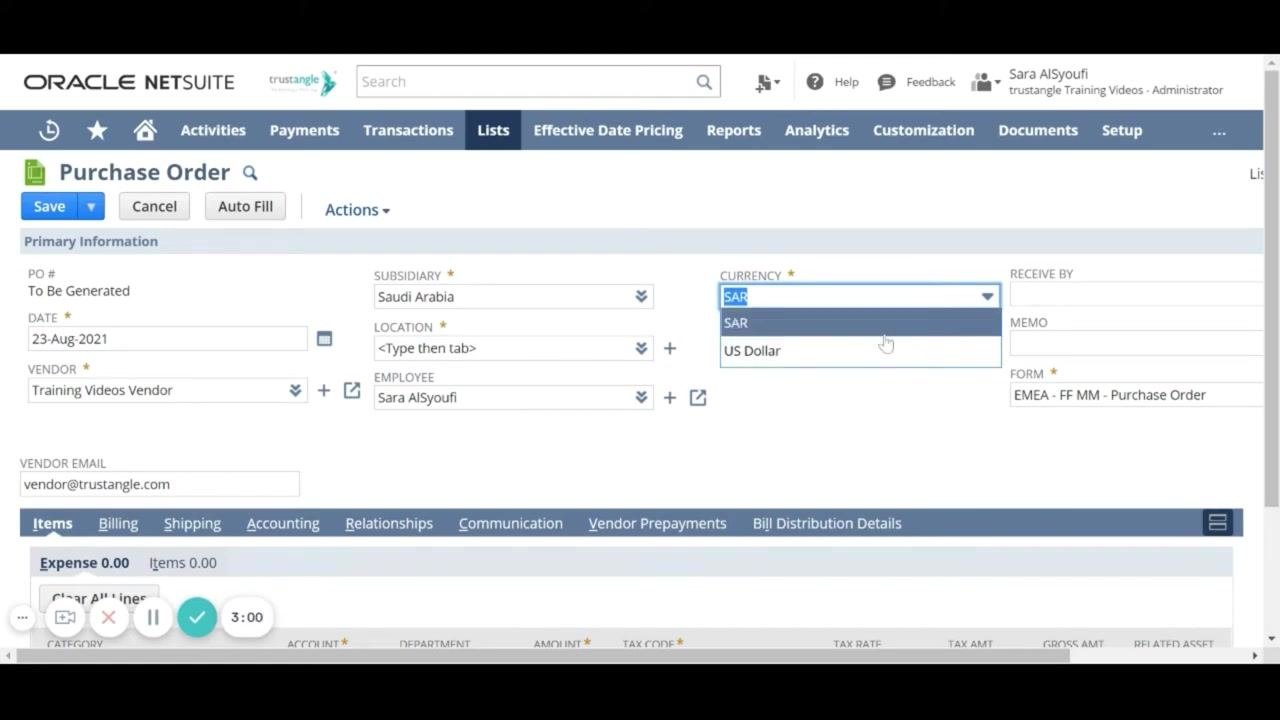
Once you select a vendor, related information such as vendor email, subsidiary, and currency populates automatically. For example, selecting "Training Videos Vendor" auto-fills Vendor Email as "vendor@trustangle.com," Subsidiary as "Saudi Arabia," and Currency as "SAR."
Choose the currency
The Currency field displays the default currency for the selected vendor. If the vendor has multiple currencies assigned, you can choose from the available options, such as SAR or US Dollar.
Select the subsidiary
The Subsidiary field is mandatory. Set it according to your organization's structure, for example, "Saudi Arabia."
Enter the location
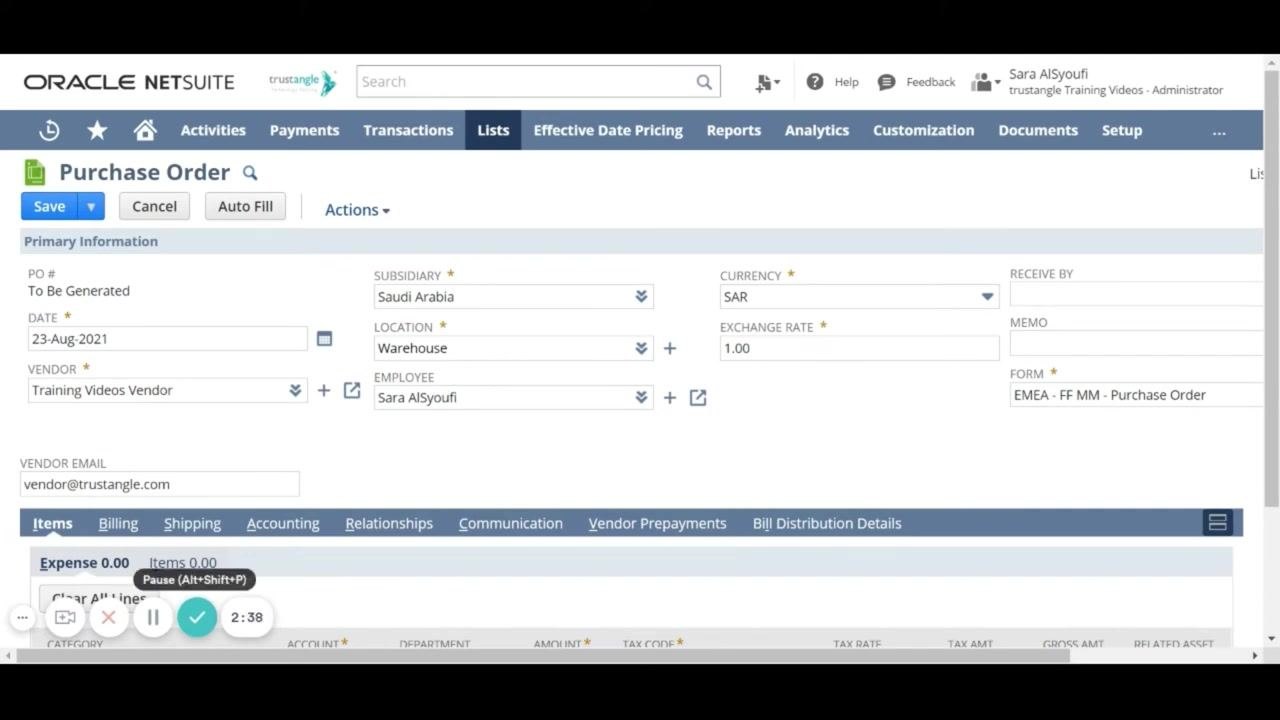
In the Location field, specify where you want to receive the goods for this purchase order. Depending on your setup, this field may be a dropdown or require you to type and select a location.
Complete other mandatory fields
Fill in any remaining required fields, such as Employee, Form, and Exchange Rate. For example: Employee = "Sara AlSyoufi," Form = "EMEA - FF MM - Purchase Order," Exchange Rate = "1.00."
Specify the employee for the purchase order
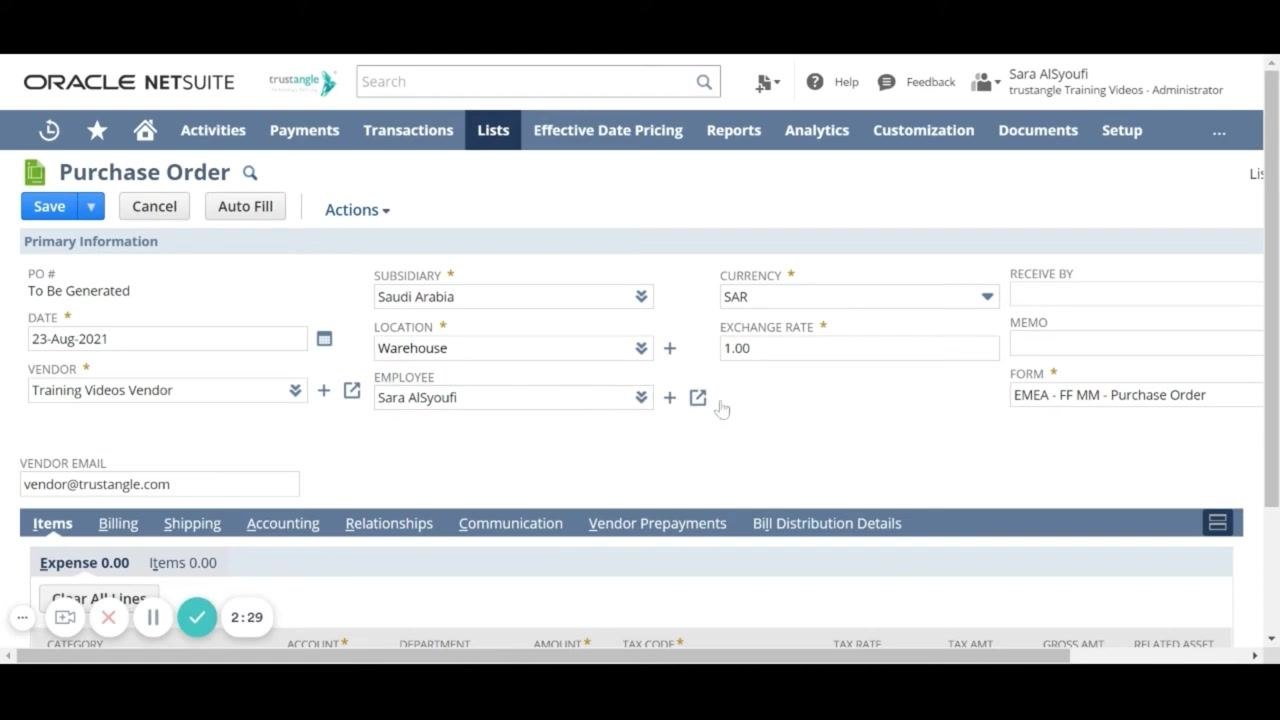
In the Employee field, select the name of the employee for whom you're entering the purchase order. If you're creating the PO for yourself, leave the default value, and your name is selected automatically.
Enter the 'Receive By' date
In the Receive By field, enter the date by which the ordered items are needed. Use the calendar picker or type the date directly.
Add a note in the memo field (optional)
If you have any notes or special instructions for this purchase order, enter them in the Memo field. For example, you might enter "Test."
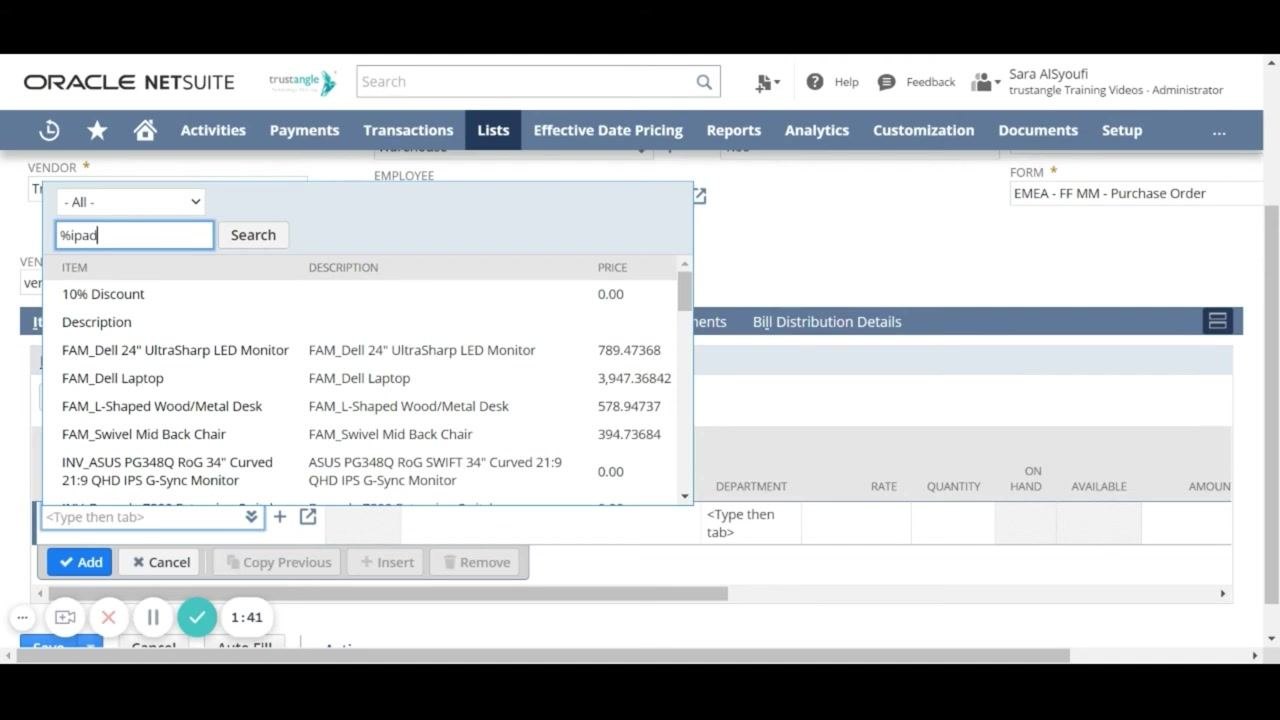
Select the item(s) to purchase
Under the Items sub-tab, click into the item field and begin typing the item name, or use a wildcard (for example, %ipad) to search. Select the desired item from the dropdown list, such as "INV_iPad Pro 12.9 inch - 128 GB."
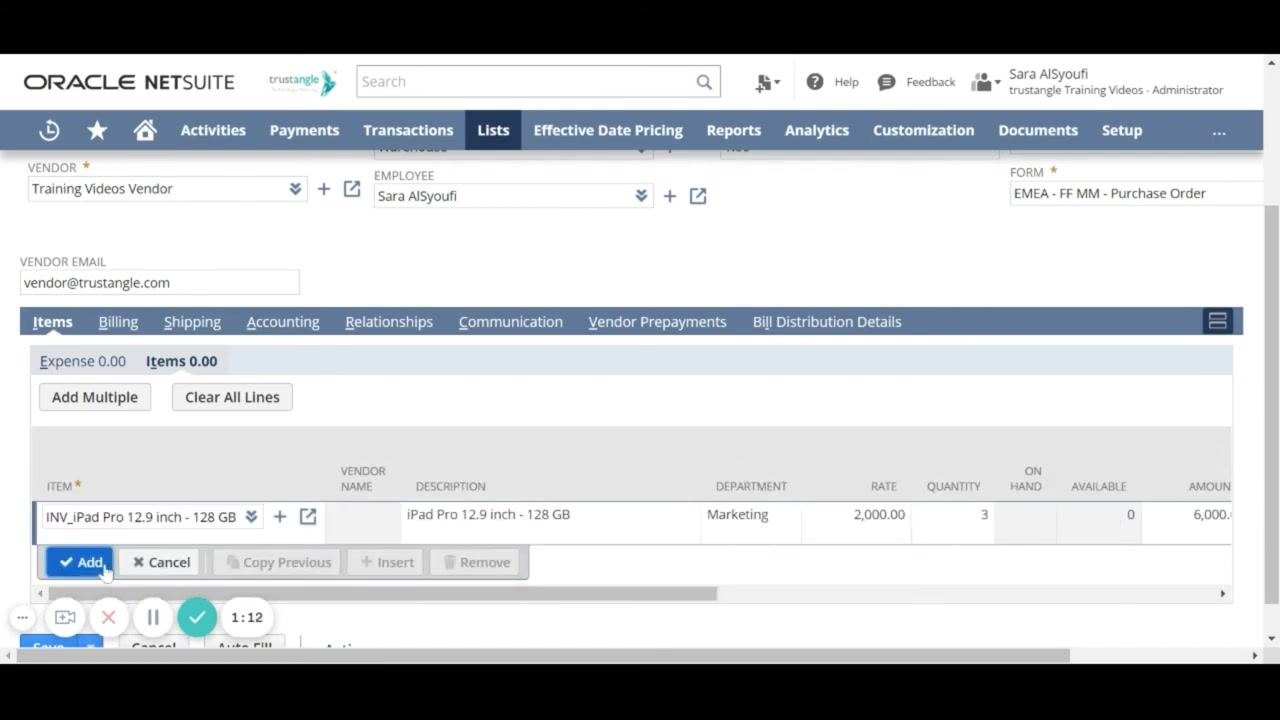
Enter department, rate, and quantity
In the Department field, select the appropriate department, such as Marketing, Administration, Operations, or Sales. Enter the Rate (unit price) for the item, for example, 2,000.00, and the Quantity to be ordered, for example, 3. The system automatically calculates the Amount (for example, 6,000.00). Ensure the Tax Code is set appropriately, such as VAT_SA:UNDEF-SA, 0.0%.
Add the item to the purchase order
Click the Add button to include the item and its details in the purchase order. The item appears in the list below with all entered details.
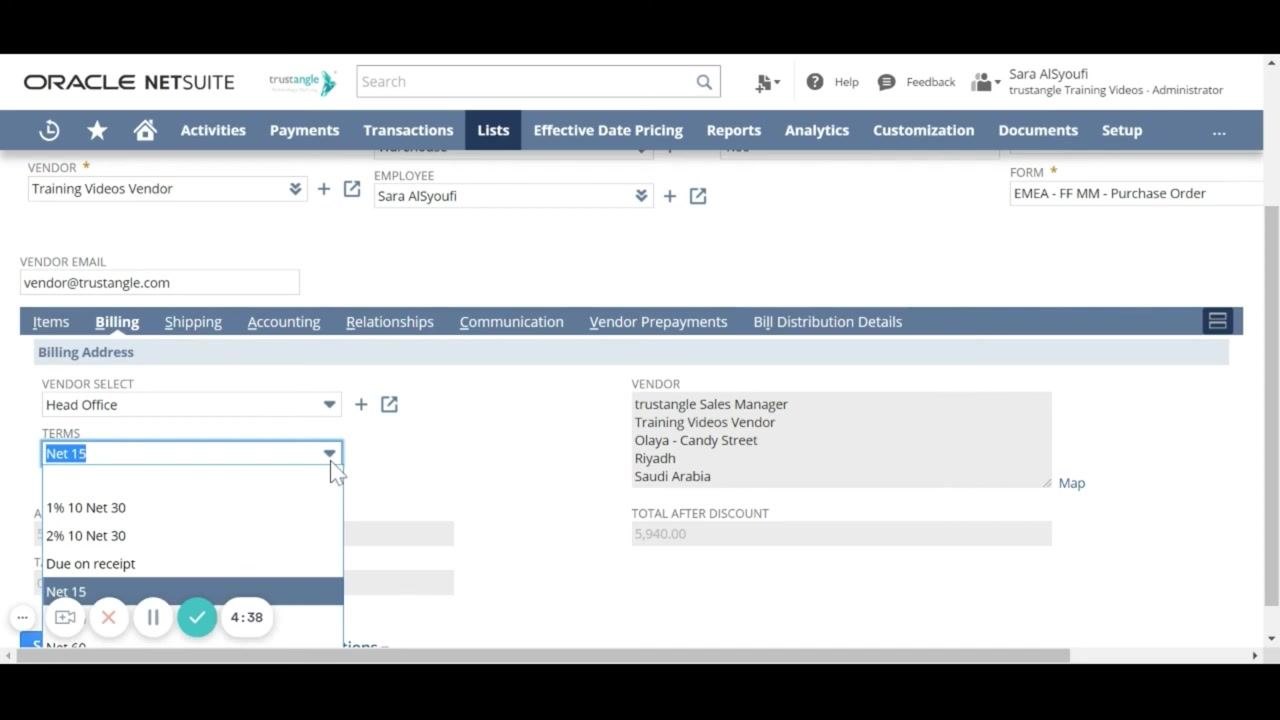
Adjust billing terms (if needed)
Go to the Billing sub-tab. In the Terms dropdown, select the appropriate payment terms for this purchase order, such as Net 15, 1% 10 Net 30, 2% 10 Net 30, or Due on receipt. The vendor's default terms are pre-selected, but you can change them for this specific PO.
Add communication details to the purchase order
Go to the Communication sub-tab. Under Messages, choose how to send the PO to the vendor:
- Check TO BE PRINTED if you want the message included in the printed PO.
- Check TO BE E-MAILED to send the PO to the vendor's email (for example, vendor@trustangle.com).
- Check TO BE FAXED if you want to fax the PO.
Enter any specific message for the vendor in the VENDOR MESSAGE field. You can also use the Events, Tasks, Phone Calls, and User Notes tabs to log additional communications.
Attach files to the purchase order
Click the Files tab under the Communication sub-tab. In the ATTACH FILE field, select or upload any files relevant to the purchase order, such as quotes, specifications, or supporting documents. Click Add to attach the selected file(s). Attached files are listed below with details such as folder, size, last modified date, and file type.
Save the purchase order
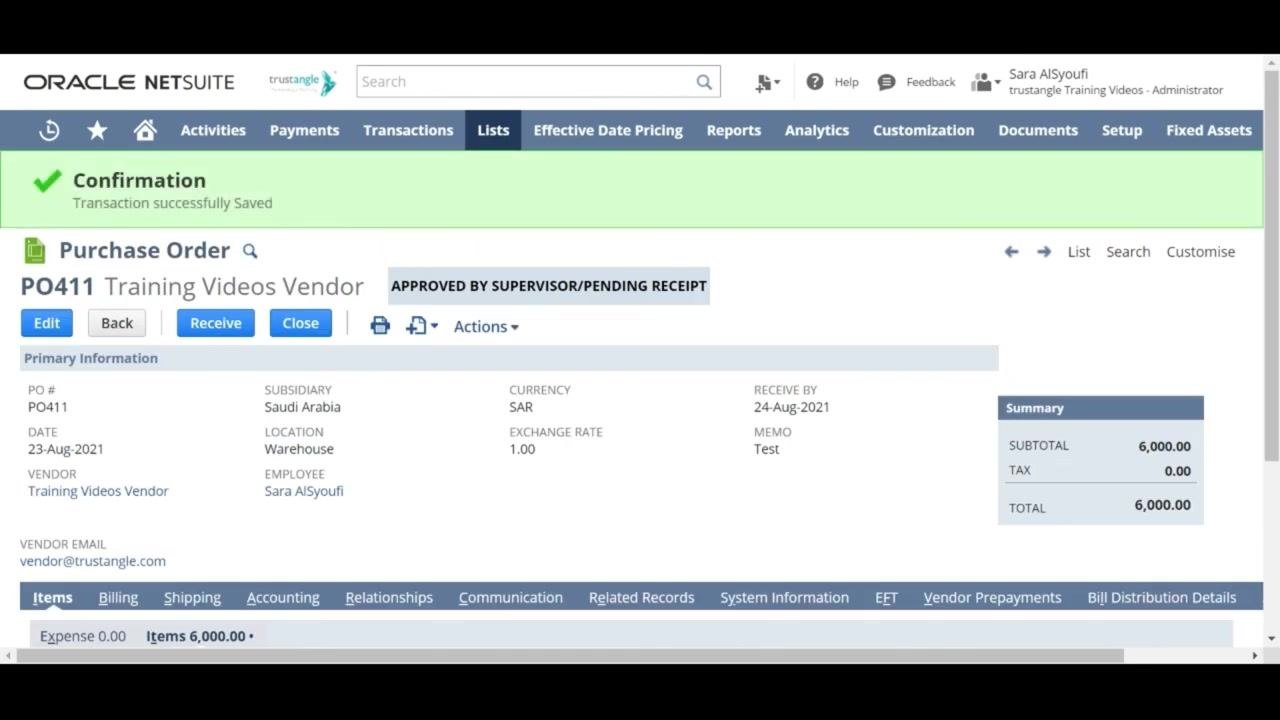
Review all entered information for accuracy, then click Save at the bottom or top of the form to finalize and submit the purchase order. The system processes the PO and displays a summary screen.
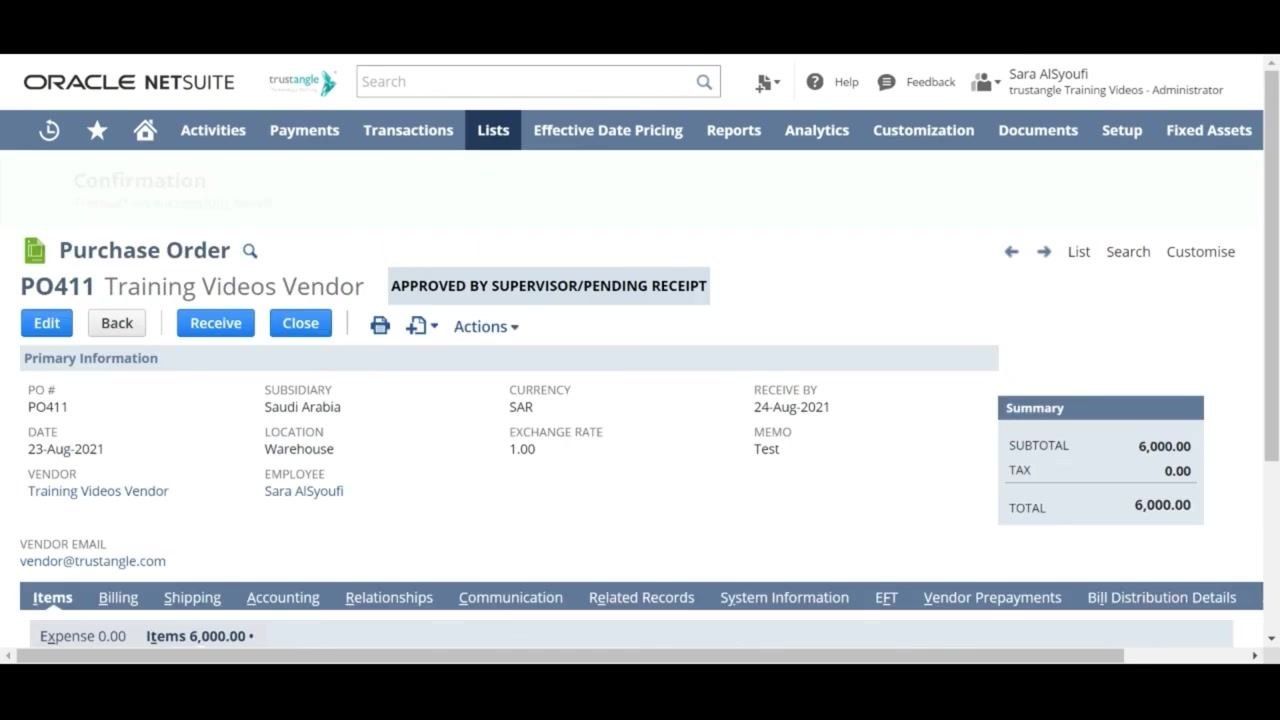
Verify confirmation of purchase order submission
After saving, look for the green Confirmation banner indicating "Transaction successfully Saved." Review the summary details, including PO number (for example, PO411), vendor, employee, dates, memo, and total amount. The status should show as "APPROVED BY SUPERVISOR/PENDING RECEIPT."
Summary
By following these steps, you have successfully learned how to create a purchase order in NetSuite—from selecting the vendor and subsidiary to entering item details, department, rate, quantity, billing terms, communication preferences, and file attachments. Once saved and confirmed, your purchase order is submitted and ready for the next stage of processing.
Generation details: cost, quality tiers
Docsie billed 2,000 credits ($1.40) to analyze this 4-minute video at standard quality. The rewrite, template fill and Word/PDF exports were included. The same video at each quality tier:
| Quality | Frames sampled | Credits | Approx. cost |
|---|---|---|---|
| Draft | every 16-30 s | 1,000 | $0.70 |
| Standard (this guide) | every 8-15 s | 2,000 | $1.40 |
| Detailed | every 4-7 s | 4,000 | $2.80 |
| Ultra | every 1-3 s | 8,000 | $5.60 |
Credits priced at $0.70 per 1,000; plans include a monthly allowance. Enterprise customers on on-premise or bring-your-own-model deployments run this on their own inference and pay no per-video credits.
Generated by Docsie Video-to-Docs on 2026-09-08 from a 3-minute video. Screenshots are frames from the source video and belong to their creator, trustangle Ltd, whose original is embedded above. If you own this video and want the guide removed or credited differently, contact us and we will act within one business day.