
How to Set Out of Office in Outlook in Microsoft 365
Setting an out of office reply in Outlook lets people who email you while you're away know when to expect a response. This guide walks you through how to set out of office in Outlook using the desktop app (Office 365 and earlier versions), how to test that it's working, and how to set it up in Outlook on the web.
Video: How to Set Out of Office in Outlook by Kevin Stratvert (2019). All credit for the demonstration goes to the creator; watch the original on YouTube. The written guide below was generated from this video by Docsie. Creator? Request a change or removal.
Setting an out of office reply in Outlook lets people who email you while you're away know when to expect a response. This guide walks you through how to set out of office in Outlook using the desktop app (Office 365 and earlier versions), how to test that it's working, and how to set it up in Outlook on the web.
Prerequisites
- A computer with Outlook installed, or access to Outlook on the web.
- An active Outlook account signed in.
- A second email account (such as Gmail) if you want to test your automatic reply.
Prepare your workspace
Sit down at your computer and make sure Outlook is installed and ready to open.

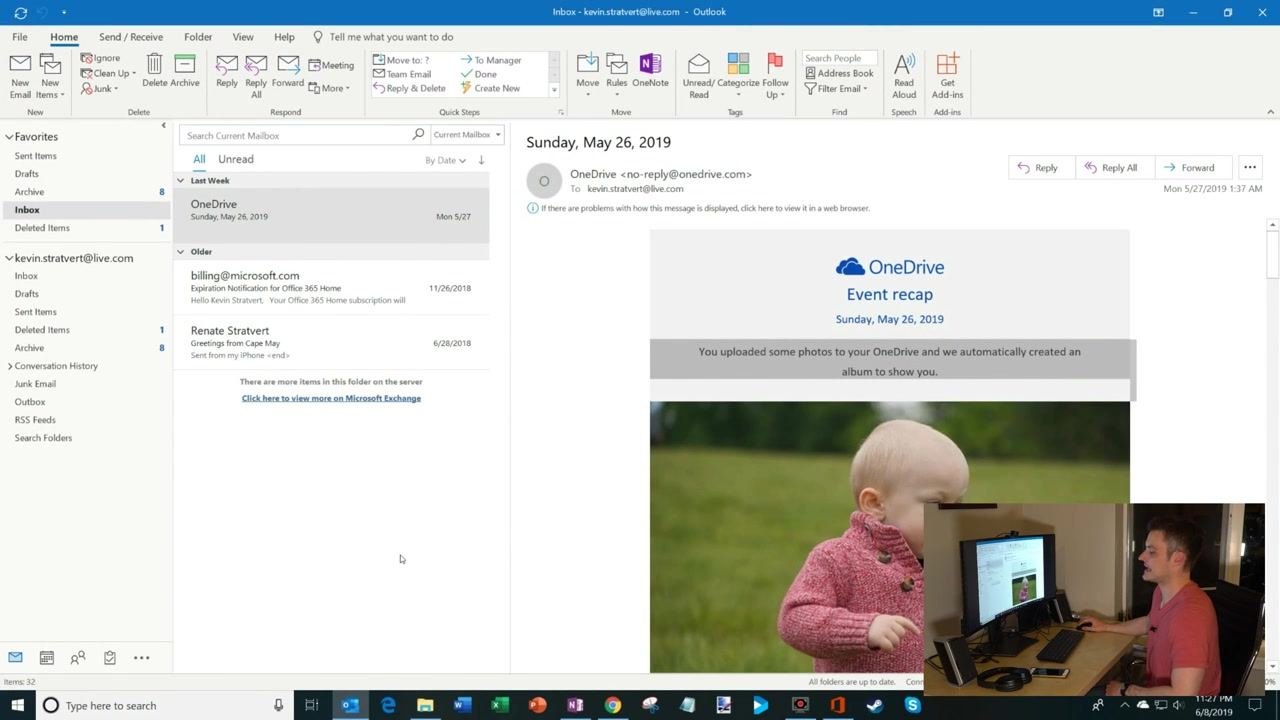
Open Outlook
Launch the Outlook application from your desktop or start menu and wait for your inbox to load.
Navigate to your inbox
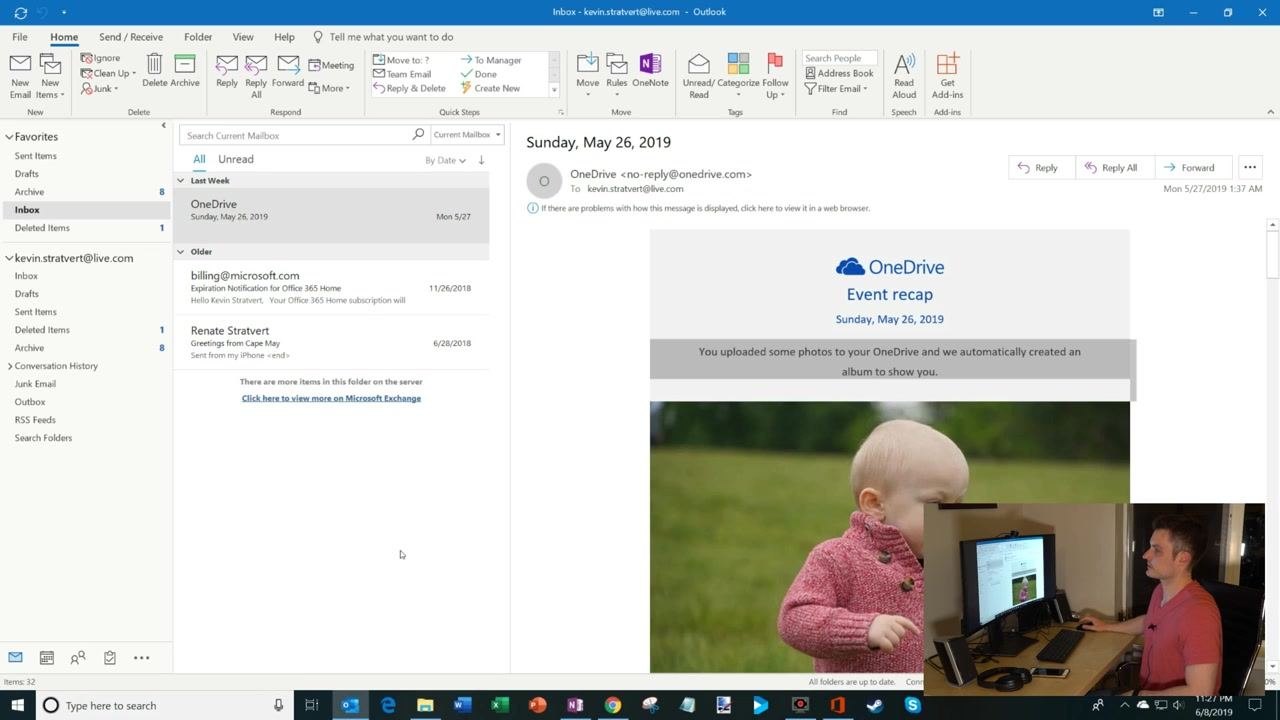
Confirm you're in the main inbox view. You should see your list of emails alongside the standard Outlook ribbon at the top.
Access the File menu
Click the File tab in the upper-left corner of the Outlook window.
Open Automatic Replies
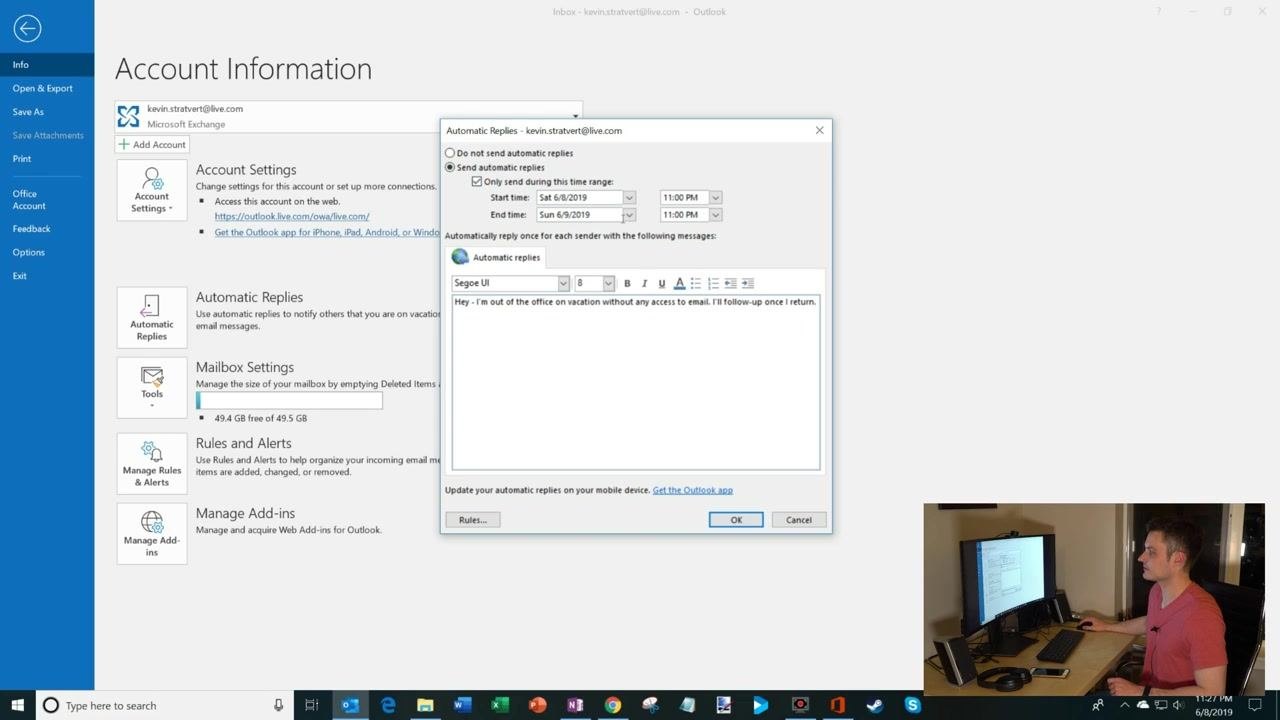
From the Account Information view, click Automatic Replies.
Turn on automatic replies and set a date range
In the Automatic Replies dialog, select Send automatic replies. If you want your reply to run only for a specific period, check Only send during this time range and set:
- Start time: for example, 6/8/2019, 11:00 PM
- End time: for example, 6/9/2019, 11:00 PM (adjust to match your own absence)
Write your out of office message
Type your message in the message box. For example:
- "Hey – I'm out of the office on vacation without any access to email. I'll follow-up once I return."
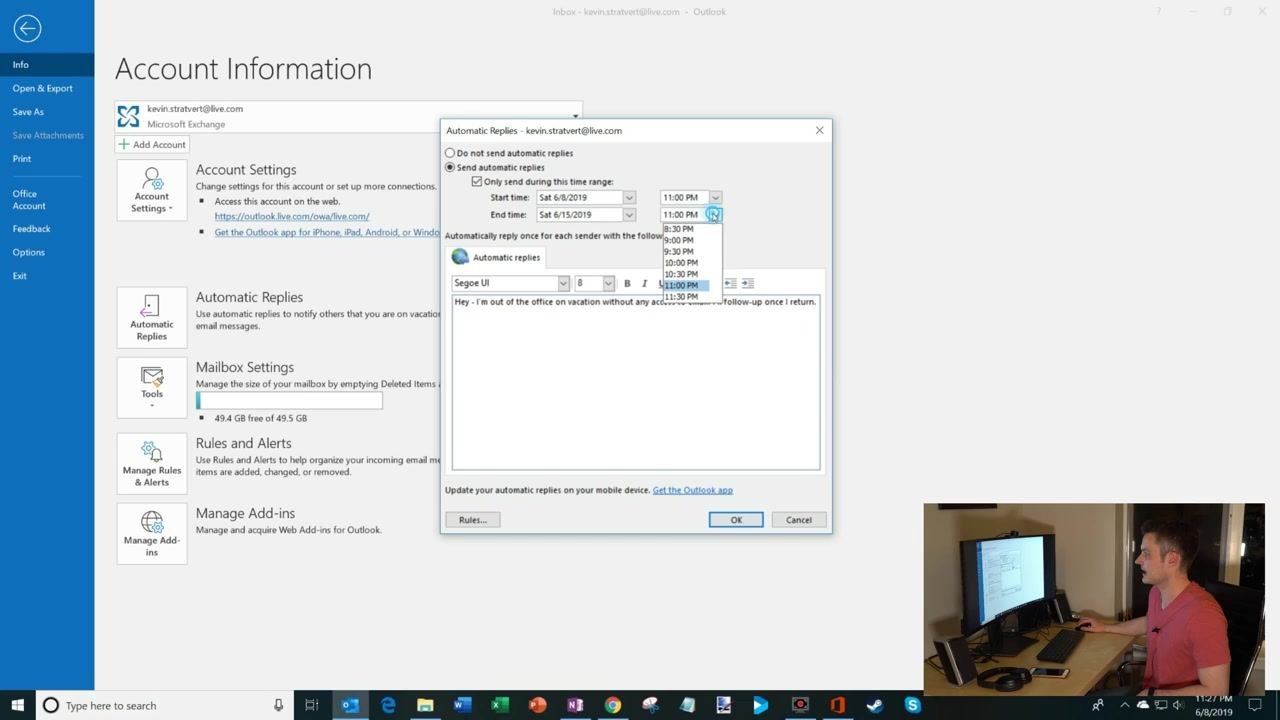
Adjust the end time if needed
Use the dropdown menu to pick a different end time for your automatic replies if the default doesn't fit your schedule.
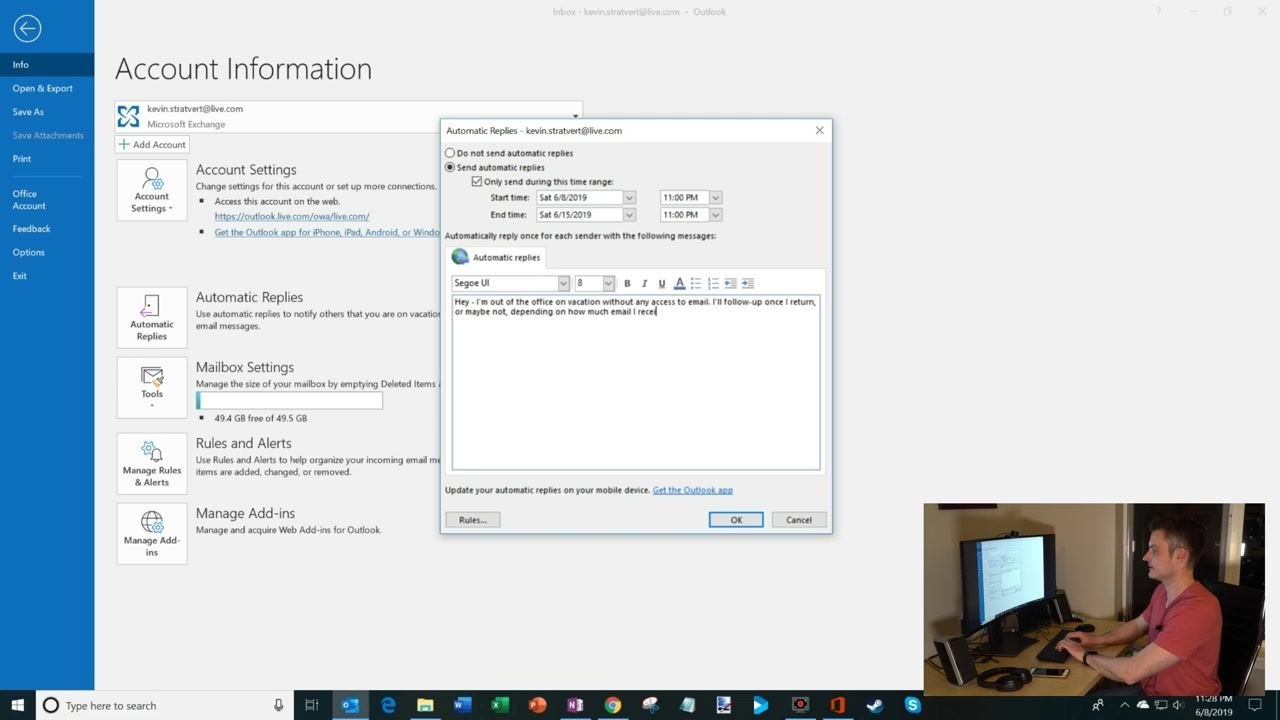
Customize your message and set internal/external options
Personalize your message however you like. For example:
- "Hey – I'm out of the office on vacation without any access to email. I'll follow-up once I return, or maybe not, depending on how much email I receive."
If you're using a work or school account, you'll see two tabs in the dialog:
- One tab for replies sent to people inside your organization.
- Another tab for replies sent to people outside your organization.
You can set different messages for each audience, for example:
- Internal: "Contact [Colleague Name] for urgent matters."
- External: "I am currently out of the office and will respond upon my return."
If you're using a personal account, you'll only see one message box and can't set separate internal and external messages.
Set up rules for automatic replies (optional)
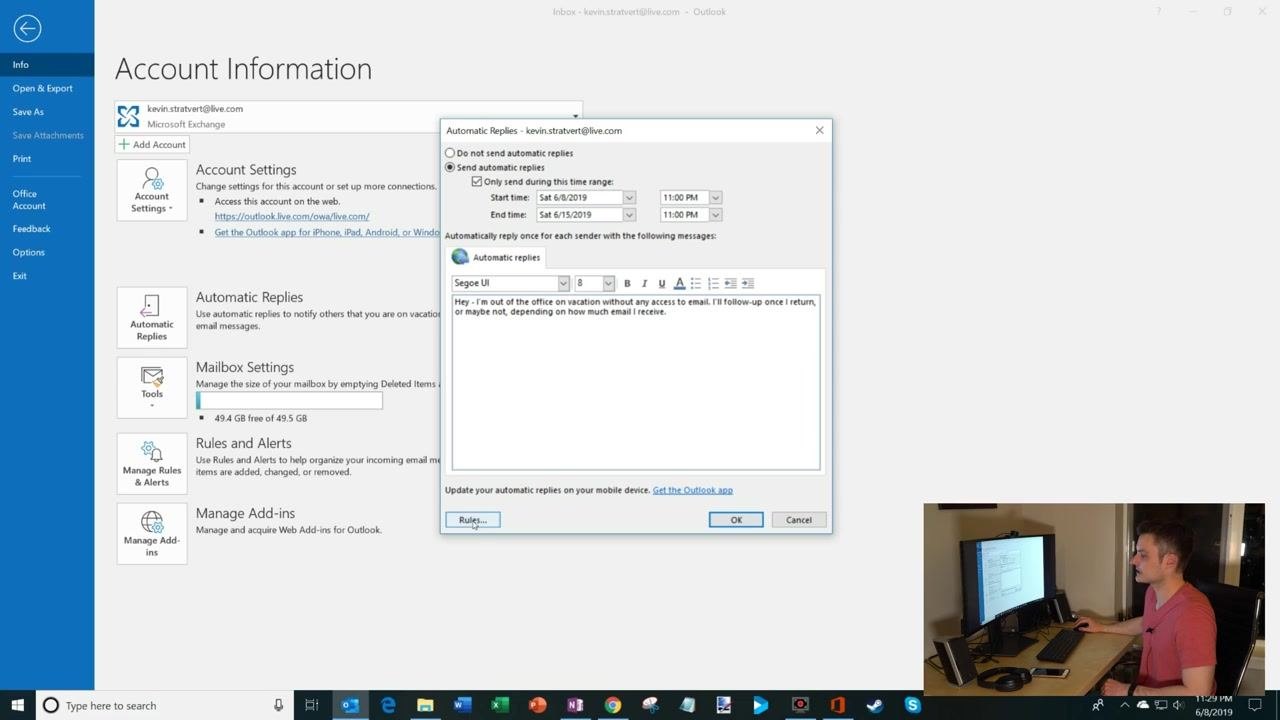
Click Rules... in the Automatic Replies dialog to add custom handling for incoming emails while you're away.
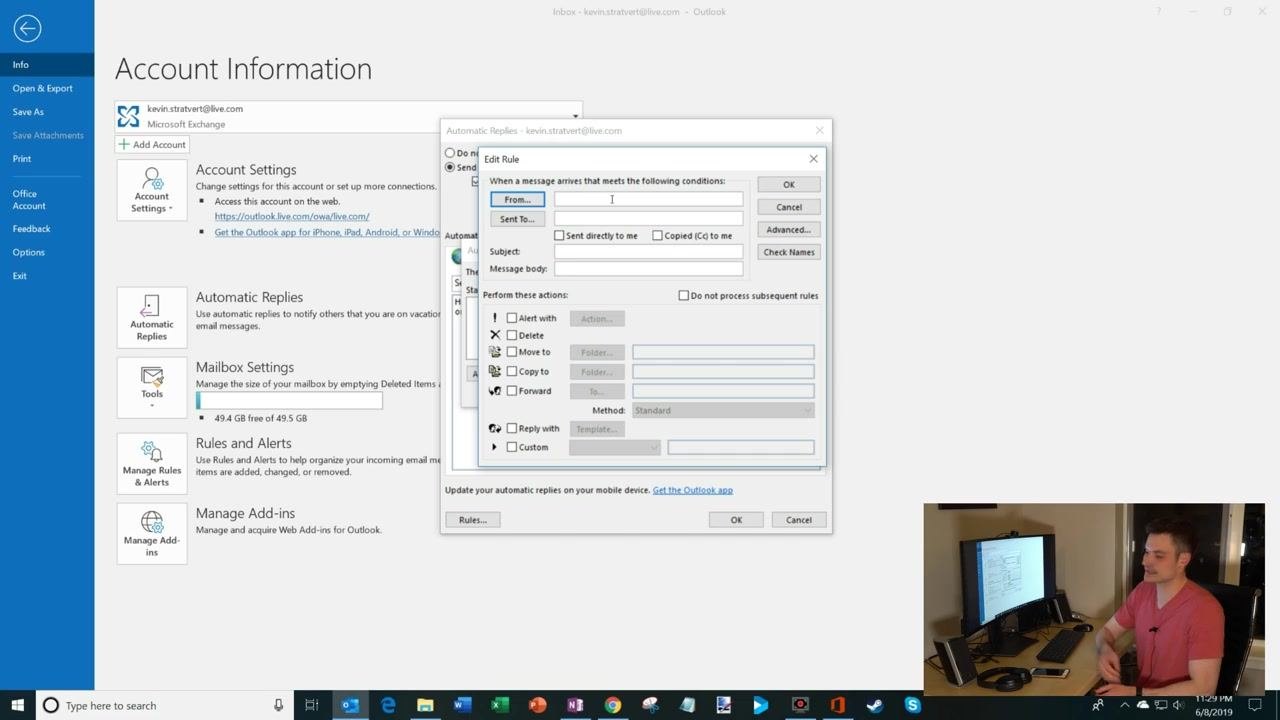
In the Edit Rule window, configure rules to match your needs:
- Specify conditions, such as emails from a certain person (like your manager) or with a specific subject.
- Choose actions, such as moving emails to a folder, forwarding them, or replying with a custom template.
- Example: let emails from your manager bypass the automatic reply or forward to another address.
Click OK to save your rules, or Cancel if you don't want to add any.
Activate your out of office response
Review your message, date range, and any rules you've set, then click OK to turn on your out-of-office reply.
Confirm automatic replies are active
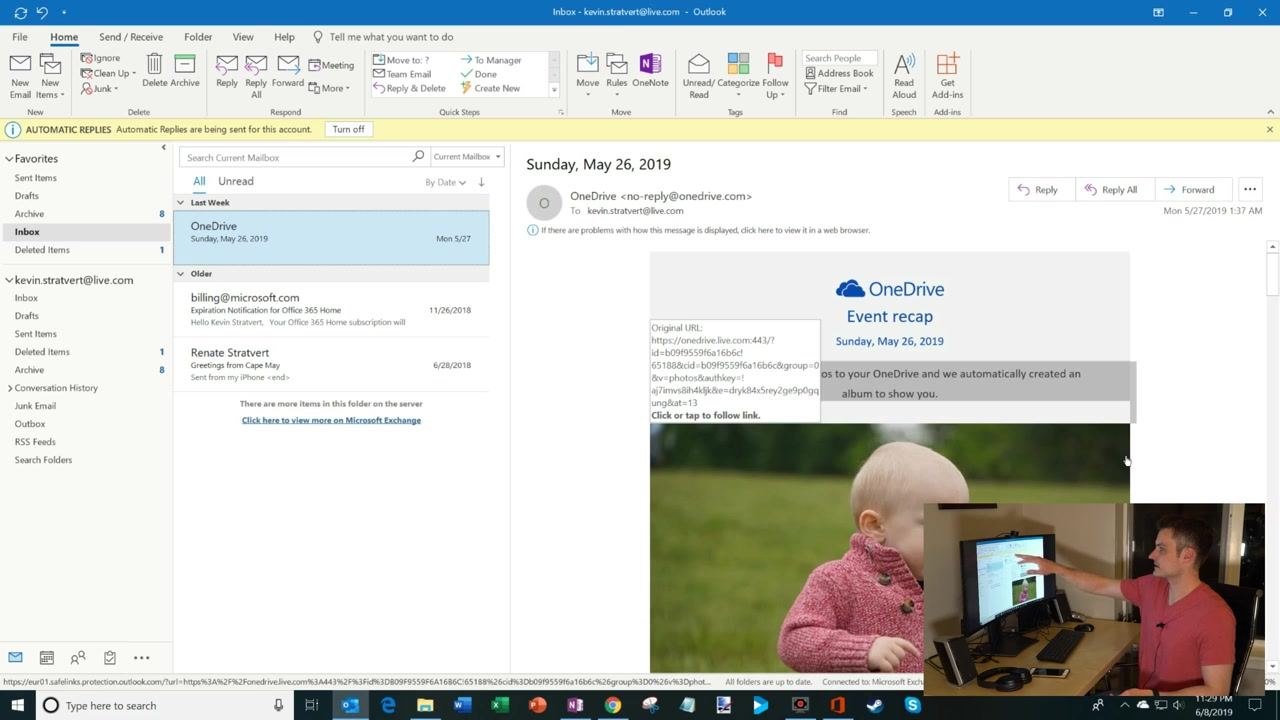
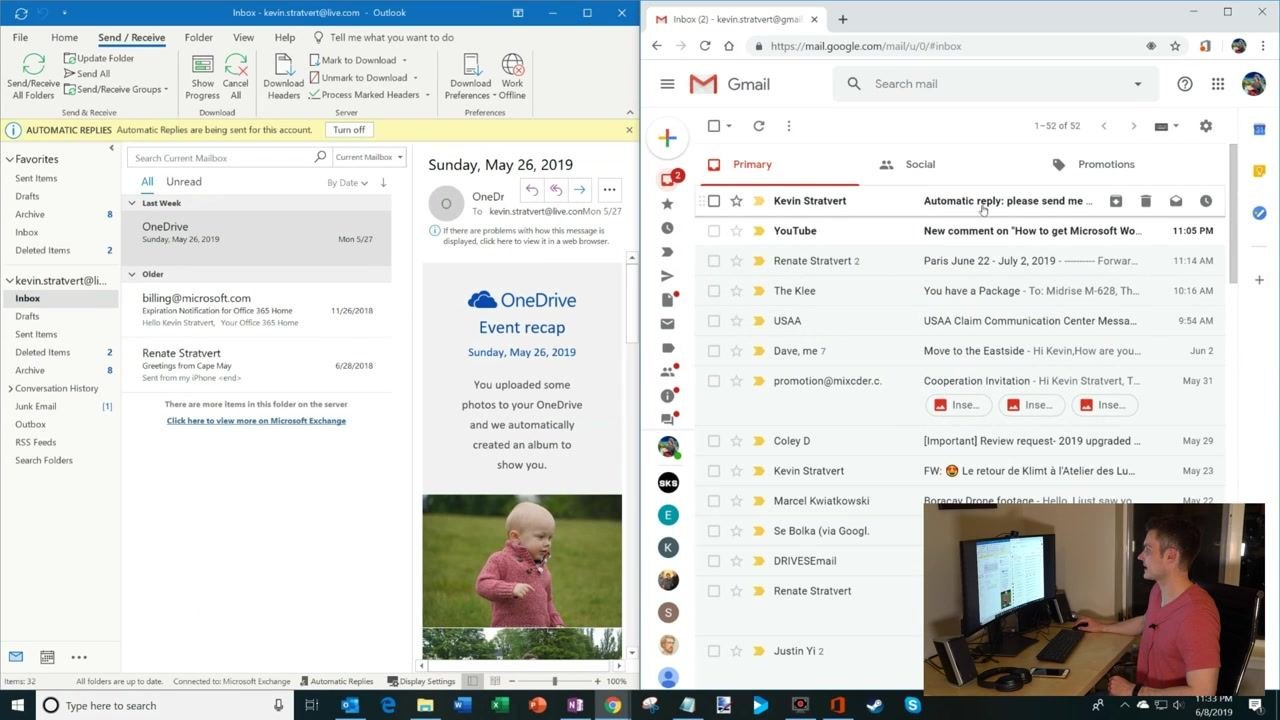
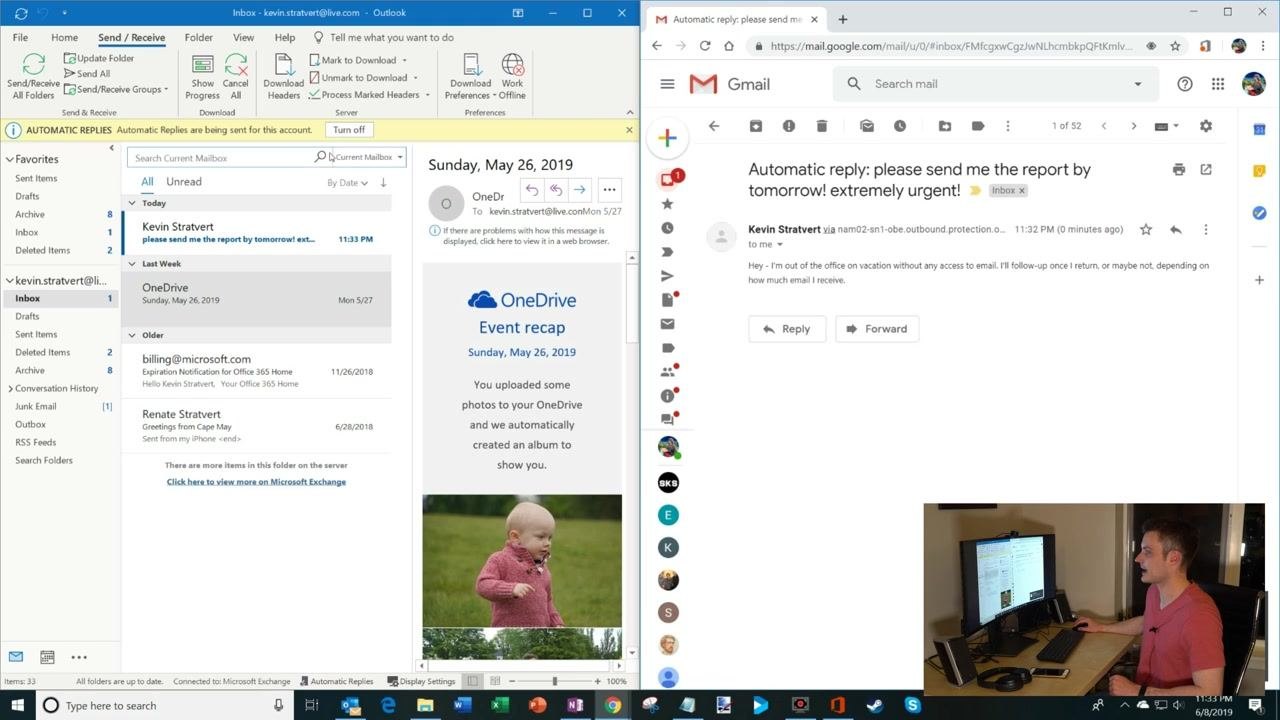
Return to your Outlook inbox and look for a yellow notification bar at the top stating: "AUTOMATIC REPLIES Automatic Replies are being sent for this account." This confirms your out-of-office response is active. You can click Turn off on this bar anytime to disable automatic replies.
Test your out of office setup
Open a separate email account, such as Gmail, and compose a new message to your Outlook address. For example:
- Subject: "Please send me the report by tomorrow! Extremely urgent."
- Body: "So please send me the reports by tomorrow. Extremely urgent."
Send the email to your Outlook account.
Wait for the automatic reply to arrive in your Gmail inbox, then open it and confirm it contains your out-of-office message, such as:
- "Hey – I'm out of the office on vacation without any access to email. I'll follow-up once I return, or maybe not, depending on how much email I receive."
Also check that the original message you sent from Gmail appears in your Outlook inbox.
Set up out of office in Outlook on the web
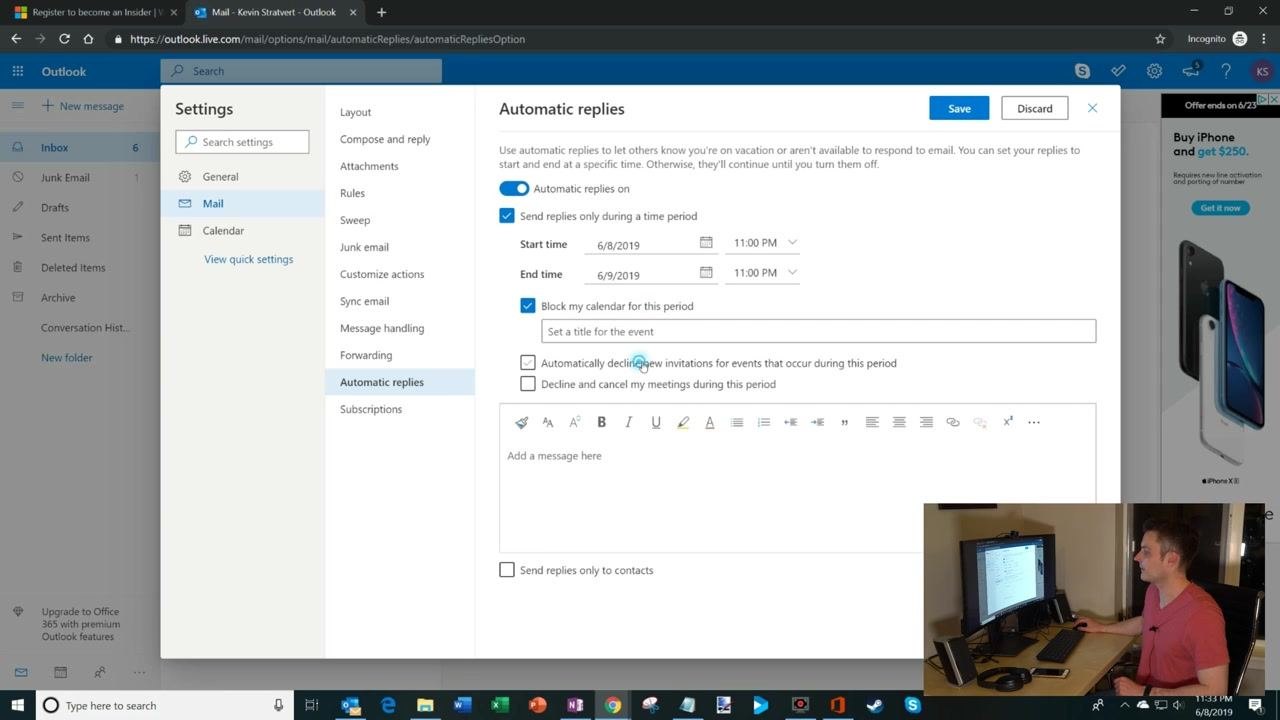
Open your browser and go to the Outlook web app (for example, https://outlook.live.com), then sign in if prompted. Click the Settings (gear) icon in the upper-right corner, then use the search box in the Quick Settings pane to type "out of office" or "automatic replies" and select Automatic replies from the results.
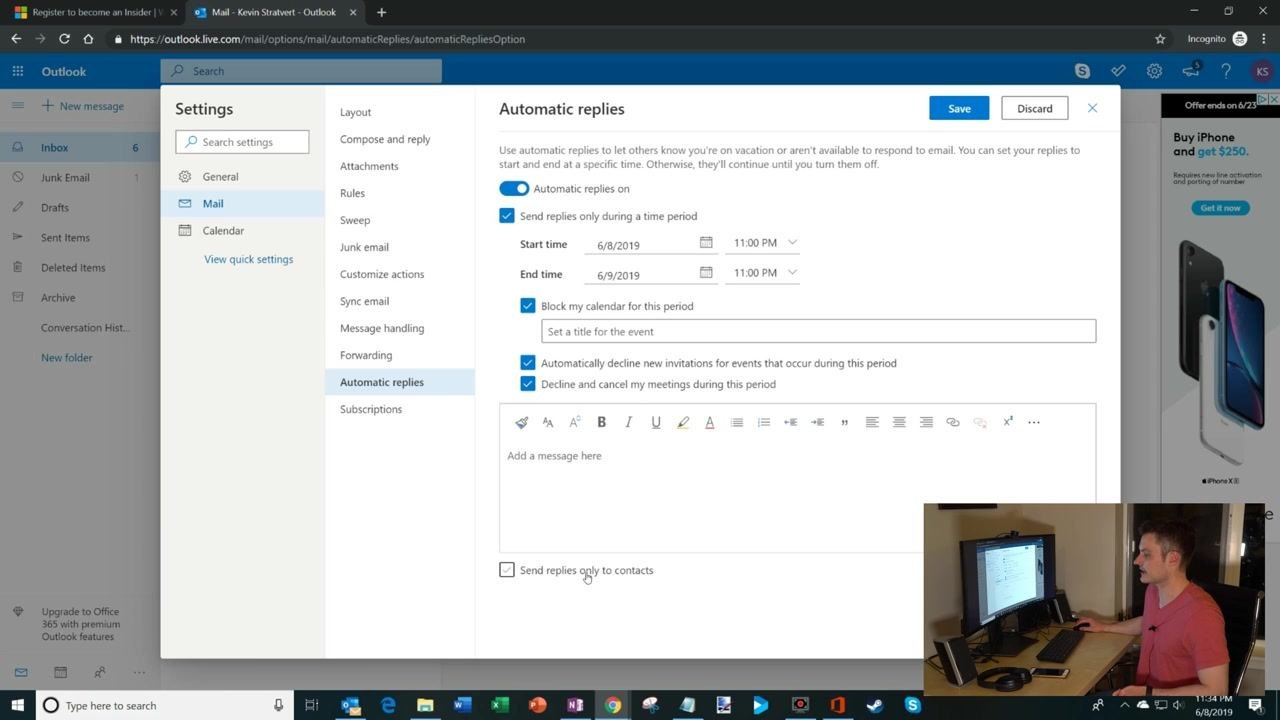
Turn on Automatic replies by toggling the switch. Optionally, check Send replies only during a time period and set your start and end dates/times, for example: Start time 6/8/2019, 11:00 PM; End time 6/9/2019, 11:00 PM. You can also select:
- Block my calendar for this period – prevents new meetings from being scheduled.
- Automatically decline new invitations for events that occur during this period – declines new meeting requests.
- Decline and cancel my meetings during this period – cancels existing meetings during your absence.
Enter your out-of-office message in the message box. Optionally, check Send replies only to contacts to limit replies to people in your contacts list, or leave it unchecked to reply to everyone.
Click Save to activate your automatic replies.
What's next
You now know how to set out of office in Outlook using both the desktop app and Outlook on the web, including how to customize messages for internal and external contacts, set rules for specific emails, and verify your setup with a test message. Be sure to:
- Activate your out-of-office reply before you leave so colleagues and contacts are informed of your absence.
- Choose whichever method — desktop app or web — best fits your workflow and device.
- Revisit the steps above or consult Outlook's help documentation if you need further assistance.

Generation details: cost, quality tiers
Docsie billed 3,000 credits ($2.10) to analyze this 6-minute video at standard quality. The rewrite, template fill and Word/PDF exports were included. The same video at each quality tier:
| Quality | Frames sampled | Credits | Approx. cost |
|---|---|---|---|
| Draft | every 16-30 s | 1,500 | $1.05 |
| Standard (this guide) | every 8-15 s | 3,000 | $2.10 |
| Detailed | every 4-7 s | 6,000 | $4.20 |
| Ultra | every 1-3 s | 12,000 | $8.40 |
Credits priced at $0.70 per 1,000; plans include a monthly allowance. Enterprise customers on on-premise or bring-your-own-model deployments run this on their own inference and pay no per-video credits.
Generated by Docsie Video-to-Docs on 2026-09-09 from a 5-minute video. Screenshots are frames from the source video and belong to their creator, Kevin Stratvert, whose original is embedded above. If you own this video and want the guide removed or credited differently, contact us and we will act within one business day.