
How to Jira How to Create a Sprint in Jira
This guide walks you through how to create a sprint in Jira using the updated Scrum interface. You'll set up a new Scrum space, add your team, build out a backlog, and configure your first sprint so your team can start working in an agile workflow.
Video: How To Create A Scrum Sprint in Jira (2026): Step By Step Tutorial by Tutorials by Manizha & Ryan (2026). All credit for the demonstration goes to the creator; watch the original on YouTube. The written guide below was generated from this video by Docsie. Creator? Request a change or removal.
This guide walks you through how to create a sprint in Jira using the updated Scrum interface. You'll set up a new Scrum space, add your team, build out a backlog, and configure your first sprint so your team can start working in an agile workflow.
Prerequisites
- Access to a Jira workspace with permission to log in and create spaces.
- The email addresses of any team members you want to invite.
- A general plan of the work items you want to track (for example, features, stories, or tasks).
Create a Scrum space in Jira
-
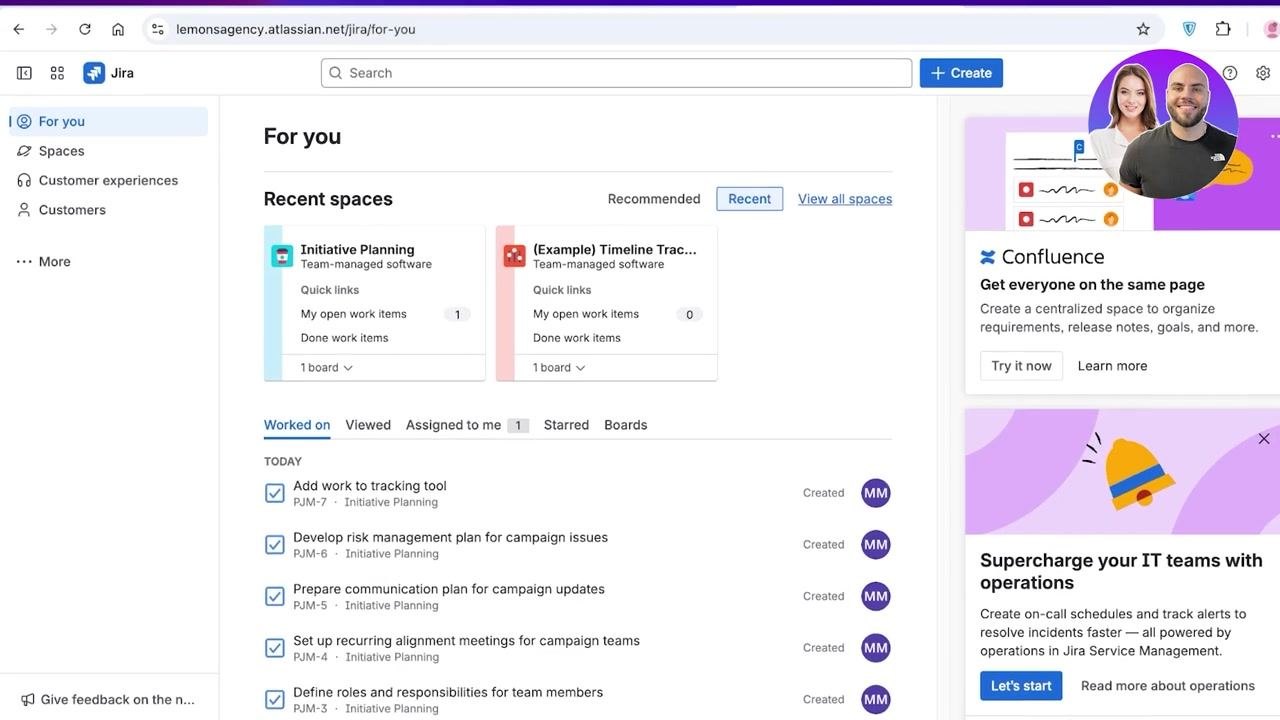
Access Jira and navigate to spaces
- Open Jira and log in to your workspace.
- On the left sidebar, click Spaces to view your available spaces.
- The main dashboard displays your recent spaces and work items. -
-
Start creating a new space
- Click + Create at the top right of the screen.
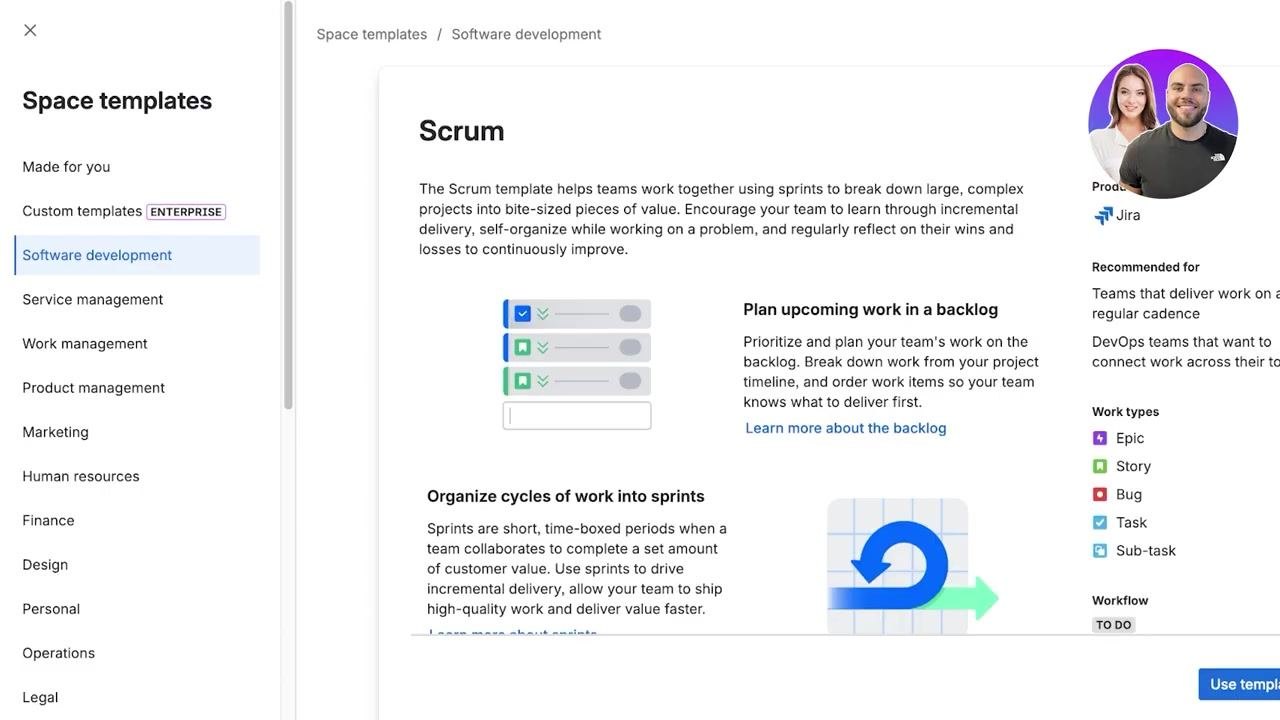
- In the space creation menu, select Software development from the list of templates on the left.
- This displays the templates related to software development. -
-
Select the Scrum template
- In the main panel, locate the Scrum template.
- Review the description to confirm it fits your needs, such as organizing work into sprints and planning backlogs.
- Click Use template at the bottom right to proceed.
-
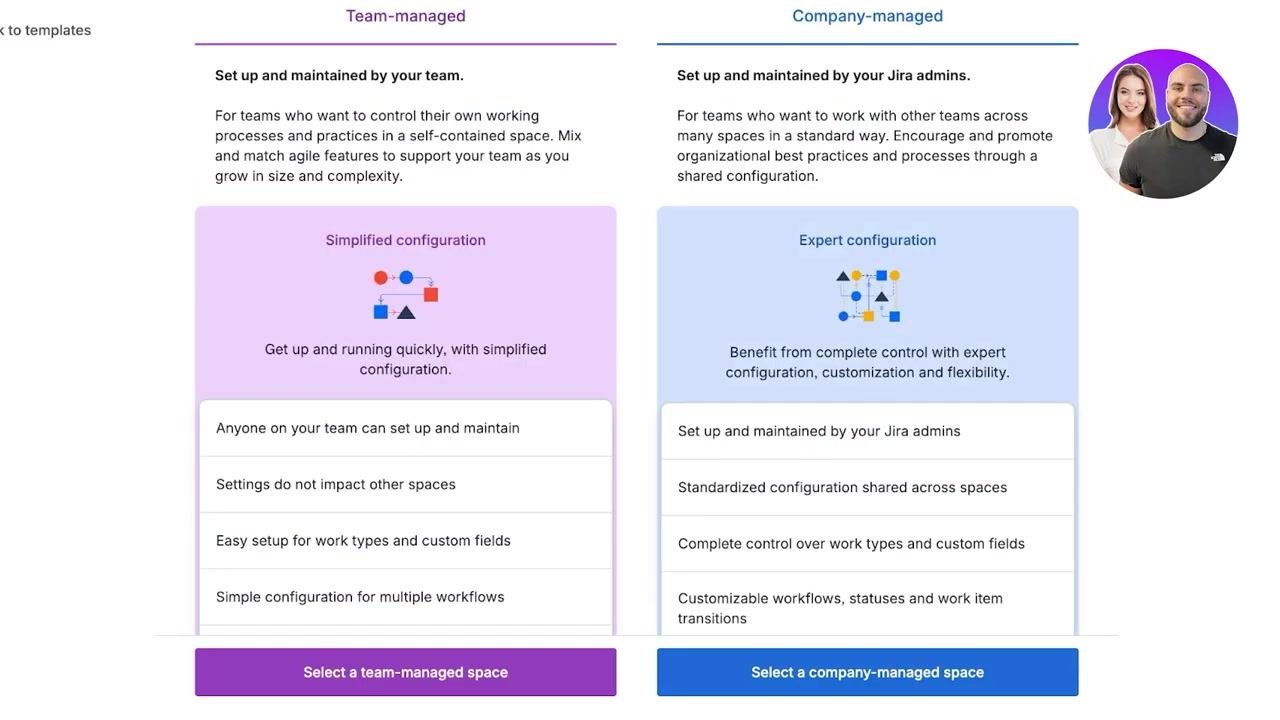
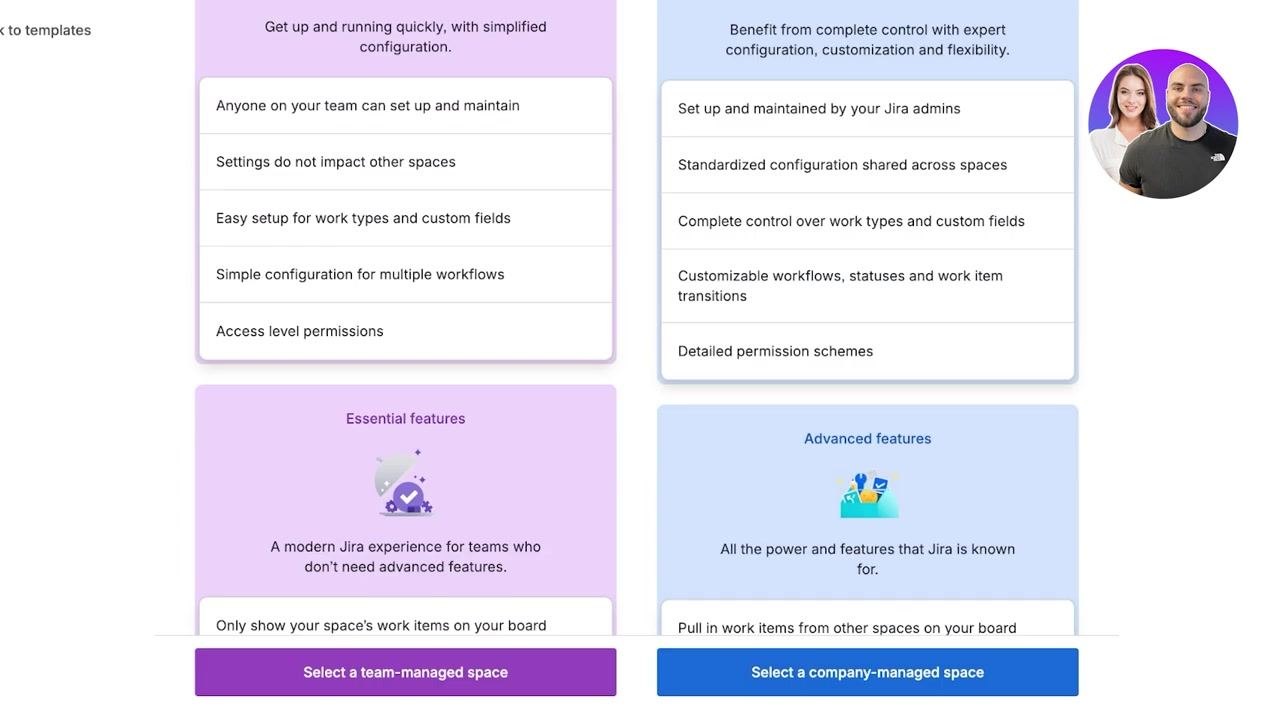
Choose how your space is managed
- Select how your space will be managed:
- Team-managed: Lets teams control their own processes in a self-contained space.
- Company-managed: Managed by Jira admins with standardized configurations.
- For most users, select Team-managed. -
- Select how your space will be managed:
-
Review management features and confirm
- Compare the features and permissions for each management type:
- Team-managed: Simplified configuration, easy setup, access-level permissions.
- Company-managed: Expert configuration, standardized settings, detailed permission schemes.
- Confirm your choice by clicking Select a team-managed space. -
- Compare the features and permissions for each management type:
-
Configure your project details
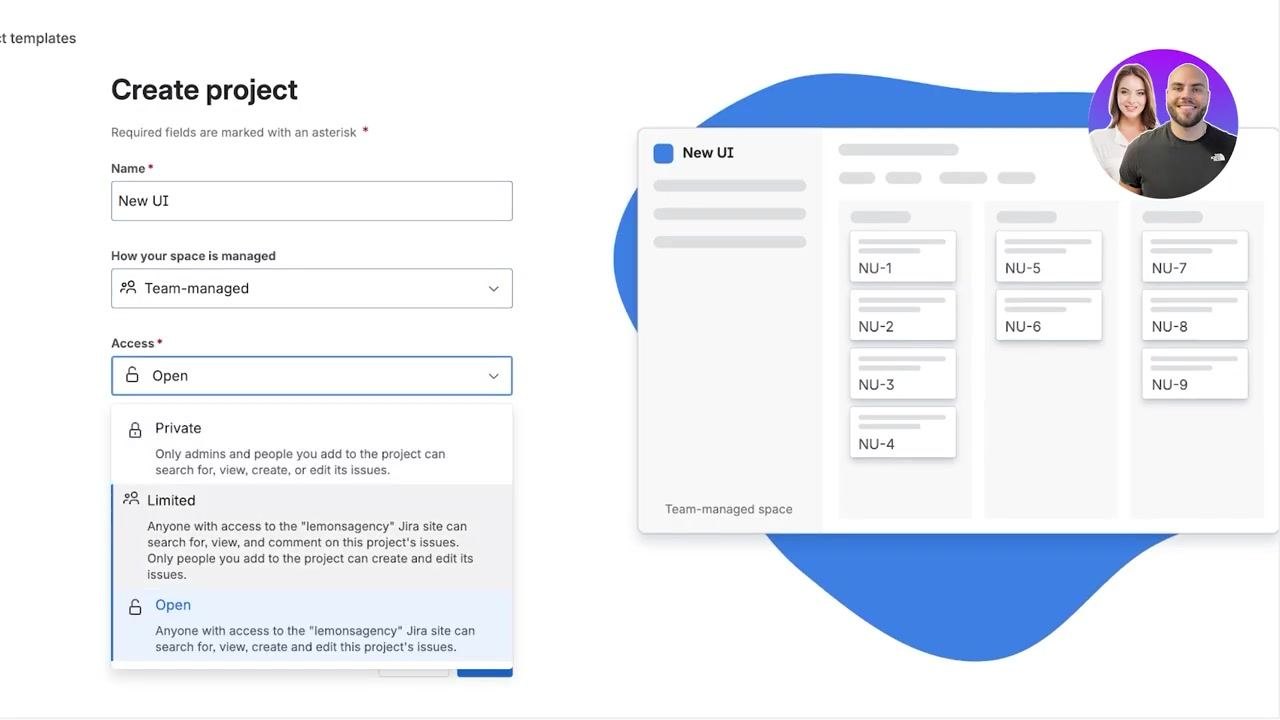
- Enter your project information:
- Name: Type your project name, for example "New UI".
- How your space is managed: Confirm "Team-managed" is selected.
- Access: Choose the access level that fits your team:
- Open: Anyone with access to the Jira site can view, create, and edit issues.
- Limited: Only people added to the project can create and edit issues; others can view and comment.
- Private: Only admins and added users can access the project.
- For this example, set Name to "New UI", management to "Team-managed", and Access to "Open" (or "Limited" for restricted editing). -
- Enter your project information:
- Finalize and create the space
- Review your selections: Name "New UI", management type "Team-managed", Access "Open", and Template "Scrum".
- Click Next to proceed.
- Jira creates your new Scrum space. -
Add team members and explore your new Scrum space
- Add team members to your space
- On the "Bring your team along" screen, enter the names or email addresses of your team members.
- For each member, select a role from the dropdown:
- Member (default): Can add, edit, and collaborate on all work.
- Administrator: Can update settings and add other admins.
- Viewer: Can view and comment, but not edit.
- Click Invite and continue to send the invitations. -
- Access your new Scrum space
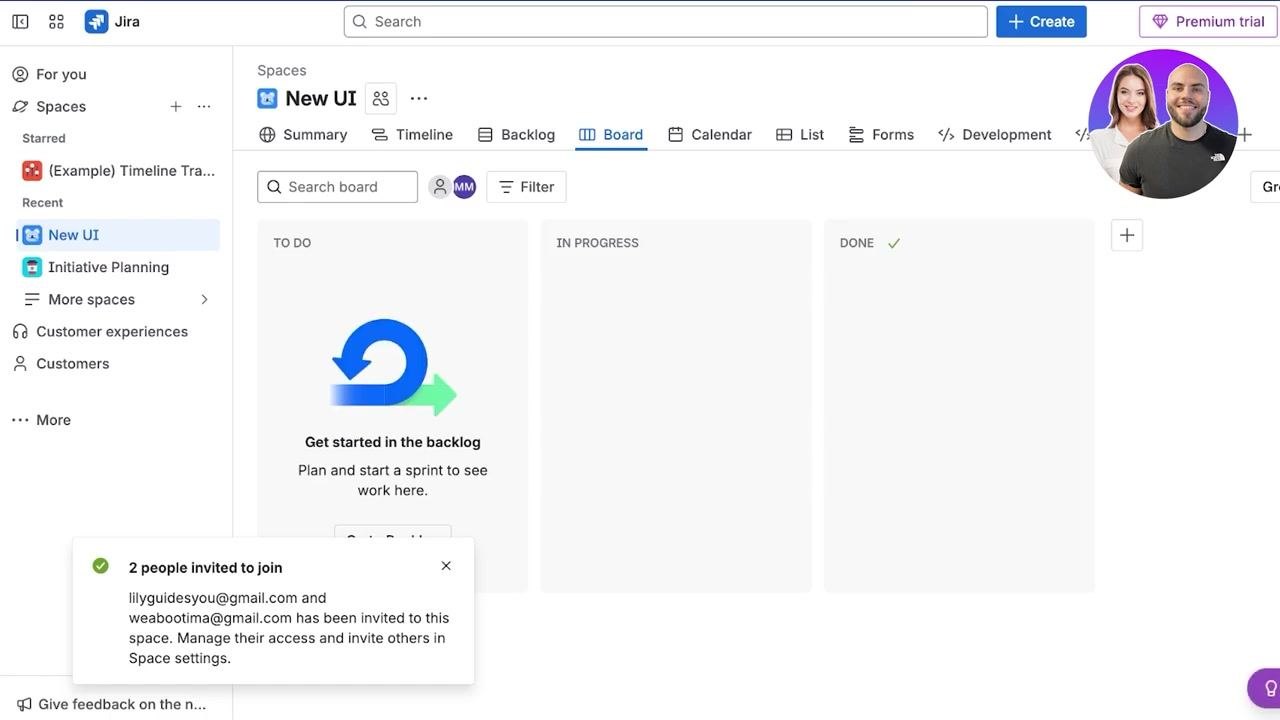
- Once team members are added, Jira displays your new project space, for example "New UI".
- The main navigation bar includes Summary, Timeline, Backlog, Board, Calendar, List, Forms, Development, and More.
- The left sidebar shows your current and recent spaces, and a notification confirms your team members have been invited. -
-
Explore the calendar and additional features
- Click Calendar to view scheduled and unscheduled work.
- Use the three-dot menu to set the default tab, rename, move, or remove tabs.
-
The right panel shows "Unscheduled work," which you can drag onto the calendar.
-
Access space settings
- Click the three-dot menu next to your space name and select Space settings.
-
From here you can change the space icon and background, add or remove people, and archive or delete the space.
-
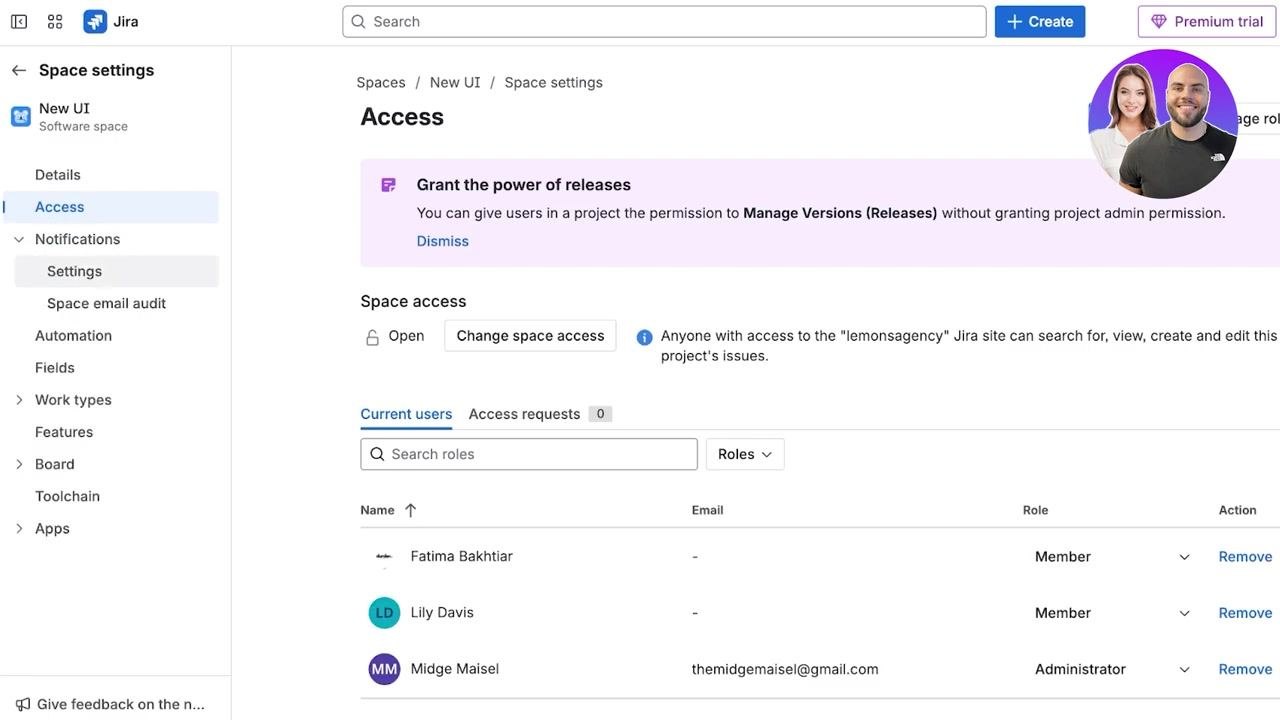
Manage access and permissions
- In Space settings, select Access to manage who can view or edit the space.
- Set the space access level, such as Open, Limited, or Private.
-
View and manage current users, their roles, and pending access requests.
-
Configure fields for your Scrum space
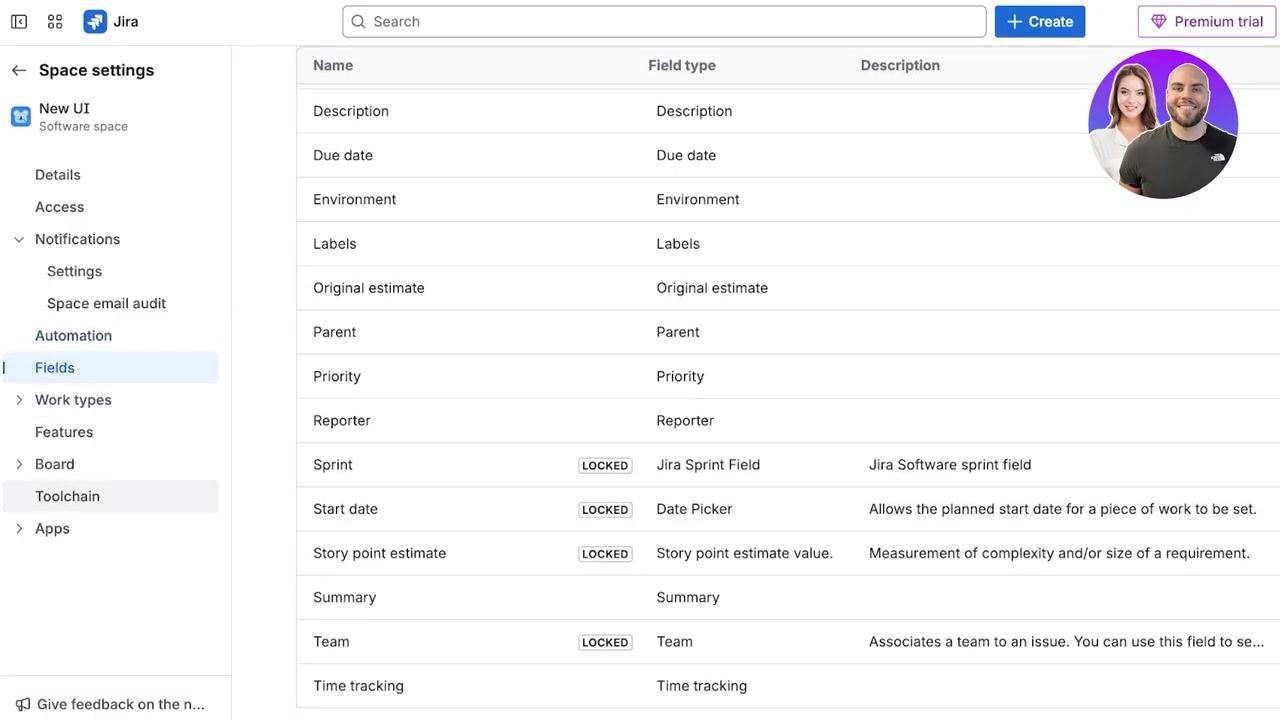
- In Space settings, go to Fields to review the fields available for issues and sprints.
- Common fields include Description, Due date, Environment, Labels, Original estimate, Parent, Priority, Reporter, Sprint, Start date, Story point estimate, Summary, Team, and Time tracking.
-
Some fields, such as Sprint, Start date, Story point estimate, and Team, are locked.
-
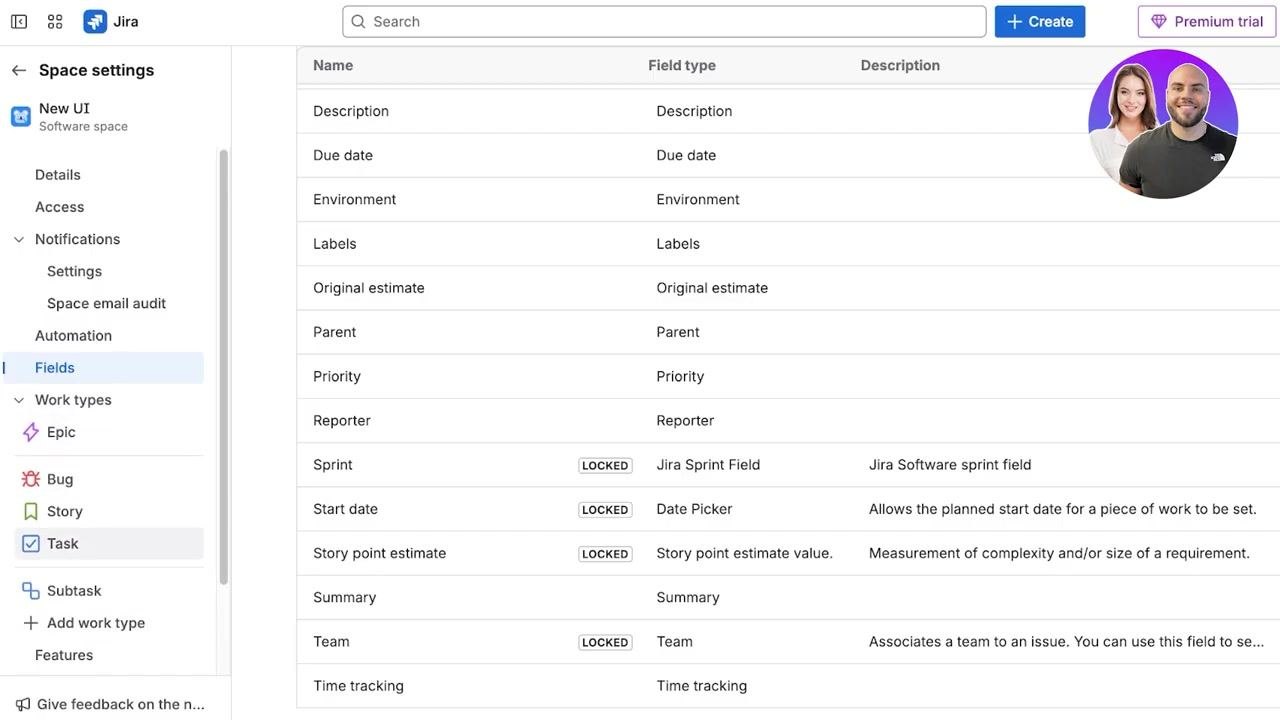
Review work types
- Under Work types, review the default issue types: Epic, Bug, Story, Task, and Subtask.
-
You can add or customize work types as needed.
-
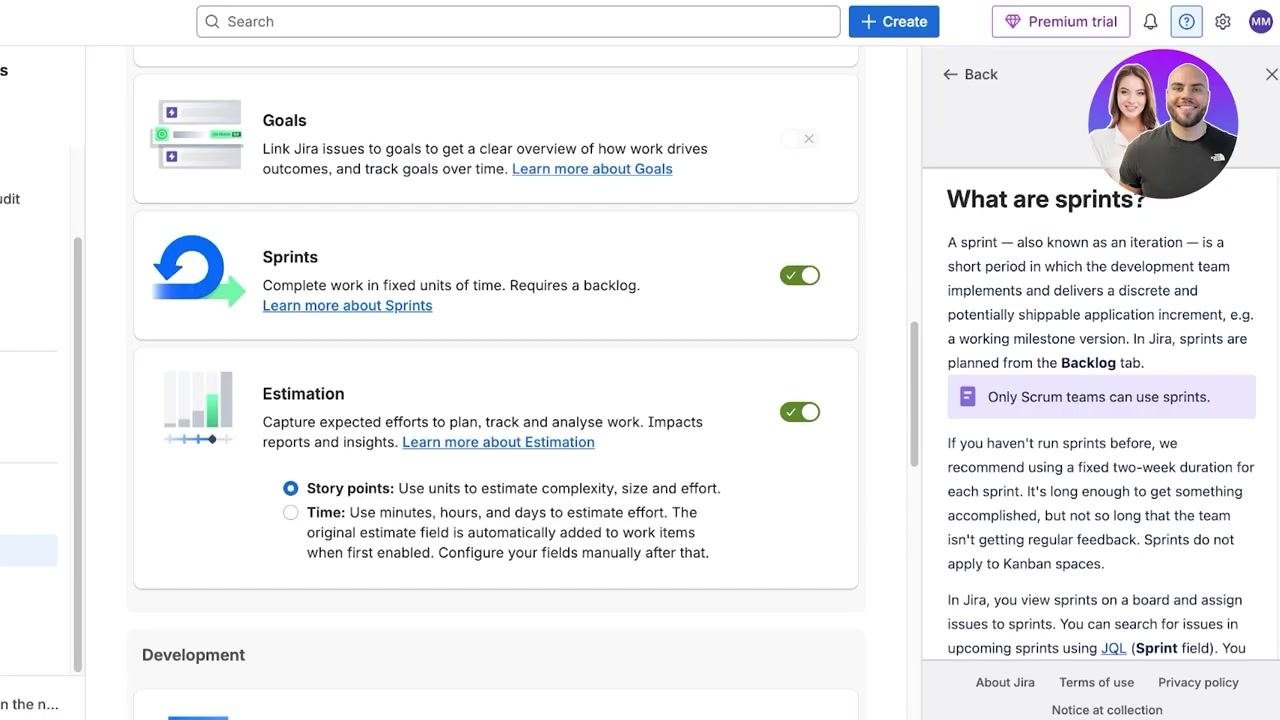
Enable sprints and backlog
- In the Features section, locate the Sprints option.
- Sprints are enabled by default and require a backlog to function.
-
Toggle sprints on or off as needed, and make sure the backlog feature is enabled for sprint planning.
Plan your backlog and create a sprint in Jira
-
Verify sprints and backlog are enabled
- Confirm the Sprints feature is toggled on in your space settings.
- Confirm the backlog is enabled, since sprints require a backlog to function.
-
Review additional features such as Goals, Estimation, Toolchain, and Integrated Apps.
-
Navigate to the backlog tab
- Go to your project space, for example "New UI".
- Click Backlog in the main navigation bar.
-
The board displays sections for your current sprint and backlog; both are empty if no work items exist yet.
-
Understand backlog and sprint planning
- You cannot add issues directly to the board until you have added them to the backlog.
- Use the Backlog section to create and organize work items before assigning them to a sprint.
- The interface prompts you to drag items from the backlog into the sprint or create new ones for planning.
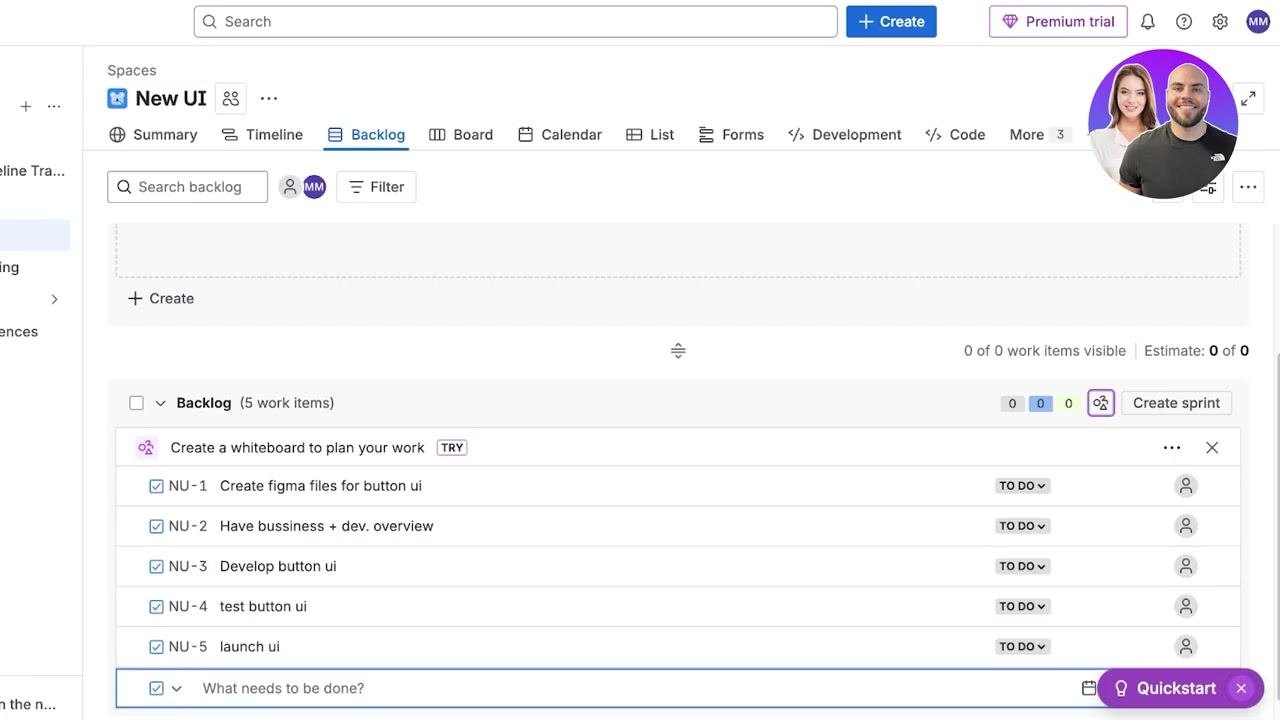
- Create work items in the backlog
- Click + Create in the Backlog section.
- Enter a title for each work item, for example: "Create figma files for button ui," "Have business + dev overview," "Develop button ui," "Test button ui," and "Launch ui."
-
Press Enter or click Create after typing each item, and continue until all planned work items are listed.
-
Review and organize your backlog
- Confirm all required work items are present in the backlog.
- Check that each item is in the "TO DO" state and assigned to the correct backlog section.
- You should see a full list of work items ready to be added to a sprint.
-
Create a new sprint
- Click Create sprint in the backlog view.
- A new sprint, for example "NU Sprint 2," appears above the backlog section.
-
Edit and name your sprint
- Click the sprint name to open the Edit sprint dialog.
- Enter the sprint details:
- Sprint name: for example, "Button Upgrade"
- Duration: Custom (select from the dropdown)
- Start date: your desired start date, for example 12/31/2018, 1:00 PM
- End date: your desired end date, for example 01/14/2019, 1:00 PM
- Sprint goal: optionally, add a goal for the sprint
-
Click Update to save your changes.
Manage your sprint and work items
-
Set sprint duration and start date
- Open Edit sprint for your sprint, for example "NU Sprint 2."
- Enter the sprint name as "Button Upgrade" and set Duration to "2 weeks."
-
Select the start date using the calendar; the end date is automatically set two weeks later.
-
Move work items into the sprint
- Drag and drop items from the Backlog into the Sprint section to plan your sprint.
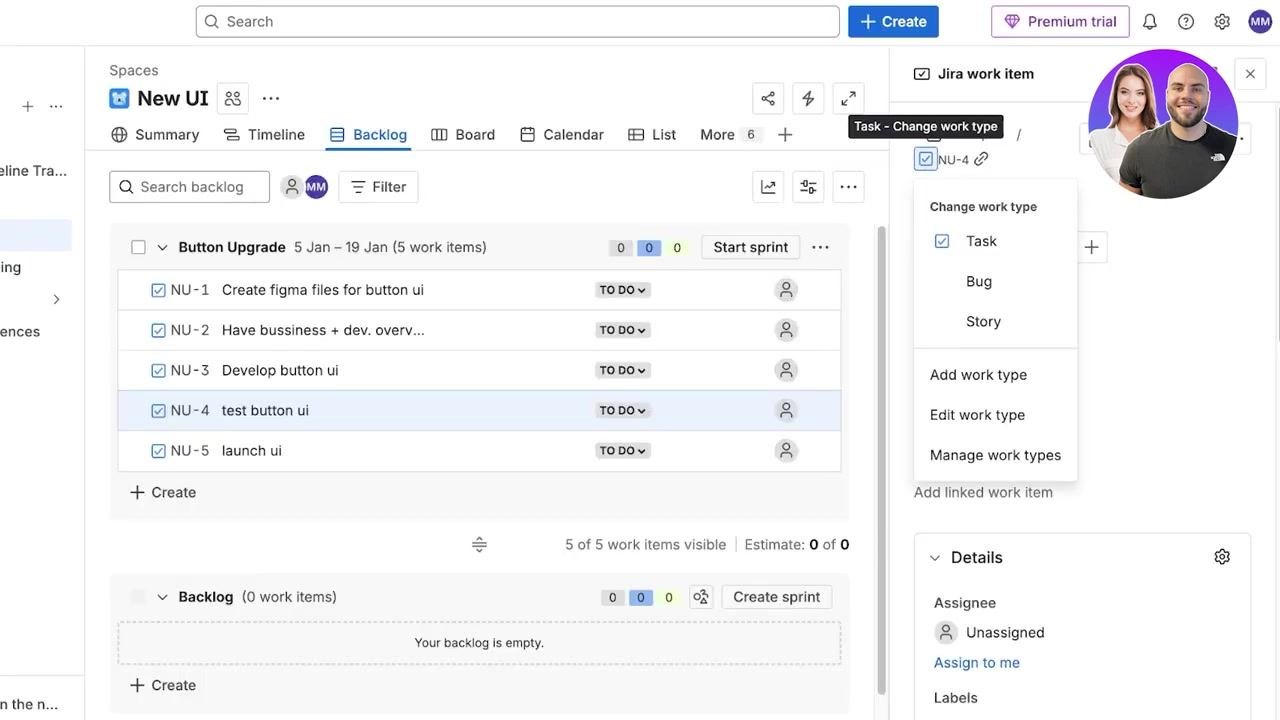
- The sprint section displays the sprint name and date range, for example "Button Upgrade 5 Jan – 19 Jan."
-
The main area prompts you to drag work items from the Backlog or create new ones, then select Start sprint when ready.
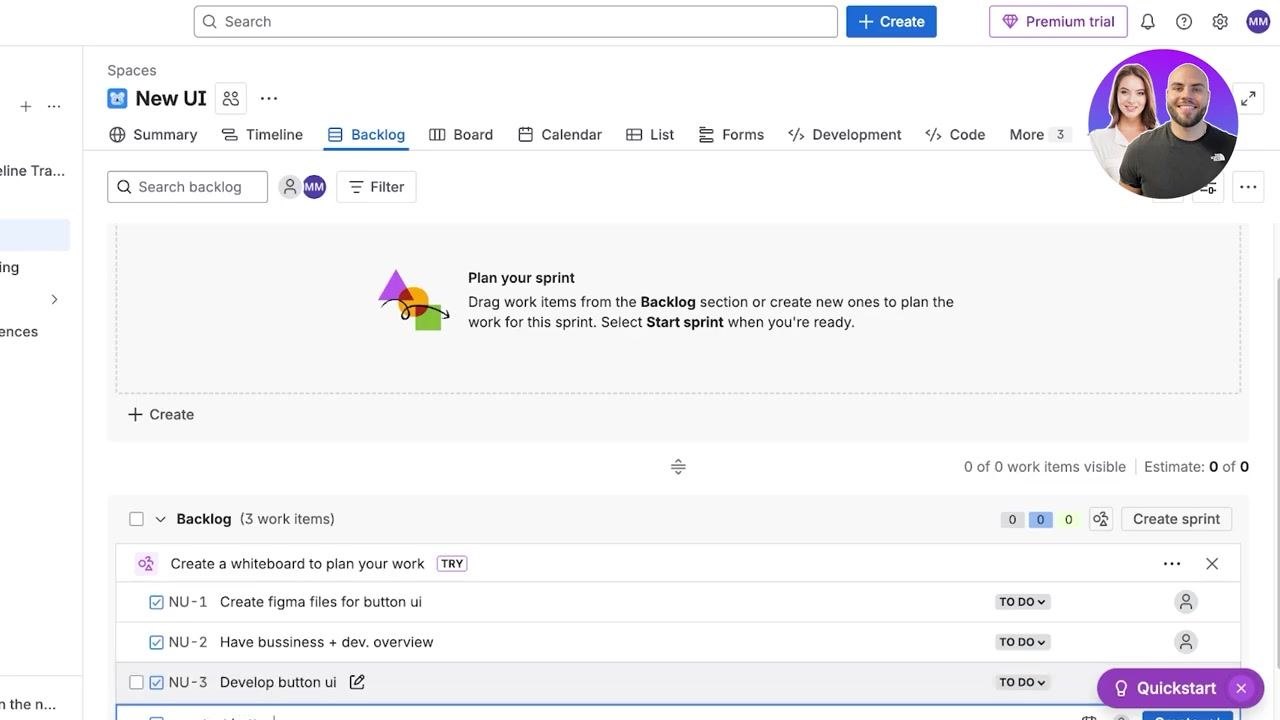
- Organize sprint items by type
- Categorize issues as stories, epics, tasks, or bugs.
- Move relevant work items, such as "Create figma files for button ui" and "Develop button ui," into the sprint.
-
Use the right panel to view and edit details for each work item, including description, subtasks, and assignee.
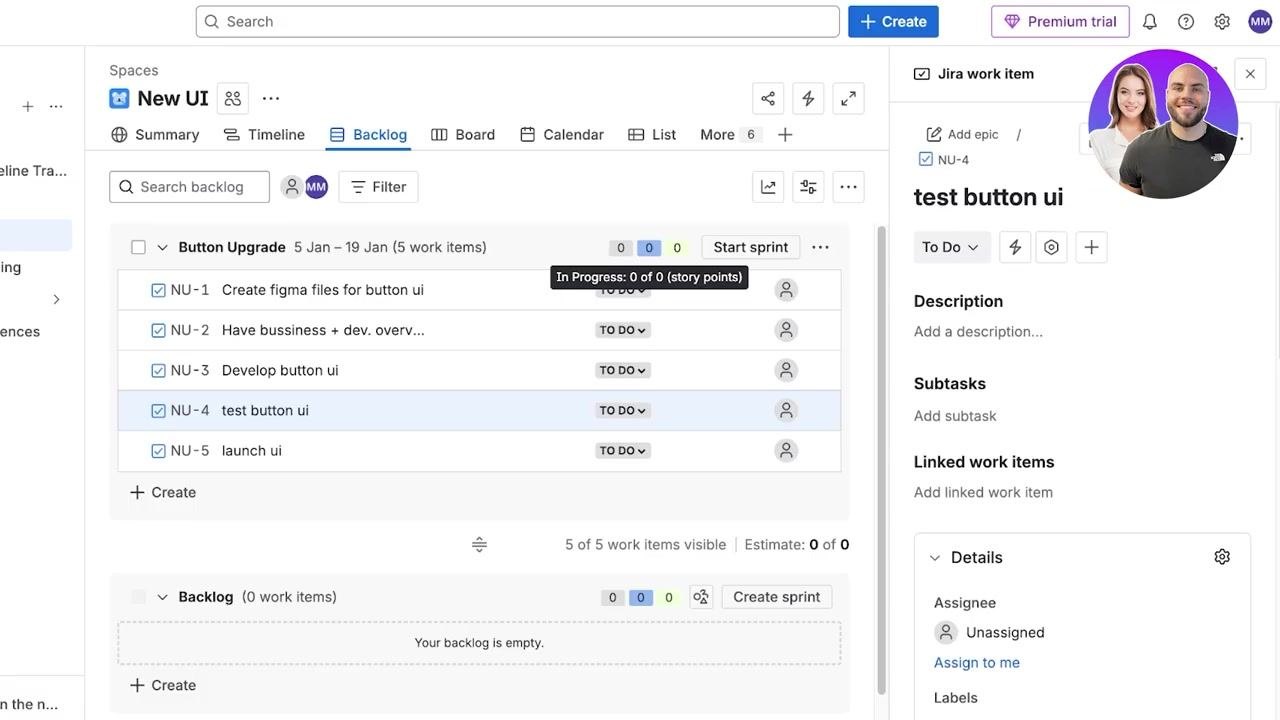
-
Change work item type
- Click the work type dropdown, for example "Task," next to a work item.
- Select the appropriate type: Task, Bug, or Story.
-
You can also add, edit, or manage work types from this menu.
-
Visualize your sprint on the board
- Click Board to switch to the board view.
- The board shows columns for "TO DO," "IN PROGRESS," and "DONE."
-
Each work item shows its current status and assignee, or "Unassigned" if none is set.
-
Apply filters and labels
- Use the Filter button to filter work items by assignee, label, or other criteria.
- Assign labels to categorize tasks as needed.
-
Start your sprint
- Once all items are planned and categorized, click Start sprint.
- A notification confirms: "Sprint started. We've filtered the board to show your new sprint. Good luck, team!"
-
Plan your next sprint
- Return to the backlog view to create and organize future sprints.
Reviewing Jira pricing plans
-
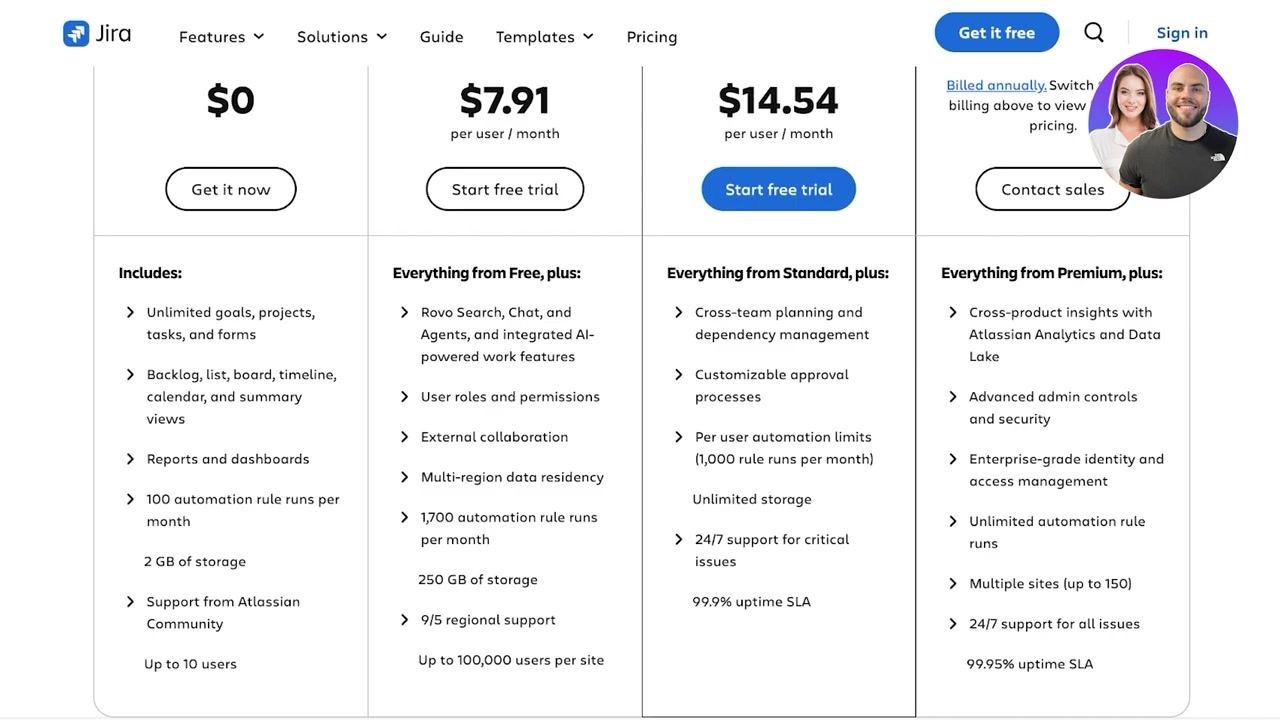
Review Jira's pricing options
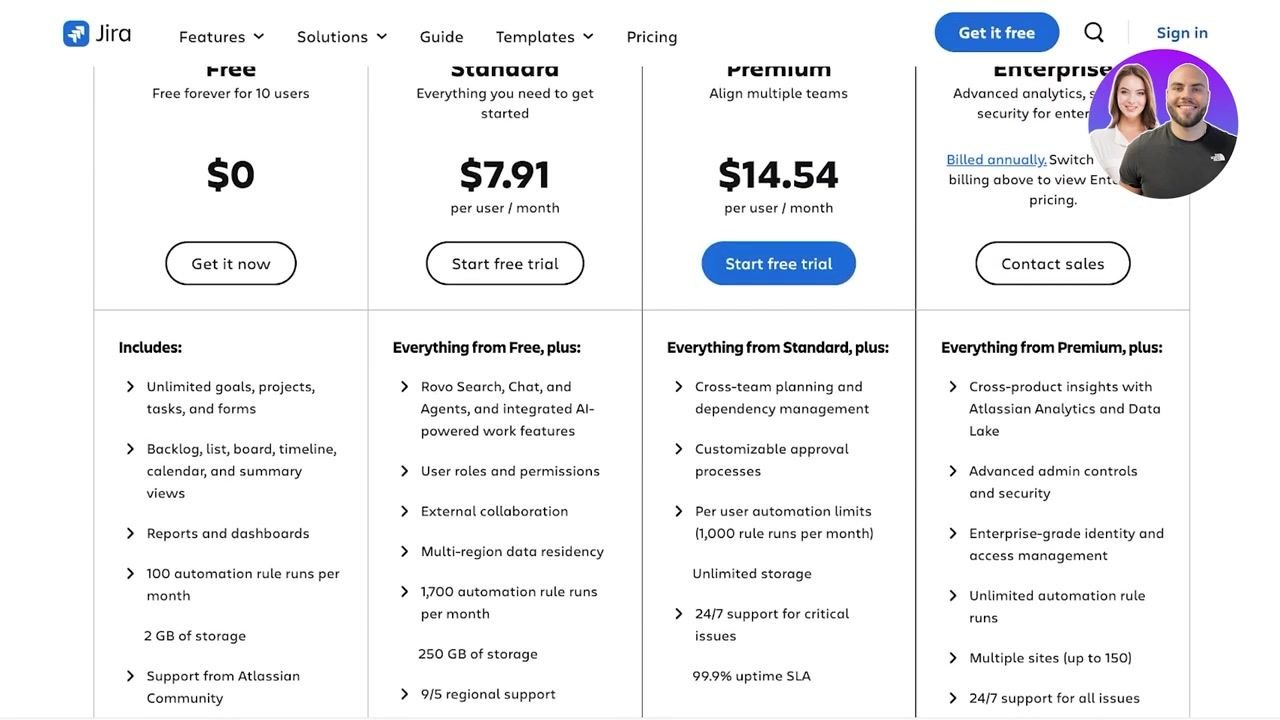
- Free: $0, free forever for up to 10 users. Includes unlimited goals, projects, tasks, forms, backlog, board, timeline, calendar, summary views, reports, dashboards, 100 automation rule runs per month, 2 GB storage, and Atlassian Community support.
- Standard: $7.91 per user/month. Adds Rovo Search, Chat, Agents, AI-powered features, user roles, permissions, external collaboration, multi-region data residency, 1,700 automation rule runs/month, 250 GB storage, and 9/5 regional support.
- Premium: $14.54 per user/month. Adds cross-team planning, dependency management, customizable approval processes, unlimited storage, 24/7 critical support, a 99.9% uptime SLA, and 1,000 automation rule runs/user/month.
-
Enterprise: Contact sales for pricing. Adds cross-product insights, advanced admin controls, enterprise-grade identity and access management, unlimited automation, multiple sites (up to 150), and 24/7 support for all issues.
-
Compare plan details and actions
- The pricing table is divided into four columns: Free, Standard, Premium, and Enterprise.
- Each column lists the plan name, price, a call-to-action button, and a breakdown of included features.
- Free is labeled "Free forever for 10 users" at $0 with a "Get it now" button.
- Standard is $7.91 per user/month with a "Start free trial" button.
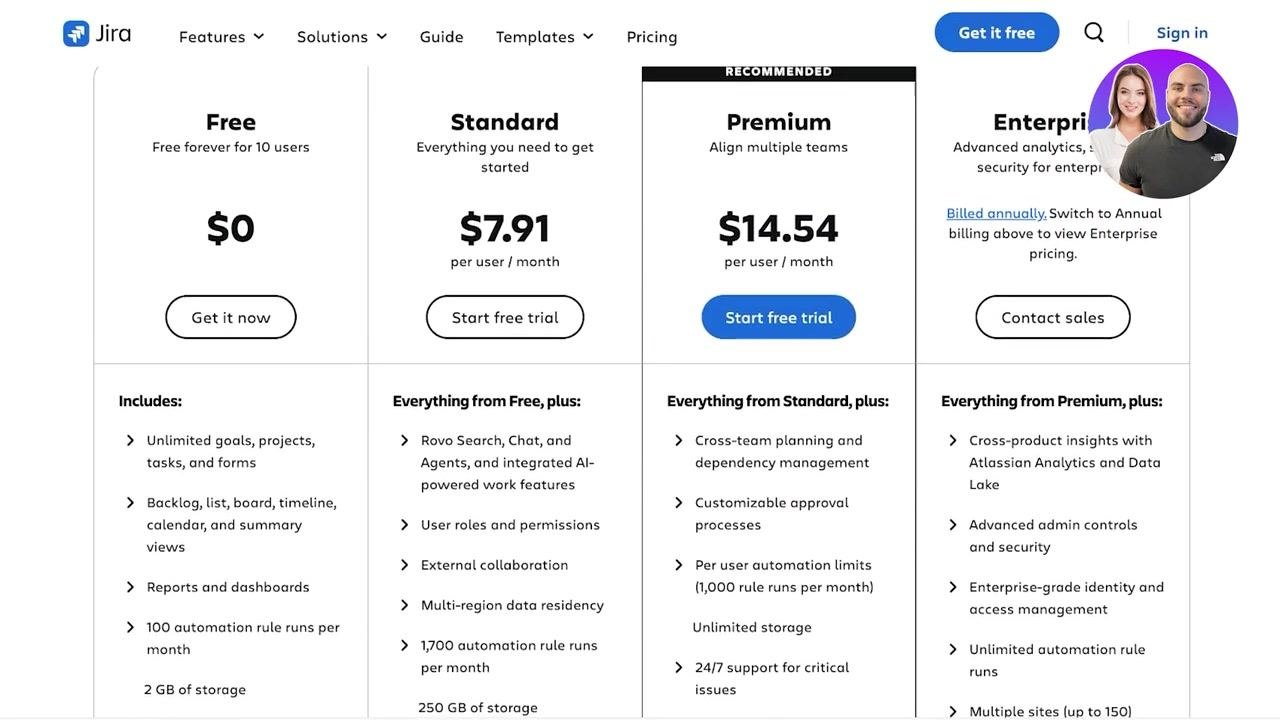
- Premium is marked "RECOMMENDED" at $14.54 per user/month with a "Start free trial" button.
- Enterprise requires contacting sales, with a "Contact sales" button.
-
The top navigation bar includes links for Features, Solutions, Guide, Templates, and Pricing, plus "Get it free" and "Sign in" options.
- Review detailed features for each plan
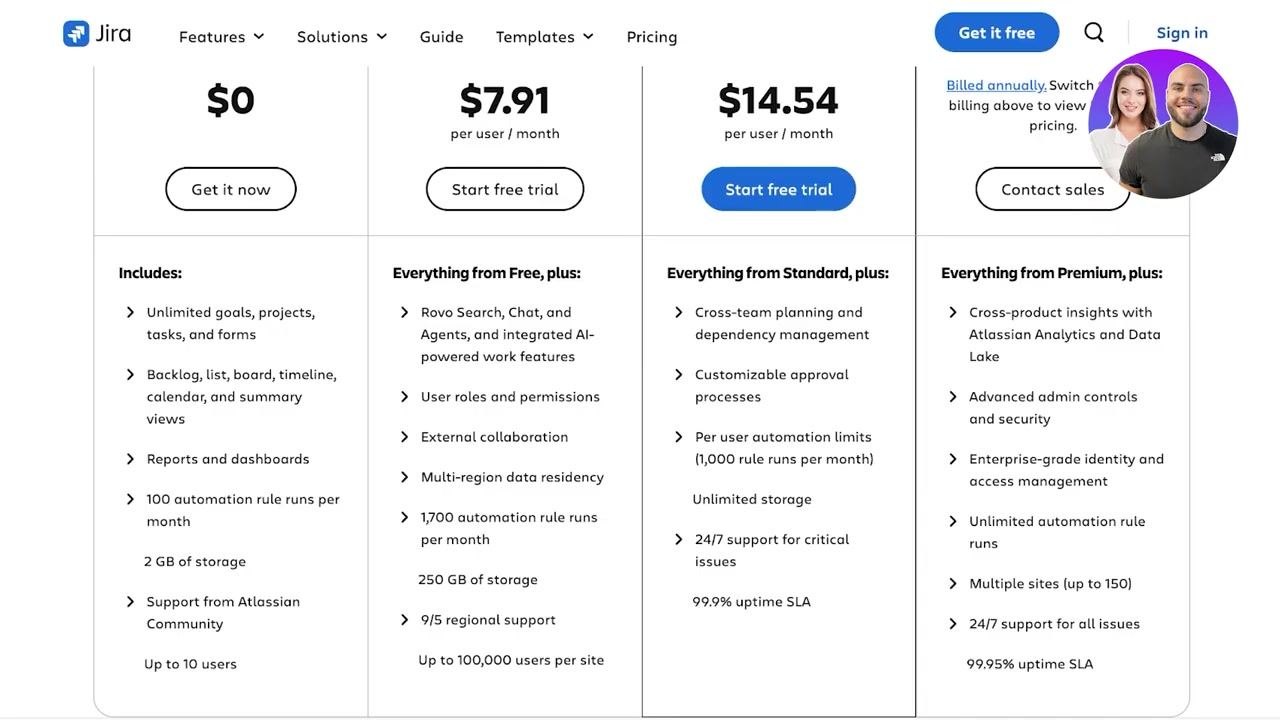
- Free plan ($0, up to 10 users): Unlimited goals, projects, tasks, and forms; backlog, list, board, timeline, calendar, and summary views; reports and dashboards; 100 automation rule runs per month; 2 GB storage; Atlassian Community support.
- Standard plan ($7.91 per user/month): All Free features, plus Rovo Search, Chat, and Agents with integrated AI-powered work features; user roles and permissions; external collaboration; multi-region data residency; 1,700 automation rule runs per month; 250 GB storage; 9/5 regional support; up to 100,000 users per site.
- Premium plan ($14.54 per user/month): All Standard features, plus cross-team planning and dependency management; customizable approval processes; 1,000 automation rule runs per user per month; unlimited storage; 24/7 critical support; a 99.9% uptime SLA.
-
Enterprise plan (contact sales): All Premium features, plus cross-product insights with Atlassian Analytics and Data Lake; advanced admin controls and security; enterprise-grade identity and access management; unlimited automation rule runs; multiple sites (up to 150); 24/7 support for all issues; a 99.95% uptime SLA.
- Note additional pricing details
- The Enterprise plan mentions "Billed annually," and switching to annual billing displays its pricing.
- Use the Contact sales button for Enterprise inquiries.
-
The table stays consistent so you can compare features at a glance across plans.
What's next
With your Scrum space, backlog, and first sprint set up in Jira, you can start moving work items through TO DO, IN PROGRESS, and DONE on the board. Once the sprint ends, return to the backlog to plan your next sprint, and revisit the pricing plans if your team needs additional storage, automation, or support as it grows.
Generation details: cost, quality tiers
Docsie billed 4,500 credits ($3.15) to analyze this 9-minute video at standard quality. The rewrite, template fill and Word/PDF exports were included. The same video at each quality tier:
| Quality | Frames sampled | Credits | Approx. cost |
|---|---|---|---|
| Draft | every 16-30 s | 2,250 | $1.57 |
| Standard (this guide) | every 8-15 s | 4,500 | $3.15 |
| Detailed | every 4-7 s | 9,000 | $6.30 |
| Ultra | every 1-3 s | 18,000 | $12.60 |
Credits priced at $0.70 per 1,000; plans include a monthly allowance. Enterprise customers on on-premise or bring-your-own-model deployments run this on their own inference and pay no per-video credits.
Generated by Docsie Video-to-Docs on 2026-09-10 from a 8-minute video. Screenshots are frames from the source video and belong to their creator, Tutorials by Manizha & Ryan, whose original is embedded above. If you own this video and want the guide removed or credited differently, contact us and we will act within one business day.