
How to Create a Board in Jira
Jira lets you build boards that fit the way your team works, whether that's a simple project board, a portfolio view spanning several projects, or a filtered board for specialized tracking. This guide walks you through how to create a board in Jira, from opening the board menu to configuring a Kanban board with issues pulled from multiple projects. It also covers how to track progress and use quick filters once your board is live.
Video: How to Create a Board in Jira a Step by Step Tutorial – Jira How-to's Series by Jexo by Monday Coffee by Appfire (2022). All credit for the demonstration goes to the creator; watch the original on YouTube. The written guide below was generated from this video by Docsie. Creator? Request a change or removal.
Jira lets you build boards that fit the way your team works, whether that's a simple project board, a portfolio view spanning several projects, or a filtered board for specialized tracking. This guide walks you through how to create a board in Jira, from opening the board menu to configuring a Kanban board with issues pulled from multiple projects. It also covers how to track progress and use quick filters once your board is live.
Prerequisites
- Access to an existing Jira project.
- A company-managed project, if you plan to create more than one board. Team-managed projects support only one board per project.
Navigate to your project
Open Jira and go to one of your existing projects. This is your starting point for creating a new board.
Open the board menu
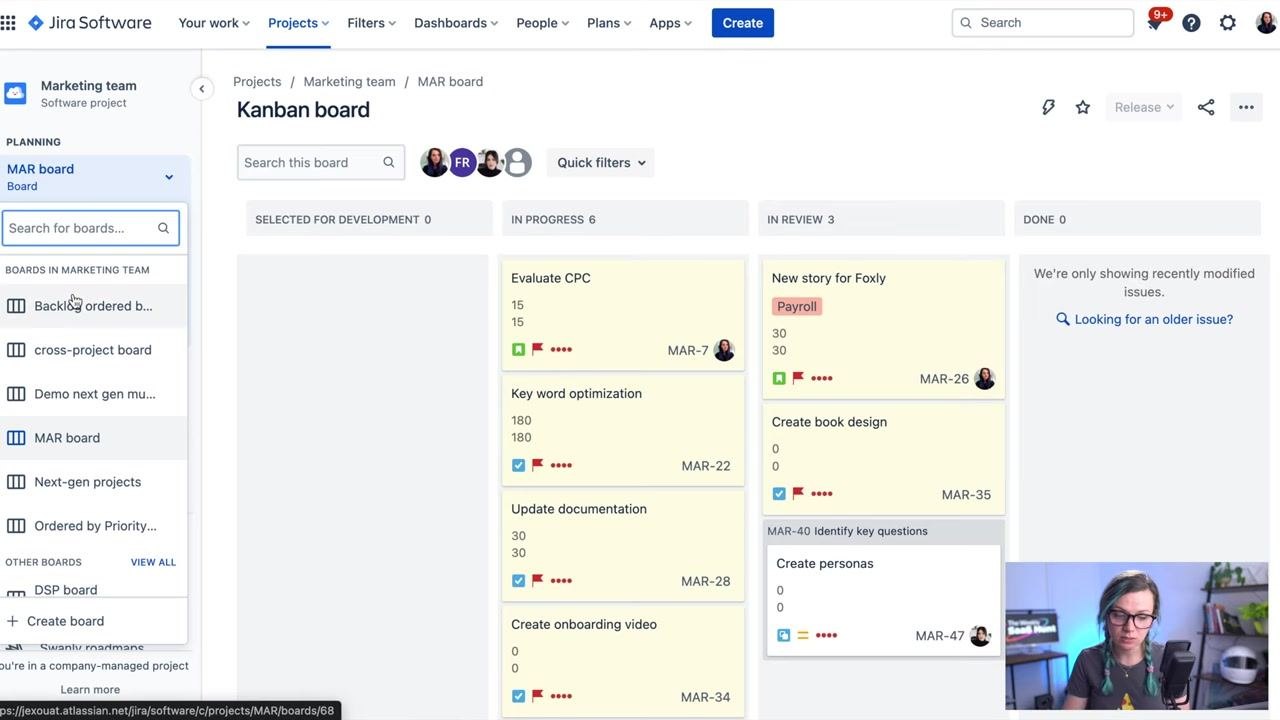
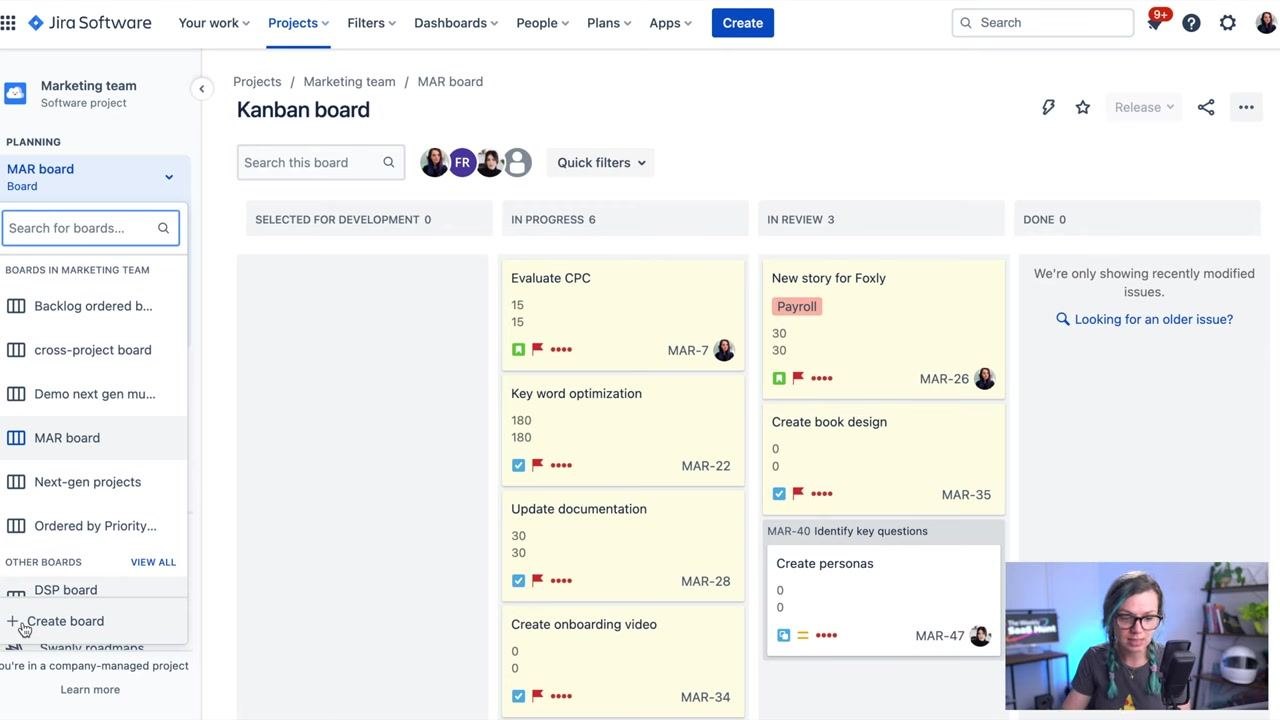
At the top of the project screen, click the Board dropdown menu. This menu lists your available boards and includes the option to create a new one at the bottom.
Confirm your project type
Check the bottom left of the sidebar to confirm you're working in a company-managed project. If the sidebar shows this message, you can proceed to create additional boards. Only company-managed projects support multiple boards; team-managed projects allow just one.
Open the create board dialog
In the Board dropdown, click + Create board to start the board creation process.
Choose a board type
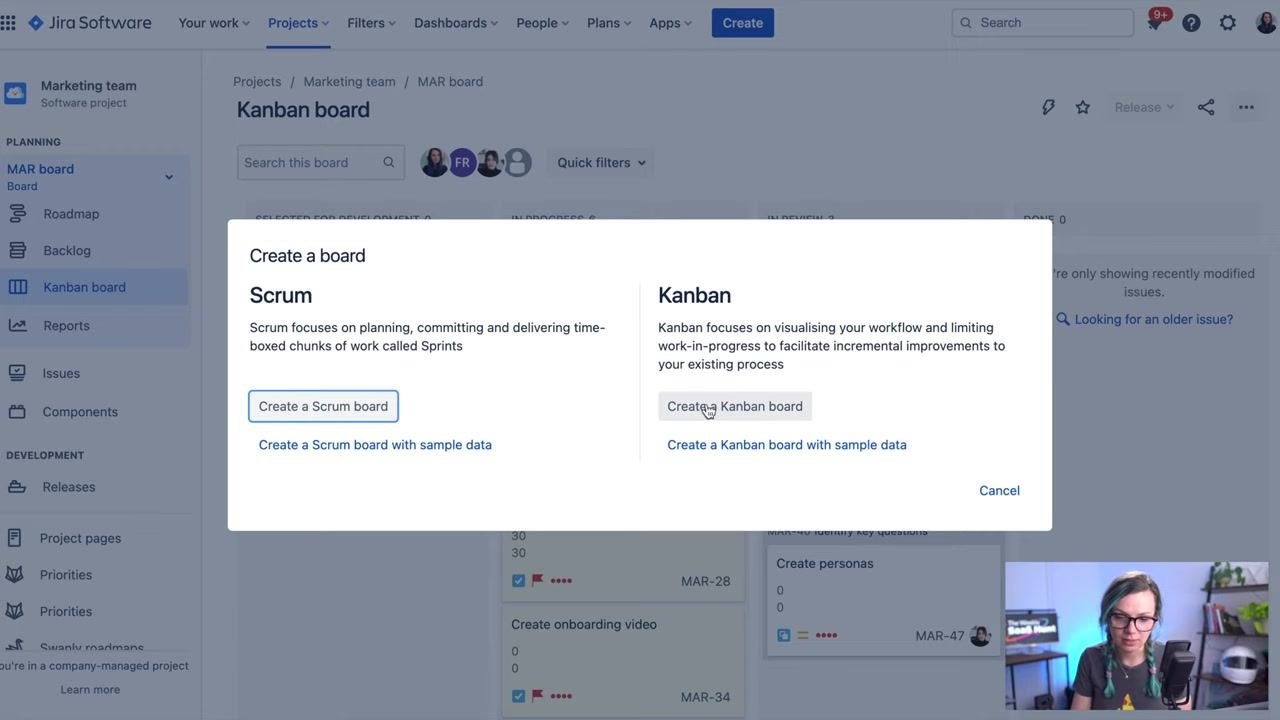
A dialog appears with two board type options: Scrum and Kanban. Scrum boards focus on planning, committing to, and delivering time-boxed chunks of work called Sprints. Kanban boards focus on visualizing your workflow and limiting work in progress to support incremental improvements.
Select Kanban board
Click Create a Kanban board to continue with the Kanban option.
Choose how to create your Kanban board
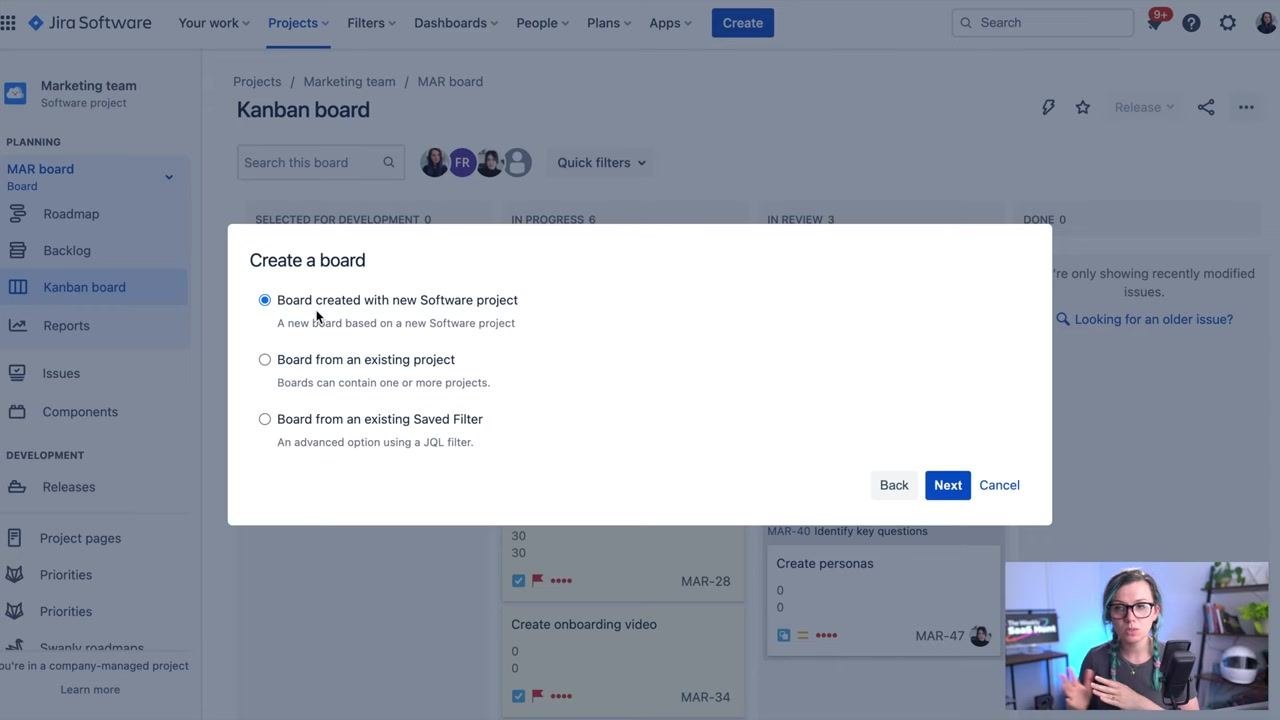
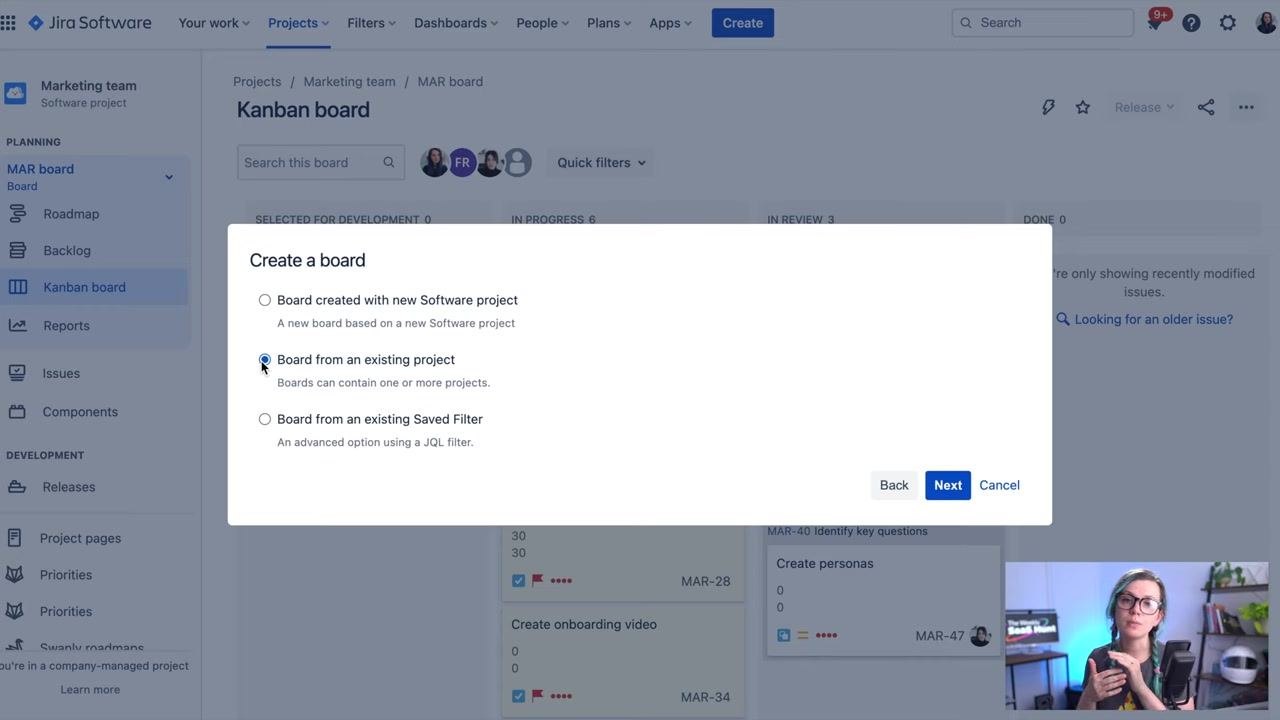
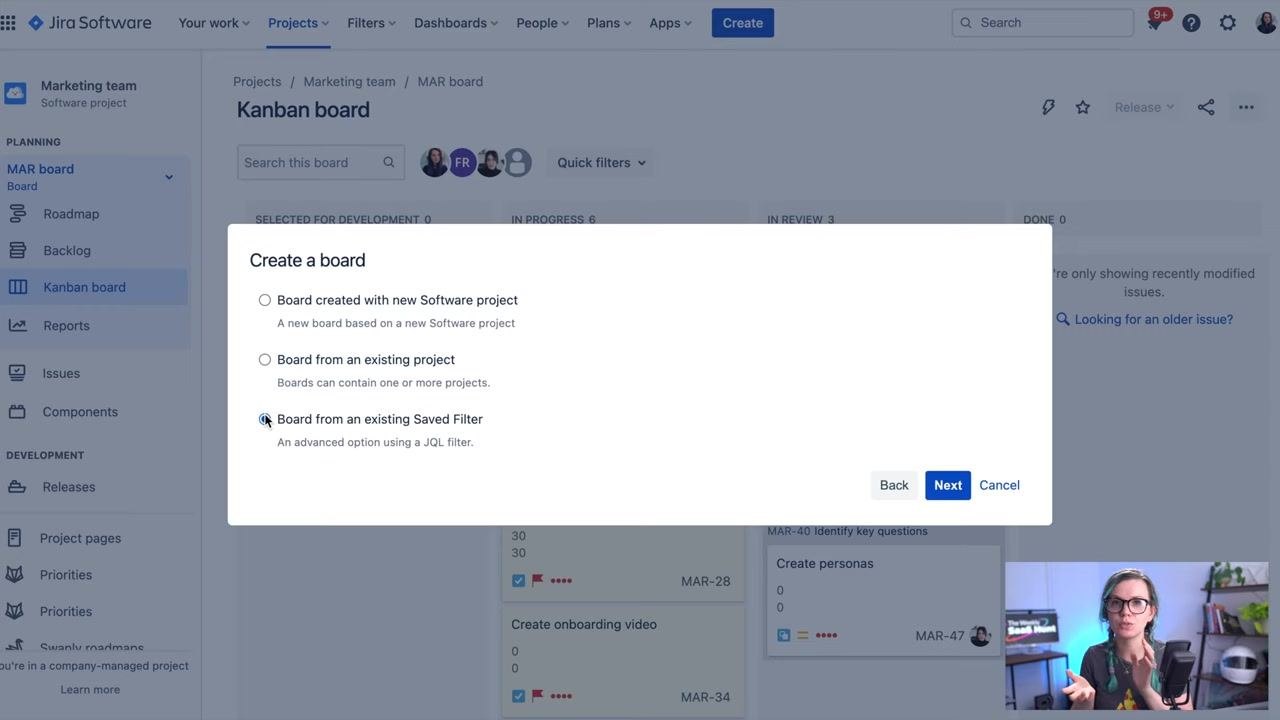
A Create a board dialog appears with three options, each suited to a different use case:
- Board created with new Software project: starts a new board based on a brand-new Software project, ideal when you don't want to mix in existing data.
- Board from an existing project: pulls issues from one or more existing projects into a single board.
- Board from an existing Saved Filter: an advanced option that uses a JQL filter to define which issues appear on the board.
Review the "board from an existing project" option
Select Board from an existing project if you want a Kanban board that aggregates issues from multiple software projects, such as one board per application you develop. This option works well for activities like stand-up meetings or portfolio overviews.
Review the "saved filter" option
Select Board from an existing Saved Filter for advanced tracking needs, such as showing only bugs for QA purposes. This option lets you filter issues across one or multiple projects using criteria like labels, creation date, custom fields, or any JQL expression.
Select "board from an existing project" and continue
Choose Board from an existing project by clicking its radio button, then click Next to move forward with configuring your board.
Name your board and select projects
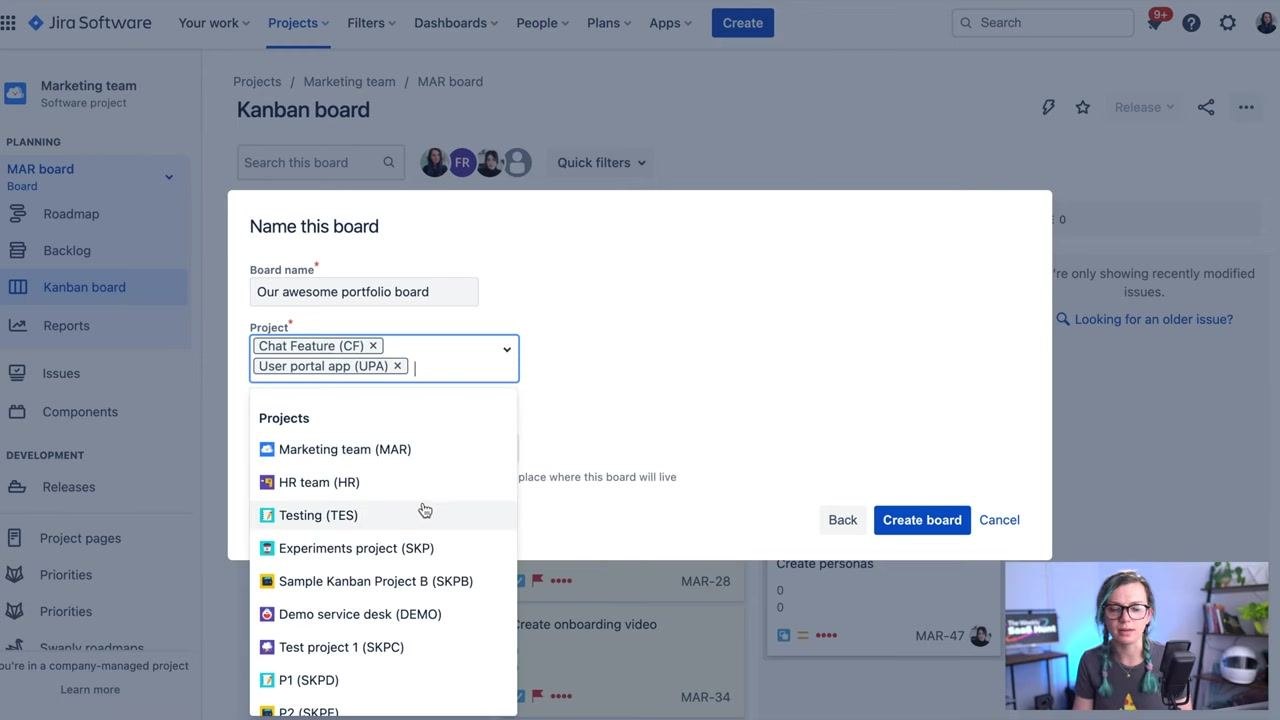
In the Name this board dialog, enter a name in the Board name field, such as Our awesome portfolio board. In the Project field, select one or more projects to include, for example: Chat Feature (CF), User portal app (UPA), and Marketing team (MAR). You can add as many projects as needed to aggregate their issues onto this board.
Choose the board location
In the Location field, select where the board will be accessible from, either a software project or your own profile. For example, selecting Chat Feature (CF) determines where you'll find and access this board later.
Create and view your board
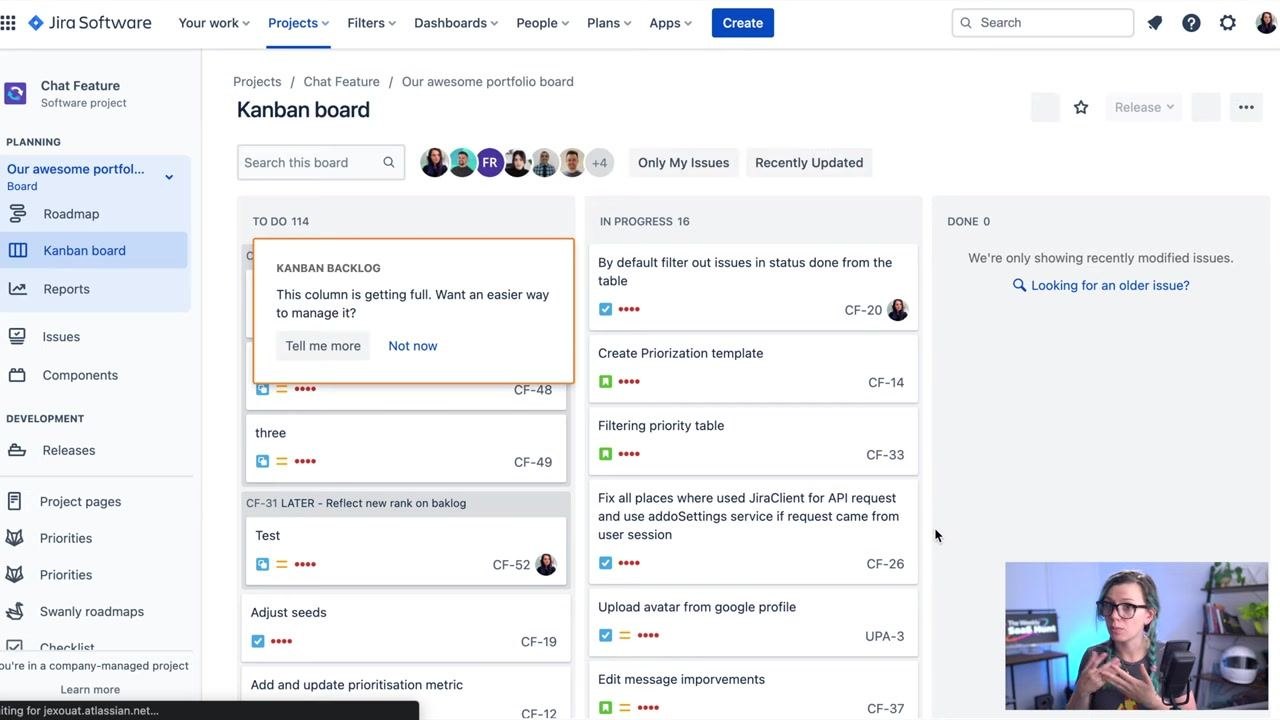
Click Create board to finalize your new Kanban board. Jira displays the board with issues from all selected projects, organized into columns such as To Do, In Progress, and Done. You may see a notification if a column, such as the Kanban Backlog, is getting full, with options like Tell me more or Not now.
Switch between boards
Use the board selector in the left sidebar to switch views. The top section lists boards related to the current project, while other boards appear below under Other Boards. Use the search bar to quickly locate a specific board, and click any board name to switch to it, even if it belongs to a different project.
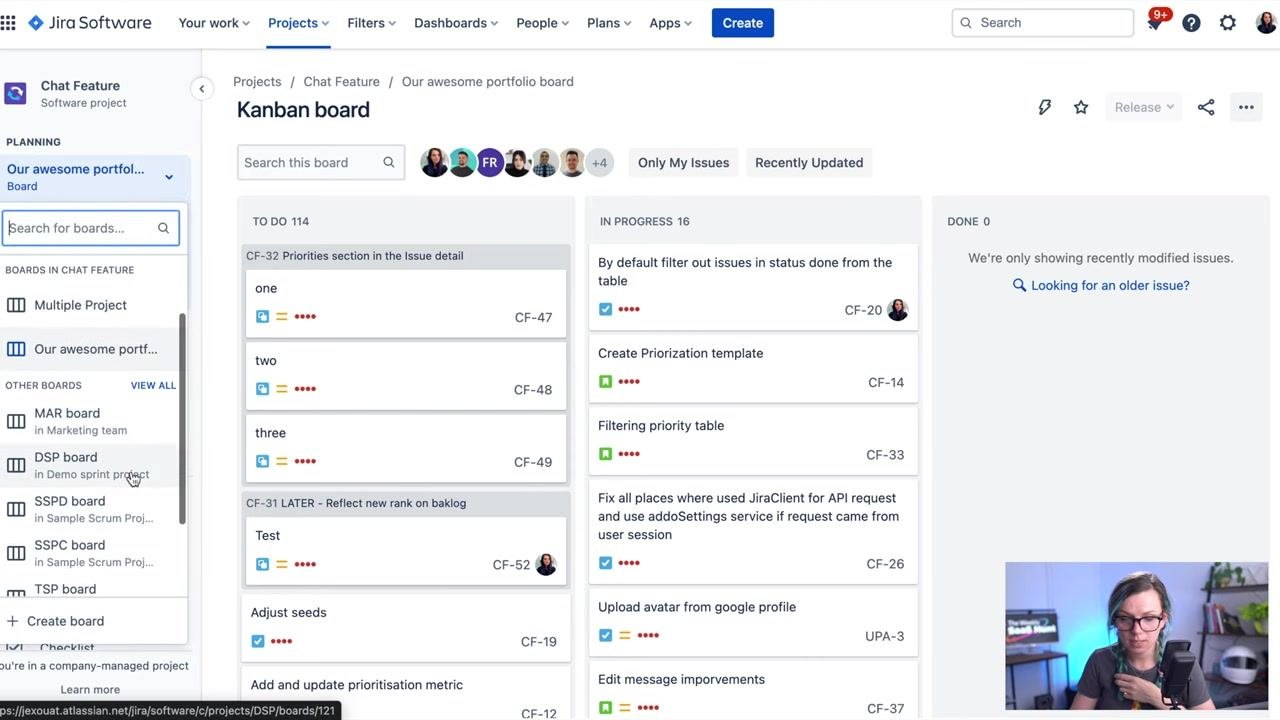
Find boards across projects
If you're unsure where a board is located, use the sidebar search or scroll through Other Boards. Selecting a board from another project automatically switches your context to that project and displays the selected board.
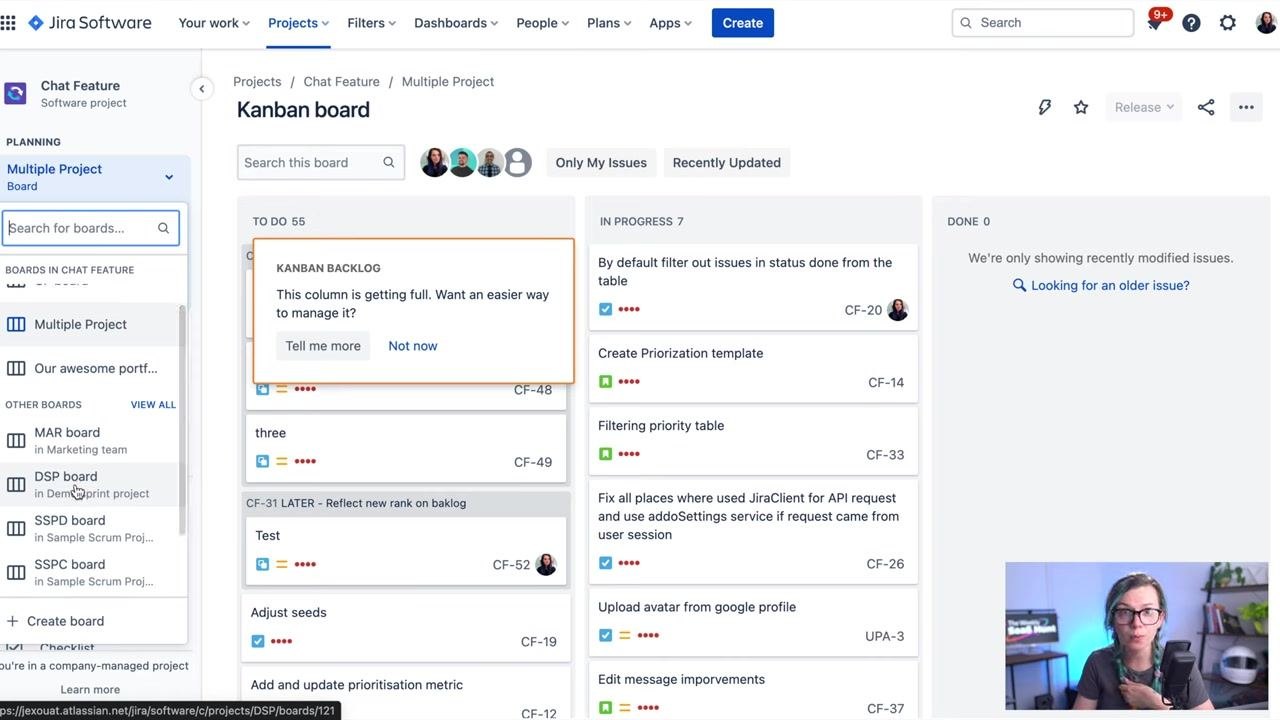
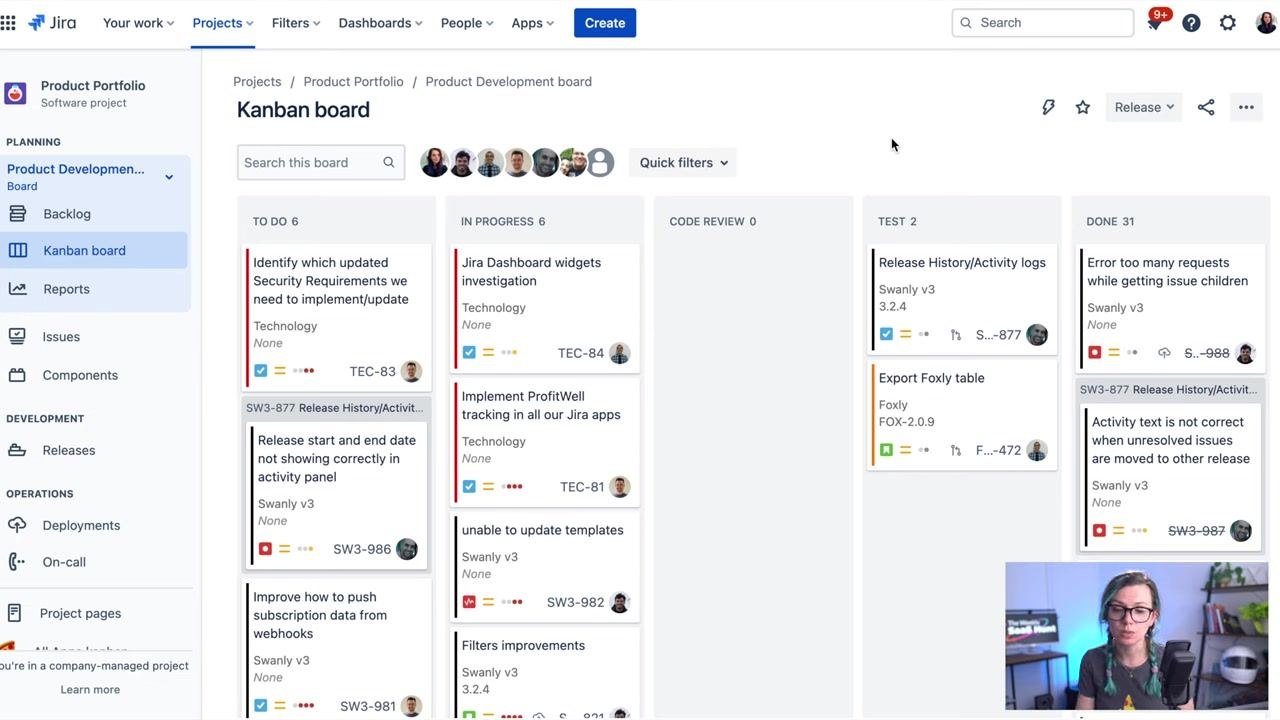
Track progress on your Kanban board
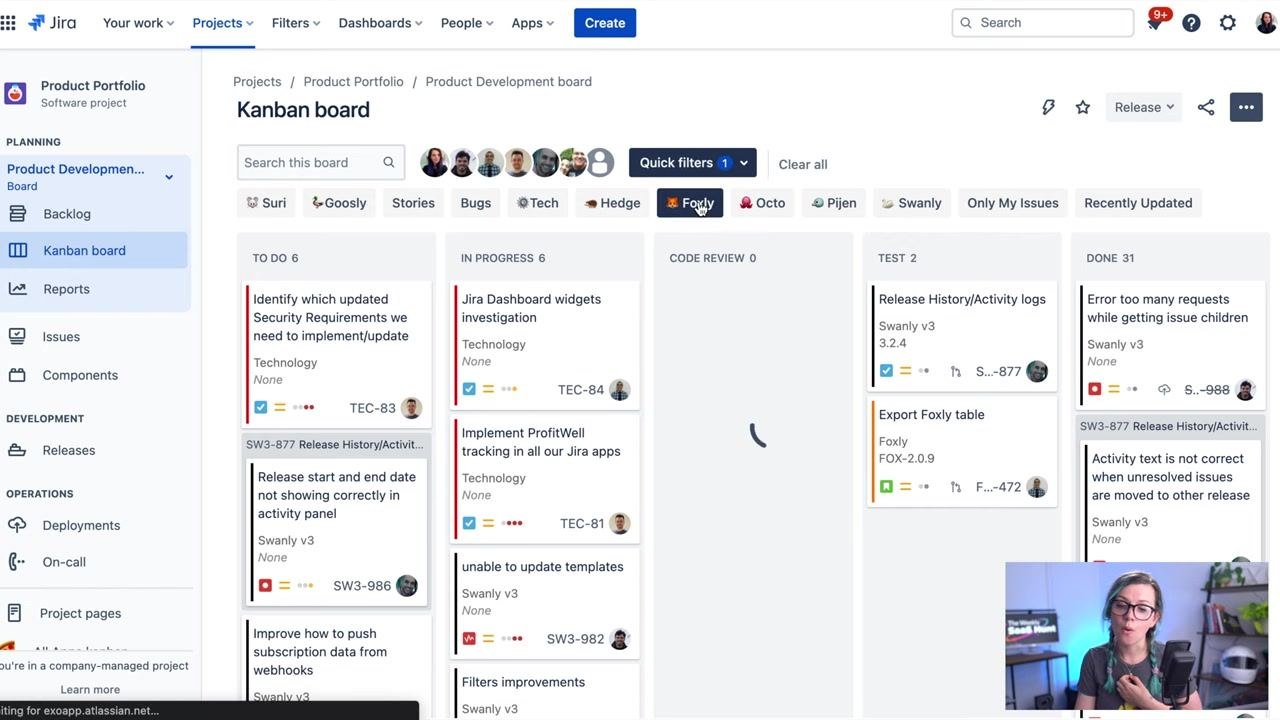
Open your Jira project and go to the Kanban board under the Product Development board. Review the columns—TO DO, IN PROGRESS, CODE REVIEW, TEST, and DONE—and the cards within each one, which show task name, project, assignee, and issue key (for example, TEC-83 or SW3-986). Team member avatars at the top of the board indicate who is involved.
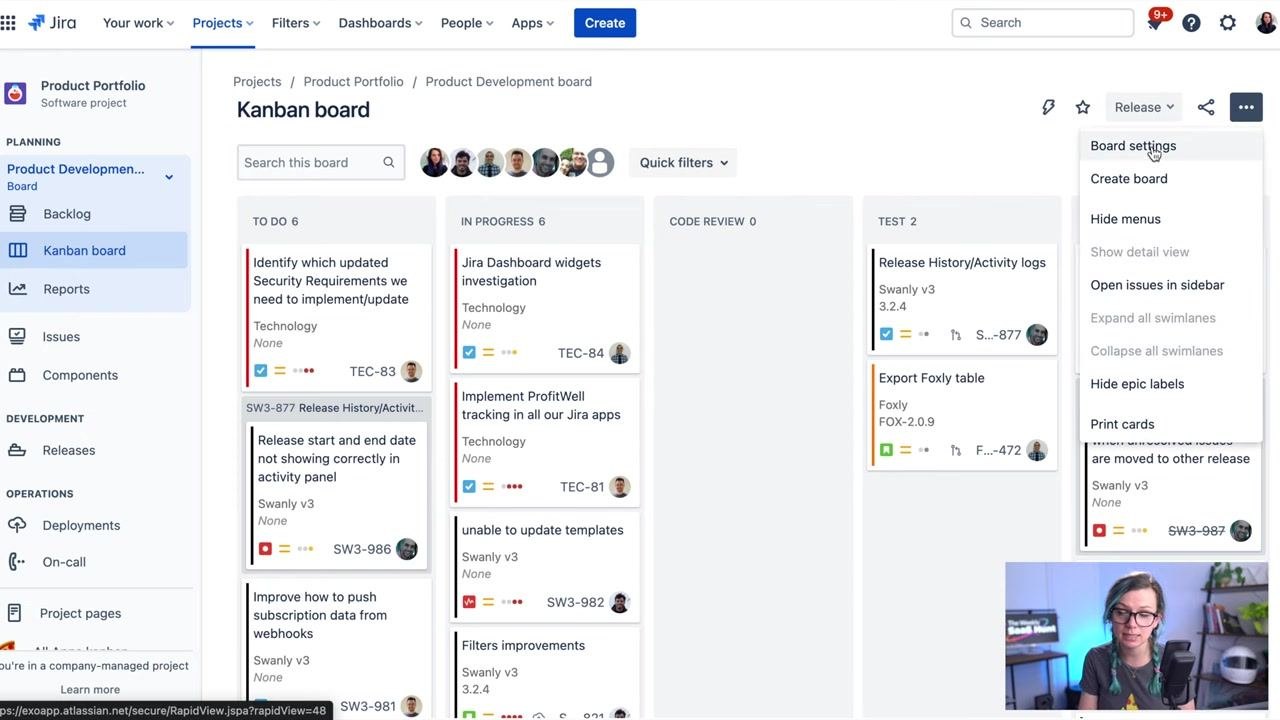
Access quick filters
Locate the Quick filters dropdown above the Kanban board columns and click it to reveal available filters. The three-dot menu in the upper right also provides options such as Board settings, Create board, Hide menus, and Open issues in sidebar.
Filter the board by app
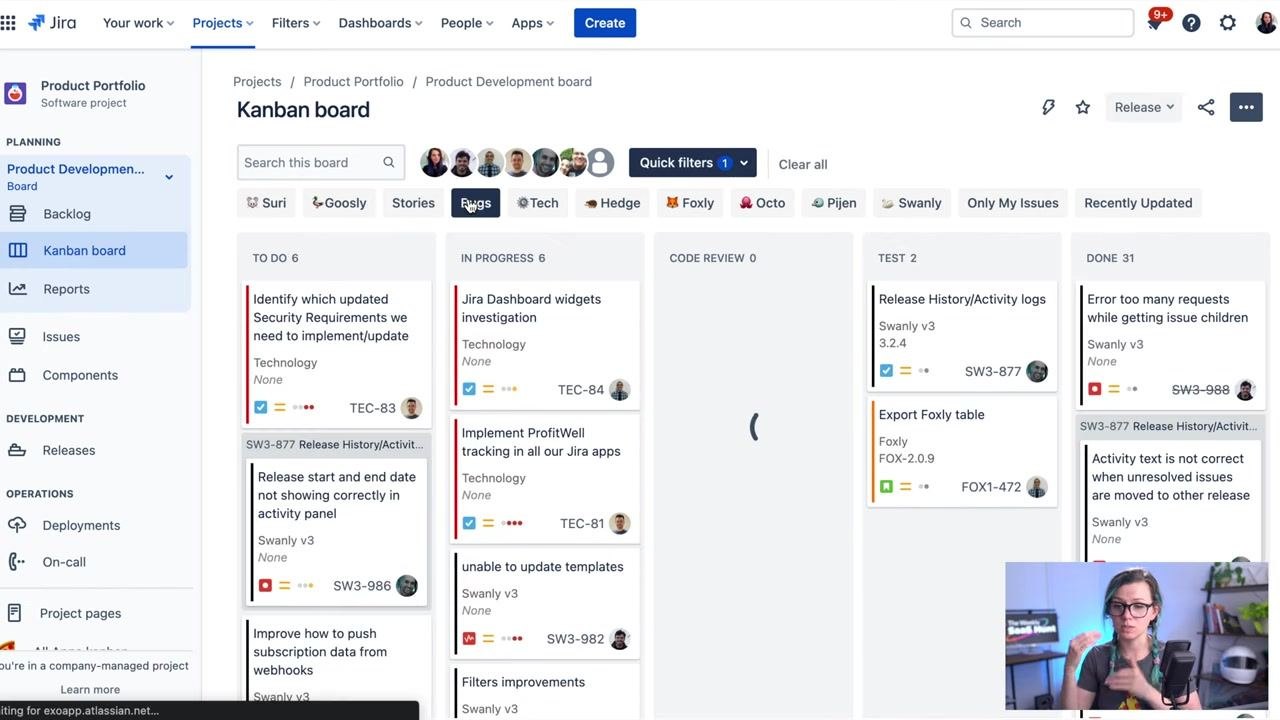
Click any quick filter button, such as Foxly, Suri, Goosly, Stories, Bugs, Tech, Hedge, Octo, Pijen, Swanly, Only My Issues, or Recently Updated, to filter the board by that category. For example, selecting Foxly updates the board to show only issues related to the Foxly app.
Filter by specific issue types
Click filters like Stories or Bugs to focus on particular issue types. The board refreshes to show only issues matching the selected type, letting you quickly isolate stories, bugs, or other custom issue types.
Predefine and manage quick filters
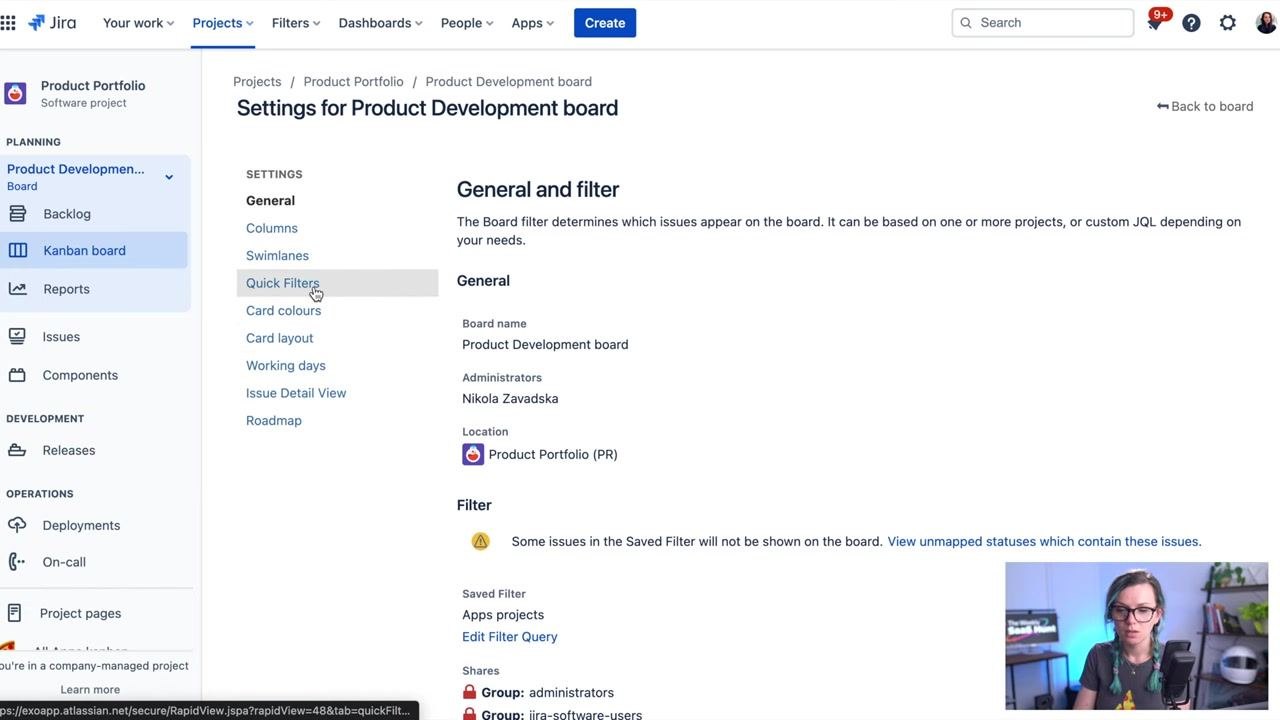
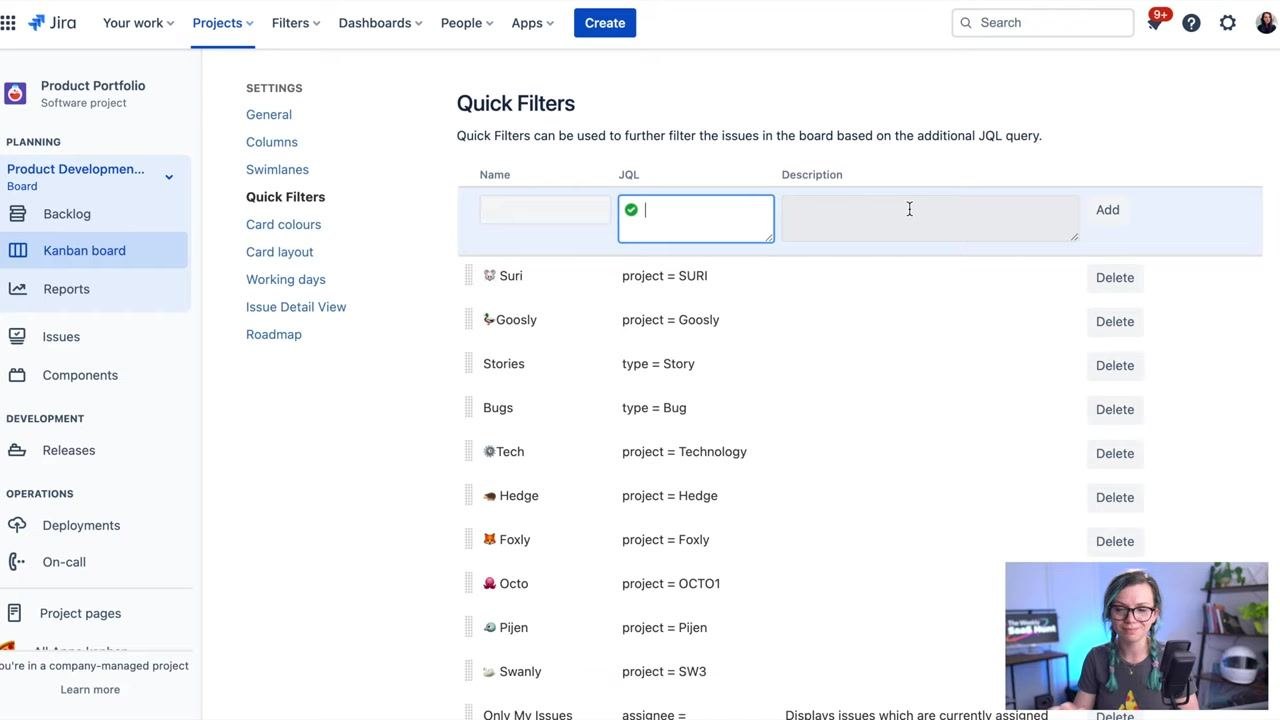
To customize quick filters, click the three-dot menu, select Board settings, then choose Quick Filters from the left-hand settings menu. Here you can view, add, or delete filters. To add a new filter, enter a label in the Name field, enter a JQL expression in the JQL field to define the filter logic (for example, project = SURI), optionally add a description, and click Add to save it.
See your quick filters on the board
Once created, your quick filters appear as buttons at the top of the Kanban board. Use these buttons to instantly filter the board according to your predefined criteria, helping your team focus on relevant issues quickly.
Summary
You now know how to create a board in Jira, whether starting from a new Software project, aggregating issues from existing projects, or building a board from a saved filter. You've also seen how to name and locate a board, switch between boards, track progress across Kanban columns, and set up quick filters to streamline navigation.
What's next
- Explore Scrum boards and Sprints if your team plans work in time-boxed cycles.
- Set up additional quick filters using JQL to match your team's specific tracking needs.
- Use the board settings menu to further customize columns, swimlanes, and other board configurations.




Generation details: cost, quality tiers
Docsie billed 4,000 credits ($2.80) to analyze this 8-minute video at standard quality. The rewrite, template fill and Word/PDF exports were included. The same video at each quality tier:
| Quality | Frames sampled | Credits | Approx. cost |
|---|---|---|---|
| Draft | every 16-30 s | 2,000 | $1.40 |
| Standard (this guide) | every 8-15 s | 4,000 | $2.80 |
| Detailed | every 4-7 s | 8,000 | $5.60 |
| Ultra | every 1-3 s | 16,000 | $11.20 |
Credits priced at $0.70 per 1,000; plans include a monthly allowance. Enterprise customers on on-premise or bring-your-own-model deployments run this on their own inference and pay no per-video credits.
Generated by Docsie Video-to-Docs on 2026-09-08 from a 7-minute video. Screenshots are frames from the source video and belong to their creator, Monday Coffee by Appfire , whose original is embedded above. If you own this video and want the guide removed or credited differently, contact us and we will act within one business day.