
How to Create an Epic in Jira
This guide walks you through everything you need to know about working with epics in Jira Software, including how to create them, how they behave differently on Kanban and Scrum boards, how to associate stories with epics, and how to use visual cues like epic colors to manage your backlog efficiently.
Video: How to Create and Use Epics in Jira - Atlassian Jira Software Tutorial by Apetech Tech Tutorials (2022). All credit for the demonstration goes to the creator; watch the original on YouTube. The written guide below was generated from this video by Docsie. Creator? Request a change or removal.
This guide walks you through everything you need to know about working with epics in Jira Software, including how to create them, how they behave differently on Kanban and Scrum boards, how to associate stories with epics, and how to use visual cues like epic colors to manage your backlog efficiently.
Prerequisites
- Access to a Jira Software project (Kanban or Scrum board type)
- Permission to create and edit issues in your project
The instructions in this guide apply to both Kanban and Scrum boards, with differences noted where relevant.
Navigating to your Jira board
- Open your Jira Software project and make sure you are on the board view (Kanban or Scrum).
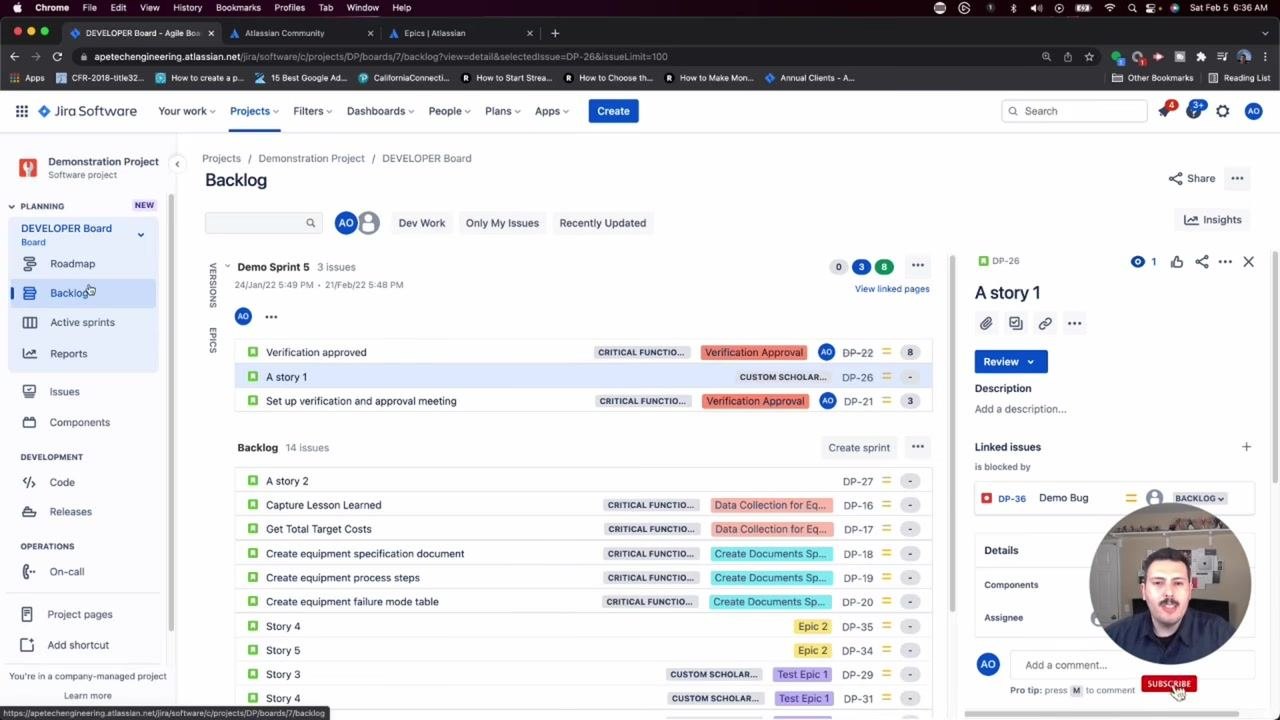
- In the left sidebar, select Backlog under your board (for example, "DEVELOPER Board").
- Review the backlog and sprint sections, which display issues along with their associated epics.
- Note the details panel on the right side of the screen, which shows information for whichever issue is currently selected.
Creating an epic
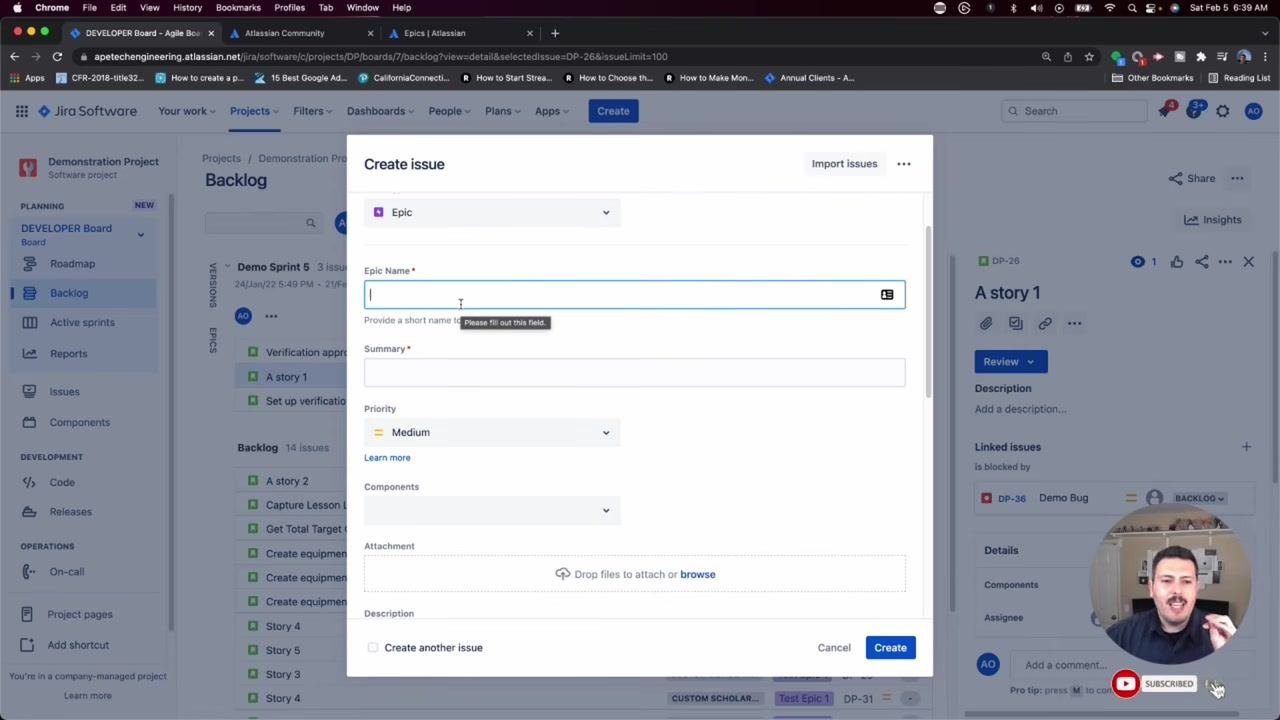
- Click the Create button at the top of the Jira interface.
- In the Create issue dialog, confirm that the correct project is selected (for example, "Demonstration Project").
- By default, the Issue type field may be set to "Story." Click the dropdown to change it.
- Select Epic from the dropdown menu.
- Fill in the required fields for your epic, including the summary and any other relevant details.
- Click Create to add the new epic to your project.
Jira handles epics slightly differently depending on the board type, but the creation process itself is the same for both Kanban and Scrum boards.
Understanding Epic Name vs. Summary
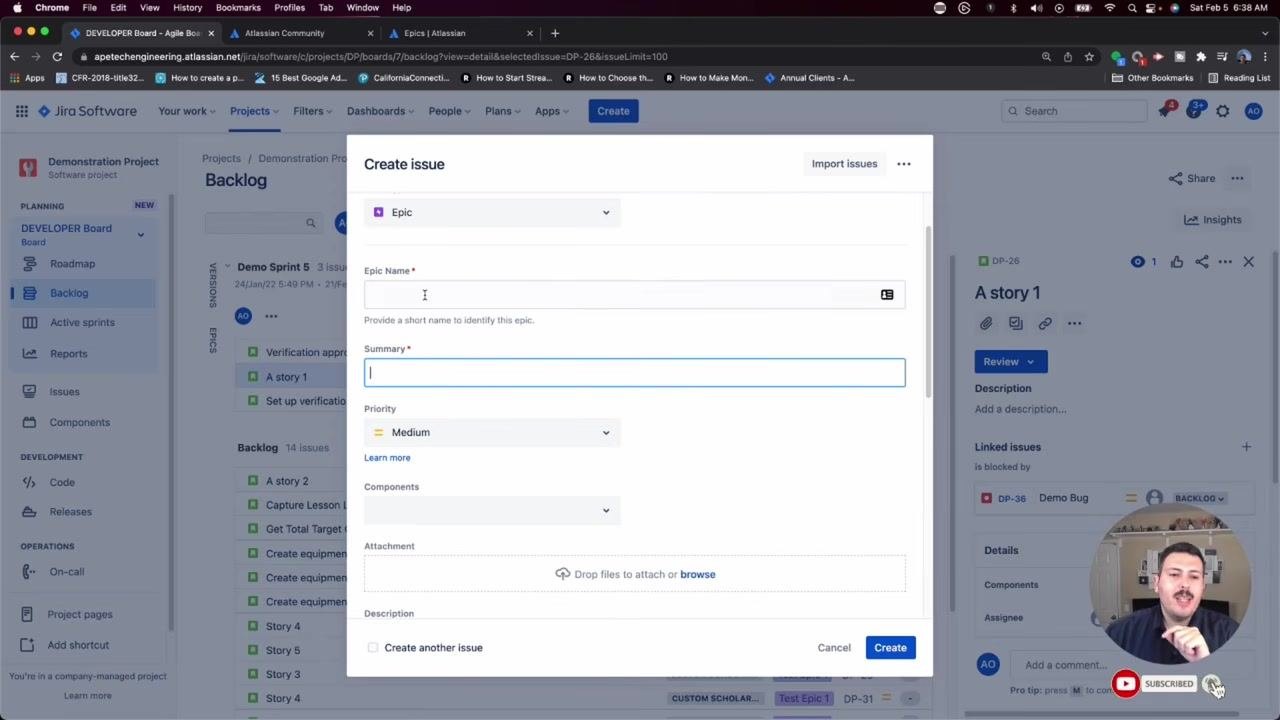
When creating an epic, you'll notice two related but distinct fields: Summary and Epic Name. Understanding the difference between them will help you keep your epics organized and easy to navigate.
-
Recognize that the Summary field is required for every issue in Jira, including epics.
- The summary acts as the "title" of the issue, even though Jira labels the field "Summary" rather than "Title."
- No issue can exist without a summary.
- Jira uses the summary to name your epic in most places throughout the interface.
-
Understand the role of the Epic Name field:
- Epic Name is also required when creating an epic.
- While the summary and epic name are often identical, they serve different purposes.
- The epic name is what appears as the "Epic Link" on stories and tasks associated with the epic.
- Many users copy and paste the same text into both fields, but they remain technically separate.
-
Note the practical difference between the two fields:
- The Epic Name is visible at the story level as the "Epic Link," helping you identify which epic a story belongs to.
- This link creates the parent-child relationship between an epic and its associated stories.
- The summary is the main title of the epic itself, while the epic name is the label displayed on linked issues.
-
Apply these best practices when naming an epic:
- If your summary is very long (for example, 200 characters), keep the epic name short, precise, concise, and descriptive.
- The epic name appears on every story linked to the epic, but only the first few characters may be visible in some views.
- Avoid long or vague epic names, since they make it harder to identify related stories at a glance.
- Example: if your summary is "Implement new authentication system for all user types across mobile and web platforms," a good epic name would be "Auth System Overhaul."
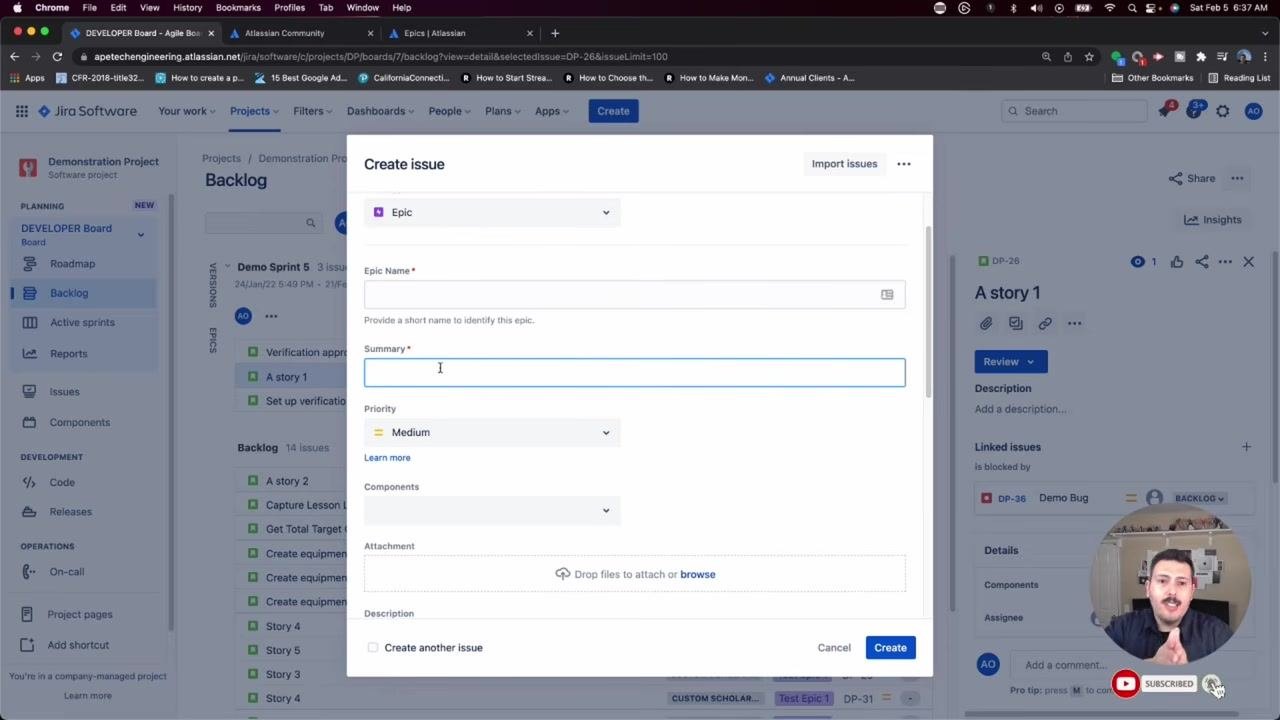
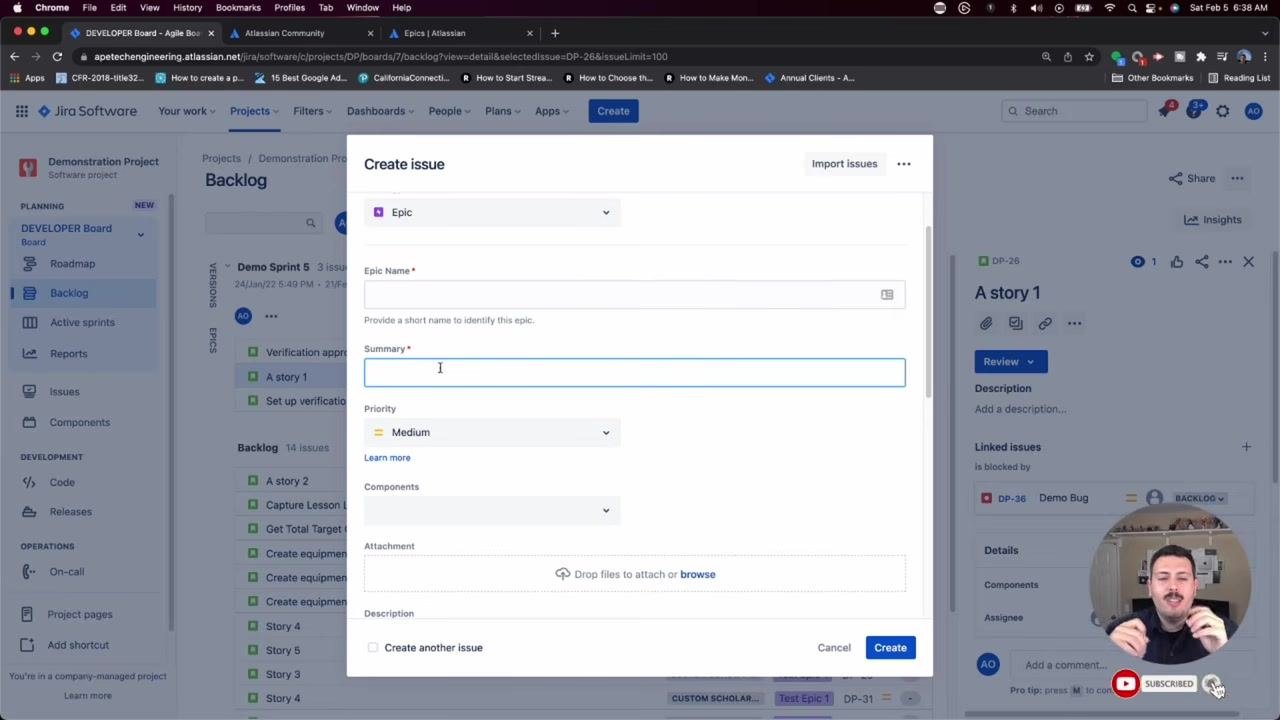
- Remember the key takeaway: give your epic a short, precise, concise, and descriptive name so your team can quickly identify its purpose when viewing linked stories and tasks.
Locating epics on Scrum vs. Kanban boards
Epics behave differently depending on your board type. Follow these steps to see the difference firsthand.
-
Create a demo epic to test this behavior:
- Open the Create issue dialog.
- Select Epic as the issue type.
- Enter "A demo Epic" as the Epic Name.
- Enter "A demo Epic" as the Summary.
- Set Priority to "Medium."
- Optionally, add components, attachments, or a description.
- Click Create.
-
Confirm that your epic was created:
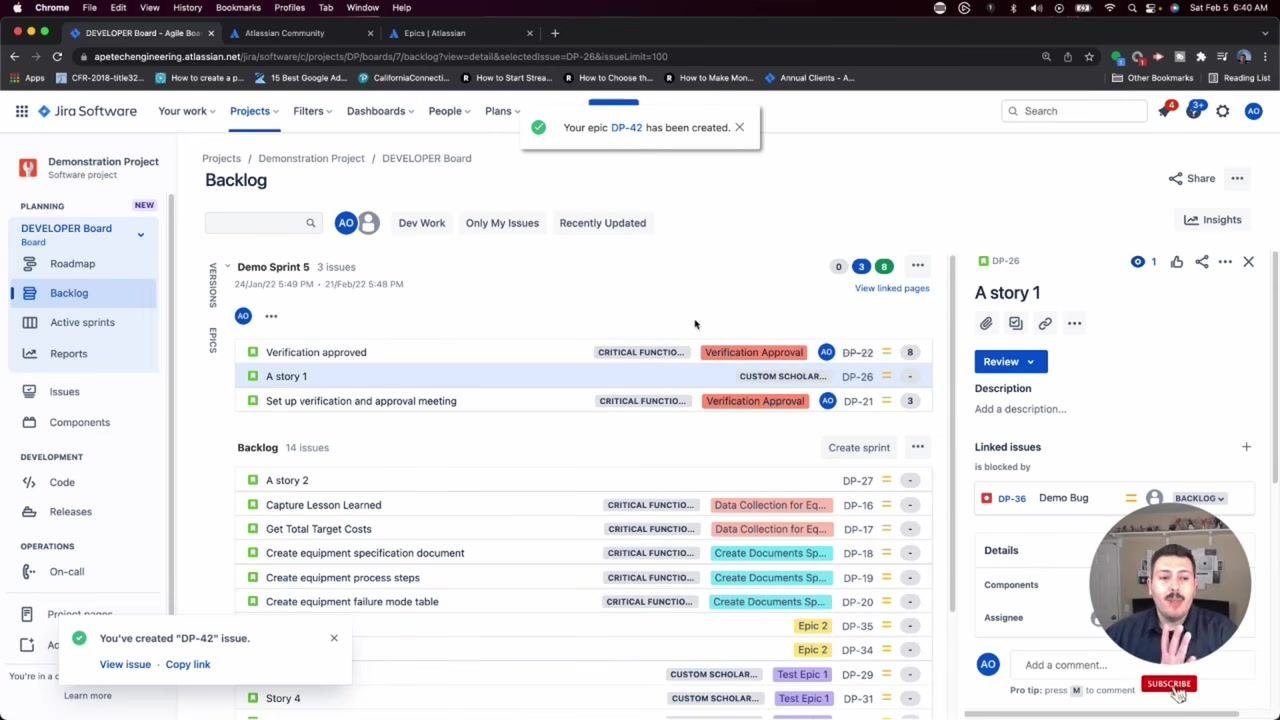
- Look for a confirmation message at the top of the screen, such as "Your epic DP-42 has been created."
- You may also see a notification in the bottom left, such as "You've created 'DP-42' issue."
-
Understand epic visibility on a Scrum board:
- Newly created epics do not appear in the main backlog list.
- Instead, they appear in a dedicated Epics panel on the left side of the backlog view.
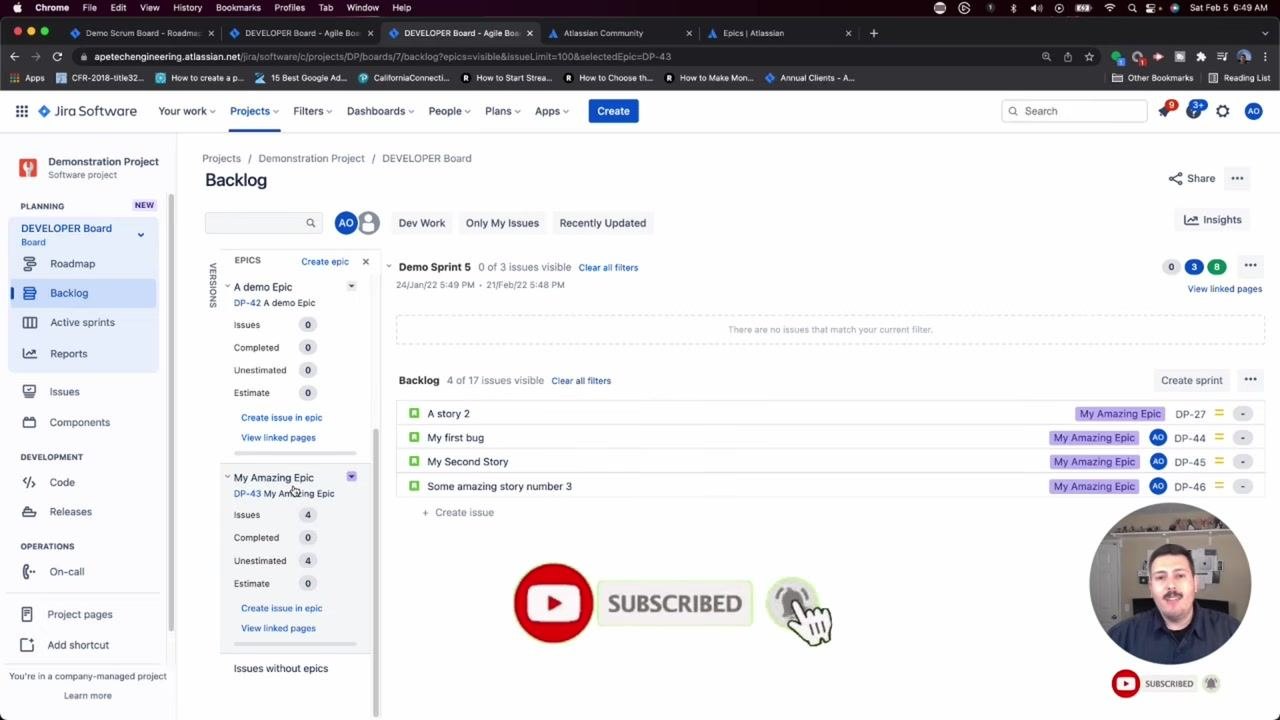
- Look under the "EPICS" section to find your epic (for example, "A demo Epic" with key DP-42).
-
Switch to a Kanban board to compare behavior:
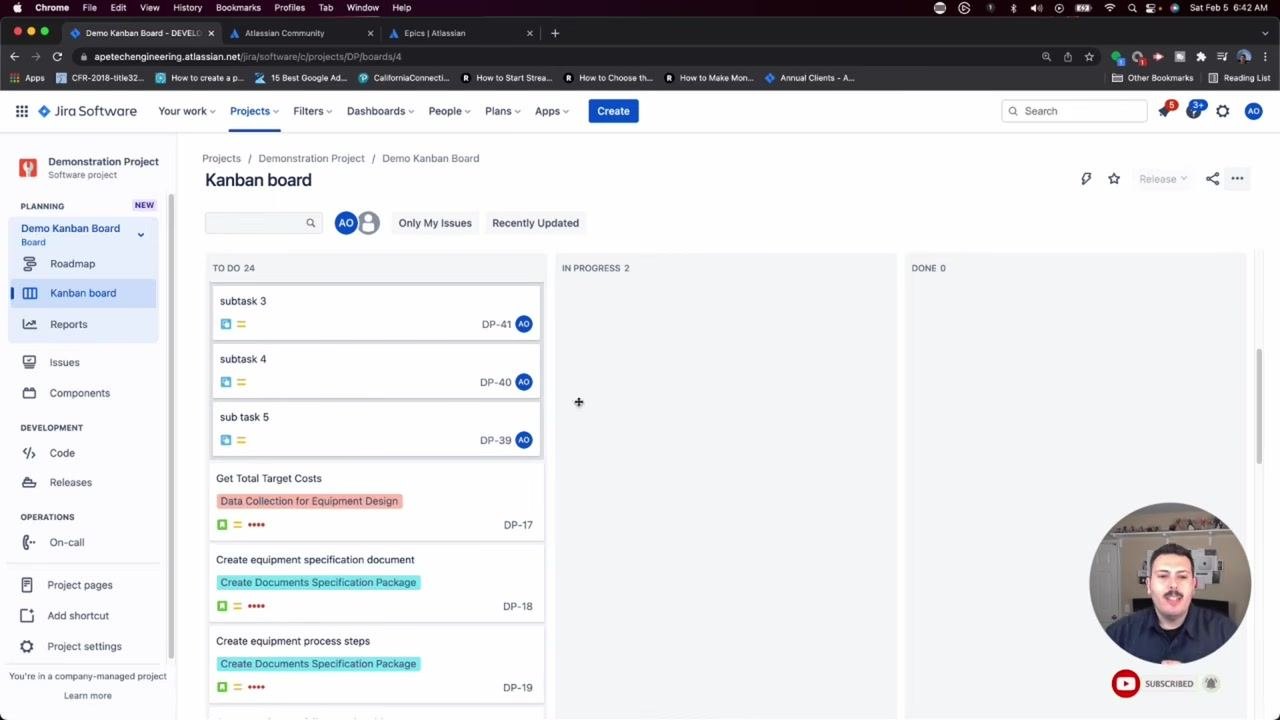
- In the left sidebar, under "BOARDS IN DEMONSTRATION PROJECT," select a Kanban board (for example, "Demo Kanban Board").
- Notice that on a Kanban board, all issue types—including epics—are displayed directly in the board's columns (for example, "TO DO").
- Your epic (for example, "A demo Epic" DP-42) appears alongside stories, bugs, and other issue types.
-
Note the difference in how each board type treats epics:
- On Kanban boards, there is no special organization for epics; all issues are treated equally and shown together.
- On Scrum boards, epics are separated into their own panel for better organization and tracking.
-
Switch back to your Scrum board when finished:
- Use the board selector in the left sidebar to return to your Scrum board (for example, "DEVELOPER Board").
- Remember that your epics will again be visible only in the Epics panel, not in the main backlog list.
Viewing and managing issues for planning
- Open your Jira Software project and navigate to your Scrum board.
- Select Backlog from the left sidebar under the "PLANNING" section.
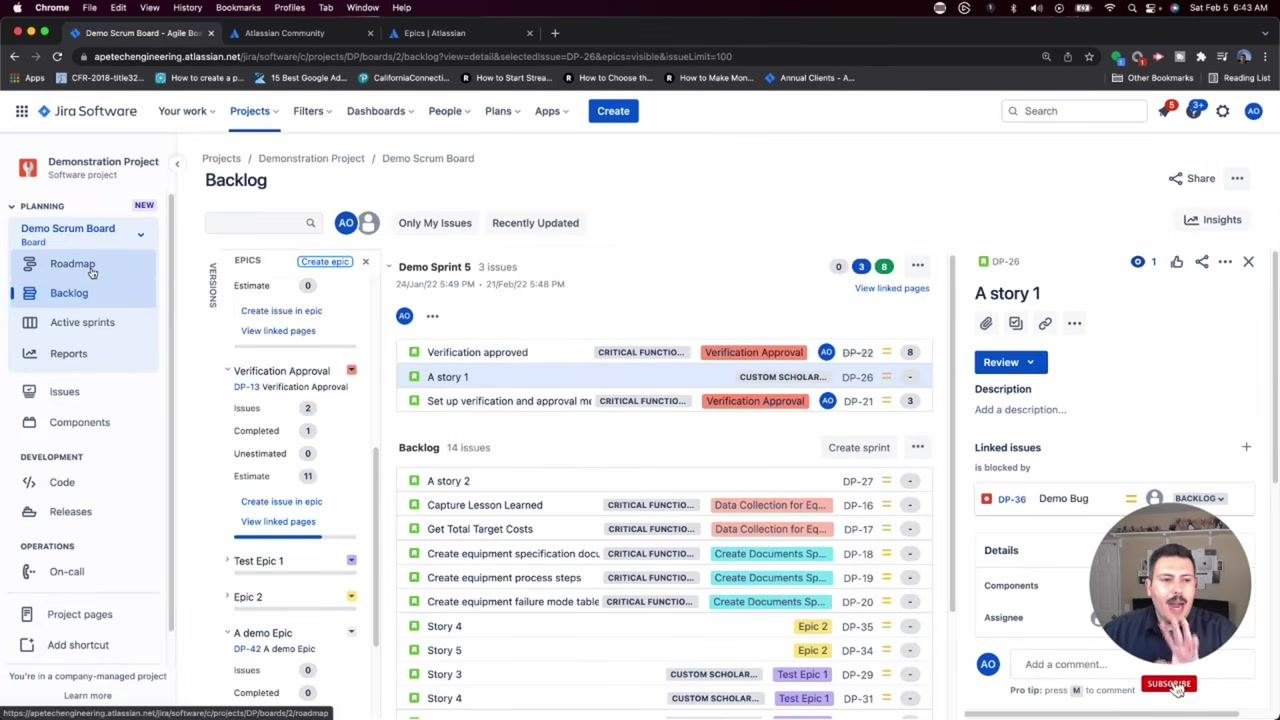
- Review the Backlog screen, which displays:
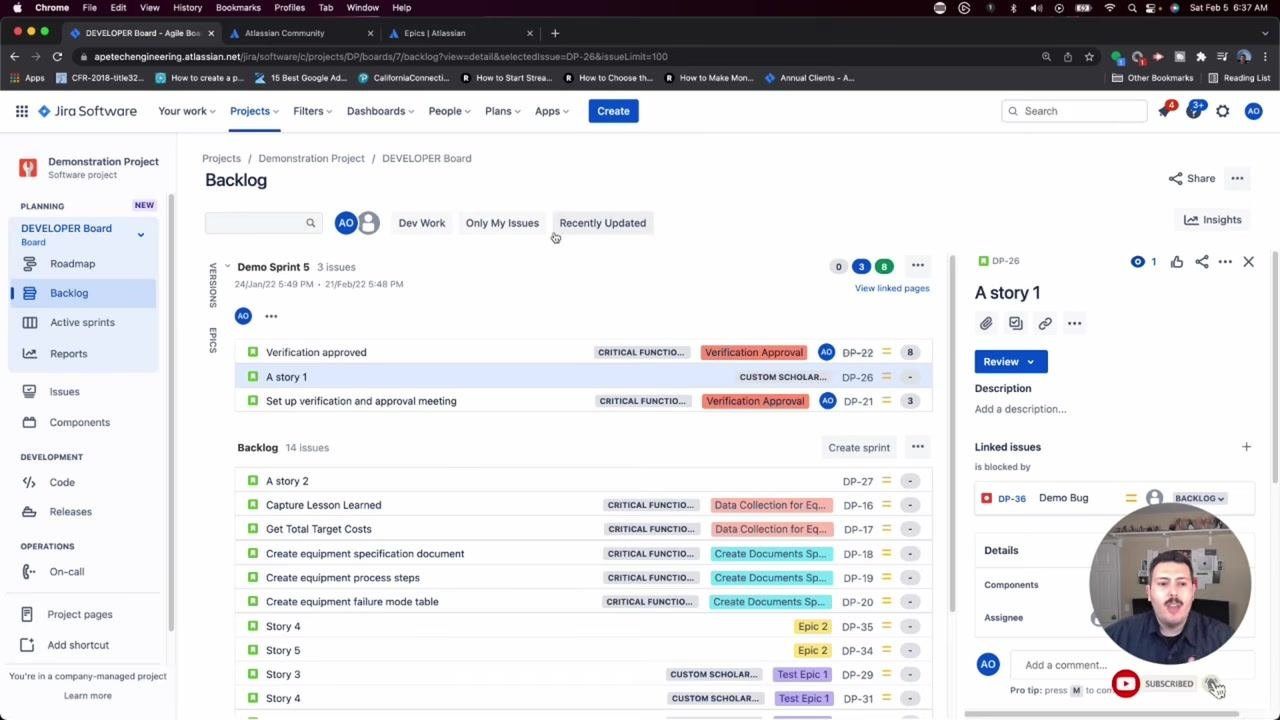
- The current sprint and its issues (for example, "Demo Sprint 5" with issues like "Verification approved" and "A story 1").
- The backlog of issues not yet assigned to a sprint.
- The Epics panel on the left, listing all epics and their details (for example, "Data Collection for Equipment Design," "Verification Approval").
- The details pane on the right, showing information for the selected issue (for example, "A story 1" with status "Review," linked issues, and other details).
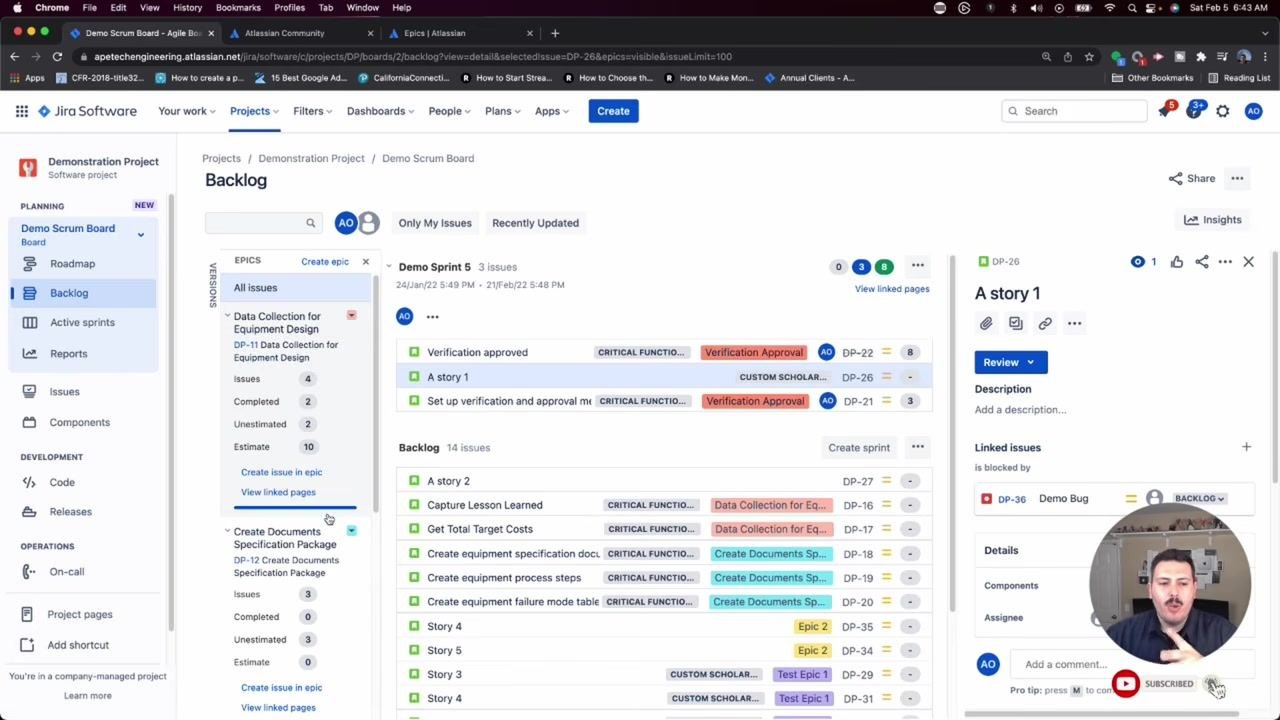
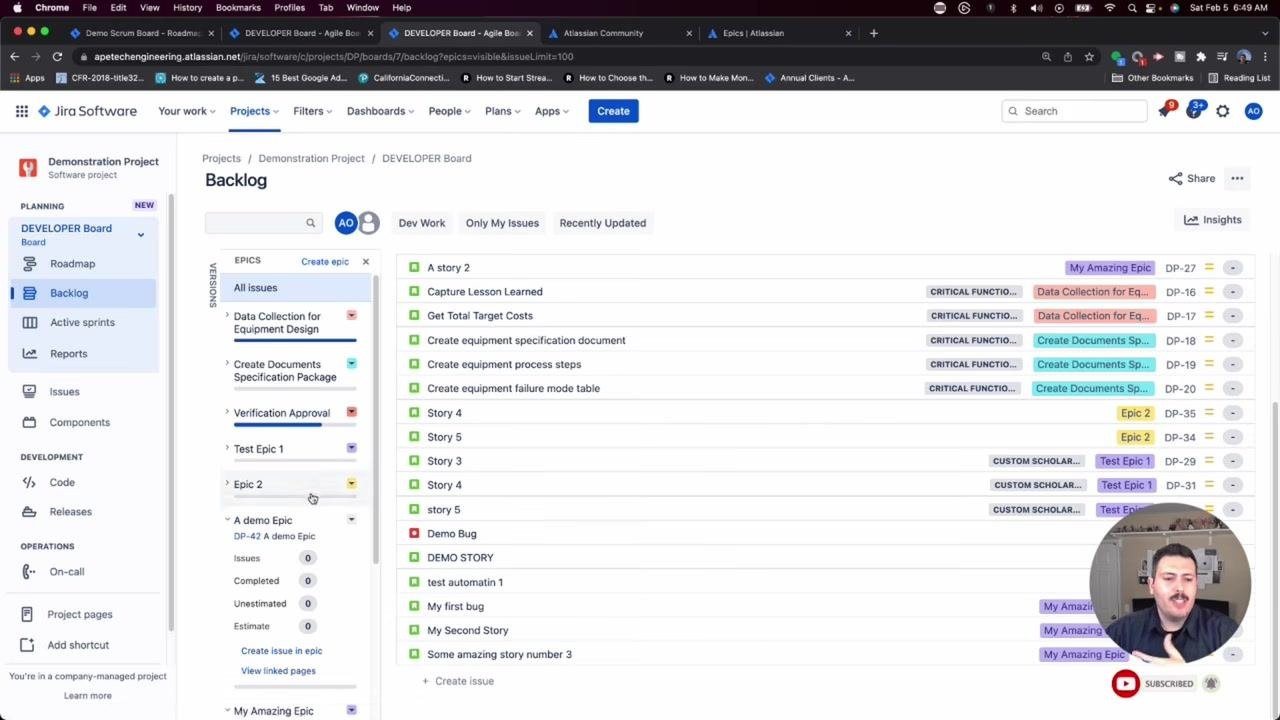
- Use the Epics panel to filter and manage issues by epic, which helps with planning and organization.
Creating epics from the Backlog and Roadmap views
- To create a new epic, locate the Epics panel on the left side of the Backlog view.
- Click Create epic at the top of the Epics panel.
- Alternatively, to create an issue within a specific epic, click Create issue in epic under the desired epic.
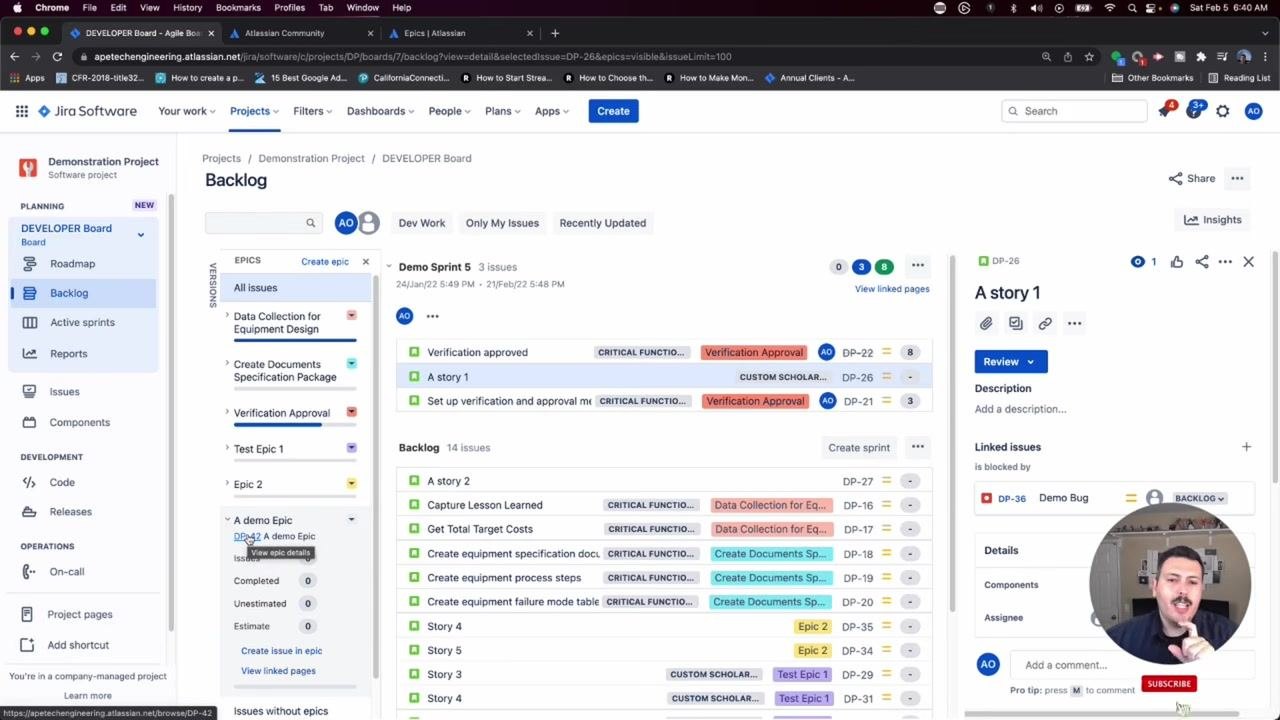
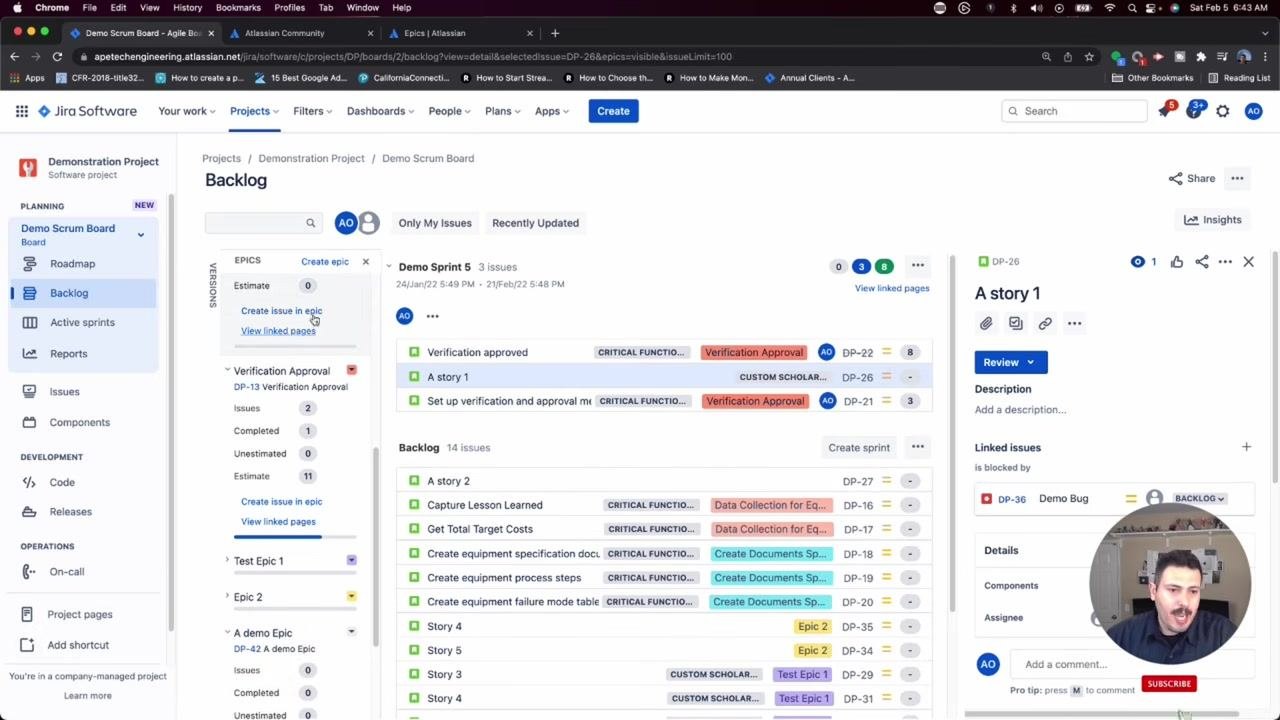
- For a more visual and powerful approach to epic creation, consider using the Roadmap view instead.
- Switch to the Roadmap view by clicking Roadmap in the left sidebar under "PLANNING."
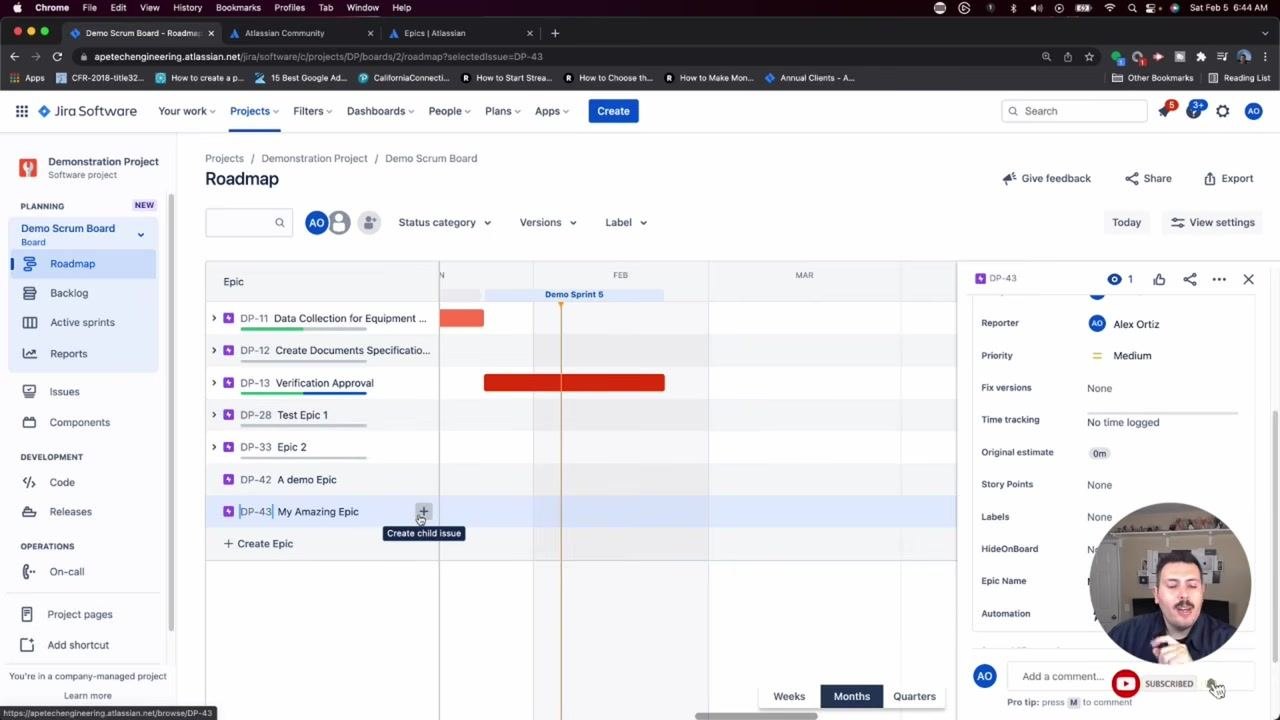
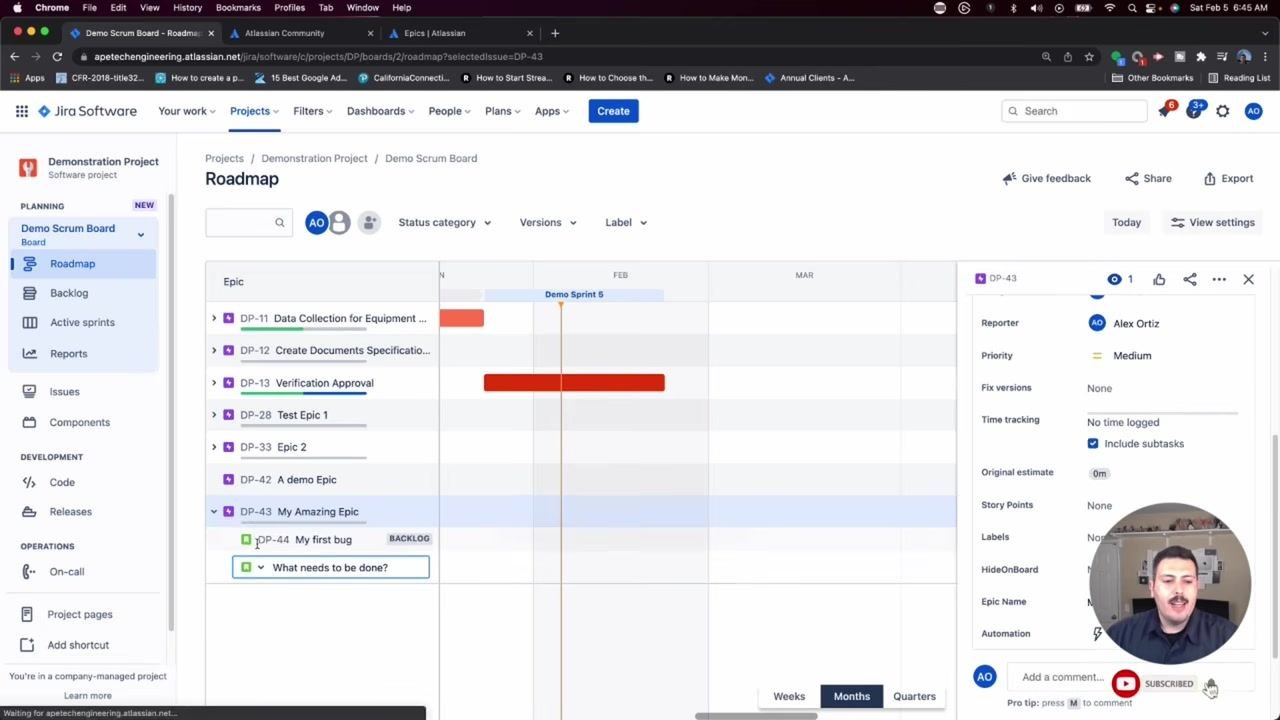
- In the Roadmap view, you'll see a timeline of all epics, along with their durations and progress.
- Select an epic (for example, "My Amazing Epic") to view its details in the right pane.
- When creating or editing an epic in the Roadmap, be aware that you may need to enter the epic name in two places: the title and the Epic Name field in the details pane.
- The system may automatically populate the epic name for you in the Roadmap view, reducing manual entry.
Associating stories with epics from the Roadmap
- To associate a story or other issue type with an epic, locate the epic in the Roadmap view.
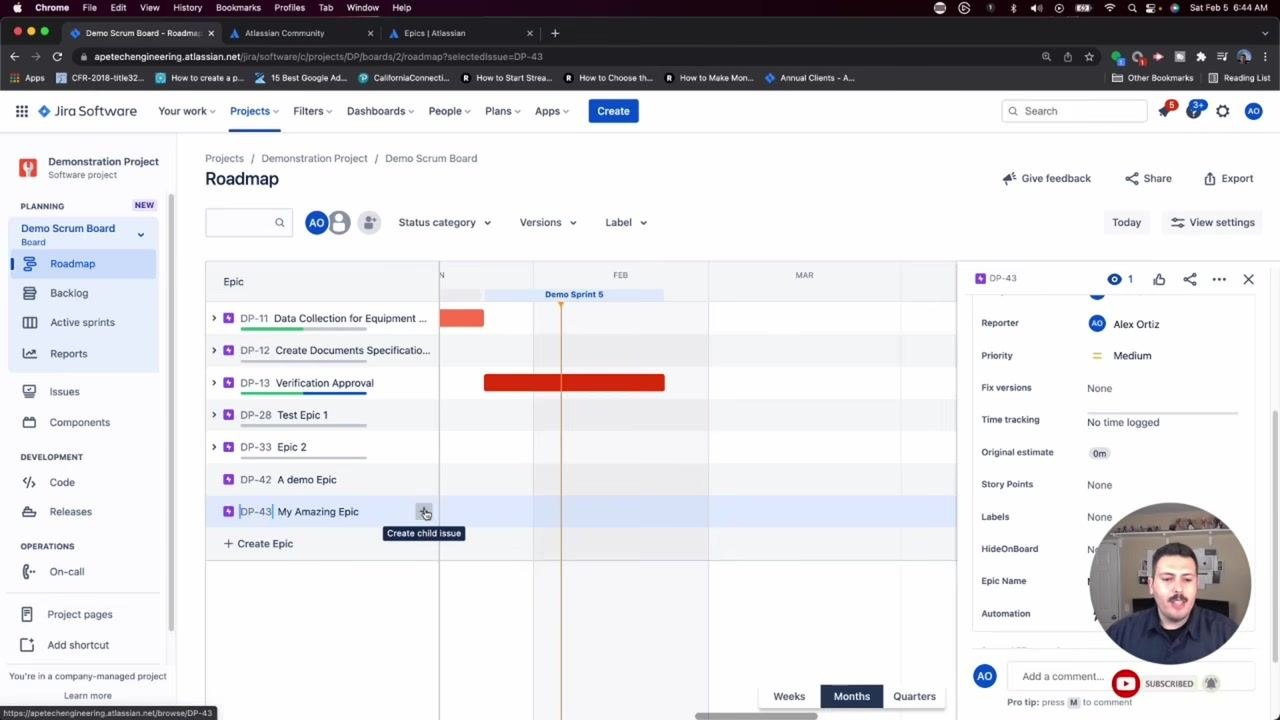
- Hover over the epic row and click the + (Create child issue) button that appears next to the epic name to create a new child issue directly under the selected epic.
- When creating a child issue, select the desired issue type (for example, Task, Bug, or Story) from the available options. Jira supports multiple issue types so you can choose the one that fits your workflow.
- Press Enter to confirm the creation of the new child issue.
- The new issue appears nested under the selected epic in the Roadmap timeline.
- The details pane on the right updates to show information for the selected epic, including fields such as Reporter, Priority, Fix versions, Time tracking, Original estimate, Story Points, Labels, Epic Name, and Automation.
Managing issues within an epic
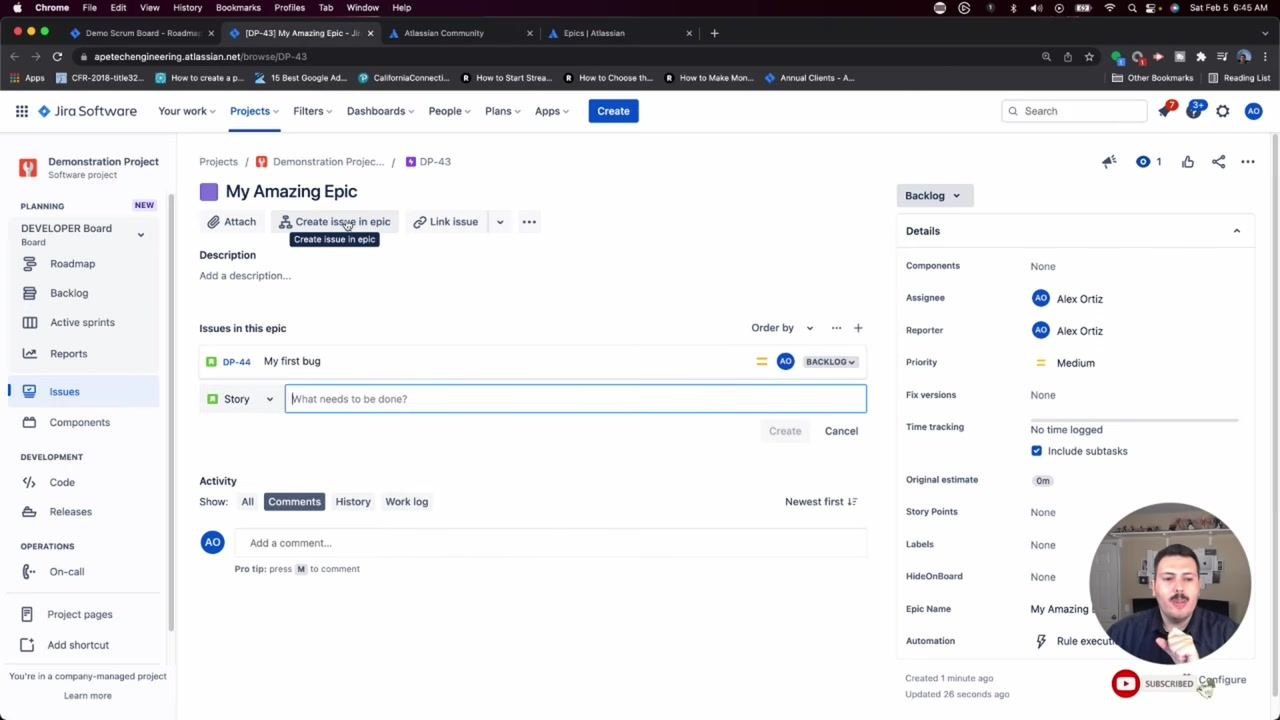
- To view all issues associated with an epic, click directly on the epic name (for example, "My Amazing Epic") in the Roadmap or Backlog.
- This opens the epic details screen, listing all issues currently linked to the epic.
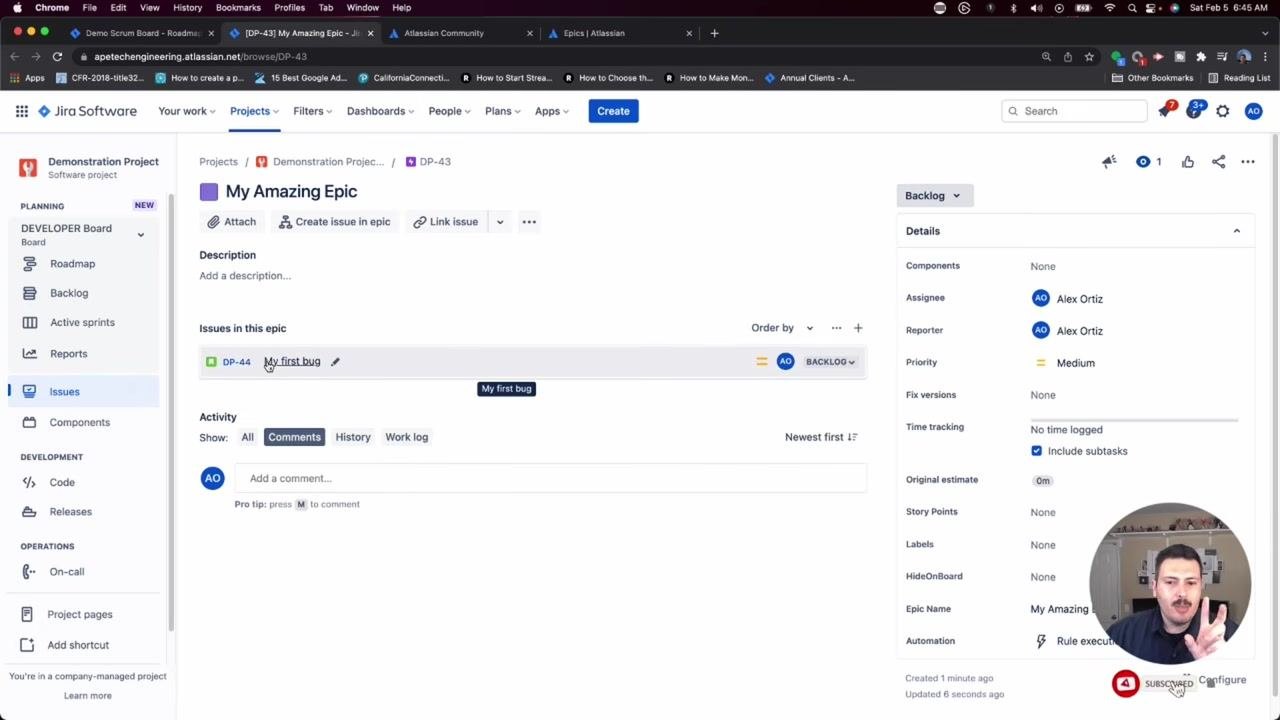
- The "Issues in this epic" section displays each issue (for example, DP-44 "My first bug") along with its status and assignee.
- The right pane shows detailed fields for the epic, such as Components, Assignee, Reporter, Priority, Fix versions, and Time tracking.
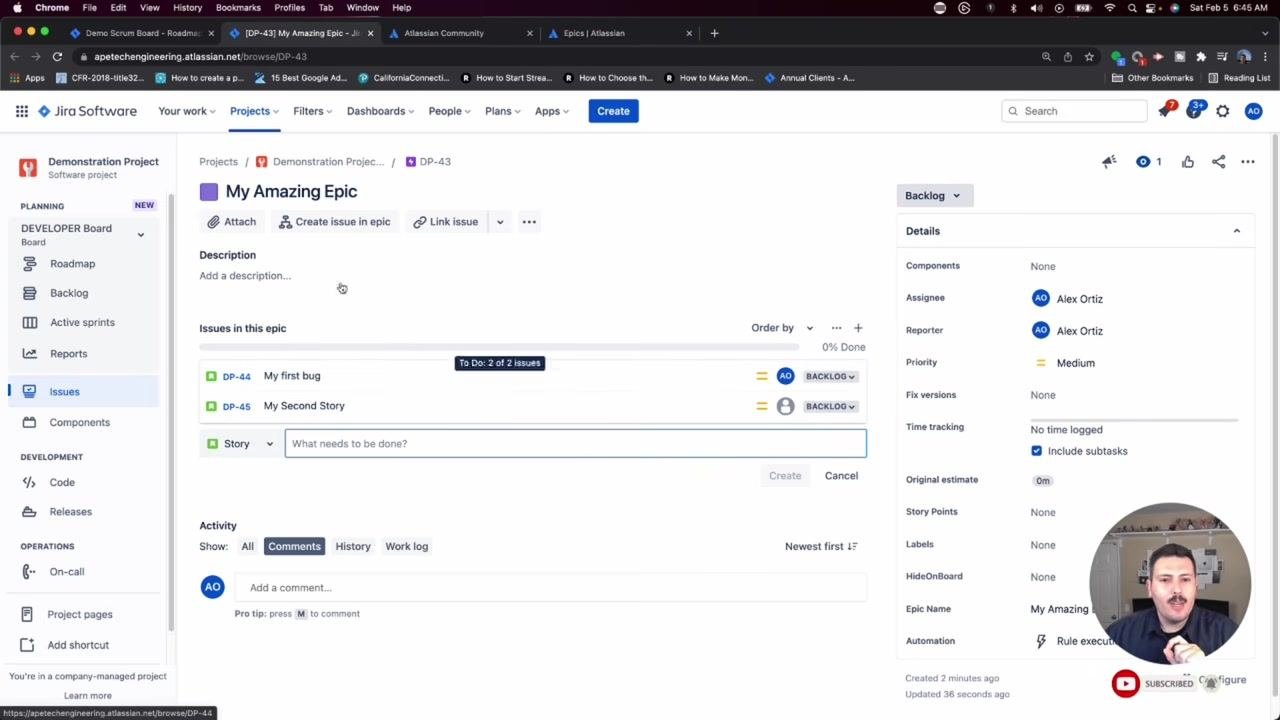
- To add another issue directly within the epic, click Create issue in epic at the top of the epic details screen.
- Enter the issue summary (for example, "What needs to be done?") in the provided field.
- Click Create to add the new issue to the epic.
- The new issue appears immediately in the "Issues in this epic" list.
-
To create additional issues, repeat the process: enter a new summary (for example, "My Second Story") and click Create. Each new issue is assigned a unique key (for example, DP-45) and listed under the epic.
-
After creating an issue, a confirmation message appears in the bottom left, indicating the issue key (for example, "You've created 'DP-46' issue"). You can click View issue or Copy link from this notification for quick access.
Understanding and using epic colors in the backlog
- Navigate to the Backlog view from the left sidebar to see all issues along with their associated epics.
- Each issue in the backlog is marked with a colored bar on the left, representing its associated epic.
- This color coding helps you quickly identify which epic an issue belongs to.
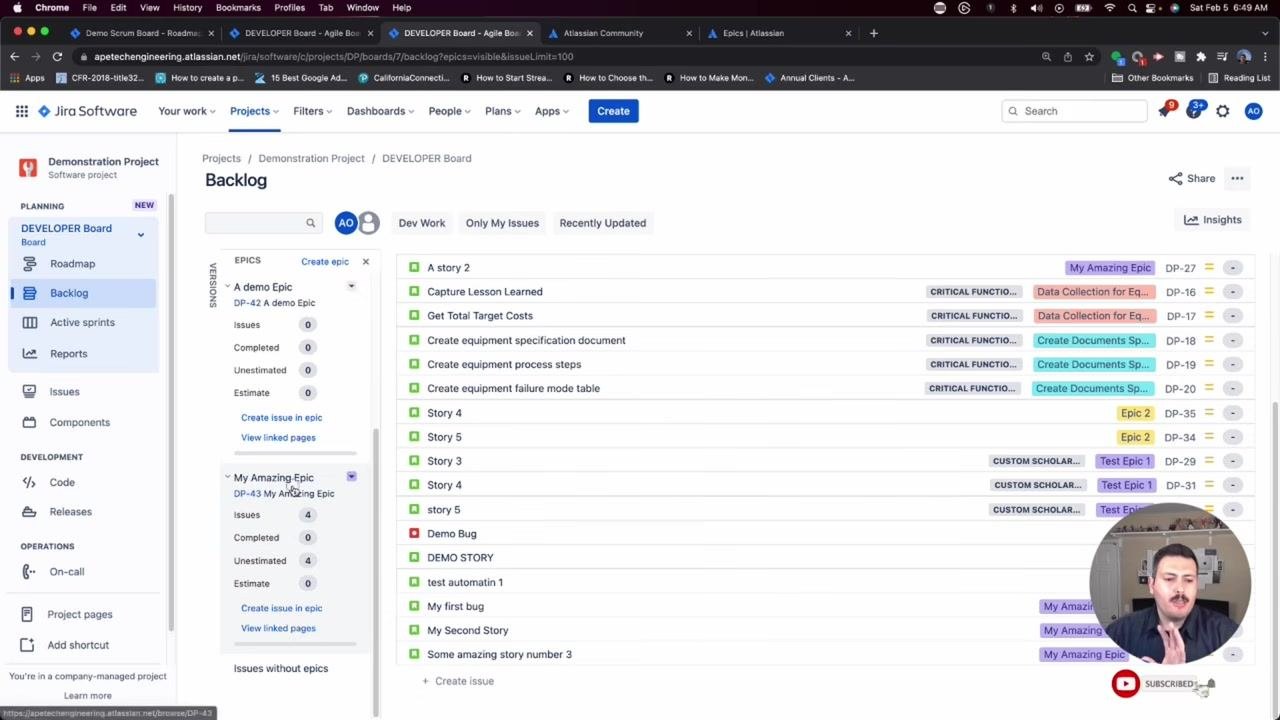
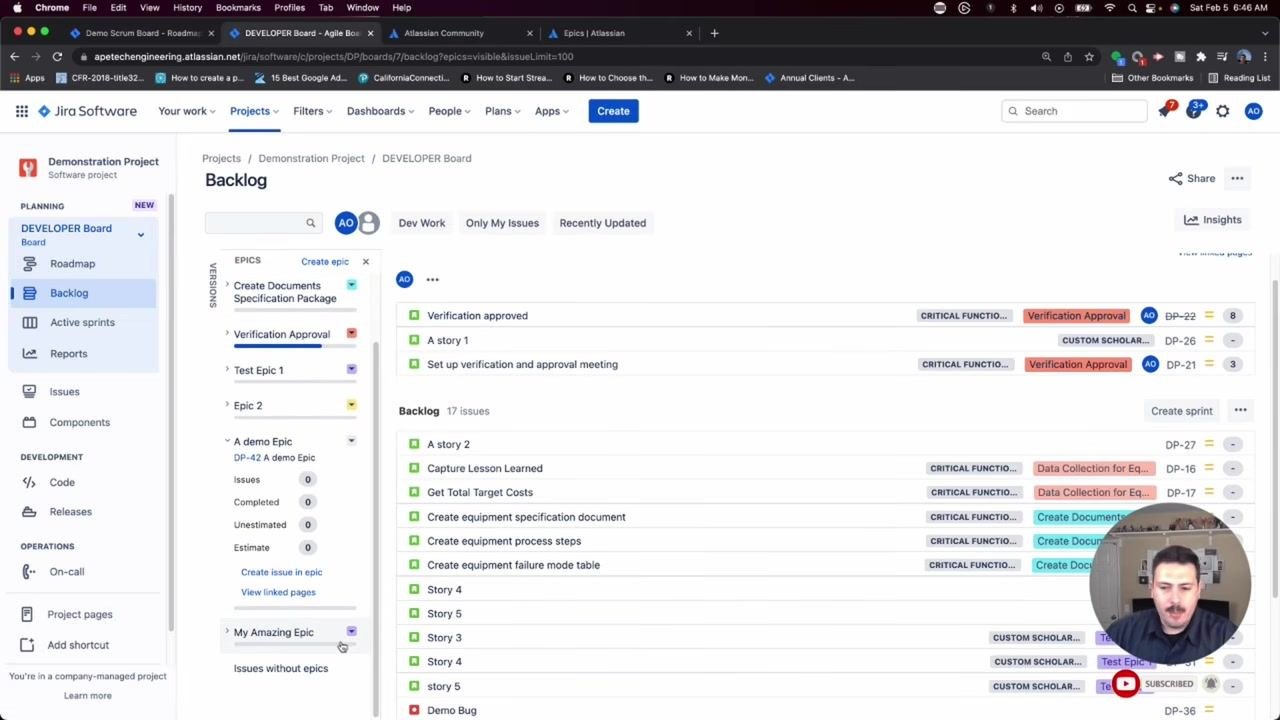
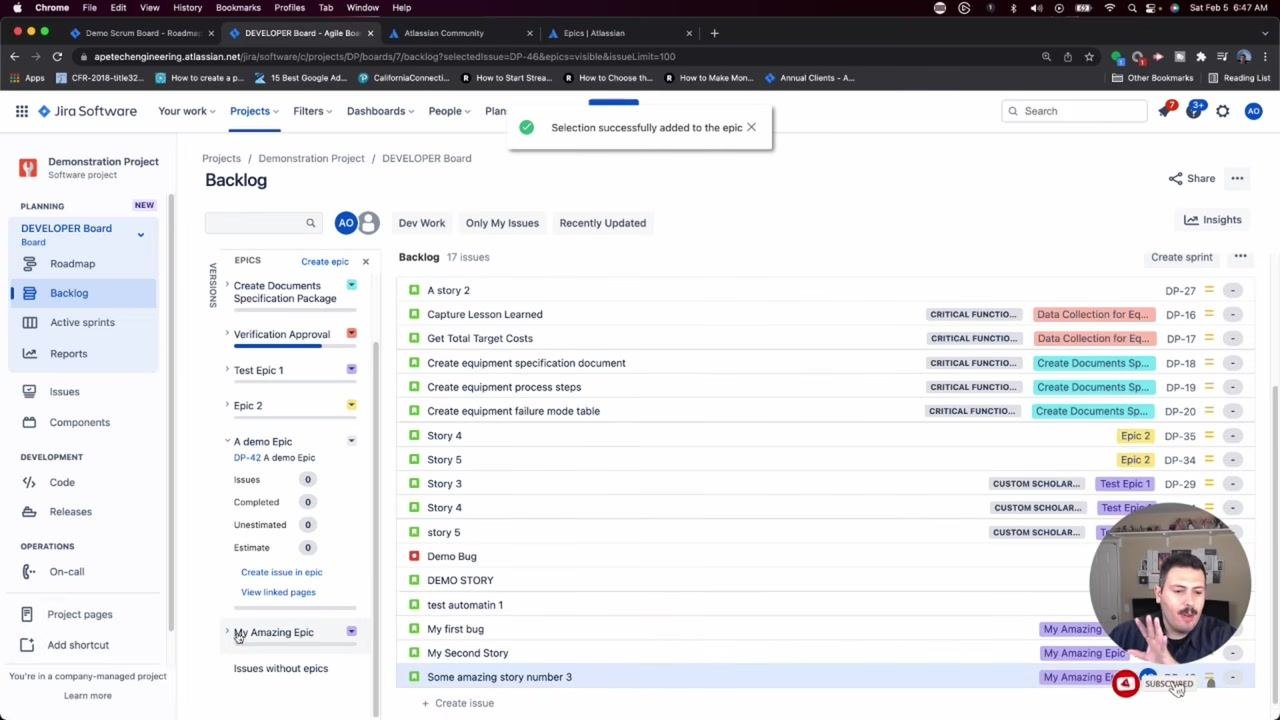
- For example, issues linked to "Verification Approval" are marked in red, "Create Documents Specification Package" in green, and "My Amazing Epic" in purple.
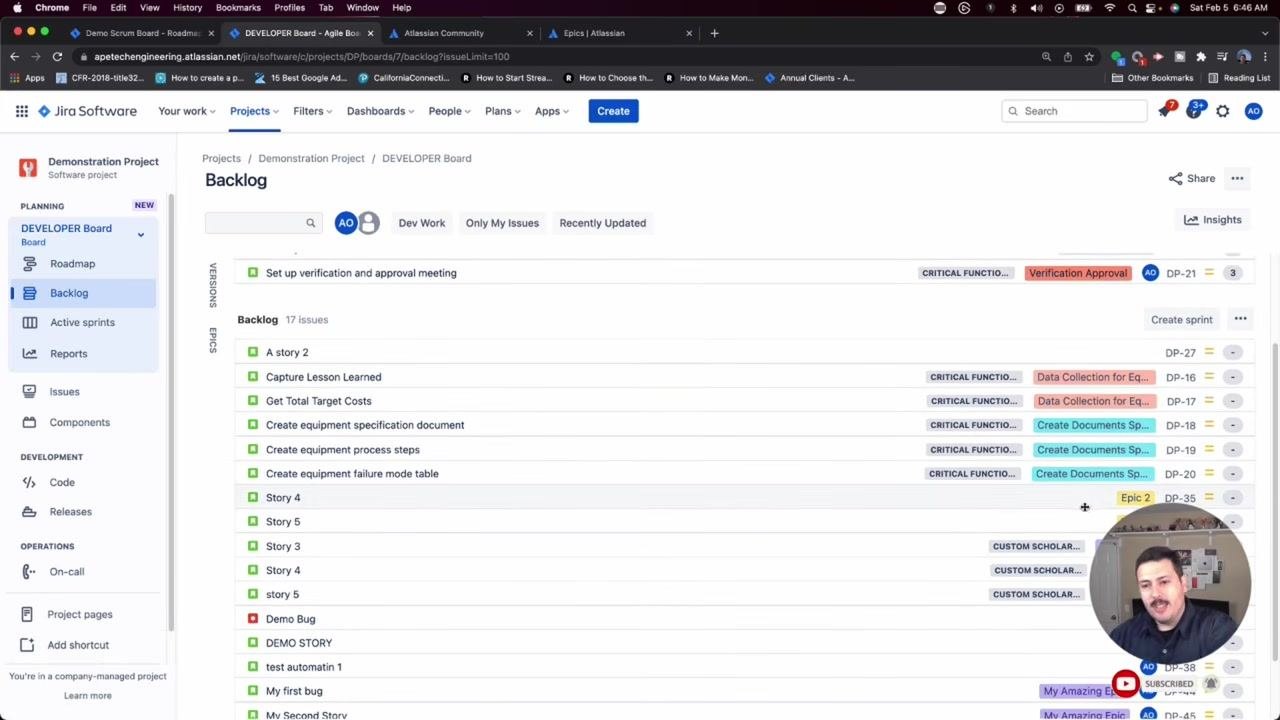
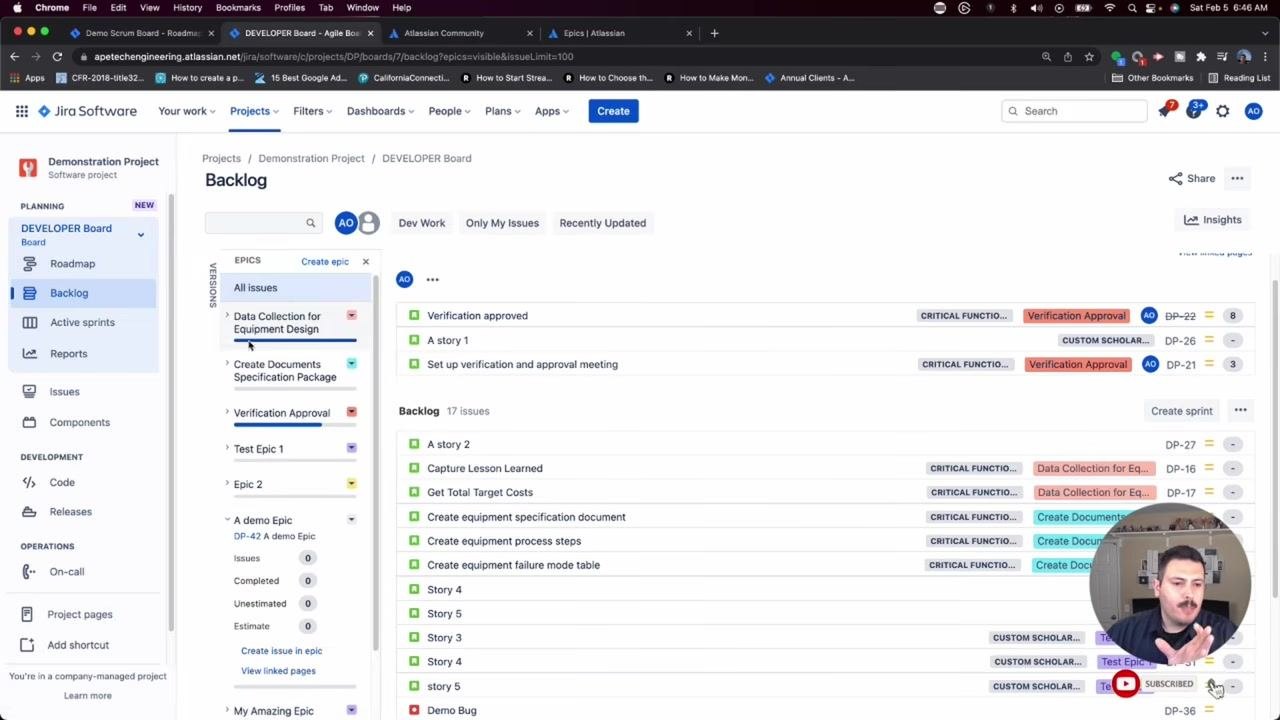
- Scroll through the backlog to locate issues by their epic color. For example, issues associated with "My Amazing Epic" are marked with a purple bar, making it easy to find and manage issues related to a specific epic.
Associating stories with epics and verifying epic links
-
Identify issues by epic color in the Backlog.
- In the Backlog view, locate issues associated with specific epics by their colored bars.
- For example, issues linked to "My Amazing Epic" are marked with a purple bar.
- Scroll down the backlog to find "My Amazing Epic" and its associated stories, identified by the purple color.
-
Drag and drop issues to associate them with an epic.
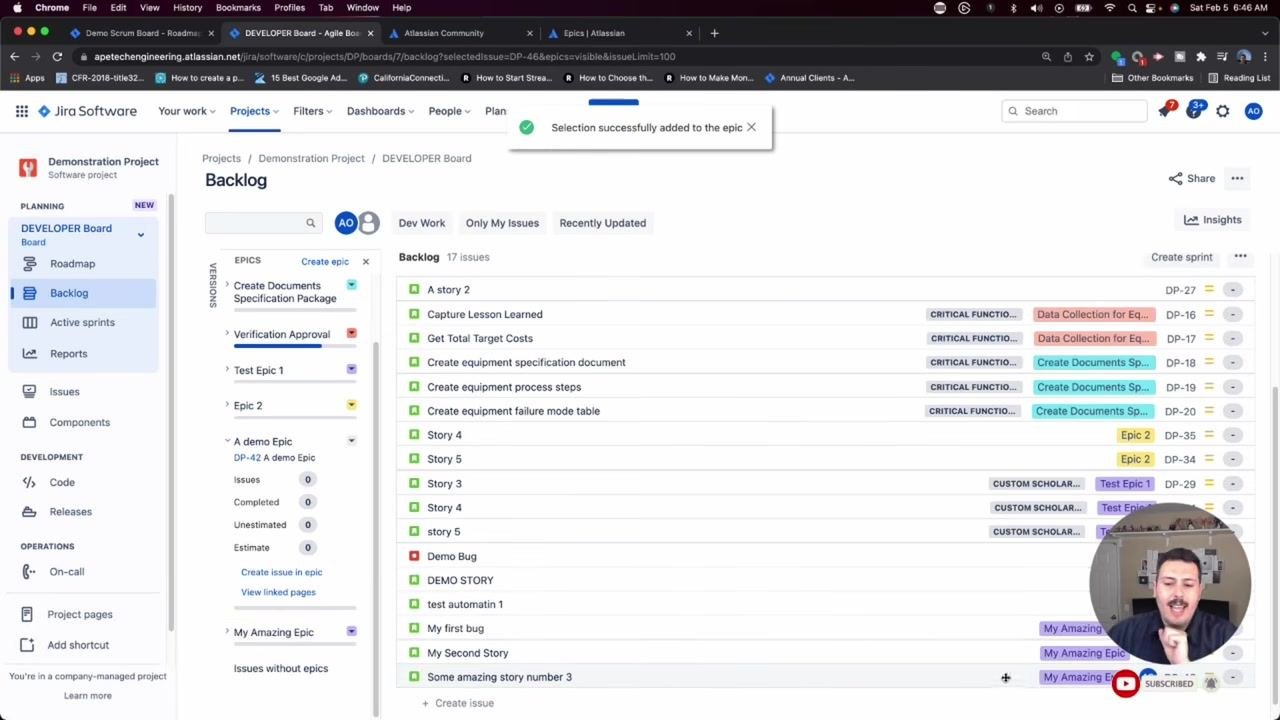
- Click and drag the desired issue (for example, "Some amazing story number 3") onto the epic in the Epics panel, or directly onto the epic row in the backlog.
- Upon successful association, a confirmation message appears at the top: "Selection successfully added to the epic."
-
Verify the issue association in the backlog.
- After associating the issue, it now appears under the epic in the backlog, and its colored bar matches the epic's color (for example, purple for "My Amazing Epic").
- The backlog reflects the updated association, grouping the issue with others under the same epic.
-
Open an issue to check its epic association.
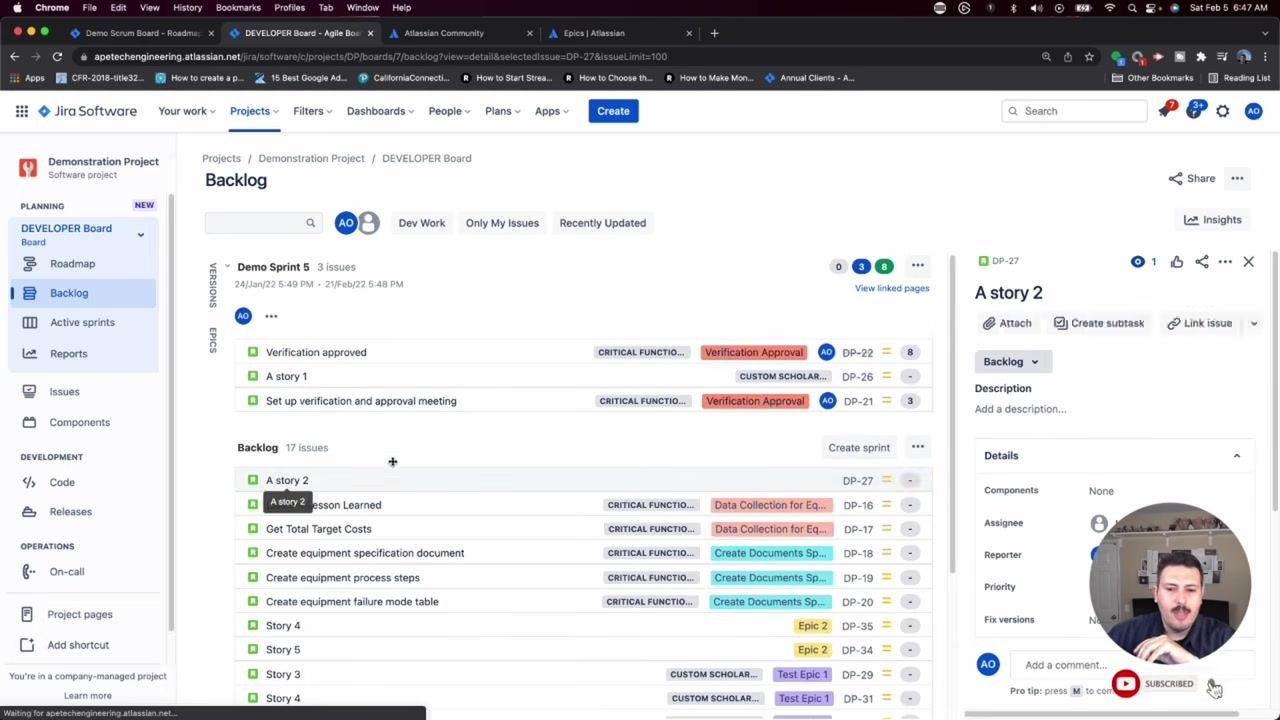
- Click on an issue in the backlog (for example, "A story 2") to open its details pane on the right.
- The details pane displays fields such as Components, Assignee, Reporter, Priority, Fix versions, and Epic Link.
- If the issue isn't yet associated with an epic, the Epic Link field shows "None."
-
Manually link an issue to an epic.
- In the issue details pane, locate the Epic Link field.
- Click into the field and select the desired epic from the dropdown (for example, "My Amazing Epic" - DP-43, shown in purple).
- This links the issue to the selected epic.
-
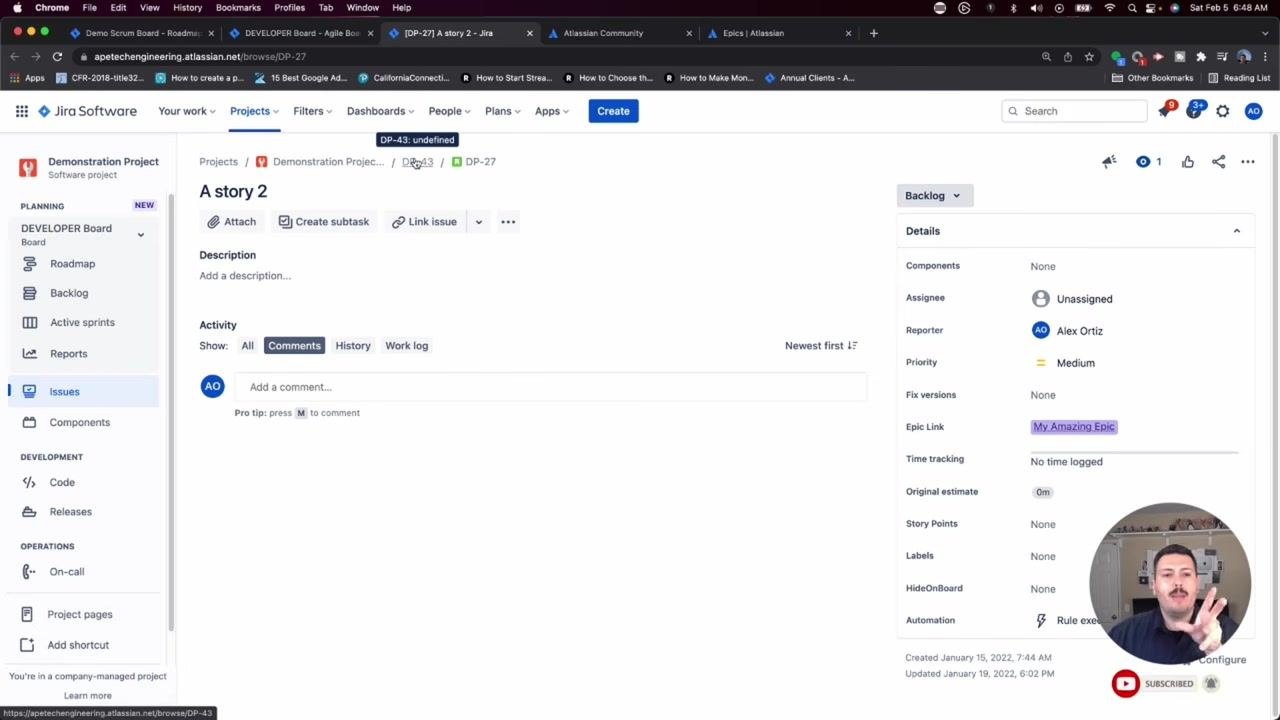
Confirm the epic link and breadcrumb update.
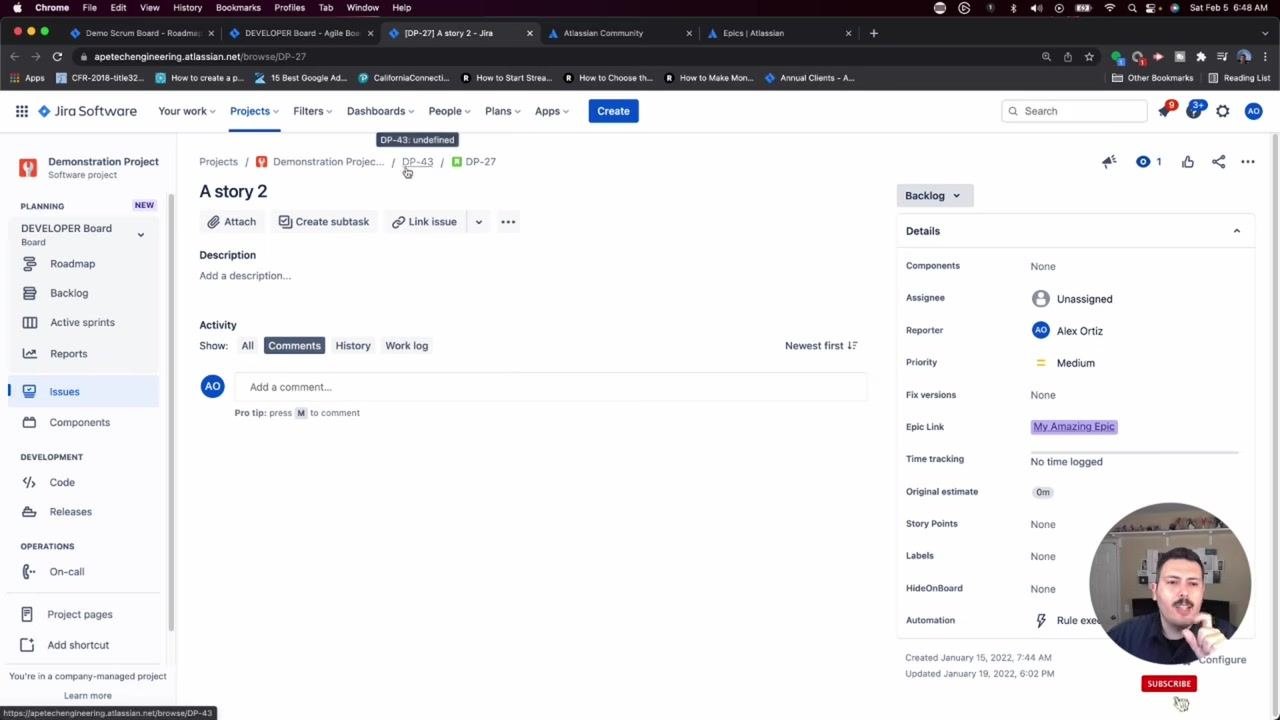
- After linking, the Epic Link field displays the selected epic (for example, "My Amazing Epic").
- The breadcrumb navigation at the top of the issue screen updates to show the epic key (for example, "DP-43") before the issue key (for example, "DP-27").
- Note: you may briefly see "undefined" next to the epic key, but the association is still valid.
- Understand parent issue display in Jira.
- Jira displays the parent epic of every issue in the breadcrumb navigation.
- This lets you quickly verify whether a story belongs to an epic by checking the breadcrumb and the Epic Link field.
- If the issue is a subtask, Jira shows the parent story; if it's a story, Jira shows the parent epic.
Reviewing epics and colors in the backlog
-
Open the Backlog view within your project and note the following:
- The "Backlog" tab is selected under the "DEVELOPER Board" in the left sidebar.
- The main area shows a list of issues grouped under "Demo Sprint 5" and "Backlog."
- Each issue is labeled with its type, summary, and associated epic or tag, color-coded for easy identification.
- The right side of each issue row displays the epic label (for example, "Verification Approval," "Data Collection for Equipment Design," "Create Documents Specification Package") in distinct colors.
- These colored labels make it easy to quickly understand issue categorization.
-
Recognize the three ways to work with epics in the backlog:
- Use the color-coded epic labels on the right side of each issue.
- Use the Epics panel on the left to view all available epics, each with a unique color and summary.
- Hover over or click on epic labels to see additional details or filter issues by epic.
- These visual cues are key to managing and navigating large backlogs efficiently.
-
Access the Epics panel for more detailed management:
- In the left sidebar, under "Backlog," locate the EPICS section.
- View all epics, including their names, issue counts, and completion status.
- Select an epic to filter the backlog and display only the issues associated with it.
-
Filter issues by epic to focus your backlog view:
- Click on an epic in the EPICS panel (for example, "My Amazing Epic").
- The backlog updates to show only issues linked to the selected epic, each labeled with the epic's color.
Summary
You now know how to create epics in Jira, understand the difference between the Summary and Epic Name fields, and see how epics behave differently on Kanban versus Scrum boards. You've also learned how to create issues directly within an epic using both the Backlog and Roadmap views, associate existing stories with epics by dragging and dropping or by using the Epic Link field, and use color-coded labels in the backlog to quickly identify and manage issues by epic.
With these tools, you can keep your backlog well organized and make it easy for your team to see how individual stories and tasks relate to larger project epics.
Generation details: cost, quality tiers
Docsie billed 6,000 credits ($4.20) to analyze this 12-minute video at standard quality. The rewrite, template fill and Word/PDF exports were included. The same video at each quality tier:
| Quality | Frames sampled | Credits | Approx. cost |
|---|---|---|---|
| Draft | every 16-30 s | 3,000 | $2.10 |
| Standard (this guide) | every 8-15 s | 6,000 | $4.20 |
| Detailed | every 4-7 s | 12,000 | $8.40 |
| Ultra | every 1-3 s | 24,000 | $16.80 |
Credits priced at $0.70 per 1,000; plans include a monthly allowance. Enterprise customers on on-premise or bring-your-own-model deployments run this on their own inference and pay no per-video credits.
Generated by Docsie Video-to-Docs on 2026-09-08 from a 11-minute video. Screenshots are frames from the source video and belong to their creator, Apetech Tech Tutorials, whose original is embedded above. If you own this video and want the guide removed or credited differently, contact us and we will act within one business day.