
How to Import Contacts from a Spreadsheet in HubSpot
This guide walks you through the full process of preparing a contacts spreadsheet and importing it into HubSpot, including cleaning your data, mapping columns to contact properties, and reviewing import results. Following these steps helps you maintain a clean, compliant, and accurate CRM.
Video: How To Import Contacts To HubSpot CRM From A Spreadsheet (Google Or Excel) by HubSpot (2023). All credit for the demonstration goes to the creator; watch the original on YouTube. The written guide below was generated from this video by Docsie. Creator? Request a change or removal.
This guide walks you through the full process of preparing a contacts spreadsheet and importing it into HubSpot, including cleaning your data, mapping columns to contact properties, and reviewing import results. Following these steps helps you maintain a clean, compliant, and accurate CRM.
Prerequisites
Before you begin, make sure you have the following:
- A spreadsheet file (CSV, XLS, or XLSX) containing your contact data.
- Only contacts who have given permission to be contacted and expect to hear from your organization.
- A clean spreadsheet, free of outdated or unengaged contacts (cold lists) and any purchased or non-opted-in lists.
- At least the following columns in your spreadsheet: First Name, Last Name, and Email. You may also include optional fields such as Phone Number and Company (Account).
Importing bad or outdated contacts can harm your email deliverability, so it's important to clean your data before you start. Remember the principle: "Garbage in, garbage out."
Structure your spreadsheet correctly
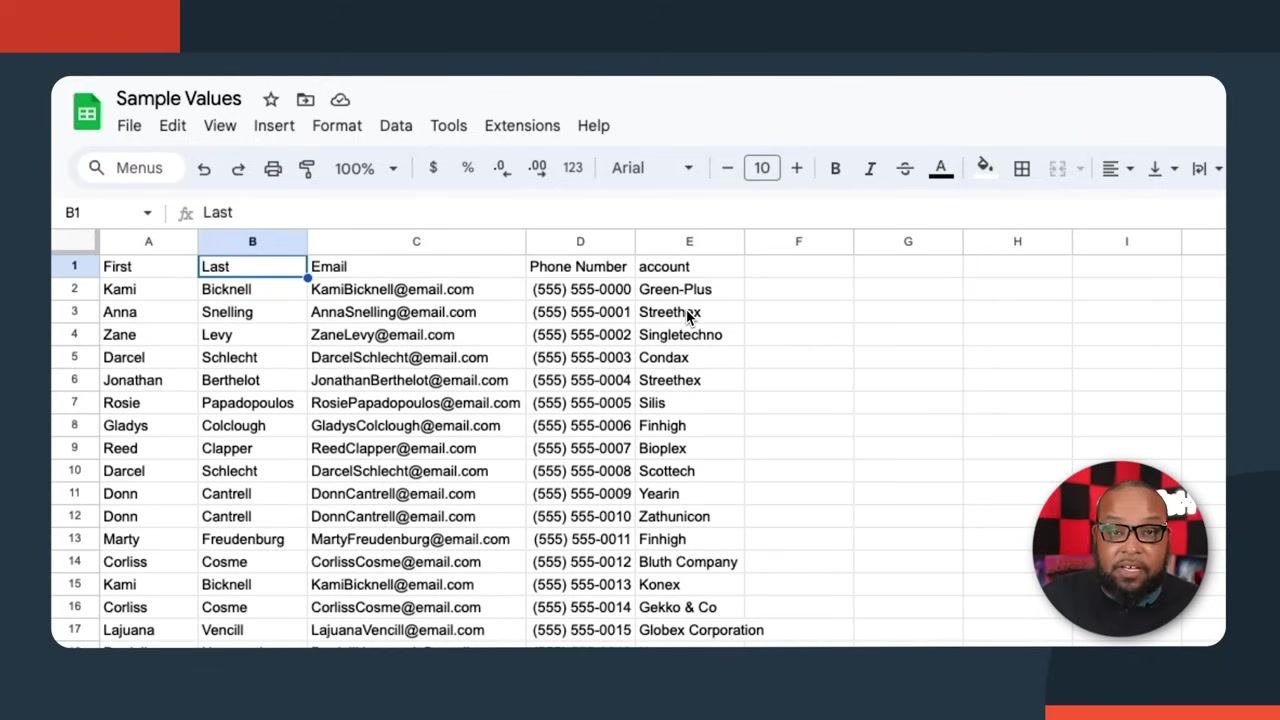
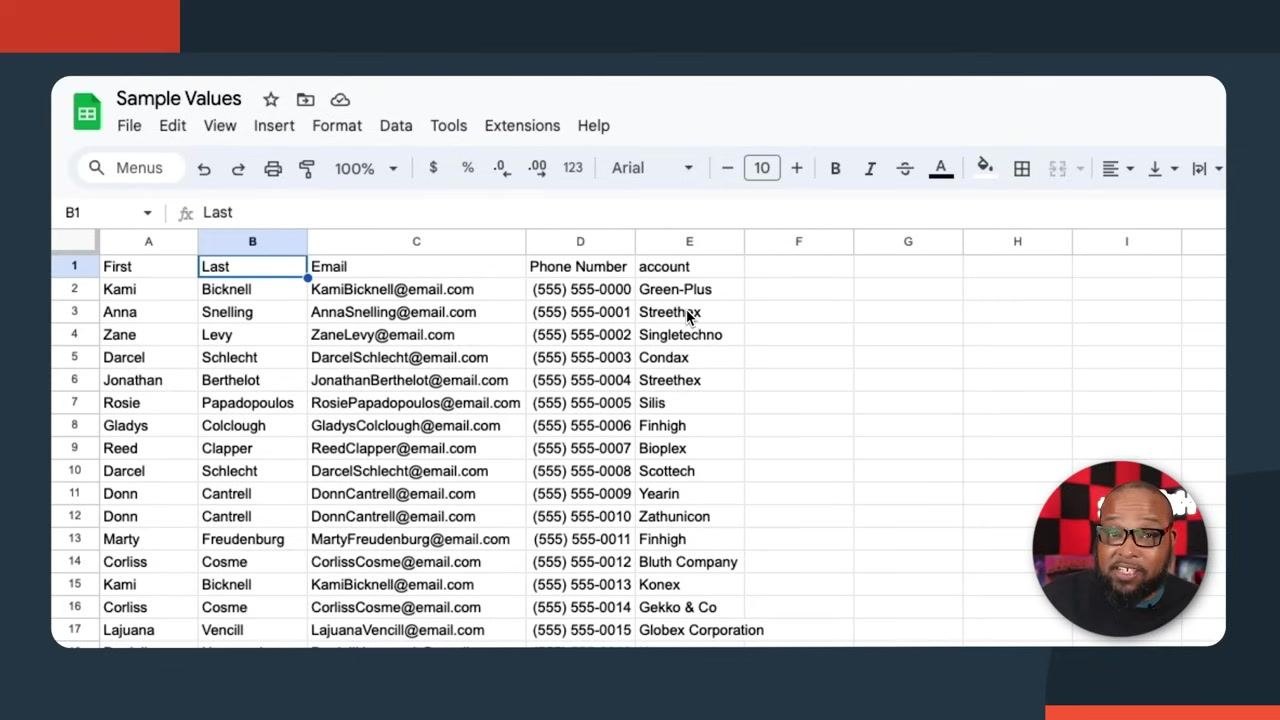
Organize your spreadsheet so it contains, at minimum, columns for First Name, Last Name, and Email. You can optionally add columns like Phone Number and Company/Account.
Example of a well-structured spreadsheet:
| First | Last | Phone Number | Account | |
|---|---|---|---|---|
| Kami | Bicknell | KamiBicknell@email.com | (555) 555-0000 | Green-Plus |
| Anna | Snelling | AnnaSnelling@email.com | (555) 555-0001 | Streethex |
| Zane | Levy | ZaneLevy@email.com | (555) 555-0002 | Singletechno |
If your spreadsheet contains extra columns, such as Company/Account, you don't need to delete them. You can simply choose not to import those fields later in the process.
Split full names into first and last name columns (if needed)
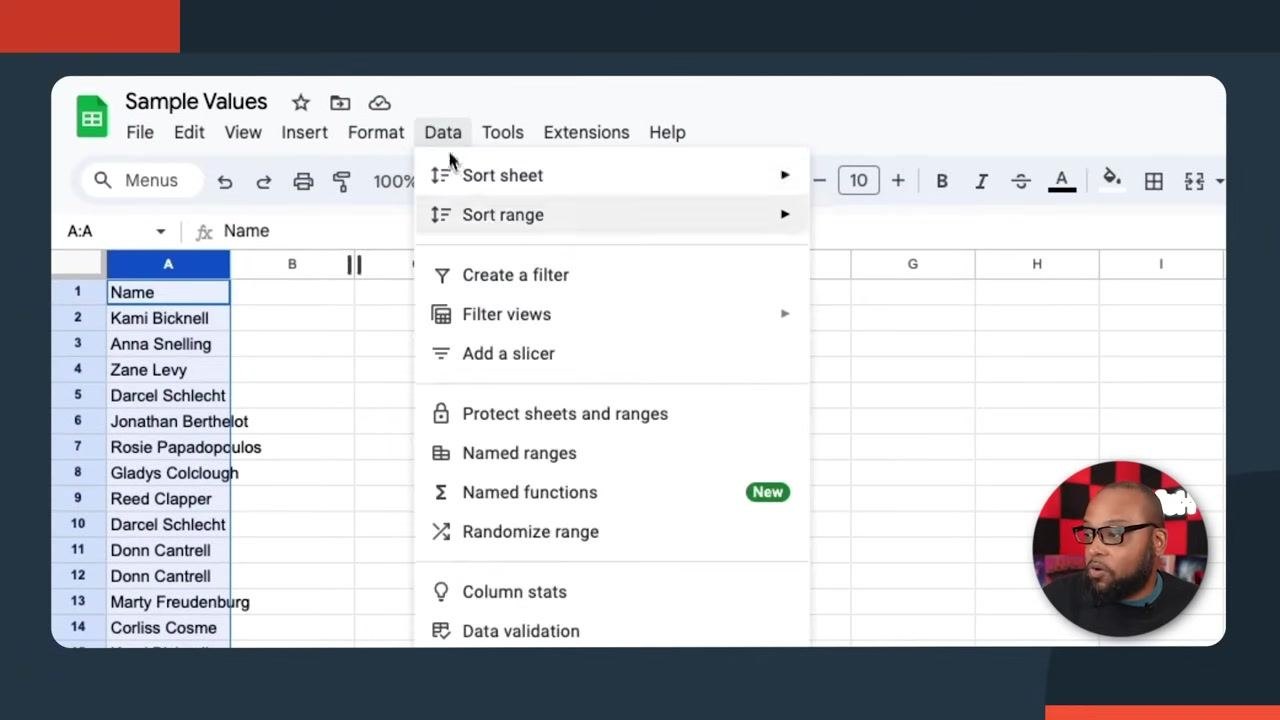
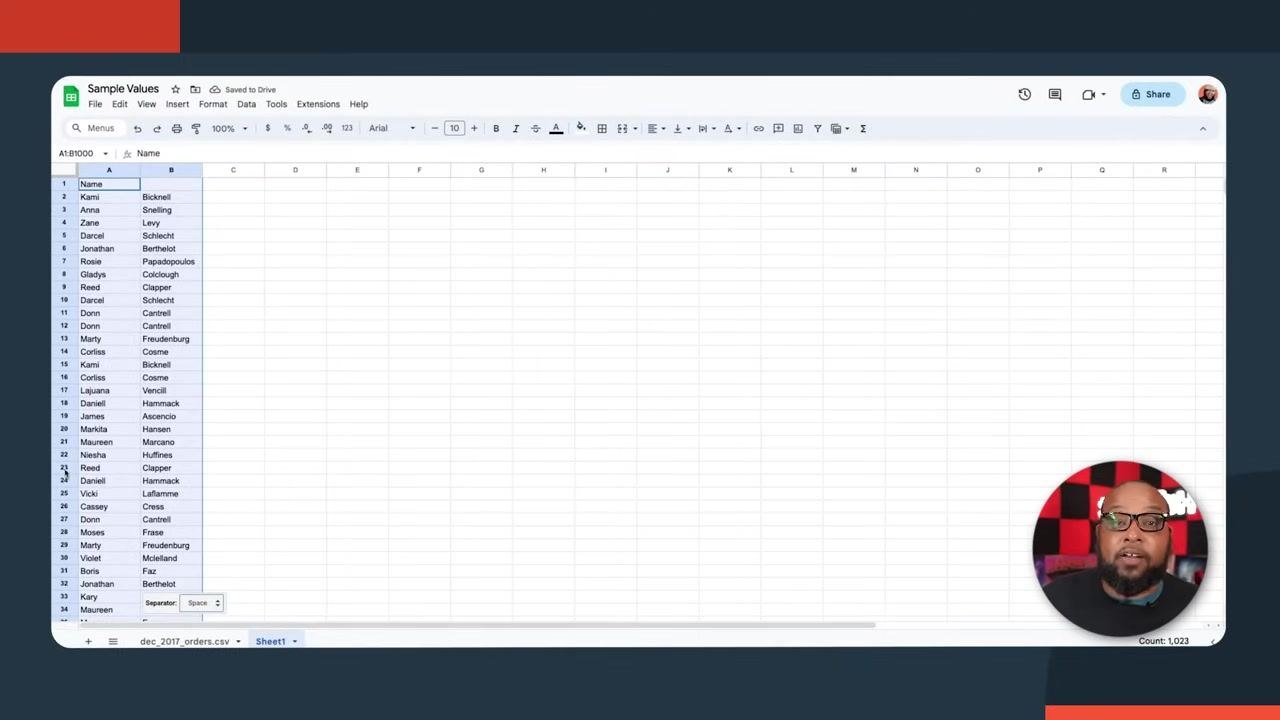
If your spreadsheet has full names in a single column (for example, a "Name" column instead of separate "First" and "Last" columns), split it before importing.
- Click the header of the column containing full names to select the entire column.
-
In your spreadsheet application (for example, Google Sheets), open the Data menu from the top toolbar.
-
Select Split text to columns from the Data menu.
-
When prompted, choose Space as the separator. This splits the full name into two columns: first name and last name.
-
Verify that the names are now separated correctly, for example "Kami" in the first column and "Bicknell" in the second column, for every row.
Start the import in HubSpot
- In HubSpot, go to Contacts and select Contacts from the menu.
- Locate the Import button in the upper right corner of the Contacts page.
- On the Imports page, you'll see two options:
- Import: For importing contacts, companies, custom objects, and more into HubSpot.
- Sync: For syncing data between HubSpot and other apps, useful for connecting legacy CRMs or other marketing/email tools.
For this guide, select Import.
Sync is powerful for ongoing connections with other tools, but for a one-time spreadsheet import, use Import.
Choose how to start your import
You'll be presented with three options:
- Import file from computer: Upload a CSV, XLS, or XLSX file with your contact data.
- Import an opt-out list: Import a list of people who should not receive emails, which is important for compliance.
- Repeat a past import: Use a previous import as a template.
For a standard contact import, select Import file from computer.
If you have a list of people who opted out of communications in a previous system, import that list first to prevent accidentally emailing them.

Choose the number of files to import
Decide whether you are importing:
- One file (recommended for beginners)
- Multiple files with associations (advanced; not recommended for first-time users)
Select One file to continue.
Choose the number of objects to import
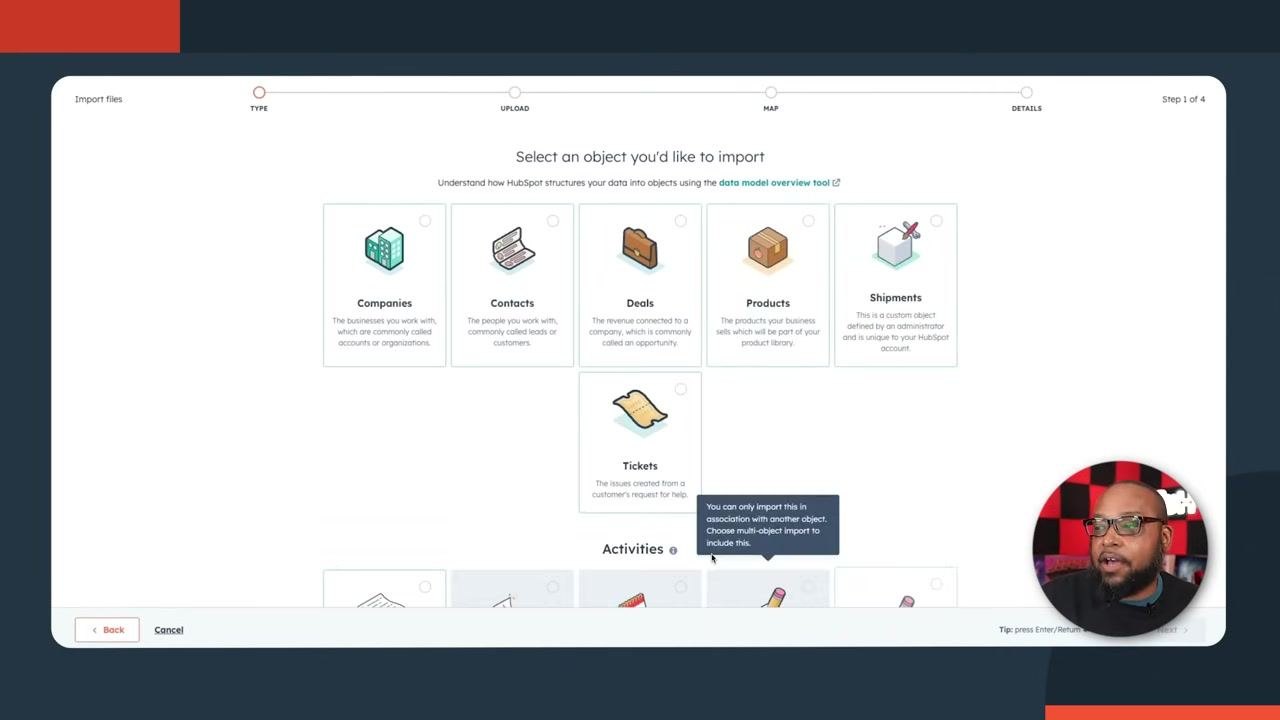
On the "How many objects are you importing?" screen, select One object. This is recommended for most users, especially beginners.
Objects in HubSpot are data types such as contacts, companies, deals, products, shipments, and tickets. The screen offers two options: "One object" (for example, only contacts) and "Multiple objects" (for example, contacts and deals). For this guide, select One object to keep the import simple.
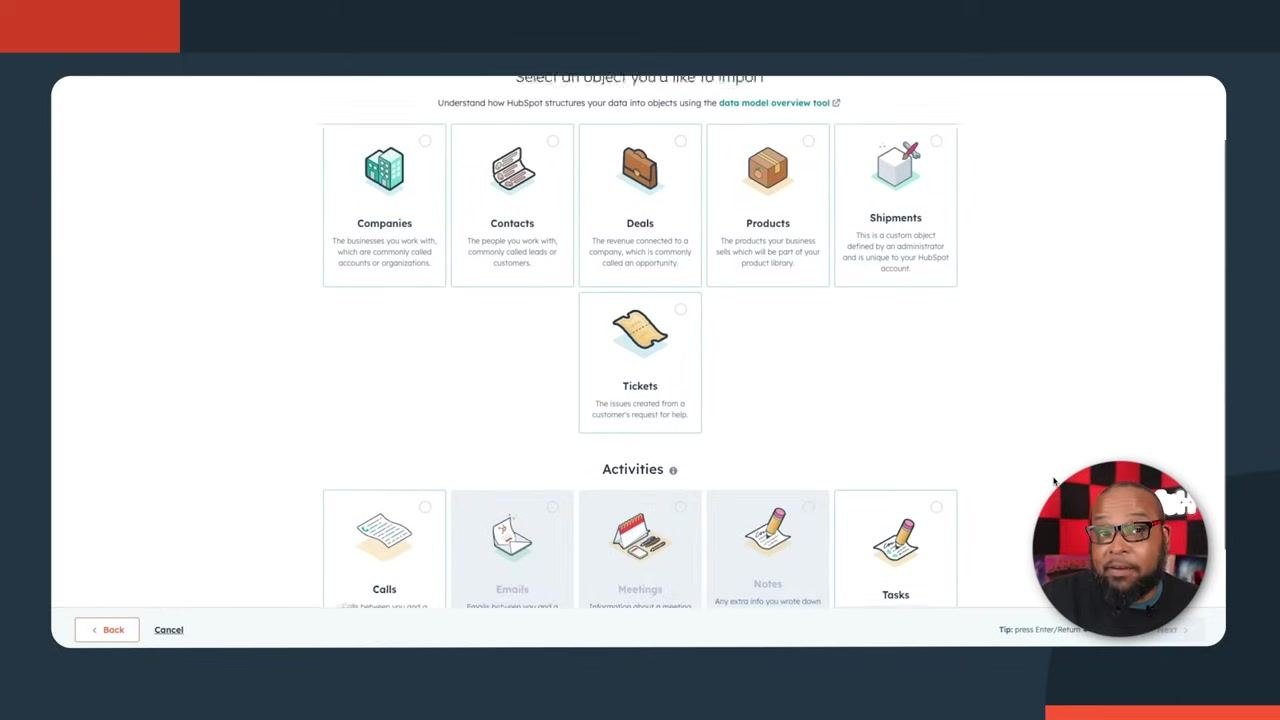
Review the list of available objects you can import:
- Companies: The businesses you work with.
- Contacts: The people you work with, leads or customers.
- Deals: Revenue opportunities connected to companies.
- Products: Items your business sells.
- Shipments: Custom objects defined by your administrator.
- Tickets: Issues created from customer requests for help.
Activities (calls, emails, meetings, notes, tasks) can also be imported, but typically in association with other objects.
Activities such as calls, emails, meetings, notes, and tasks are listed under "Activities." These can be imported from a spreadsheet but may require association with other objects.
Upload your file and choose import behavior
On the "Upload your files" screen, confirm your file is ready to import. Make sure it's in CSV format for best compatibility.
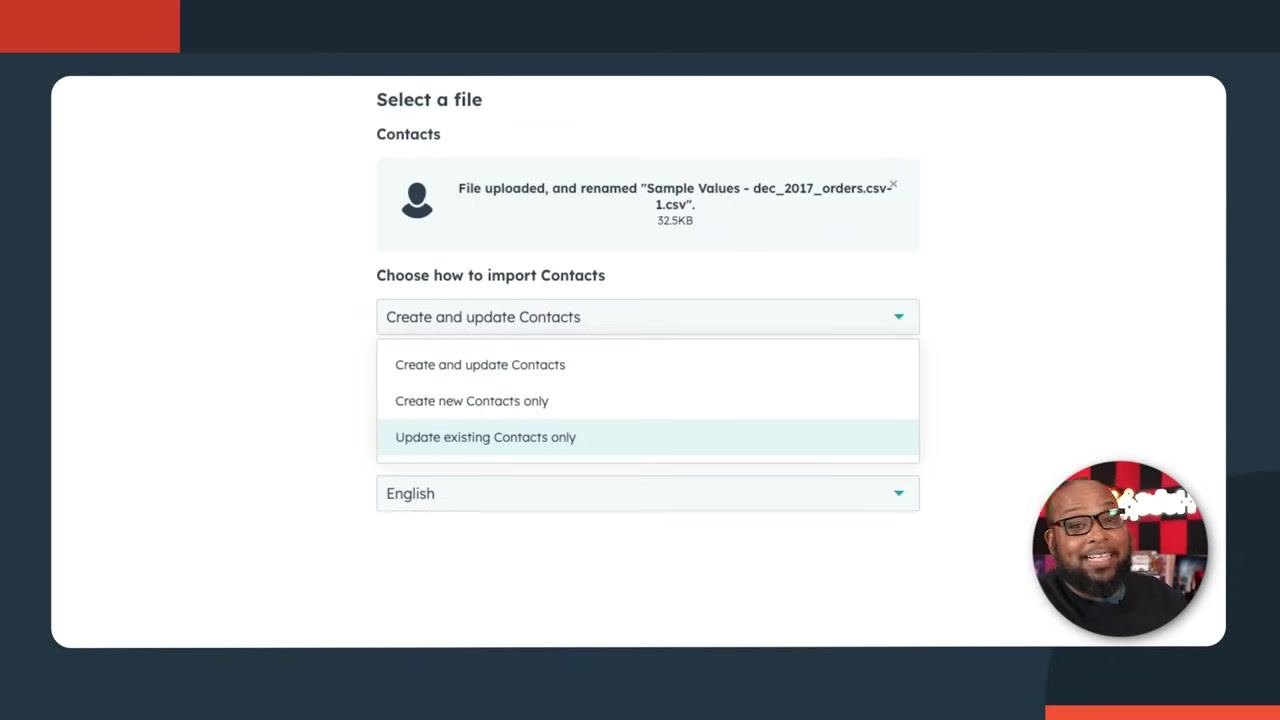
Select from the dropdown menu how you want to import contacts:
- Create and update Contacts (default): Adds new contacts and updates existing ones.
- Create new Contacts only: Only adds new contacts; does not update existing records.
- Update existing Contacts only: Only updates records that already exist in HubSpot; rows not matching existing records will error out.
For most users, Create and update Contacts is recommended.
Also select the language of the column headers in your file (for example, English). This helps HubSpot accurately map your columns to its properties.
A note on data source: When importing from multiple data sources, identify your "source of truth"—the system with the most accurate and up-to-date information—and import it first to avoid overwriting good data with outdated or incorrect information. If you want to avoid corrupting existing data, use Create new Contacts only to add only new records, or Update existing Contacts only to update records already in HubSpot without adding new ones.
Verify your file and import settings
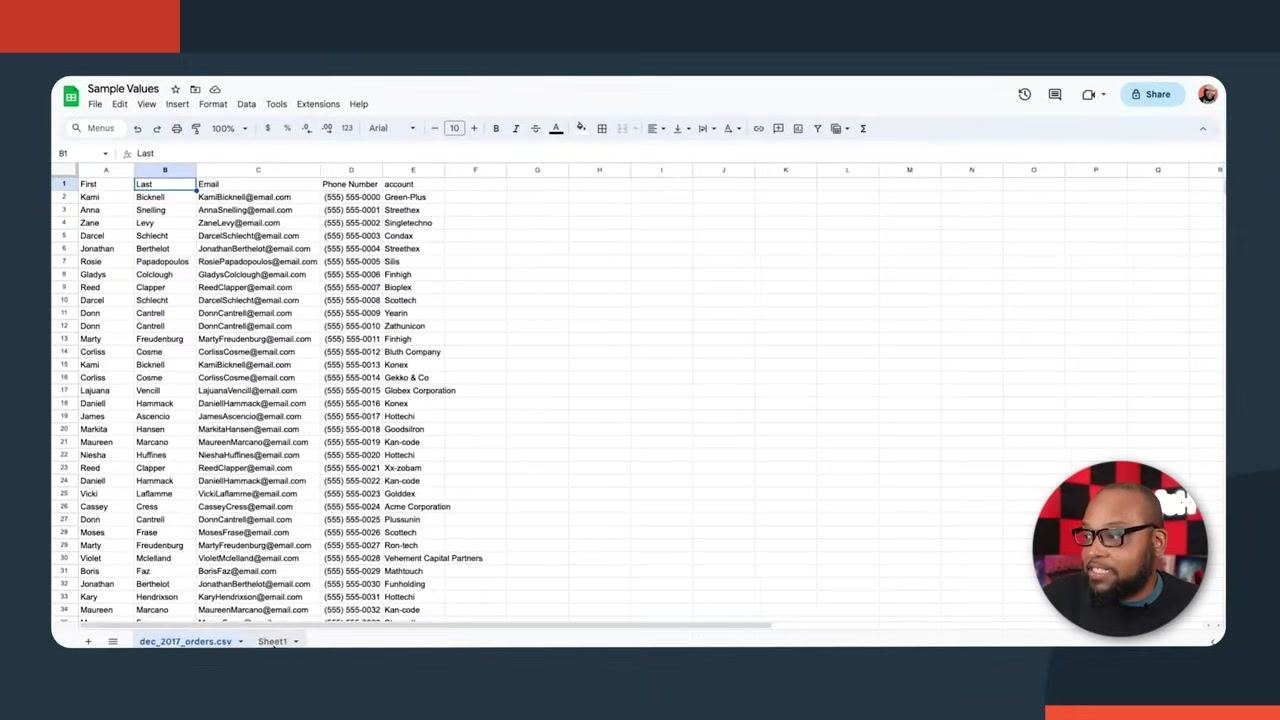
Confirm that the correct file has been uploaded. In this example, the file is named "Sample Values - dec_2017_orders.csv" and is 32.5KB in size. Double-check that your file contains only the data you intend to import.
On the "Choose how to import Contacts" dropdown, select the option that matches your data management needs, as described above. In this example, Update existing Contacts only is selected, which ensures only existing records in HubSpot are updated, preventing the addition of new, potentially incorrect data.
Confirm the language for your column headers is set correctly, for example English.
Before finalizing, review your spreadsheet for duplicate entries, incomplete or missing information, and incorrect formatting (such as email addresses or phone numbers). Clean your data as needed to prevent import errors or CRM corruption.
Map columns to contact properties
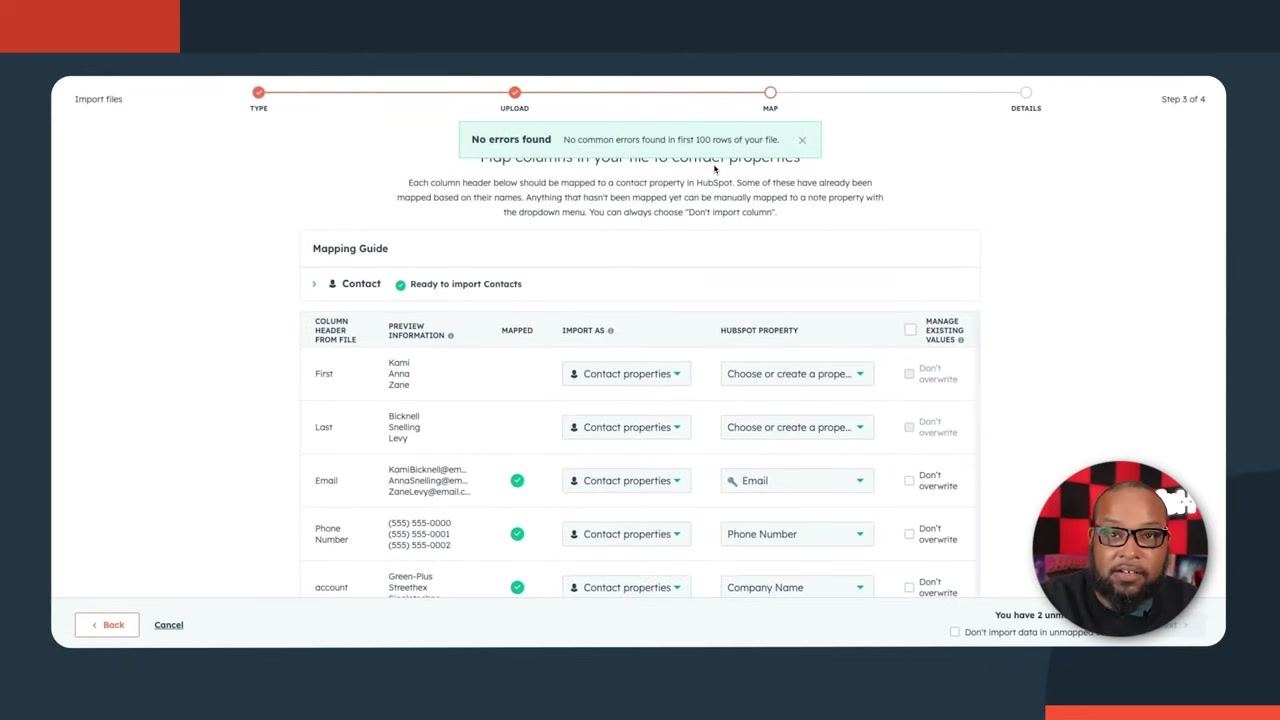
After uploading your file, you'll see the mapping screen. The interface shows a progress bar at the top with steps: Type, Upload, Map, and Details (you are on step 3 of 4). A notification confirms: "No errors found. No common errors found in first 100 rows of your file."
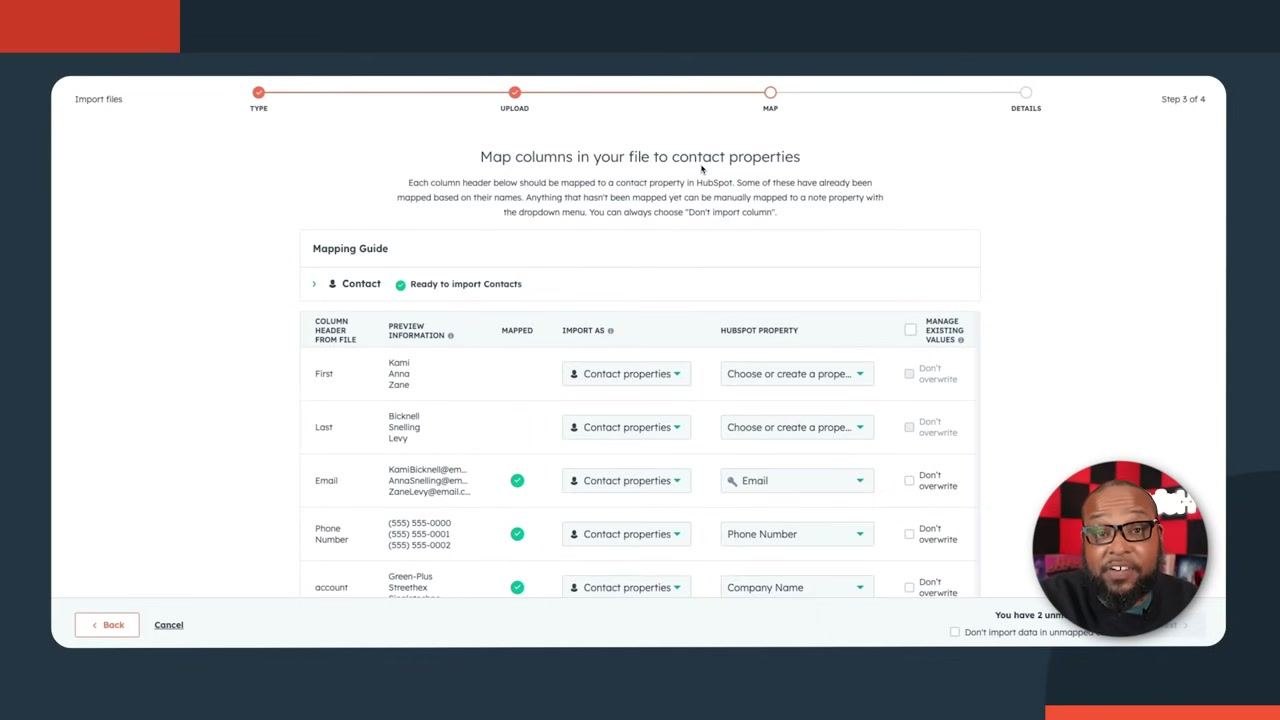
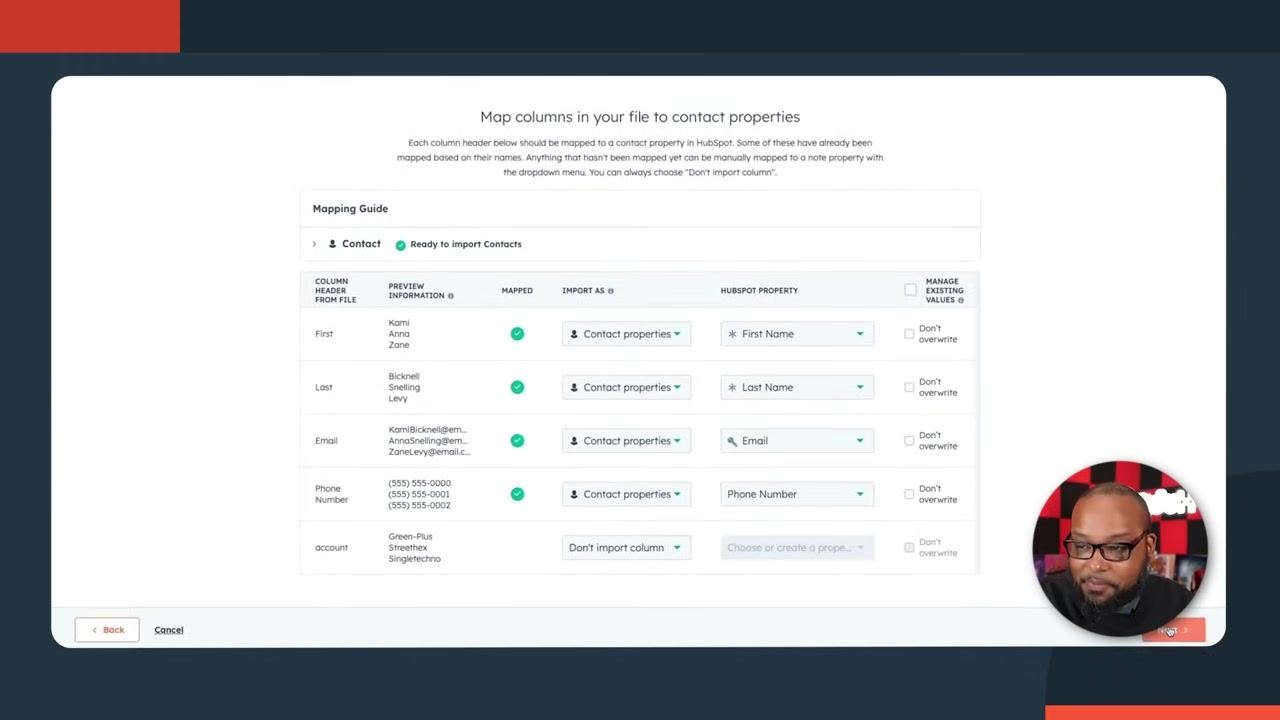
The main section, titled "Map columns in your file to contact properties," lists each column header from your file along with preview data, mapping options, and HubSpot property assignments (for example: First, Last, Email, Phone Number, Account). The system indicates "Ready to import Contacts."
If no errors are found, you can proceed. If errors are detected, the system prompts you to resolve them before continuing.
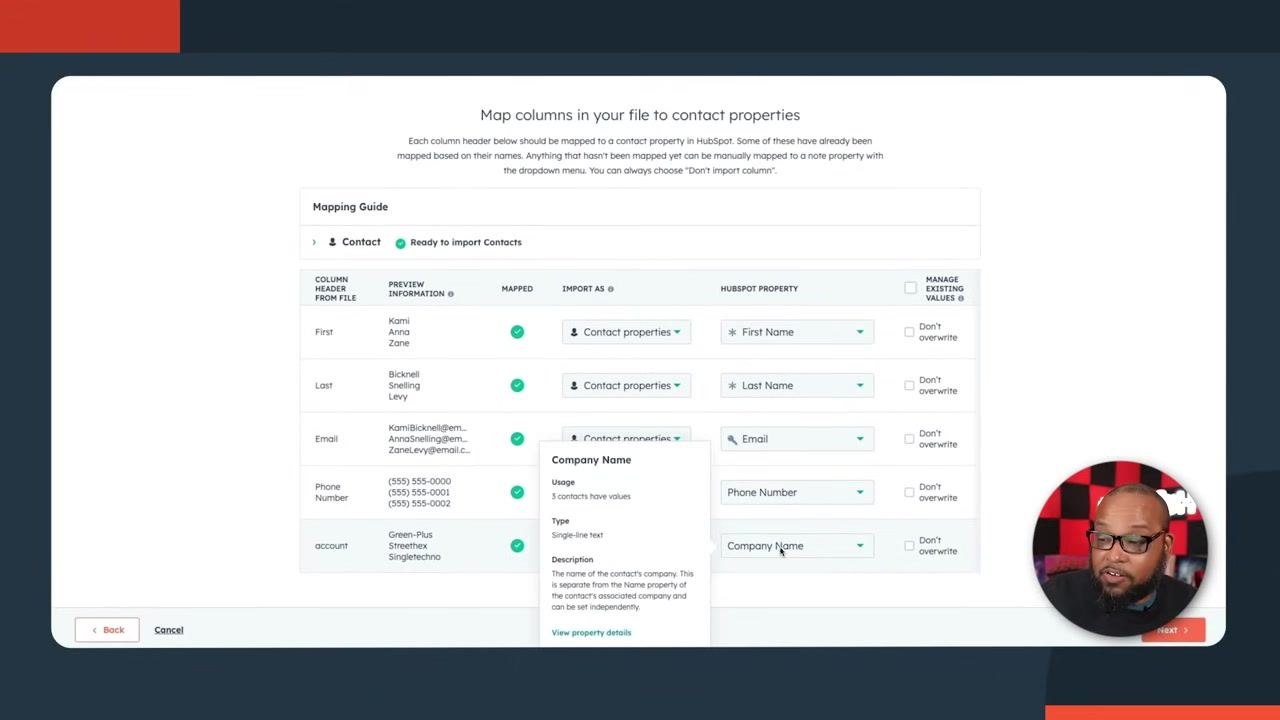
For each column, select the correct "Import As" type (for example, Contact properties) and assign the corresponding HubSpot property using the dropdown (for example, First Name, Last Name, Email, Phone Number, Company Name). Optionally, check Don't overwrite if you don't want to update existing values.
Handle deduplication and skip unwanted columns
Use the Record ID property to deduplicate or update existing records. When selected, a tooltip explains: "Import will use this record ID column as a unique identifier to match records in this import with existing records in your CRM. Note: Any rows in this import that don't have a record ID will create new records." Alternatively, select Don't import column if you don't want to import a specific column.
If you don't want to import company names, select Don't import column for the Account/Company Name field. The dropdown for Company Name provides usage and description details to help you decide.
Create a new property if needed
If your data contains a column that doesn't match any existing HubSpot property, you can create a new one. Click to create a new property, then fill in:
- Object type (for example, Contact)
- Group (select the appropriate group)
- Label (for example, account)
- Description (optional)
Before creating new properties, check whether an appropriate one already exists to avoid unnecessary duplicates. Not all data from your import file needs to be imported—only map what is necessary.
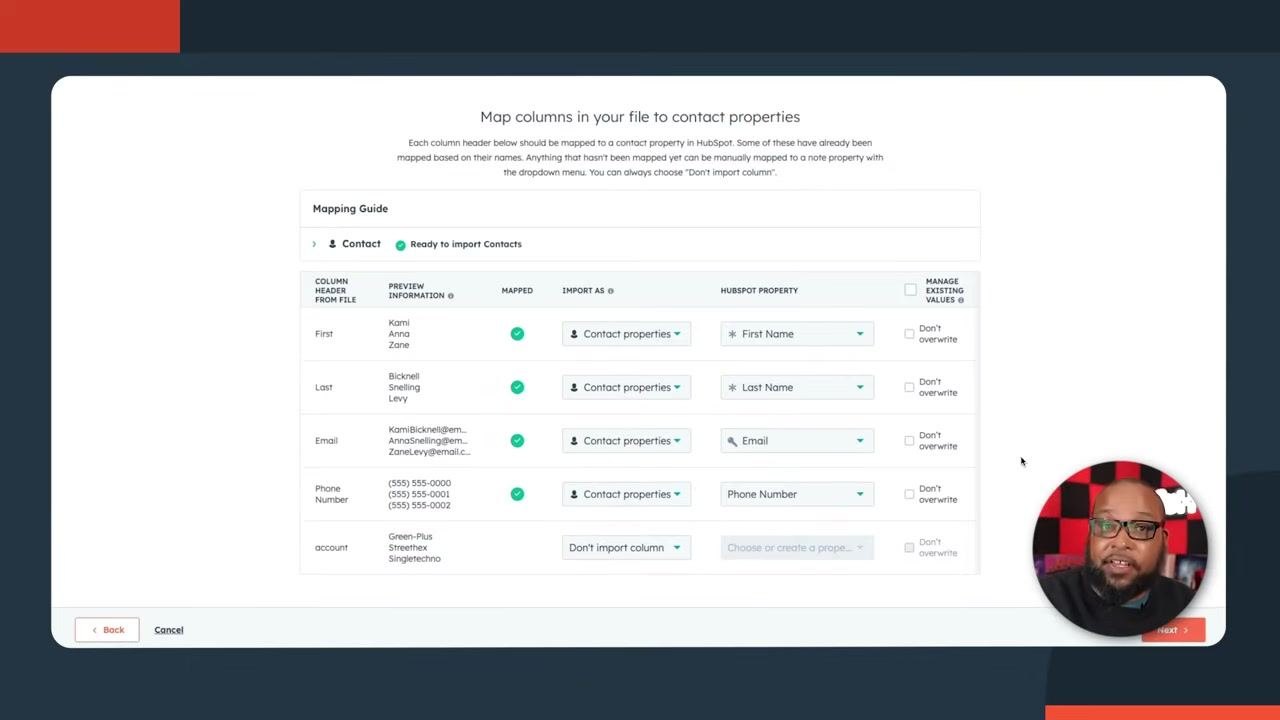
Once all columns are mapped or intentionally skipped, click Next to continue.
Review your final mapping
Confirm that each column from your file is mapped to the correct HubSpot property. For unmapped columns, select "Choose or create a property" if you want to map them, or leave as "Don't import column" if not needed. Optionally, check Don't overwrite for any property if you don't want to update existing values during import.
Click Next to proceed to the import details screen.
Name your import
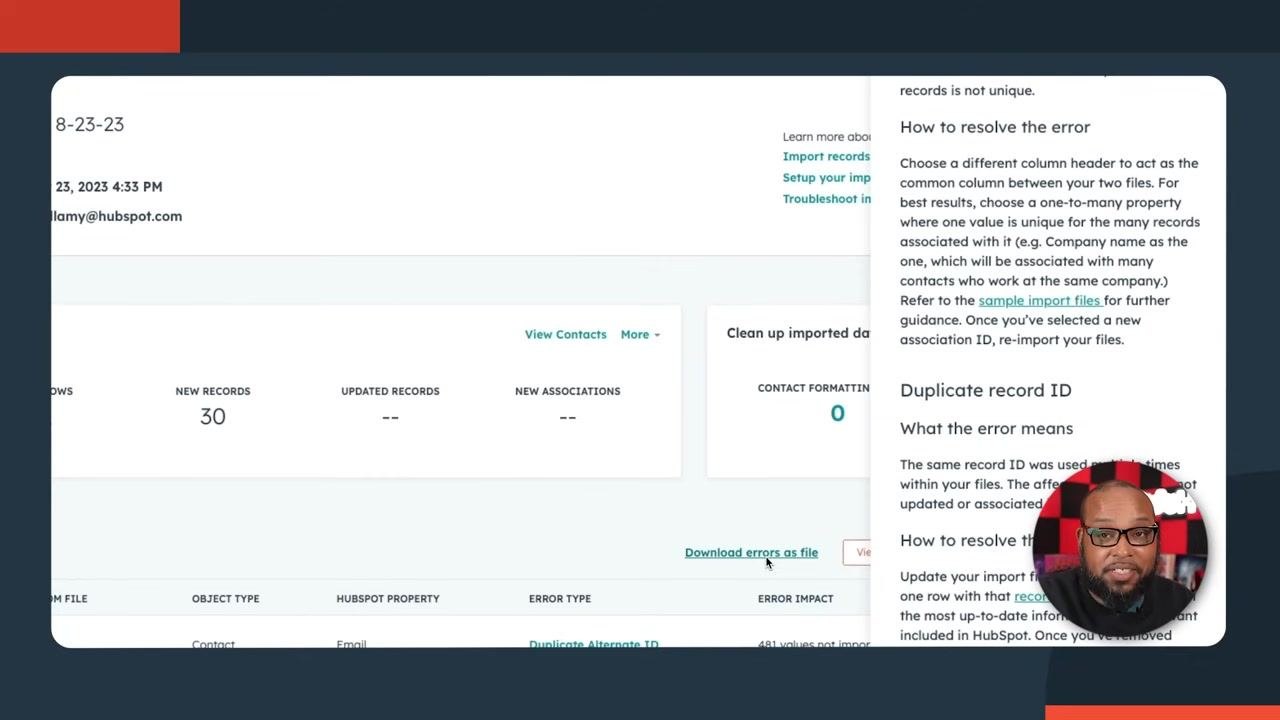
In the "A few final details" screen, enter a meaningful name in the Import name field, for example "Full CRM List - 8-23-23." Avoid using only the file name—choose a name that helps you identify the import later.
Optionally create a list and confirm compliance
Check the box labeled Create a list from this import if you want HubSpot to automatically generate a list of the imported contacts. This is useful for quickly accessing or segmenting the imported data.
You must also check the box confirming: "I agree that all contacts in this import are expecting to hear from my organization. I have a prior relationship with these contacts and have emailed them at least once in the past year. I can confirm this list wasn't purchased, rented, appended, or provided by a third party." This step is required to proceed with the import.
Start the import
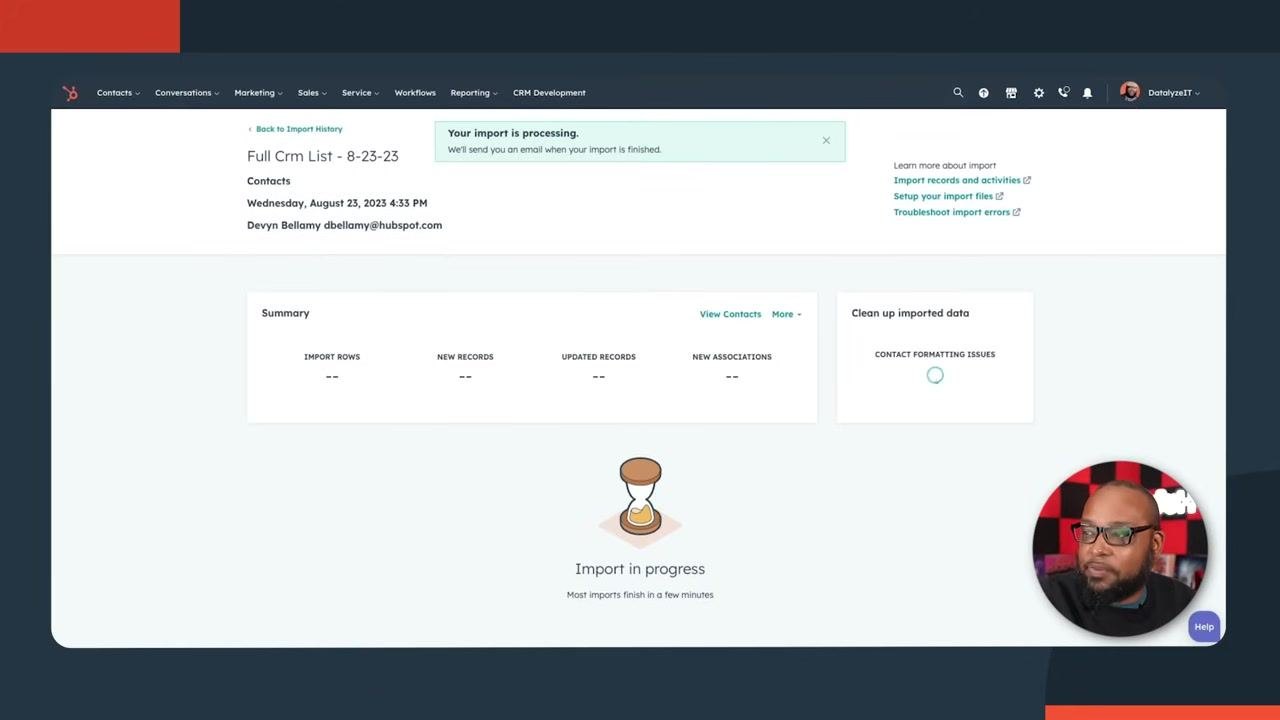
After confirming all details and agreements, submit the import. The system displays an "Import in progress" screen, showing a summary and a progress indicator. You will receive an email notification when the import is complete.
Review the import summary and errors
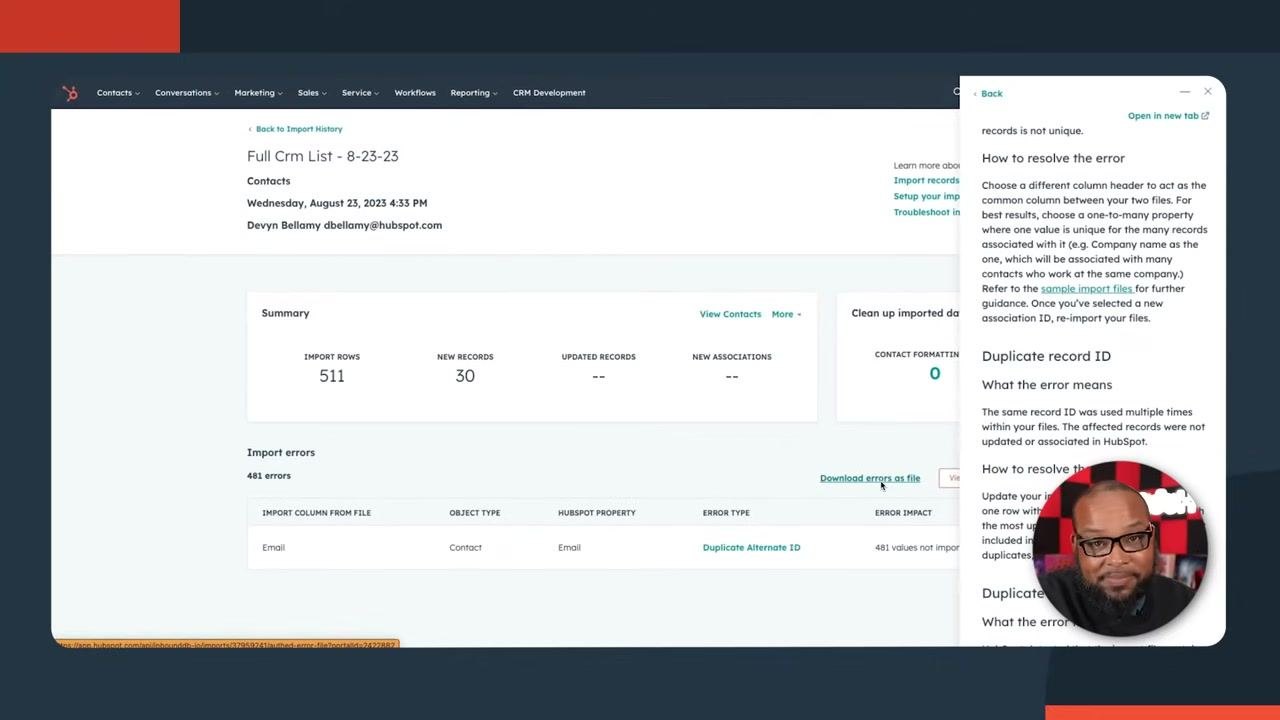
Once the import is complete, review the summary, which includes:
- Total import rows (for example, 511)
- New records created (for example, 30)
- Updated records and new associations, if any
- Contact formatting issues (for example, 0)
Check for import errors listed below the summary. For example, "Duplicate Alternate ID" errors for the Email property, with the number of values not imported (for example, 481). You can download the error report as a file or view rows with errors for further troubleshooting.
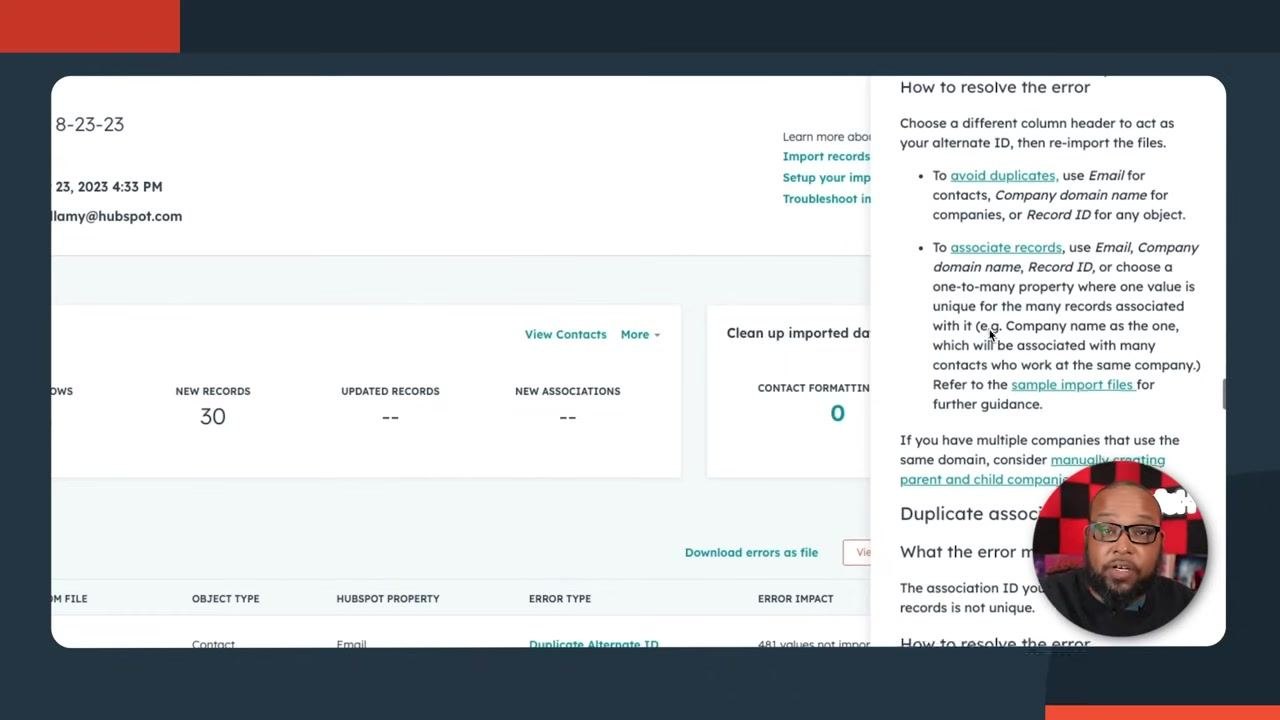
Click on error details to view guidance on resolving issues. For example, a "Duplicate Alternate ID" error for the Email property will show a help panel with instructions such as:
- Use a unique column (such as Email, Company domain name, or Record ID) to avoid duplicates.
- For associations, ensure the association ID is unique for each record.
- Refer to sample import files or create parent/child company relationships if needed.
Best practices before you finish
Keep the following in mind as you complete your import:
- Duplicate records will trigger errors like "Duplicate Alternate ID," so use a unique identifying column (Email, Company domain name, or Record ID) to prevent this.
- You can review the full import summary, including import name, date and time, user email, and error counts, and download the error report for further review.
- Don't rush through error resolution. Take the time to review and address errors immediately rather than leaving them to fix later, to maintain clean and accurate CRM data and prevent future issues.

Summary
Once you have reviewed the summary and resolved any errors, your import process is complete. By preparing your spreadsheet correctly, mapping columns carefully, and reviewing your import results, you ensure that your HubSpot CRM remains clean, accurate, and compliant. Always review error reports, resolve issues as they arise, and use descriptive import names for easier tracking in the future.
Generation details: cost, quality tiers
Docsie billed 5,000 credits ($3.50) to analyze this 10-minute video at standard quality. The rewrite, template fill and Word/PDF exports were included. The same video at each quality tier:
| Quality | Frames sampled | Credits | Approx. cost |
|---|---|---|---|
| Draft | every 16-30 s | 2,500 | $1.75 |
| Standard (this guide) | every 8-15 s | 5,000 | $3.50 |
| Detailed | every 4-7 s | 10,000 | $7.00 |
| Ultra | every 1-3 s | 20,000 | $14.00 |
Credits priced at $0.70 per 1,000; plans include a monthly allowance. Enterprise customers on on-premise or bring-your-own-model deployments run this on their own inference and pay no per-video credits.
Generated by Docsie Video-to-Docs on 2026-09-08 from a 9-minute video. Screenshots are frames from the source video and belong to their creator, HubSpot , whose original is embedded above. If you own this video and want the guide removed or credited differently, contact us and we will act within one business day.