
How to Change Marketing Contact Status in HubSpot
Marketing contacts in HubSpot are the contacts you can send marketing emails to, include in marketing automation, and target with ads. Because HubSpot bills you based on the number of marketing contacts on your account, it's important to know how to change marketing contact status in HubSpot — whether you're updating contacts manually, through form submissions, or with automated workflows. This guide walks you through each method, along with how non-HubSpot form submissions and user permissions affect marketing contact management.
Video: How to Set Marketing Contacts in HubSpot (plus when & how to use this feature) by HubSpot Hacks (2022). All credit for the demonstration goes to the creator; watch the original on YouTube. The written guide below was generated from this video by Docsie. Creator? Request a change or removal.
Marketing contacts in HubSpot are the contacts you can send marketing emails to, include in marketing automation, and target with ads. Because HubSpot bills you based on the number of marketing contacts on your account, it's important to know how to change marketing contact status in HubSpot — whether you're updating contacts manually, through form submissions, or with automated workflows. This guide walks you through each method, along with how non-HubSpot form submissions and user permissions affect marketing contact management.
Prerequisites
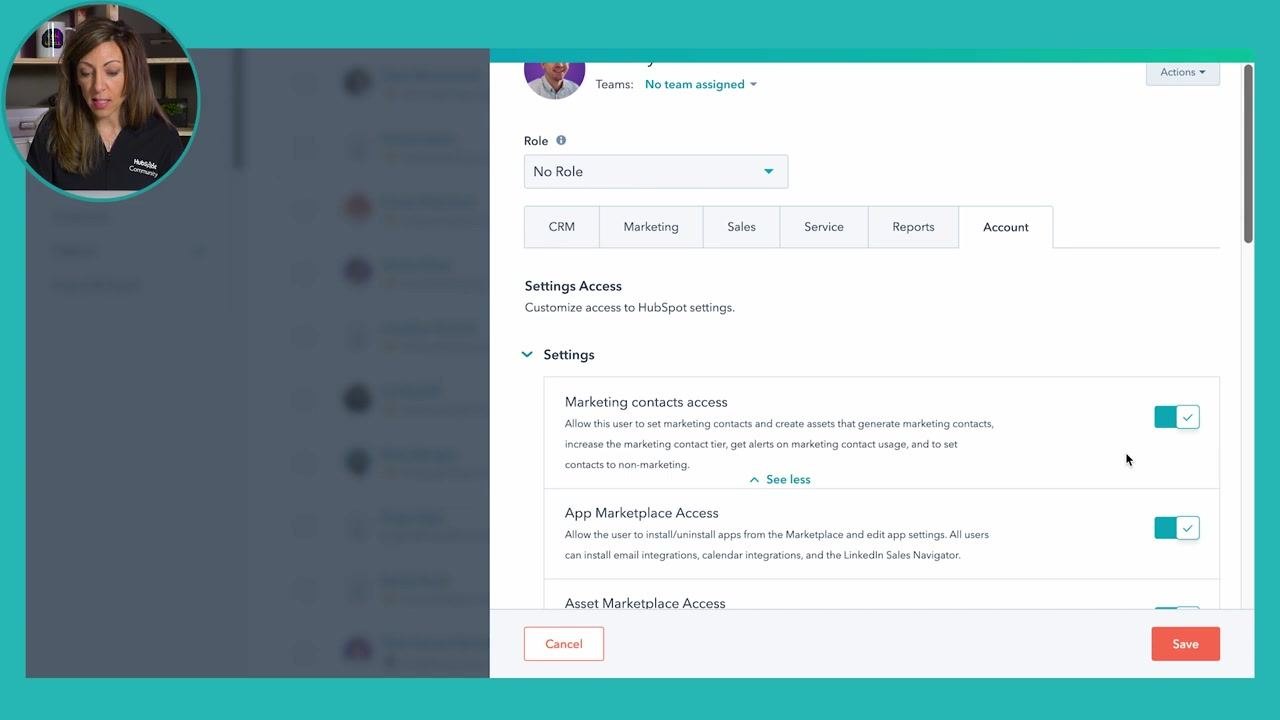
Before you can set or change a contact's marketing status, your HubSpot user account needs the correct permissions. Confirm this first if you don't see the marketing contact options described below.
Verify your marketing contacts access
- Go to the user management or permissions settings in HubSpot.
- Select the user whose permissions you want to review or edit.
- Under the Account tab, locate the Settings Access section.
- In the Settings area, find Marketing contacts access.
Enable marketing contacts access for the user
- Turn the toggle for Marketing contacts access to ON. This allows the user to:
- Set marketing contacts.
- Create assets that generate marketing contacts.
- Increase the marketing contact tier.
- Get alerts on marketing contact usage.
- Set contacts to non-marketing.
- Adjust other access settings as needed, such as App Marketplace Access and Asset Marketplace Access.
- Click Save to apply your changes.
Review your team's roles and permissions regularly to ensure compliance and security. If you run into issues setting marketing contact status, confirm that this permission is enabled on your account.
Set contacts as marketing contacts manually
Access your HubSpot contacts
- Log in to your HubSpot account.
- Navigate to the Contacts section to view your contact list.
Identify the contacts to update
Review your contact list and decide which contact or contacts you want to set as marketing contacts.
Select the contacts
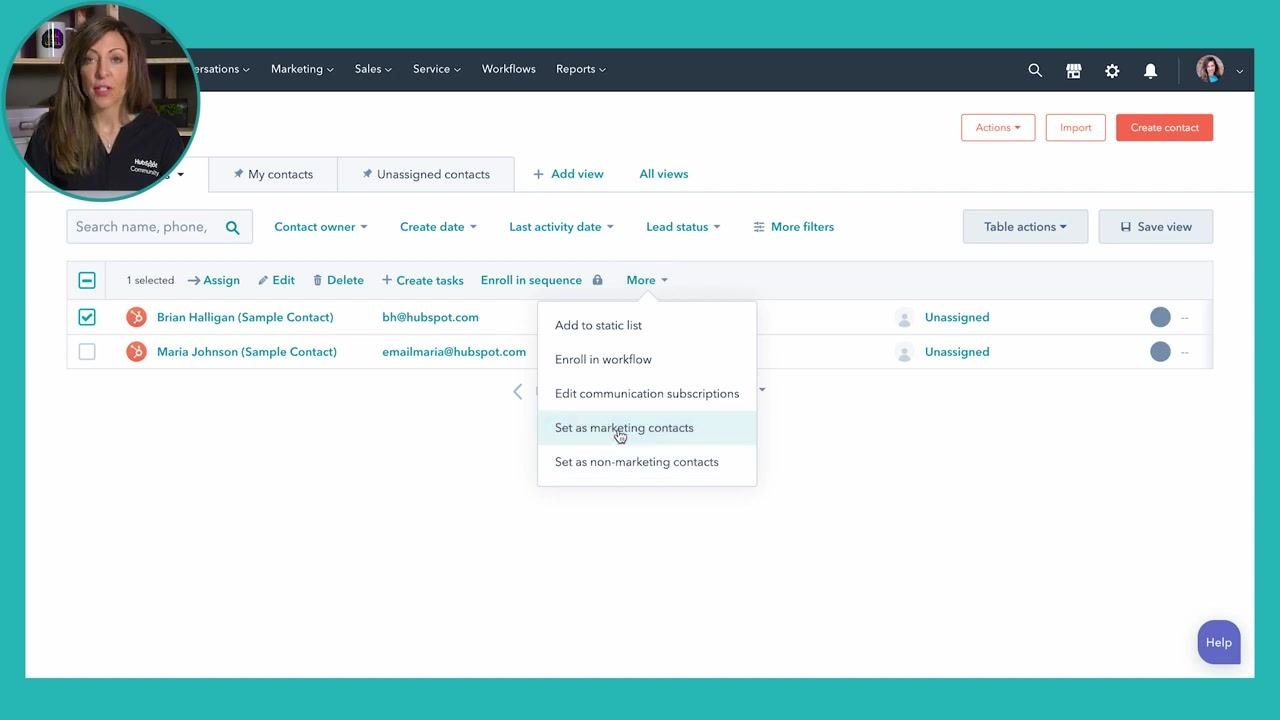
- Click the checkbox next to the contact you want to update (for example, Brian Halligan).
- You can select one or multiple contacts at a time by checking additional boxes.
Set the selected contacts as marketing contacts
In the dropdown menu, select Set as marketing contacts. This designates the selected contact(s) as marketing contacts, making them eligible to receive marketing communications.
Understand billing implications
You are charged for marketing contacts in HubSpot based on how many you have active. If you remove a contact's marketing status, the change will not affect your billing until the next pay period. For more details on billing, refer to HubSpot's help documentation.
Set contacts as non-marketing contacts
Select the contacts to remove as marketing contacts
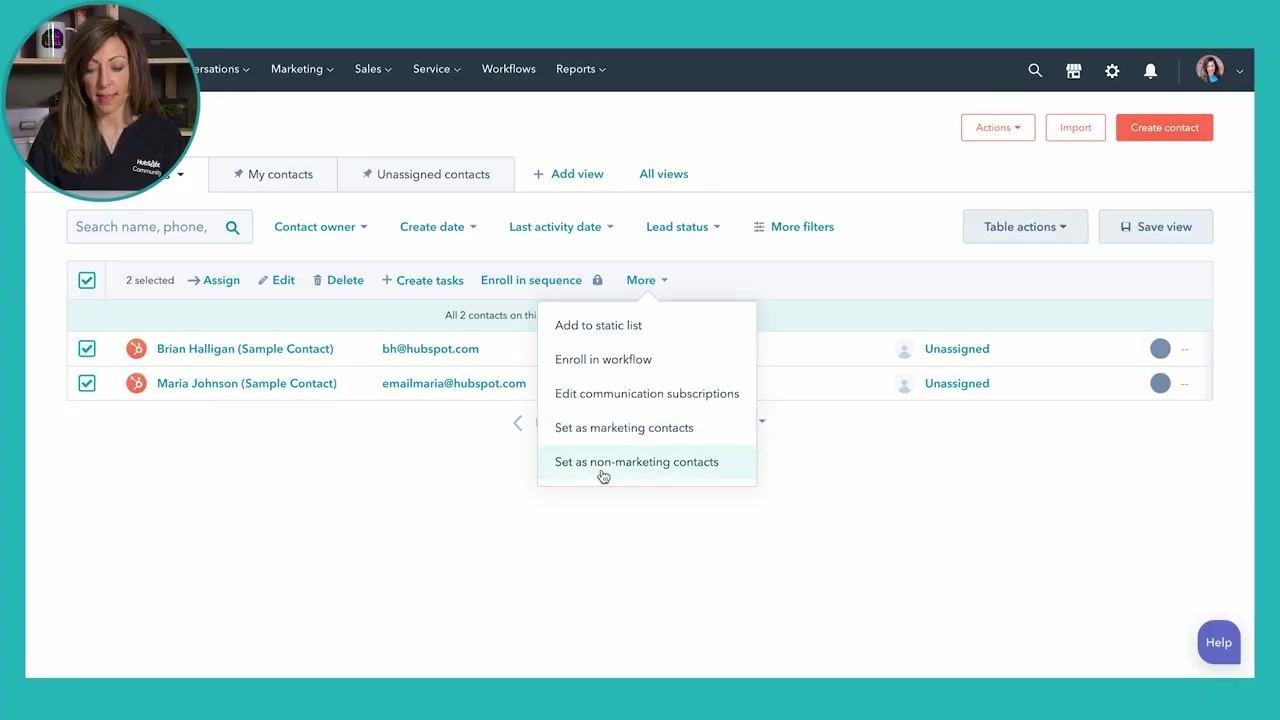
In your HubSpot Contacts list, select the contacts you wish to update by checking the boxes next to their names (for example, Brian Halligan and Maria Johnson).
Set the selected contacts as non-marketing contacts
In the dropdown, select Set as non-marketing contacts to remove the marketing status from the selected contacts. If you attempt to set contacts as marketing contacts when they already have that status, HubSpot will notify you and provide guidance.
Automatically set marketing contacts with forms
Navigate to the Forms tool
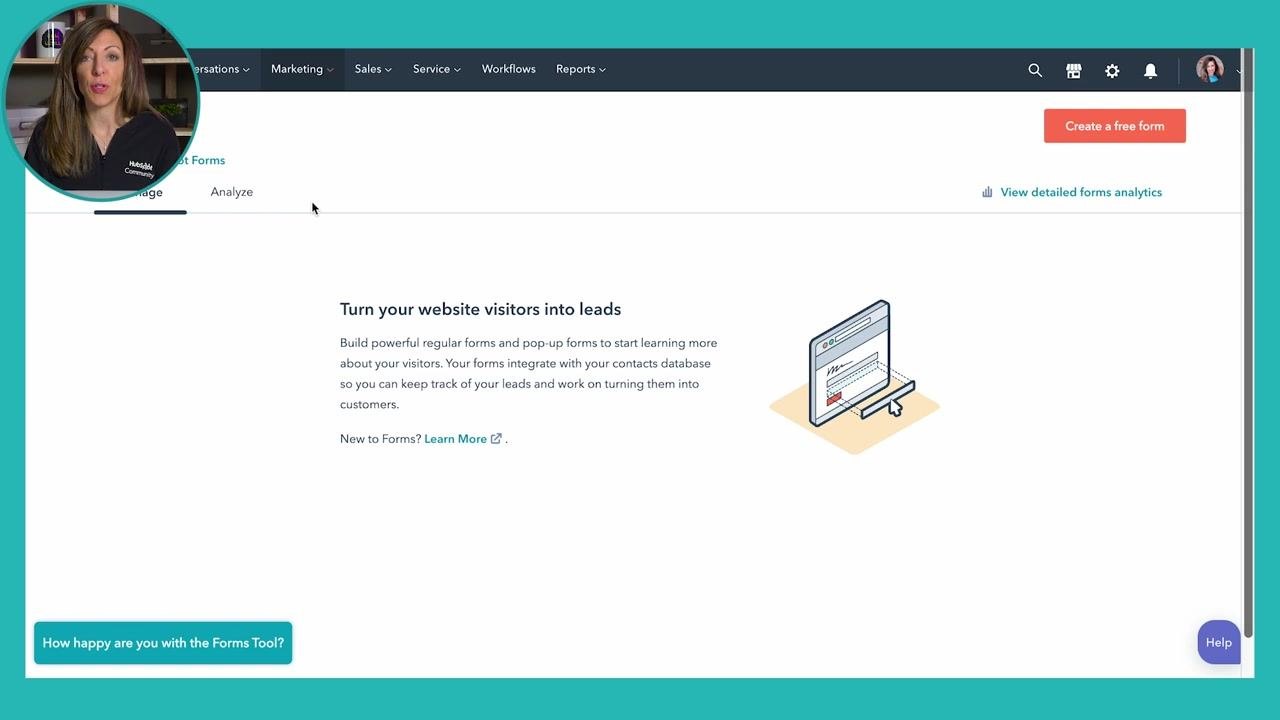
Go to the Marketing menu and select Forms. The Forms dashboard displays options to create and manage forms.
Create or edit a form
Click Create a free form to start a new form, or select an existing form to edit. Choose a template such as Registration, Contact us, or Newsletter sign-up, or start with a blank form.
Access form options
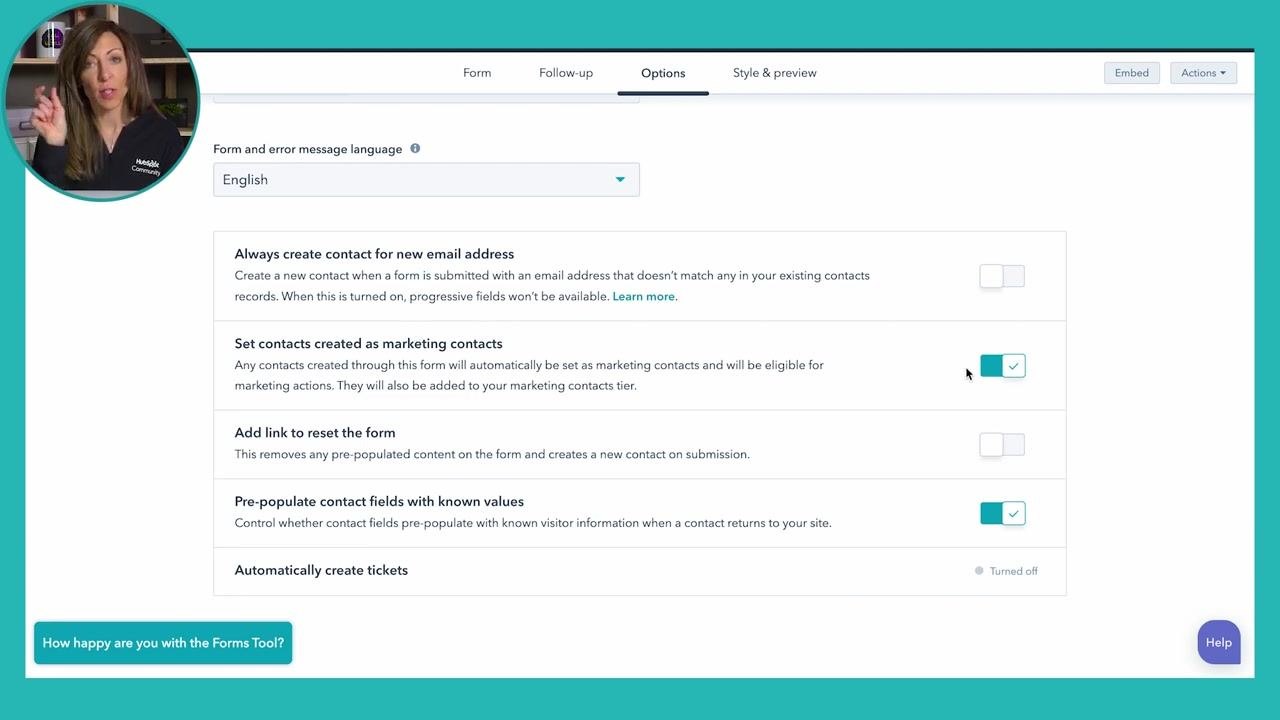
In the HubSpot form editor, click the Options tab at the top of the screen.
Locate the marketing contact setting
Scroll down to find the option labeled Set contacts created as marketing contacts.
Enable marketing contact status for form submissions
Toggle the switch next to Set contacts created as marketing contacts to the right so it turns blue and displays a checkmark. Confirm that the toggle shows as blue and checked for the setting to be active. This ensures that any new contact created through this form is automatically labeled as a marketing contact and added to your marketing contacts tier.
Save and publish the form
After configuring the form, save and publish it. All contacts who submit this form will automatically be set as marketing contacts.
Automate marketing contact status with workflows
Create a new workflow
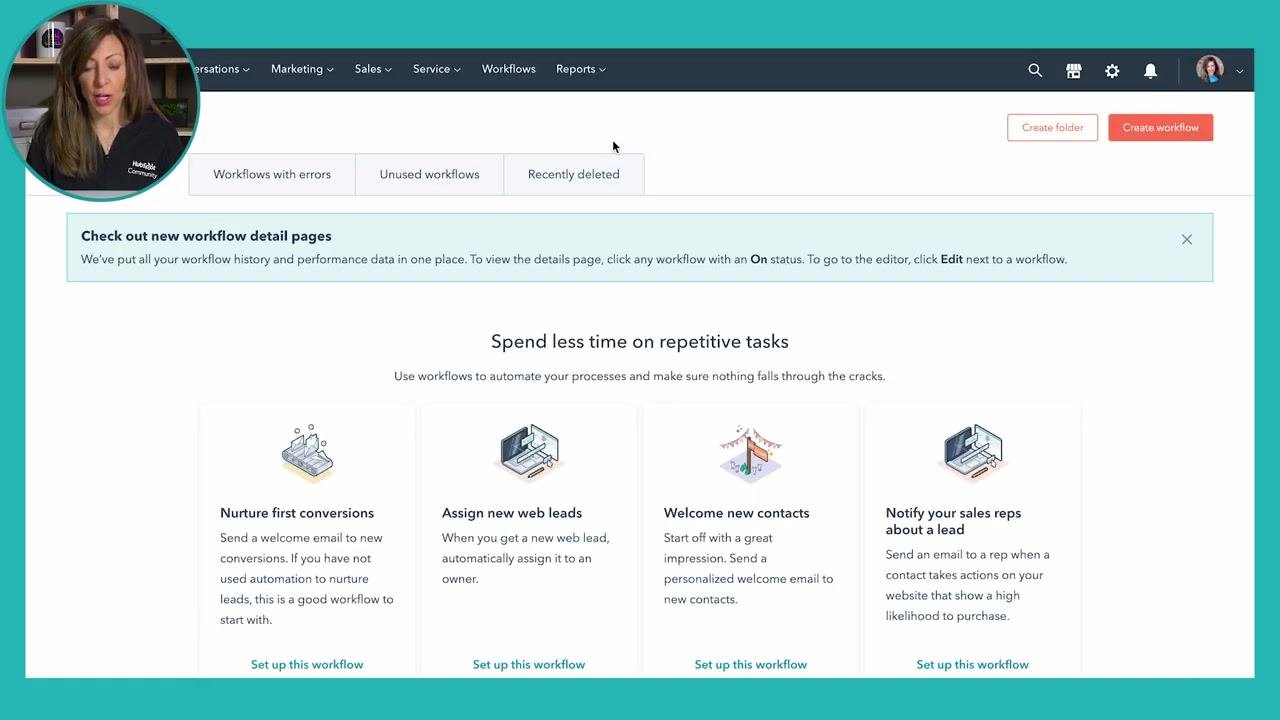
Click Create workflow in the upper right corner, then choose to start from scratch or select a template.
Select the workflow type
Choose Contact-based workflow to trigger actions based on contact activity, then select Blank workflow to define your own triggers and actions.
Set the enrollment trigger
Define the trigger that will enroll contacts into this workflow, such as a form submission, event attendance, or another HubSpot property or activity. The specific trigger depends on your use case — for example, "attended webinar series about XYZ."
Add an action to change marketing contact status
- Open the workflow editor in HubSpot.
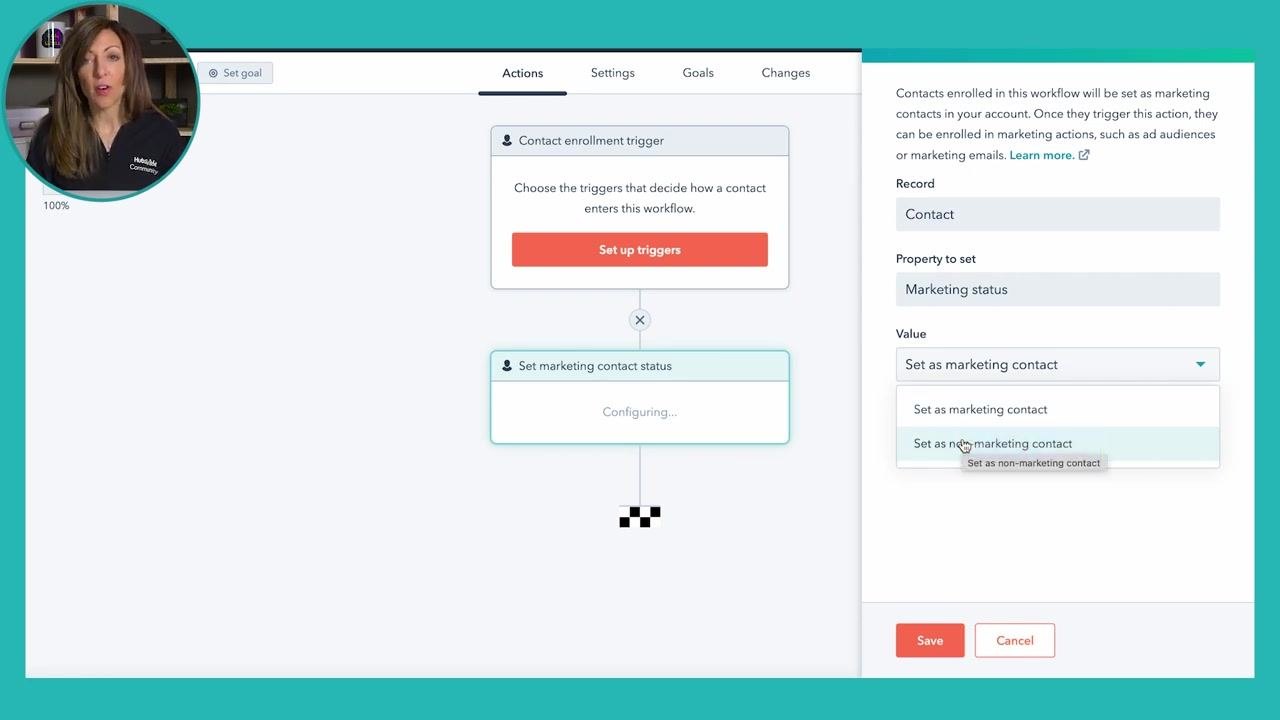
- Under the Actions tab, locate the Contact enrollment trigger section and click Set up triggers to define how a contact enters the workflow.
- Add an action to Set marketing contact status.
- In the configuration panel on the right:
- Set Record to Contact.
- Set Property to set to Marketing status.
- Under Value, choose either Set as marketing contact or Set as non-marketing contact (for unsubscribed contacts).
- Click Save to apply the changes.
Save and activate the workflow
Review your workflow settings and actions, then save and turn on the workflow to automate labeling contacts as marketing contacts based on your defined triggers.
Use unsubscribe events as workflow triggers
Consider scenarios where a contact unsubscribes from your communications and plan to use that event as a trigger to update their marketing status accordingly. Set the workflow trigger to activate when a contact unsubscribes, so unsubscribed contacts are automatically updated to non-marketing status.
Manage contacts from non-HubSpot forms
Navigate to non-HubSpot forms management
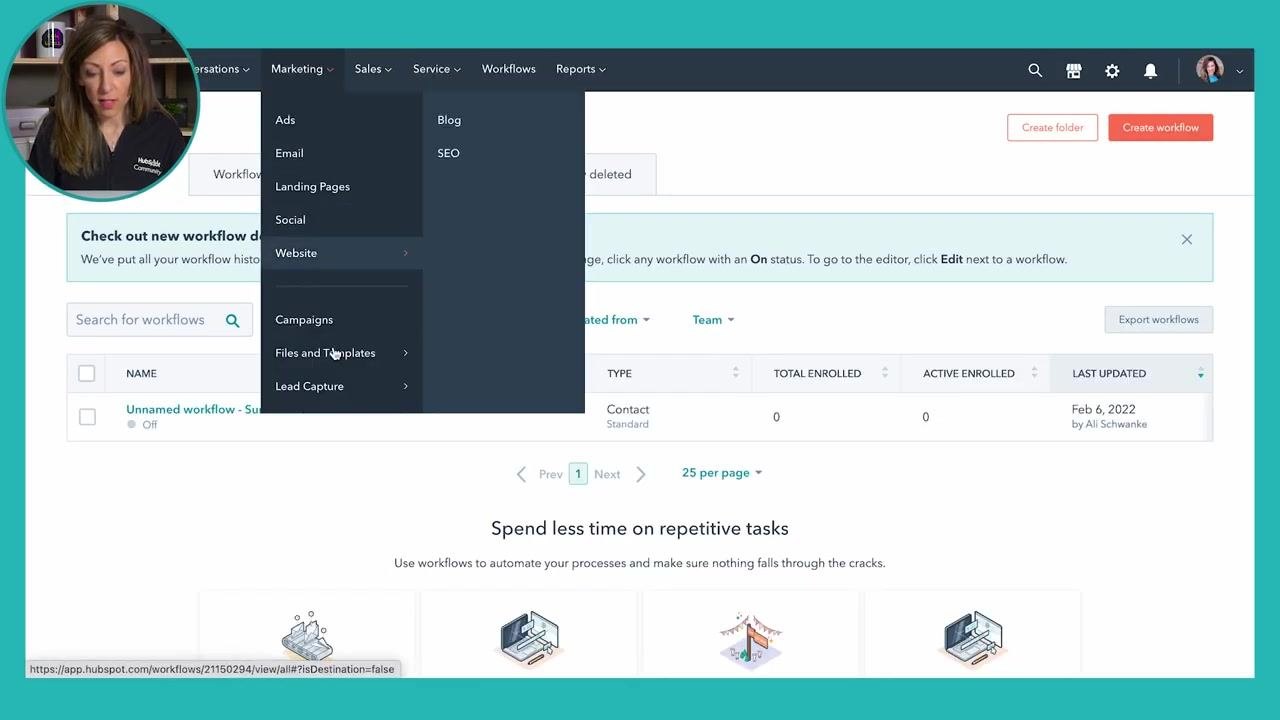
Go to the main navigation bar and select Marketing. Hover over Website and select Lead Capture > Forms. The Forms dashboard lets you view all forms, including non-HubSpot forms.
View and manage non-HubSpot forms
In the Forms dashboard, select the Non-HubSpot Forms tab. Review the list of forms, including their names, submission rates, and last modified dates. Use the search bar or date range filters to locate specific forms.
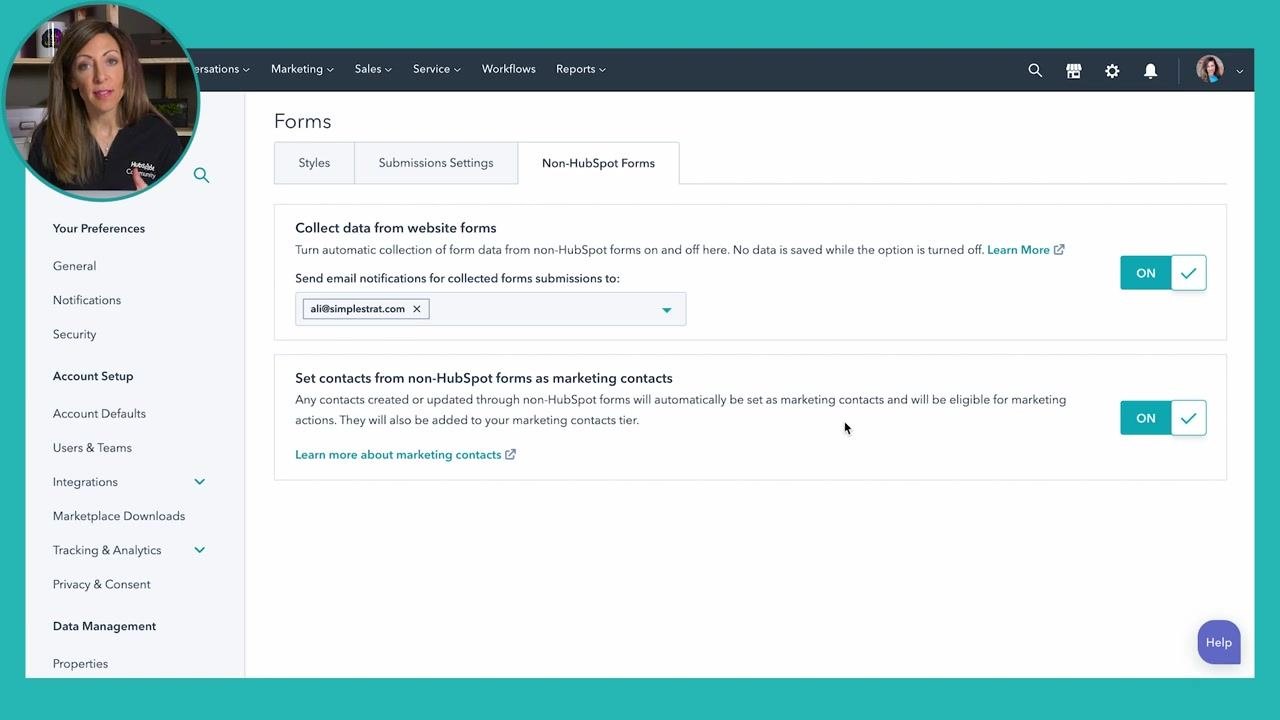
Access non-HubSpot form settings
Click the settings icon or link for Non-HubSpot Forms. A tooltip appears explaining that you can collect submissions and contacts from website forms not created in HubSpot. Click the settings link in the tooltip to open the Non-HubSpot Forms preferences.
Configure data collection and marketing contact settings
In the Non-HubSpot Forms settings:
- Ensure Collect data from website forms is toggled ON.
- Set the email address to receive notifications for collected form submissions.
- Ensure Set contacts from non-HubSpot forms as marketing contacts is toggled ON.
This automatically sets any contacts created or updated through non-HubSpot forms as marketing contacts, making them eligible for marketing actions.
What's next
By following these steps, you can change marketing contact status in HubSpot manually, through form submissions, and via automated workflows — ensuring accurate billing and alignment with your marketing strategy. Keep your user permissions, form settings, and workflow triggers up to date so new and existing contacts are classified correctly as your contact database grows.
Generation details: cost, quality tiers
Docsie billed 4,000 credits ($2.80) to analyze this 8-minute video at standard quality. The rewrite, template fill and Word/PDF exports were included. The same video at each quality tier:
| Quality | Frames sampled | Credits | Approx. cost |
|---|---|---|---|
| Draft | every 16-30 s | 2,000 | $1.40 |
| Standard (this guide) | every 8-15 s | 4,000 | $2.80 |
| Detailed | every 4-7 s | 8,000 | $5.60 |
| Ultra | every 1-3 s | 16,000 | $11.20 |
Credits priced at $0.70 per 1,000; plans include a monthly allowance. Enterprise customers on on-premise or bring-your-own-model deployments run this on their own inference and pay no per-video credits.
Generated by Docsie Video-to-Docs on 2026-10-11 from a 7-minute video. Screenshots are frames from the source video and belong to their creator, HubSpot Hacks, whose original is embedded above. If you own this video and want the guide removed or credited differently, contact us and we will act within one business day.