
How to Perform an EKG
This documentation explains how to perform an EKG, also known as an electrocardiogram (ECG), which records the electrical activity of a patient's heart. It covers every stage of the procedure, from introducing yourself and confirming patient consent through electrode placement, lead connection, recording, and reviewing the final printout. Following these steps in order helps ensure an accurate trace and a safe, comfortable experience for the patient.
Video: How to record an ECG - OSCE Guide | UKMLA | CPSA | PLAB 2 by Geeky Medics (2017). All credit for the demonstration goes to the creator; watch the original on YouTube. The written guide below was generated from this video by Docsie. Creator? Request a change or removal.
This documentation explains how to perform an EKG, also known as an electrocardiogram (ECG), which records the electrical activity of a patient's heart. It covers every stage of the procedure, from introducing yourself and confirming patient consent through electrode placement, lead connection, recording, and reviewing the final printout. Following these steps in order helps ensure an accurate trace and a safe, comfortable experience for the patient.

Purpose
This procedure standardizes how to perform an EKG so that the electrical tracing of the heart is captured accurately, the patient is correctly identified, and the patient's comfort and privacy are maintained throughout.
Scope
This procedure applies to any medical professional performing a 12-lead ECG on a patient in a clinical setting.
Required equipment and materials
- ECG machine with color-coded leads
- Disposable electrodes (sticky pads)
- Examination couch
- Pillow for patient support

Procedure
Step 1: Introduce yourself and confirm consent
Greet the patient, introduce yourself as the medical professional performing the ECG, and thank them for coming. Ask for the patient's name and date of birth to confirm their identity.
Example exchange: - "Can I just confirm your name and date of birth?" - Patient: "James Alexander, 13th December 1989."
Explain that you would like to perform an ECG, describe it as an electrical tracing of the heart, and confirm the patient is comfortable with the procedure.
Example: "I'd like to do an ECG today. It's an electrical tracing of your heart. Would that be okay?"
Wait for the patient to agree before proceeding.
Step 2: Confirm patient details
Sit facing the patient in a quiet, private environment and confirm their full name and date of birth again to ensure correct identification and safety.
Example: "Sure, it's James Alexander, 13th December 1989."
Step 3: Explain the procedure
Clearly explain what an ECG is and what it involves. State that sticky pads (electrodes) will be placed on the chest, arms, and legs to measure the heart's electrical activity.
Example: "It's going to involve me placing some sticky pads on your chest, arms and legs and measuring the electrical activity of your heart."
Reassure the patient, answer any questions, and confirm again that they are comfortable to proceed.
Step 4: Prepare the patient
Ask the patient to remove their top to allow access to the chest, and instruct them to lie down on the examination couch. Confirm the patient is comfortable and ask whether they have any chest pain.
Example: "Are you comfortable where you are?" Patient: "Yes, I am."
Position the patient at a 45-degree angle on the couch, using a pillow for support.
Step 5: Identify electrode placement landmarks
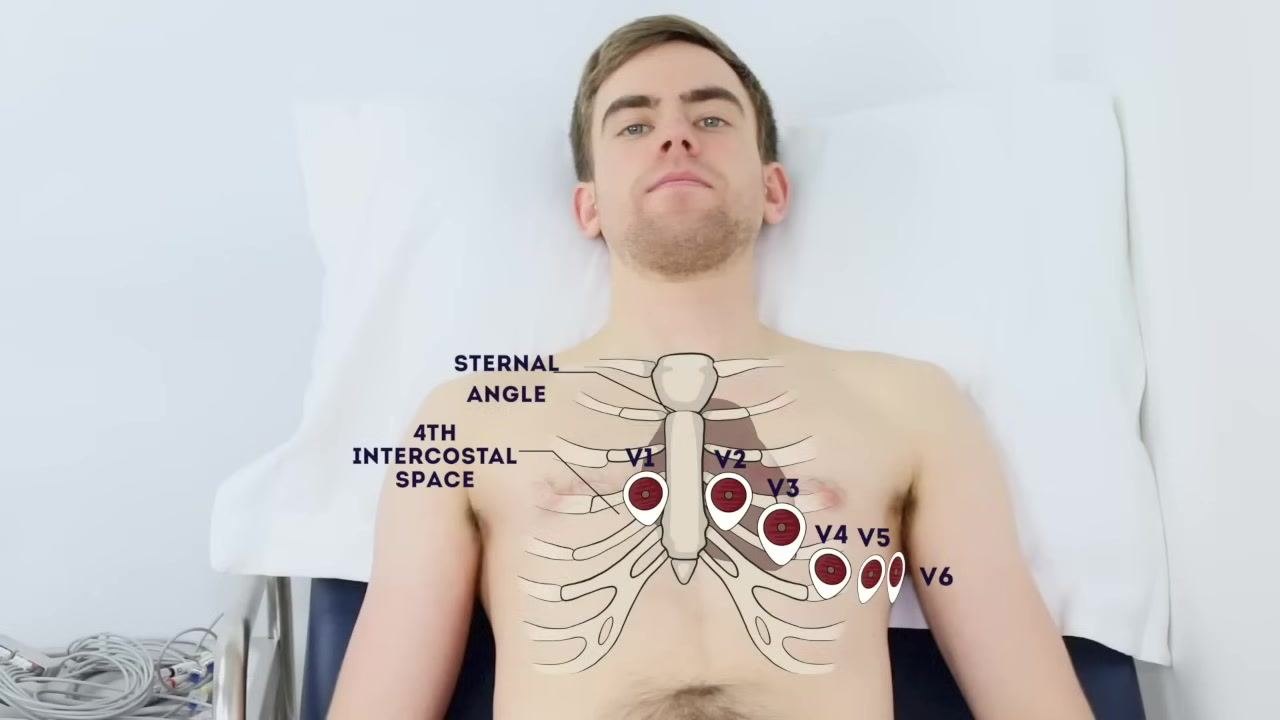
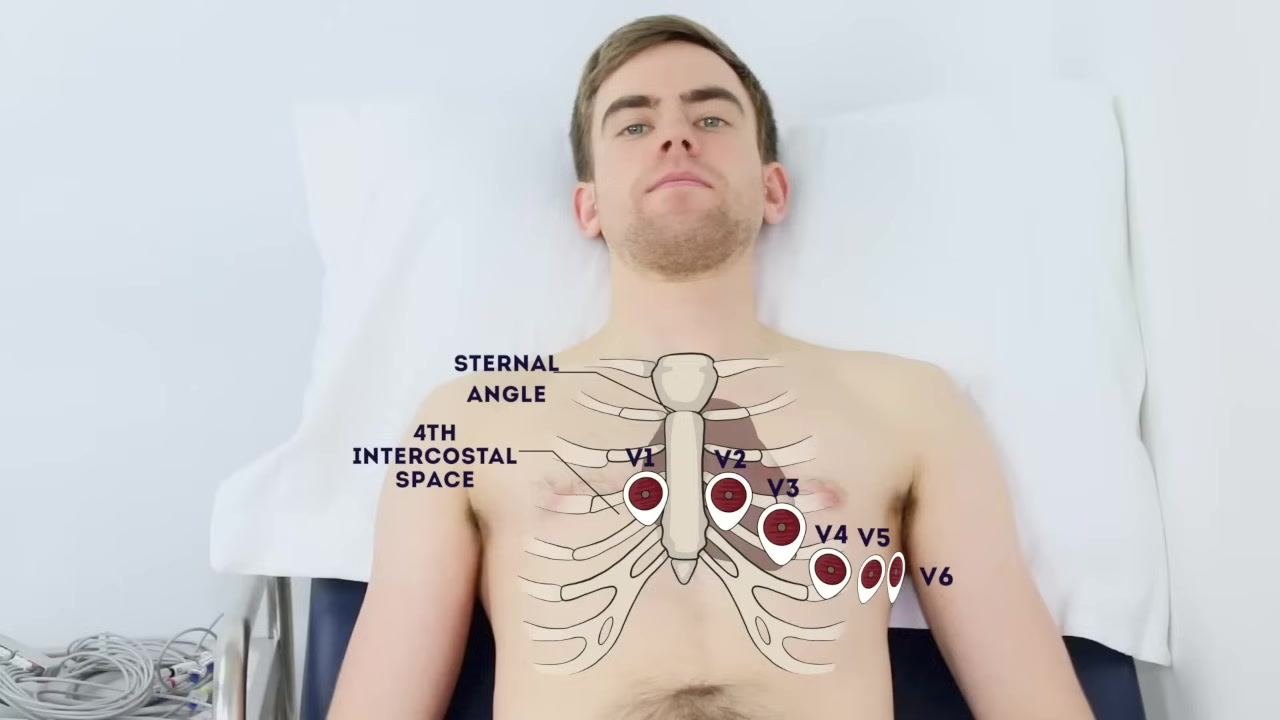
Visually identify and palpate the anatomical landmarks used for electrode placement, including the sternal angle and the 4th intercostal space. Mark the positions for chest leads V1 through V6 as follows:
- V1: Right 4th intercostal space at the sternal border
- V2: Left 4th intercostal space at the sternal border
- V3: Midway between V2 and V4
- V4: Left 5th intercostal space at the mid-clavicular line
- V5: Left anterior axillary line at the level of V4
- V6: Left mid-axillary line at the level of V4
Step 6: Attach electrode V1
Begin attaching the sticky pad electrodes at the identified positions, starting with V1 at the right 4th intercostal space. Ensure the electrode is firmly attached to clean, dry skin.
Step 7: Attach electrode V4
Continue by attaching V2 at the left 4th intercostal space, then attach V4 at the left 5th intercostal space along the mid-clavicular line.
Step 8: Attach electrode V5 and complete chest lead placement
Attach V5 at the left anterior axillary line at the level of V4, then complete the set by attaching V3 (midway between V2 and V4) and V6 (left mid-axillary line at the level of V4). Ensure every electrode is firmly attached to clean, dry skin.

Step 9: Attach upper limb electrodes
Ask the patient to relax their hands flat at their sides. Attach an electrode to a bony prominence on each upper limb, such as the ulnar styloid process at the wrist.
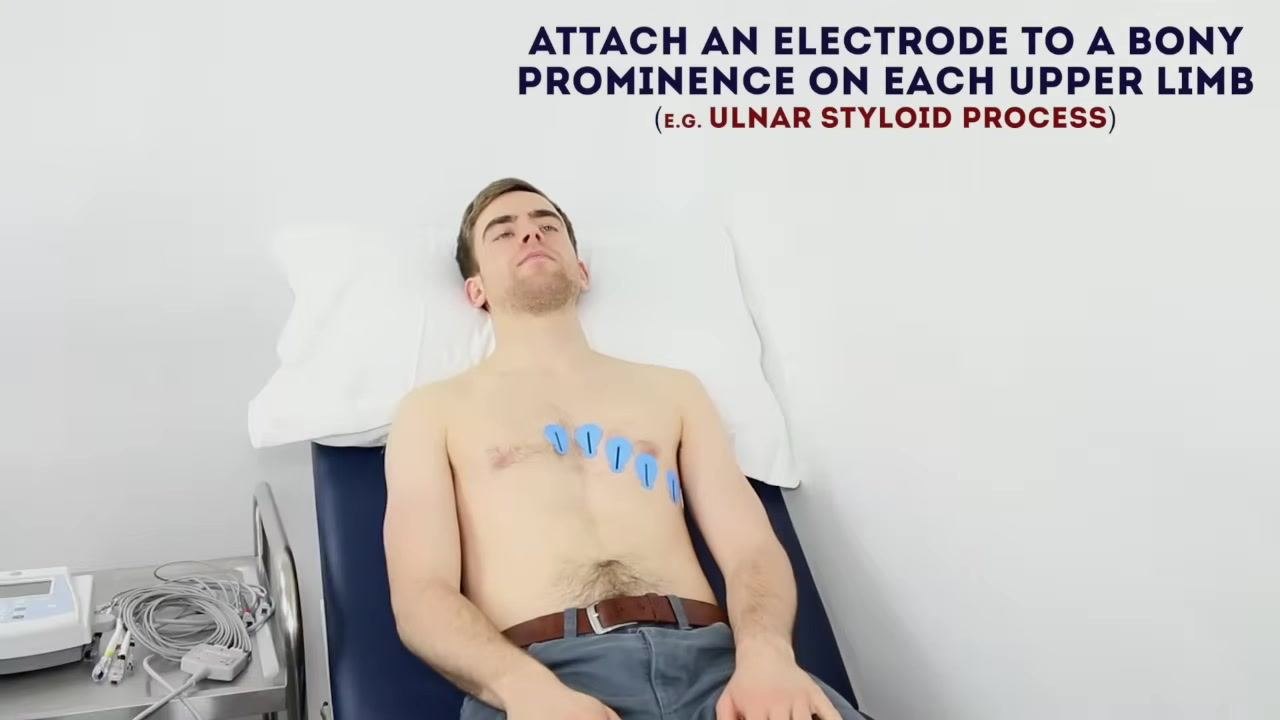
Example instruction: "So if you just relax your hands flat for me, just on the side. That's great, thank you. Just gonna put some sticky pads on your wrist and on your ankles as well."
Step 10: Attach lower limb electrodes
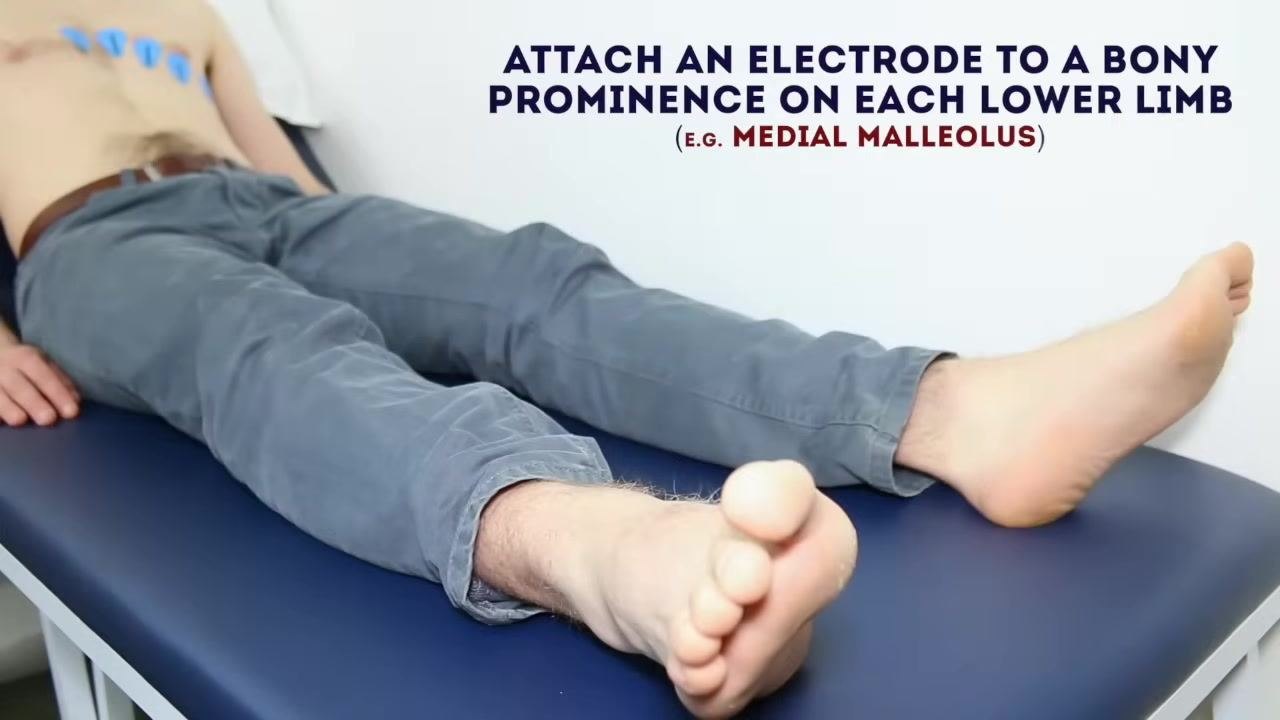
Attach an electrode to a bony prominence on each lower limb, such as the medial malleolus at the ankle. Confirm all limb electrodes are securely in place before proceeding.
Step 11: Connect ECG leads to electrodes
Attach the ECG machine leads to the corresponding chest and limb electrodes, matching each lead's color and label to the correct position. Double-check all connections for security and correct placement.
Step 12: Verify lead colour coding
Confirm each lead is connected to the correct limb using color as a guide. For example, the yellow lead connects to the left arm ("Lemon = Left"), and the black lead connects to the right leg.
Step 13: Instruct the patient during recording
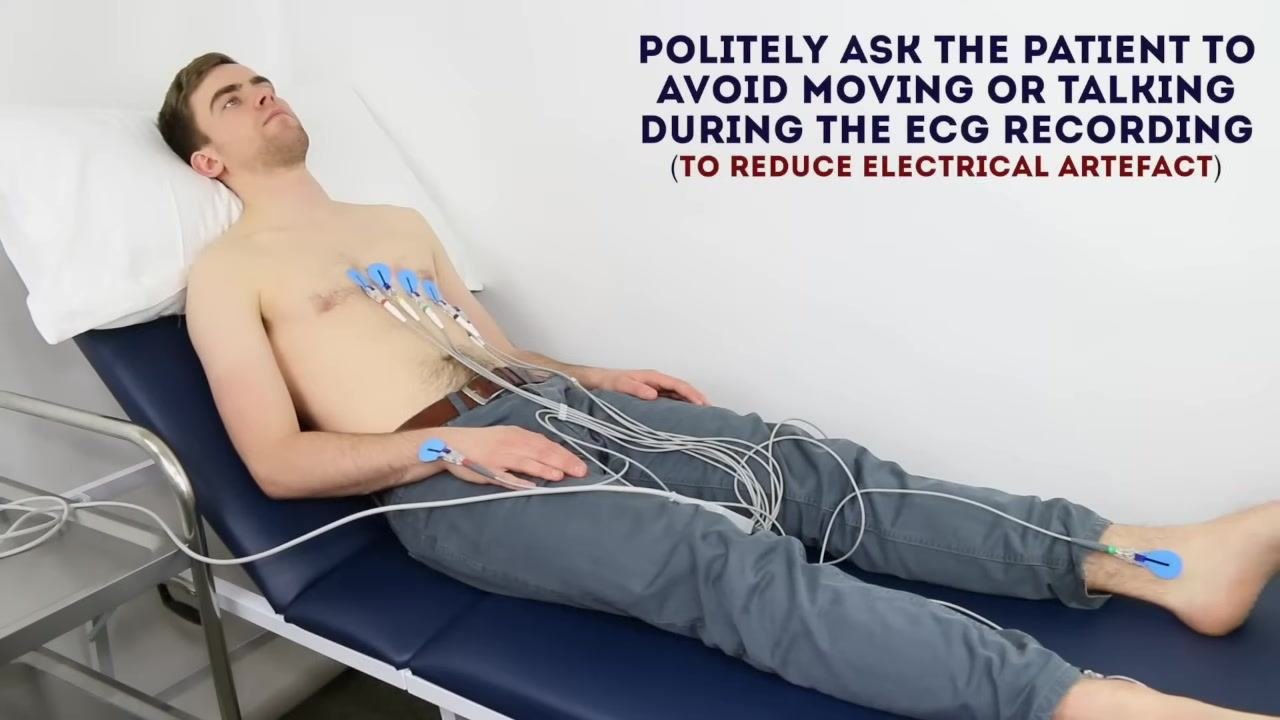
Politely ask the patient to remain still and avoid talking during the ECG recording to reduce electrical artefact.
Example instruction: "Please avoid moving or talking during the ECG recording."
Step 14: Operate the ECG machine and inspect trace quality
Start the ECG recording using the machine controls. Inspect the trace on the machine display to ensure it is clear and free from interference before saving or printing.
Step 15: Label the ECG with patient details
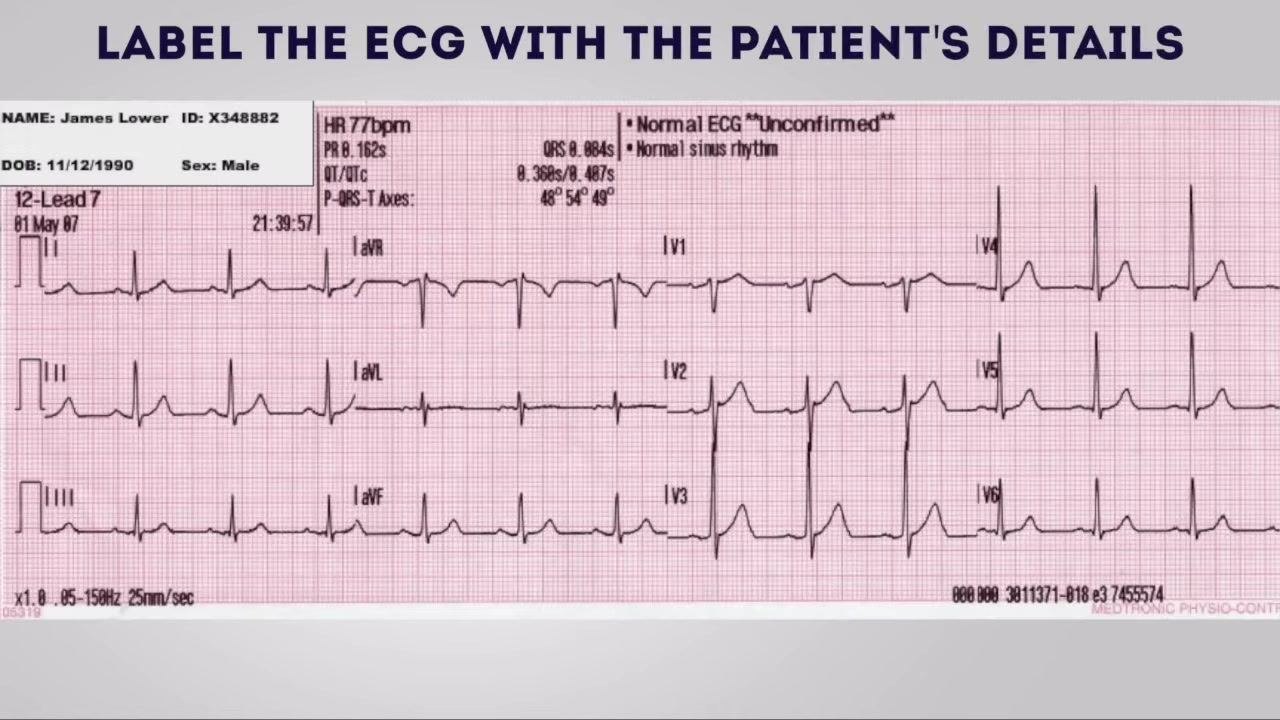
Ensure the printed or saved ECG is labeled with the patient's full name, date of birth, and other identifying details. Double-check that the information matches the patient.
Step 16: Remove electrodes and leads
Thank the patient for their cooperation. Gently remove all leads and electrodes, and assist the patient in getting dressed. Confirm they are comfortable before leaving.
Safety note: Maintain patient privacy and dignity throughout the procedure. Dispose of single-use electrodes appropriately and clean reusable equipment according to local protocols.
Step 17: Review and interpret the ECG printout
Examine the printed ECG for patient identification details and recording settings before filing or handing it over for clinical review. A typical printout includes:
- Patient identification: name, ID number, date of birth, sex
- ECG type: 12-Lead ECG, with date and time of recording
- Heart Rate (HR)
- PR interval
- QRS duration
- QT/QTc
- P-QRS-T axes
- Rhythm interpretation
- Calibration settings (e.g., 25 mm/sec, 0.05–150 Hz)
Visually inspect all 12 leads (I, II, III, aVR, aVL, aVF, V1–V6) for trace quality and abnormalities, and ensure the printout is clear, legible, and free from artefact.
Verification and summary
- Confirm all steps of the procedure have been completed before concluding the ECG.
- Follow local protocols for documentation, equipment cleaning, and patient care.
- Refer to professional clinical training for further guidance and competency development.
Disclaimer
This documentation is intended for educational purposes and may contain errors. It should not substitute for professional clinical training, and clinical skills should not be performed based solely on this information. No liability is accepted for loss incurred from reliance on the information provided.
What's next
Continue building competency by seeking supervised practice and professional clinical training in performing and interpreting ECGs.
Generation details: cost, quality tiers
Docsie billed 2,000 credits ($1.40) to analyze this 4-minute video at standard quality. The rewrite, template fill and Word/PDF exports were included. The same video at each quality tier:
| Quality | Frames sampled | Credits | Approx. cost |
|---|---|---|---|
| Draft | every 16-30 s | 1,000 | $0.70 |
| Standard (this guide) | every 8-15 s | 2,000 | $1.40 |
| Detailed | every 4-7 s | 4,000 | $2.80 |
| Ultra | every 1-3 s | 8,000 | $5.60 |
Credits priced at $0.70 per 1,000; plans include a monthly allowance. Enterprise customers on on-premise or bring-your-own-model deployments run this on their own inference and pay no per-video credits.
Generated by Docsie Video-to-Docs on 2026-09-09 from a 3-minute video. Screenshots are frames from the source video and belong to their creator, Geeky Medics, whose original is embedded above. If you own this video and want the guide removed or credited differently, contact us and we will act within one business day.