
How to Create a Custom Order Set in Epic
This guide walks you through creating a personalized admission order set in Epic, tailored to your most frequent clinical selections and workflow preferences. You will also learn how to build, save, and reuse custom order panels for labs, imaging, and consults, streamlining the patient admission process and reducing repetitive data entry.
Video: How To Make Custom Order Sets In Epic by Conan Liu, M.D. (2022). All credit for the demonstration goes to the creator; watch the original on YouTube. The written guide below was generated from this video by Docsie. Creator? Request a change or removal.
This guide walks you through creating a personalized admission order set in Epic, tailored to your most frequent clinical selections and workflow preferences. You will also learn how to build, save, and reuse custom order panels for labs, imaging, and consults, streamlining the patient admission process and reducing repetitive data entry.
Prerequisites
- Access to a patient's chart in Epic with permissions to create and manage user versions of order sets.
- Familiarity with your standard admission workflow and the order sets you use most often (e.g., "IM (General) Acute Care Admission").
Creating your custom order set
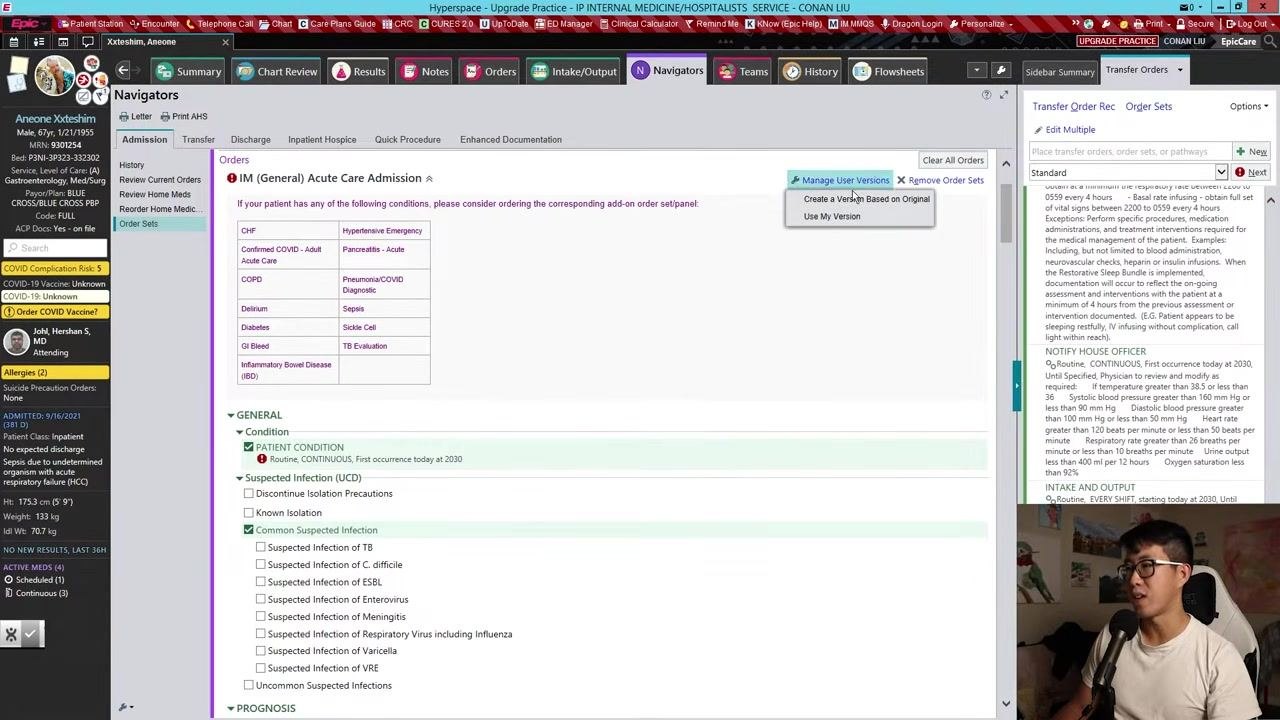
- Access the admission order sets Open the patient's chart in Epic and navigate to the Order Sets section under the Admission navigator. Locate the relevant admission order set, such as "IM (General) Acute Care Admission."
-
Open the desired order set Click on the order set you want to customize (for example, "IM (General) Acute Care Admission") and wait for it to load.
-
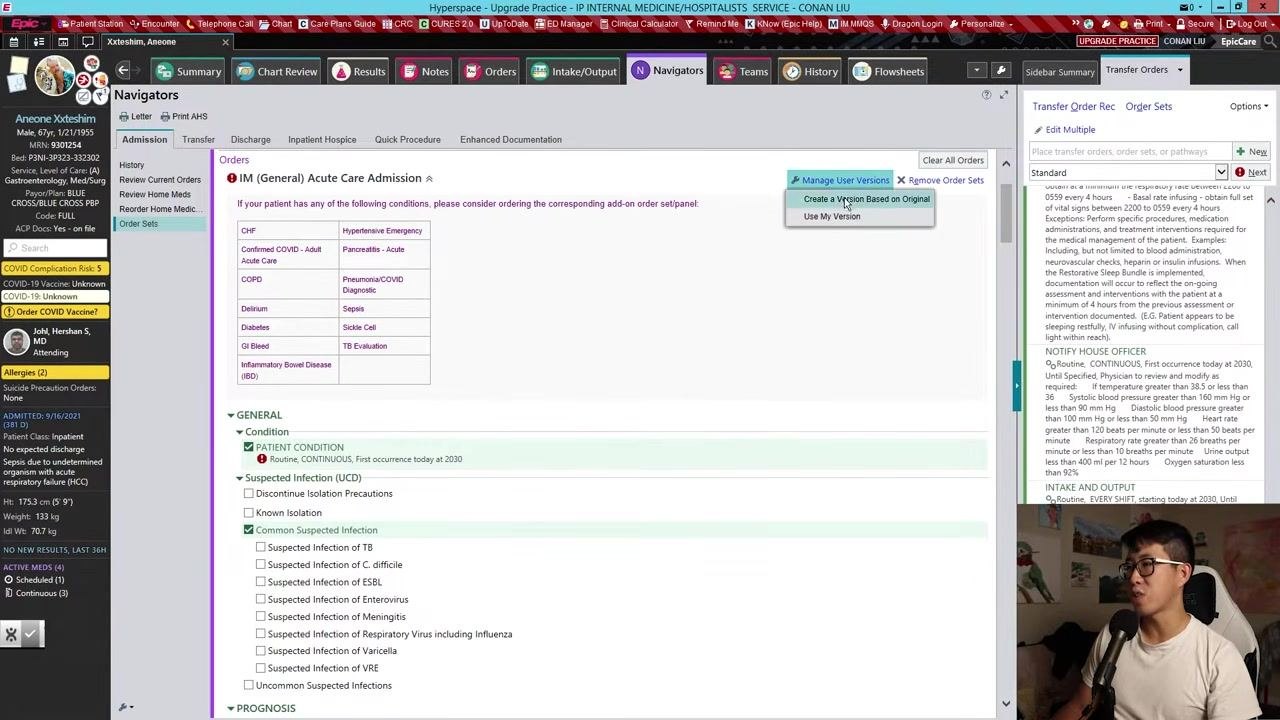
Manage user versions In the top right corner, click Manage User Versions, then select Create a Version Based on Original from the dropdown menu.
-
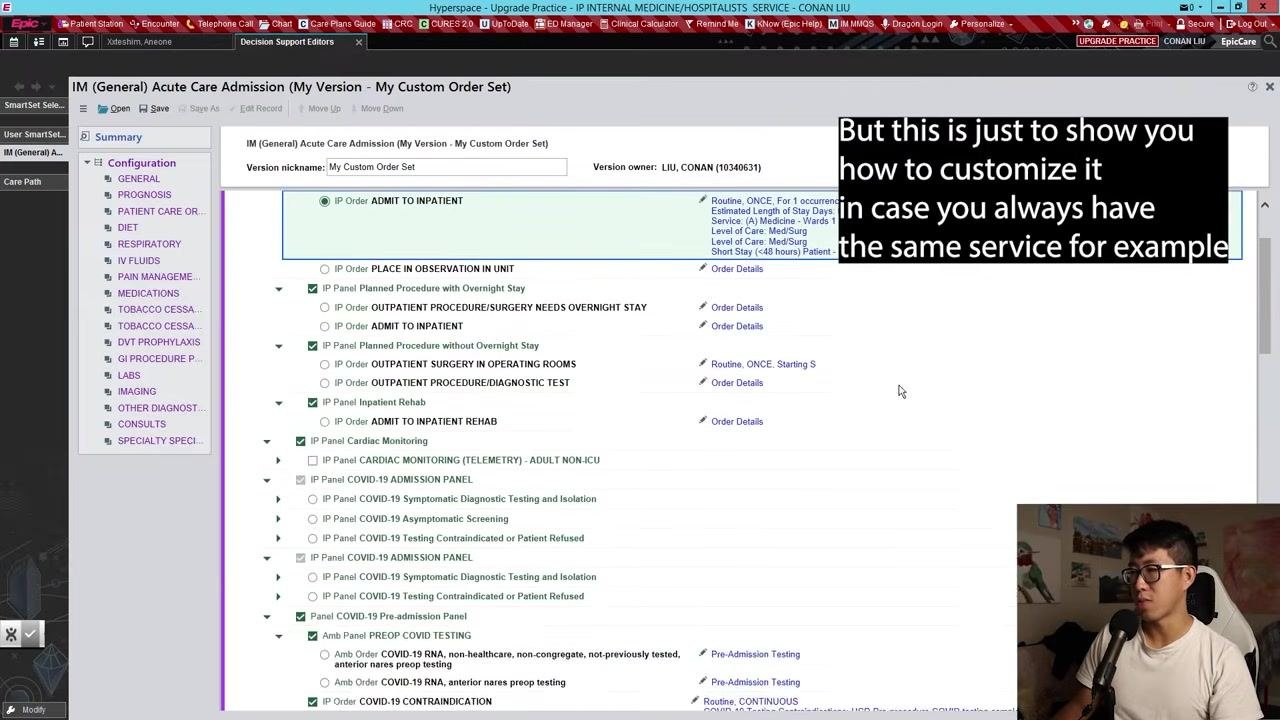
Name your custom order set On the new page that opens for your custom version, enter a version nickname in the provided field (for example, "My Custom Order Set"). Confirm that your name appears as the version owner.
-
Configure frequently used options In the configuration menu, expand relevant sections such as Admit to Hospital, Condition, and others as needed. Select the options you use most frequently so they are included in your default order set.
-
Specify admission details Click into the Admit to Hospital section. For Admit to Inpatient, select:
- Service: "Medicine - Wards 1"
- Level of Care: "Med/Surg"
- Short Stay: "No" (not a short stay)
Fill in any other required fields, such as estimated length of stay and attending physician, if prompted.
-
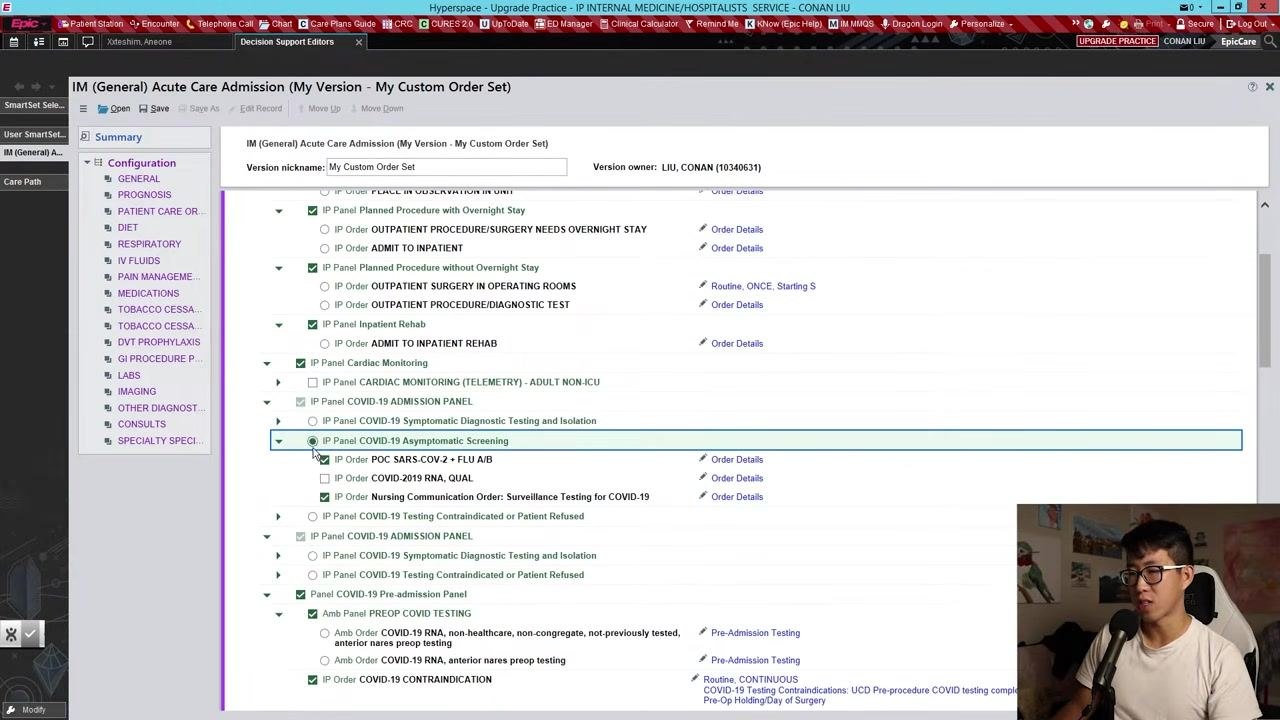
Deselect unnecessary default orders Review the list of default orders and uncheck any you do not want included by default (for example, "Cardiac Monitoring (Telemetry) - Adult Non-ICU").
-
Add additional screening or panels Scroll to relevant panels, such as COVID-19 screening, and select COVID-19 Asymptomatic Screening if this is part of your routine.
-
Set patient condition Go to the Condition section and set Patient Condition to "Fair" or your preferred default.
-
Save and use your custom order set Once all selections are made, save your custom order set. Use this version for future admissions to streamline your workflow.
By completing these steps, you will have a personalized admission order set in Epic, pre-filled with your most common selections, saving time and reducing repetitive data entry.
Configuring code status, prognosis, and patient care orders
- Set code status and suspected infection defaults In the Code Status section, select Full Resuscitation as the default. In the Suspected Infection section, do not select any default options, since this is typically determined case-by-case.
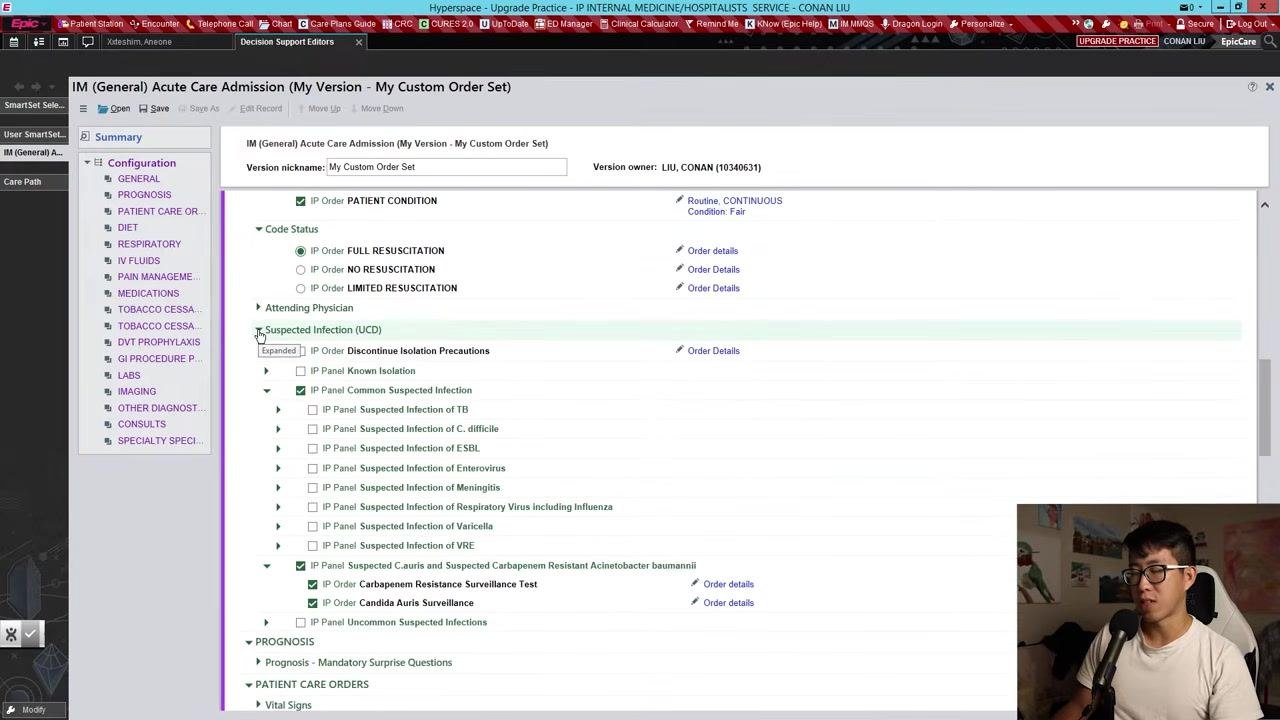
- Configure prognosis In the Prognosis section, under Mandatory Surprise Questions, select Yes, I WOULD BE SURPRISED if the patient died in the next six months as your default.
-
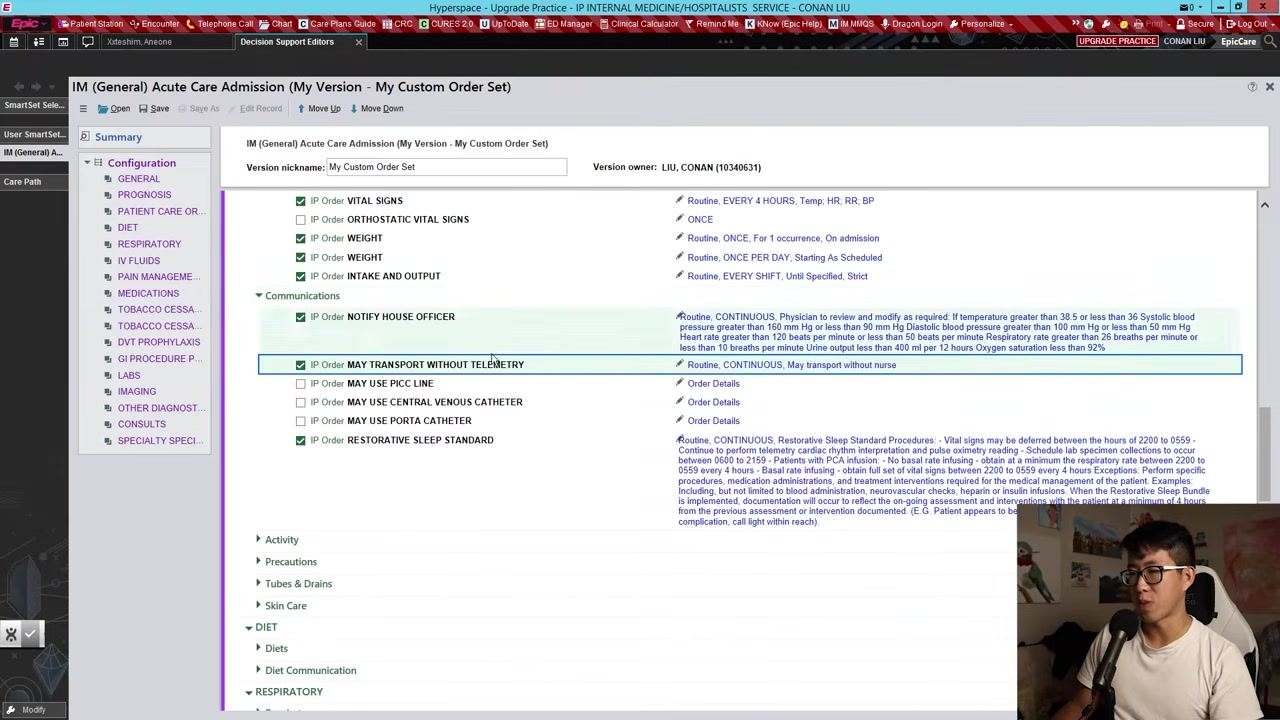
Set patient care orders: vital signs and intake/output In the Vital Signs section, set:
- Routine, EVERY 4 HOURS, Temp, HR, RR, BP
- Weight: "ONCE, For 1 occurrence, On admission" and "ONCE PER DAY, Starting As Scheduled"
- Intake and Output: "EVERY SHIFT, Until Specified, Strict"
These settings ensure frequent monitoring and documentation.
-
Set communication preferences In the Communications section, select May Transport Without Telemetry as a default. Leave other communication options at their default settings unless you have specific preferences.
-
Set activity and precautions Leave the Activity section as default unless you have a standard preference. In the Precautions section, set No risk precautions as the default, and leave Physical Restrictions as routine unless otherwise needed.
-
Set diet orders In the Diet section, do not select a default diet (such as "Regular Diet") unless you always use the same diet for admissions. This prevents accidental default orders for patients with special dietary needs.
-
Set respiratory orders In the Respiratory section, select Pulse Oximetry with Vitals (Routine, Continuous) and set Oxygen Therapy to "Routine, Continuous. Keep oxygen sats greater than 92%." Optionally, add orders for nasal cannula or other respiratory support as needed.
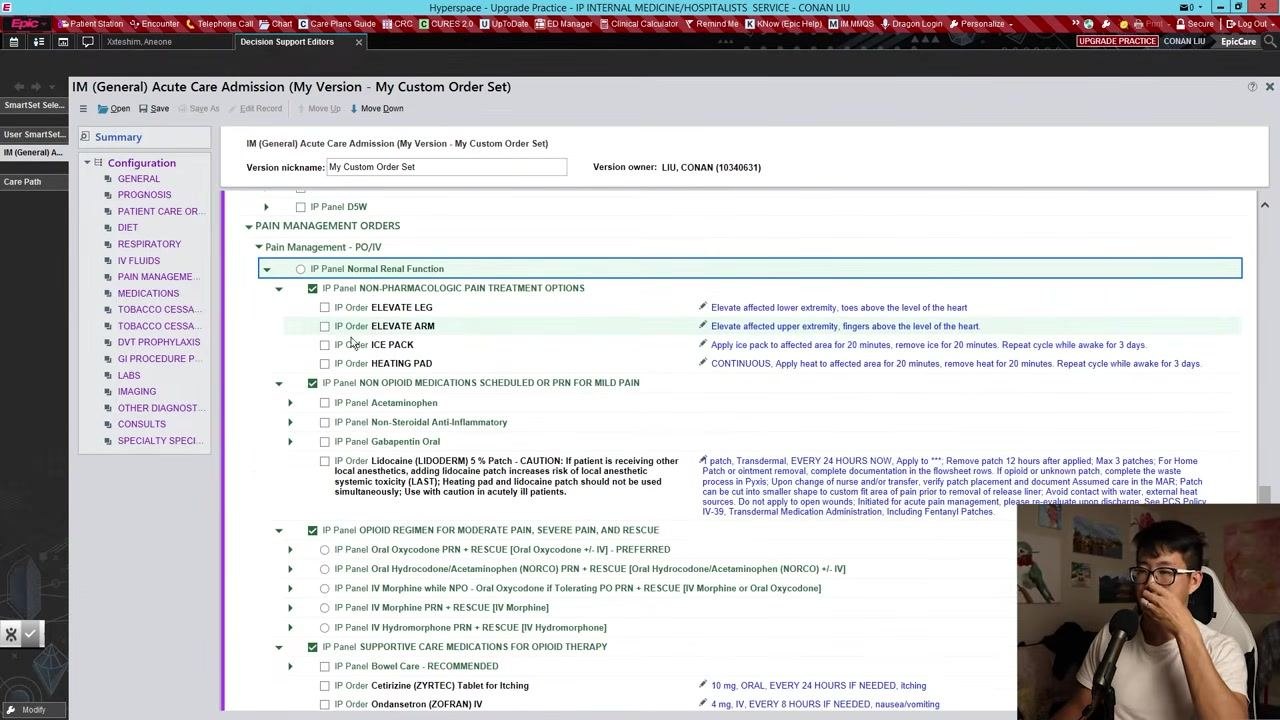
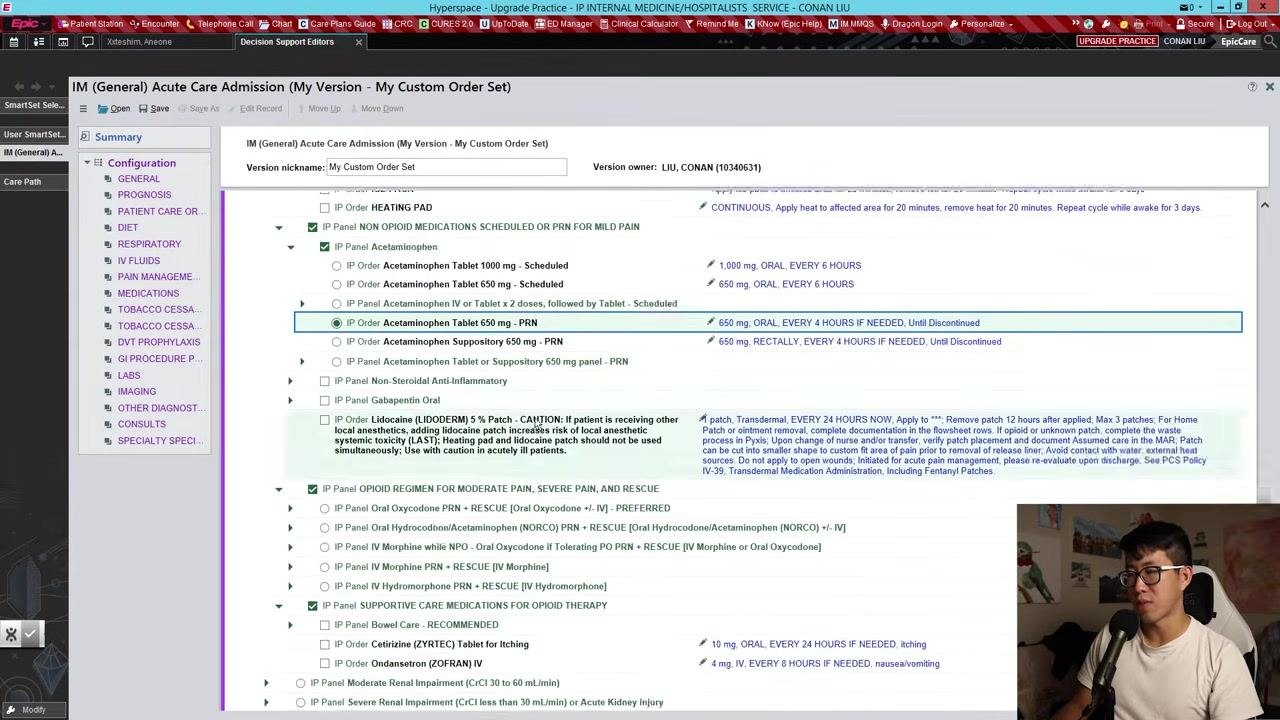
- Set pain management orders In the Pain Management section, under Non-Opioid Medications Scheduled or PRN for Mild Pain, select Acetaminophen Tablet 650 mg – PRN, ORAL, EVERY 4 HOURS IF NEEDED, Until Discontinued. Avoid selecting the suppository form unless specifically needed.
- Set bowel care and insomnia orders In the Bowel Care section, select Miralax and PRN Bisacodyl as default bowel care medications. In the Insomnia section, select Melatonin 3 mg, daily at bedtime as the default insomnia medication.
By completing these steps, your custom admission order set will be further tailored to your workflow, reducing repetitive selections and ensuring your most common orders are pre-filled for every new admission. Continue to review and adjust each section as needed for your clinical practice.
Finalizing labs, imaging, consults, and saving your order set
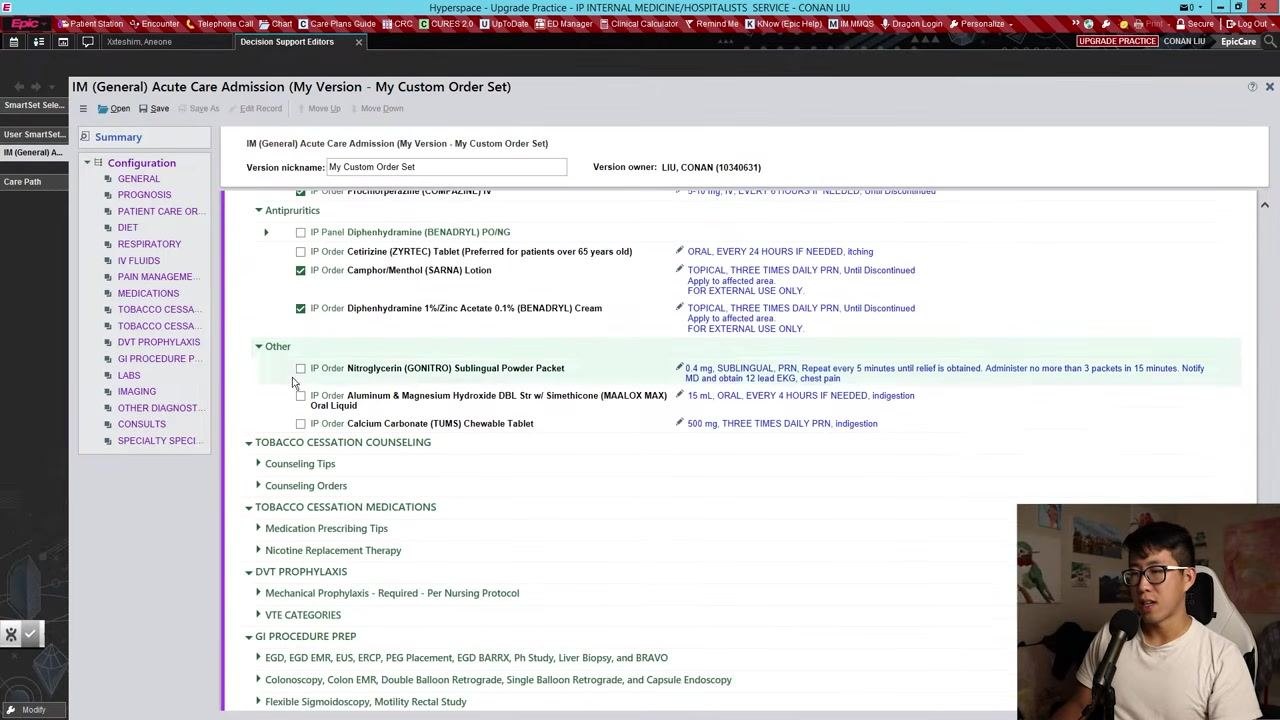
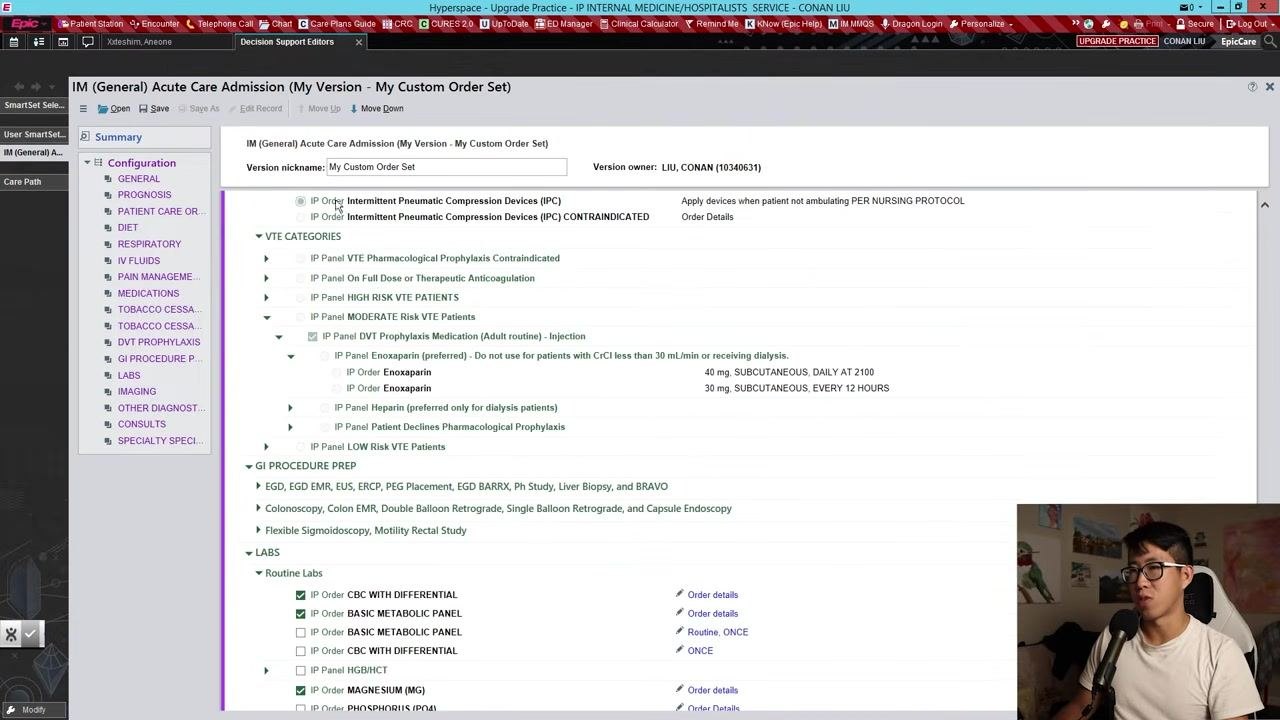
- Review and adjust antiemetics, antipyretics, and other medications Leave the Antiemetics and Antipyretics sections as they are, with no changes to the default selections. In the Other medications section, do not select any additional medications unless you have a standard preference. For Tobacco Cessation, do not make changes unless you routinely prescribe these interventions. In the DVT Prophylaxis section, leave blank unless you always order a specific medication (for example, Lovenox); if so, select Lovenox as your default, otherwise leave it unselected.
- Configure routine labs
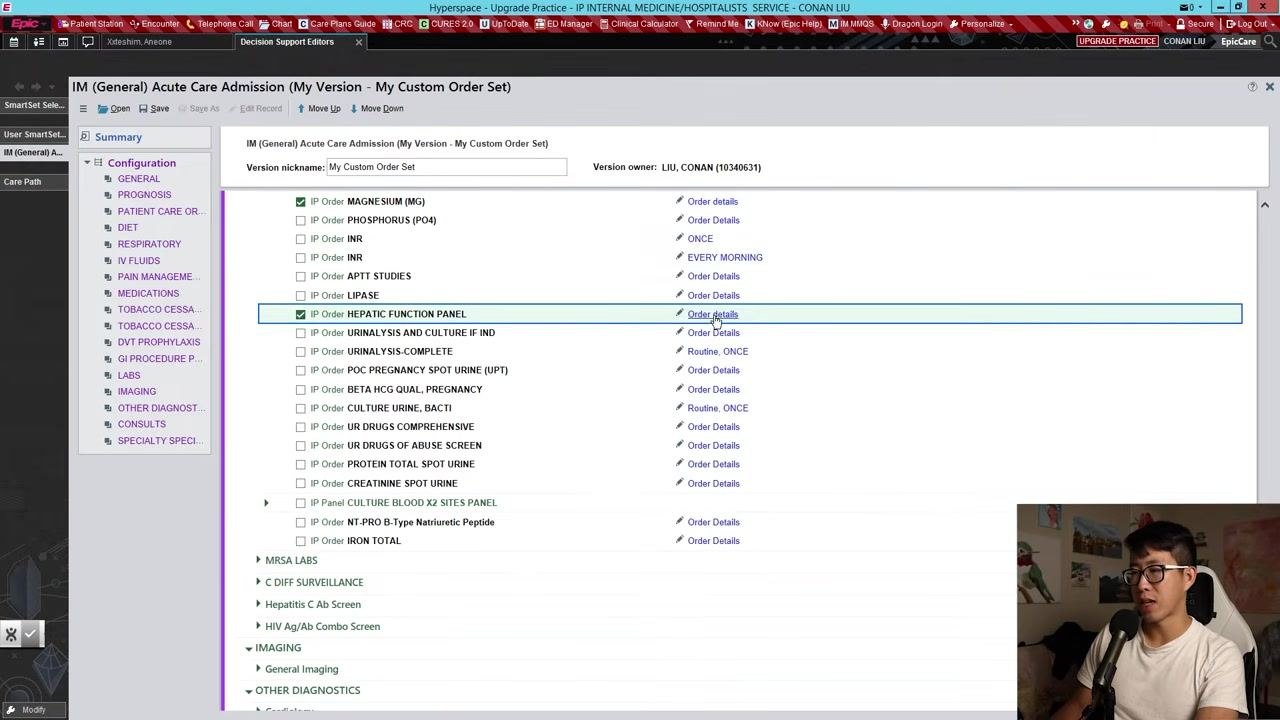
Navigate to the Labs section and expand Routine Labs:
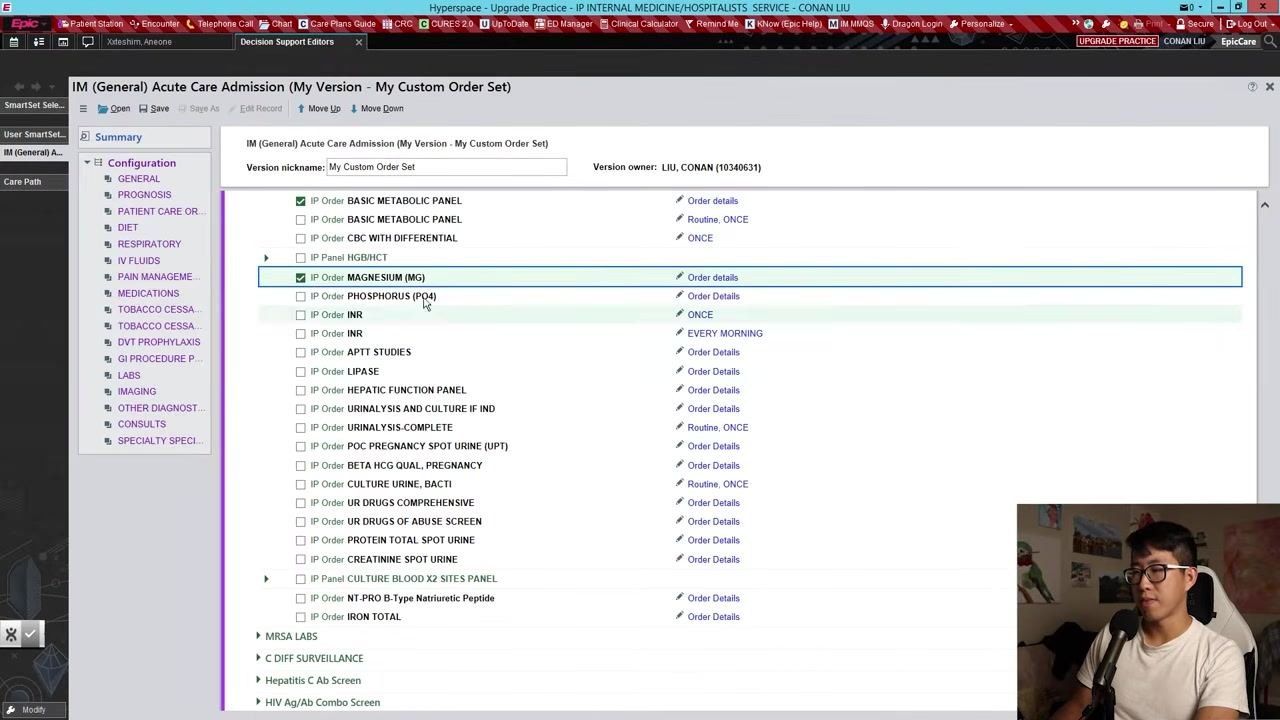
- Select CBC with Differential as a default order, and remove the "3 occurrences" option so it is ordered once every morning instead of three times.
- Select Basic Metabolic Panel as a default order, and remove the "3 occurrences" option so it continues indefinitely.
- Select Magnesium (MG) and set it to be ordered every morning.
- Select Hepatic Function Panel and set it to "Routine, Once" (on admission).
-
Skip general imaging unless needed Do not select any default imaging orders (for example, Chest X-ray), as these are typically completed in the Emergency Department.
-
Add a Physical Therapy Evaluation consult In the Consults section, under Ancillary, select Physical Therapy Eval & Ongoing TX. Set the condition to be evaluated or treated as "Assess mobility needs," and set the timing to Routine, specifying that the evaluation should occur within 48 hours.
- Save your custom order set Once all desired defaults are set, click Save at the top of the screen to save your custom admission order set. Confirm that your new order set appears in the list of available order sets under your chosen name (for example, "My Custom Order Set").
By completing these steps, you ensure your custom admission order set is tailored to your workflow, with frequently used labs, consults, and medication orders pre-filled. This streamlines the admission process and reduces repetitive data entry for each new patient. Continue to review and update your order set as your clinical practice evolves.
Using your order set during a patient admission
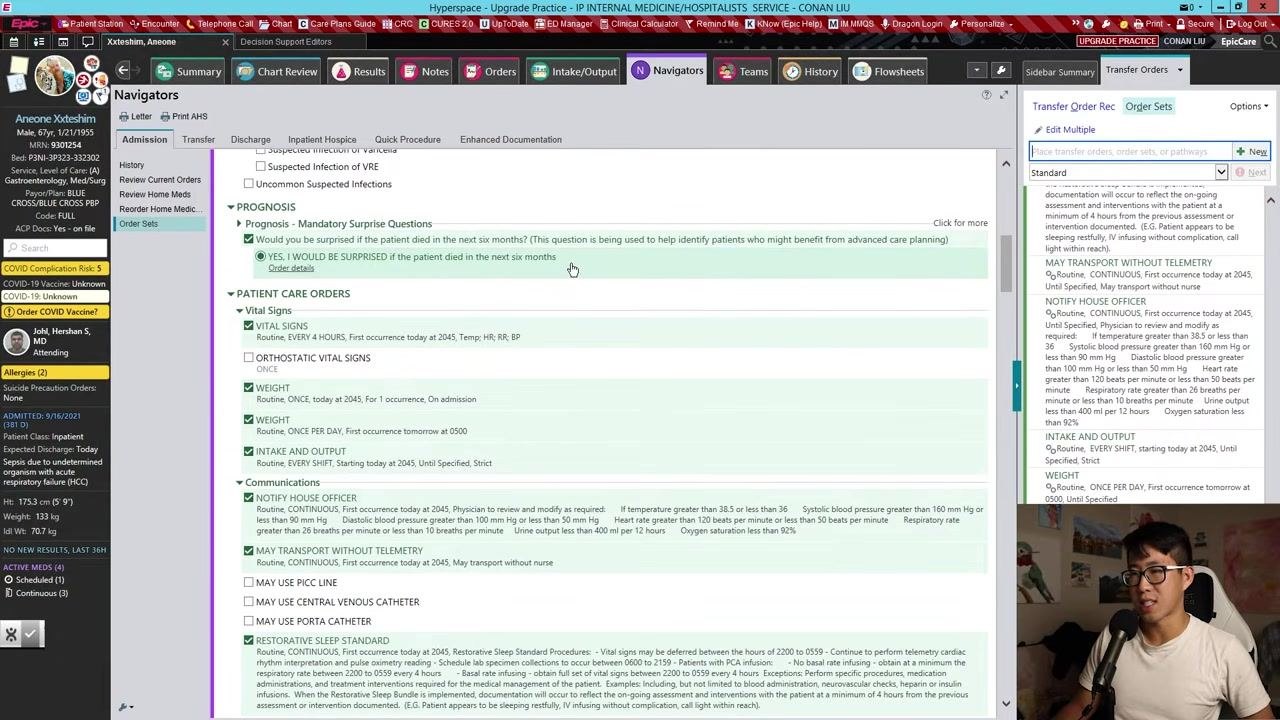
- Observe patient condition updates Notice that the patient's condition is automatically updated in Epic after entering relevant information. The "IM (General) Acute Care Admission" navigator displays the updated patient condition under the GENERAL section (for example, "PATIENT CONDITION: Routine, Continuous, first occurrence today at 2045"). Review any suggested infection precautions and common suspected infections listed.
- Review prognosis and patient care orders
Check the mandatory prognosis question, "Would you be surprised if the patient died in the next six months?" and ensure it is answered (for example, "YES, I WOULD BE SURPRISED if the patient died in the next six months"). Review and confirm patient care orders such as:
- Vital Signs: "Routine, EVERY 4 HOURS, first occurrence today at 2045"
- Notify House Officer: "Routine, CONTINUOUS, first occurrence today at 2045"
- May Transport Without Telemetry: "Routine, CONTINUOUS, first occurrence today at 2045"
- Intake and Output, Weight, and other relevant orders
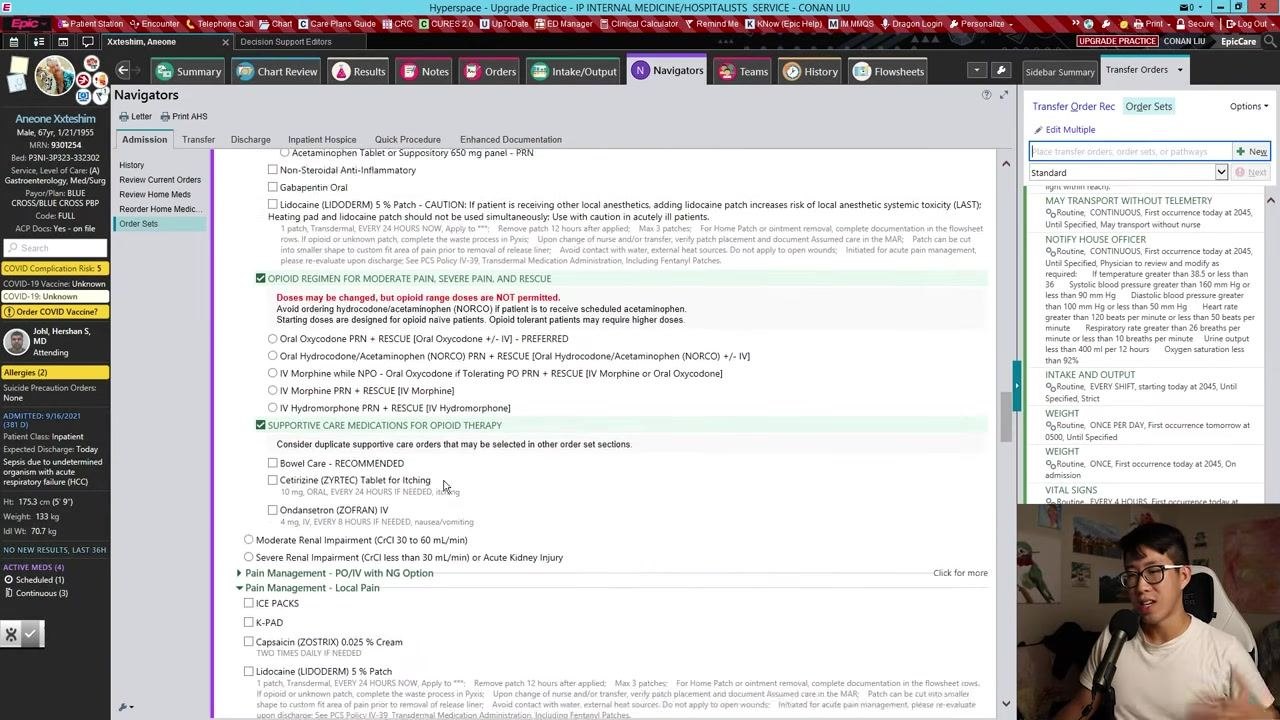
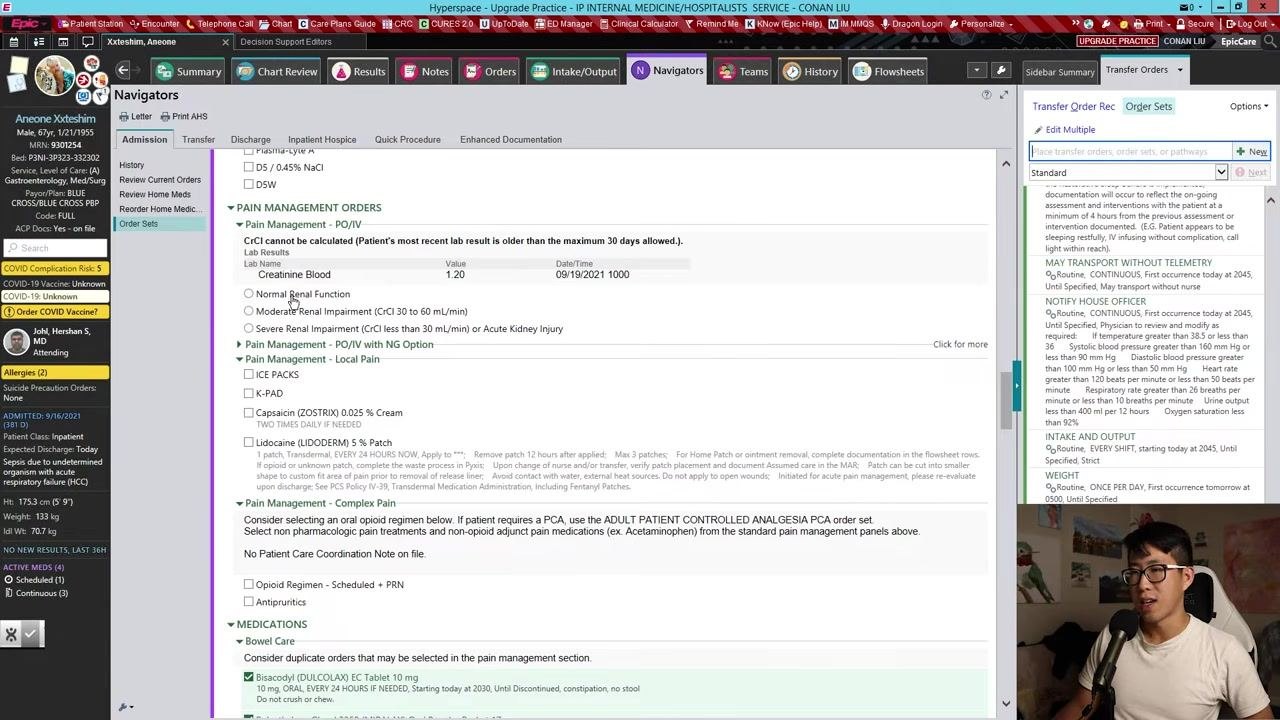
- Verify pain management and medication orders Confirm pain management orders based on renal function (for example, "Creatinine Blood: 1.20, Date/Time: 09/19/2021 1000, Normal Renal Function"). Review available pain management options (PO/IV, local pain, complex pain) and check for supportive care medications for opioid therapy, such as Bowel Care, Cetirizine for itching, and Ondansetron for nausea. Review additional medication orders such as Bisacodyl for bowel care.
-
Utilize opioid regimens and supportive care medications Select appropriate opioid regimens for moderate or severe pain and rescue (for example, "Oral Oxycodone PRN + RESCUE (Oral Hydrocodone/Acetaminophen (NORCO) +/- IV)"). Ensure supportive care medications for opioid therapy are checked as needed, and review and select additional pain management and supportive care options as appropriate.
-
Access and review lab and surveillance orders Scroll through the navigator to review lab orders such as Hepatic Function Panel ("Routine, ONCE, today at 2045"), INR, APTT Studies, Urinalysis, MRSA Labs, Diff Surveillance, and Imaging. Confirm that all necessary labs and surveillance tests are included in the admission order set.
-
Search and select custom order sets Use the search bar to find specific order sets or panels, such as "COVID." Review available order sets, panels, medications, and procedures. For example, select "Conan's COVID Labs" from the procedures list for frequently used COVID-related tests.
-
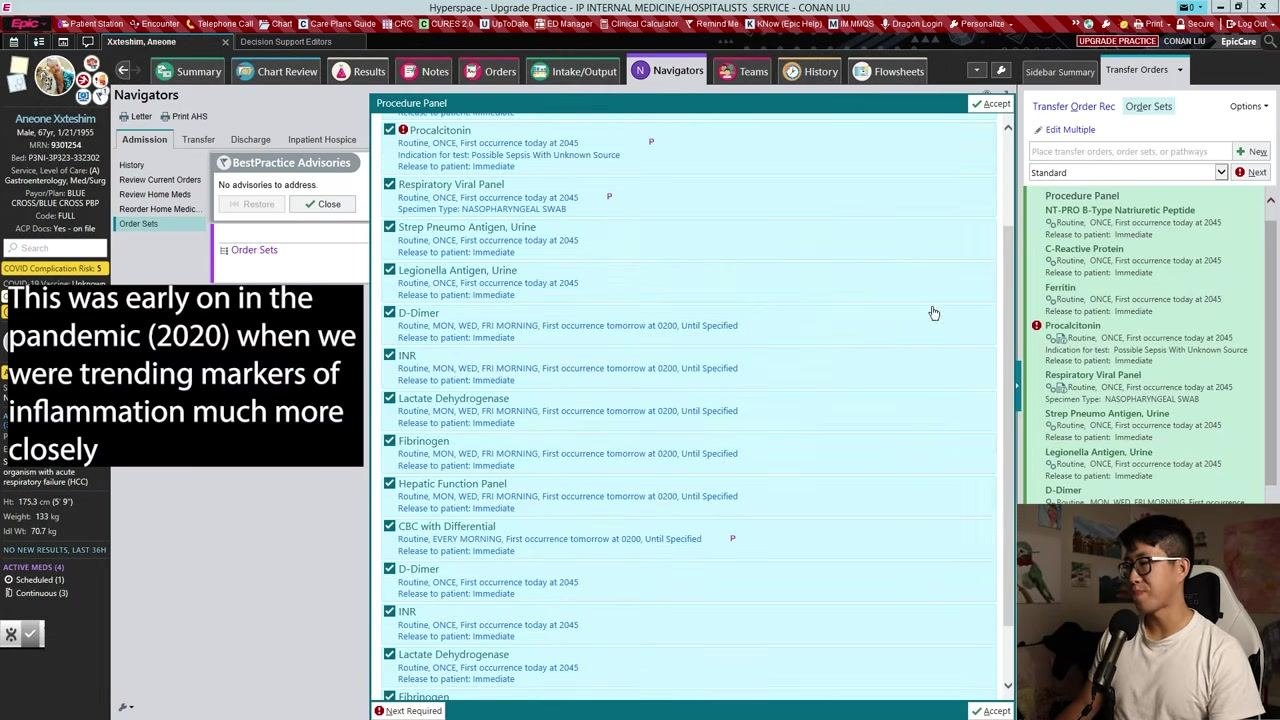
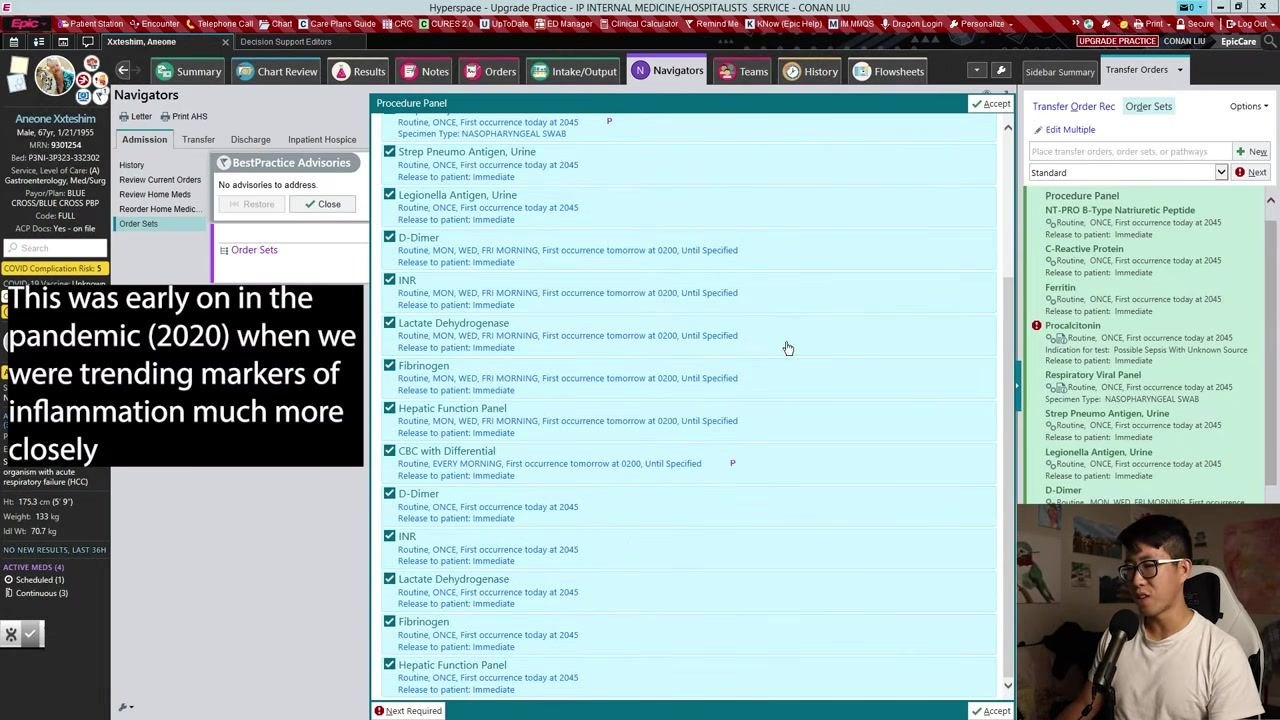
Review and accept predefined order panels Examine the contents of the selected order panel, which may include Procalcitonin, Respiratory Viral Panel, Strep Pneumo Antigen, Legionella Antigen, D-Dimer, INR, Lactate Dehydrogenase, Fibrinogen, Hepatic Function Panel, CBC with Differential, Ferritin, C-Reactive Protein, and NT-PRO B-Type Natriuretic Peptide. Note the frequency and timing for each test (for example, "Routine, MON, WED, FRI MORNING, first occurrence tomorrow at 0200"), then accept the order panel to add all selected tests to the patient's orders.
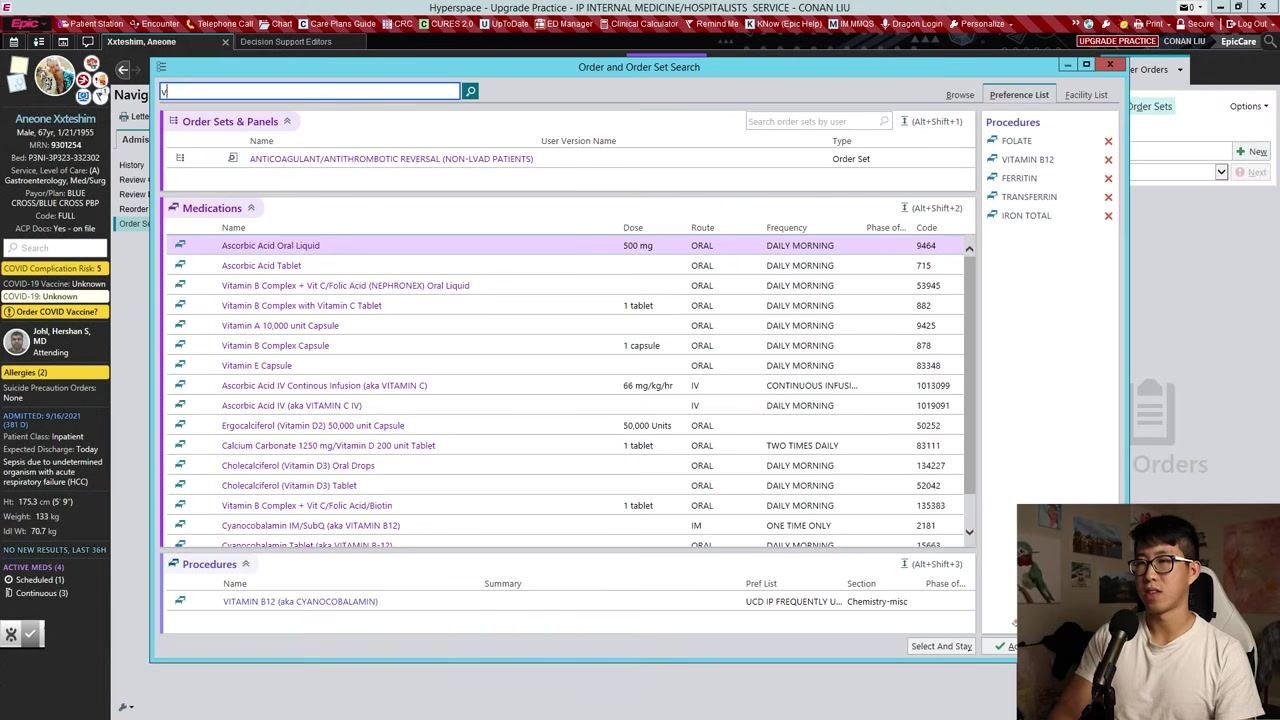
- Customize and build your own order set To create a custom order set, use the search bar to find and add specific labs or procedures. For example, search for "IRON" and add "IRON TOTAL," "TRANSFERRIN," "FERRITIN," and "Vitamin B12" to your custom panel. Select each desired procedure from the search results and add it to your order set.
By following these steps, you can efficiently update patient conditions, review and confirm all necessary orders, utilize predefined or custom order sets, and streamline the patient admission process in Epic.
Creating, saving, and reusing custom order panels
- Accept and finalize your custom order set After building your custom order set (for example, adding labs like IRON TOTAL, TRANSFERRIN, FERRITIN, VITAMIN B12, FOLATE, and Vitamin D 25 Hydroxy), review the list of medications and procedures in the Order and Order Set Search window. Click Accept to finalize and save your selections. The right sidebar displays the selected procedures under New Orders, confirming they are ready for submission.
-
Access the Add to Preference List window Navigate to the Options menu and choose to add your custom order set to your preference list. In the Add to Preference List window, enter a display name for your order panel in the Display Name field (for example, "Conan's Nutrition Panel"). Ensure all desired orders are listed in the Order Panel section; you can remove any items by clicking Remove next to each order. Click Accept to save the custom panel to your preference list for future use.
-
Search and retrieve custom order panels To use your saved custom panel, type the relevant keyword (for example, "nutrition") in the order set search bar. Locate your custom panel (for example, "Conan's Nutrition Panel") in the search results under Order Sets & Panels, then click on it to review or add it to the patient's orders.
-
Search for and use other custom panels You can also search for other panels, such as "fever," to find predefined or custom fever workup panels (for example, "Conan's fever workup"). Review the available order sets and panels in the search results.
-
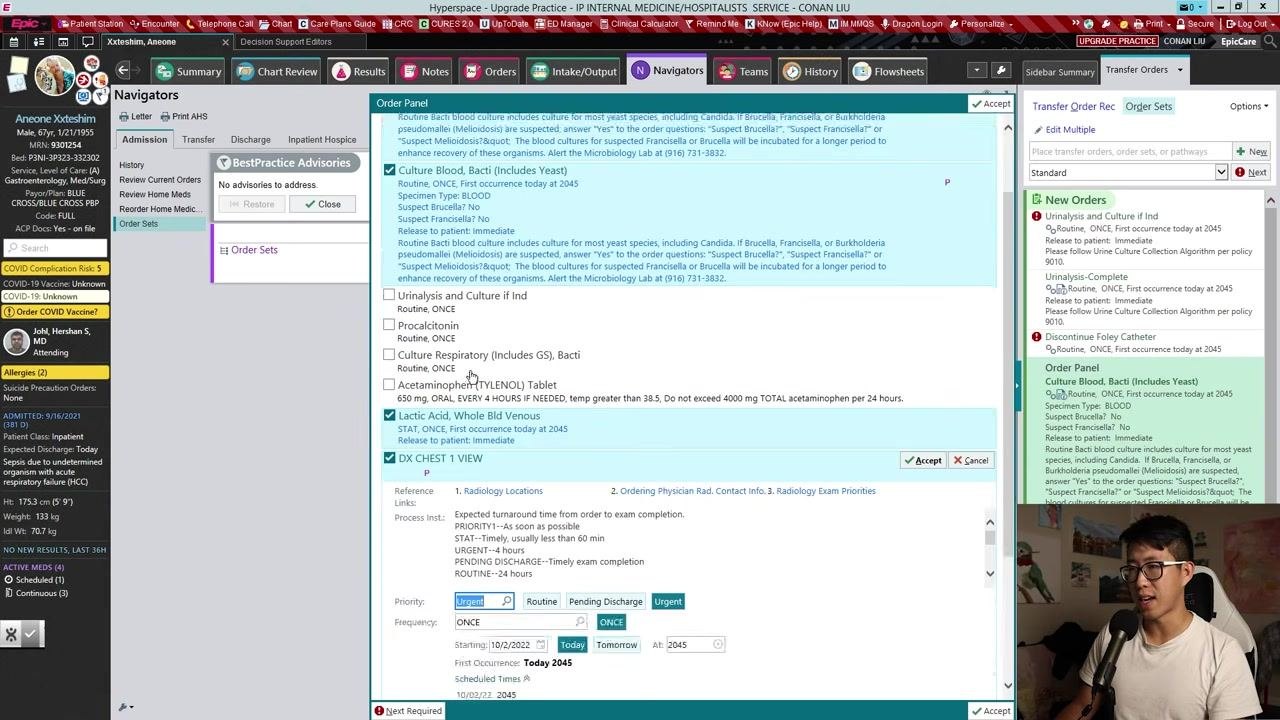
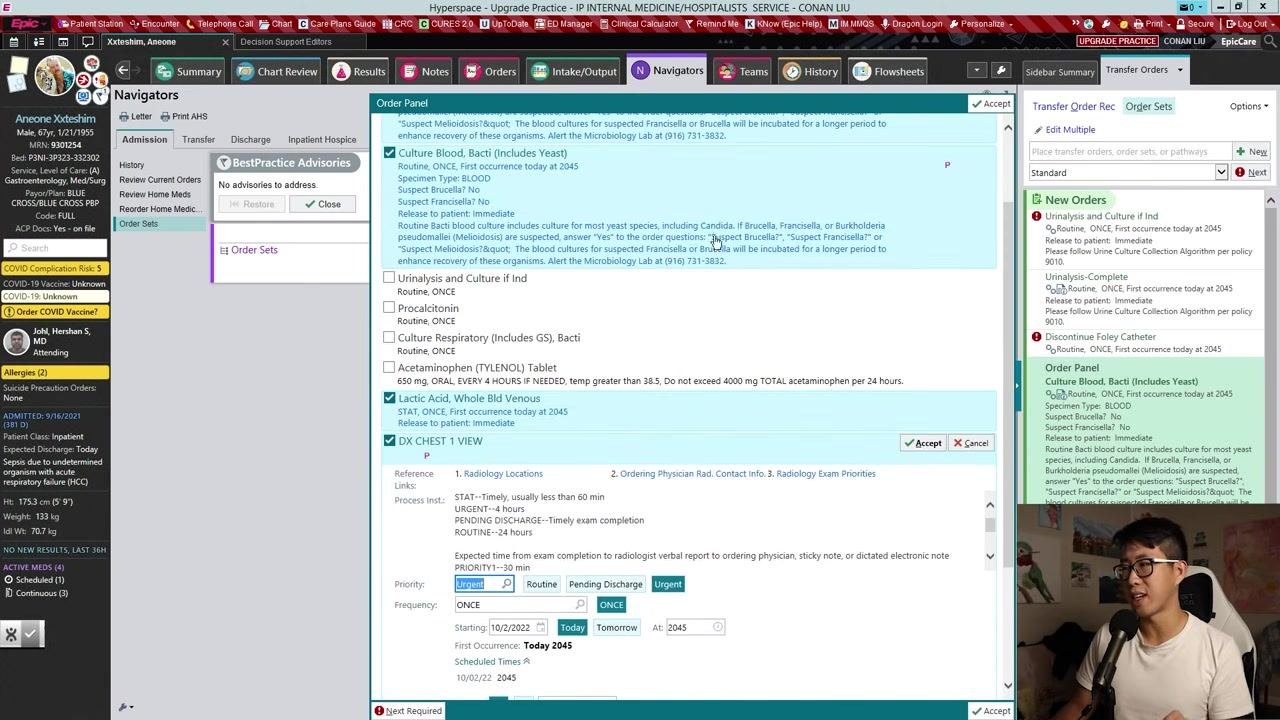
Review and customize order panel items When opening a custom panel (for example, a fever workup), review the included orders such as blood cultures, urinalysis, procalcitonin, respiratory cultures, acetaminophen, lactic acid, and chest X-ray. Some items may not be checked by default, allowing you to select only the tests or procedures needed for the current patient. Adjust selections as appropriate before accepting the panel.
-
Select additional orders as needed If desired, check additional boxes for tests such as urinalysis, procalcitonin, or respiratory cultures. Confirm all selections and click Accept to add the chosen orders to the patient's chart.
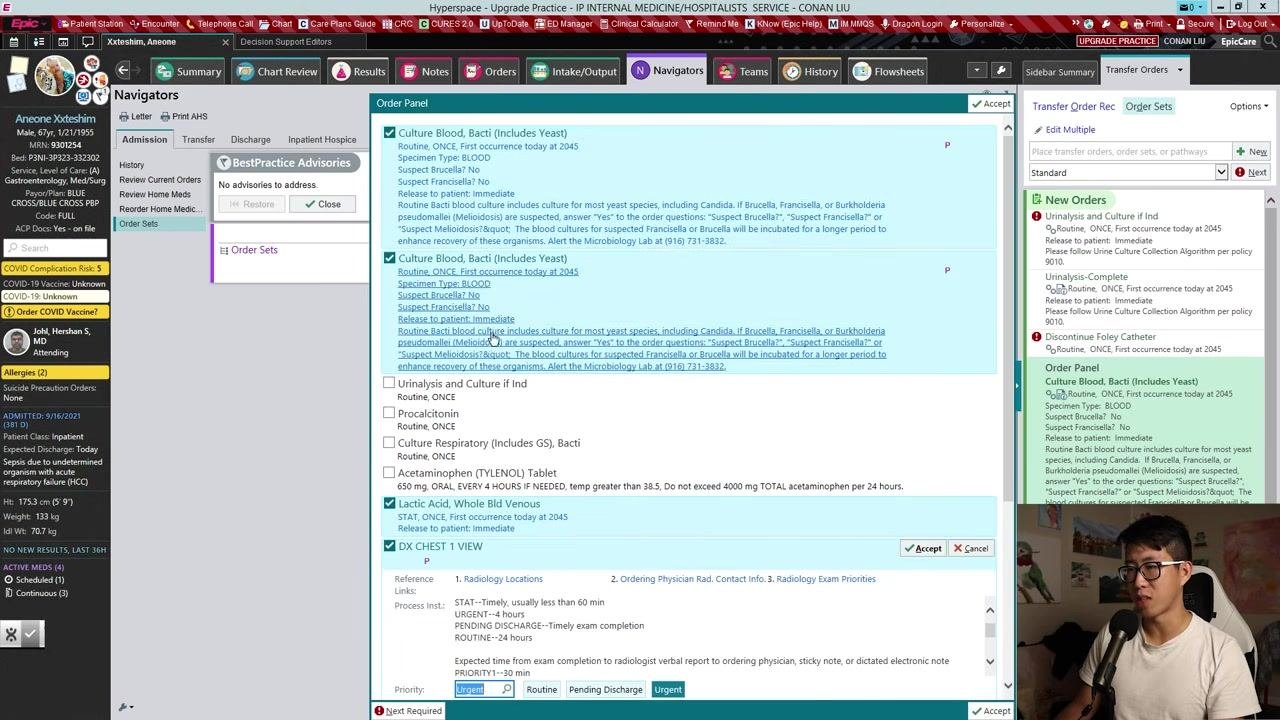
- Complete the order entry process After accepting the order panel, review the New Orders sidebar to ensure all selected orders are listed and ready for submission. The main navigator returns to the Order Sets section, confirming that the process is complete.
What's next
Once you have finalized your custom order panel, it is saved to your preference list and can be quickly retrieved by keyword search for future admissions. You can continue building additional custom panels for other common clinical scenarios (such as fever workups or nutrition panels) to further streamline your ordering process and ensure consistency in patient care documentation.
Generation details: cost, quality tiers
Docsie billed 4,500 credits ($3.15) to analyze this 9-minute video at standard quality. The rewrite, template fill and Word/PDF exports were included. The same video at each quality tier:
| Quality | Frames sampled | Credits | Approx. cost |
|---|---|---|---|
| Draft | every 16-30 s | 2,250 | $1.57 |
| Standard (this guide) | every 8-15 s | 4,500 | $3.15 |
| Detailed | every 4-7 s | 9,000 | $6.30 |
| Ultra | every 1-3 s | 18,000 | $12.60 |
Credits priced at $0.70 per 1,000; plans include a monthly allowance. Enterprise customers on on-premise or bring-your-own-model deployments run this on their own inference and pay no per-video credits.
Generated by Docsie Video-to-Docs on 2026-09-08 from a 8-minute video. Screenshots are frames from the source video and belong to their creator, Conan Liu, M.D., whose original is embedded above. If you own this video and want the guide removed or credited differently, contact us and we will act within one business day.