
How to Use Continuing Care in Dentrix
Dentrix G6 includes a List Manager feature that makes it easy to build a customized continuing care overdue list. This guide walks you through how to use continuing care in Dentrix to filter patients, select the data fields you need, and generate a report you can use for patient follow-up and outreach.
Video: Dentrix Continuing Care List by Dentrix Office Manager (2016). All credit for the demonstration goes to the creator; watch the original on YouTube. The written guide below was generated from this video by Docsie. Creator? Request a change or removal.
Dentrix G6 includes a List Manager feature that makes it easy to build a customized continuing care overdue list. This guide walks you through how to use continuing care in Dentrix to filter patients, select the data fields you need, and generate a report you can use for patient follow-up and outreach.
Prerequisites
- Access to the Dentrix Office Manager application.
- Dentrix G6, since the List Manager feature referenced in this guide is new to this version.
Creating the continuing care overdue list
Step 1: Open the Dentrix Office Manager
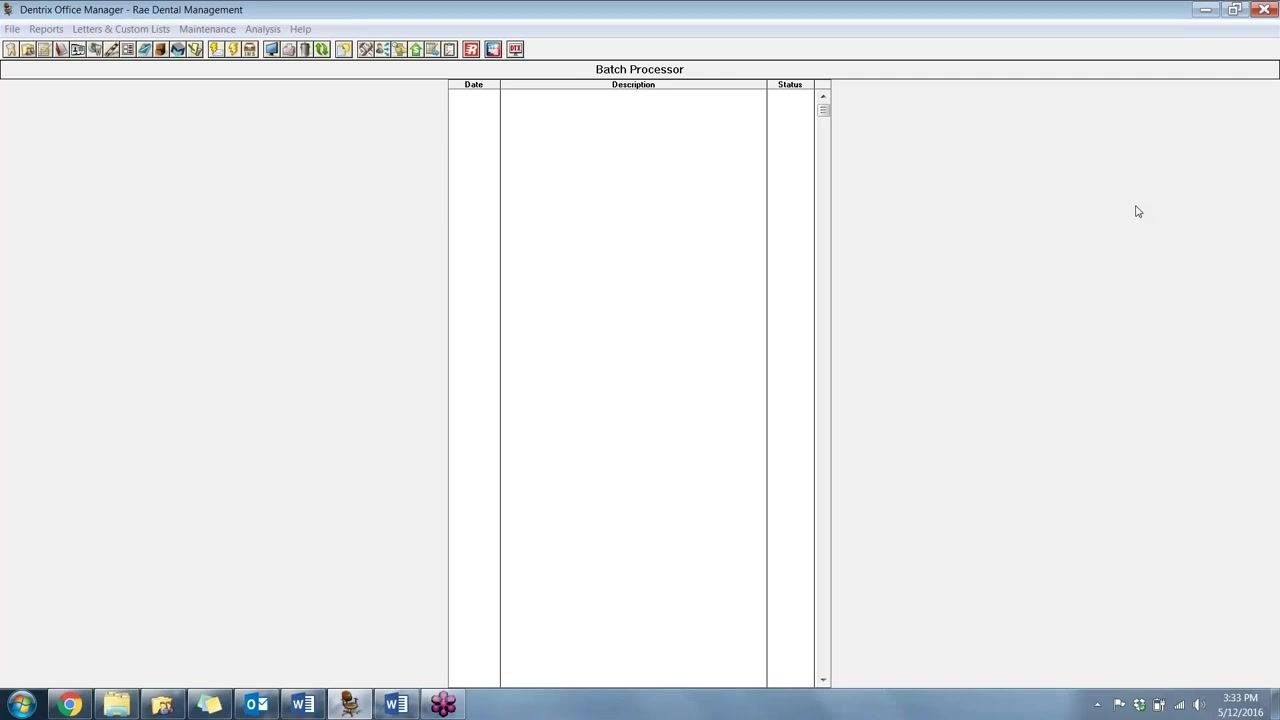
Open the Dentrix Office Manager application and confirm you are on the main screen. This screen displays the Batch Processor window along with the toolbar icons and menu bar.
Step 2: Navigate to Letters & Custom Lists
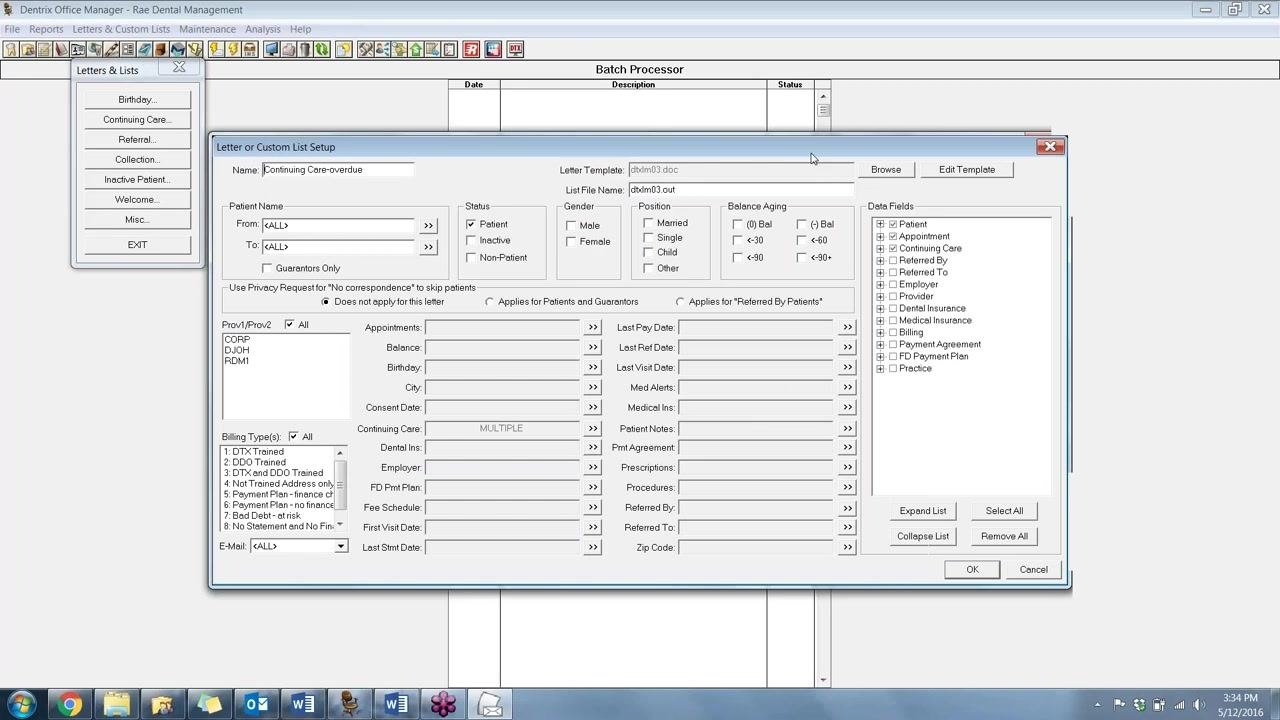
From the top menu, select Letters & Custom Lists. A "Letters & Lists" dialog opens, offering options such as Birthday, Continuing Care, Referral, Collection, Inactive Patient, Welcome, Misc., and Exit.
Step 3: Open the Continuing Care list
In the "Letters & Lists" dialog, click Continuing Care. The "Continuing Care Letters & Custom Lists" window opens, displaying available custom lists and letter templates. Locate or create a list titled Continuing Care Overdue—you can use any existing title, but this guide uses "Continuing Care Overdue."
Step 4: Edit the Continuing Care Overdue list
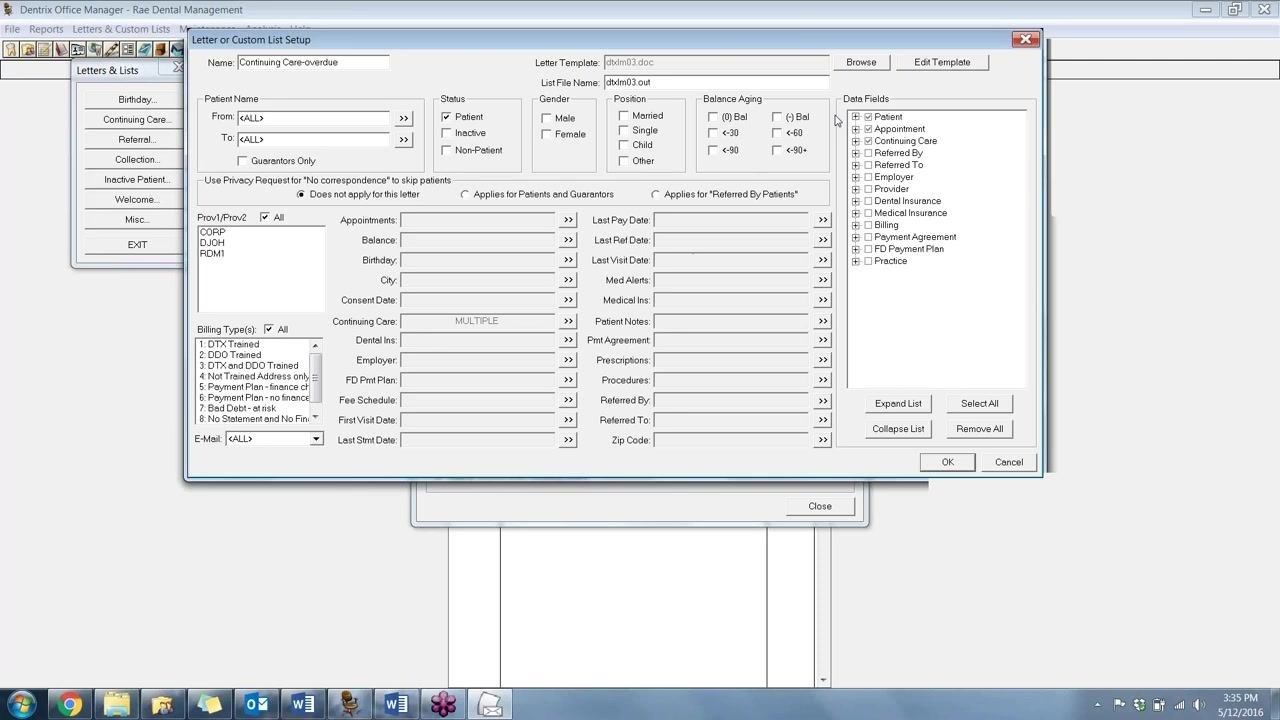
With "Continuing Care-overdue" selected, click Edit. The "Letter or Custom List Setup" window appears, where you can configure the list's filters and data fields.
Step 5: Configure list filters (optional)
In the "Letter or Custom List Setup" window, you can narrow your list using the following filters:
- Patient Name (From/To)
- Status (Patient, Inactive, Non-Patient)
- Gender (Male, Female)
- Position (Married, Single, Child, Other)
- Balance Aging (various ranges)
- Provider(s)
- Billing Type(s)
Apply any combination of these filters to focus on your desired patient group.
Step 6: Select patient data fields for the report
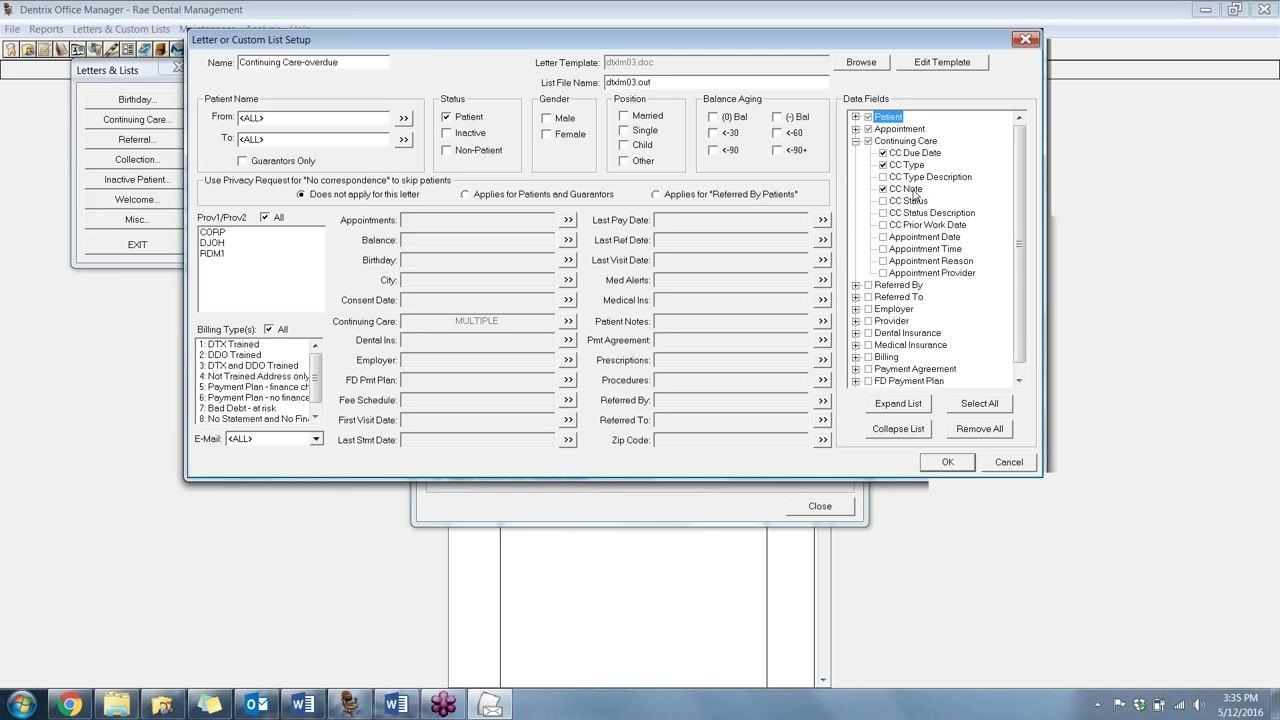
On the right side of the window, under Data Fields, expand the "Patient" section and check the boxes for the columns you want in your report. For example, select:
- Last Name
- First Name
- Preferred Name
You can select additional fields as needed for your practice.
Step 7: Select appointment and continuing care data fields
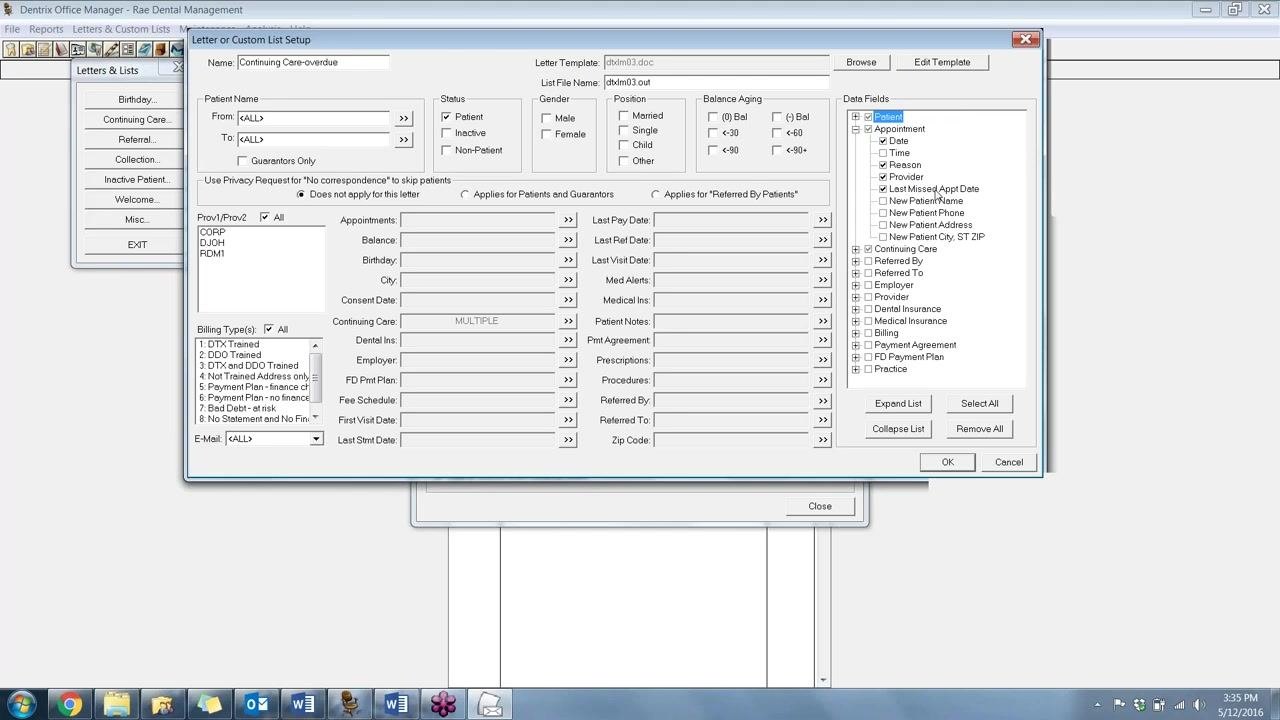
Continue selecting data fields in the Letter or Custom List Setup window. Under the Appointment section, check:
- Date
- Reason
- Provider
- Last Missed Appt Date
These fields let you see the patient's next appointment, the reason for it, the provider, and the date of the last missed appointment—useful information for follow-up.
Next, under the Continuing Care section, check:
- CC Due Date
- CC Type
- CC Note
These fields display the continuing care due date, the type of continuing care (such as Perio or Prophy), and any associated notes. Confirm that all the fields you want are selected before continuing.
Step 8: Set the continuing care due date range and types
Click the button next to the Continuing Care section to open the "Select Continuing Care Ranges" dialog. In the Due Date fields, enter the date range for overdue continuing care—for example, From 01/01/2016 to 12/31/2016.
Under Continuing Care Type, select the types to include. For this example, select both PERIO (periodontal maintenance) and PROPHY (periodic cleaning). This combines Perio and Prophy patients into a single list, a feature unique to the List Manager compared to the standard Continuing Care Report.
Choose whether to include:
- All patients
- Only those with attached appointments
- Only those without attached appointments
Click OK to apply your selections.
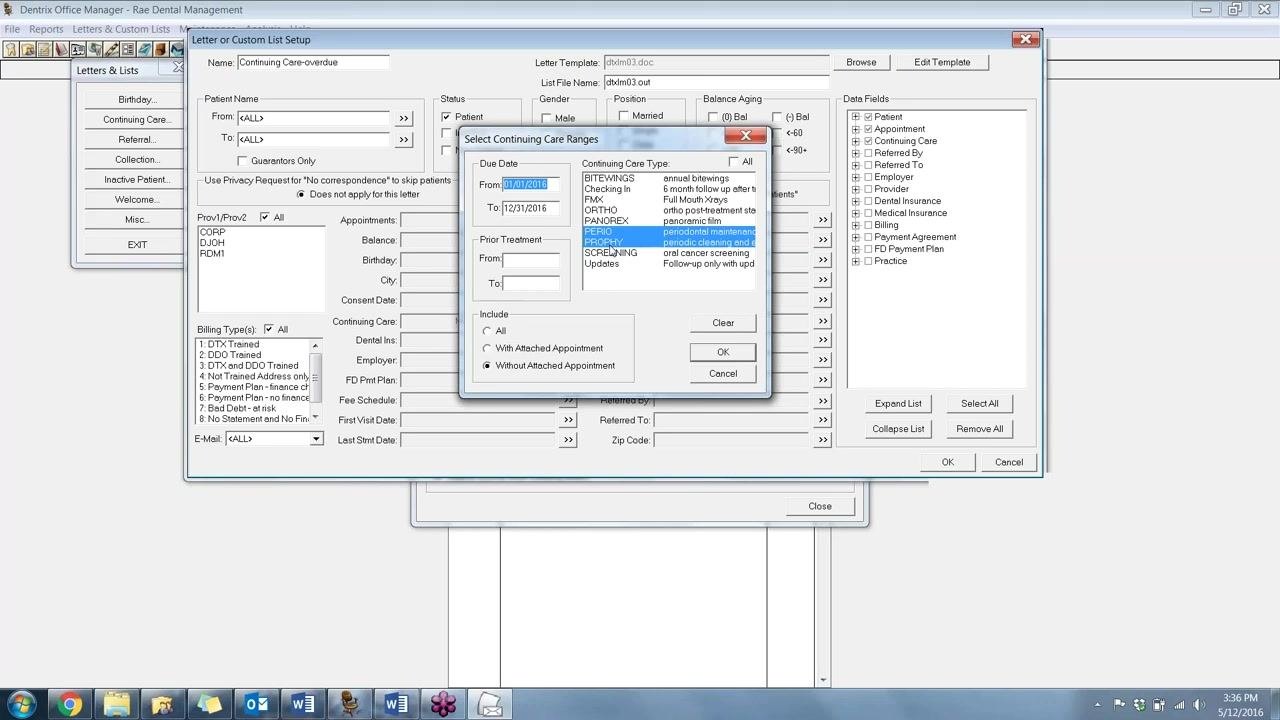
The List Manager differs from the standard Dentrix Continuing Care Report in that it lets you combine multiple continuing care types, such as Perio and Prophy, on one list. The standard report only allows you to select all types at once (which may include unwanted types like bitewings) or a single type at a time, making the List Manager more flexible for customized reporting.
Step 9: Open the List Manager and generate your report
In the Continuing Care Letters & Custom Lists window, click Open List Manager—this feature is new in Dentrix G6. The List Manager generates your report based on the criteria and fields you selected.
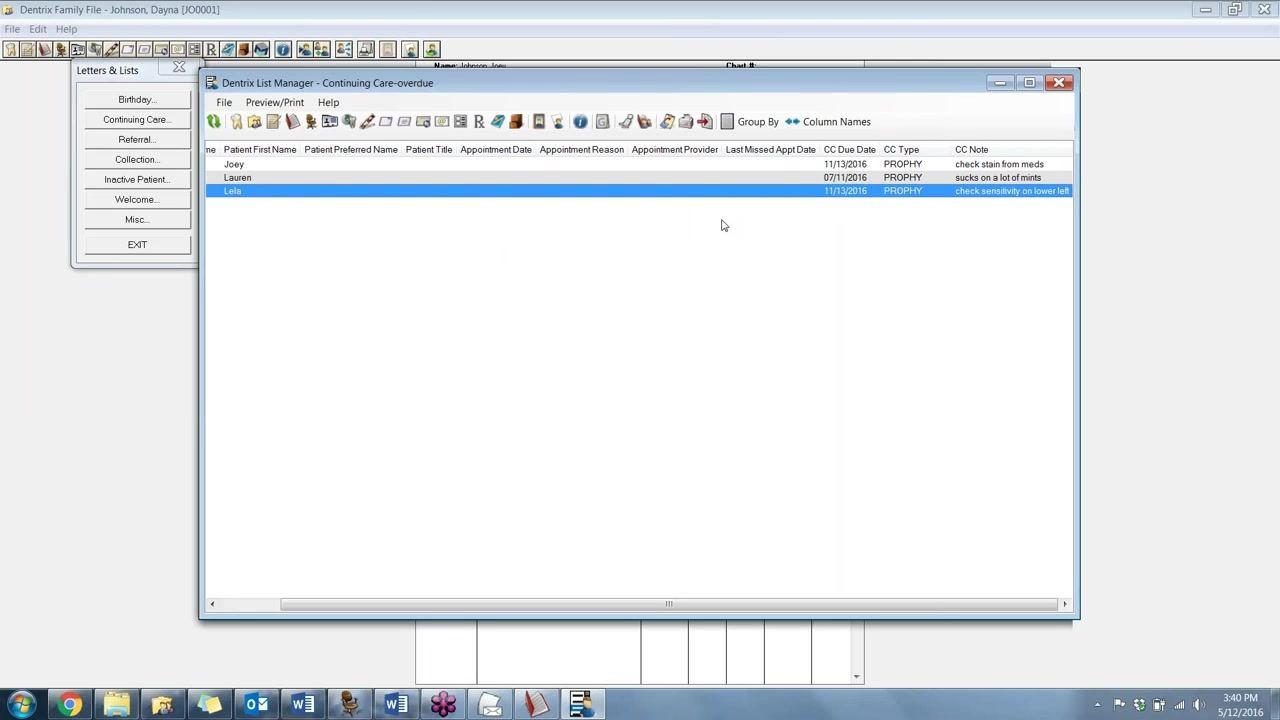
Review the report that appears. In this example, the report lists three patients who are not scheduled for any appointments, so the Appointment Date, Appointment Reason, and Appointment Provider columns are empty.
Scroll horizontally in the List Manager to view additional columns:
- CC Due Date (Continuing Care Due Date)
- CC Type (Continuing Care Type, e.g., PROPHY)
- CC Note (motivational note for each patient)
The CC Note column pulls motivational notes from the patient's family file, which you can use to personalize follow-up calls.
Understanding the motivational note
Step 10: Locate the motivational note source
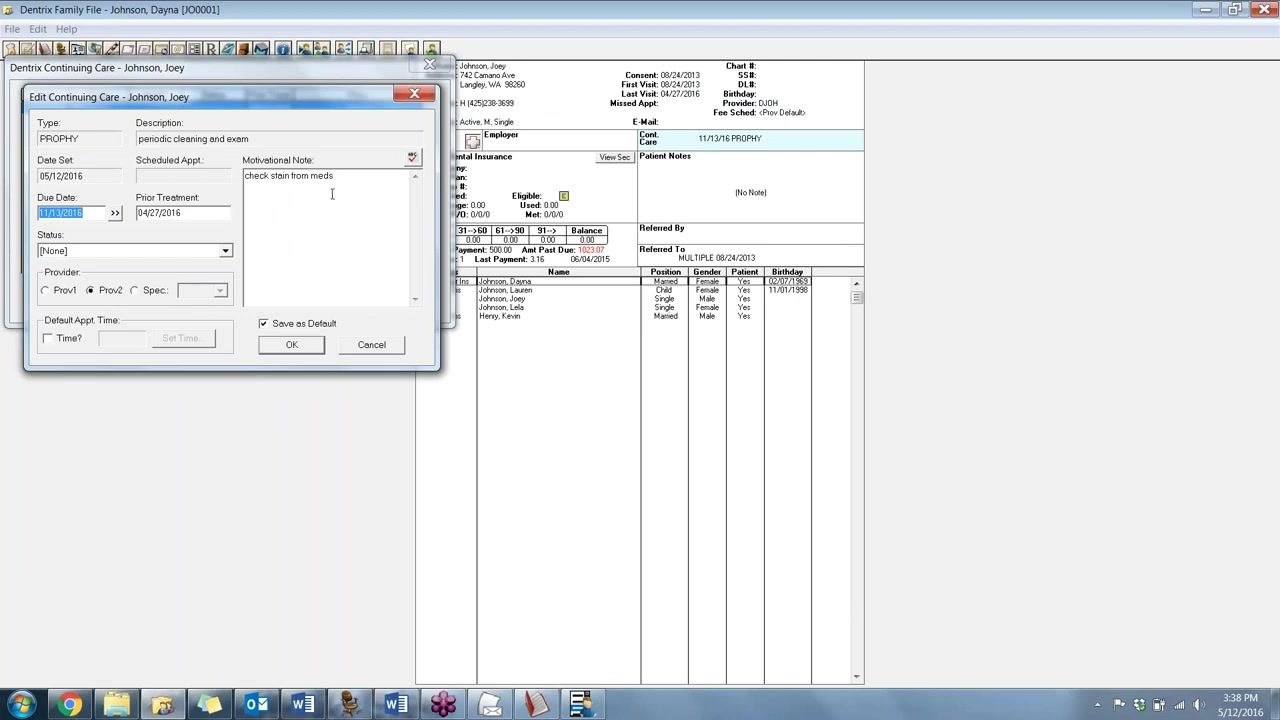
To see where the CC Note comes from, open the patient's Family File, then open the Continuing Care box for the patient and click Edit to open the Edit Continuing Care window.
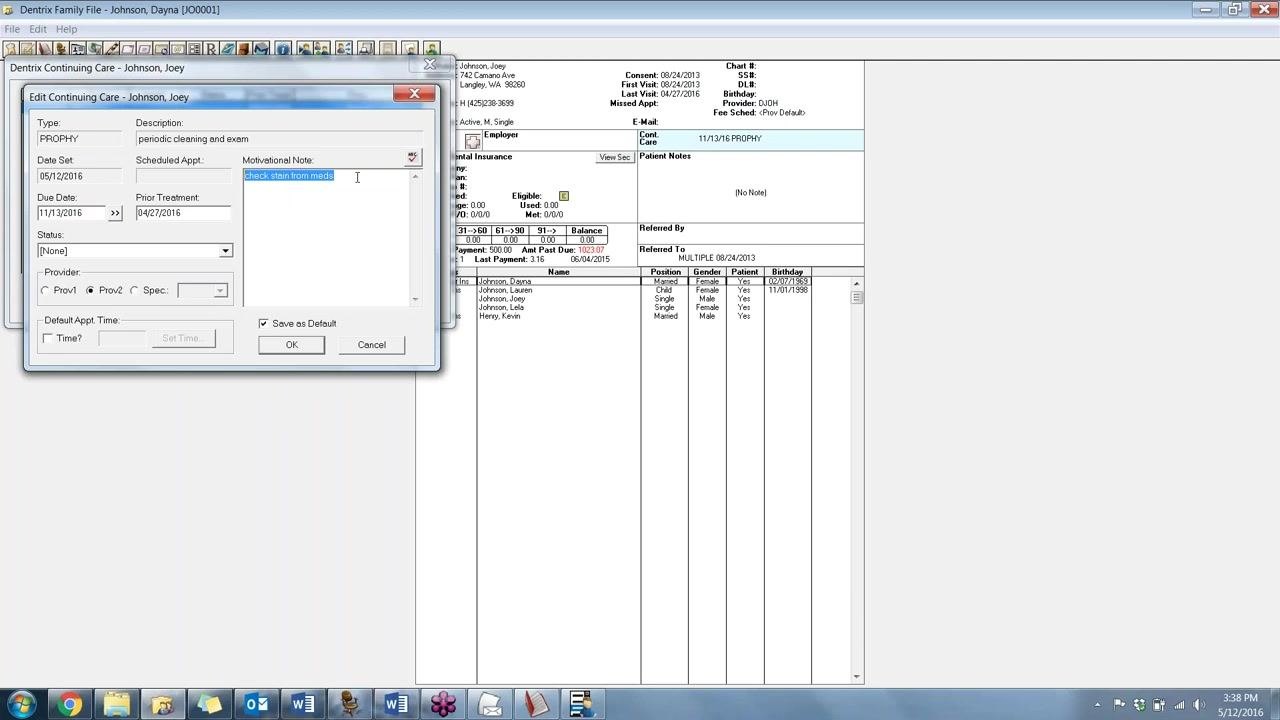
In the Edit Continuing Care window, locate the Motivational Note field. This is where you enter or update a note specific to the patient's continuing care needs, such as "check stain from meds." This note now displays in the List Manager report, making it easy to reference during follow-up calls. If you have used this field before—for example, to print on postcards—it now also appears in your overdue list for more effective communication.
Following up with patients
Step 11: Identify a patient to contact
From the list, identify the patient you want to contact (for example, Joey) and click to highlight that patient's row.
Step 12: Open the Office Journal
Use the toolbar or menu options to open the Office Journal for the selected patient. The Office Journal lets you log communications and follow-up actions for each patient.
Step 13: Record a new journal entry
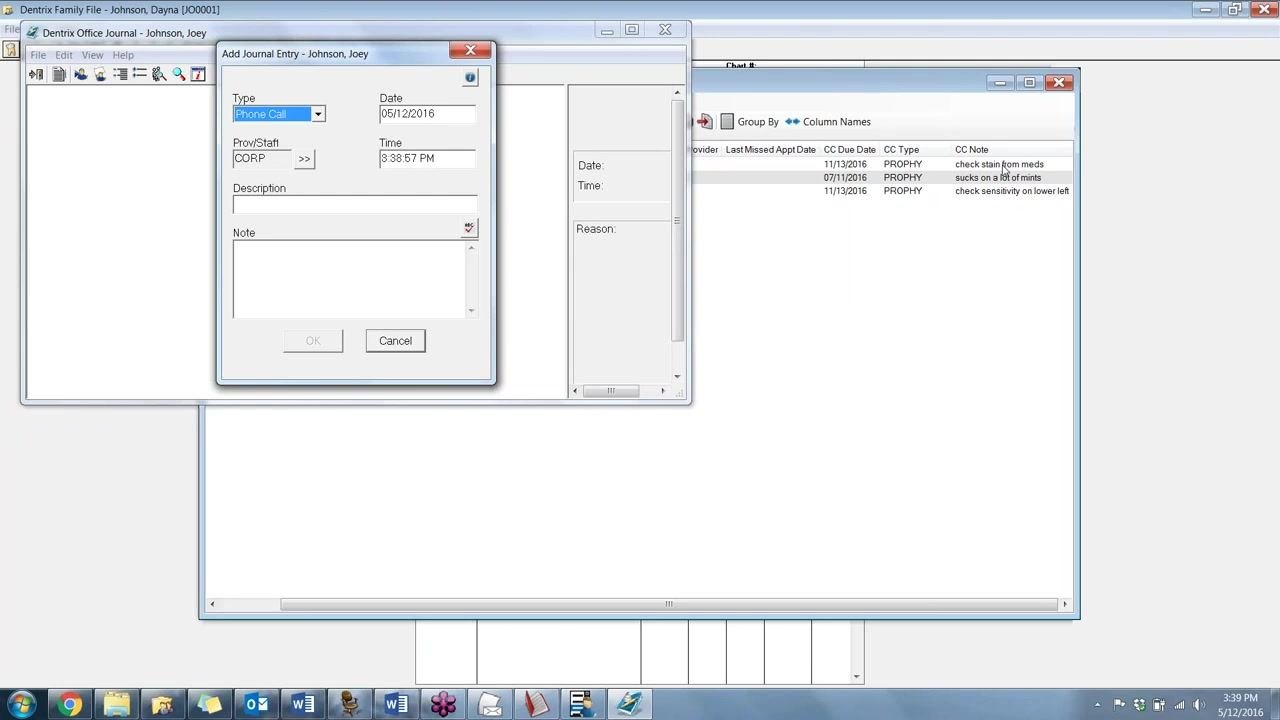
In the Office Journal window, click to add a new entry. The "Add Journal Entry" dialog appears. Set the following fields:
- Type: Select "Phone Call" from the dropdown.
- Date: 05/12/2016 (example).
- Time: 3:38:57 PM (example).
- Prov/Staff: CORP (example).
- Description: Leave blank or enter a brief summary of the call.
- Note: Enter details of the conversation, such as "Called Joey to remind about overdue checkup and cleaning."
Step 14: Use the CC Note to personalize follow-up calls
Use the information in the CC Note column to personalize your conversation. For example, say: "Hey Joey, I know that you're overdue for your checkup and cleaning. I'm just calling to get you scheduled." Reference specific notes, such as: "Your hygienist wanted to check the stain on your teeth from your medication."
Review the CC Notes for each patient to add value to your follow-up calls. Example notes include:
- "check stain from meds"
- "sucks on a lot of mints"
- "check sensitivity on lower left"
These notes give your front office team quick, actionable information to use during patient outreach.
Step 15: Save the journal entry
Click OK in the Add Journal Entry dialog to log the communication after completing the call.
Step 16: Repeat for each overdue patient
Repeat the process for each patient listed as overdue in the Continuing Care list. Use the Office Journal to document all communications, and leverage the CC Notes to keep each call personalized and relevant.
Step 17: Review the patient's Family File
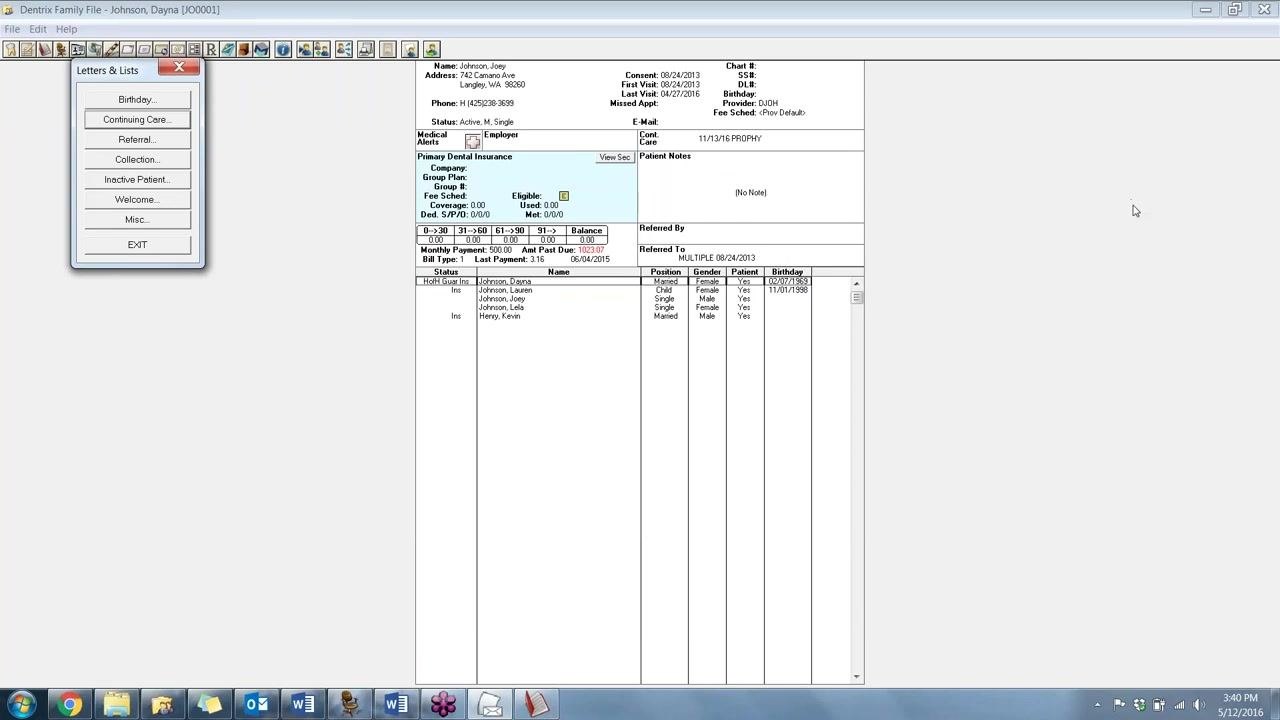
Return to the patient's Family File to review or update additional information. The Dentrix Family File window displays:
- Patient name and address (e.g., Johnson, Joey, 742 Camano Ave, Langley, WA 98260)
- Contact information, such as phone number
- Status, consent date, first/last visit dates, missed appointment date, provider, and fee schedule
- Insurance details, eligibility, coverage, and balance
- Monthly payment and past due amounts
- Family members listed with their positions, genders, patient status, and birthdays
Use this information to verify patient details, update records, or prepare for further communication.
What's next
Now that you know how to use continuing care in Dentrix to build an overdue list, repeat this process regularly to keep your patient recall schedule up to date. Continue logging each follow-up call in the Office Journal and use the CC Notes to keep your outreach personalized and effective.
Generation details: cost, quality tiers
Docsie billed 3,500 credits ($2.45) to analyze this 7-minute video at standard quality. The rewrite, template fill and Word/PDF exports were included. The same video at each quality tier:
| Quality | Frames sampled | Credits | Approx. cost |
|---|---|---|---|
| Draft | every 16-30 s | 1,750 | $1.22 |
| Standard (this guide) | every 8-15 s | 3,500 | $2.45 |
| Detailed | every 4-7 s | 7,000 | $4.90 |
| Ultra | every 1-3 s | 14,000 | $9.80 |
Credits priced at $0.70 per 1,000; plans include a monthly allowance. Enterprise customers on on-premise or bring-your-own-model deployments run this on their own inference and pay no per-video credits.
Generated by Docsie Video-to-Docs on 2026-10-14 from a 6-minute video. Screenshots are frames from the source video and belong to their creator, Dentrix Office Manager, whose original is embedded above. If you own this video and want the guide removed or credited differently, contact us and we will act within one business day.