
How to Chart Supernumerary Teeth in Dentrix
Supernumerary teeth—extra teeth beyond the normal count—require special handling in Dentrix because they don't have a standard tooth number on the graphical chart. This guide walks you through how to chart supernumerary teeth in Dentrix, from adding the extraction to the treatment plan, drawing a visual notation on the tooth chart, and updating the record once the extraction is complete.
Video: Charting a Supernumerary Tooth in Dentrix by Dentrix Office Manager (2013). All credit for the demonstration goes to the creator; watch the original on YouTube. The written guide below was generated from this video by Docsie. Creator? Request a change or removal.
Supernumerary teeth—extra teeth beyond the normal count—require special handling in Dentrix because they don't have a standard tooth number on the graphical chart. This guide walks you through how to chart supernumerary teeth in Dentrix, from adding the extraction to the treatment plan, drawing a visual notation on the tooth chart, and updating the record once the extraction is complete.
Prerequisites
- Access to a patient's chart in Dentrix.
- Familiarity with the Treatment Plan Case Setup screen.
Open the patient chart
Launch Dentrix and navigate to the patient's chart screen. Make sure you are in the Treatment Plan Case Setup section. The main window displays a graphical tooth chart, treatment plan options on the left, and procedure codes on the right.
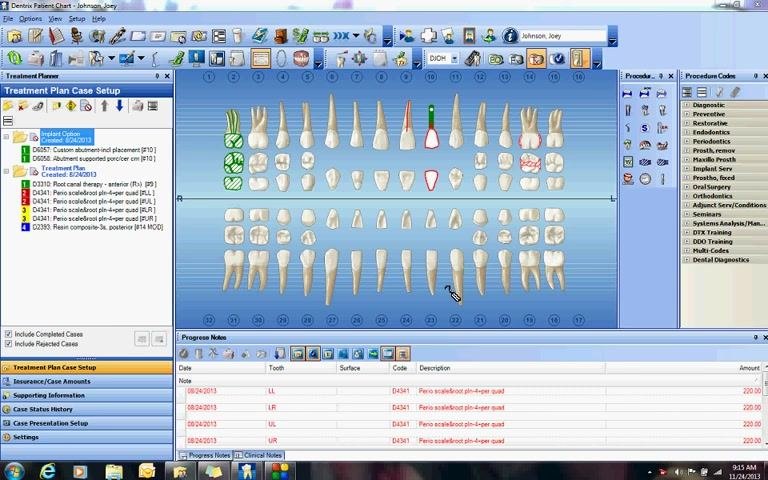
Start a new treatment plan entry
Click the Treatment Plan button at the top of the screen. Do not select a tooth on the graphical chart at this stage, since supernumerary teeth are entered by number rather than by clicking the chart.
Enter the supernumerary tooth number
When prompted to enter a tooth number, add 50 to the regular tooth number to represent the supernumerary tooth. For example, for an extra tooth located near teeth 6 and 7, you would enter 57 in the Enter Tooth Range dialog box. Click OK to confirm.
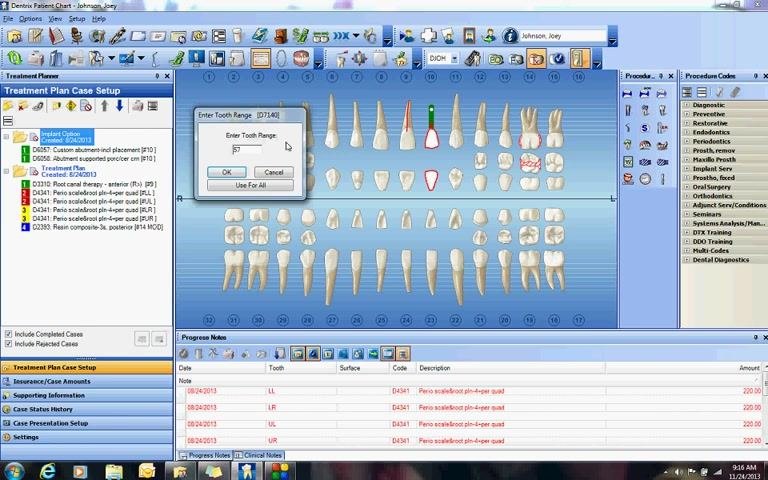
Verify the treatment plan entry
Check the treatment plan list in the left panel to confirm that the extraction for tooth number 57 has been added. The procedure now appears in the treatment plan list, but keep in mind that the supernumerary tooth will not display on the graphical tooth chart itself.
Open chart notations
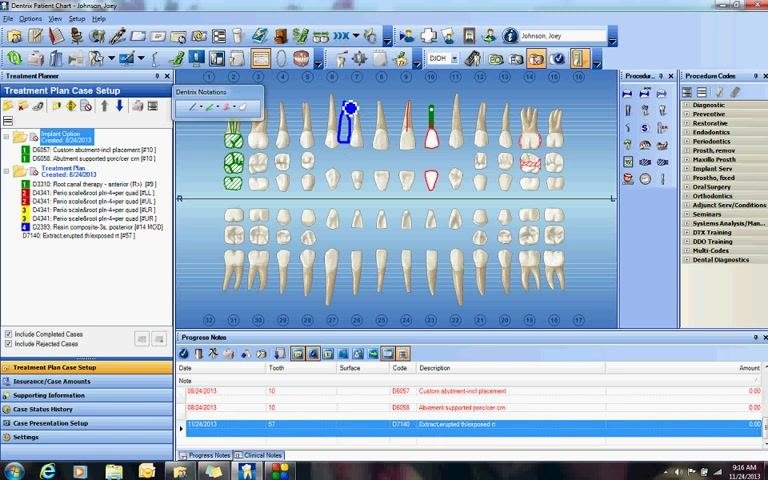
To visually represent the extra tooth on the chart, go to the top toolbar and click Chart Notations, then select Edit to enable drawing mode. A drawing toolbar appears.
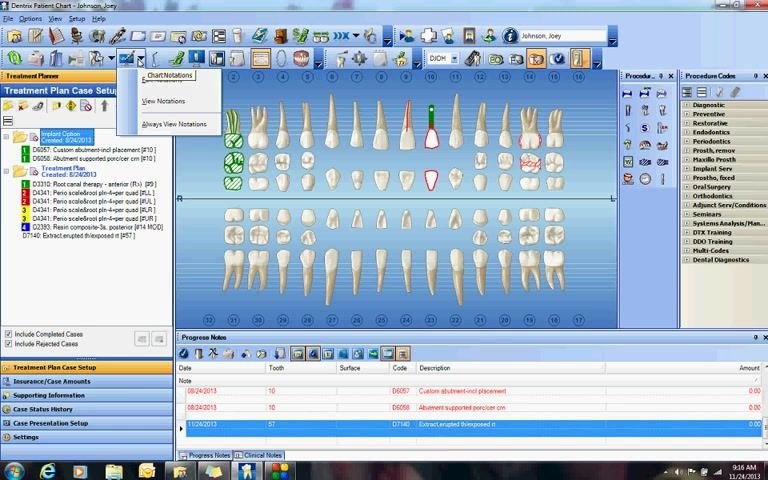
Select the drawing tool
Click the drop-down menu in the drawing toolbar and choose the thick blue pen option for clear visibility on the chart.
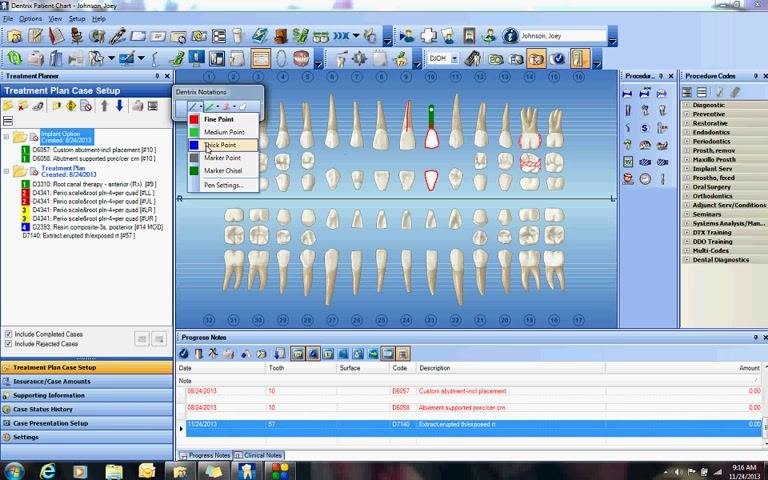
Draw the supernumerary tooth freehand
Use the drawing tool to sketch the supernumerary tooth in the appropriate location on the tooth chart. Artistic accuracy isn't necessary—the goal is simply to indicate the presence of an extra tooth for clinical reference. The blue outline represents the supernumerary tooth.
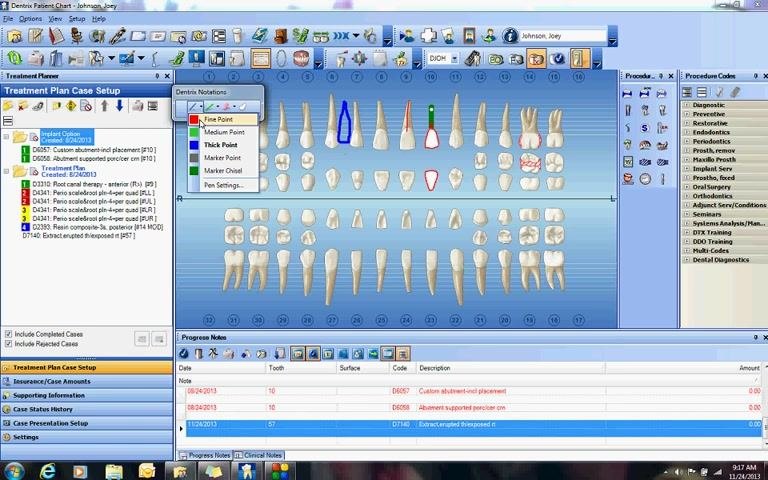
Mark the tooth for extraction
Select the red pen from the drawing toolbar by clicking the drop-down menu and choosing the fine point red option. Draw red lines through the blue-outlined supernumerary tooth to visually indicate that it is scheduled for extraction.
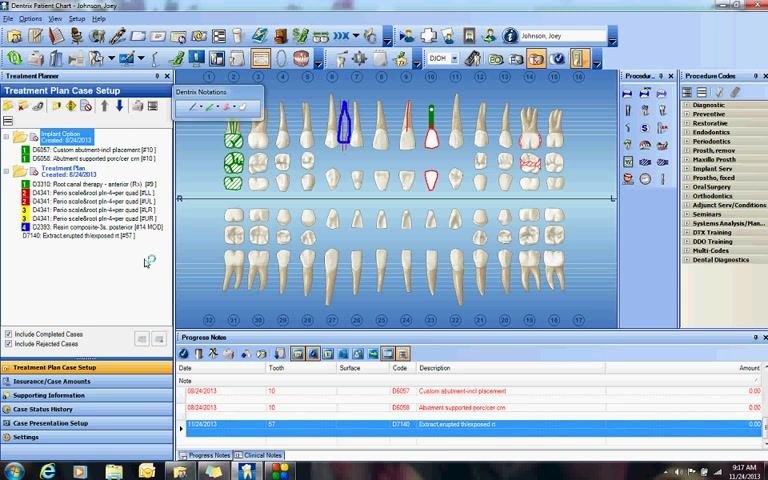
Review the chart notation
Confirm that the supernumerary tooth is clearly marked on the chart with both the blue outline and the red extraction lines. Also confirm that the treatment plan entry for the extraction (for example, D7140 for tooth 57) is visible in the treatment plan list.
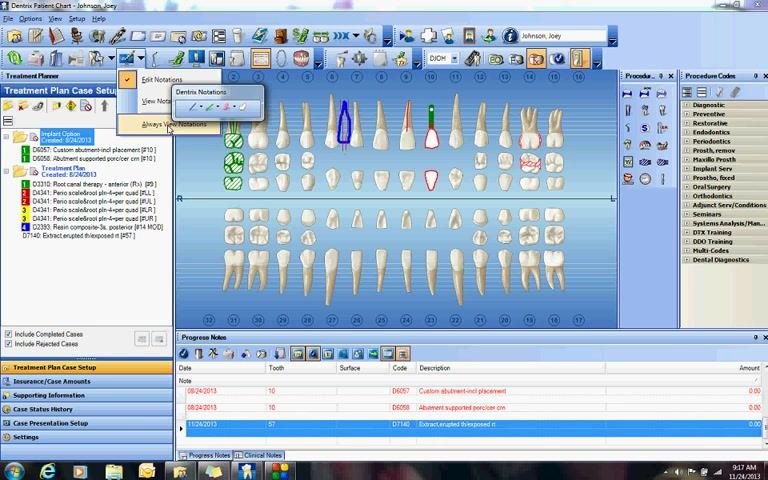
Set the notation to always display
Click Chart Notations again and select Always View Notations. This keeps your drawing visible on the chart even after you close the drawing toolbar.
Hide the drawing toolbar
Close or minimize the drawing toolbar to declutter your workspace while keeping the notation visible on the chart.
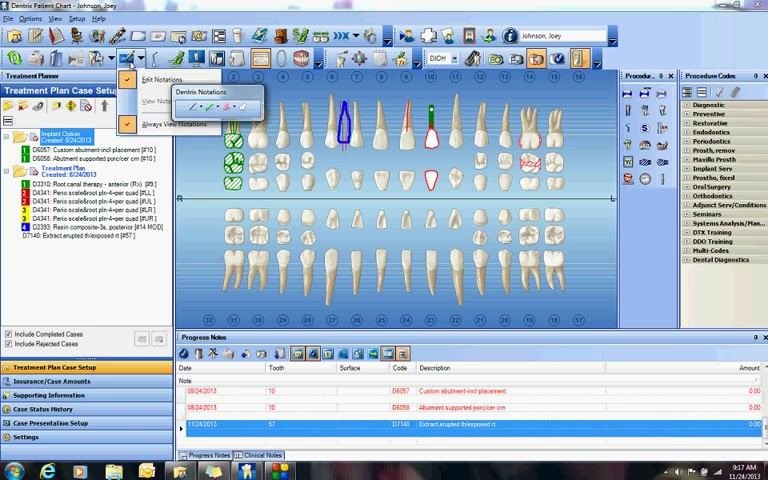
Mark the extraction as complete
When the patient returns and the extraction is performed, locate the extraction entry (for example, D7140 for tooth 57) in the treatment plan or progress notes section. Click Set Complete to mark the procedure as finished.
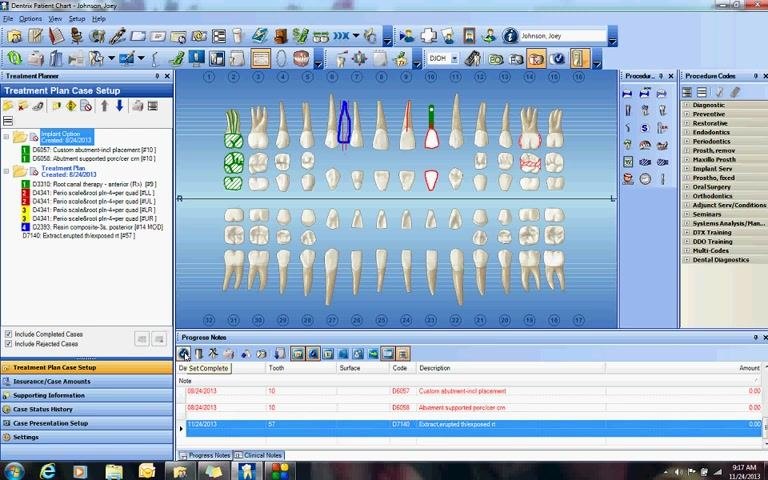
Erase the supernumerary tooth drawing
After marking the extraction as complete, the freehand drawing does not disappear automatically. Click Chart Notations and select Edit Notations, then choose the eraser tool from the drawing toolbar to erase the blue and red markings representing the supernumerary tooth.
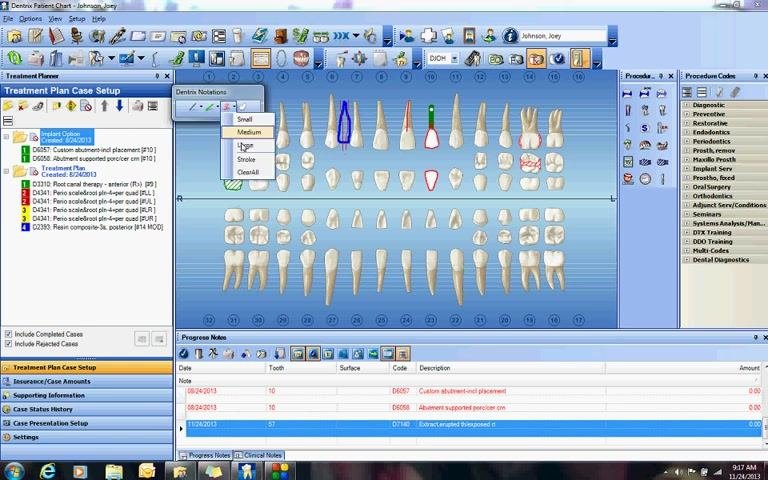
Confirm the chart is updated
Make sure the supernumerary tooth drawing is fully erased from the chart. The extraction remains documented in the treatment history, while the visual notation is removed from the current chart view.
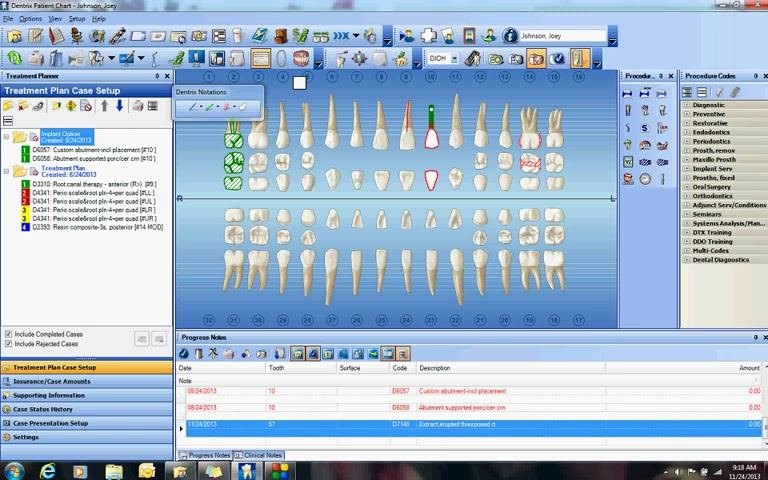
Important reminders
- Always add 50 to the regular tooth number when charting a supernumerary tooth (for example, tooth 7 + 50 = 57).
- Do not select a tooth on the chart before entering the supernumerary tooth number in the treatment plan.
- Manually erase the freehand drawing after the extraction is completed, since it does not disappear automatically.
Summary
By following these steps, you can accurately chart, visually represent, and update the status of a supernumerary tooth extraction in Dentrix. This keeps your clinical documentation clear while ensuring the patient record stays accurate once treatment is complete.
Generation details: cost, quality tiers
Docsie billed 2,000 credits ($1.40) to analyze this 4-minute video at standard quality. The rewrite, template fill and Word/PDF exports were included. The same video at each quality tier:
| Quality | Frames sampled | Credits | Approx. cost |
|---|---|---|---|
| Draft | every 16-30 s | 1,000 | $0.70 |
| Standard (this guide) | every 8-15 s | 2,000 | $1.40 |
| Detailed | every 4-7 s | 4,000 | $2.80 |
| Ultra | every 1-3 s | 8,000 | $5.60 |
Credits priced at $0.70 per 1,000; plans include a monthly allowance. Enterprise customers on on-premise or bring-your-own-model deployments run this on their own inference and pay no per-video credits.
Generated by Docsie Video-to-Docs on 2026-10-11 from a 3-minute video. Screenshots are frames from the source video and belong to their creator, Dentrix Office Manager, whose original is embedded above. If you own this video and want the guide removed or credited differently, contact us and we will act within one business day.