
How to Split a Claim in Dentrix
When some procedures on a primary claim have received payment while others remain outstanding, you need to know how to split a claim in Dentrix so the unpaid procedures can be resubmitted to insurance separately. This guide walks you through identifying when splitting is possible, using the Split Claim dialog box, and finalizing the new claims in the Ledger.
Video: split primary claim by jcwestfall (2013). All credit for the demonstration goes to the creator; watch the original on YouTube. The written guide below was generated from this video by Docsie. Creator? Request a change or removal.
When some procedures on a primary claim have received payment while others remain outstanding, you need to know how to split a claim in Dentrix so the unpaid procedures can be resubmitted to insurance separately. This guide walks you through identifying when splitting is possible, using the Split Claim dialog box, and finalizing the new claims in the Ledger.
Prerequisites
Before you split a claim, confirm the following:
- Some procedures on the claim have received payment, while others are still outstanding and require resubmission to insurance.
- You split the claim before posting any partial payment.
You cannot split a claim if:
- Payment has already been received and posted for that claim.
- The claim has been moved into history due to payment entry.
- A secondary claim has already been created for the primary claim.
- The claim is a pretreatment authorization.
Always check the claim status before attempting to split it.
Copy any insurance claim notes
If the original claim has insurance claim notes attached, copy these notes before you begin the split. After splitting, you'll paste the copied notes into the new (second) claim so that all relevant information is retained.
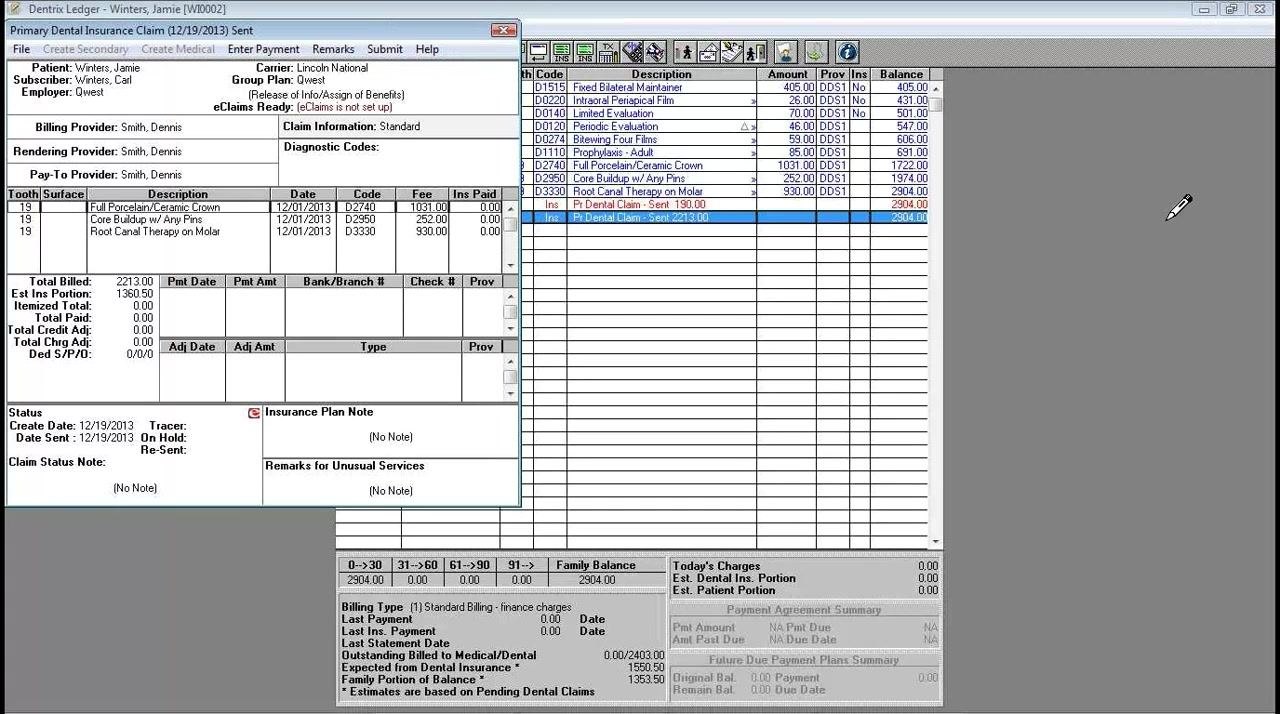
Highlight the primary insurance claim
In the Dentrix Ledger, locate and highlight the primary insurance claim you want to split. Claims in the ledger are listed by date, patient name, and description, so select the relevant claim row.
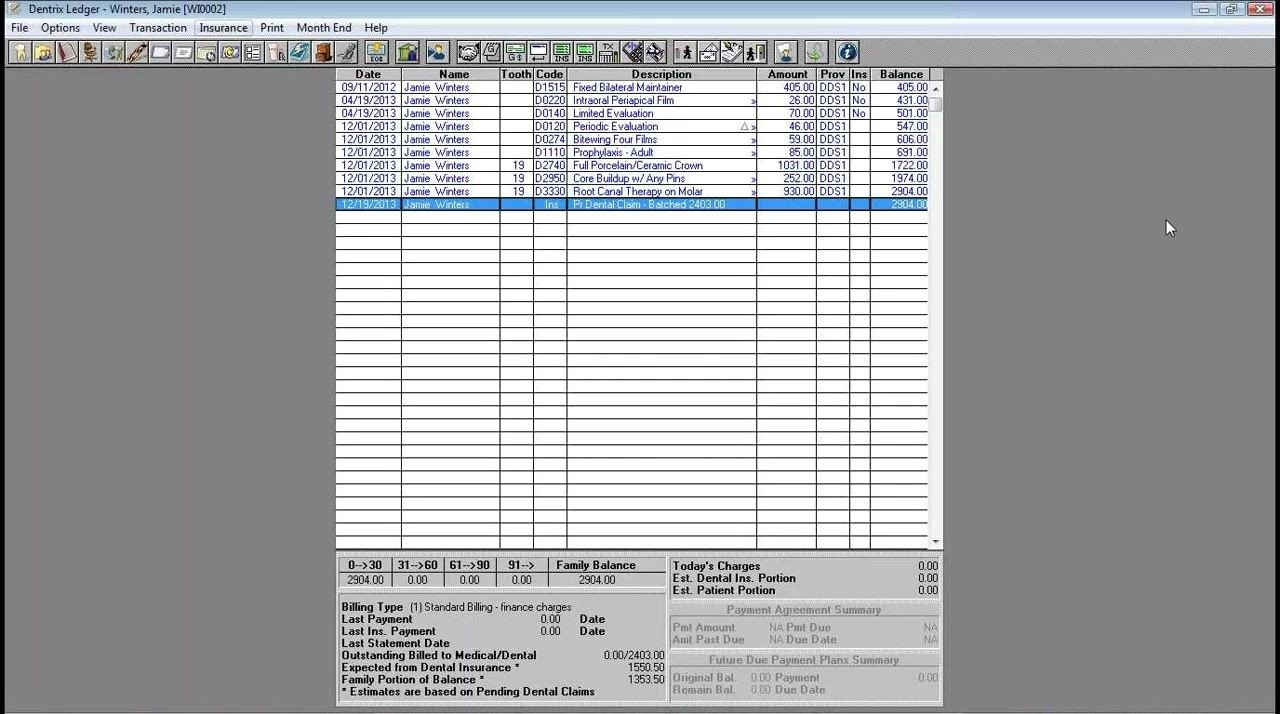
Open the Split Primary Claim option
From the ledger menu bar at the top, click Insurance. In the Insurance menu, select Split Primary Claim to open the Split Claim dialog box.
Move procedures to the second claim
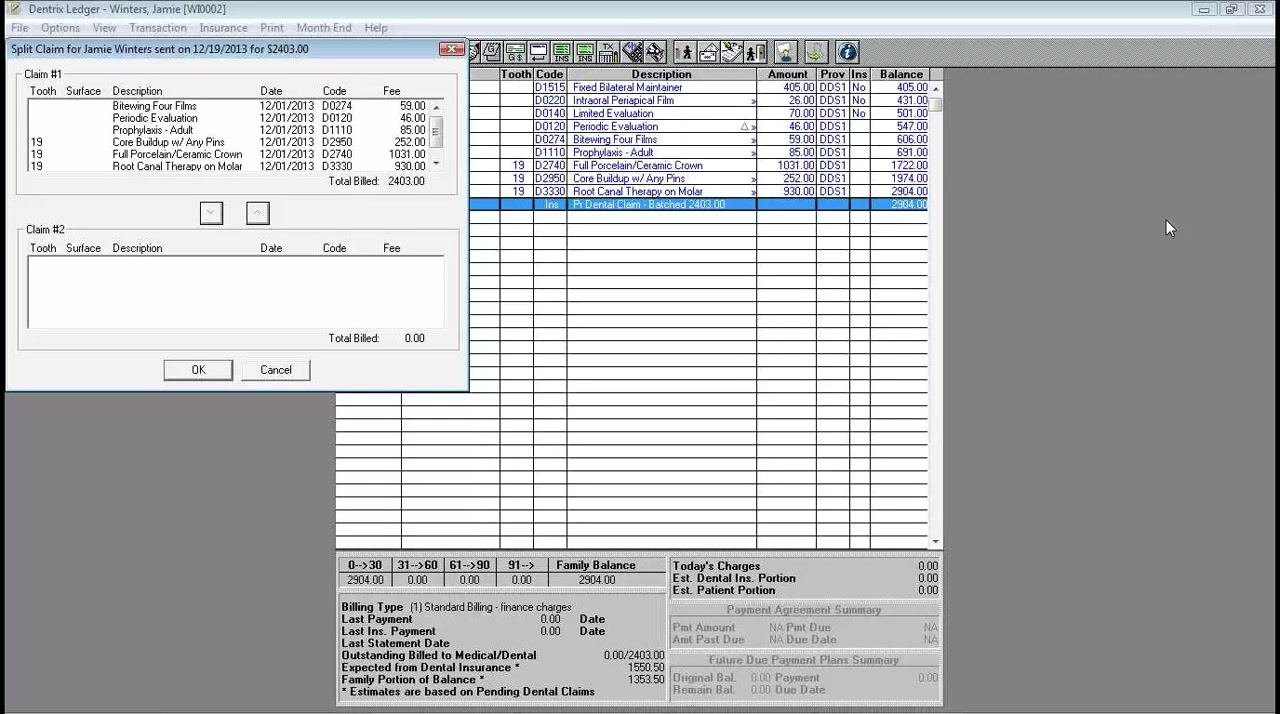
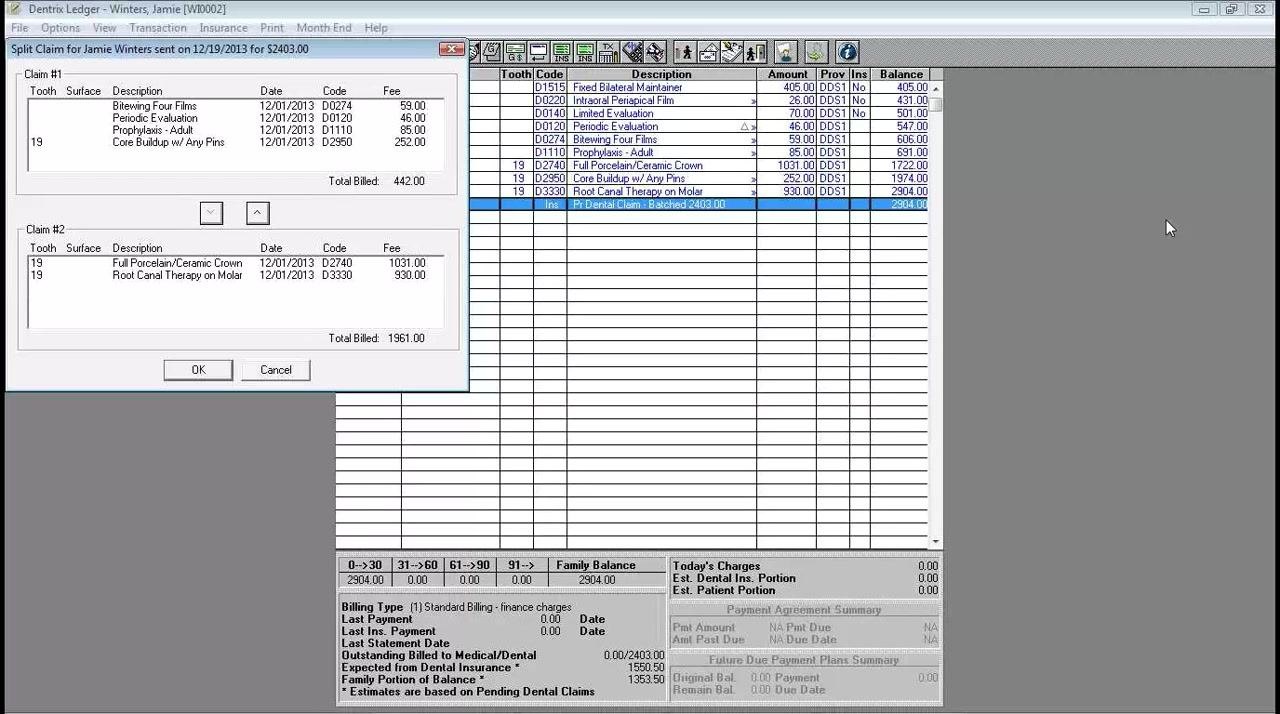
The Split Claim dialog box displays two panes:
- Claim #1: Lists all procedures currently on the claim.
- Claim #2: Initially empty — this will hold the procedures you move to the new claim.
For example, procedures such as "Bitewing Four Films," "Prophylaxis - Adult," and "Root Canal Therapy on Molar" appear with their respective codes and fees.
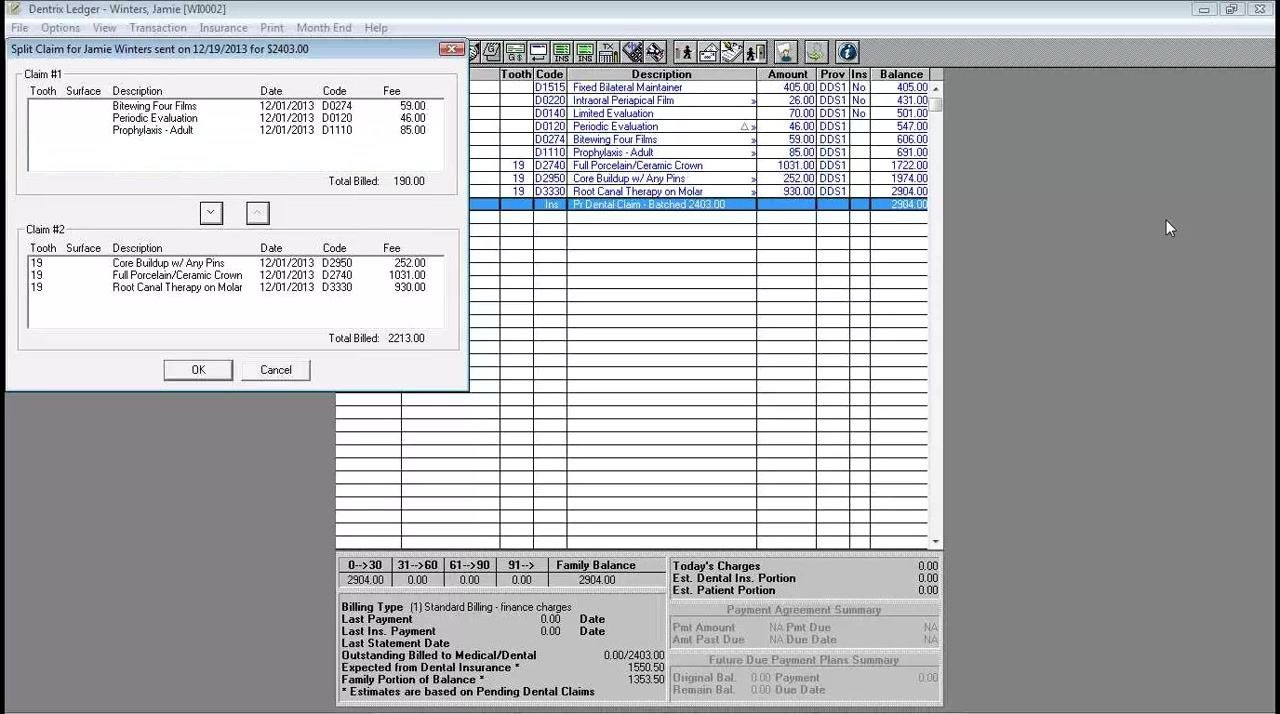
Highlight the procedures in Claim #1 that need to be moved — for instance, those requiring resubmission or additional information. Click the down arrow button to move the selected procedures to Claim #2. If you move a procedure by mistake, highlight it in Claim #2 and use the up arrow to move it back to Claim #1.
For example, procedures for tooth 19 — "Core Buildup w/ Any Pins," "Full Porcelain/Ceramic Crown," and "Root Canal Therapy on Molar" — are moved to Claim #2.
Review and adjust the split
Double-check that the correct procedures are listed in each claim. Use the arrow buttons to make any necessary adjustments before finalizing.
Finalize the split claims
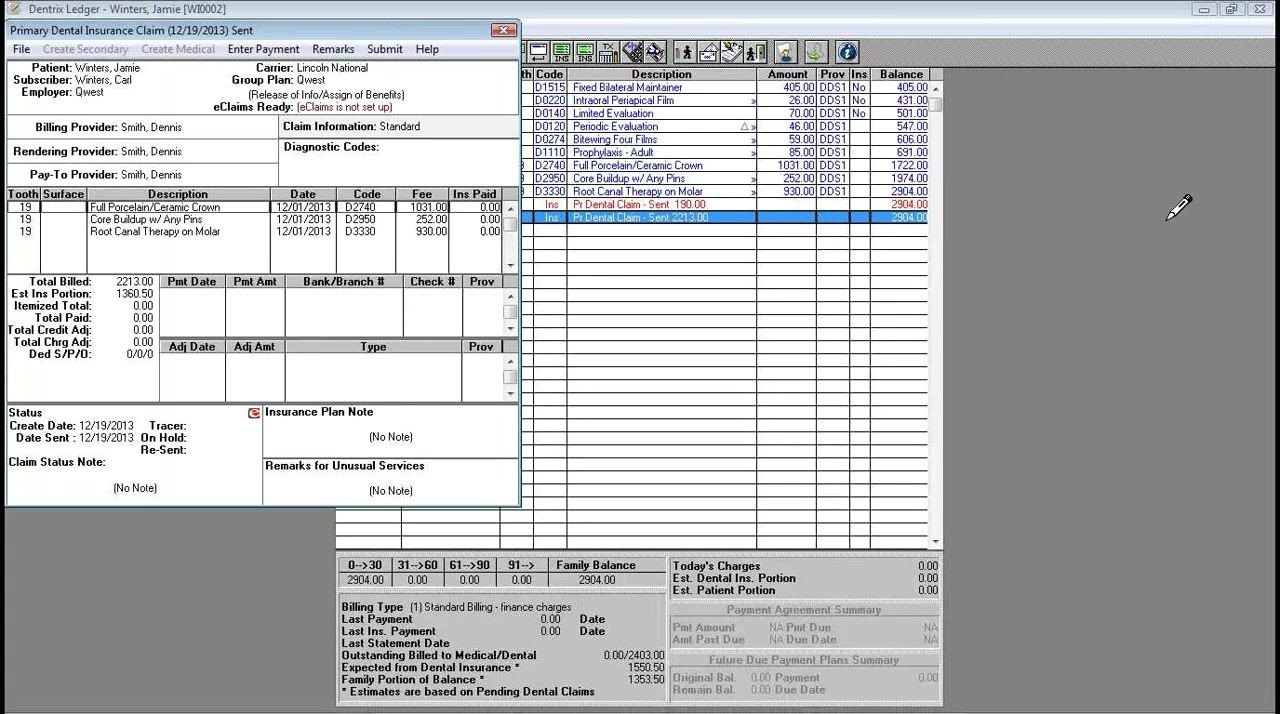
Click OK to confirm and exit the Split Claim dialog box. The Ledger now displays two separate claims for the same date: the first claim contains the procedures that remained in Claim #1, and the second contains those moved to Claim #2. Each claim then functions like any other primary claim in Dentrix.
For example, the ledger shows "Pt Dental Claim - Sent 190.00" and "Pt Dental Claim - Sent 2213.00" for the same patient and date.
Enter payments and resubmit claims
Enter payment for the procedures that have received payment on the appropriate claim. Paste the insurance claim notes you copied earlier into the second claim, and add any additional information required directly from the Ledger. Resubmit the second claim as needed, making sure all necessary documentation is included.
Summary
Splitting a primary claim in Dentrix lets you separate paid procedures from outstanding ones so the unpaid items can be resubmitted to insurance. Always verify the claim's status first, copy any existing claim notes, use the Split Claim dialog box to move procedures between Claim #1 and Claim #2, and confirm the split before entering payments or resubmitting the second claim.
Generation details: cost, quality tiers
Docsie billed 2,000 credits ($1.40) to analyze this 4-minute video at standard quality. The rewrite, template fill and Word/PDF exports were included. The same video at each quality tier:
| Quality | Frames sampled | Credits | Approx. cost |
|---|---|---|---|
| Draft | every 16-30 s | 1,000 | $0.70 |
| Standard (this guide) | every 8-15 s | 2,000 | $1.40 |
| Detailed | every 4-7 s | 4,000 | $2.80 |
| Ultra | every 1-3 s | 8,000 | $5.60 |
Credits priced at $0.70 per 1,000; plans include a monthly allowance. Enterprise customers on on-premise or bring-your-own-model deployments run this on their own inference and pay no per-video credits.
Generated by Docsie Video-to-Docs on 2026-10-14 from a 3-minute video. Screenshots are frames from the source video and belong to their creator, jcwestfall, whose original is embedded above. If you own this video and want the guide removed or credited differently, contact us and we will act within one business day.