
How to Create a Template in Confluence
Confluence templates help your team create content quickly and consistently. When the built-in templates don't meet your specific needs, you can create a custom template from scratch. This guide walks you through recognizing when a new template is needed, choosing between a space or global template, building the template's structure, enhancing it with placeholder text and macros, and promoting it so your team can reuse it easily.
Video: How to Make a Great Template in Confluence by K15t (2021). All credit for the demonstration goes to the creator; watch the original on YouTube. The written guide below was generated from this video by Docsie. Creator? Request a change or removal.
Confluence templates help your team create content quickly and consistently. When the built-in templates don't meet your specific needs, you can create a custom template from scratch. This guide walks you through recognizing when a new template is needed, choosing between a space or global template, building the template's structure, enhancing it with placeholder text and macros, and promoting it so your team can reuse it easily.
Prerequisites
Before you begin, make sure you have the following:
- A page type that your team or company creates repeatedly (for example, a decision-making or consensus page)
- Access to Space Settings if you plan to create a space-specific template, or access to global Settings if you plan to create a template for the entire Confluence instance
- Familiarity with the standard Confluence page editor, since the template editor works the same way
Recognizing when to create a template
A good way to identify the need for a template is to look at pages that have already worked well for your team. For example, one team created a Confluence page to answer a specific question and make a decision asynchronously. The page worked because team members actively participated in the comments, reached consensus, and clearly documented both the question and the final decision.
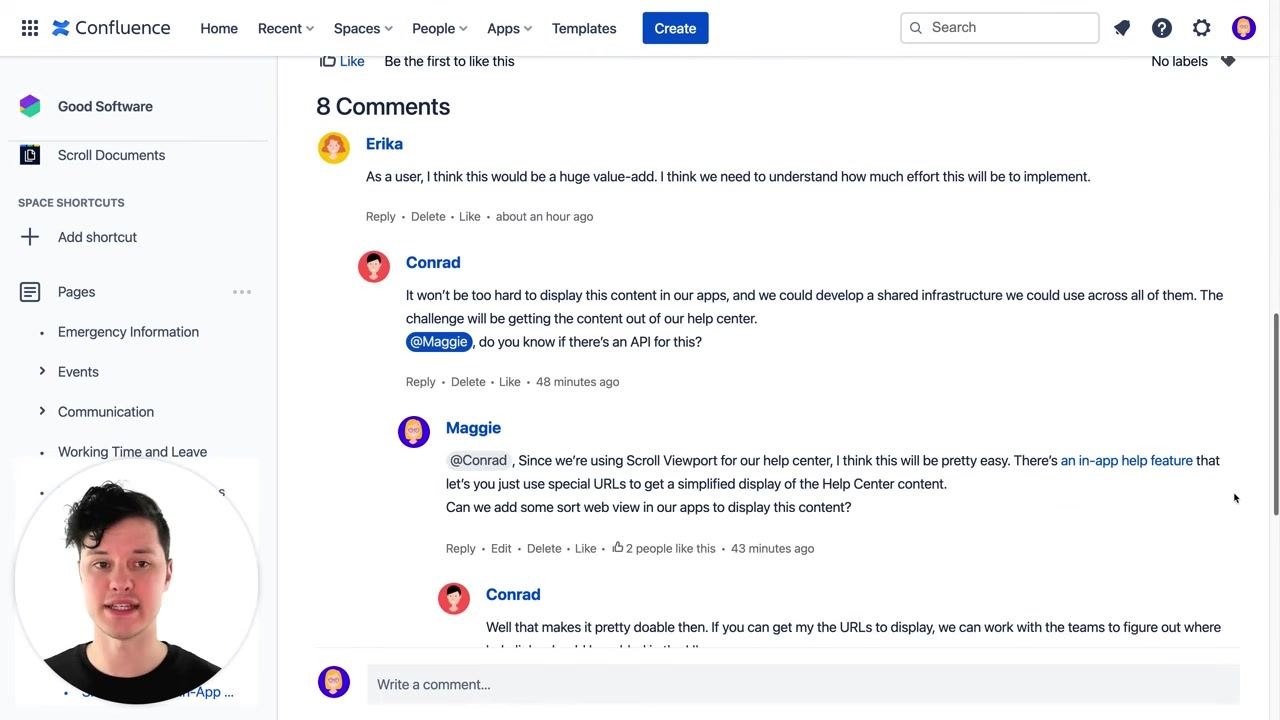
Team members used the comments section to discuss the topic, ask questions, make suggestions, and agree on an outcome.
Make sure both the answer to the question and the decisions reached are clearly documented on the page, since this documentation becomes the model for your future template.
Before creating a template, ask yourself whether this page type will be used repeatedly by your team. If the answer is yes, proceed with turning the page into a template for consistent and efficient content creation.
Check for existing templates
- Go to the top menu bar in Confluence and click the Templates tab.
- Review the available templates to see if one already meets your needs.
- Use the search bar to enter keywords related to your use case.
- If no suitable template exists, this confirms that you need to create a new one.
Decide where to create your template
Determine whether the template should be available only within a specific team or space, or across your entire Confluence instance.
- Space Template: If the template is for a particular team or space, go to that space and navigate to Space Settings > Content Tools to create the template there. This makes it available only within that space.
- Global Template: If the template should be available to everyone in Confluence, create a global template instead. This makes it accessible across all spaces.
Access and manage global templates
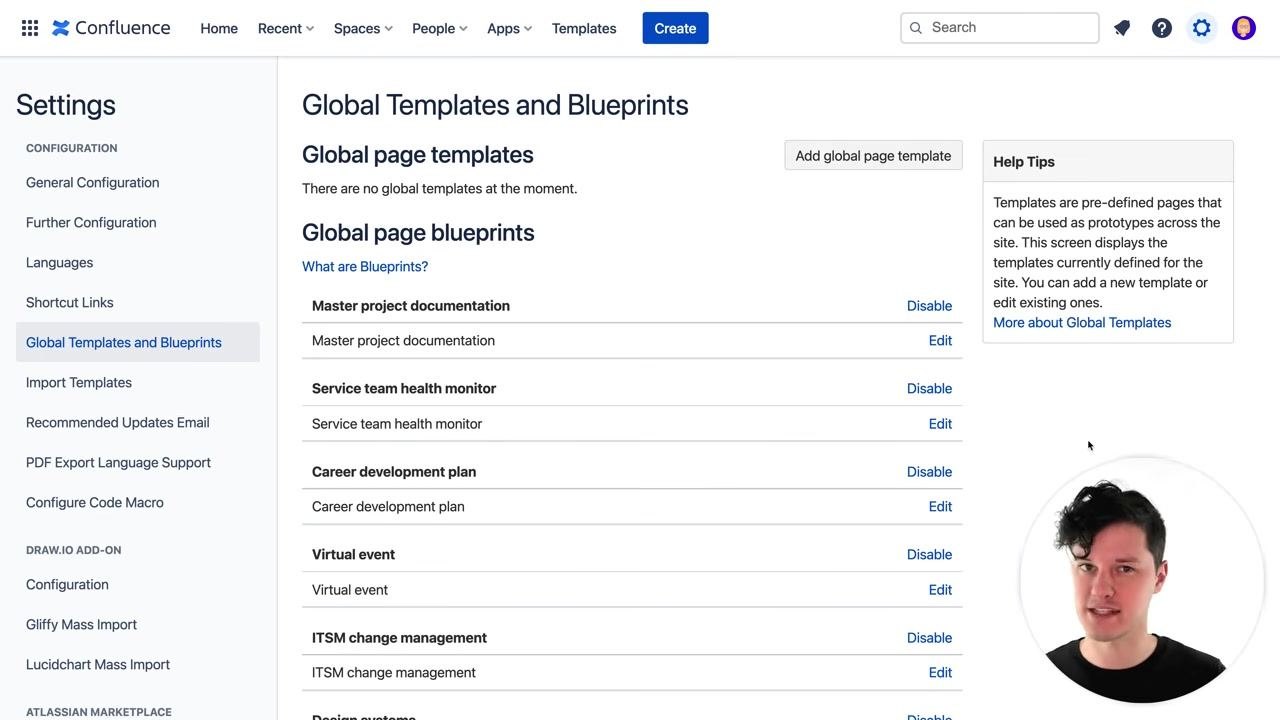
- Go to Settings in Confluence.
- Select Global Templates and Blueprints from the left sidebar.
-
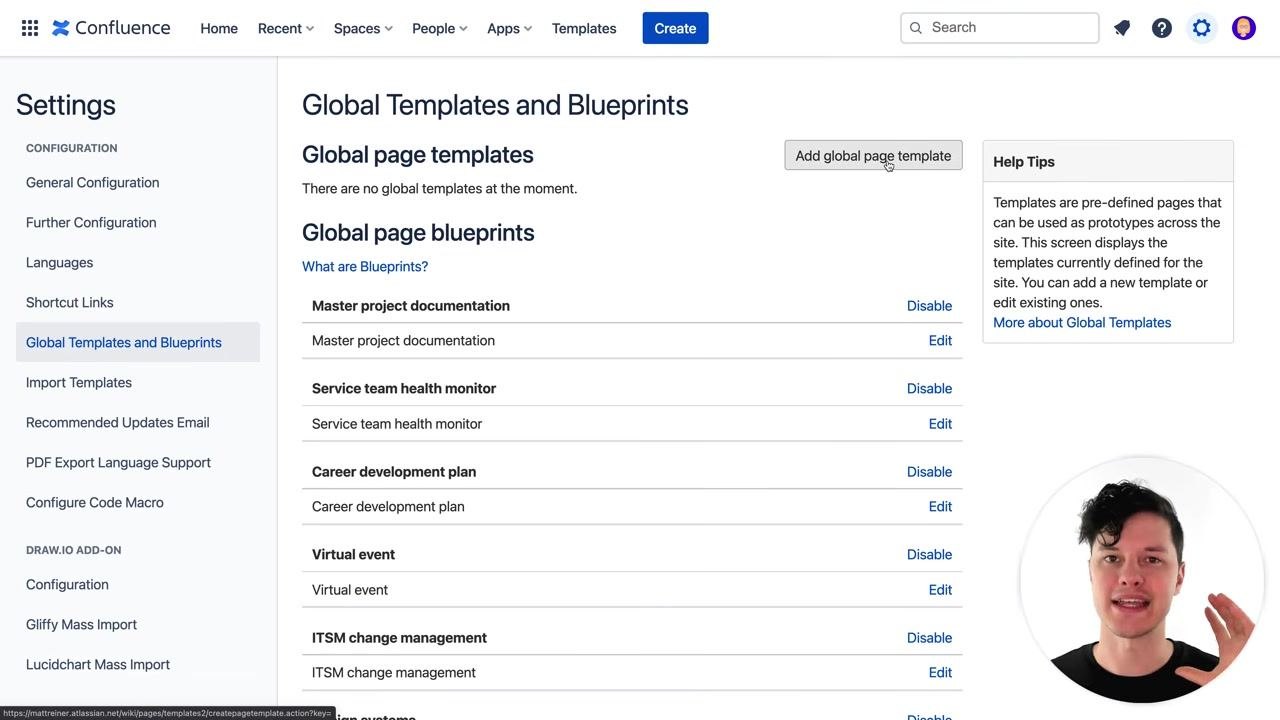
Review the list of current global page templates and blueprints. From here you can Edit existing templates to customize them for your team or company, or Disable templates that are not needed.
-
Click the Add global page template button to start creating a new template.
The template editor is identical to the regular Confluence page editor, so it is familiar and easy to use if you have created pages before.
Build the template structure
- Add a new section to your template page to help organize content and enable advanced formatting later. In the editor, click to insert a section layout. You will see a blank template with the breadcrumb Administration / Templates, a placeholder Page title, and the prompt "Now let's fill this page up".
-
Add the Page Properties macro to capture summary information (meta tags) about each page created from the template. Type
/page pin the editor to bring up macro suggestions, then select Page Properties from the list. This macro lets you enter a table of summary information that can be reported on later. -
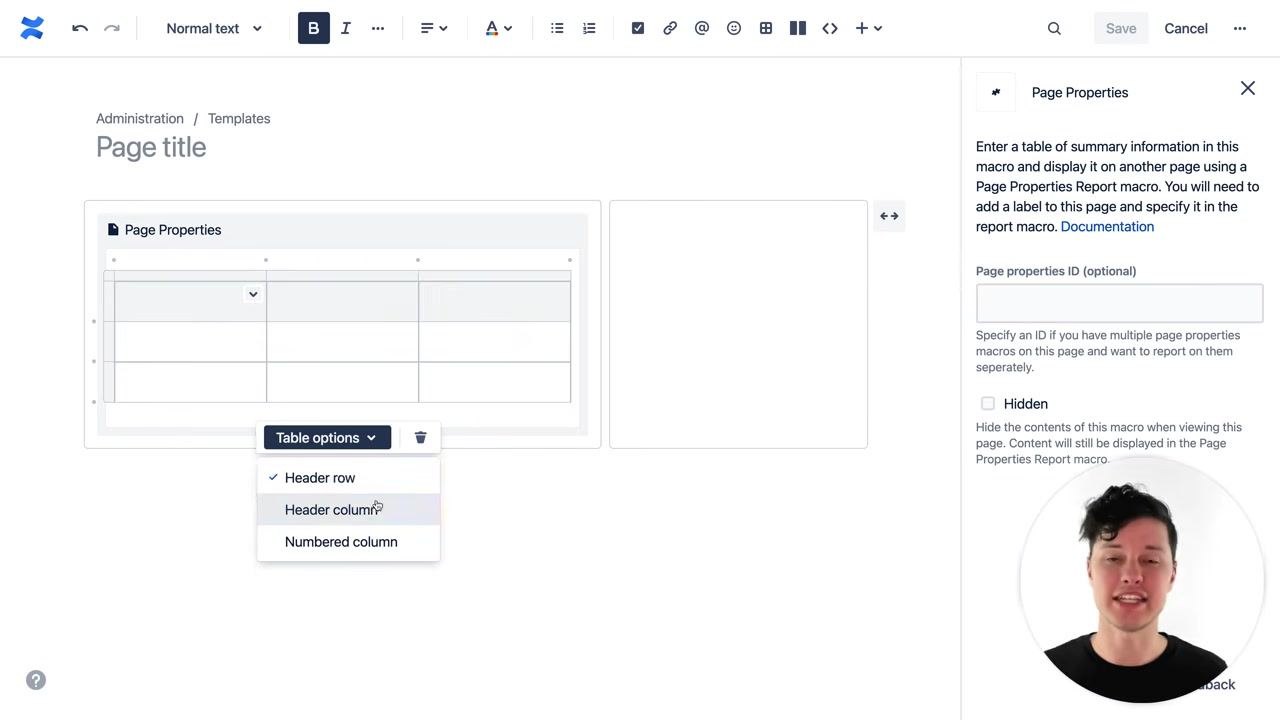
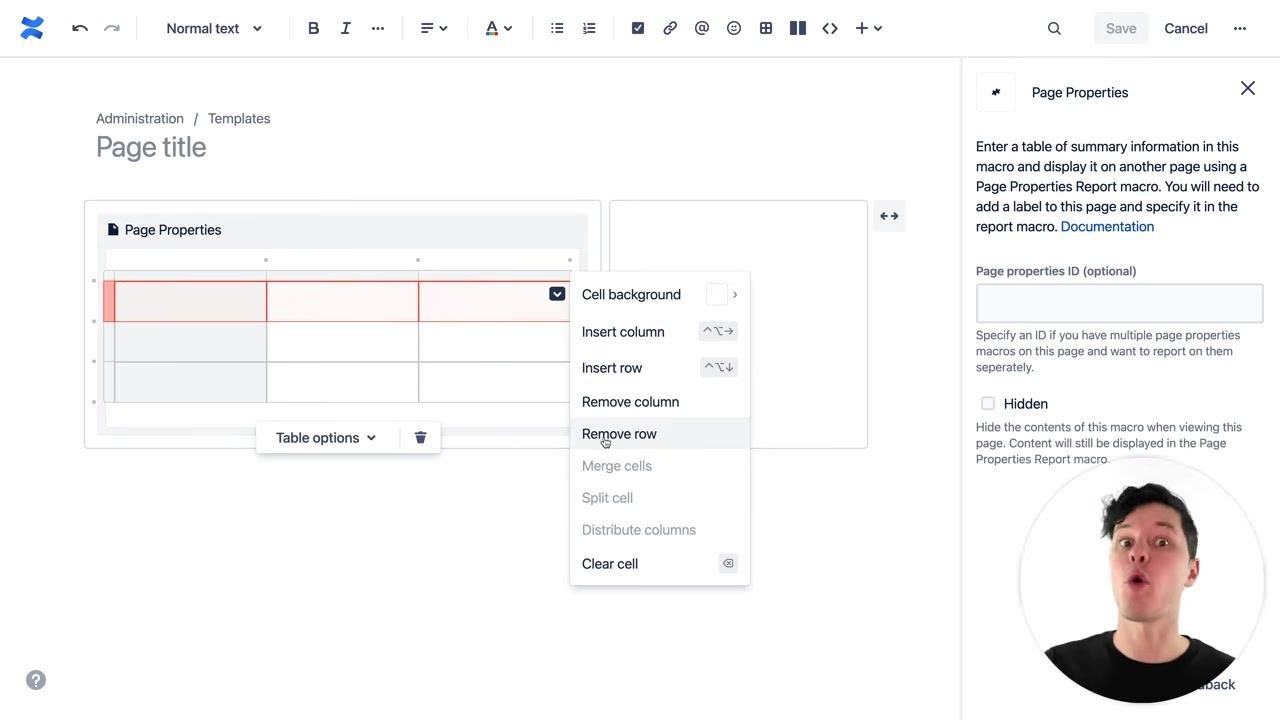
Once the macro is inserted, a table appears. Click Table options to adjust the table structure, adding or removing rows and columns as needed. For example, you might keep only the necessary rows and columns for your metadata.
-
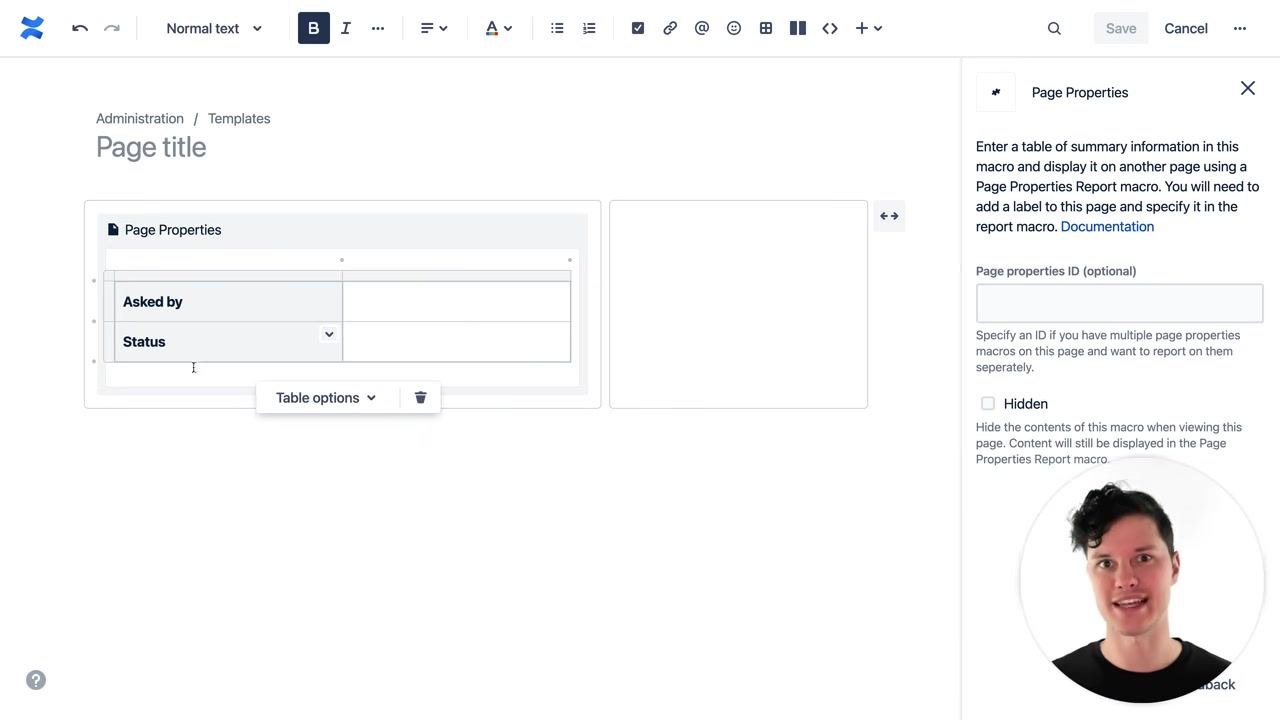
In the Page Properties table, add metadata fields such as: - Asked by: The person who initiated the page or question - Status: The current status of the page or decision
These fields will be filled out each time a new page is created from the template.
- Structure your template using a pyramid approach, so the most important information appears at the top with supporting details below. Add headings and sections for: - Description: A brief overview or context - Answer: The main answer or resolution - Decisions: The key decisions made
Use heading styles (for example, Heading 1 or Heading 2) to clearly differentiate the sections.
- Insert a Contributors section to track who participated in discussions and decisions. Add a heading titled Contributors, type
/conto bring up macro suggestions, and select Contributors. This macro can display both authors and commenters, giving a full picture of collaboration.
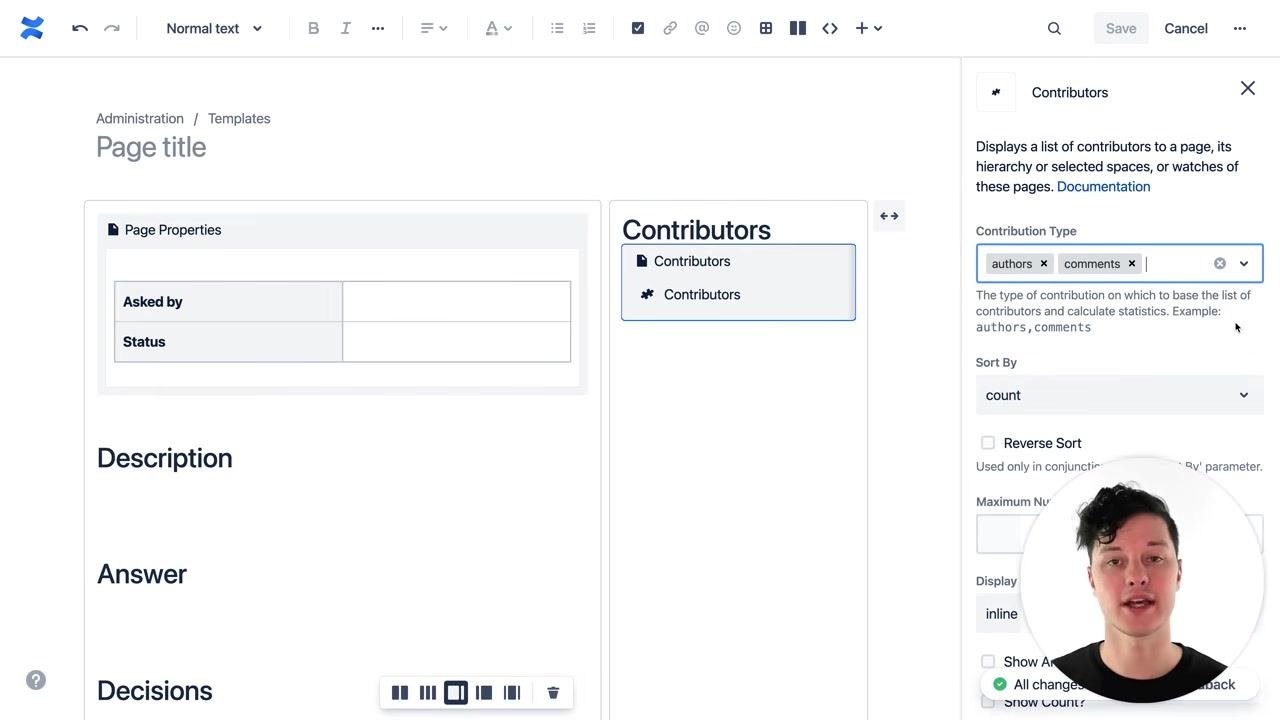
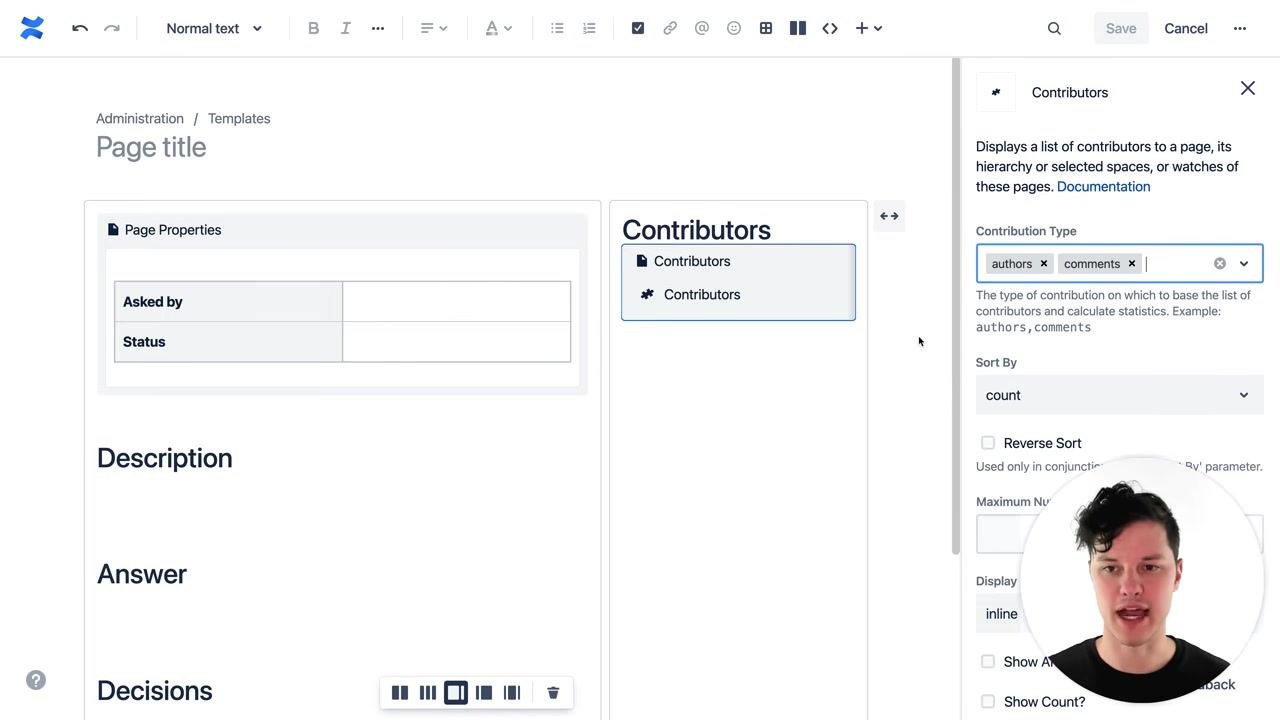
- In the Contributors macro settings, set Contribution Type to include both
authorsandcomments, so the macro lists everyone who authored or commented on the page. You can also adjust sorting, the maximum number of contributors displayed, and the display style.
- Review your finished layout to confirm it now includes a Page Properties table for metadata, clearly labeled sections for Description, Answer, and Decisions, and a Contributors section configured to show both authors and commenters. This structure supports both content creators and readers, and enables robust reporting and collaboration tracking.
Enhance the template with placeholder text and macros
Templates can be improved with several techniques to make them more interactive and informative, rather than just static documents.
-
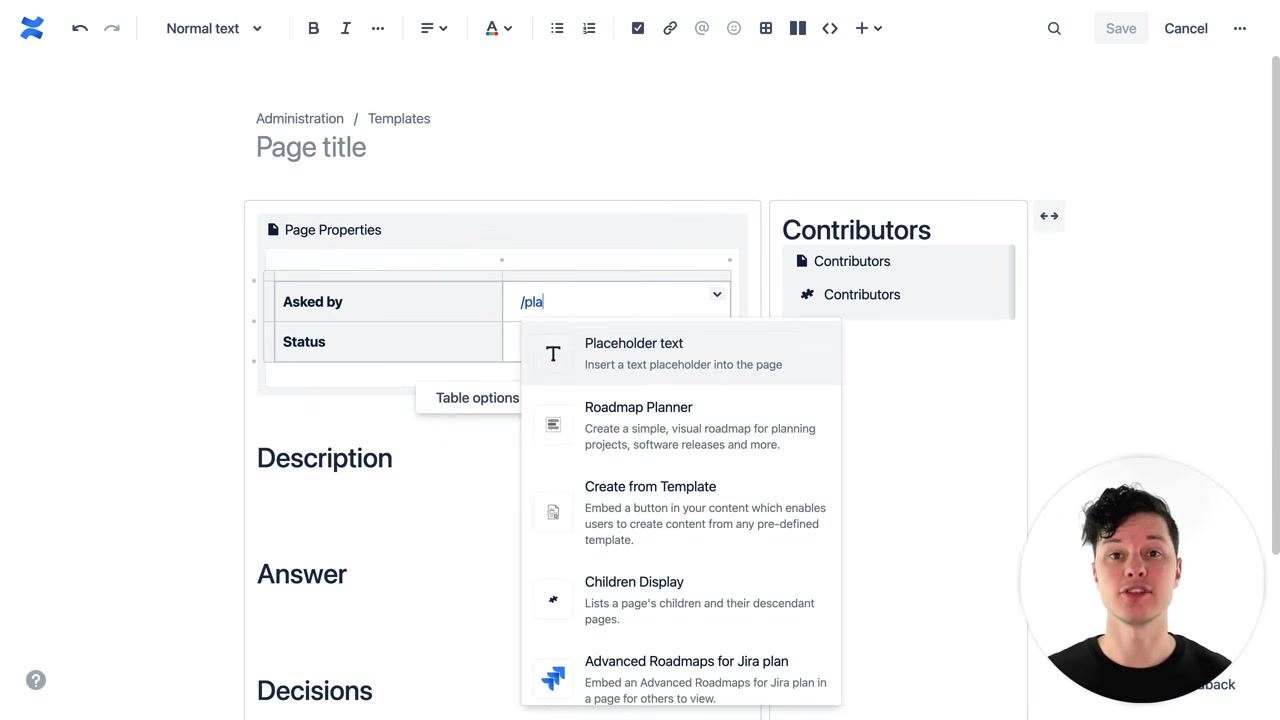
Open your template's editing interface and locate the section where you want to add instructional or placeholder text. Type
/plato bring up the macro selection, then select Placeholder text to insert a text placeholder into the page. -
Use placeholder text to instruct users on actions to take immediately, such as mentioning themselves in the Asked by field (for example, "@mention the person asking the question, like yourself"). In the Description field, add guidance such as "Describe what the question is, why it matters, and what the team needs to consider."
-
In the Answer section, add placeholder text instructing users to summarize the answer from team comments and include all important details. For example: "Summarize the answer the team has come up with from the page comments. Include all important details so teammates don't have to dig through the comments later."
If placeholder text is not replaced during editing, it remains visible on the page, serving as ongoing guidance for future users.
-
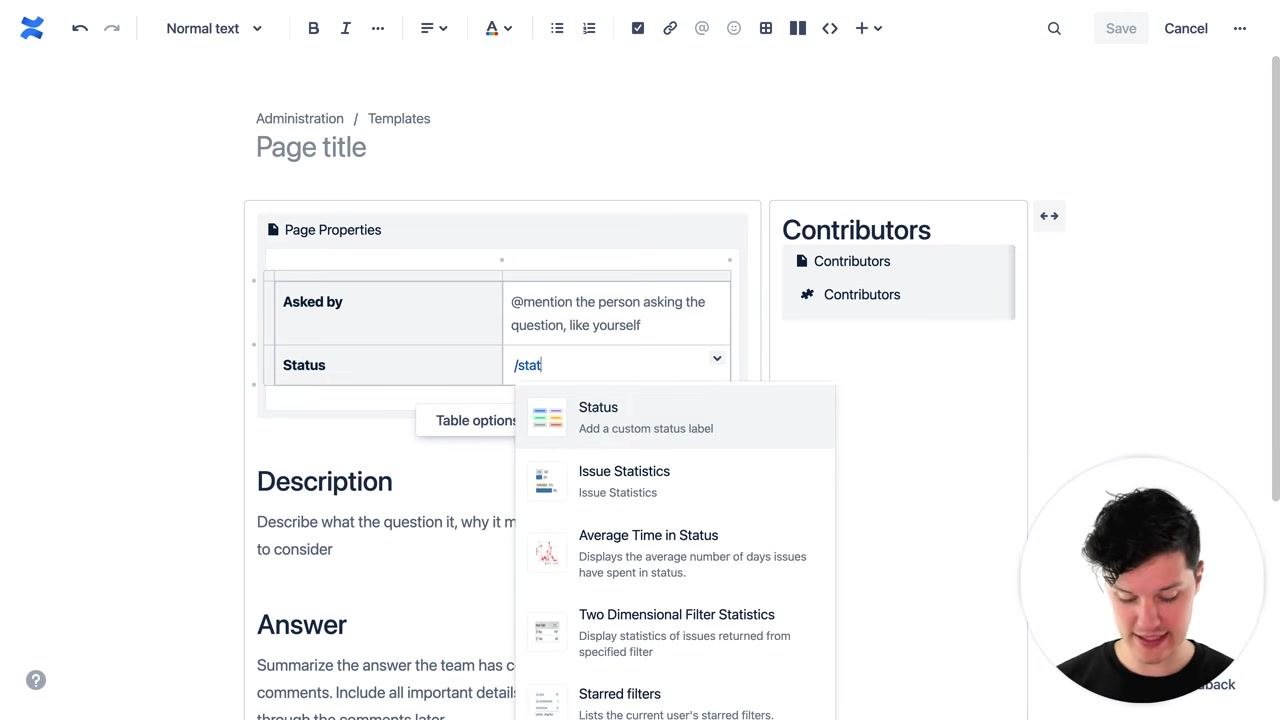
In the Status field of the Page Properties table, type
/statto bring up the macro selection and select Status to add a custom status label. Enter a status value (for example, "SET A STATUS") and choose a color for the label. -
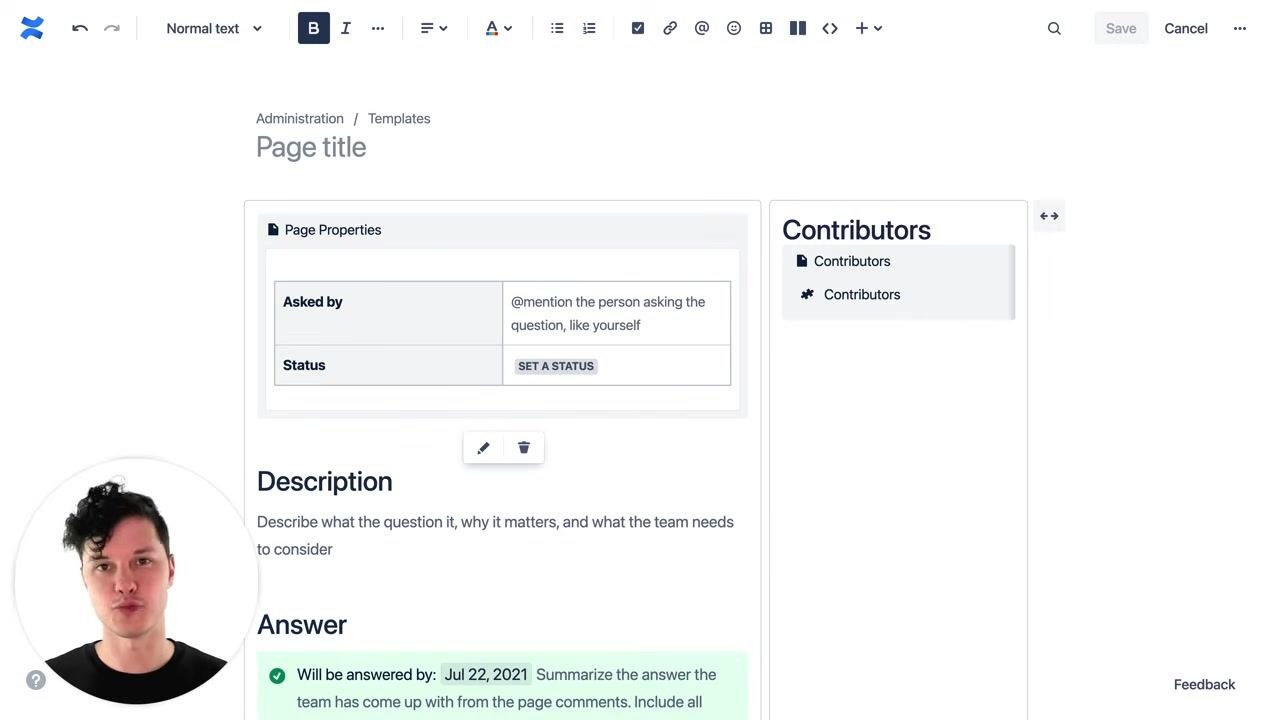
In the Answer section, add a date field to indicate when the answer will be provided. Use the date picker to select a date (for example, "Jul 22, 2021") with instructional text such as "Will be answered by: Jul 22, 2021."
-
Review your enhanced template to confirm it now includes placeholder text for all key fields (Asked by, Description, Answer), a status macro for tracking progress, and a date field for answer deadlines. The template should guide users through what information to provide and when.
Add labels to your template
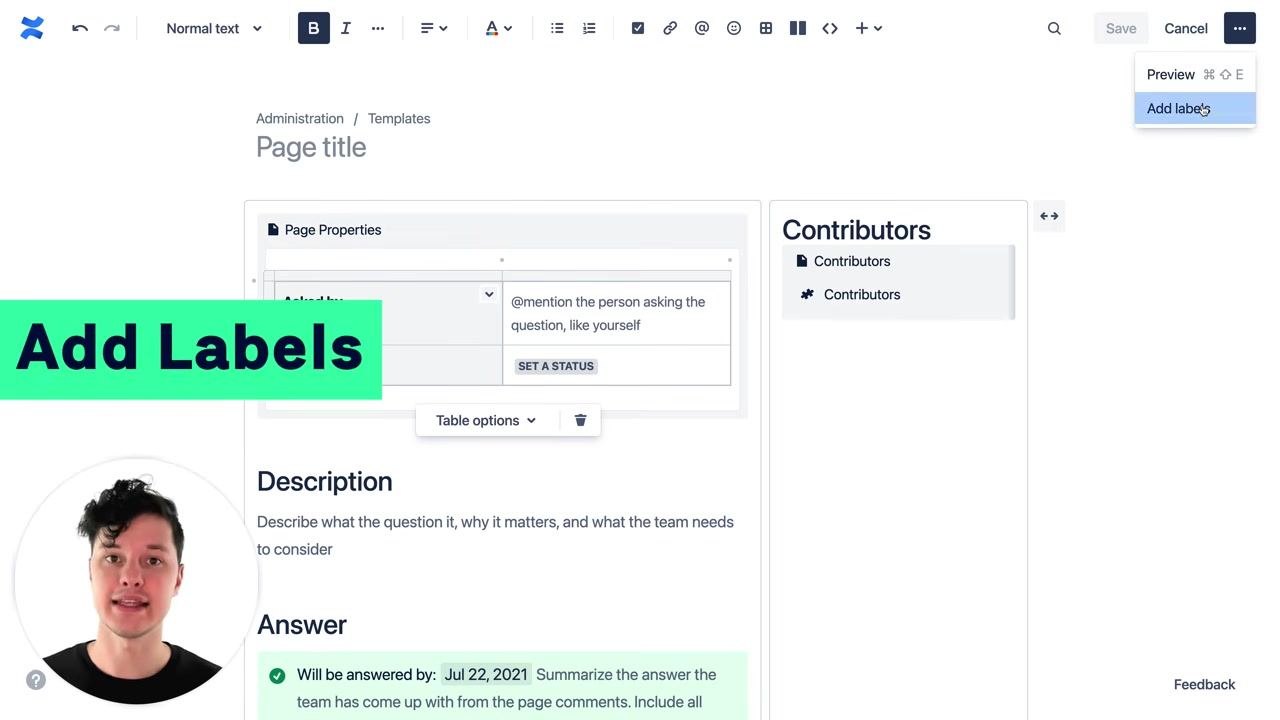
- Open the template you wish to enhance and make sure you are in editing mode, where you can see the Page Properties, Description, and Answer fields. Locate the options menu (three dots) in the upper right corner.
- Click the options menu and select Add labels. In the Labels dialog box, type the desired label (for example,
open-team-question) and click Add to apply it. Tip: In page view, pressinglalso opens this dialog box.
Adding a label to a template ensures every page created from that template automatically includes the label. This acts as a meta tag, enabling advanced features such as filtering and organizing pages by label within Confluence.
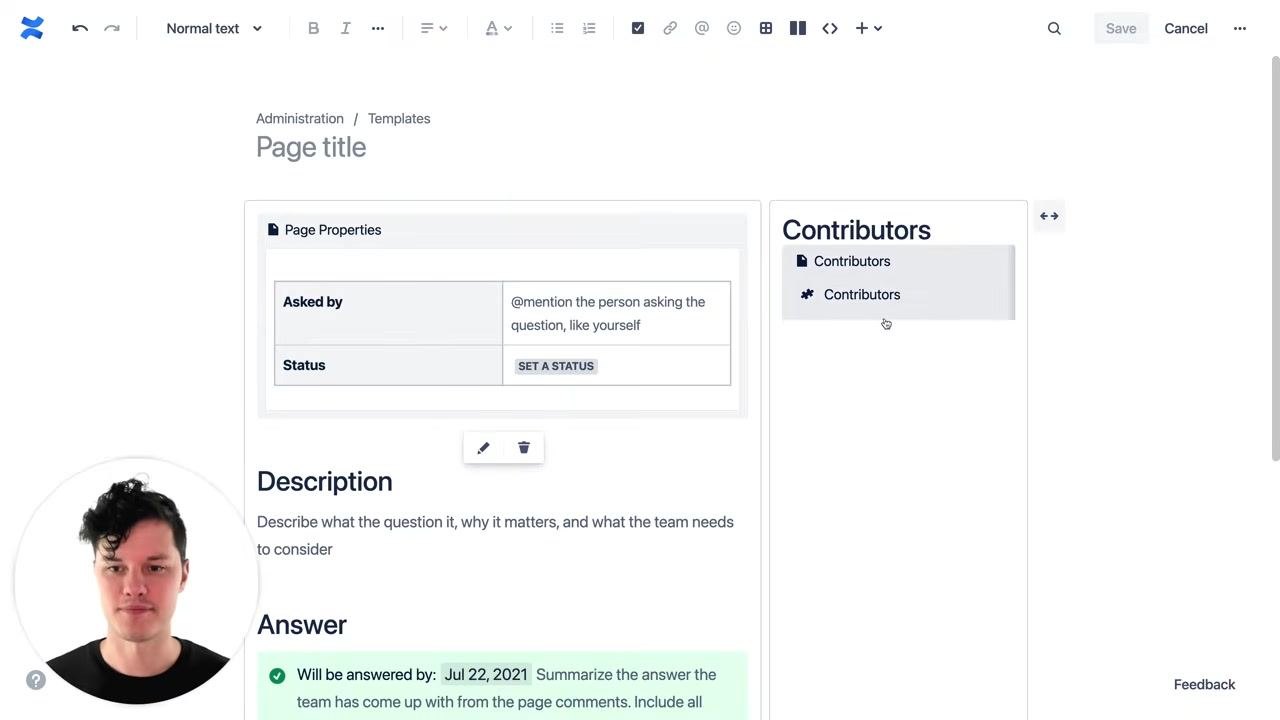
- After adding the label, close the Labels dialog. The template editing screen displays the Page Properties, Description, and Answer sections, with the Contributors macro visible on the right.
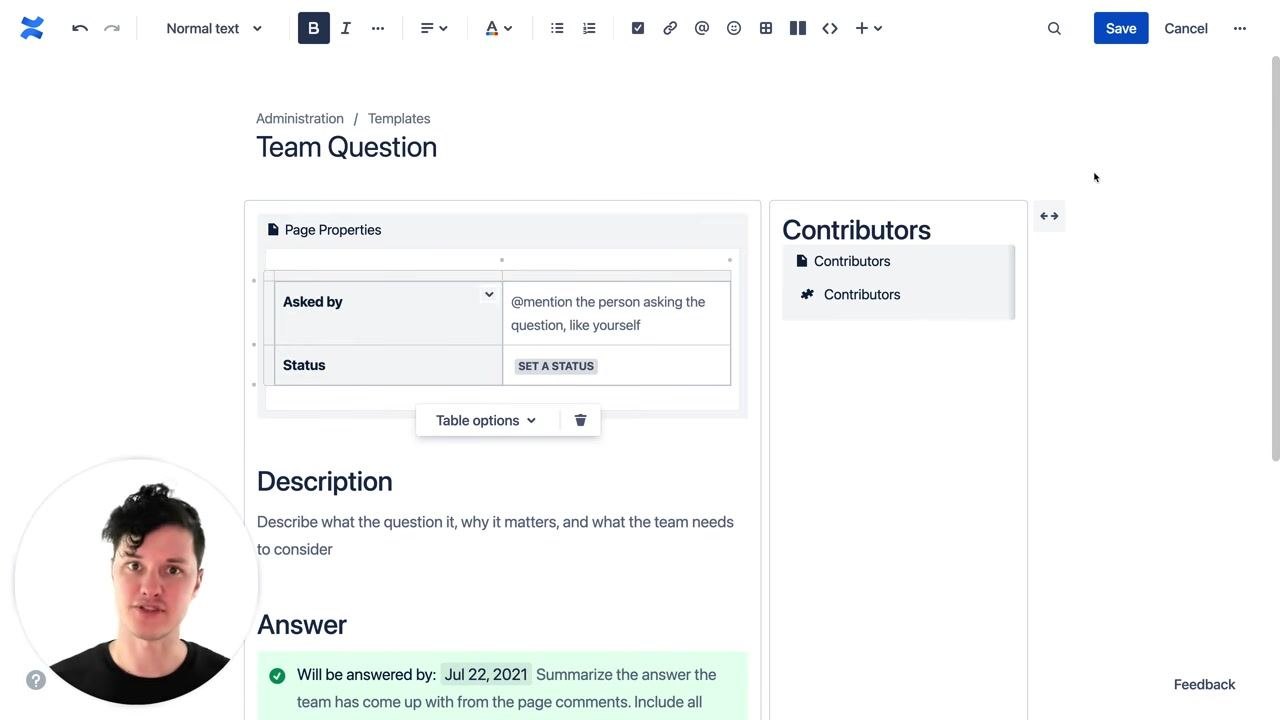
- Preview the completed template, titled "Team Question," which includes the Page Properties table with Asked by and Status fields, the Description and Answer sections with instructional text and a date, and the Contributors macro on the right.
Add a description to your template
-
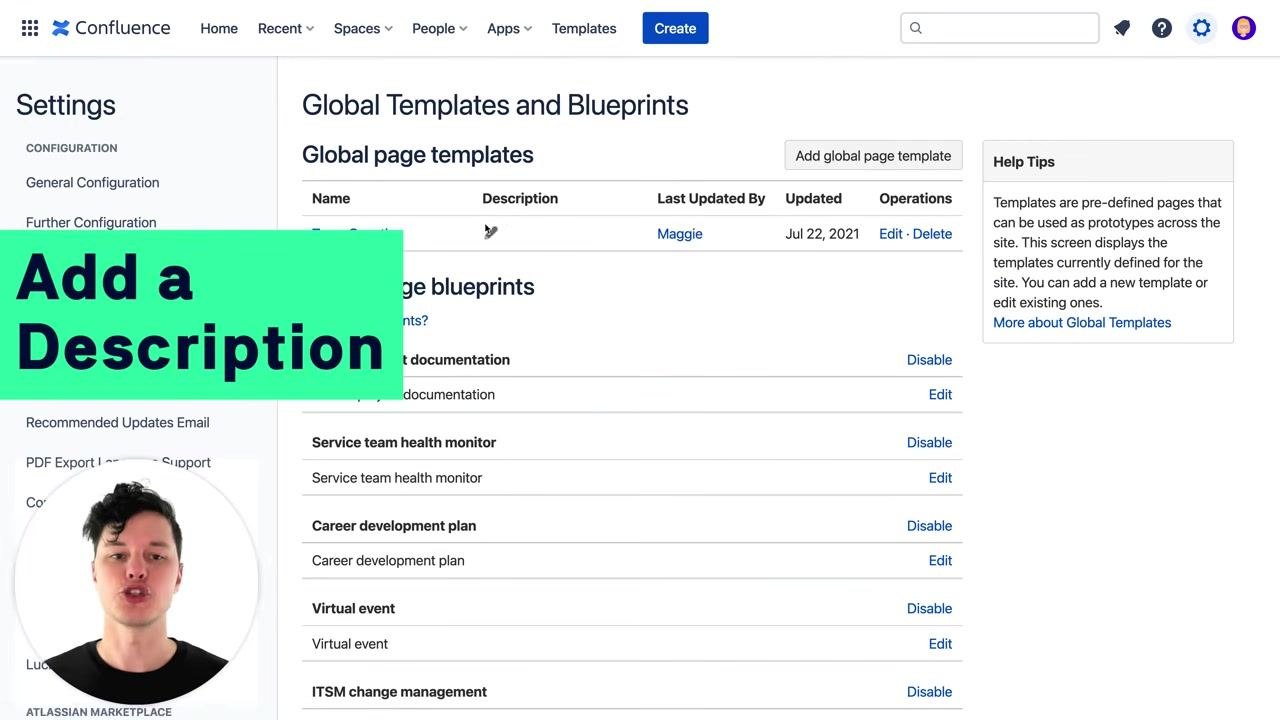
Go to Settings > Global Templates and Blueprints to view the list of global page templates, including columns for Name, Description, Last Updated By, Updated, and Operations.
-
Click Edit next to the template you want to describe. In the Edit template description dialog, enter a clear and concise description, for example: "Work with your team to asynchronously answer a difficult question and document your decision." Click Save to apply it.
-
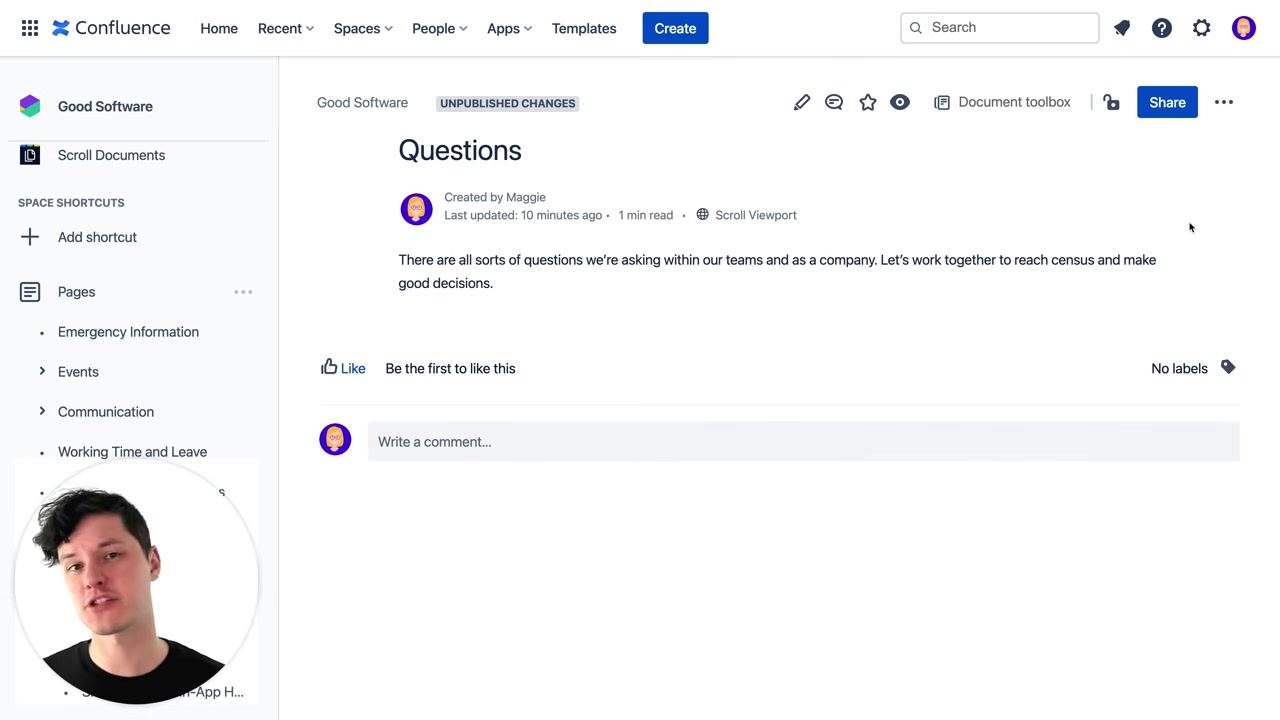
For reference, here is a page listing questions within the "Good Software" space, showing a header "Questions," author information ("Created by Maggie"), a brief description, a comment section, and a "No labels" indicator before labels are added.
Create a centralized questions page with a template button
- Navigate to the "Questions" page within the "Good Software" Confluence space. It includes the page title, author information ("Created by Maggie"), last updated time, estimated reading time, a description ("There are all sorts of questions we're asking within our teams and as a company. Let's work together to reach consensus and make good decisions."), a "No labels" indicator, and a comment section with a "Like" option. This page serves as a central location for all company questions.
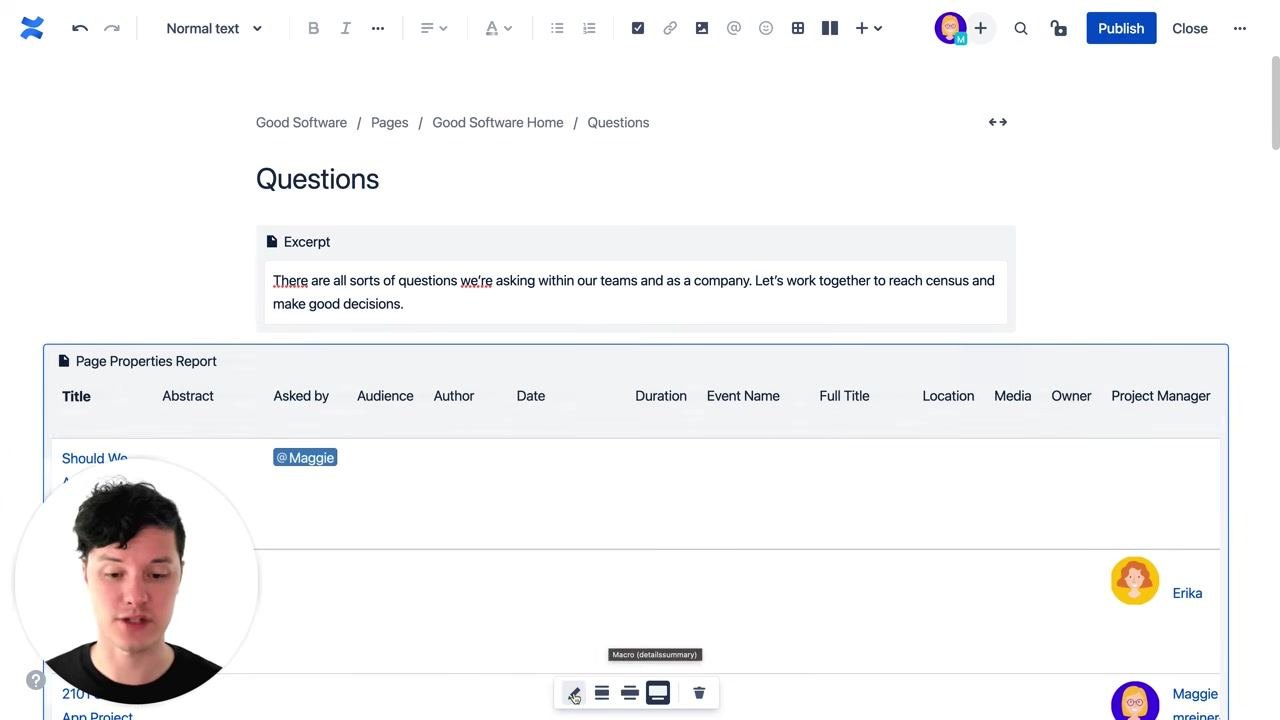
- Enter editing mode for the "Questions" page to filter for the label
open team questions. The page displays an Excerpt macro with the introductory description and a Page Properties Report macro, which lists questions filtered by the selected label. Table columns include Title, Abstract, Asked by, Audience, Author, Date, Duration, Event Name, Full Title, Location, Media, Owner, and Project Manager.
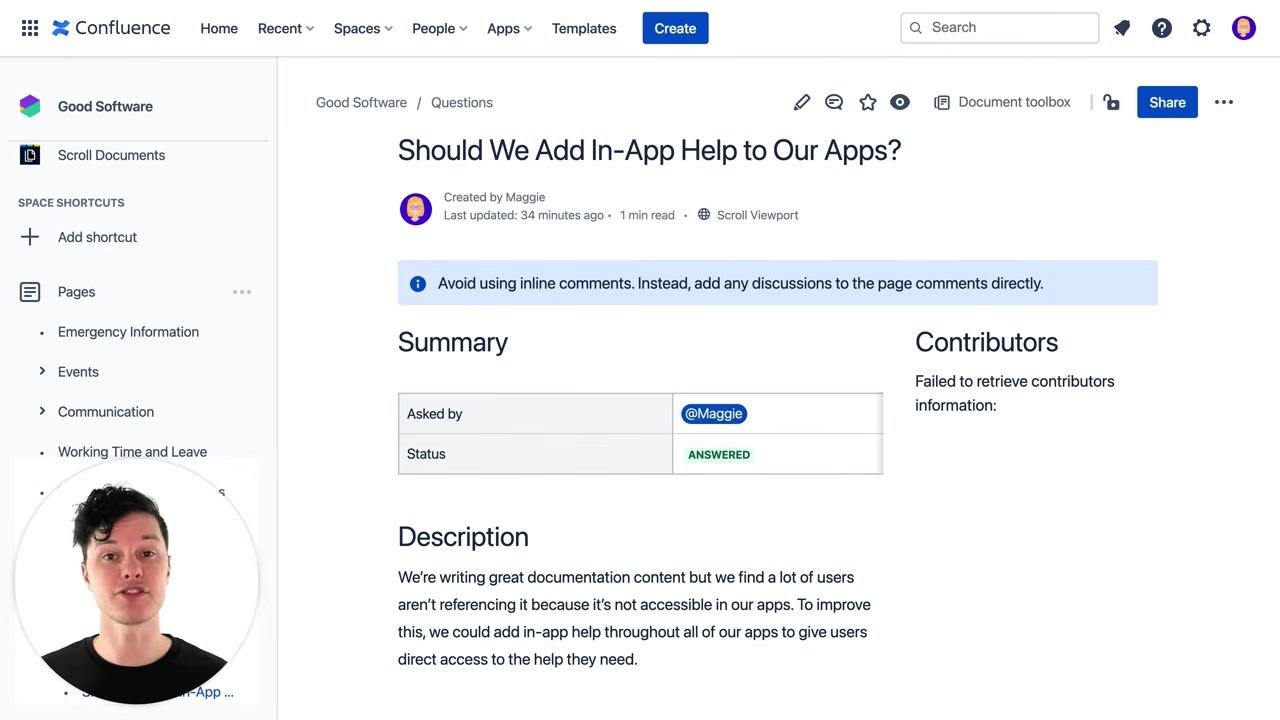
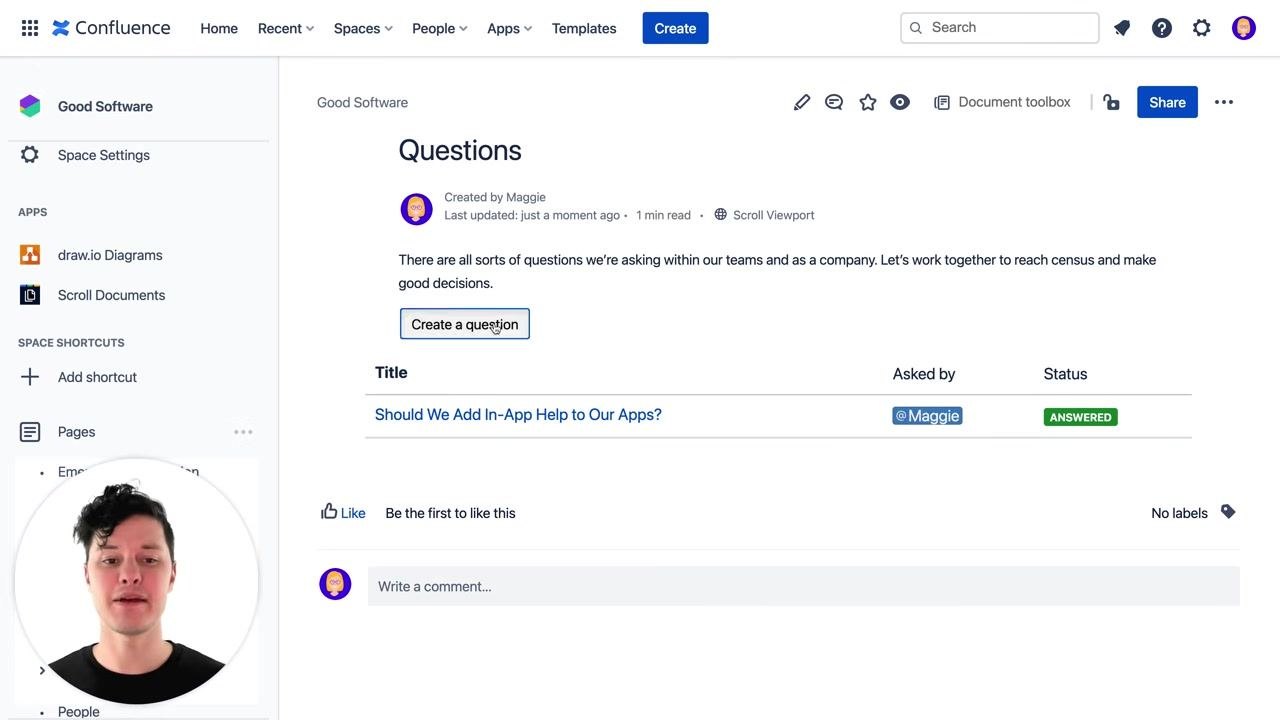
- Configure the Page Properties Report macro to show all question pages that are currently unanswered. The table displays the title "Should We Add In-App Help to Our Apps?", asked by @Maggie, with a status of "ANSWERED" (green label). This report provides a clear overview of all question pages and their statuses.
-
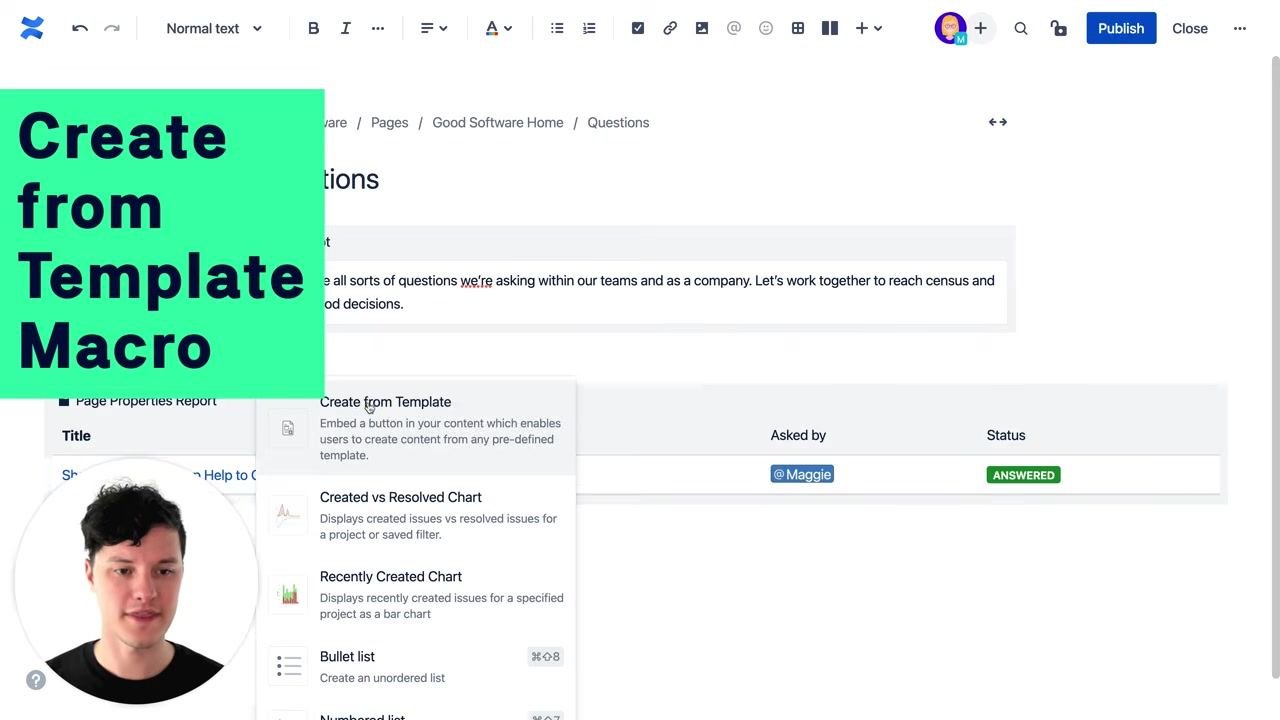
Begin adding a macro to the page and select Create from Template from the macro selection menu. Its description reads: "Embed a button in your content which enables users to create content from any pre-defined template." Other options visible in the menu include "Created vs Resolved Chart" and "Recently Created Chart."
-
In the Edit 'Create from Template' Macro dialog, set Button text to "Create a question" and choose a template from the Template name dropdown.
-
Scroll through the template dropdown and select "Team Question" from the list of available templates. The preview continues to show the "Create from template" button.
-
Set the Title of page to be created field to a naming convention such as
Question: [your question here]. Additional options, such as space key and macro settings, are also visible in the dialog.
- Click Save to insert the macro into the page, then prepare to publish the updated "Questions" page.
-
Once published, the "Questions" page displays the introductory description, a new "Create a question" button that lets users quickly create new question pages from the "Team Question" template, the Page Properties Report table listing existing questions and their status, and comment and like options.
-
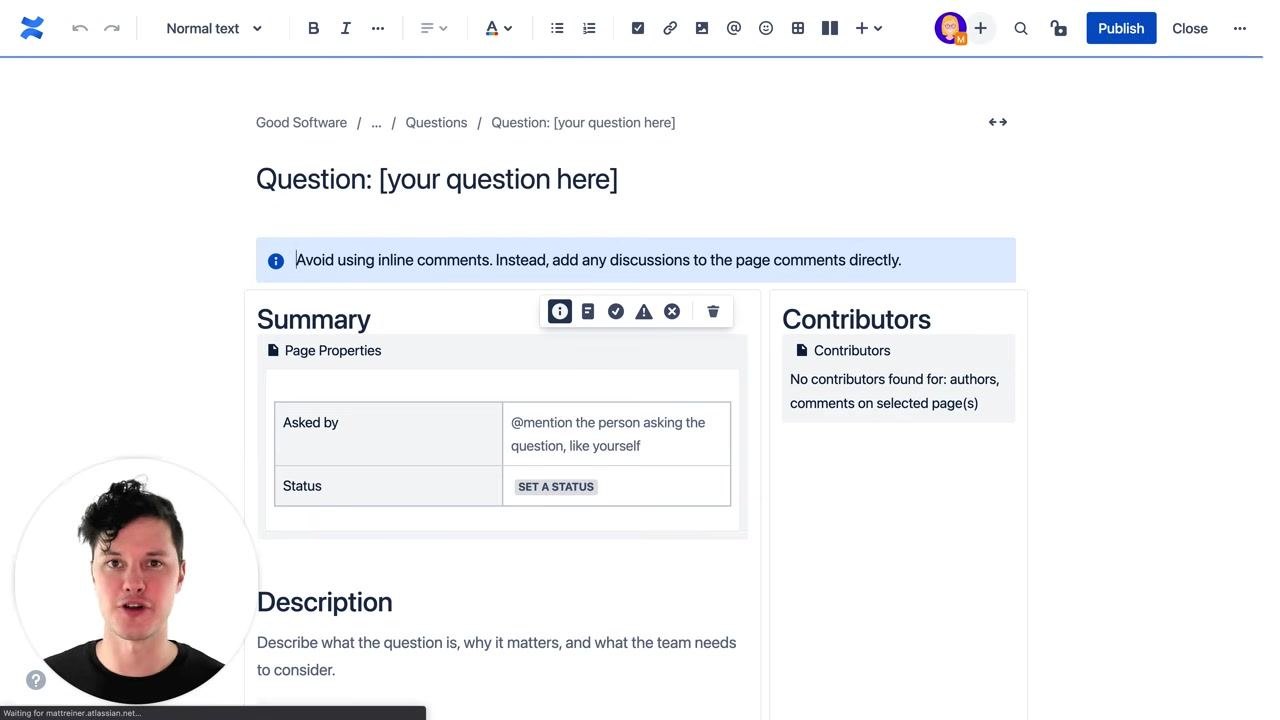
After clicking the "Create a question" button, a new page is generated from the "Team Question" template. It includes the title "Question: [your question here]," a notice to avoid inline comments and use page comments instead, a Summary section with a Page Properties macro (fields for "Asked by" with @mention and "Status" with a "Set a status" button), a Contributors macro on the right (no contributors found yet), and a Description section with instructions to describe what the question is, why it matters, and what the team needs to consider.
Add ongoing guidance and macros
- Insert placeholder text into your template sections to provide built-in help content that explains what each area of the template is for. Examples include: - For immediate actions: "@mention yourself so we know who asked the question." - For context: "Write a description of the question so everybody knows what is being discussed." - For future actions: "Later, come back and document the answer the team comes up with and the decisions the team makes."
If users do not replace the placeholder text, it remains visible on the page, reminding them which sections still need to be filled out.
-
Use placeholder text to distinguish between tasks that need to be completed immediately and those that should be addressed later. This guides users both during initial page creation and when they return to update the page.
-
Add macros to your template to provide structure and functionality, especially for users unfamiliar with macros. Recommended macros include: - Status Macro: Lets users set and display the current status of the question or task - Tip Macro: Offers helpful hints or best practices directly within the template - Date Macro: Lets users insert relevant dates, such as when the question was asked or answered - Decision Macro: Provides a dedicated area to record the team's final decisions
Copy and paste any instructional text as needed to further clarify template sections.
- Review the enhanced template to confirm it includes clear placeholder text for each section, status, tip, date, and decision macros for structured input, and instructional text that guides users through the process without requiring them to understand macros or advanced Confluence features.

Summary
You have learned how to recognize when a Confluence template is needed, choose between a space or global template, and build a robust structure using Page Properties, a pyramid content layout (Description, Answer, Decisions), and a Contributors section. You have also enhanced the template with placeholder text, status and date macros, labels, and descriptions, and created a centralized questions page with a "Create from Template" button so anyone in your company can submit new questions using a standardized template.
What's next
- Consider your team's asynchronous and distributed work environment when designing further templates, and provide the right resources and guidance within each template to support users at every step.
- Regularly review and update your templates to ensure they remain helpful and relevant.
- Explore additional template ideas, such as a custom meeting notes template, to further support your team's documentation needs.
- Encourage your team to use and share improved templates, and promote collaboration by sharing resources and best practices for template creation.
Generation details: cost, quality tiers
Docsie billed 5,500 credits ($3.85) to analyze this 11-minute video at standard quality. The rewrite, template fill and Word/PDF exports were included. The same video at each quality tier:
| Quality | Frames sampled | Credits | Approx. cost |
|---|---|---|---|
| Draft | every 16-30 s | 2,750 | $1.92 |
| Standard (this guide) | every 8-15 s | 5,500 | $3.85 |
| Detailed | every 4-7 s | 11,000 | $7.70 |
| Ultra | every 1-3 s | 22,000 | $15.40 |
Credits priced at $0.70 per 1,000; plans include a monthly allowance. Enterprise customers on on-premise or bring-your-own-model deployments run this on their own inference and pay no per-video credits.
Generated by Docsie Video-to-Docs on 2026-09-08 from a 10-minute video. Screenshots are frames from the source video and belong to their creator, K15t, whose original is embedded above. If you own this video and want the guide removed or credited differently, contact us and we will act within one business day.