
How to Create a Space in Confluence
This guide walks you through creating a new space in Confluence Cloud, configuring it as a software project space, customizing space shortcuts and navigation, and setting up a documentation space. You'll learn how to manage project documentation, add meeting notes, and organize your Confluence environment for team collaboration.
Video: Confluence Tutorial #4 - How to Create Spaces in Confluence by RCV Academy (2020). All credit for the demonstration goes to the creator; watch the original on YouTube. The written guide below was generated from this video by Docsie. Creator? Request a change or removal.
This guide walks you through creating a new space in Confluence Cloud, configuring it as a software project space, customizing space shortcuts and navigation, and setting up a documentation space. You'll learn how to manage project documentation, add meeting notes, and organize your Confluence environment for team collaboration.
Prerequisites
- An active Confluence Cloud account (signed up and logged in)
- Access to the Confluence home page
- A Jira project available if you plan to link a software project space (optional)
Creating a new space
Step 1: Access the Confluence home page
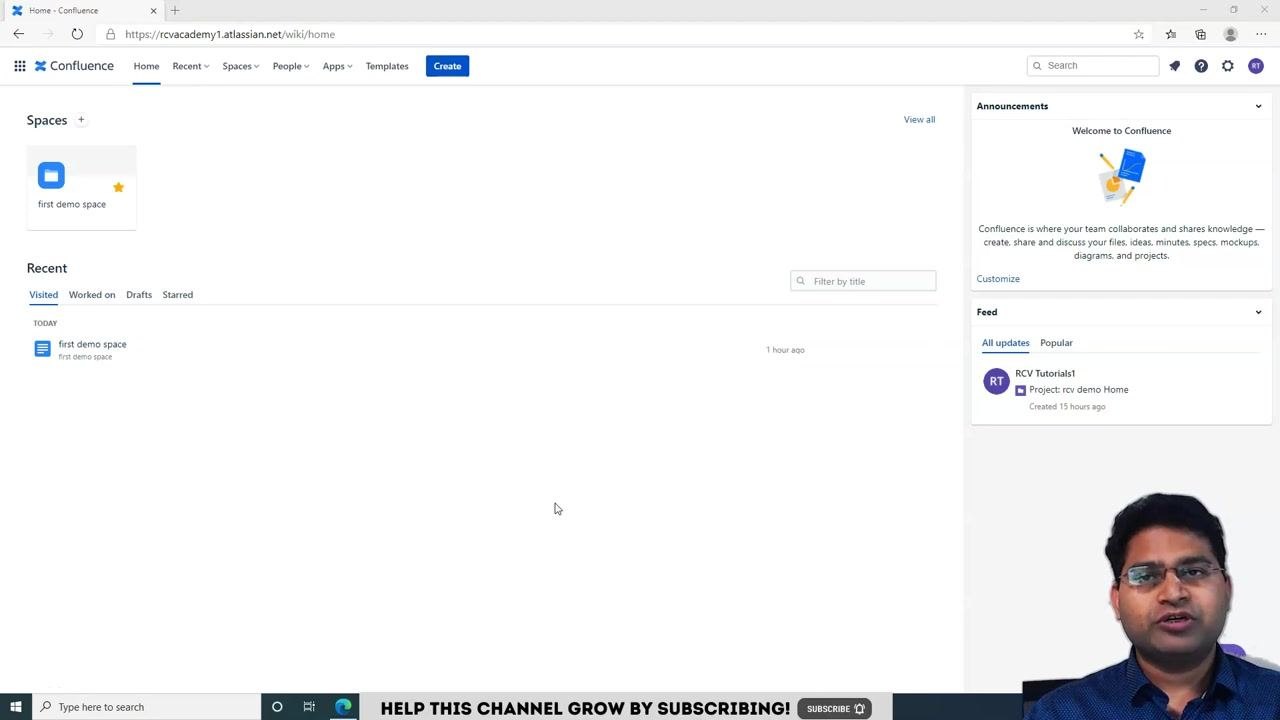
After signing up and logging in, you are directed to the Confluence home page. Here you will see your default workspace and any spaces created during sign-up, such as "first demo space." The top navigation bar includes Home, Recent, Spaces, People, Apps, Templates, and a blue Create button. The right panel shows Announcements and Feed sections, while the main area displays your spaces and recent activity.
Step 2: View all spaces
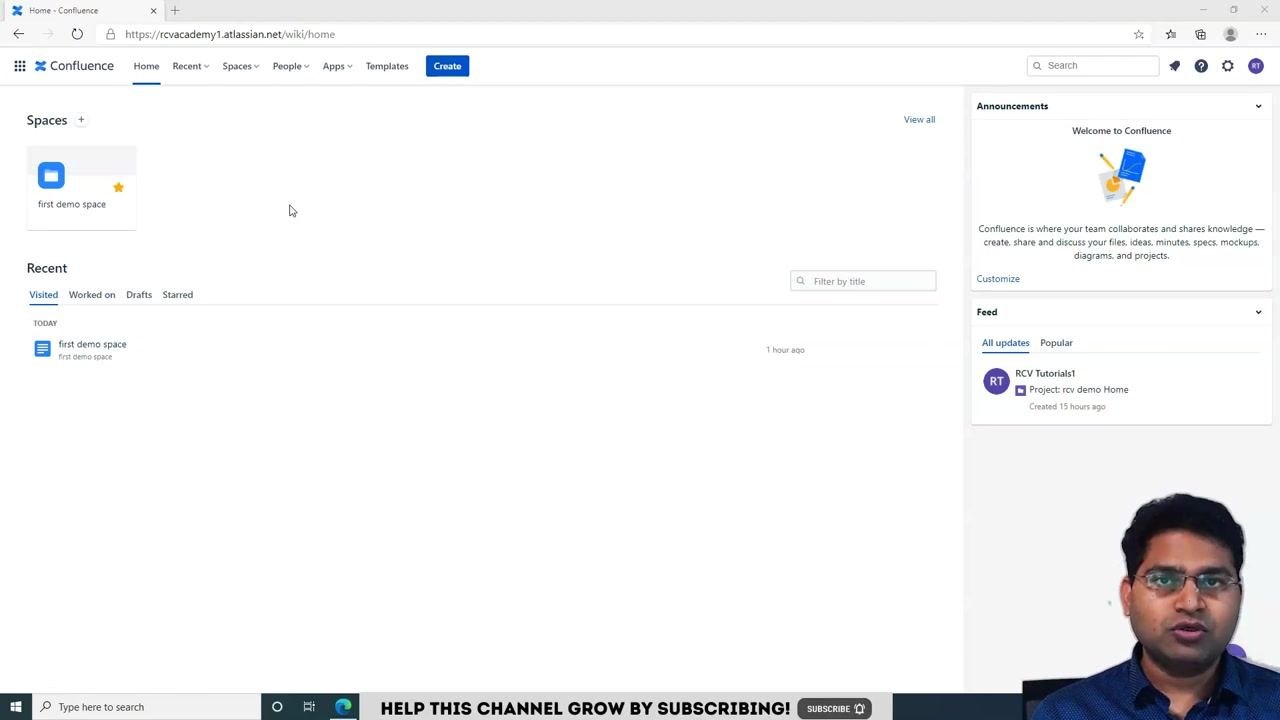
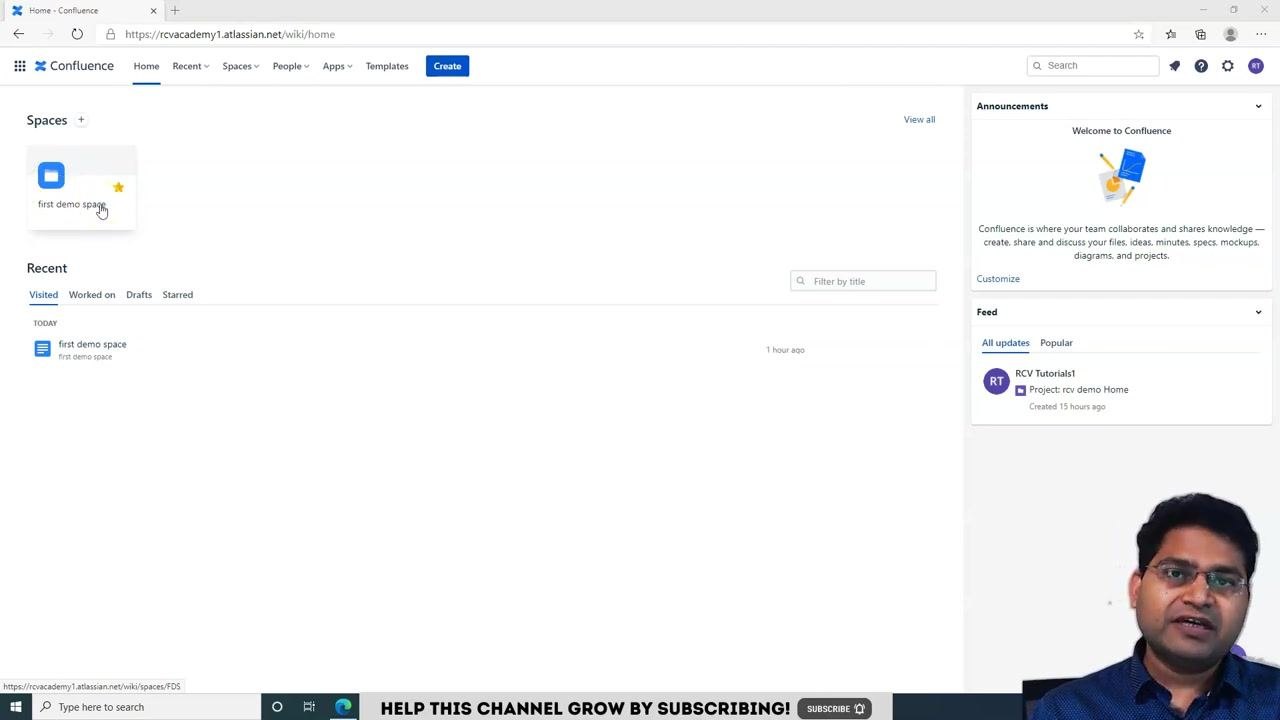
To create a new space, click View all next to the Spaces section, or use the Spaces dropdown in the top navigation bar and select View all spaces. This redirects you to the Spaces management page.
Step 3: Initiate space creation
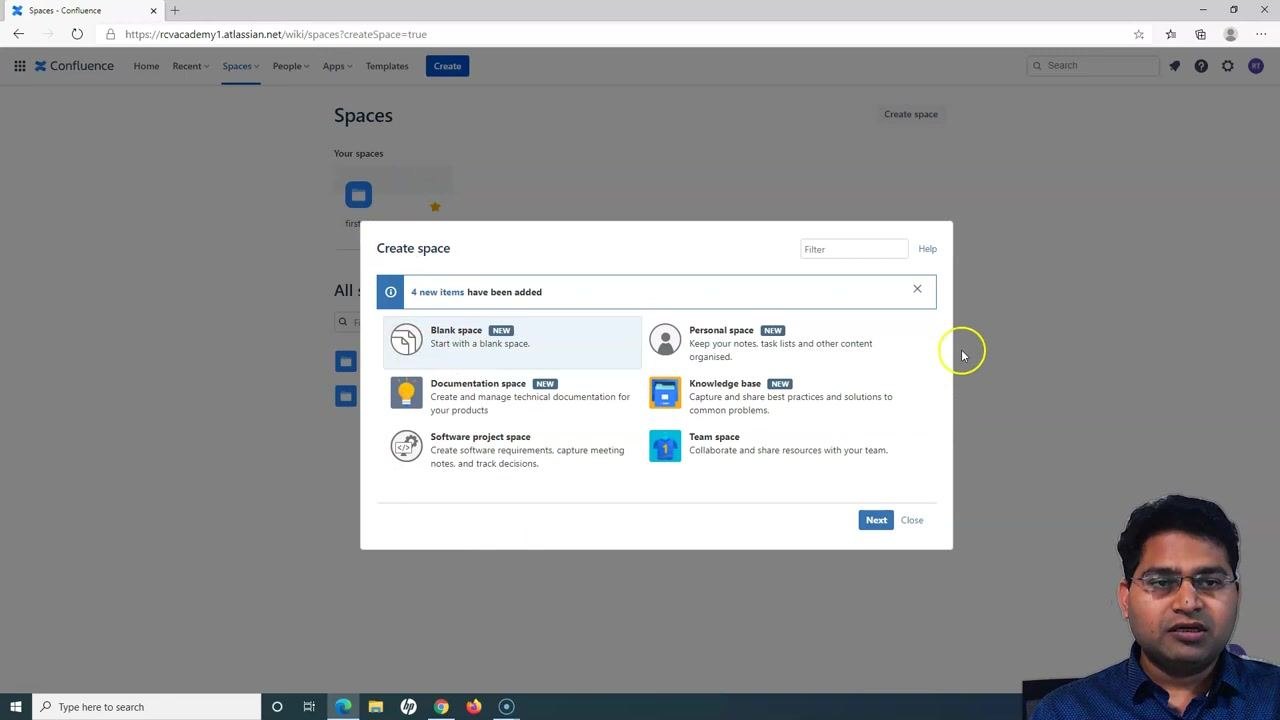
On the Spaces management page, click the Create space button located at the top right. This opens a pop-up window for space creation.
Step 4: Choose the type of space
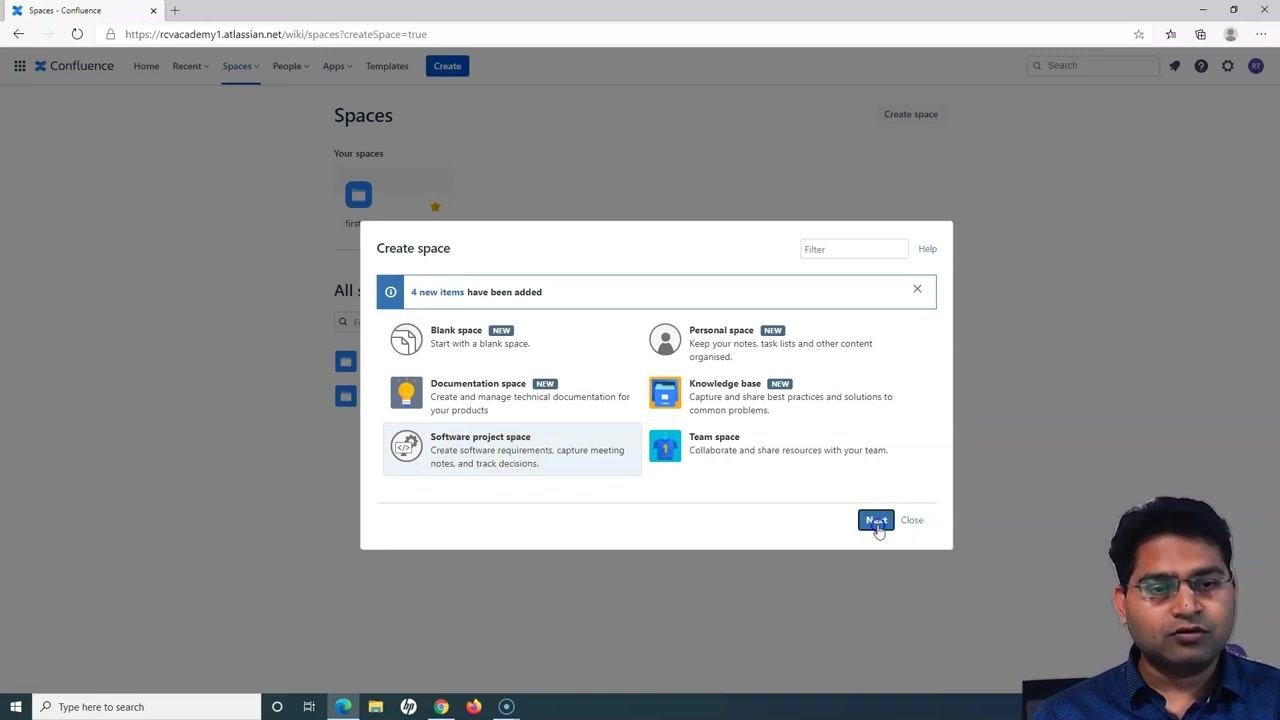
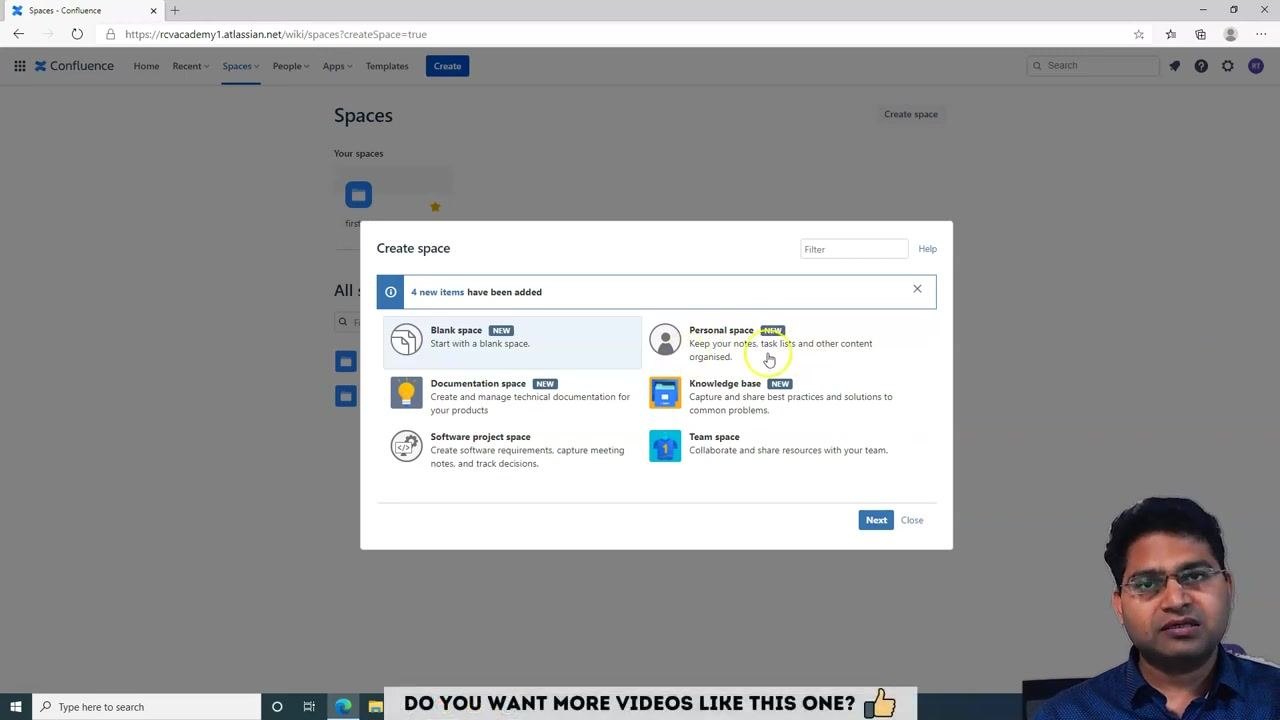
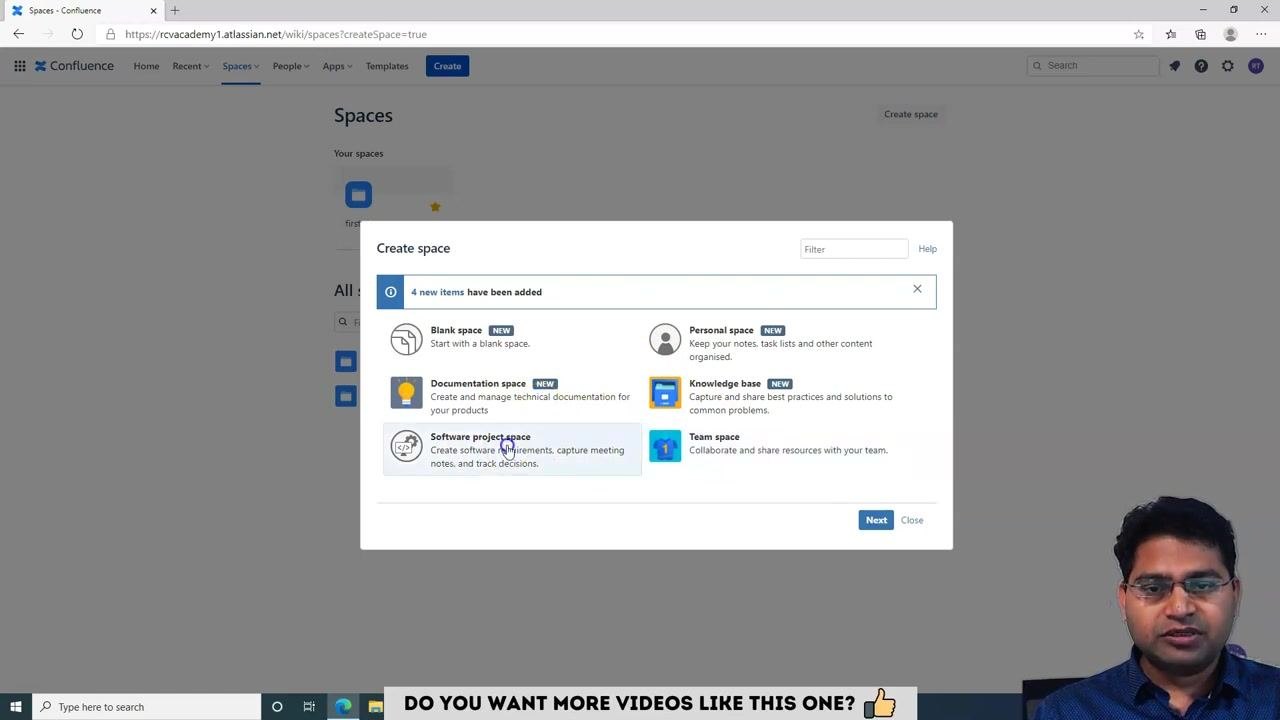
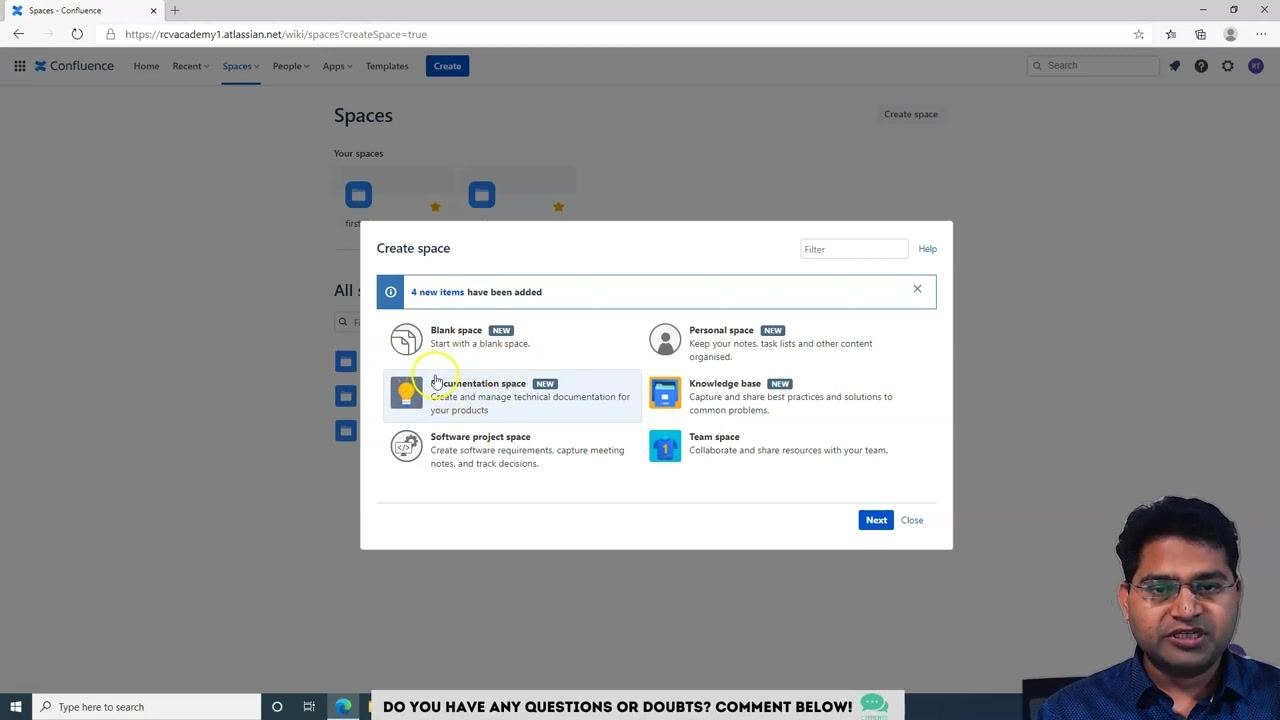
In the Create space pop-up, you will see several space type options:
- Blank space – Start with a blank space
- Documentation space – Create and manage technical documentation for your products
- Software project space – Create software requirements, capture meeting notes, and track decisions
- Personal space – Keep your notes, task lists, and other content organized
- Knowledge base – Capture and share best practices and solutions to common problems
- Team space – Collaborate and share resources with your team
Select the type of space you want to create by clicking on it. For example, select Software project space to create a space for a specific software project.
Step 5: Proceed to the next step
After selecting the desired space type (for example, Software project space), click Next at the bottom right of the pop-up. This takes you to the configuration screen for your new space.
Configuring a software project space
Step 6: Select the Jira project for the space
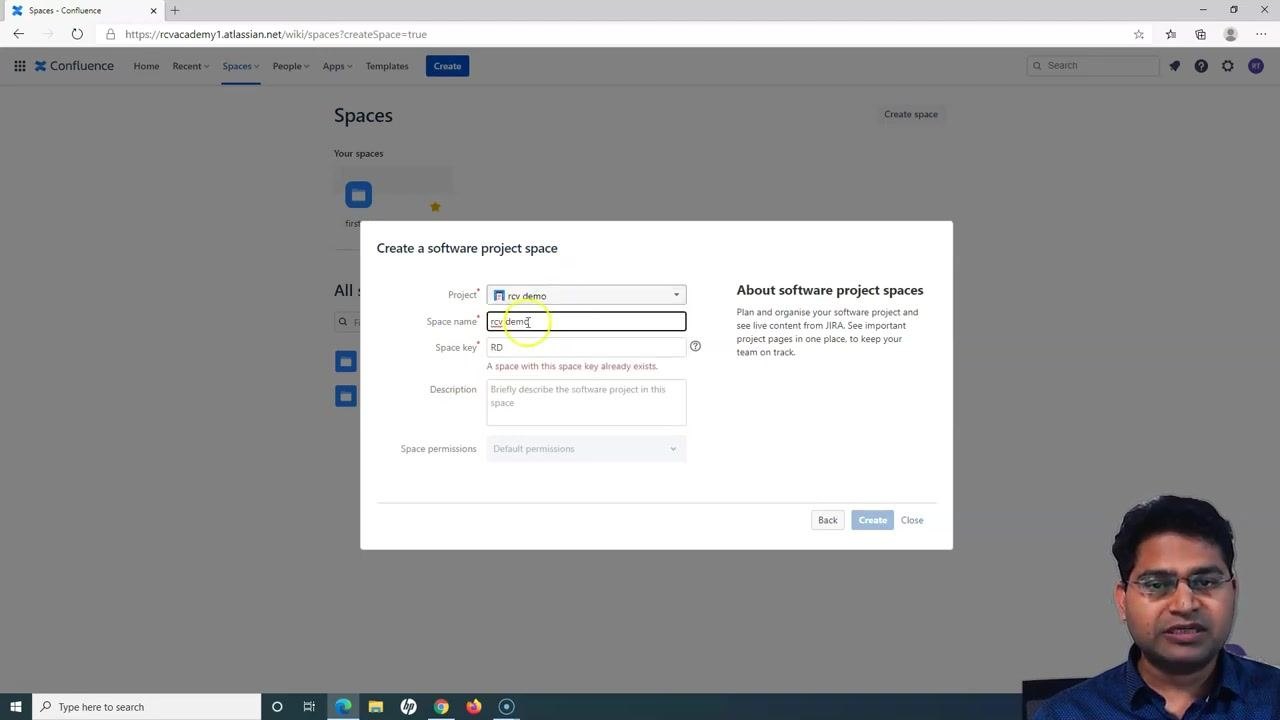
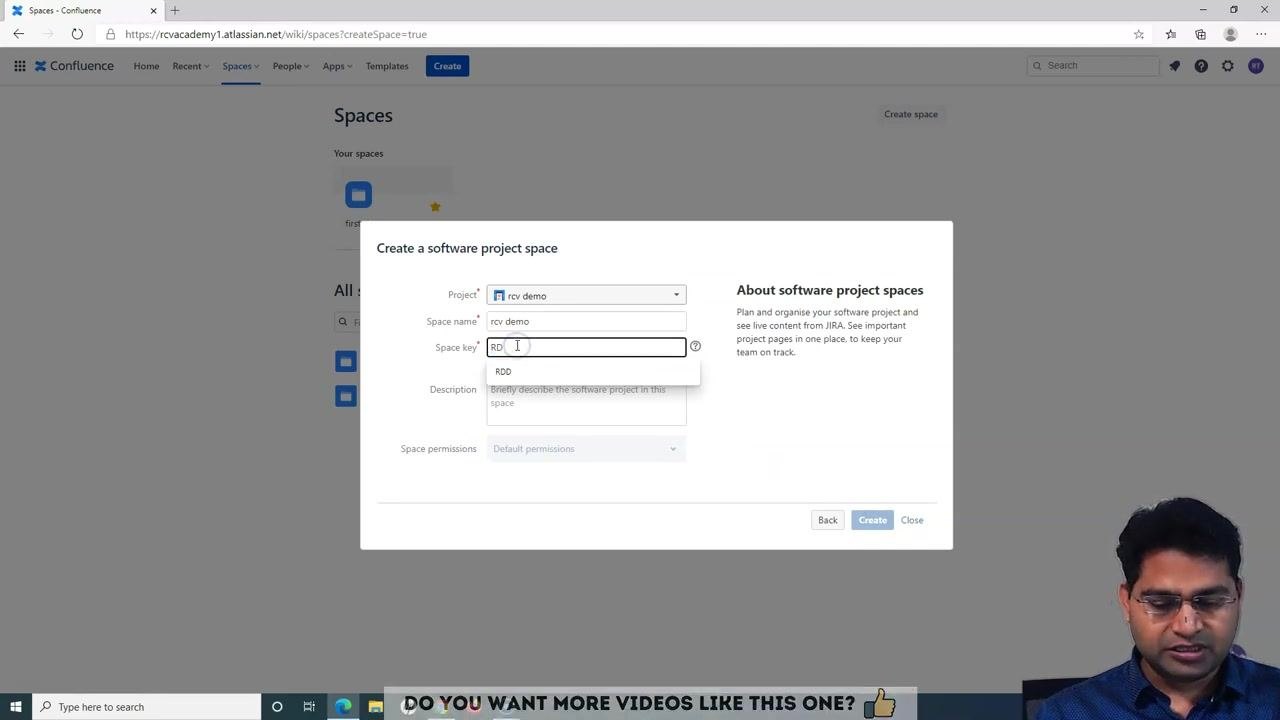
In the Create a software project space dialog, locate the Project dropdown and select the Jira project you want to associate with this Confluence space. For example, select "rcv demo." This links the Confluence space to your Jira project, allowing integration of project information.
Step 7: Enter the space name
In the Space name field, enter a descriptive name for your space. For example, type "rcv demo."
Step 8: Set a unique space key
In the Space key field, enter a unique identifier for the space. For example, type "RDD." If the key is not unique, you will see a warning: "A space with this space key already exists." Adjust the key as needed to ensure uniqueness.
Step 9: Provide a description
In the Description field, enter a brief summary of the space's purpose. For example, type "This is software project space." This helps users understand the intent and content of the space.
Step 10: Review space permissions
The Space permissions field shows "Default permissions" and may be disabled (grayed out) if you are using the free version of Jira/Confluence. You cannot modify permissions in the free version; upgrading is required for custom permissions.
Step 11: Create the space
After filling in all required fields (Project, Space name, Space key, Description), click Create at the bottom right to create the project space. If you do not wish to proceed, click Close to exit the dialog.
Step 12: Explore other space types
If you want to create a different type of space, return to the Create space dialog. The available space types are:
- Blank space – Start with a blank space for any purpose
- Personal space – Keep your notes, task lists, and other content organized for personal use
- Documentation space – Manage technical documentation for your products
- Knowledge base – Capture and share best practices and solutions to common problems
- Team space – Collaborate and share resources with your team
Select the desired space type by clicking on it, then click Next to proceed with its setup.
Finalizing your software project space
Step 13: Create the software project space
Click Create at the bottom right of the Create a software project space dialog. This creates the space and links it to the selected Jira project ("rcv demo").
Step 14: Wait for the space to be created
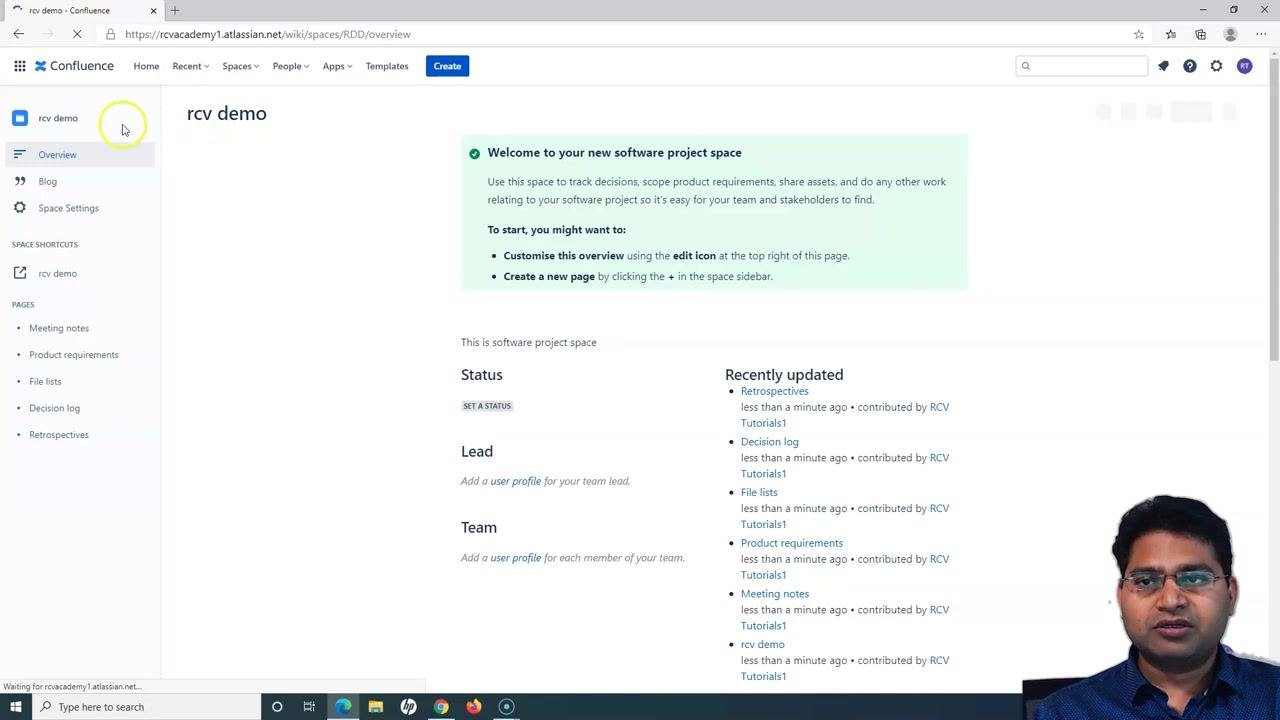
After clicking Create, the dialog closes and the system processes your request. The new space is created and automatically linked to the specified Jira project.
Step 15: View the newly created space
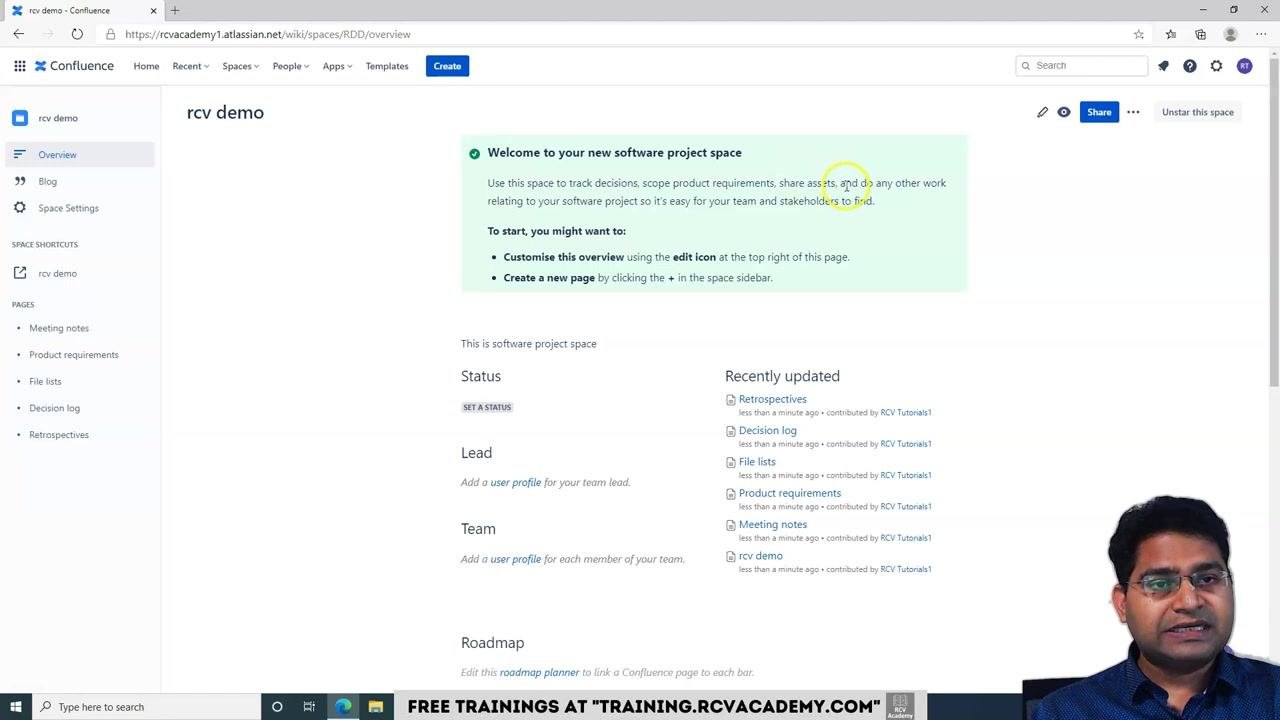
Once the space is created, you are redirected to its overview page. The overview page displays:
- A welcome message: "Welcome to your new software project space"
- Instructions to customize the overview or create a new page
- Space description: "This is software project space"
- Status section (option to set a status)
- Lead and Team sections (add user profiles)
- Recently updated pages (Retrospectives, Decision log, File lists, Product requirements, Meeting notes, rcv demo)
Step 16: Access all spaces
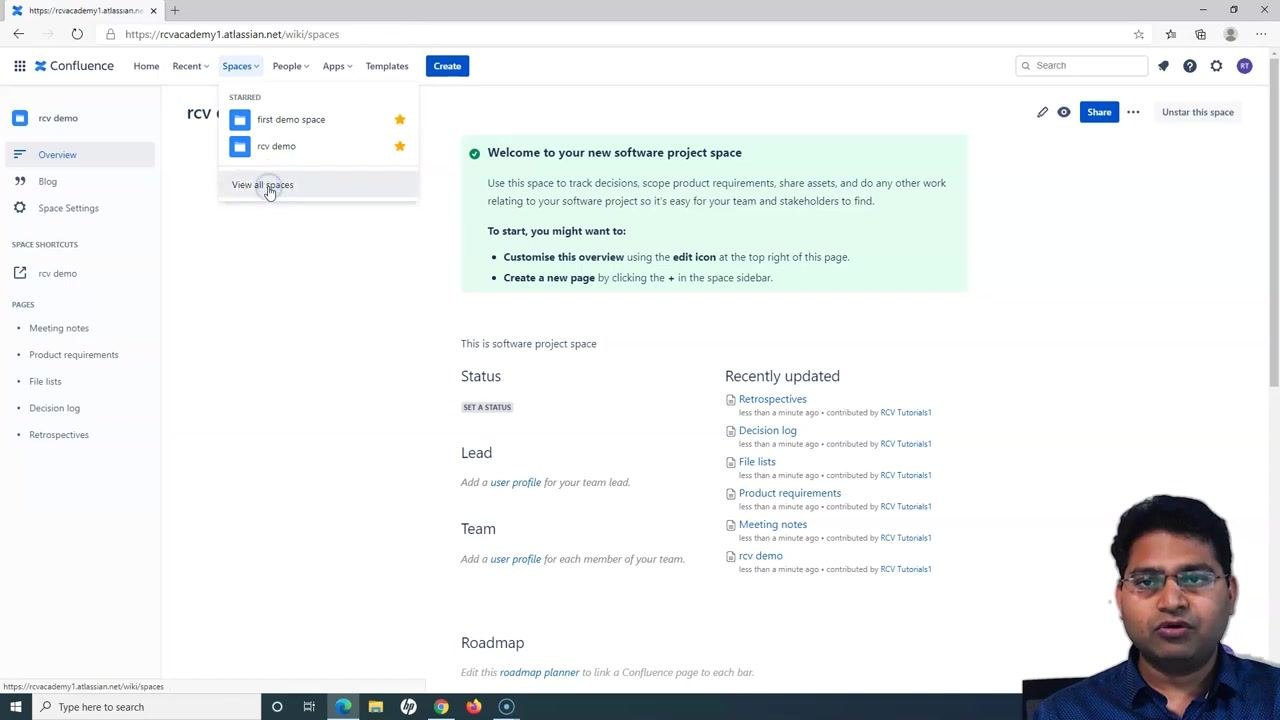
To view all available spaces, click the Spaces dropdown in the top navigation bar and select View all spaces. This displays a list of all spaces, including "first demo space" (created during trial signup) and "rcv demo" (the new software project space linked to your Jira project).
Step 17: Review the spaces list
On the Spaces page, you will see cards for "first demo space" and "rcv demo," along with a full list of all spaces showing details such as type (for example, software-project), star/favorite status, and visibility.
Step 18: Navigate back to the project space overview
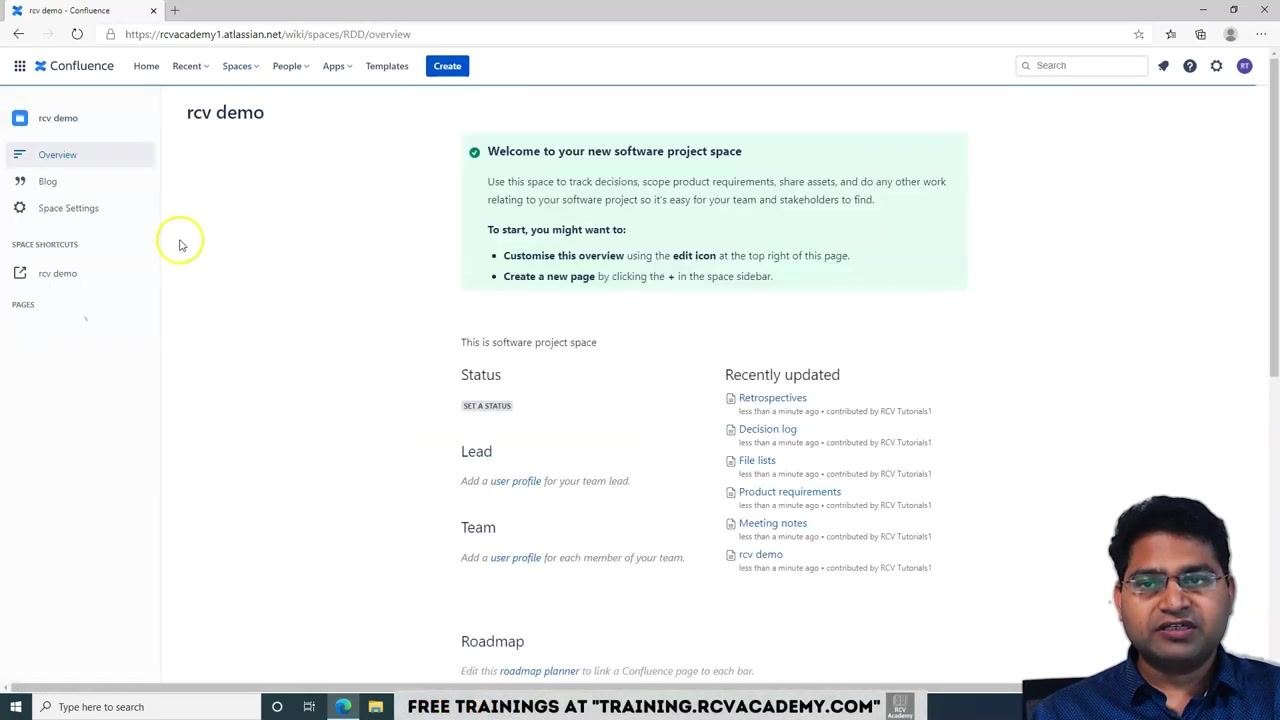
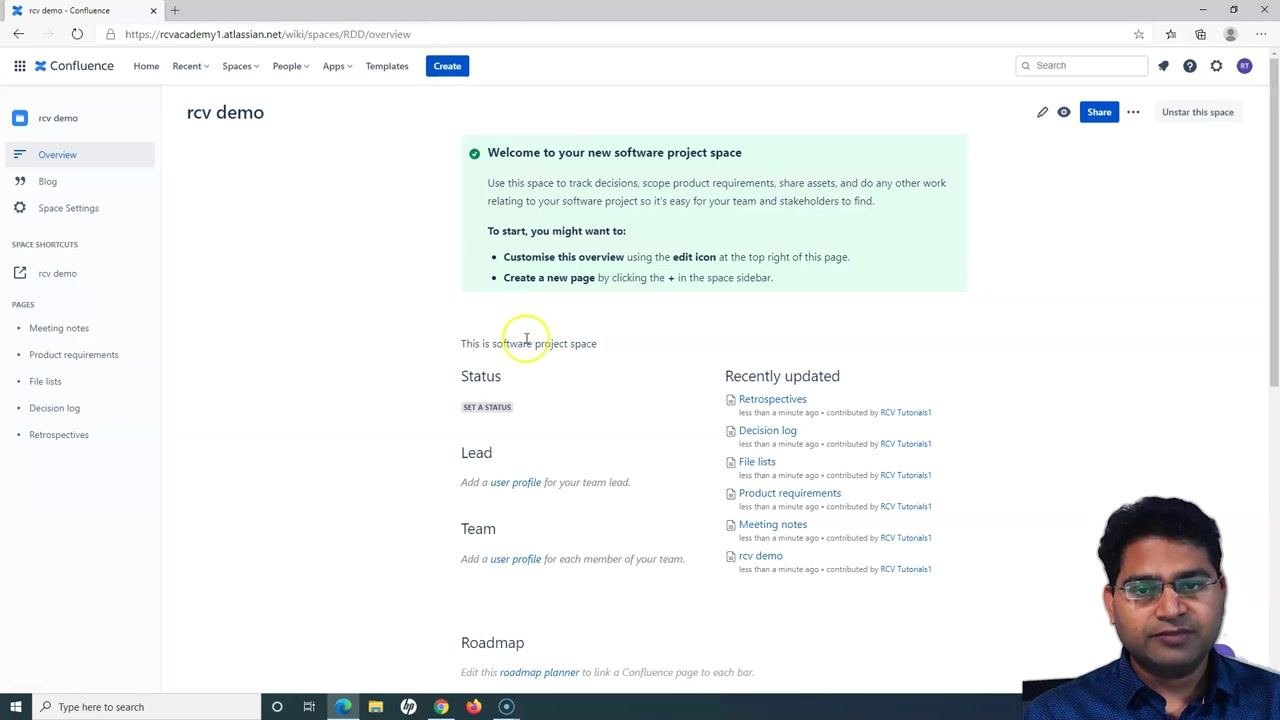
Click on the "rcv demo" space from the list or sidebar to return to its overview page. The overview page provides quick access to Overview, Blog, Space Settings, Space Shortcuts, and Pages (Meeting notes, Product requirements, File lists, Decision log, Retrospectives).
Step 19: Understand the purpose of the software project space
The software project space is primarily used for managing project requirements, storing project-related documents (meeting notes, product requirements, decision logs, retrospectives, file lists), and tracking project status, lead, and team members. The overview page can be customized, and new pages can be added as needed.
Step 20: Customize and use your space
Use the edit icon at the top right of the overview page to customize the space overview. Click the + icon in the space sidebar to create new pages for your project. Add user profiles for the lead and team members to keep your project organized, and refer to the Recently updated section to track changes and updates within the space.
Step 21: Locate and access project documentation sections
On the overview page, find the Pages section in the left sidebar. It includes links to all essential project documentation: Meeting notes, Product requirements, File lists, Decision log, and Retrospectives. These pages help you organize and store all documents required for your software project.
Step 22: Review recently updated documents
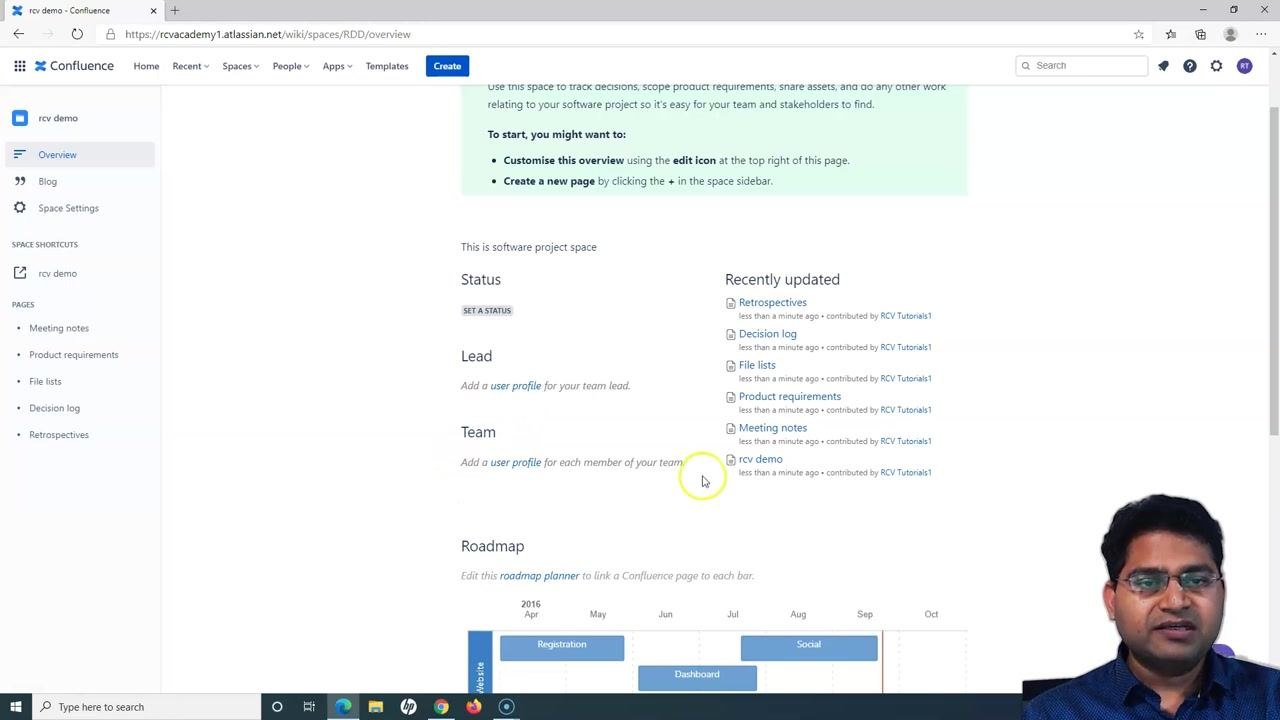
In the Recently updated section, view the latest changes to your project documentation, including Retrospectives, Decision log, File lists, Product requirements, Meeting notes, and the rcv demo space overview. Each entry shows the time of the last update and the contributor's name.
Step 23: Add team and lead profiles
Under the Lead section, click Add a user profile to assign a team lead for the project space. Under the Team section, click Add a user profile for each member of your team to keep your project organized.
Step 24: Set project status
Click Set a status in the Status section to update the current status of your project.
Step 25: Utilize the roadmap planner
Scroll down to the Roadmap section to view or edit the project roadmap. Click Edit this roadmap planner to link Confluence pages to each bar in the roadmap, helping you track project phases and milestones.
Customizing space shortcuts and navigation
Step 26: Access the overview page
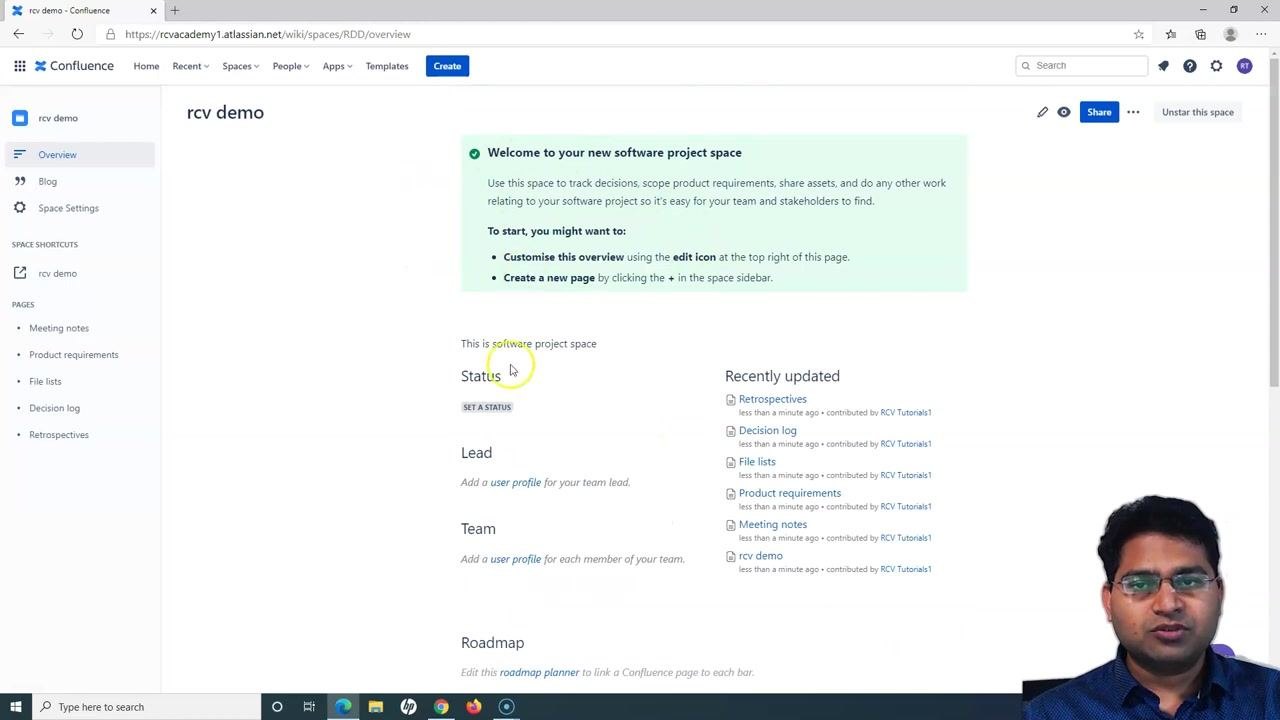
Open your Confluence space. The overview page displays a welcome message, project status, lead, team, roadmap, and a list of recently updated pages. The left sidebar contains navigation links: Overview, Blog, Space Settings, and shortcuts under SPACE SHORTCUTS. The PAGES section lists Meeting notes, Product requirements, File lists, Decision log, and Retrospectives. The main panel provides instructions to customize the overview using the edit icon or to create a new page using the + in the sidebar.
Step 27: Open Space Settings
In the left sidebar, click Space Settings to update space settings and manage shortcuts. This allows you to configure various aspects of your space, including adding or editing shortcuts for quick access.
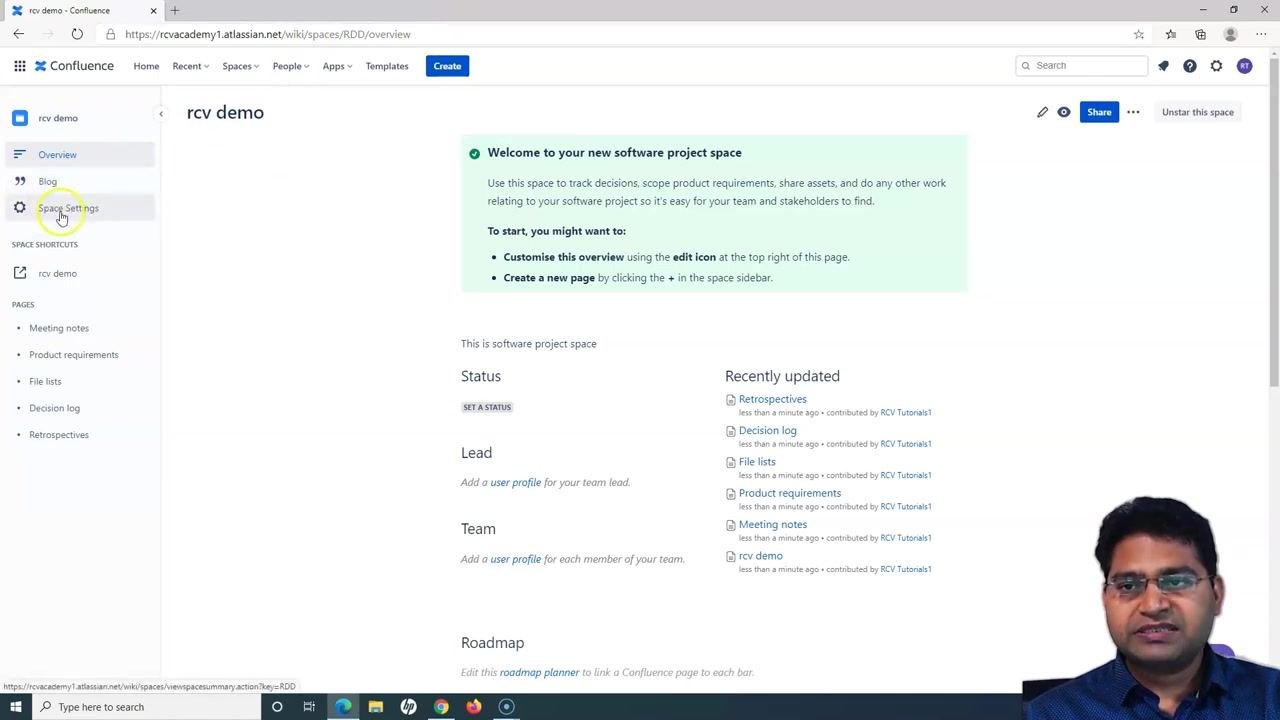
Step 28: Edit space shortcuts
Click the pencil/edit icon next to SPACE SHORTCUTS in the sidebar to open the Edit space shortcuts dialog. Here you can add links to frequently used resources such as web pages or other Confluence pages. Enter the web address (for example, "www.example.com") and optionally provide a name for the shortcut, then click Add shortcut.
Step 29: Add and save a shortcut
After entering the web address (for example, "www.rcvacademy.com") and an optional name, click Add shortcut. Once all desired shortcuts are added, click Save to apply the changes.
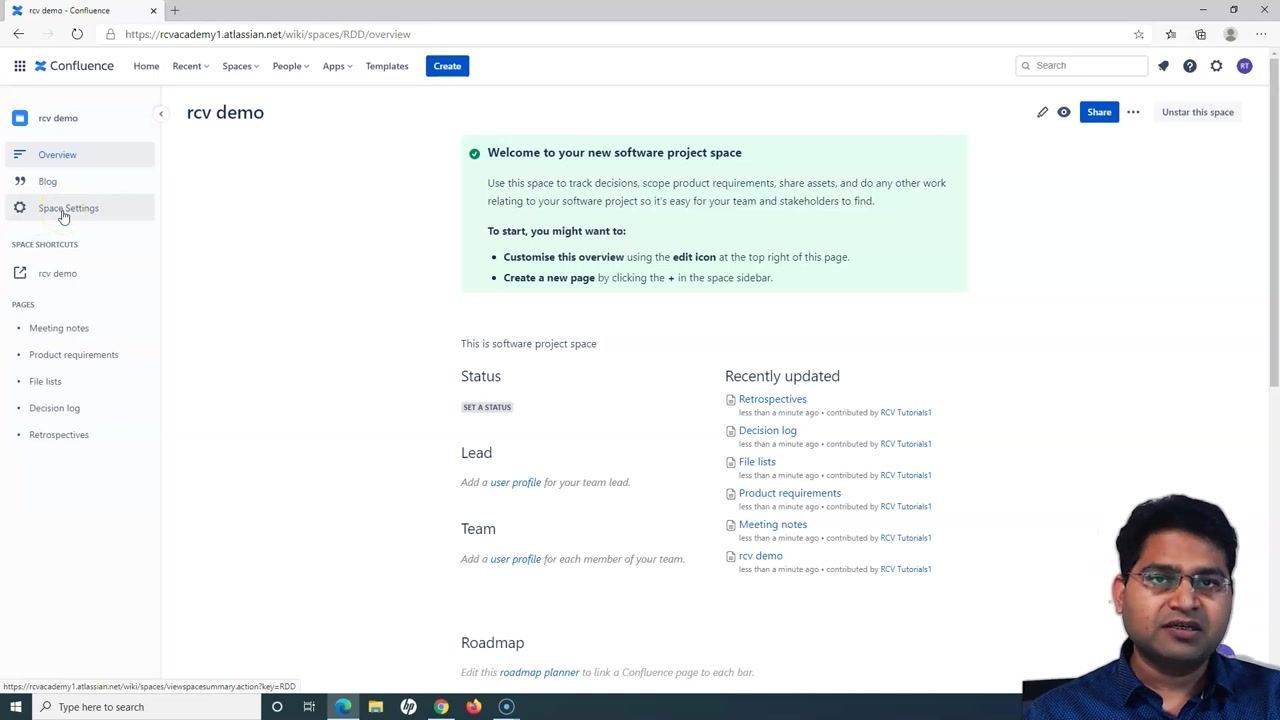
Step 30: Verify the added shortcut
Confirm that the new shortcut appears under SPACE SHORTCUTS in the sidebar (for example, "RCV Academy"). These shortcuts provide quick access to important resources for your team.
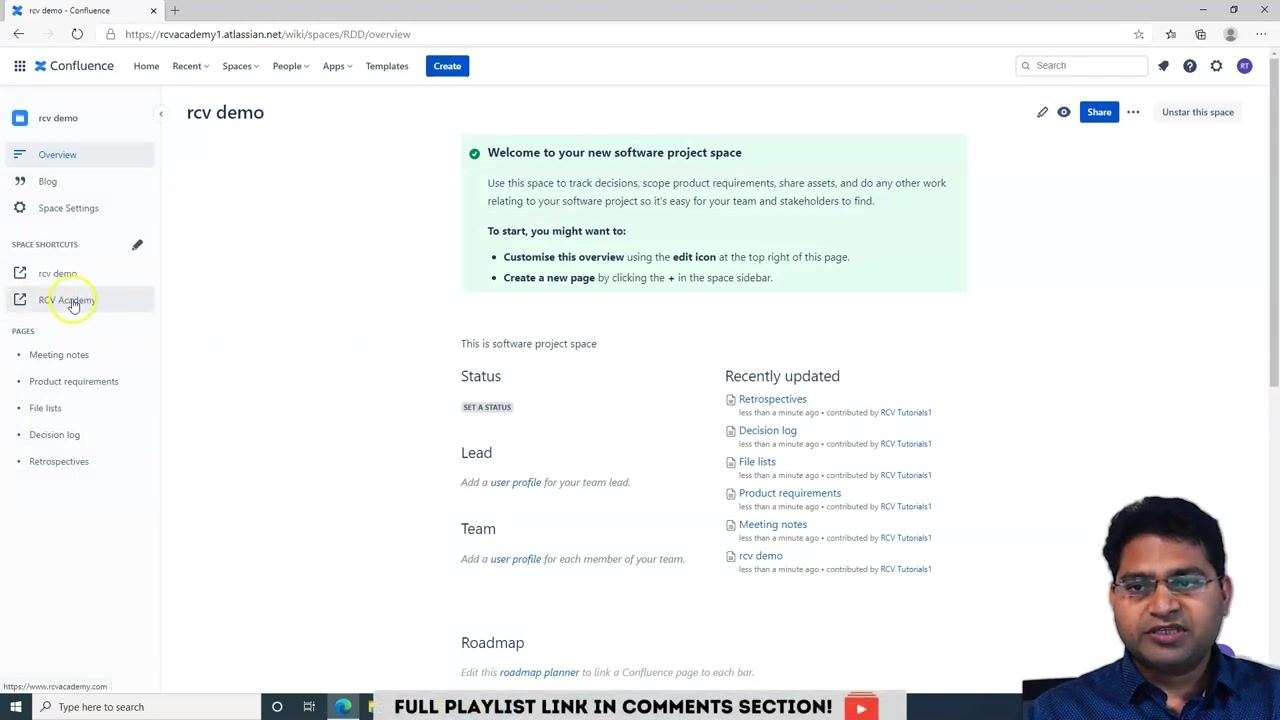
Step 31: Utilize shortcuts for team efficiency
Use these shortcuts to quickly access key documents such as requirement documents, onboarding materials, or any other frequently referenced resources. Shortcuts are especially useful for team members who need handy links to essential documents.
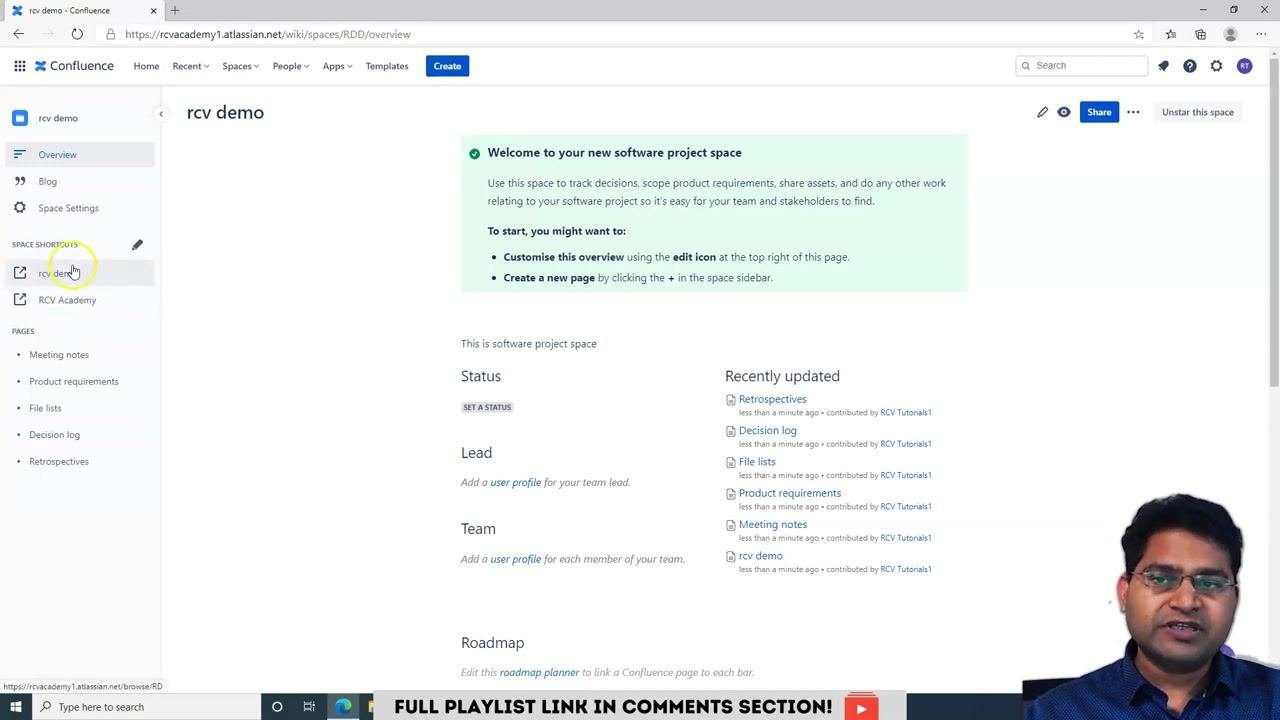
Step 32: Navigate to key pages
In the PAGES section of the sidebar, access important pages like Meeting notes, Product requirements, File lists, Decision log, and Retrospectives. These pages are organized for easy navigation and quick reference.
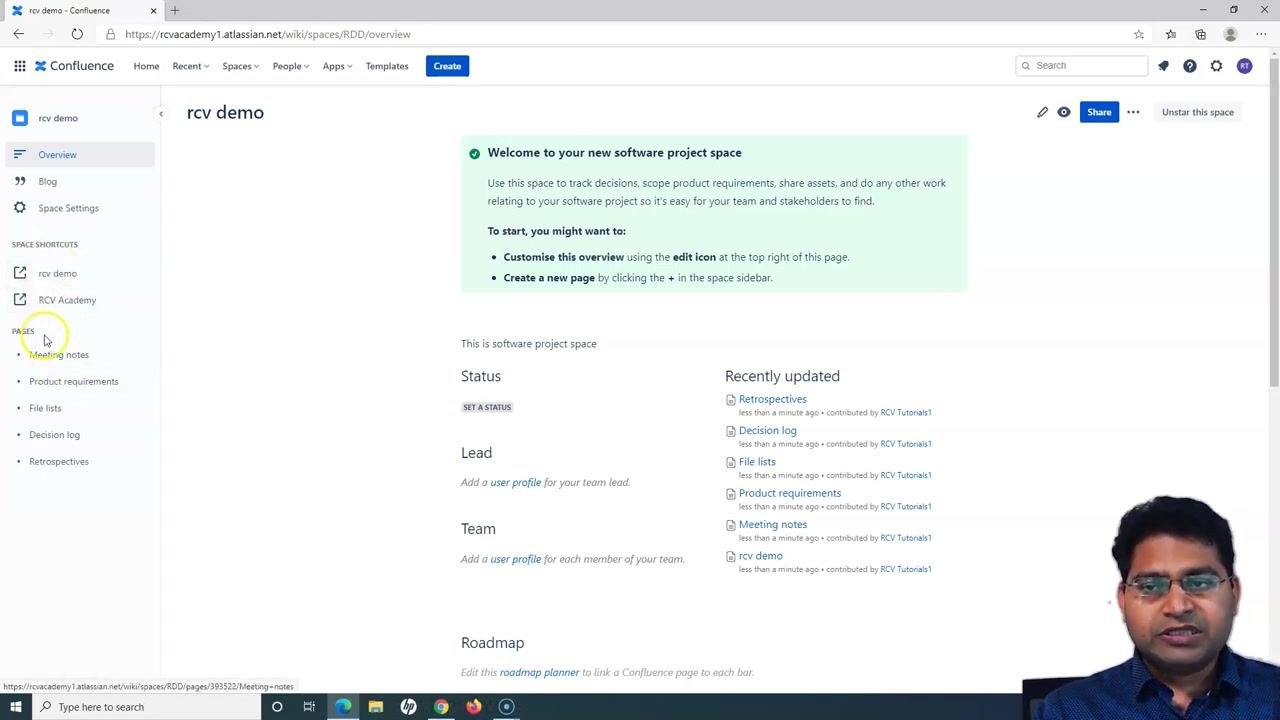
Creating meeting notes in a project space
Step 33: Navigate to the project space
Open your Confluence project space (for example, "rcv demo"). The overview page displays project details, status, lead, team, roadmap, and recently updated pages.
Step 34: Access the meeting notes section
In the left sidebar, locate the PAGES section. Hover over or click on Meeting notes to reveal additional options. The cursor highlights "Meeting notes," indicating it is about to be selected.
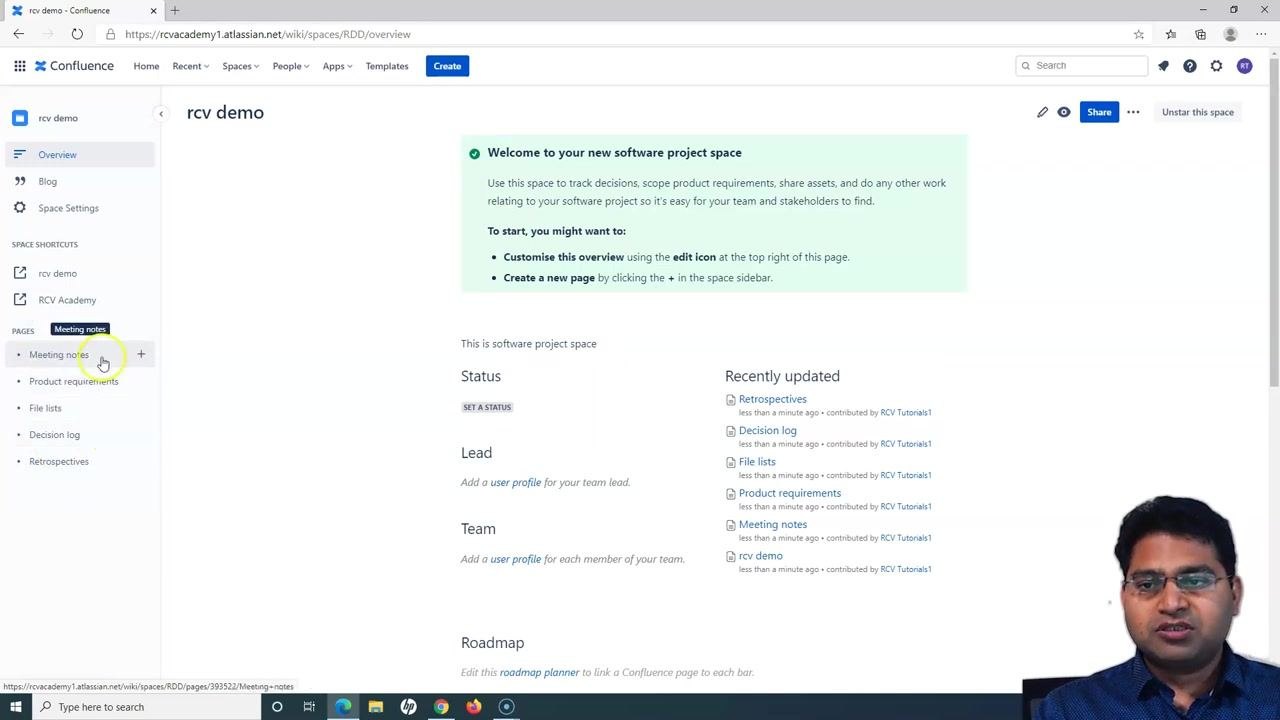
Step 35: Create a new meeting notes page
Click the + icon next to Meeting notes to create a child page. A tooltip labeled "Create a child page" appears when hovering over the + icon.
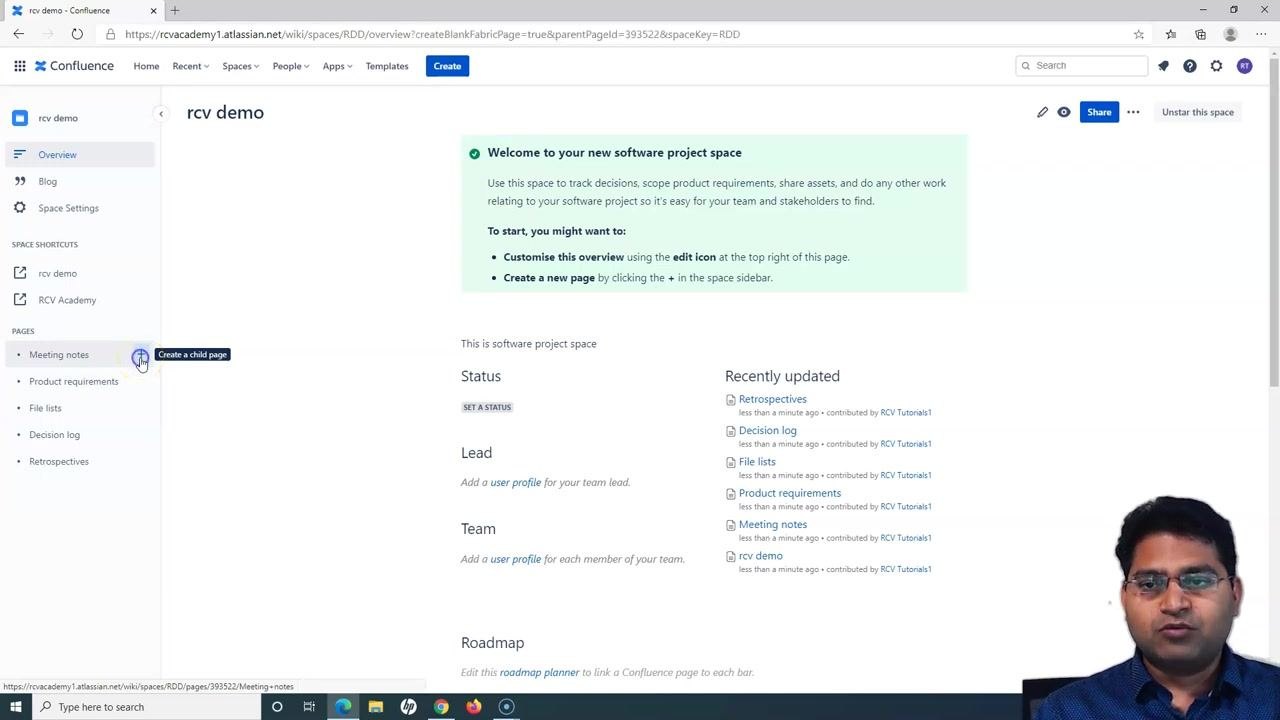
Step 36: Enter meeting notes content
A new page editor opens under the Meeting notes section. Enter a title for your meeting notes, such as "Test" or "Test Meeting notes." Optionally, add content or use the provided suggestions (for example, a table of contents, date, or roadmap).
Step 37: Publish the meeting notes page
Once you have entered the desired content, click Publish in the top right corner to save the meeting notes. The page title is updated to "Test Meeting notes" before publishing.
Step 38: Verify the meeting notes page
After publishing, the new meeting notes page appears as a child under Meeting notes in the sidebar. The main panel displays the meeting notes content, author, and options to like or comment.
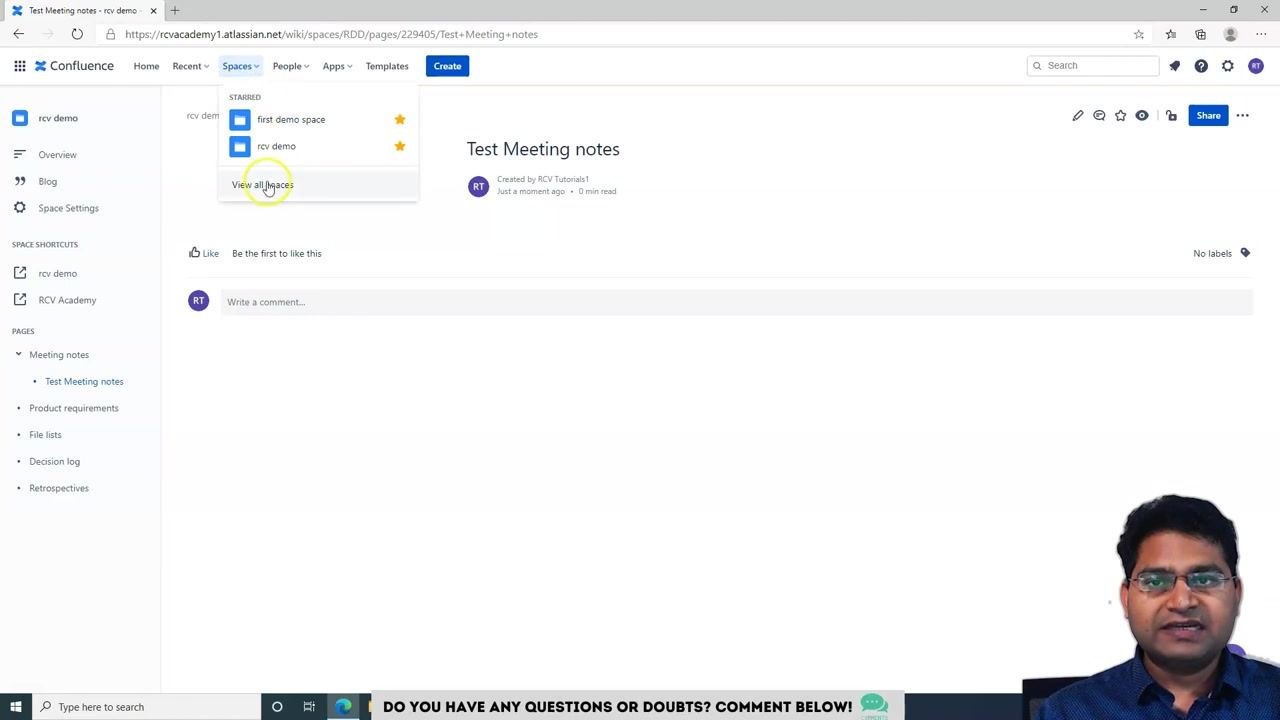
Creating a documentation space
Step 39: Access all spaces
In the top navigation bar, click Spaces, then select View all spaces from the dropdown to see the list of available spaces.
Step 40: Initiate documentation space creation
Click Create space or select the option to add a new space. In the Create space dialog, choose Documentation space from the available templates. The Documentation space option is highlighted, with the description "Create and manage technical documentation for your products."
Step 41: Configure documentation space details
Enter the required details:
- Space name: Documentation Demo space
- Space key: DDS
- Description: (Optional) Briefly describe the documentation in this space
Review the "About documentation spaces" section for more information.
Step 42: Create the documentation space
Click Create to finalize and create the new documentation space. The new space is added to your list of spaces and is ready for use.
Exploring and customizing your new documentation space
Step 43: Review the predefined template in the documentation space
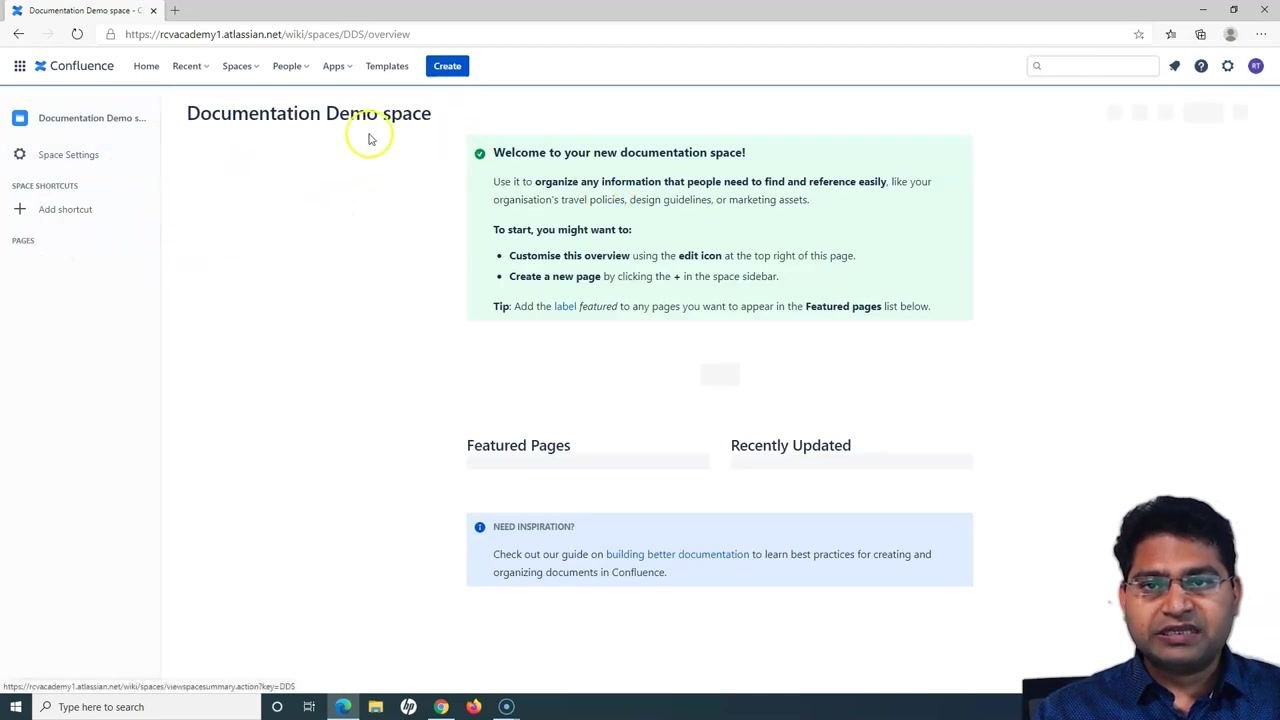
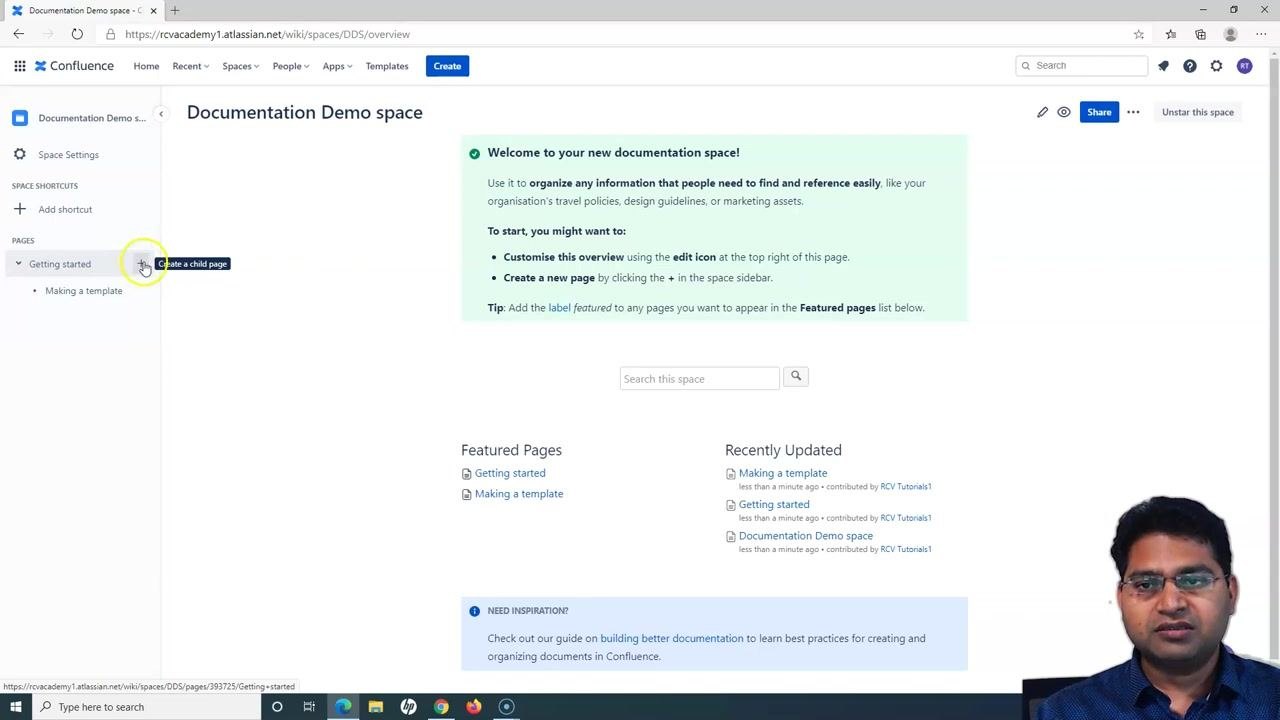
Upon creation, the documentation space opens with a predefined template. The main panel displays the space name, "Documentation Demo space," along with a welcome message in a green box: "Welcome to your new documentation space!" with instructions to organize information, customize the overview, and create new pages, plus a tip about using the "featured" label for important pages.
The sidebar on the left includes Space Settings, Space Shortcuts (option to add shortcuts), and Pages (no pages listed yet). The bottom section includes Featured Pages and Recently Updated (both empty at this stage). A blue "Need Inspiration?" box links to a guide on building better documentation.
Step 44: Observe the populated template and page list
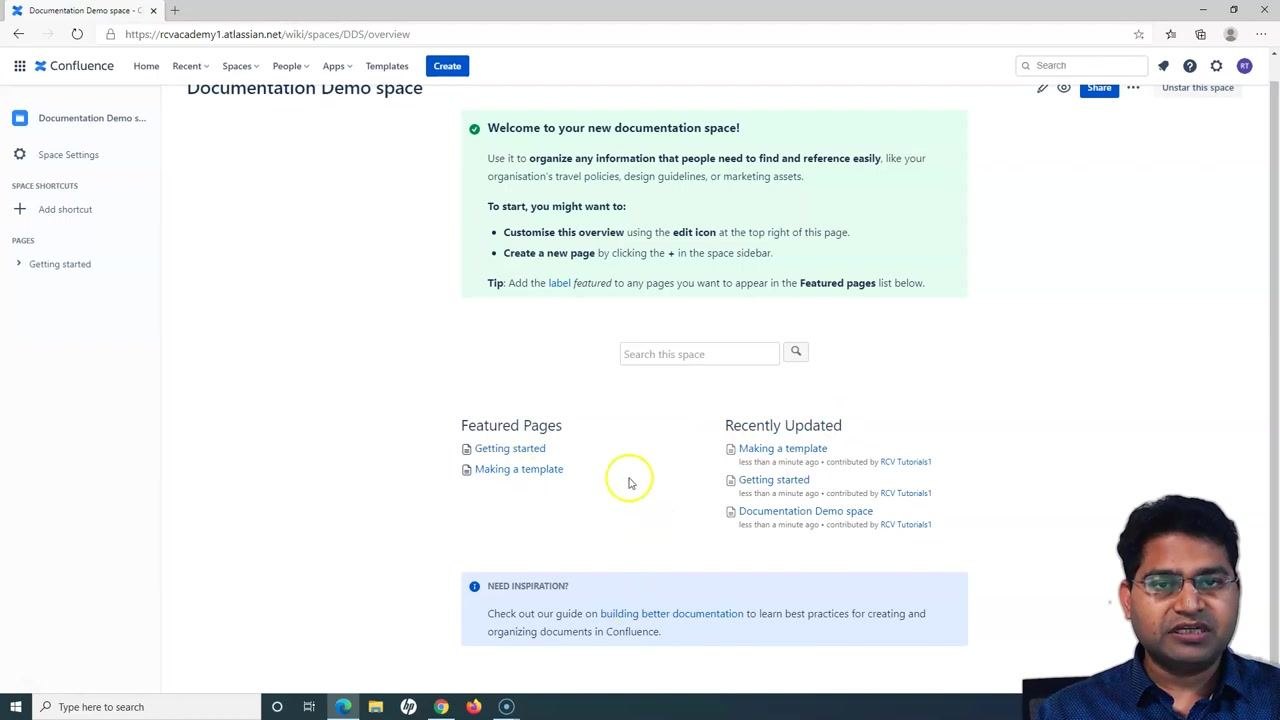
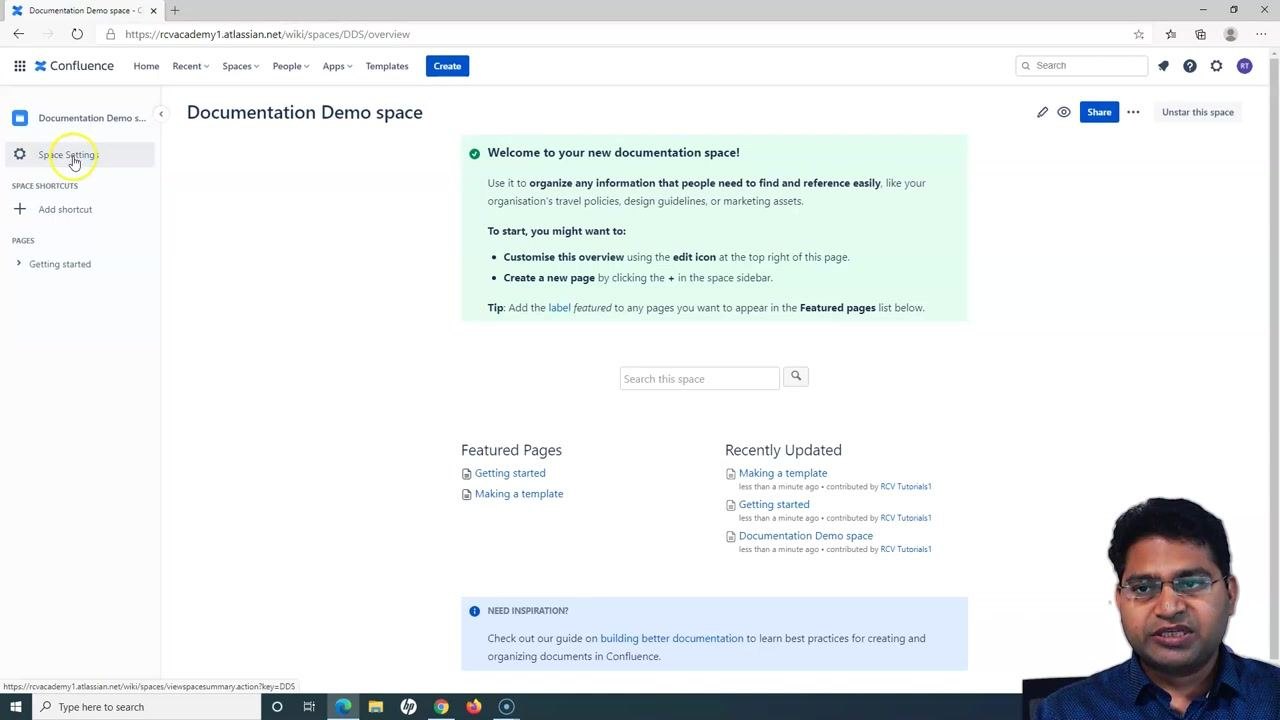
As you begin using the space, default pages such as Getting started and Making a template appear under Featured Pages and Recently Updated. The sidebar lists Getting started (expandable, with "Making a template" as a child page). The main panel shows:
- Featured Pages: Getting started, Making a template
- Recently Updated: Making a template, Getting started, Documentation Demo space (with timestamps and contributor info)
The search bar allows searching within the space, and the "Need Inspiration?" box remains at the bottom.
Step 45: Access Space Settings
To customize or manage the space, click Space Settings in the left sidebar. The cursor highlights "Space Settings," indicating it is about to be selected.
Step 46: Create a child page
To add a new page under an existing page (for example, "Getting started"), click the + icon next to the page name in the sidebar. A tooltip appears: "Create a child page." This allows you to build a hierarchy of documentation pages within your space.
Step 47: Explore the Space Settings overview
After clicking Space Settings, the Space Settings panel opens. Available tabs include Overview, Permissions, Content Tools, Look and Feel, and Integrations. The Overview tab displays:
- Space Details: Logo, Name (Documentation Demo space), Key (DDS), Home page, Created by, Categories, Description, Administrators
- Additional tabs: Sidebar Configuration, Archive Space, Delete Space
What's next
You have now created a software project space linked to Jira, configured space shortcuts and navigation, added meeting notes, and set up a documentation space with its default template. From here, you can continue building out your project documentation, add more team members and shortcuts, and further customize your space settings. For advanced space settings and permissions, refer to the next tutorial.
Generation details: cost, quality tiers
Docsie billed 5,000 credits ($3.50) to analyze this 10-minute video at standard quality. The rewrite, template fill and Word/PDF exports were included. The same video at each quality tier:
| Quality | Frames sampled | Credits | Approx. cost |
|---|---|---|---|
| Draft | every 16-30 s | 2,500 | $1.75 |
| Standard (this guide) | every 8-15 s | 5,000 | $3.50 |
| Detailed | every 4-7 s | 10,000 | $7.00 |
| Ultra | every 1-3 s | 20,000 | $14.00 |
Credits priced at $0.70 per 1,000; plans include a monthly allowance. Enterprise customers on on-premise or bring-your-own-model deployments run this on their own inference and pay no per-video credits.
Generated by Docsie Video-to-Docs on 2026-09-08 from a 9-minute video. Screenshots are frames from the source video and belong to their creator, RCV Academy, whose original is embedded above. If you own this video and want the guide removed or credited differently, contact us and we will act within one business day.