
How to Use PTO in Workday
This guide walks you through how to use PTO in Workday to request leave or time off as an employee. You'll learn how to check your time off balance, submit a leave request, and verify the approval status of your submission once it has been reviewed.
Video: How to Request Leave or Time Off in Workday | Step-by-Step Employee Guide by CSPHR. All credit for the demonstration goes to the creator; watch the original on YouTube. The written guide below was generated from this video by Docsie. Creator? Request a change or removal.
This guide walks you through how to use PTO in Workday to request leave or time off as an employee. You'll learn how to check your time off balance, submit a leave request, and verify the approval status of your submission once it has been reviewed.
Prerequisites
- An active Workday employee account with access to the employee portal.
- Any supporting documents you may need to attach (for example, a medical report for health-related leave).
Checking your time off balance
Log in to your Workday employee portal
Log in and make sure you land on the main dashboard.
Review your time off balance
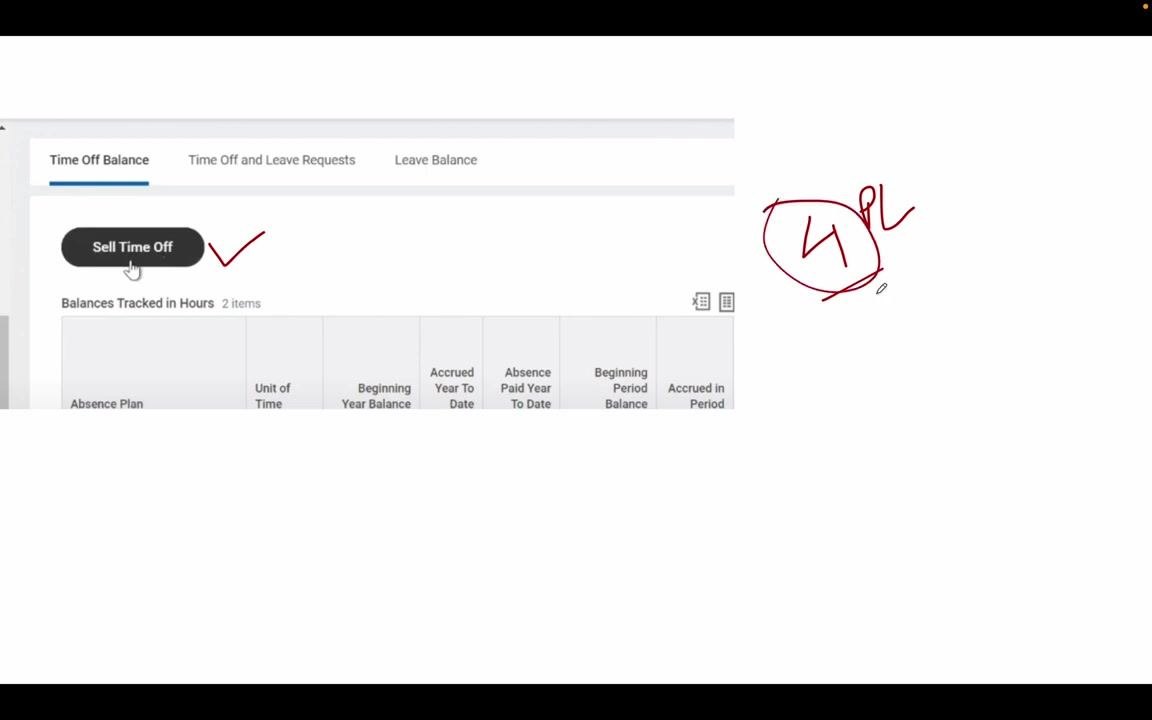
The Time Off Balance tab displays your available leave balances. You can see details such as Absence Plan, Unit of Time, Beginning Year Balance, Accrued Year To Date, Absence Paid Year To Date, Beginning Period Balance, and Accrued in Period.
(Optional) Sell unused time off
If you want to sell your leave (for example, 4 PL) to another employee in exchange for money, click Sell Time Off. This option is available under the Time Off Balance tab.
Submitting a time off and leave request
Open the Time Off and Leave Requests tab
Click on the appropriate option to start a new leave request.
Select your leave dates
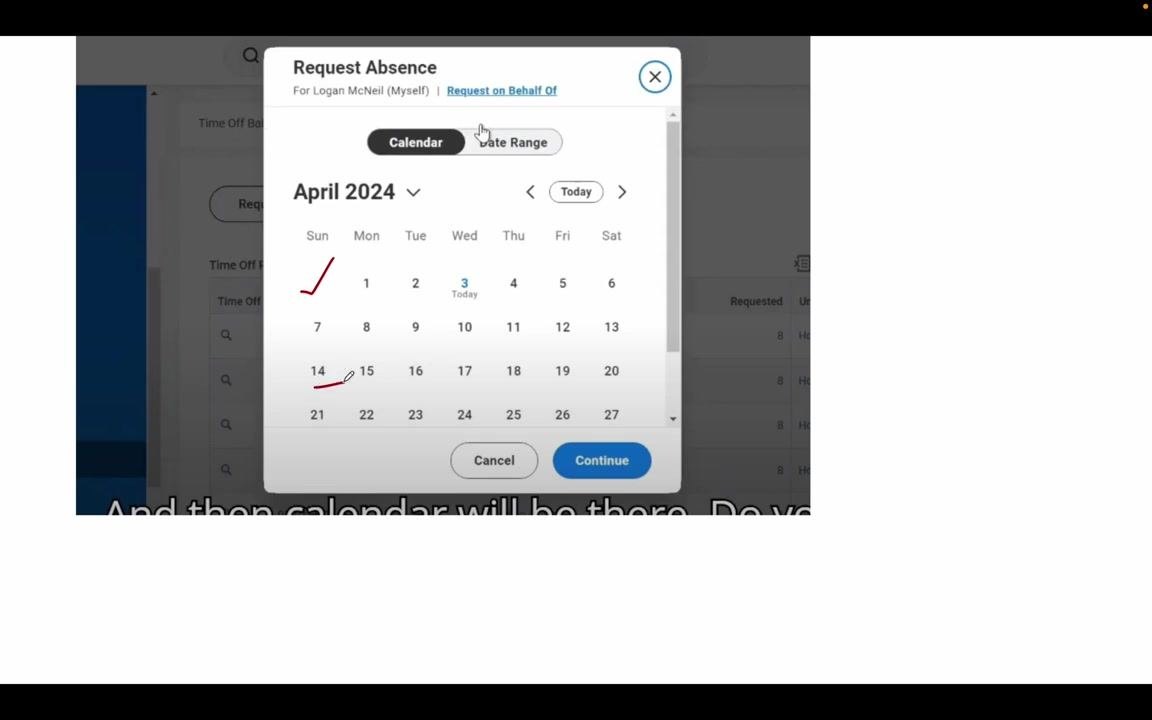
In the leave request dialog, use the calendar to select your start and end dates. For example, to request leave starting April 14, 2024, for 7 days, click April 14 in the calendar.
Click Continue
Click Continue to proceed to the next step.
Select your type of leave
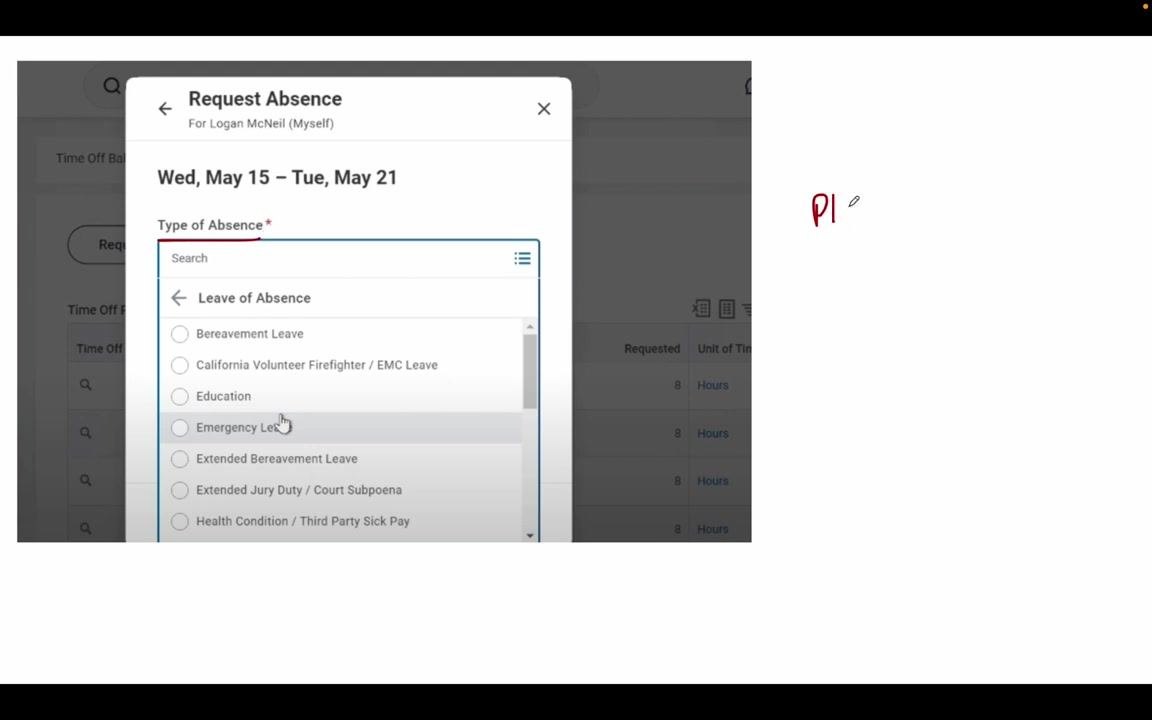
In the Request Absence dialog, review the Type of Absence dropdown. Available options include Bereavement Leave, California Volunteer Firefighter / EMC Leave, Education, Emergency Leave, Extended Bereavement Leave, Extended Jury Duty / Court Subpoena, Health Condition / Third Party Sick Pay, and more. For example, select Emergency Leave if you are applying for emergency leave.
Click Continue after selecting your leave type
Make sure you've chosen the leave type that matches your situation before proceeding.
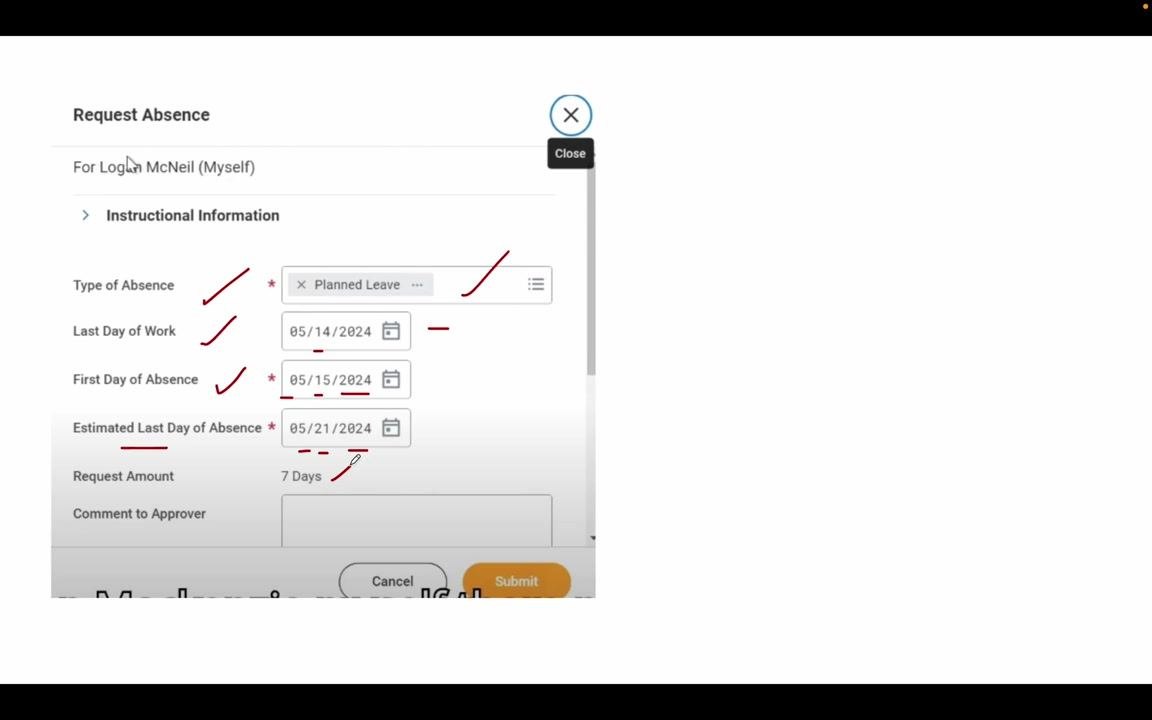
Enter your leave details
Fill in the following fields:
- Type of Absence: Confirm your selected leave type (for example, Planned Leave).
- Last Day of Work: Enter the last day you'll be working before your leave (for example, 05/14/2024).
- First Day of Absence: Enter the first day you'll be absent (for example, 05/15/2024).
- Estimated Last Day of Absence: Enter the last day you expect to be absent (for example, 05/21/2024).
- Request Amount: The system automatically calculates the total number of days (for example, 7 Days).
You can also add a comment to the approver to provide additional context.
(Optional) Attach supporting documents
If your leave type requires documentation (for example, medical or emergency leave), upload the relevant files. Click Select files under the Attachments section and choose the file(s) to upload.
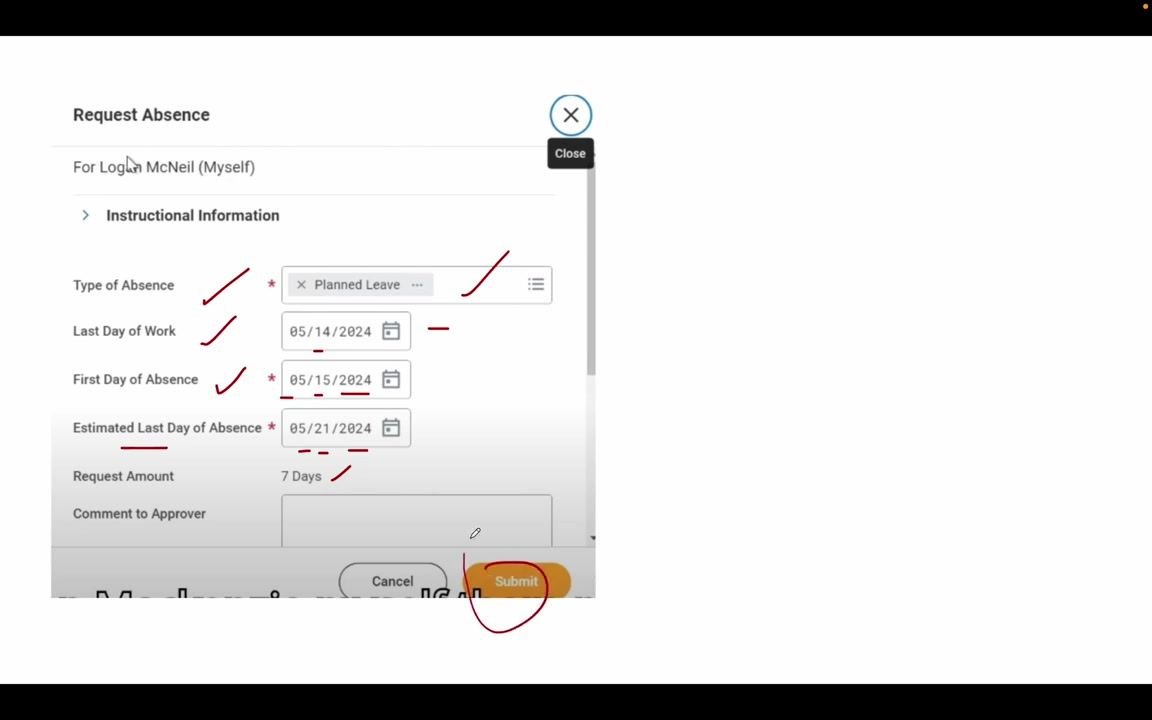
Submit your leave request
Review all entered information for accuracy, then click Submit to finalize your leave request.
Review your submitted leave details
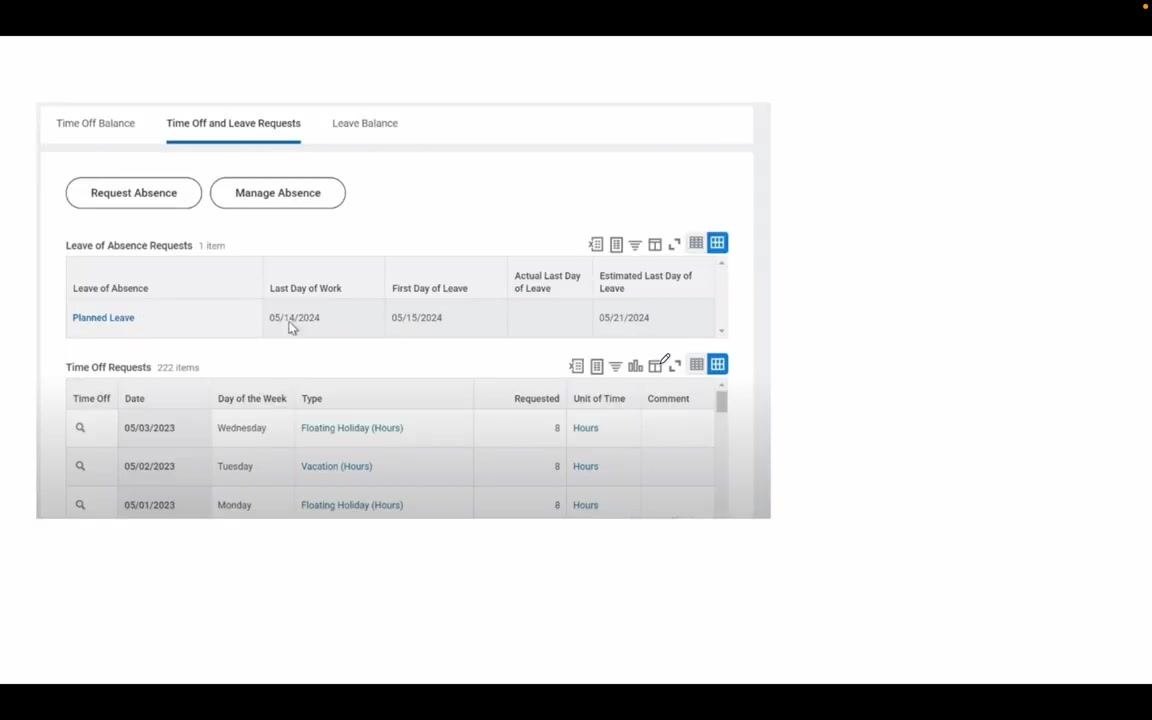
After submitting, go to the Time Off and Leave Requests tab. Under Leave of Absence Requests, confirm your entry is listed correctly. For example:
- Leave of Absence: Planned Leave
- Last Day of Work: 05/14/2024
- First Day of Leave: 05/15/2024
- Estimated Last Day of Leave: 05/21/2024
Checking your leave approval status
Access your job profile
To check whether your leave has been approved after a few days, log in to your Workday portal and go to your profile by clicking your profile icon or name. Then select the Job section from the left-hand menu.
Open your worker history
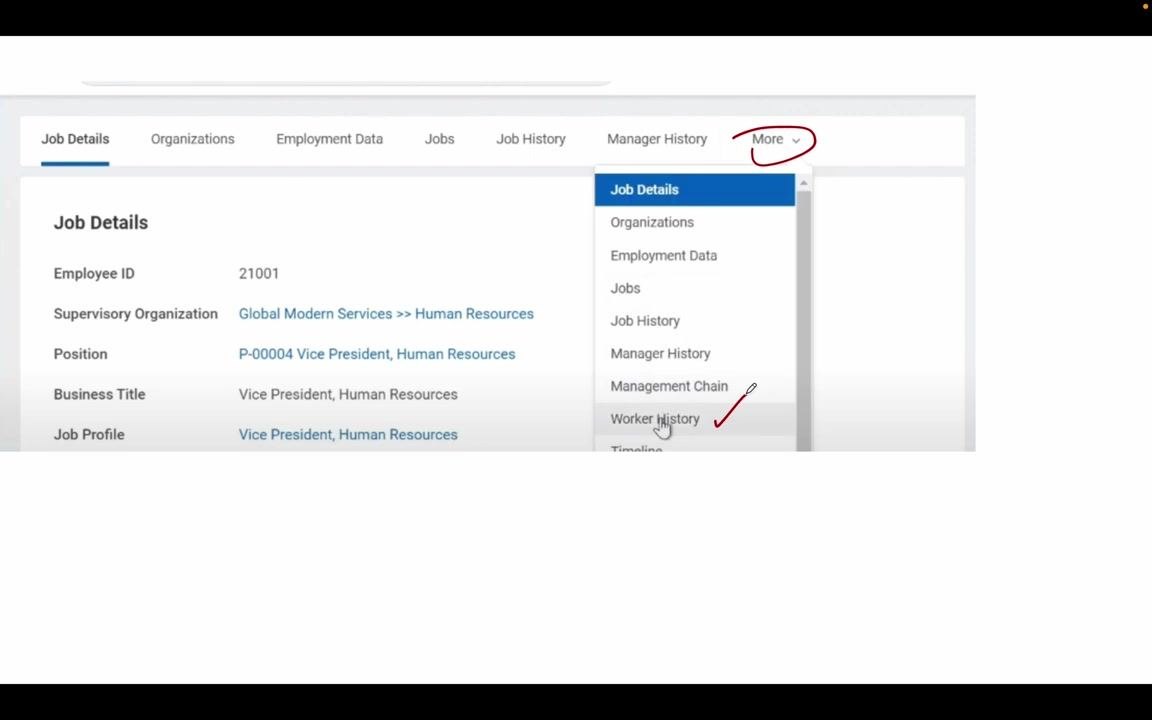
In the Job Details area, click the More dropdown menu and select Worker History from the list.
Review your leave approval status
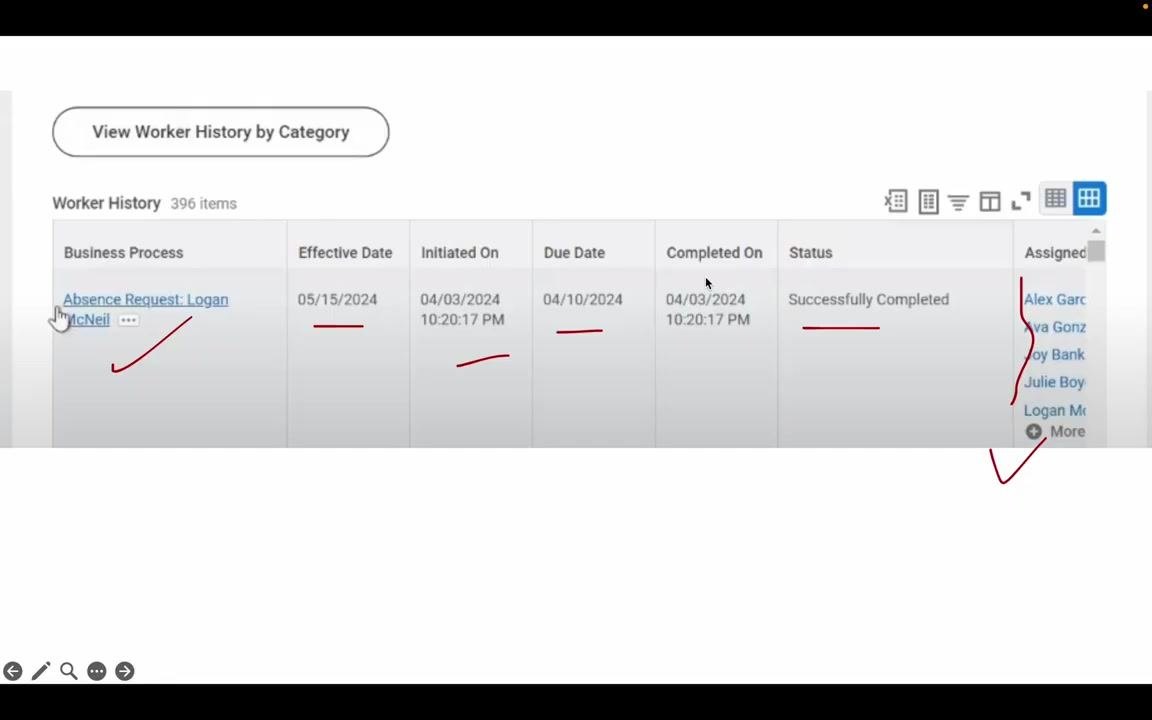
In the Worker History section, locate your absence request entry and review the following columns:
- Business Process: Absence Request (with your name)
- Effective Date: (for example, 05/15/2024)
- Initiated On: (for example, 04/03/2024 10:20:17 PM)
- Due Date: (for example, 04/10/2024)
- Completed On: (for example, 04/03/2024 10:20:17 PM)
- Status: Successfully Completed (indicates your manager has approved your leave)
- Assigned To: List of approvers or involved parties
If the Status shows Successfully Completed, your leave has been approved.
(Optional) View additional details
Click the Absence Request link for more information about your leave process, if needed.
Summary
By following these steps, you now know how to use PTO in Workday to:
- Check your time off balance and, if needed, sell unused leave.
- Submit a complete leave or time off request with supporting details and documents.
- Verify your submitted leave details and check the approval status through your worker history.
Generation details: cost, quality tiers
Docsie billed 2,500 credits ($1.75) to analyze this 5-minute video at standard quality. The rewrite, template fill and Word/PDF exports were included. The same video at each quality tier:
| Quality | Frames sampled | Credits | Approx. cost |
|---|---|---|---|
| Draft | every 16-30 s | 1,250 | $0.88 |
| Standard (this guide) | every 8-15 s | 2,500 | $1.75 |
| Detailed | every 4-7 s | 5,000 | $3.50 |
| Ultra | every 1-3 s | 10,000 | $7.00 |
Credits priced at $0.70 per 1,000; plans include a monthly allowance. Enterprise customers on on-premise or bring-your-own-model deployments run this on their own inference and pay no per-video credits.
Generated by Docsie Video-to-Docs on 2026-10-12 from a 4-minute video. Screenshots are frames from the source video and belong to their creator, CSPHR, whose original is embedded above. If you own this video and want the guide removed or credited differently, contact us and we will act within one business day.