
How to Submit Time in Workday
This guide walks you through how to submit time in Workday, from logging in and entering your work hours to reviewing, submitting, and editing your time entries. It also covers how to use the auto-fill feature to copy hours from a prior week and where to find additional Workday resources.
Video: Submitting Hours in Workday by Susanne Treiber. All credit for the demonstration goes to the creator; watch the original on YouTube. The written guide below was generated from this video by Docsie. Creator? Request a change or removal.
This guide walks you through how to submit time in Workday, from logging in and entering your work hours to reviewing, submitting, and editing your time entries. It also covers how to use the auto-fill feature to copy hours from a prior week and where to find additional Workday resources.
Prerequisites
- Access to your institution's Workday login page
- Your Workday login credentials
- Knowledge of the location, fund, and program codes associated with your work (e.g., Truax Main Building, 100 General Fund, P93830 Writing Center)
Log in to Workday
Open your web browser and navigate to your institution's Workday login page. Enter your credentials and log in to access your account.
Open the Time application
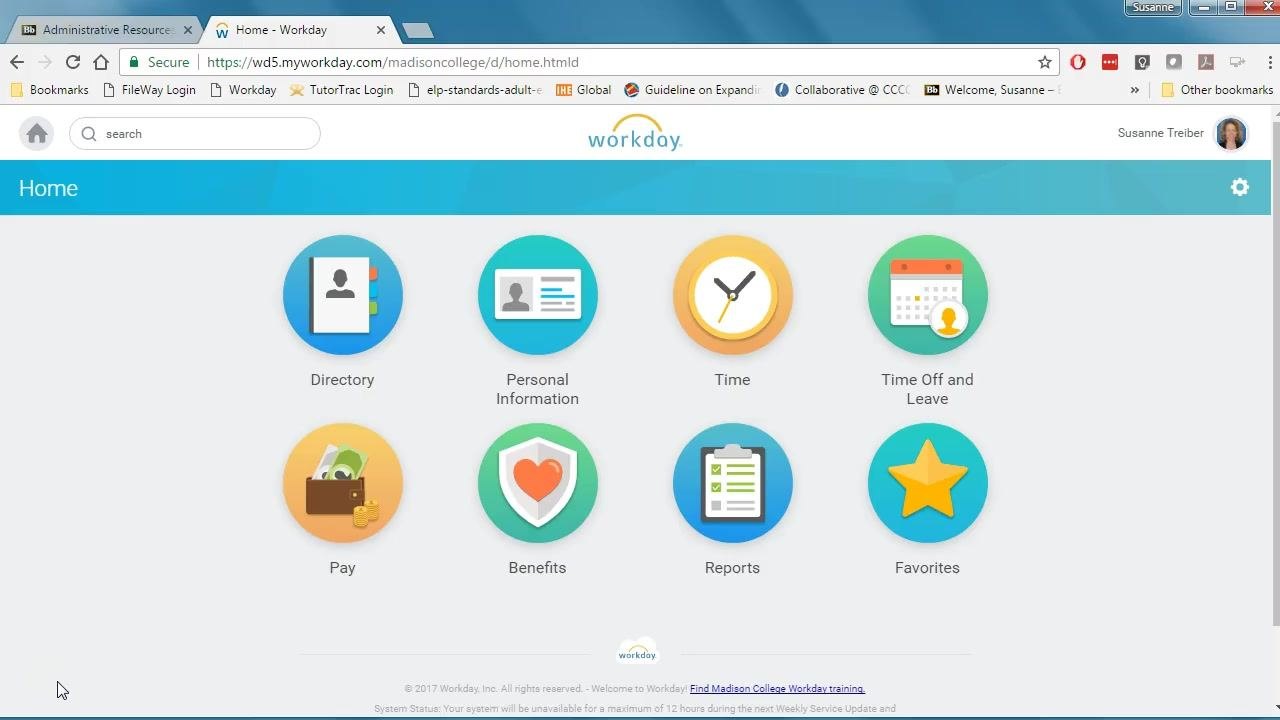
After logging in, the Workday home screen displays several application icons, including Directory, Personal Information, Time, Time Off and Leave, Pay, Benefits, Reports, and Favorites.
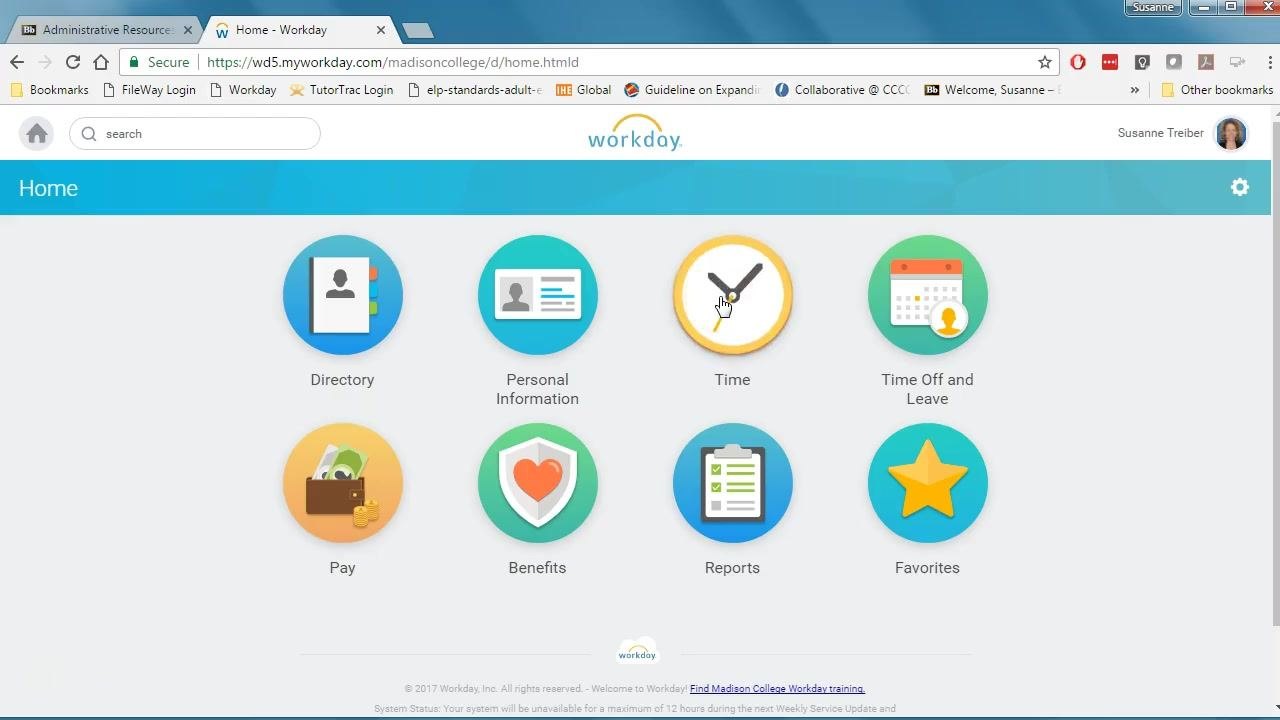
Locate and click the Time app (the icon with a clock) to begin entering your hours.
Choose the week for time entry
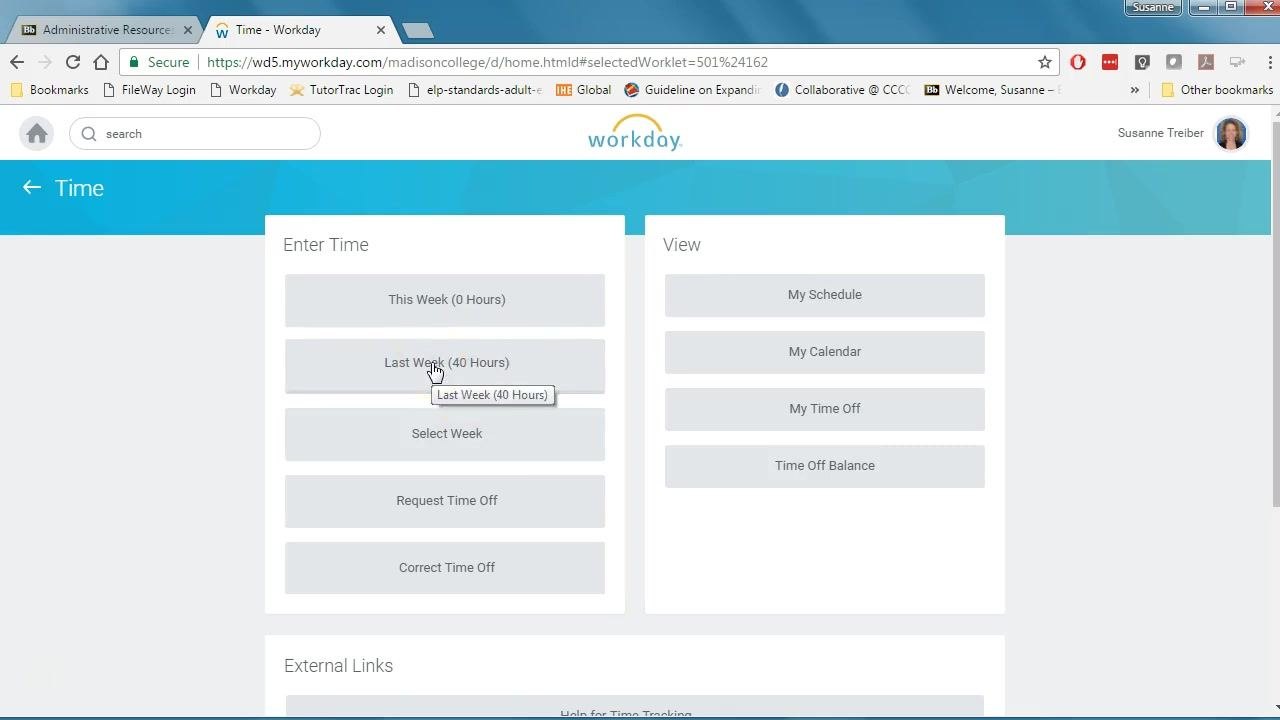
On the Enter Time screen, you'll see several options:
- This Week (shows current hours, e.g., 0 Hours)
- Last Week (shows hours already logged, e.g., 40 Hours)
- Select Week
- Request Time Off
- Correct Time Off
Click This Week if you are reporting hours for the current week, or Last Week if you are reporting hours for the previous week.
Open the time entry grid
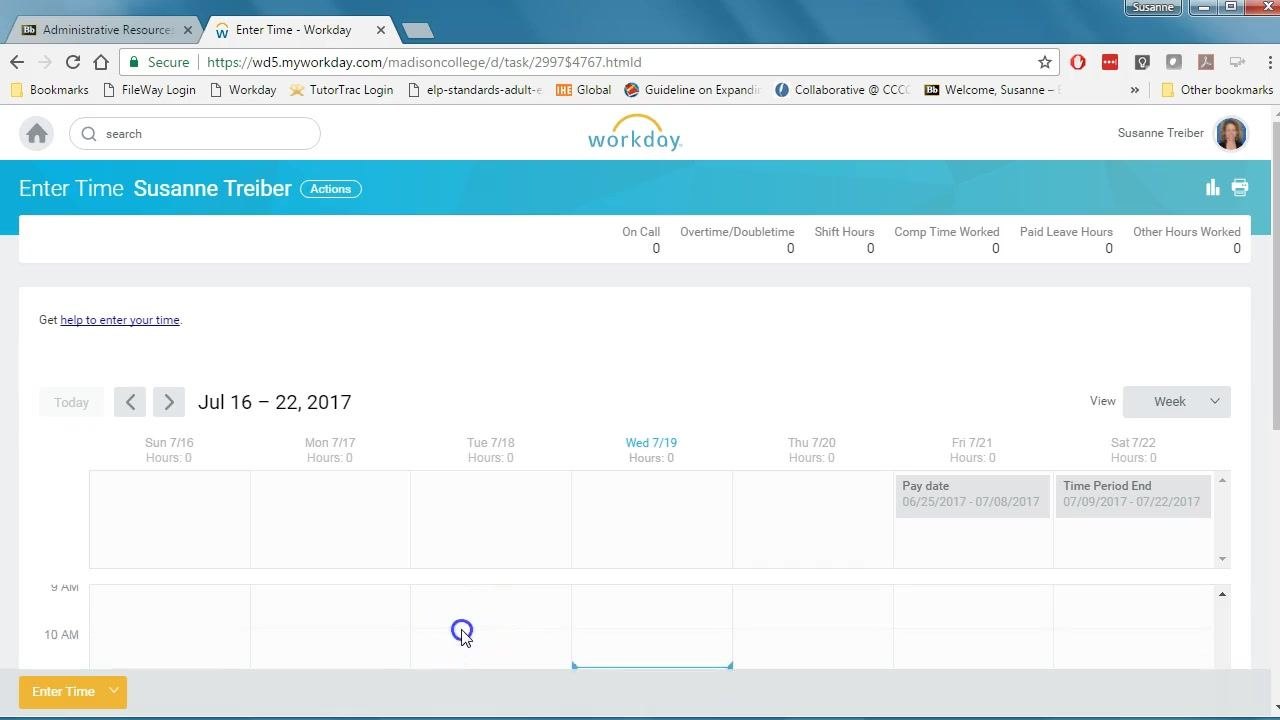
The Enter Time grid for your selected week appears, showing the days of the week (e.g., Sun 7/16, Mon 7/17, Tue 7/18) alongside time slots (e.g., 7 AM, 8 AM, 9 AM).
Click the cell that corresponds to the day you worked and the time you started.
Enter your work hours
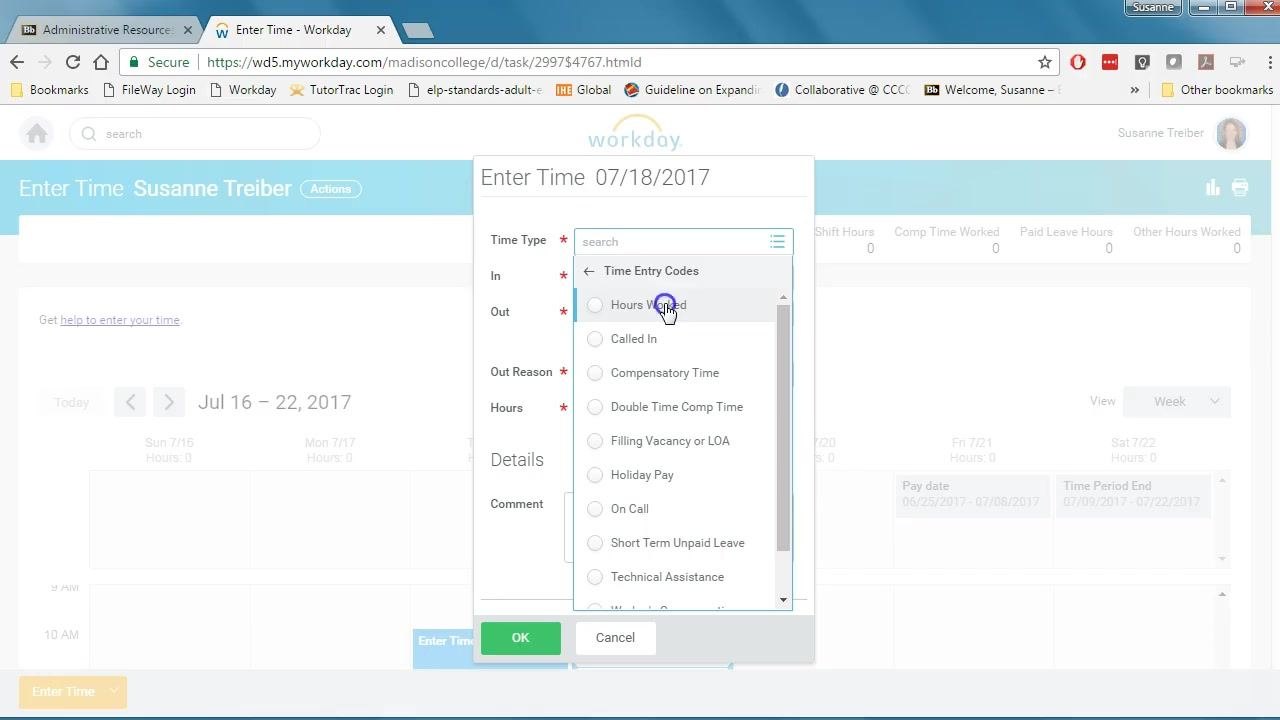
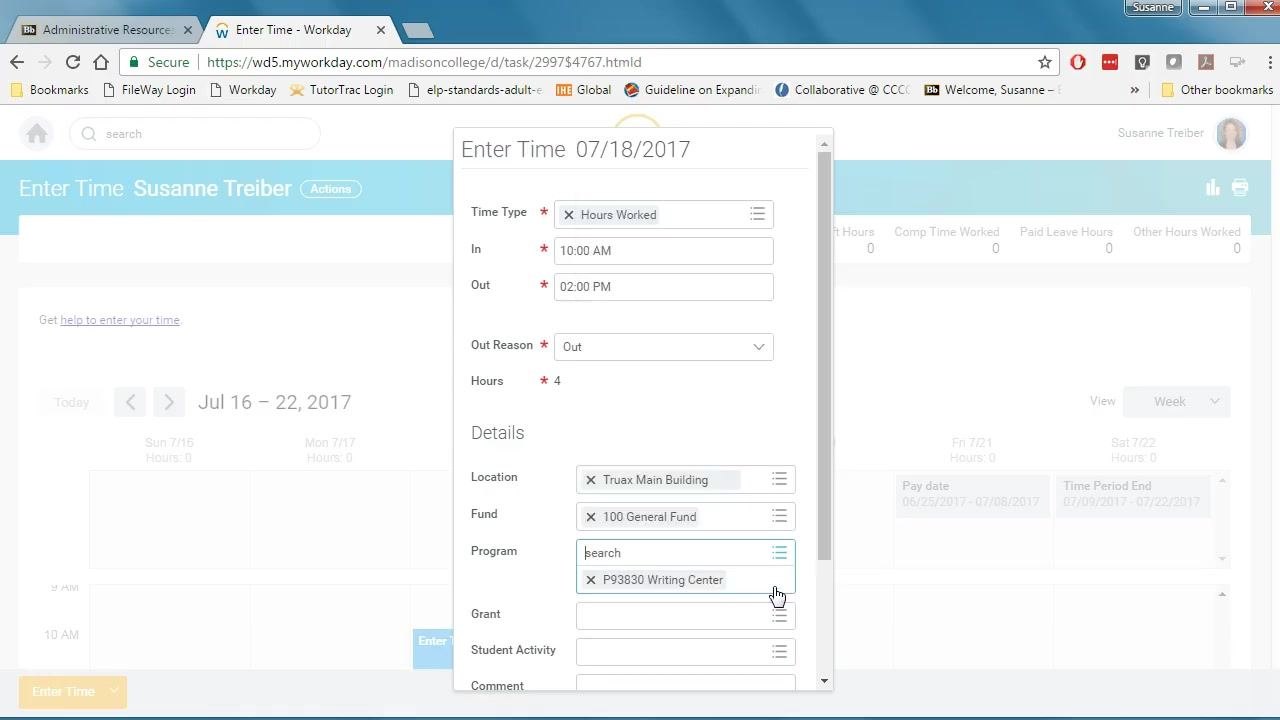
The Enter Time dialog opens for the selected day. Under Time Type, click the dropdown and select Hours Worked from the Time Entry Codes list.
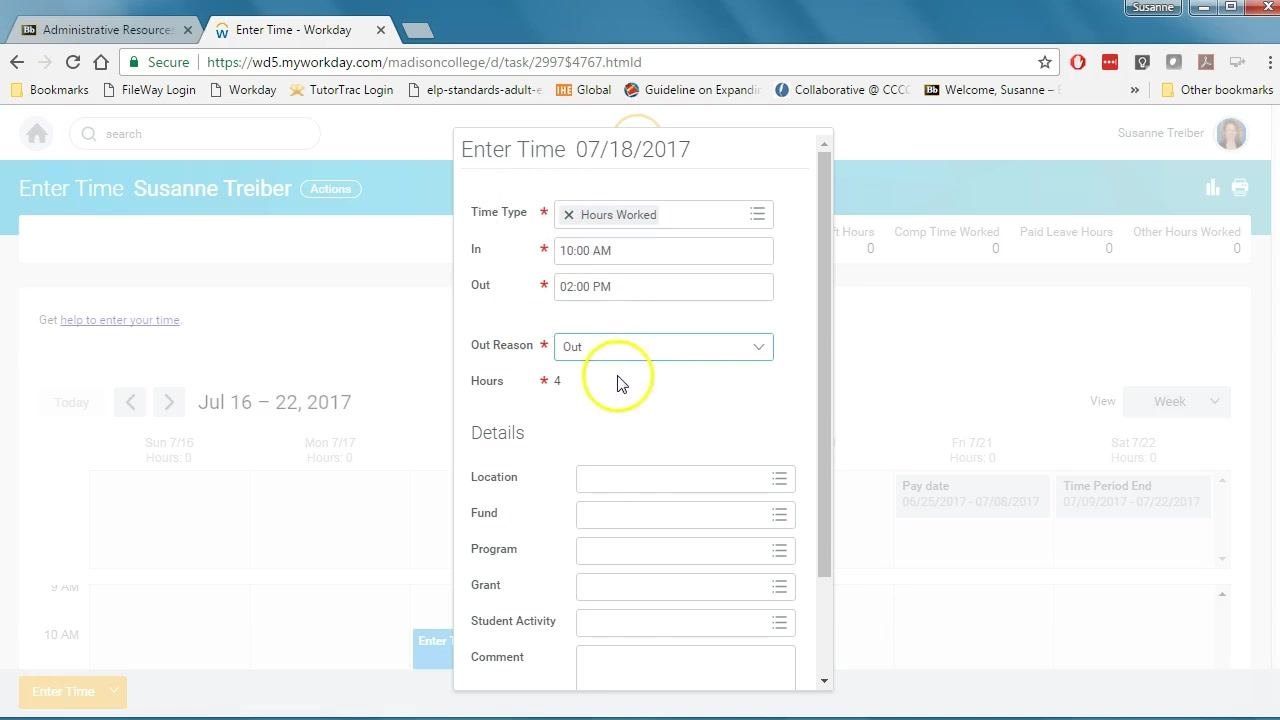
Next, fill in your work hours:
- In the In field, enter your start time (e.g., 10:00 AM)
- In the Out field, enter your end time (e.g., 2:00 PM)
- Confirm Out Reason is set to Out
Workday automatically calculates your total hours based on these entries (e.g., 4 hours).
Complete the Details section
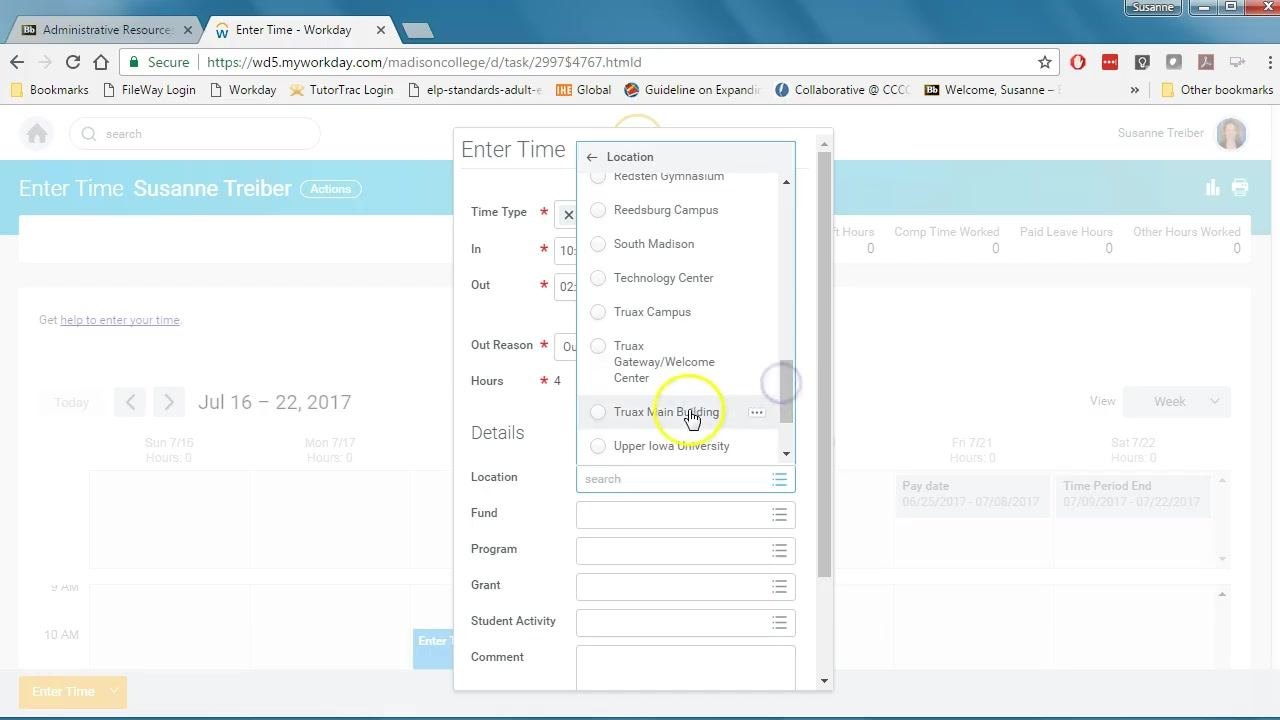
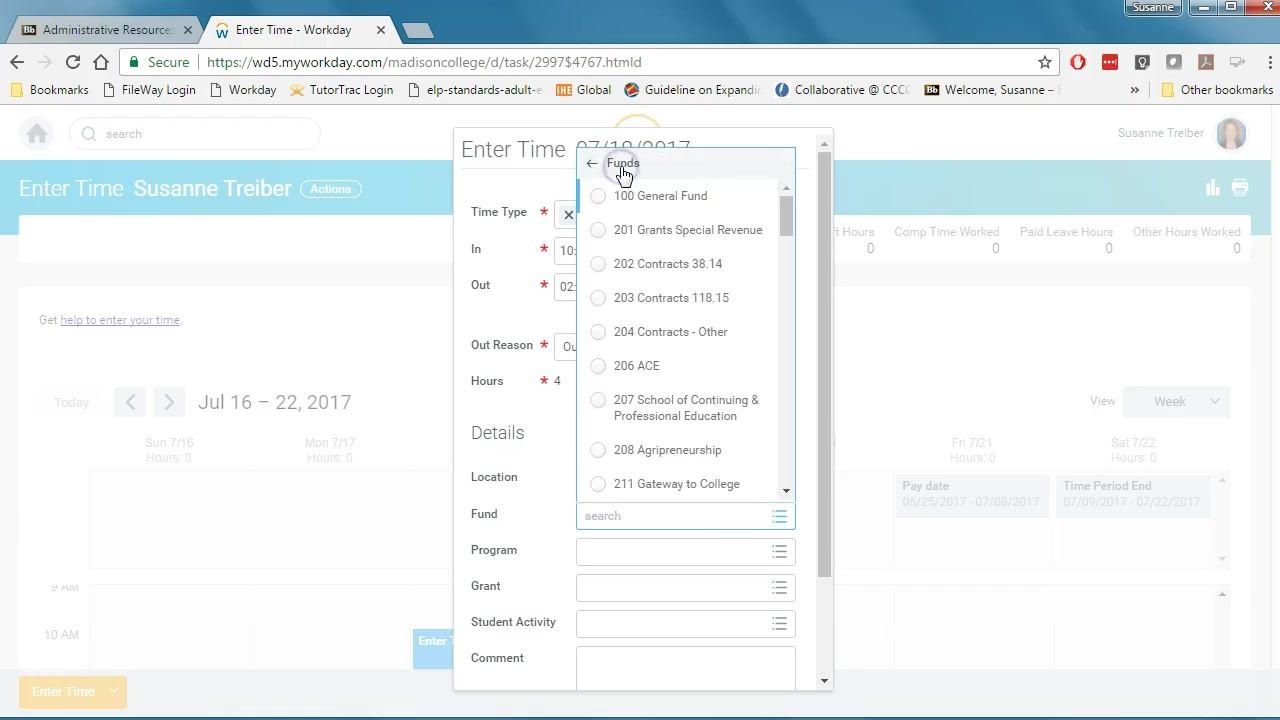
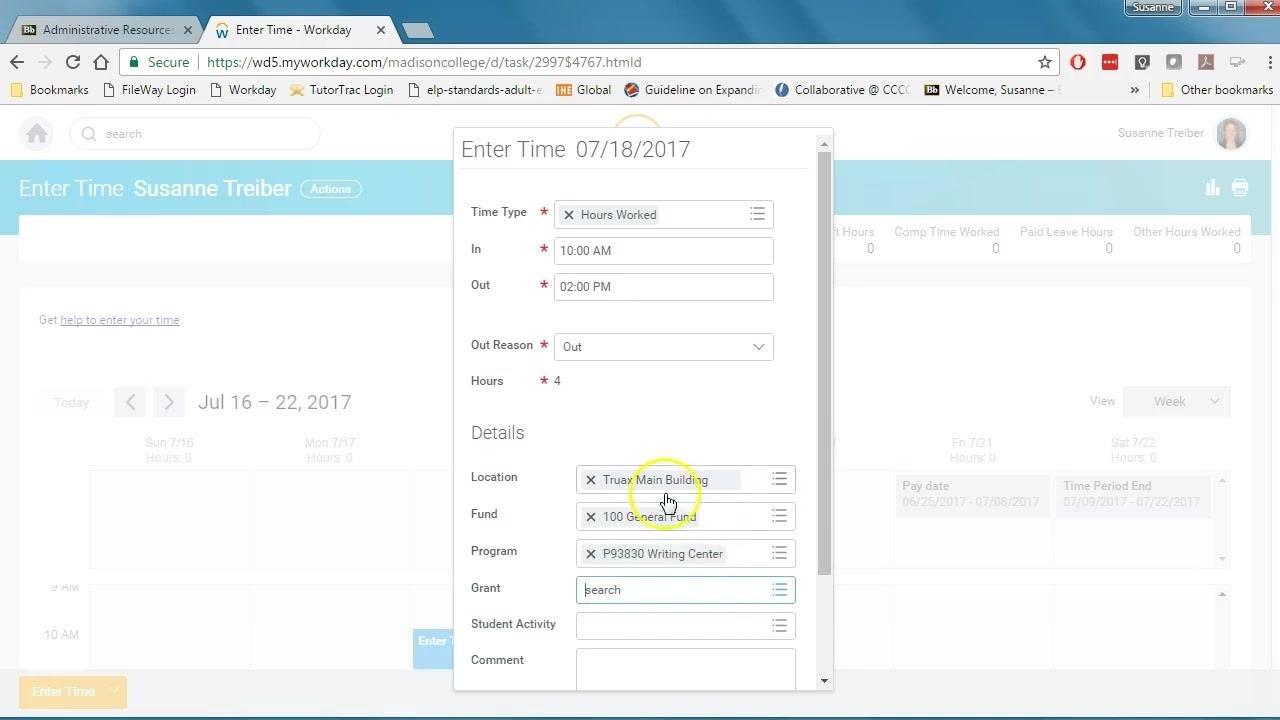
In the Details section of the Enter Time dialog, fill in the following fields:
Location — Click the Location dropdown and select where you actually worked: - Truax or the Online Writing Center → select Truax Main Building - South Campus → select South - Reedsburg → select Reedsburg
Fund — Click the Fund dropdown and select 100 General Fund, which usually appears at the top of the list.
Program — Click into the Program field, type Writing Center, select P93830 Writing Center from the list, and press Tab to confirm.
Confirm that both the top information (Time Type, In, Out, Out Reason, Hours) and the three Details fields (Location, Fund, Program) are filled out.
Add a comment (optional)
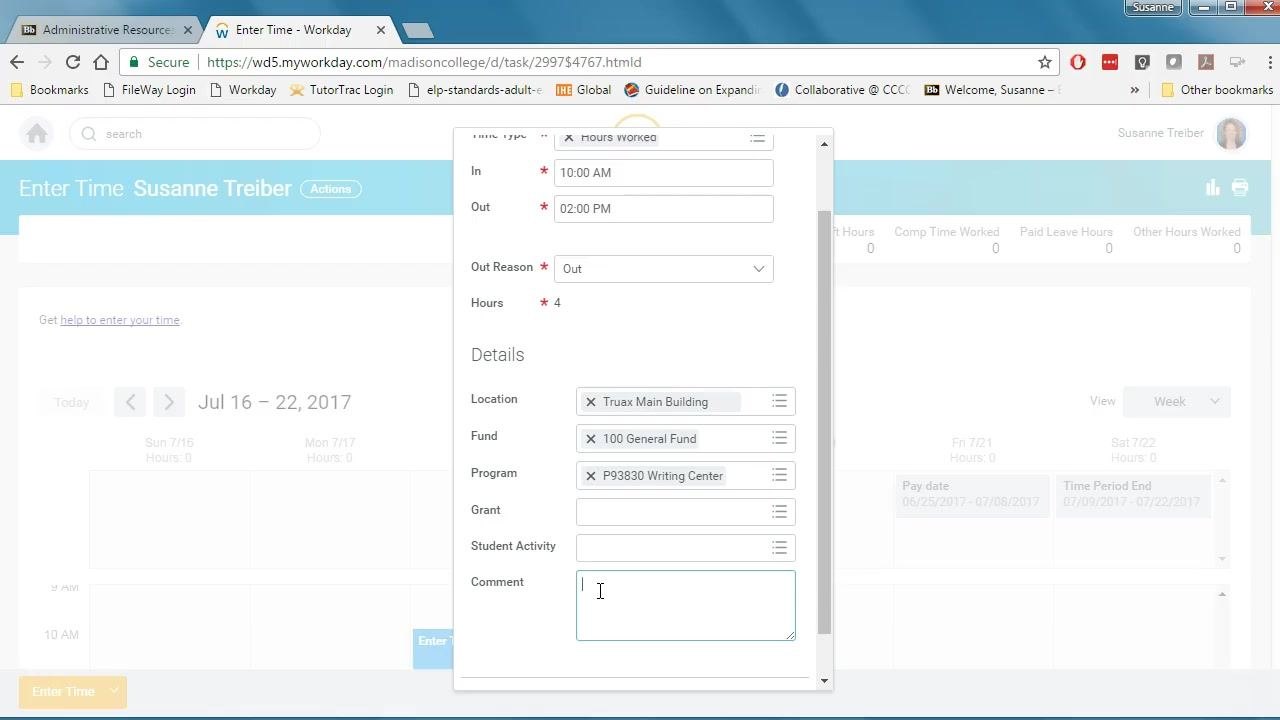
Use the Comment box only if your hours differ from your normal schedule — for example, if you added a shift, covered for someone, or worked outside your usual weekly load. Enter an explanation in this field when applicable.
Save your time entry
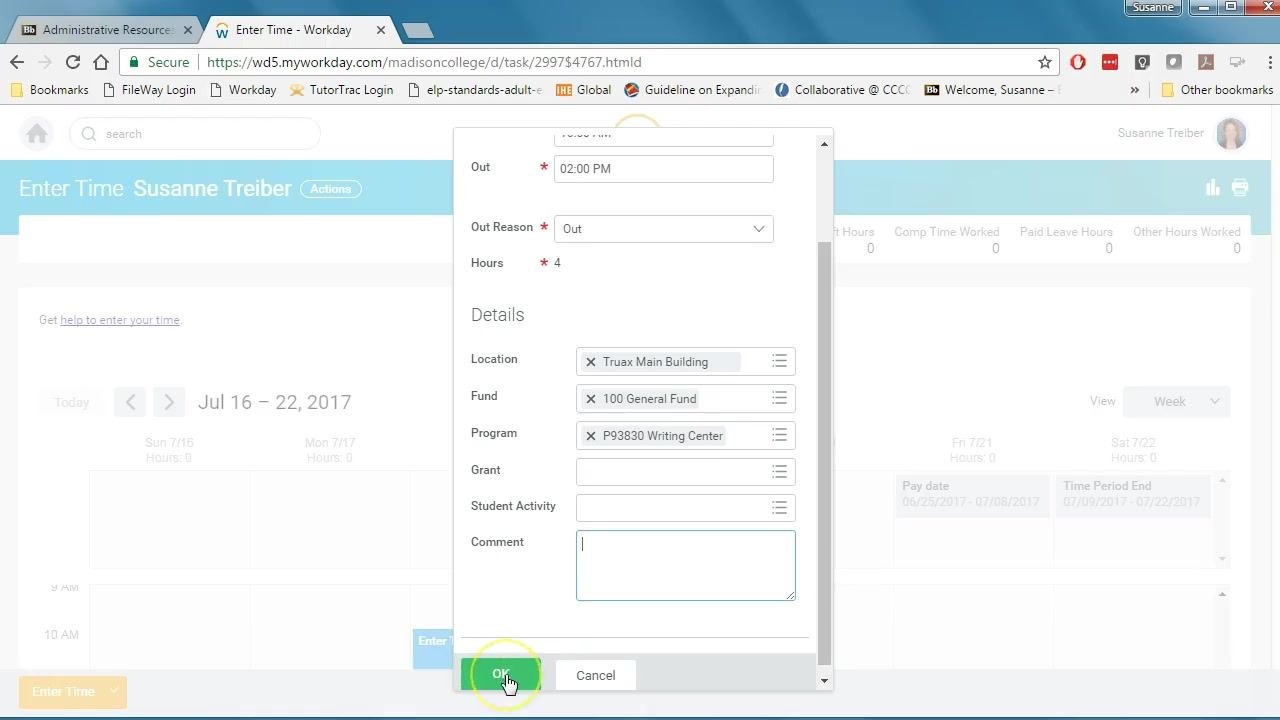
Once all required information and any necessary comments are entered, click OK at the bottom of the dialog. This saves your time entry for the selected day but does not submit it for approval yet.
Review and submit your time entries
If you worked additional hours on the same day or on other days, repeat the time entry process for each block of time. Make sure all your hours for the pay period are entered before submitting.
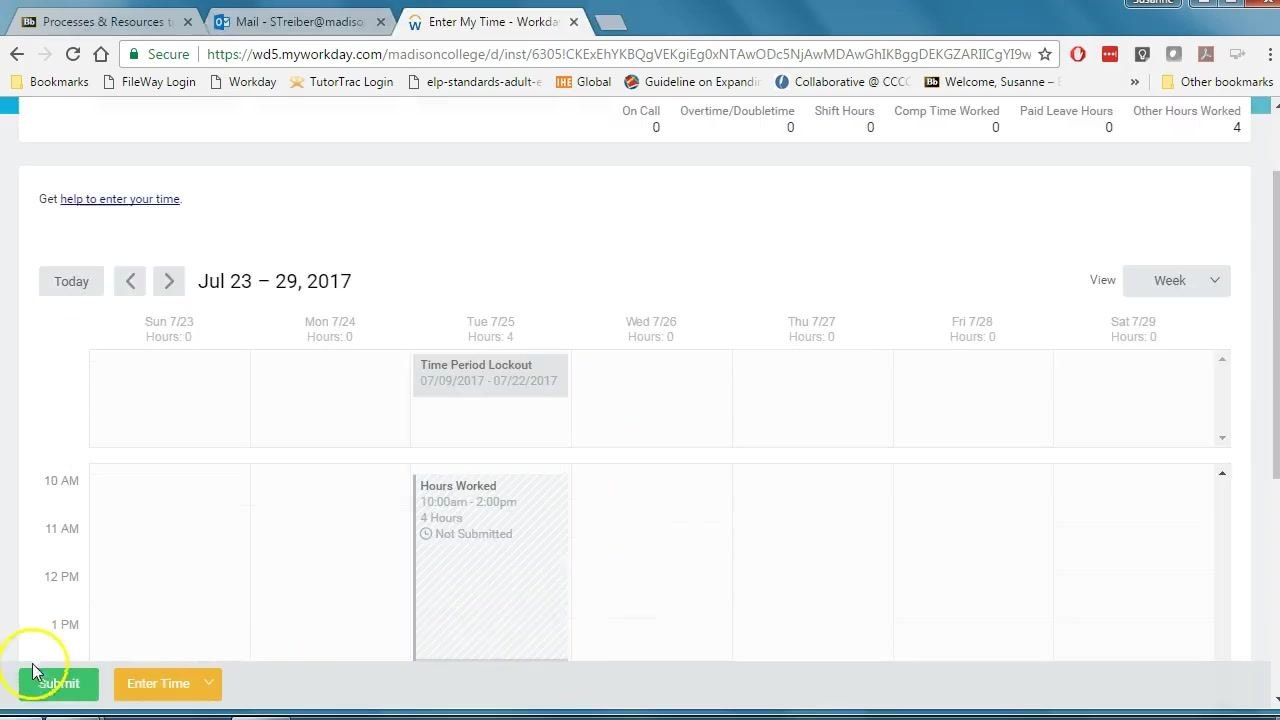
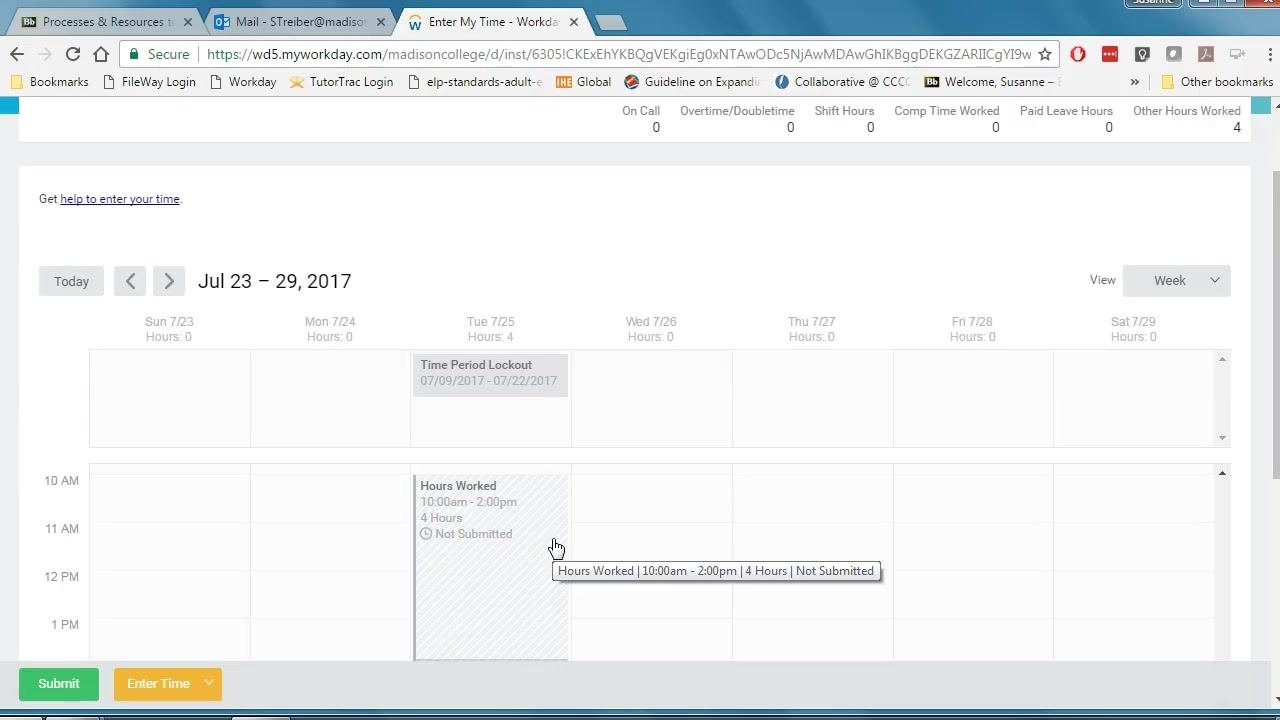
Check the upper right corner of the Enter My Time screen to confirm that Other Hours Worked matches the total hours you actually worked.
Review the calendar grid to verify that each day you worked is accurately reflected. Hover over or click each Hours Worked block to see details such as time in, time out, and submission status.
Click the green Submit button at the bottom left of the Enter My Time screen to begin the submission process.
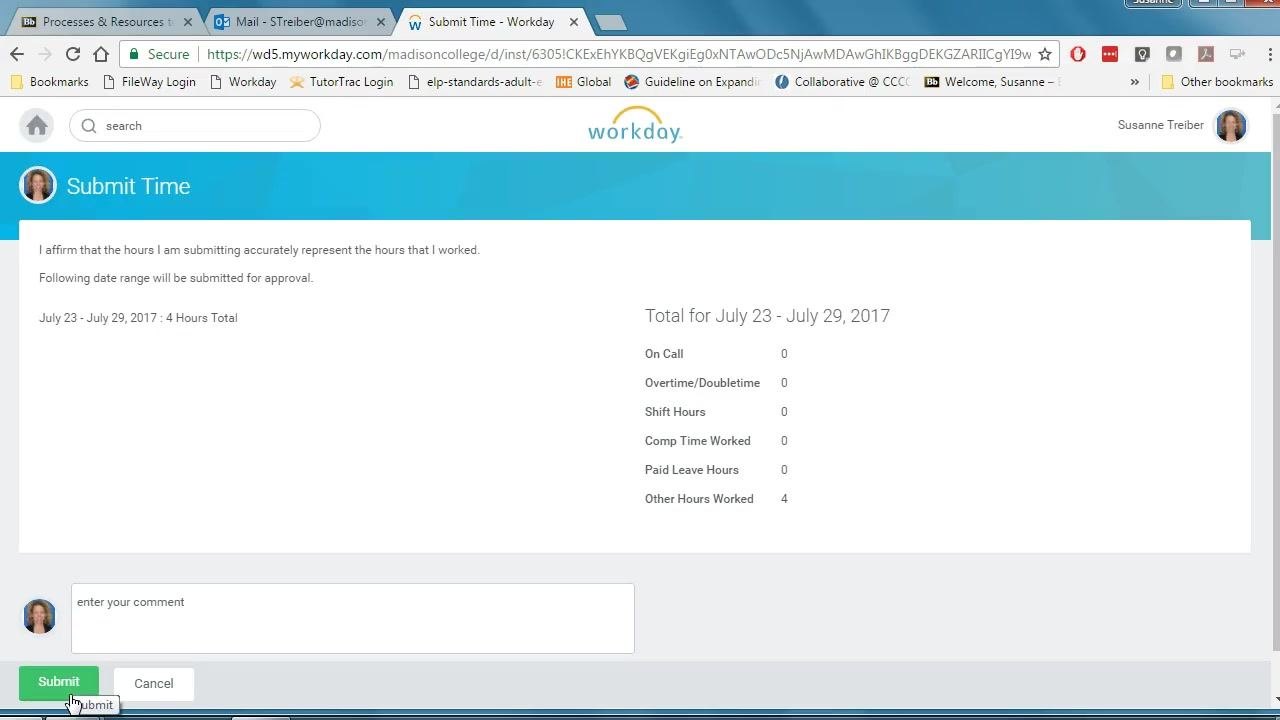
A Submit Time confirmation window appears, summarizing your total hours for the pay period (e.g., "July 23 – July 29, 2017: 4 Hours Total"). If everything is correct, click the green Submit button again.
After submitting, you may see a "Your changes have been saved" message. Click the orange Done button to finish.
Important: You must complete all three steps — Submit, Submit, Done (sometimes remembered as "green, green, orange") — for your hours to be officially submitted for approval and for you to be paid.
Edit submitted time entries if needed
If you discover an error after submitting — for example, you actually worked until 3:00 PM instead of 2:00 PM — you can still correct your entry. Click the relevant day's time block to reopen the Enter Time dialog.
Update the Out time to the correct value.
Click OK to save your changes, then repeat the submission process: click Submit, confirm in the Submit Time window, and click Done to ensure your updated hours are recorded.
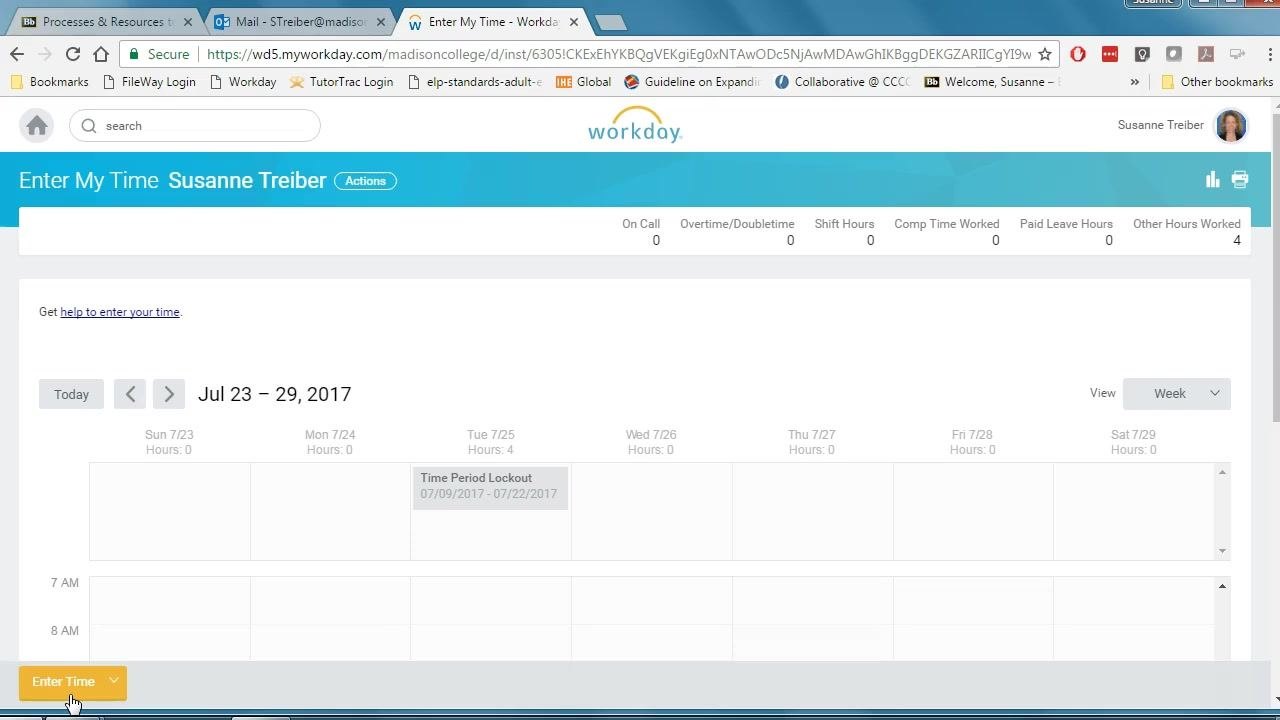
Auto-fill hours from a prior week
If you worked the same schedule as a previous week, you can copy those hours instead of re-entering them manually.
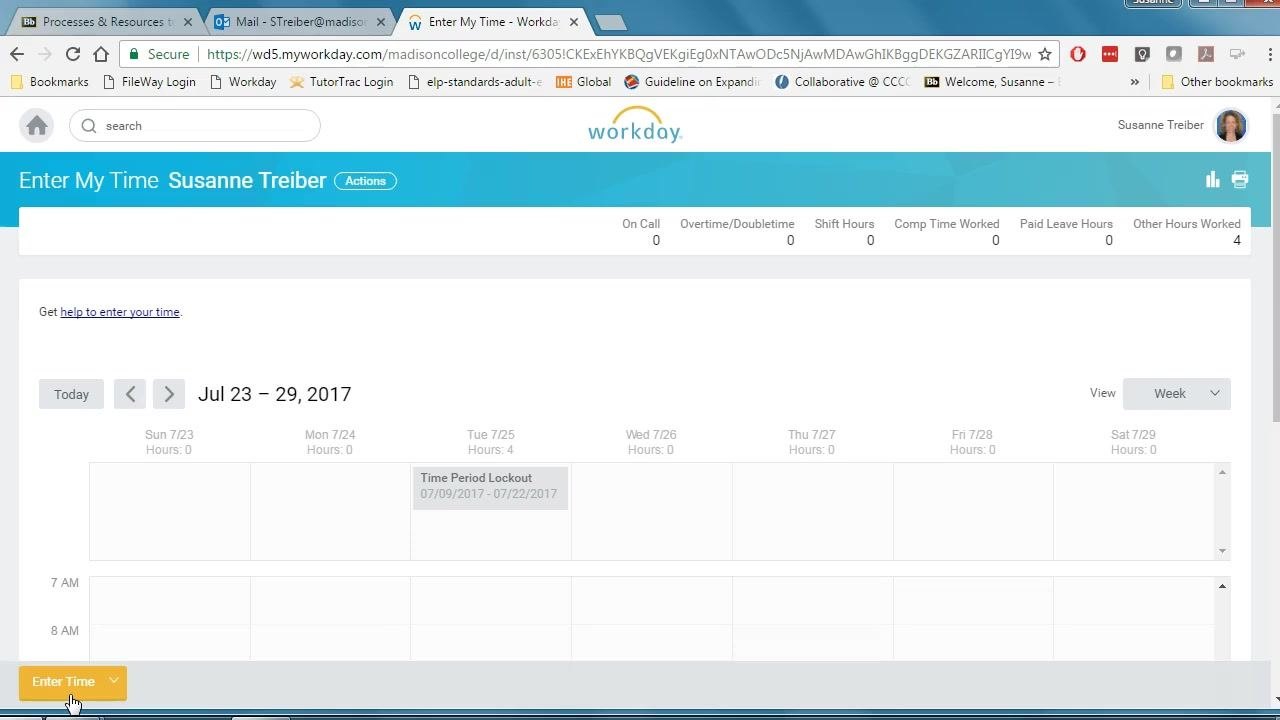
Navigate to the Enter My Time section and confirm you are viewing the correct week (e.g., Jul 16–22, 2017). Your name appears at the top, and the weekly calendar shows 0 hours for days not yet entered.
Click the yellow Enter Time button at the bottom left of the screen to open a dropdown menu, then select Auto-fill from Prior Week. This option is only available if you have previously entered and submitted hours.
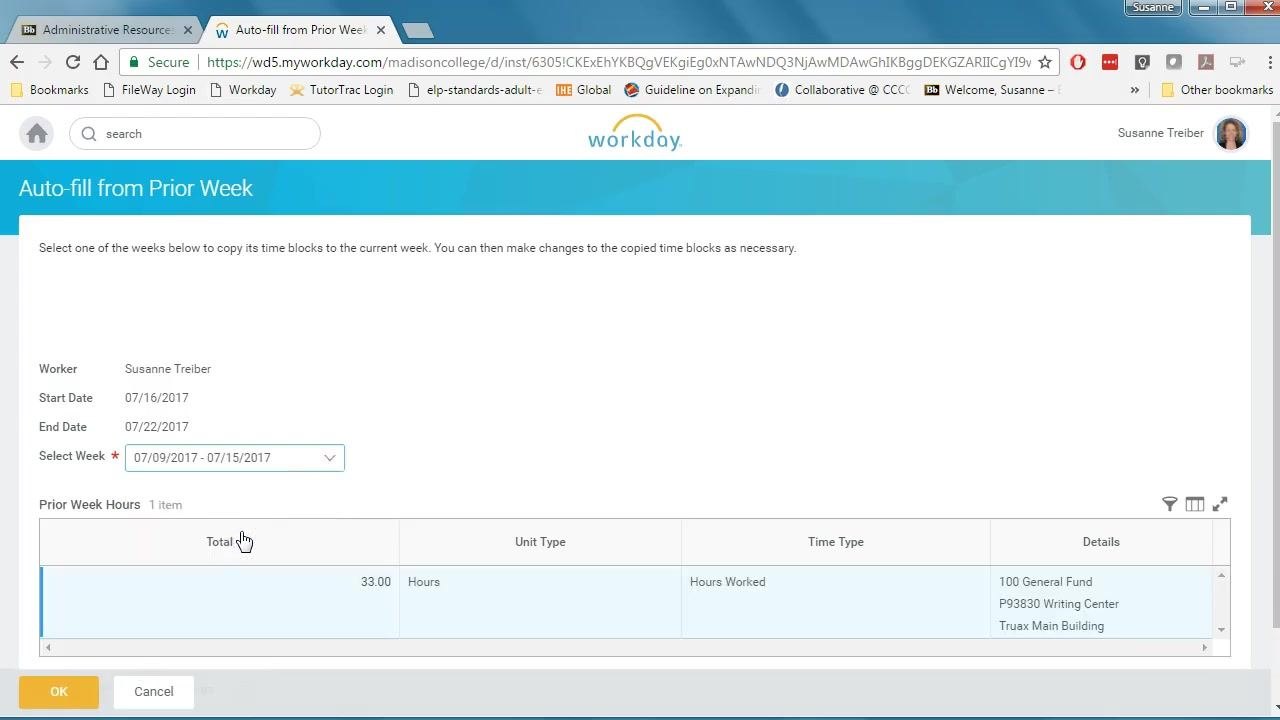
Select the prior week and confirm details
In the Auto-fill from Prior Week window, confirm your name and the start and end dates for the current week (e.g., 07/16/2017–07/22/2017). Use the Select Week dropdown to choose a previous week with submitted hours (e.g., 07/09/2017–07/15/2017).
Review the Prior Week Hours summary, which shows the total hours, unit type, time type, and details (such as fund, program, and location).
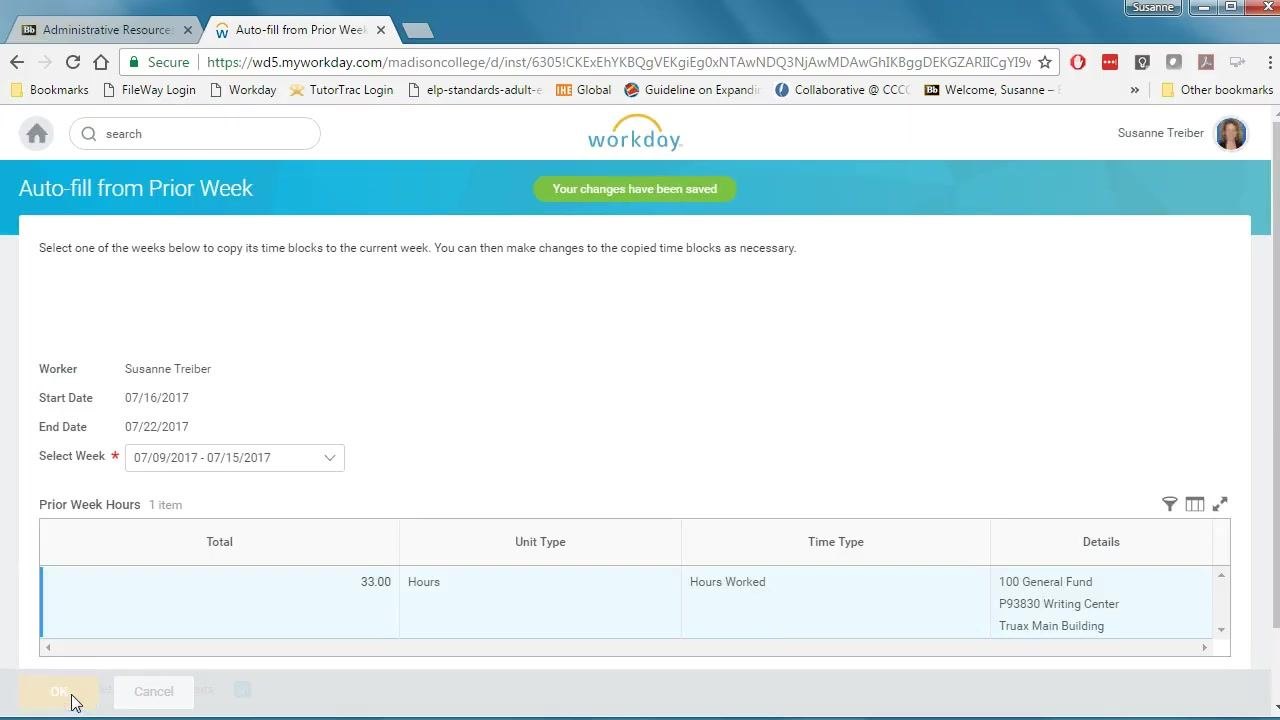
Click OK to copy the selected week's hours into the current week.
Wait for the "Your changes have been saved" confirmation message to appear at the top of the window. The copied hours now appear in the current week but have not been submitted yet — you can still edit the time blocks if needed.
Verify the auto-filled hours
Return to the main Enter My Time screen and review the calendar for the current week. Confirm that hours from the prior week have been filled in for each day, with each time block showing the hours worked, time range, and "Not Submitted" status.
Once you've verified the entries, follow the submission process described in Step 9 to submit these hours for approval.
Finding additional Workday resources
If you have further questions about using Workday, navigate to the Administrative Resources tab in your Blackboard course. This section contains helpful documents and guides.
Within Administrative Resources, locate the Workday Guides folder, which contains step-by-step instructions and troubleshooting information for Workday.
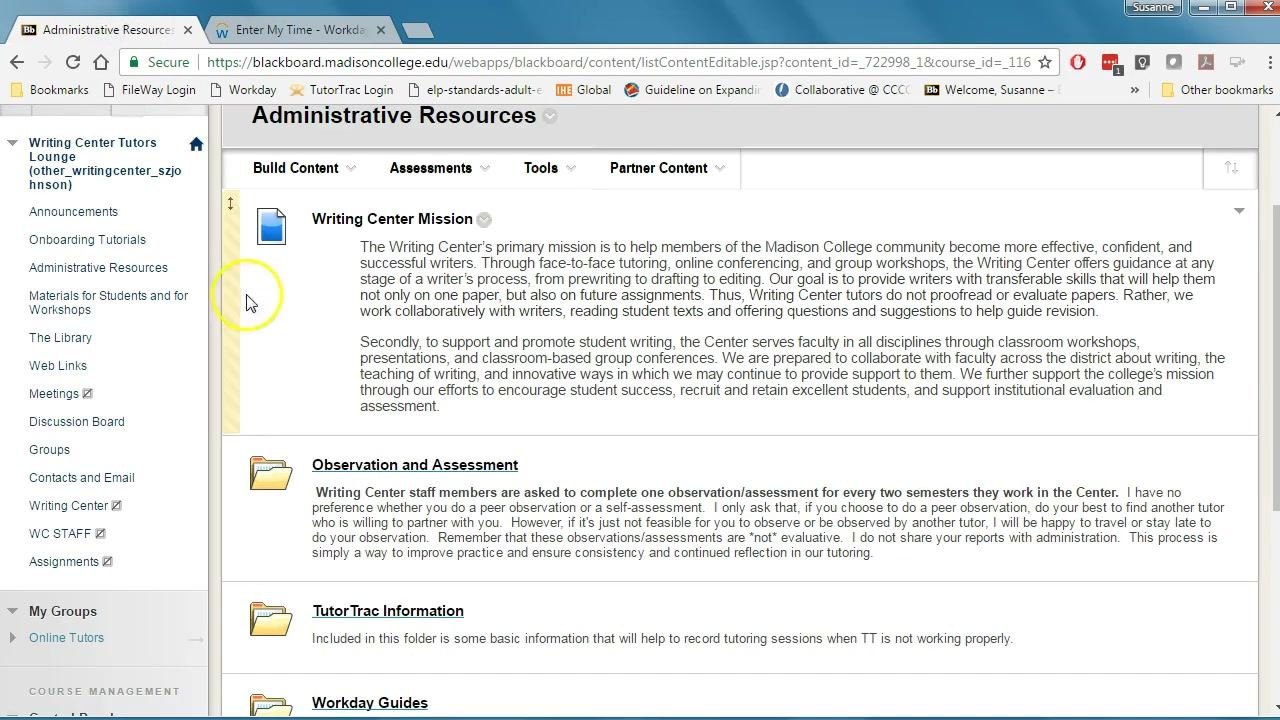
You can also access the Writing Center Handbook and Online Tutoring Handbook in this section by clicking the provided links to download or view these documents.
What's next
Now that you know how to submit time in Workday, be sure to enter your hours regularly and complete the full submission process (Submit, Submit, Done) each pay period. If you need to make corrections after submitting, revisit Step 10, and use the auto-fill feature in Step 11 to save time when your schedule repeats from week to week.
Generation details: cost, quality tiers
Docsie billed 3,500 credits ($2.45) to analyze this 7-minute video at standard quality. The rewrite, template fill and Word/PDF exports were included. The same video at each quality tier:
| Quality | Frames sampled | Credits | Approx. cost |
|---|---|---|---|
| Draft | every 16-30 s | 1,750 | $1.22 |
| Standard (this guide) | every 8-15 s | 3,500 | $2.45 |
| Detailed | every 4-7 s | 7,000 | $4.90 |
| Ultra | every 1-3 s | 14,000 | $9.80 |
Credits priced at $0.70 per 1,000; plans include a monthly allowance. Enterprise customers on on-premise or bring-your-own-model deployments run this on their own inference and pay no per-video credits.
Generated by Docsie Video-to-Docs on 2026-10-12 from a 6-minute video. Screenshots are frames from the source video and belong to their creator, Susanne Treiber, whose original is embedded above. If you own this video and want the guide removed or credited differently, contact us and we will act within one business day.