
How to Create a Calculated Field in Workday
This guide walks you through how to create a calculated field in Workday by reviewing the functions available for each data type, understanding the three levels of calculated field complexity, and learning how a function's return value determines where it belongs. Whether you're building your first calculated field or refining your reporting skills, this walkthrough covers the core functions you'll use most often, along with practical examples for text, dates, numbers, currency, boolean logic, and object-related data.
Video: Intro to Workday Calculated Fields functions by David TheSharingGuy (2022). All credit for the demonstration goes to the creator; watch the original on YouTube. The written guide below was generated from this video by Docsie. Creator? Request a change or removal.
This guide walks you through how to create a calculated field in Workday by reviewing the functions available for each data type, understanding the three levels of calculated field complexity, and learning how a function's return value determines where it belongs. Whether you're building your first calculated field or refining your reporting skills, this walkthrough covers the core functions you'll use most often, along with practical examples for text, dates, numbers, currency, boolean logic, and object-related data.
Prerequisites
- Familiarity with basic Workday reporting concepts.
- An understanding of the six core data types used in calculated fields: Text, Date, Number, Currency, Boolean, and Object(s).
Understanding the three levels of calculated fields in Workday
Step 1: Identify the three levels of calculated fields.
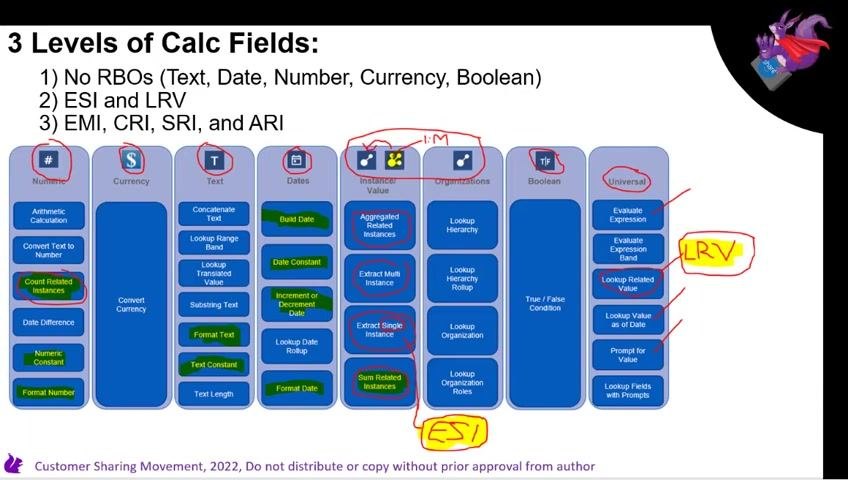
Calculated fields in Workday fall into three levels of increasing complexity:
- Level 1: No RBOs — Text, Date, Number, Currency, Boolean
- Level 2: ESI and LRV (Extract Single Instance and Lookup Related Value)
- Level 3: EMI, CRI, SRI, and ARI (Extract Multi-Instance, Count Related Instances, Sum Related Instances, Aggregate Related Instances)
Step 2: Narrow the function list by removing most lookup functions.
For an introductory view, remove most lookup functions from the full list. Lookup functions appear across several categories, but only a few are kept in focus for this walkthrough — the rest are set aside for later.
Step 3: Review the simplified list of functions you'll focus on.
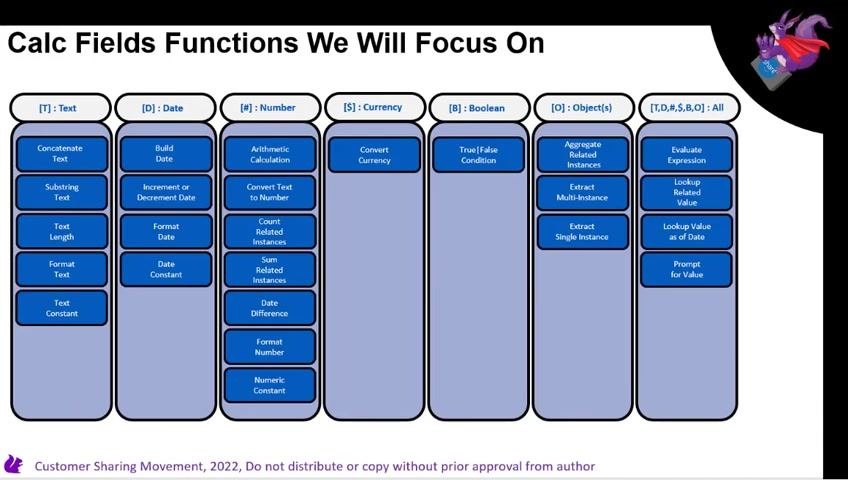
With most lookup functions removed, the remaining functions cover the essentials for each data type:
- Text: Concatenate Text, Substring Text, Text Length, Format Text, Text Constant
- Date: Build Date, Increment or Decrement Date, Format Date, Date Constant
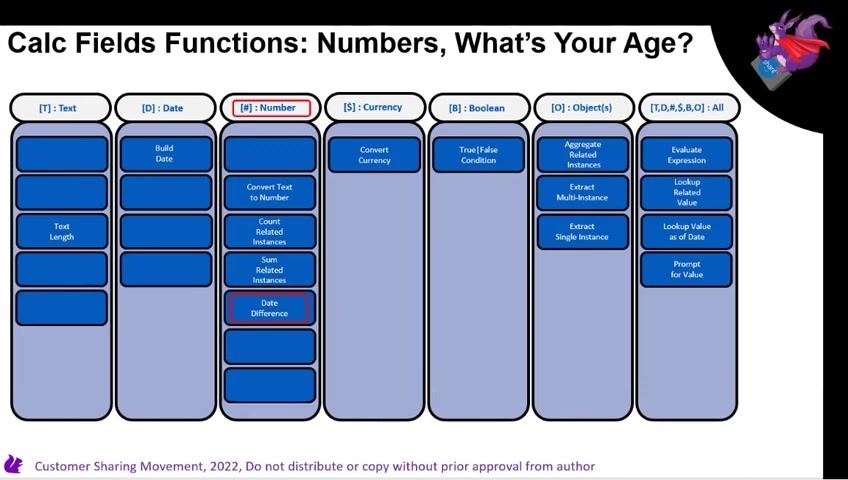
- Number: Arithmetic Calculation, Convert Text to Number, Count Related Instances, Sum Related Instances, Date Difference, Format Number, Numeric Constant
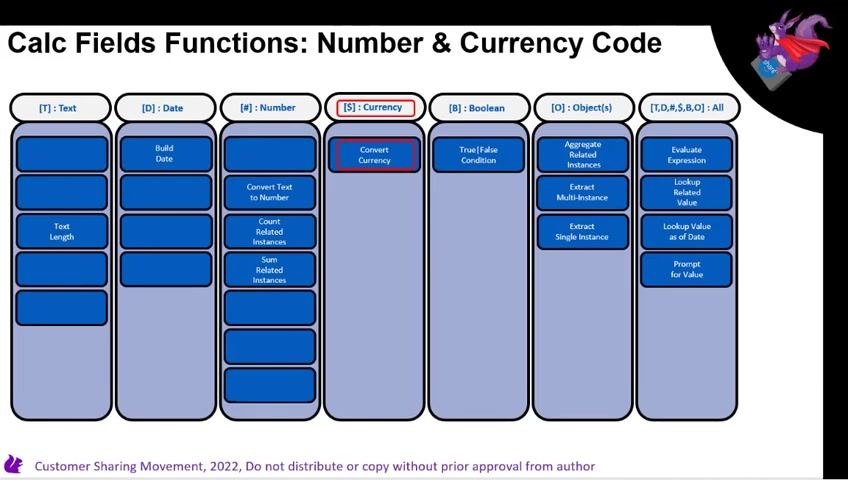
- Currency: Convert Currency
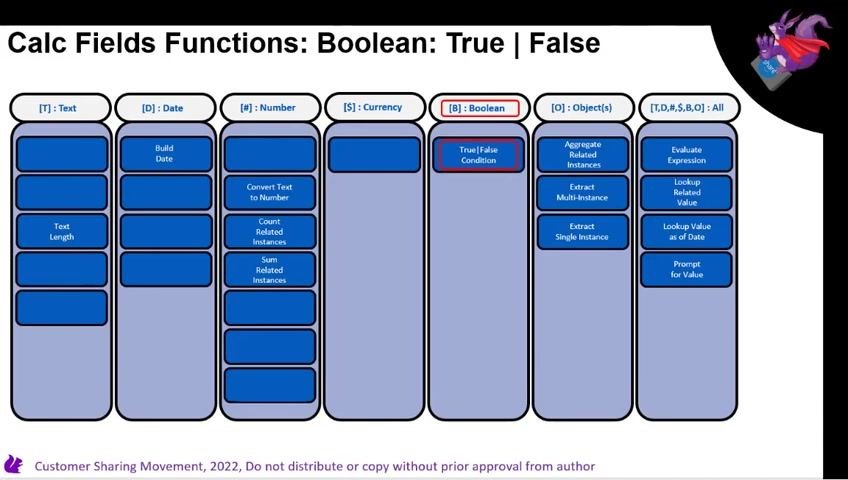
- Boolean: True/False Condition
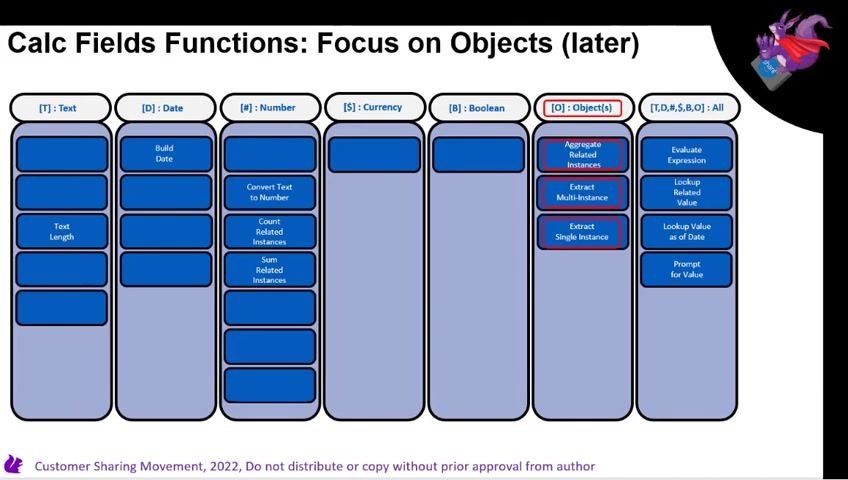
- Object(s): Aggregate Related Instances, Extract Multi-Instance, Extract Single Instance
- All Types: Evaluate Expression, Lookup Related Value, Lookup Value as of Date, Prompt for Value
Working with constants and formatting functions
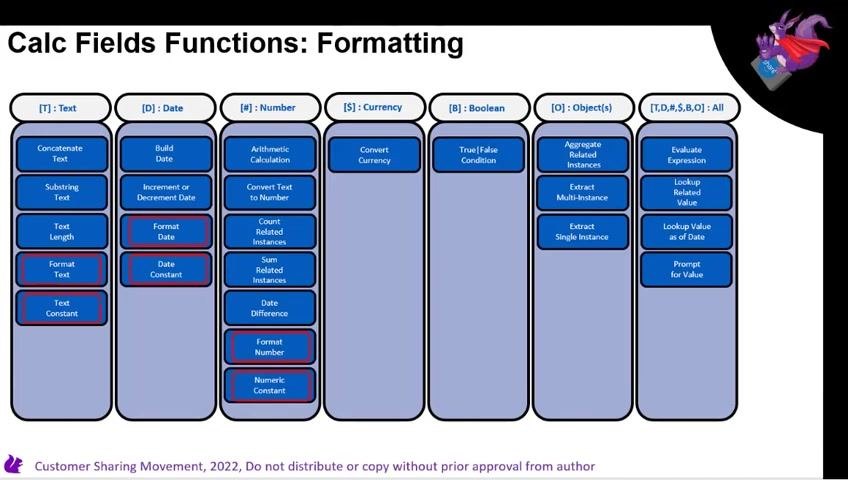
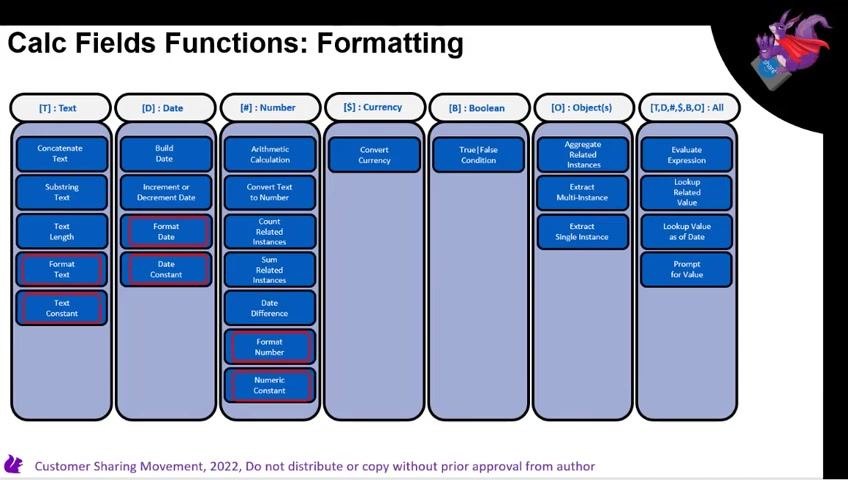
Calculated fields use three types of constants: a Text Constant (for example, the word "hello"), a Date Constant (for example, January 1st, 2030), and a Numeric Constant (for example, the number 99). Each matches its corresponding data type.
Step 4: Locate the formatting functions for each data type.
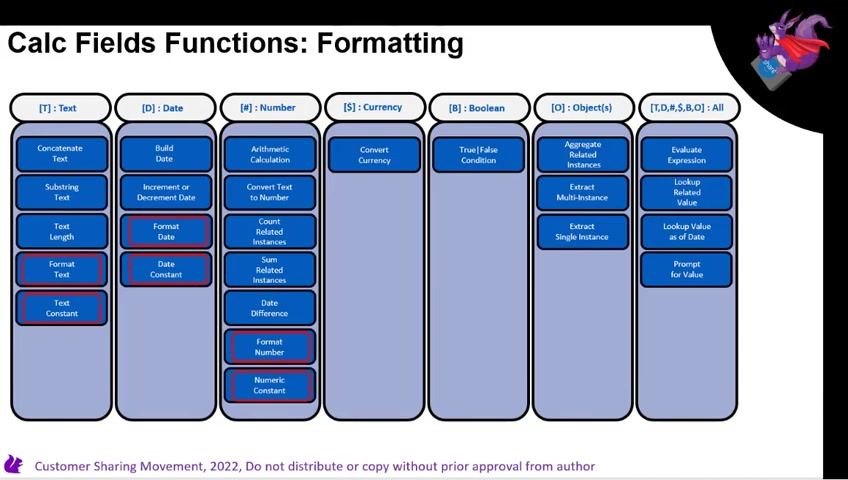
Three formatting functions let you control how values display: Format Text (convert text to all lowercase or all uppercase), Format Date (change how dates display, such as switching slashes to hyphens), and Format Number (adjust how numbers are displayed).
Step 5: Apply the correct formatting function to your data type.
Use Format Text to change letter casing, Format Date to alter how a date appears, and Format Number to control number display. Each function only applies within its own data type column.
Creating a calculated field in Workday: practical examples
Step 6: Format a number for currency display.
If an arithmetic calculation produces several digits to the right of the decimal point but you need to display it as money, use the Format Number function to round the value to two decimal places.
Step 7: Create initials using text functions.
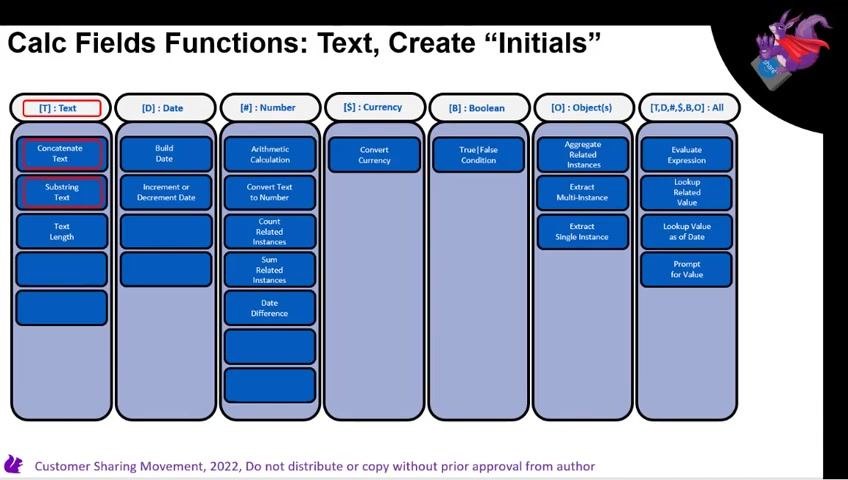
Build a person's initials by extracting the first character of their first name with Substring Text, extracting the first character of their last name with Substring Text, and then joining the two results together with Concatenate Text.
Step 8: Add days to a date.
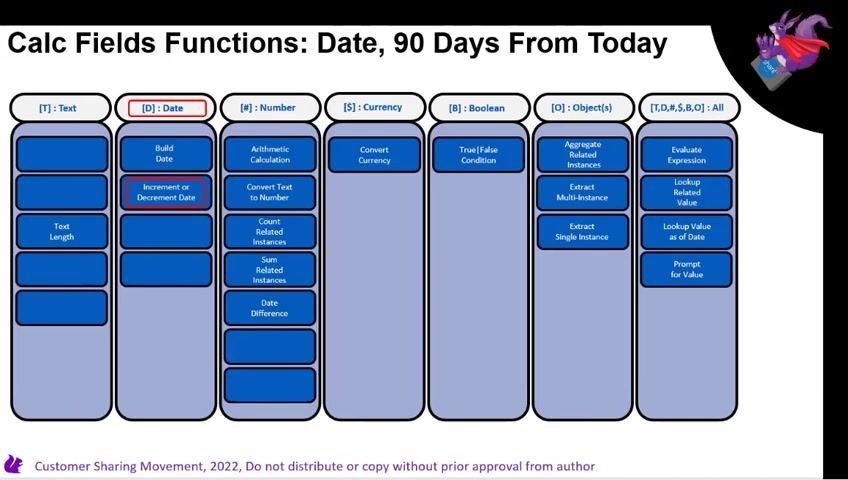
To calculate a date a set number of days from today (for example, 90 days), use the Increment or Decrement Date function under the Date category. This lets you calculate a future or past date by adding or subtracting days.
Step 9: Perform arithmetic on number fields.
Use the Arithmetic Calculation function to perform addition, subtraction, multiplication, and division on number fields. This function supports most numeric calculations in your data set.
Step 10: Understand why Date Difference is a Number function.
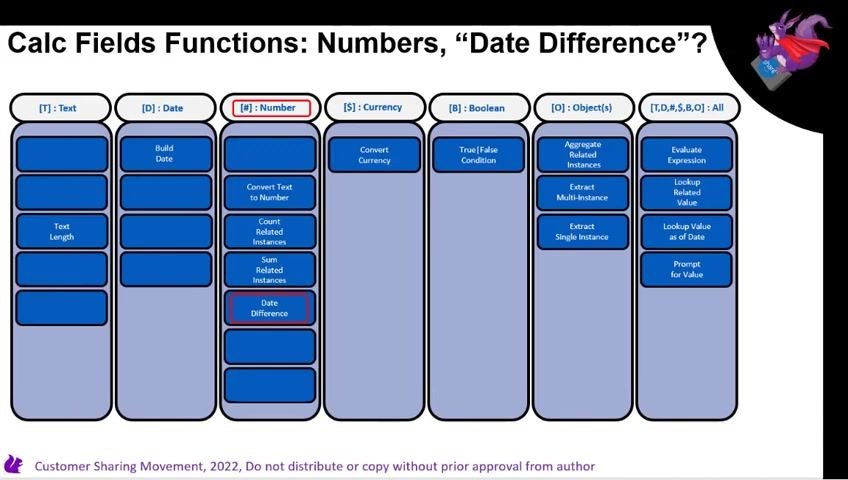
The Date Difference function is grouped under the Number category, not Date, because it returns a numeric value (the difference expressed in days, months, or years) rather than a date. For example, to calculate age, subtract a date of birth from today's date using Date Difference — the result is a number representing age.
Step 11: Calculate age in days.
To find someone's age expressed in days, use Date Difference with the date of birth and today's date as inputs. The output is the total number of days between the two dates.
Using currency, boolean, and object functions
Step 12: Convert between currencies.
A currency value always consists of a number plus a currency code (such as USD or EUR). Use the Convert Currency function, grouped under the Currency category, to convert a value from one currency to another.
Step 13: Apply boolean logic with True/False conditions.
Use the True/False Condition function, grouped under the Boolean category, to compare values or fields. This condition evaluates to either true or false, enabling logical branching in your calculations.
Step 14: Identify object-related functions for later use.
Some functions operate on objects and return numbers, including Aggregate Related Instances, Extract Multi-Instance, and Extract Single Instance. These are covered in more depth in a later section.
Step 15: Recognize number functions tied to objects.
Some Number-category functions relate to objects, including Count Related Instances and Sum Related Instances. These are also explored in a future section.
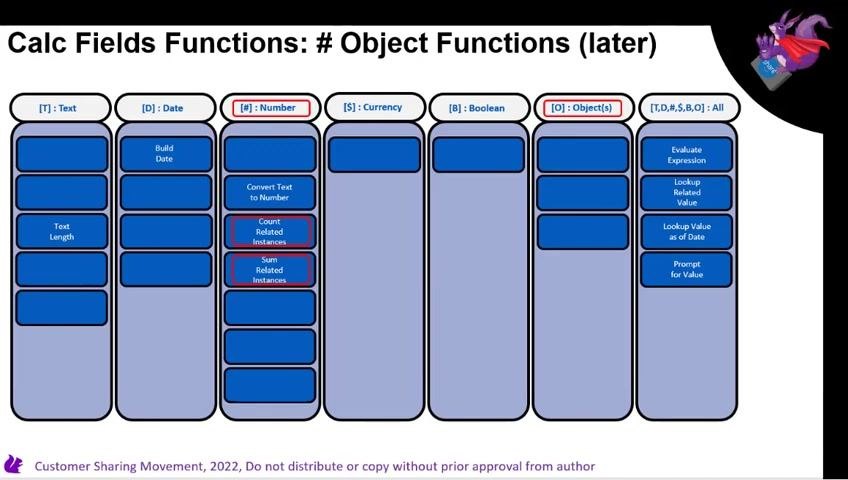
Step 16: Use functions that can return any data type.
Functions grouped under the "All" category can return Text, Date, Number, Currency, Boolean, or Object values. Key functions in this group are:
- Evaluate Expression: Calculate a value based on a custom expression.
- Lookup Related Value: Retrieve a value from a related record.
- Lookup Value as of Date: Retrieve a value as it existed on a specific date, past or future — for example, looking up a person's name as of a year ago, ten years ago, or a future date if a name change is scheduled, or looking up a salary as of a specific date.
- Prompt for Value: Request user input for a value at runtime.
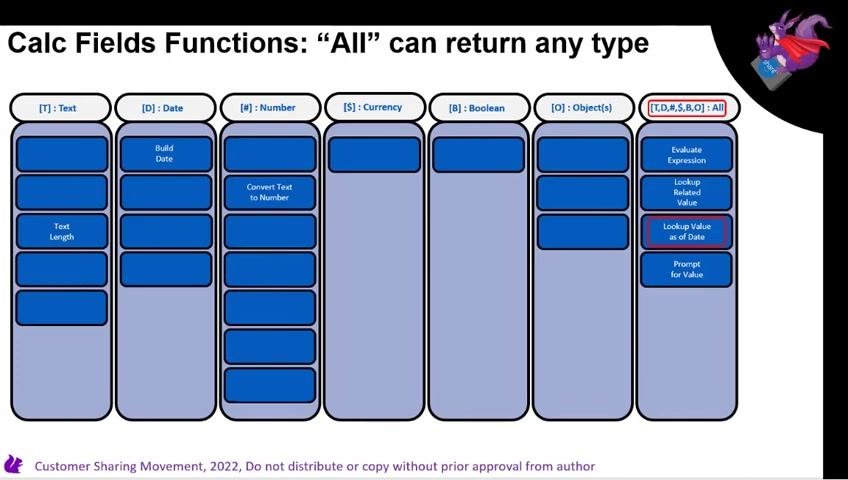
Step 17: Use Evaluate Expression for IF-style logic.
The Evaluate Expression function, grouped under the "All" category (labeled [T, D, #, $, B, O] : All), can return any data type. Use it to perform IF-style logic, producing dynamic, conditional results based on your custom expression. The "All" category also includes Lookup Related Value and Prompt for Value.
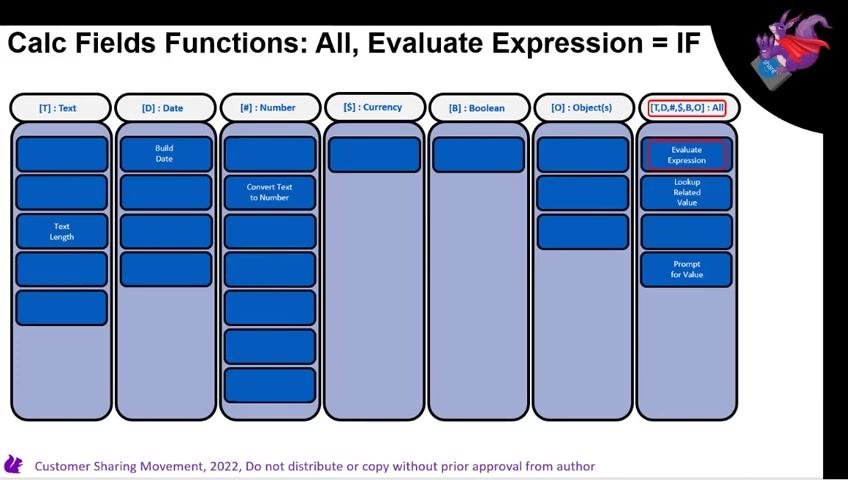
Understanding data types and function return values
Step 18: Assign a data type before using a value in a calculation.
Every value used in a calculated field must have an assigned data type before use — Text, Date, Number, Currency, Boolean, or Object(s). For example, to test whether a number value is less than zero, you must first declare that value as a Number type.
Step 19: Implement conditional logic using Evaluate Expression.
Use Evaluate Expression to implement IF-THEN-ELSE logic. For example, test if a number is less than zero: if true, return zero; if not, return the original value. This logic is handled by Evaluate Expression, available across all data types.
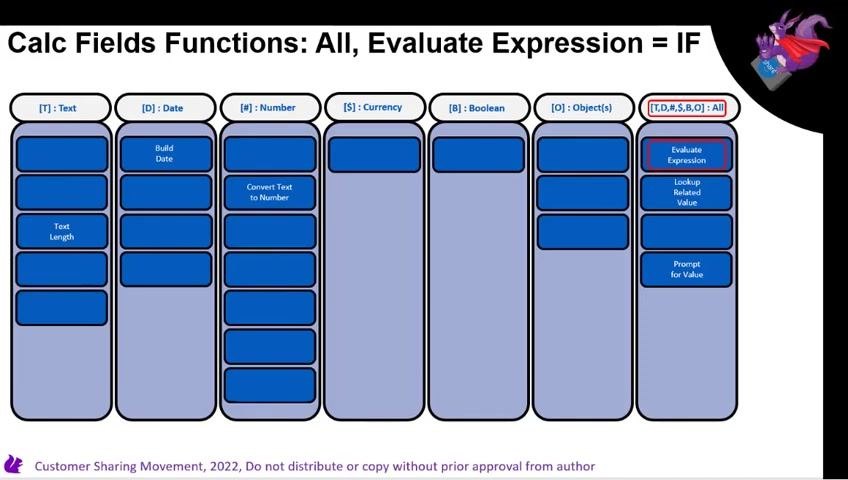
Step 20: Return values based on your condition.
If your condition (for example, value less than 0) is met, return the specified value (for example, 0). If the condition is not met, return the original value. This ensures your calculation always returns the expected data type.
Step 21: Recognize that each data type has a limited, specific set of functions.
The available calculated field functions are limited and specific to each data type — there isn't a universal function list that applies everywhere.
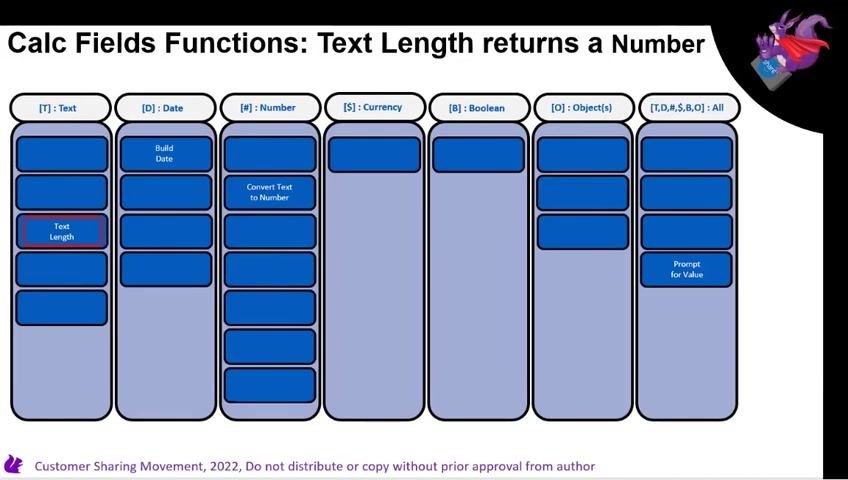
Step 22: Understand that a function's return type may differ from its input type.
Some functions operate on one data type but return another. For example, the Text Length function operates on Text but returns a Number — the length of the text string, not the text itself.
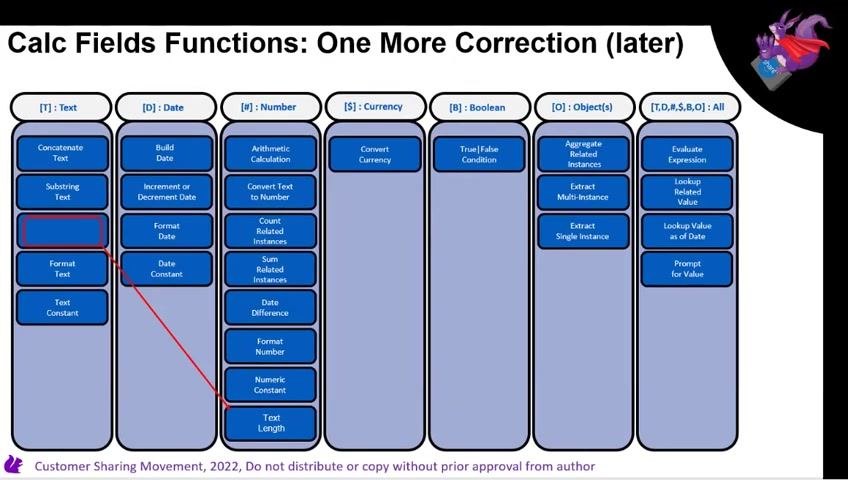
Step 23: Track how functions move between data type columns.
Functions are organized by their return value, not by the data type they operate on. As an example, Text Length moves from the Text column to the Number column because it returns a Number.
Step 24: Review the corrected function list.
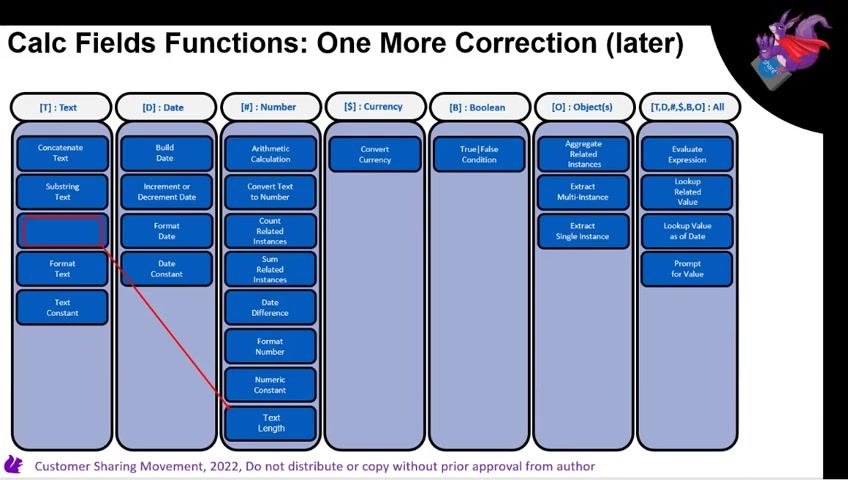
After moving functions to the columns matching their return type, review the updated, more accurate list of calculated field functions.
Step 25: Keep the updated list for reference.
This corrected list of functions, organized by actual return type, will be referenced again later in the process.
Reviewing calc field levels for building calculated fields
Step 26: Review the three levels of calculated fields again, with function detail.
Calculated fields organize into three levels:
- Level 1 — No RBOs: Text, Date, Number, Currency, Boolean (no Related Business Objects)
- Level 2 — ESI and LRV: Extract Single Instance and Lookup Related Value
- Level 3 — EMI, CRI, SRI, and ARI: Extract Multi Instance, Count Related Instances, Sum Related Instances, Aggregate Related Instances
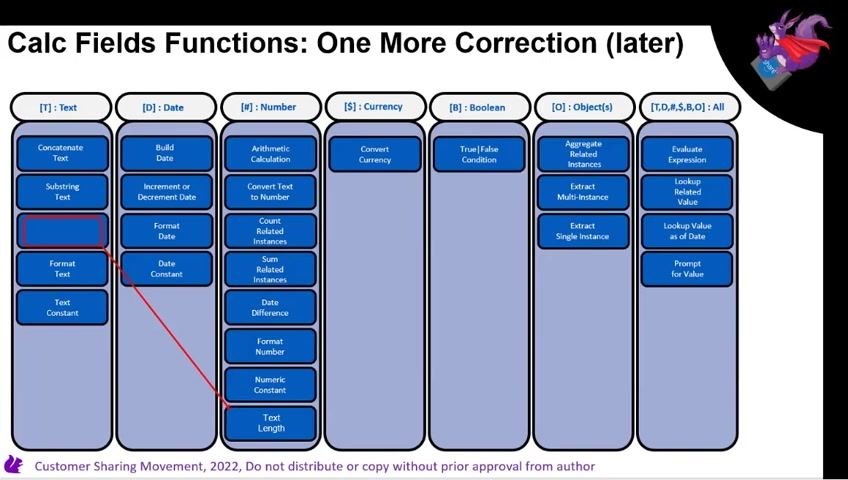
Level 1 functions don't involve related business objects. Level 2 functions extract or look up values from related objects. Level 3 functions aggregate or summarize data across multiple related instances.
Step 27: Examine the full matrix of functions grouped by level.
Review the matrix showing functions grouped by data type and level, with color-coding and annotations marking level abbreviations such as ESI and LRV.
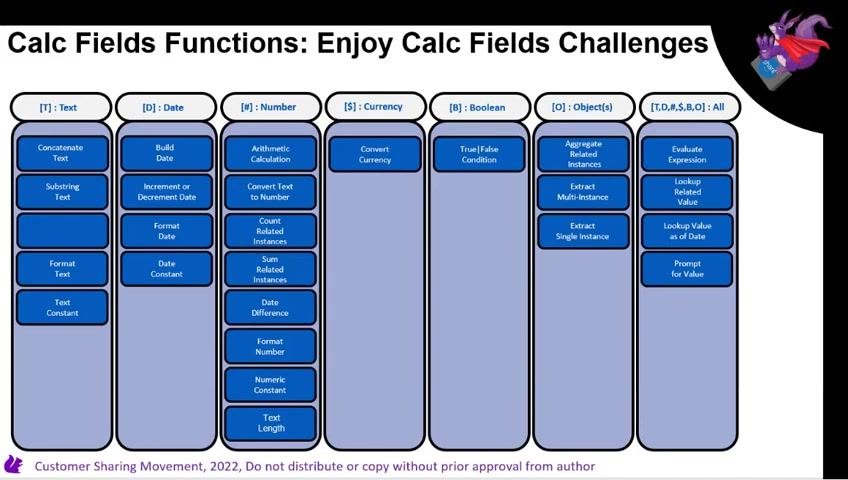
Each column in the matrix represents a data type, and the functions listed under a column return values of that type. Universal functions, in the rightmost column, work across all data types.
Step 28: Review the complete list of calculated field functions by data type.
Use this comprehensive list as your reference for which functions apply to which data type:
- Text: Concatenate Text, Substring Text, Format Text, Text Constant
- Date: Build Date, Increment or Decrement Date, Format Date, Date Constant
- Number: Arithmetic Calculation, Convert Text to Number, Count Related Instances, Sum Related Instances, Date Difference, Numeric Constant, Format Number, Text Length
- Currency: Convert Currency
- Boolean: True/False Condition
- Object(s): Aggregate Related Instances, Extract Multi-Instance, Extract Single Instance
- Universal (All Types): Evaluate Expression, Lookup Related Value, Lookup Value as of Date, Prompt for Value
Step 29: Move on to hands-on challenges.
With the function categories and their data types reviewed, you're ready to apply this knowledge in practical, hands-on exercises.
Summary
You've now reviewed how to create a calculated field in Workday, from selecting the right function for each data type to understanding how a function's return value — not its input — determines its category. You've walked through the three levels of calculated fields, seen practical examples like formatting currency, building initials, adding days to a date, and calculating age, and learned how versatile "All" category functions like Evaluate Expression support conditional logic across every data type. With this foundation, you're ready to apply the correct functions to your own calculated field challenges.
Generation details: cost, quality tiers
Docsie billed 4,000 credits ($2.80) to analyze this 8-minute video at standard quality. The rewrite, template fill and Word/PDF exports were included. The same video at each quality tier:
| Quality | Frames sampled | Credits | Approx. cost |
|---|---|---|---|
| Draft | every 16-30 s | 2,000 | $1.40 |
| Standard (this guide) | every 8-15 s | 4,000 | $2.80 |
| Detailed | every 4-7 s | 8,000 | $5.60 |
| Ultra | every 1-3 s | 16,000 | $11.20 |
Credits priced at $0.70 per 1,000; plans include a monthly allowance. Enterprise customers on on-premise or bring-your-own-model deployments run this on their own inference and pay no per-video credits.
Generated by Docsie Video-to-Docs on 2026-09-14 from a 7-minute video. Screenshots are frames from the source video and belong to their creator, David TheSharingGuy, whose original is embedded above. If you own this video and want the guide removed or credited differently, contact us and we will act within one business day.