
How to Create a Workflow in SharePoint
This guide shows you how to create a workflow in SharePoint that automates a document approval process using Microsoft Teams, SharePoint, and Power Automate. Once set up, users upload files to a designated folder, a manager reviews and approves or rejects them, and the flow automatically moves approved files or notifies the submitter of a rejection with the reason.
Video: Create Simple Document Approval Flows using Power Automate & SharePoint by Competitive Computing Consultants Inc. (2020). All credit for the demonstration goes to the creator; watch the original on YouTube. The written guide below was generated from this video by Docsie. Creator? Request a change or removal.
This guide shows you how to create a workflow in SharePoint that automates a document approval process using Microsoft Teams, SharePoint, and Power Automate. Once set up, users upload files to a designated folder, a manager reviews and approves or rejects them, and the flow automatically moves approved files or notifies the submitter of a rejection with the reason.
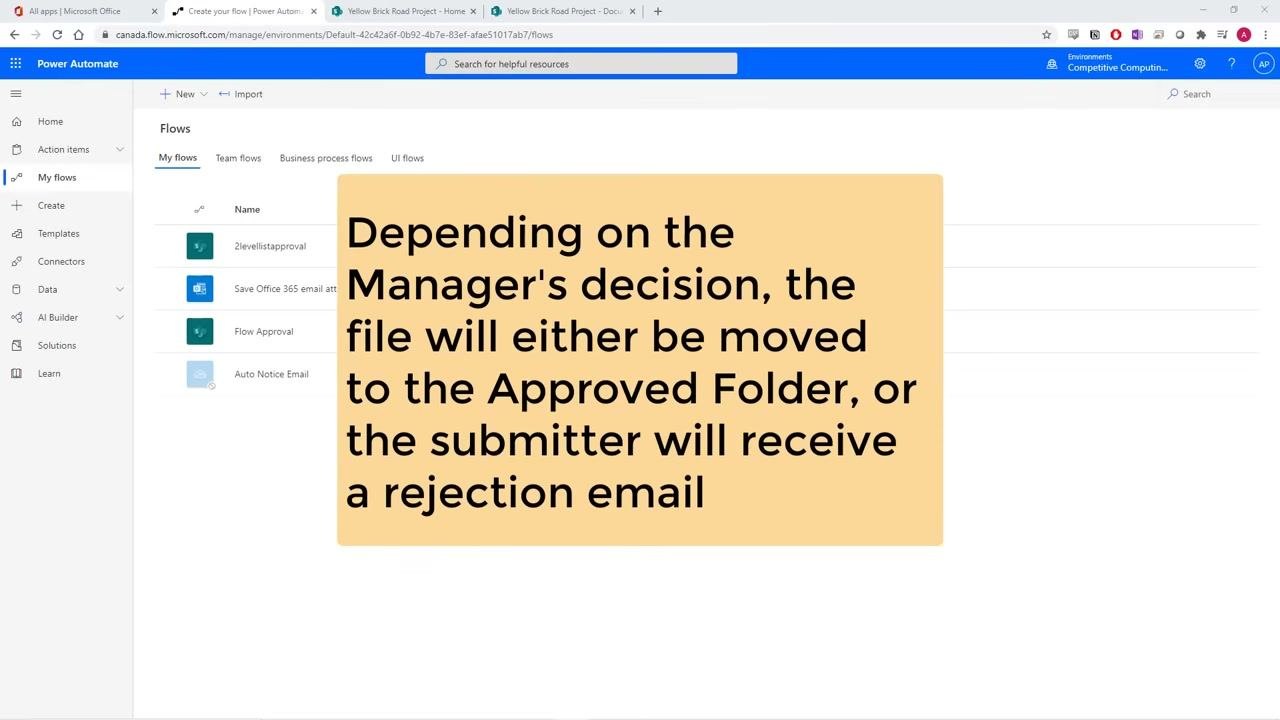
Understanding the approval workflow
Before building the flow, it helps to understand what it will do.
-
Users upload files to a designated folder, and those files are sent off for approval by a manager.
-
Depending on the manager's decision, the file is either moved to the Approved folder, or the submitter receives a rejection email explaining why the file was rejected.
Prerequisites
Before you start, make sure you have:
- Access to a SharePoint site or a Microsoft Team.
- Access to Power Automate in your Microsoft 365 account. If Power Automate does not appear in your account, contact your IT administrator to request access.
Keep in mind that the backend of a Microsoft Teams file system is a SharePoint site. Every channel you create in Teams automatically creates a corresponding document folder in SharePoint.
Verifying Teams and SharePoint access
-
Open Microsoft Teams and confirm you can see the team where you want to build the workflow, along with its channels.
-
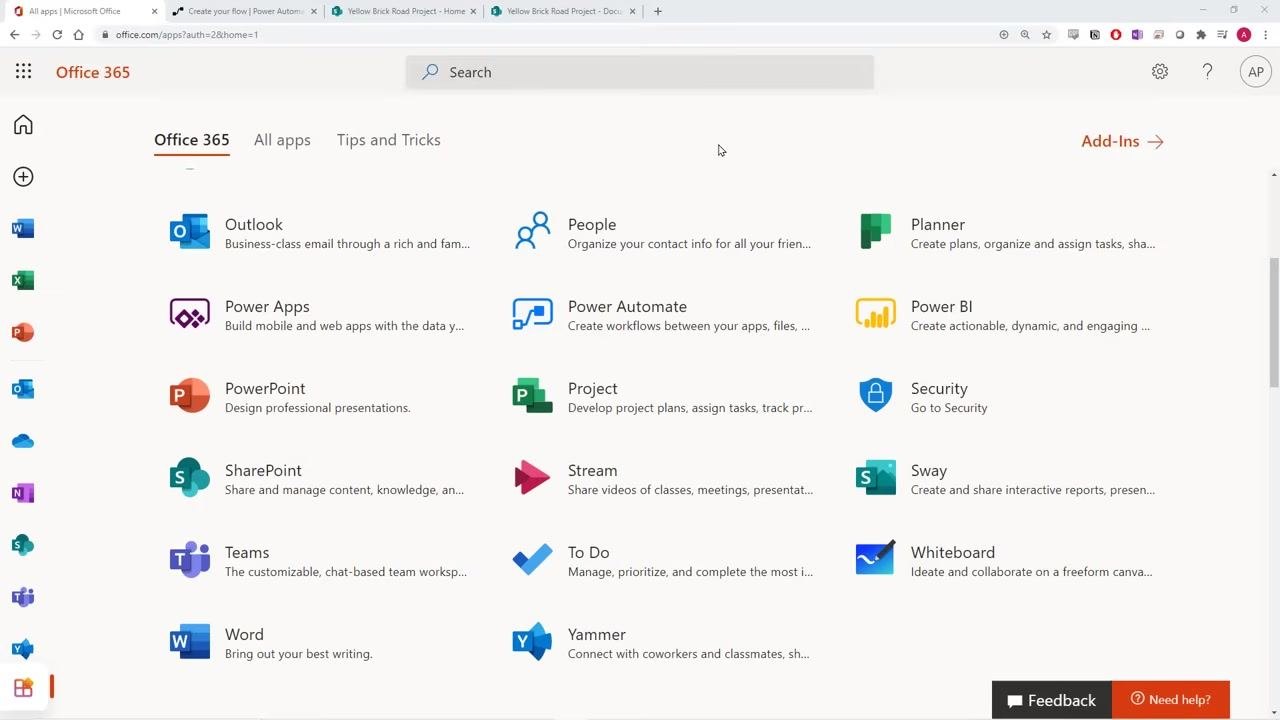
Go to portal.office.com and check whether Power Automate appears in your list of Office 365 apps.
-
If Power Automate is not listed, contact your IT administrator to request access before continuing.
Creating folders or channels for the workflow
Decide where to create your workflow folders based on how your organization works:
- If your organization primarily uses Microsoft Teams, create two channels within the desired team: one named Pre Approved and one named Approved. Each channel automatically creates a corresponding folder in the linked SharePoint site.
- If your organization uses SharePoint directly, go to the SharePoint site's Documents section and create two folders: Pre Approved and Approved.
Do not create both Teams channels and SharePoint folders for the same workflow — if you create Teams channels, the SharePoint folders are generated automatically.
-
In Microsoft Teams, select the team where you want to set up the workflow, click Create more channels, enter the channel name (for example, Pre Approved or Approved), optionally add a description, set privacy to Standard - Accessible to everyone on the team, and click Add.
-
Confirm that both the Approved and Pre Approved channels now appear under your team in Teams.
-
Navigate to the SharePoint site linked to your team, go to the Documents section, and confirm that the Approved and Pre Approved folders are present.
-
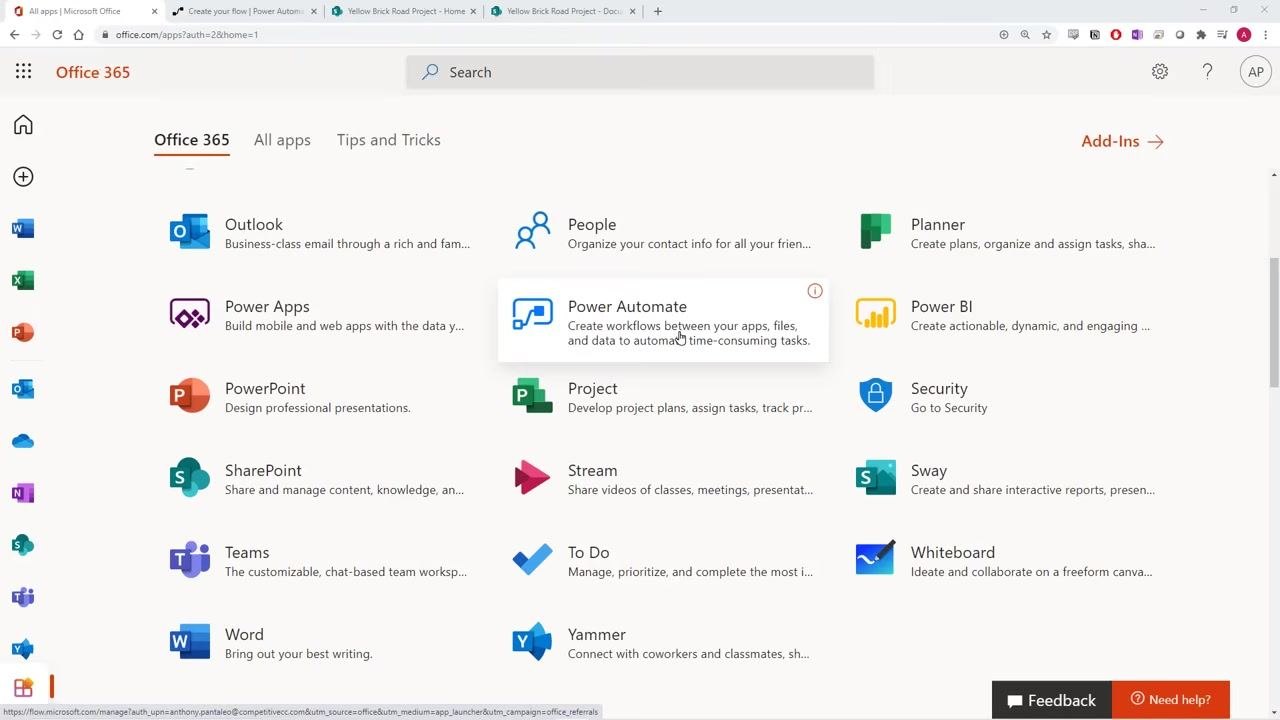
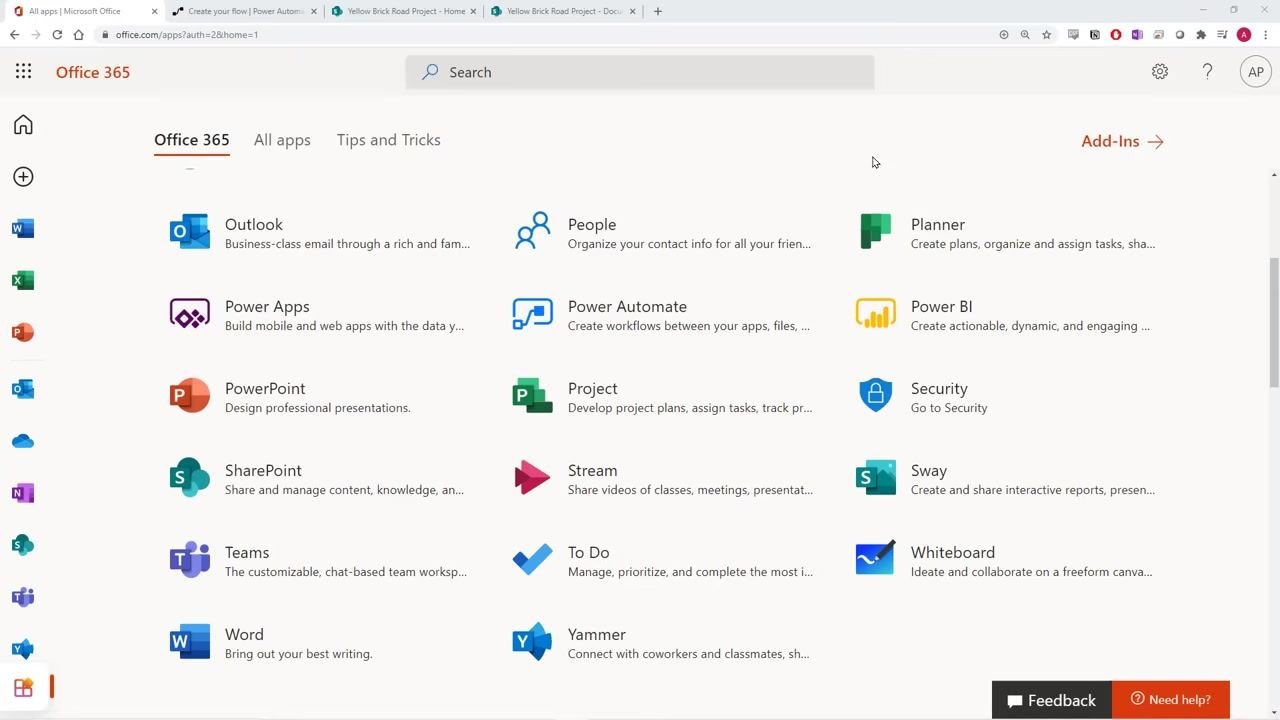
From the Office 365 app launcher, click Power Automate to open it and start building your document approval workflow.
Opening Power Automate and starting a new flow
- Go to your Office 365 homepage (office.com) and click Power Automate from the list of available apps.
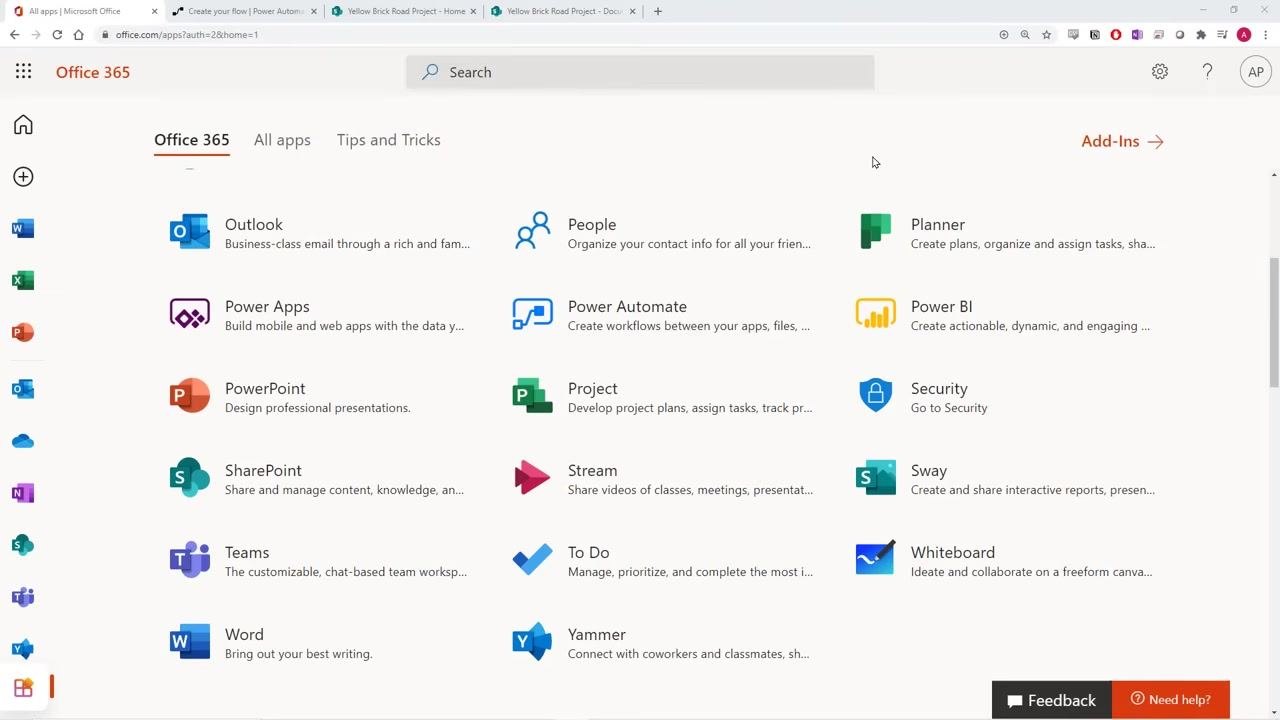
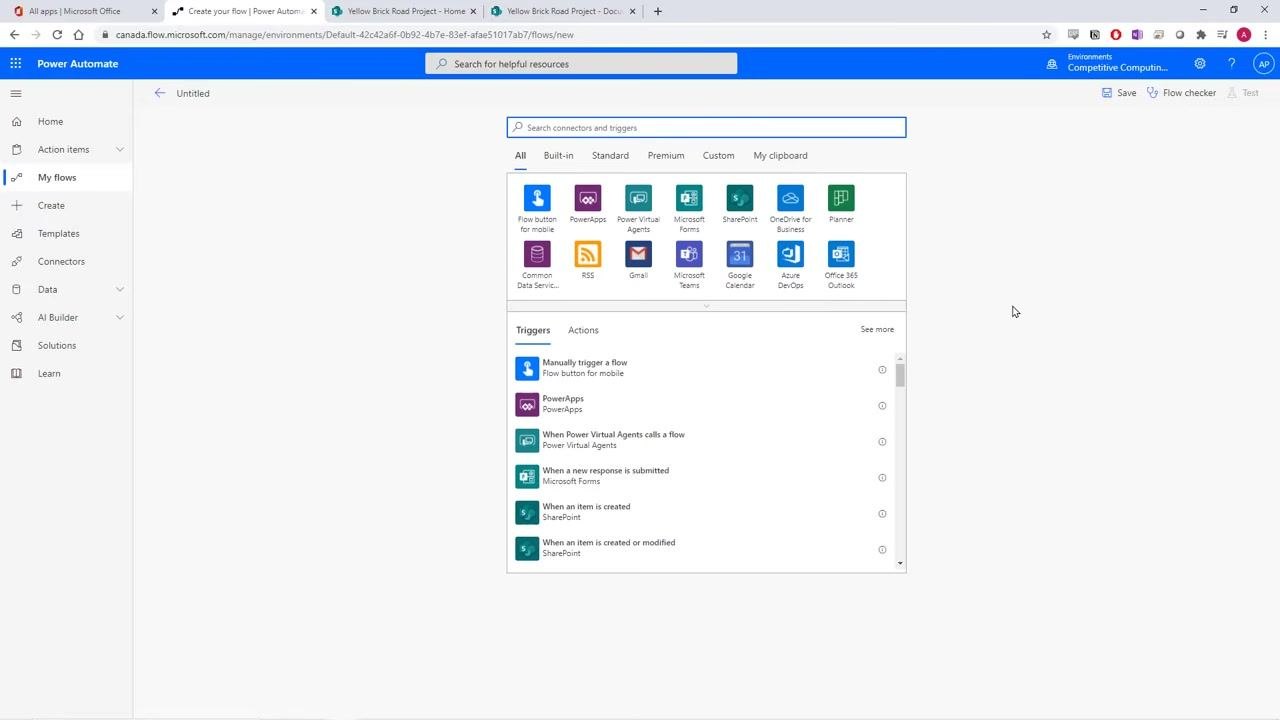
- Once Power Automate opens, select My flows from the left-hand navigation menu, click New in the ribbon, and select Automated—from blank from the dropdown. When prompted to choose a template, click Skip to proceed without one.
You are now in the Flow Creation tool, a drag-and-drop interface for building automations using triggers (events that start the flow) and actions (tasks the flow performs).
Adding the trigger
-
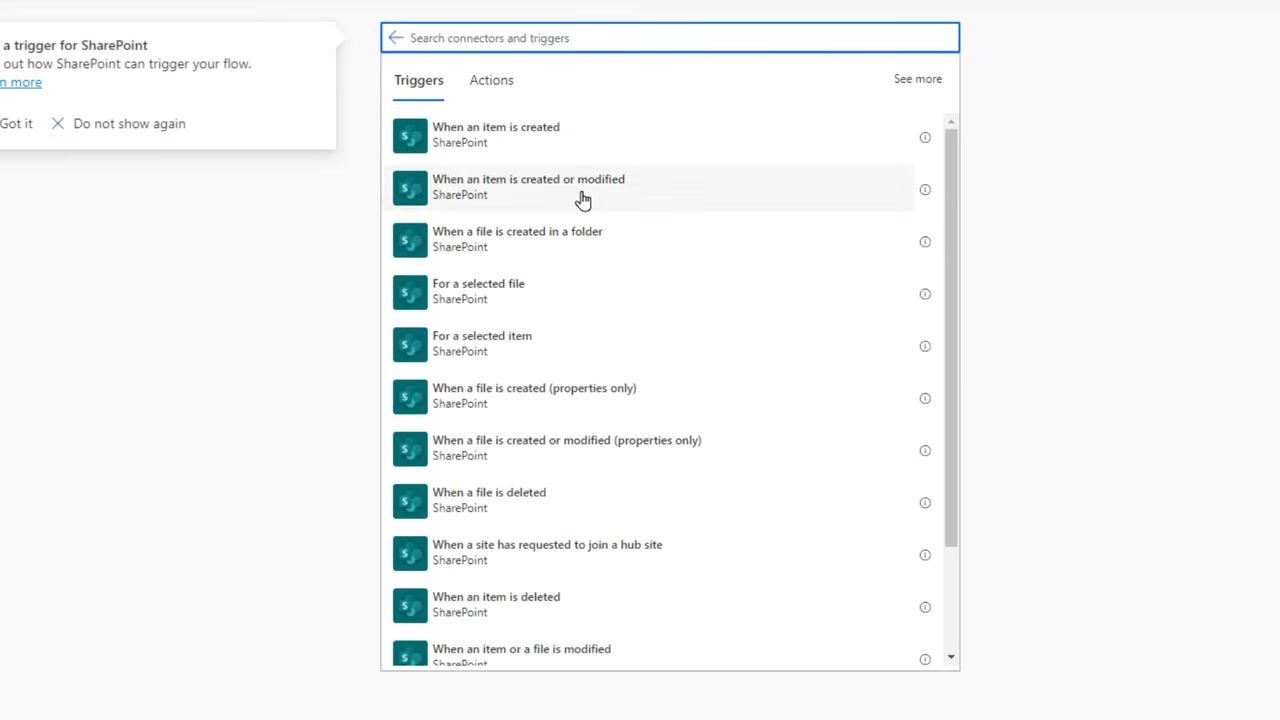
In the search bar at the top, type SharePoint to filter available triggers and actions, then select the trigger named When a file is created or modified (properties only).
-
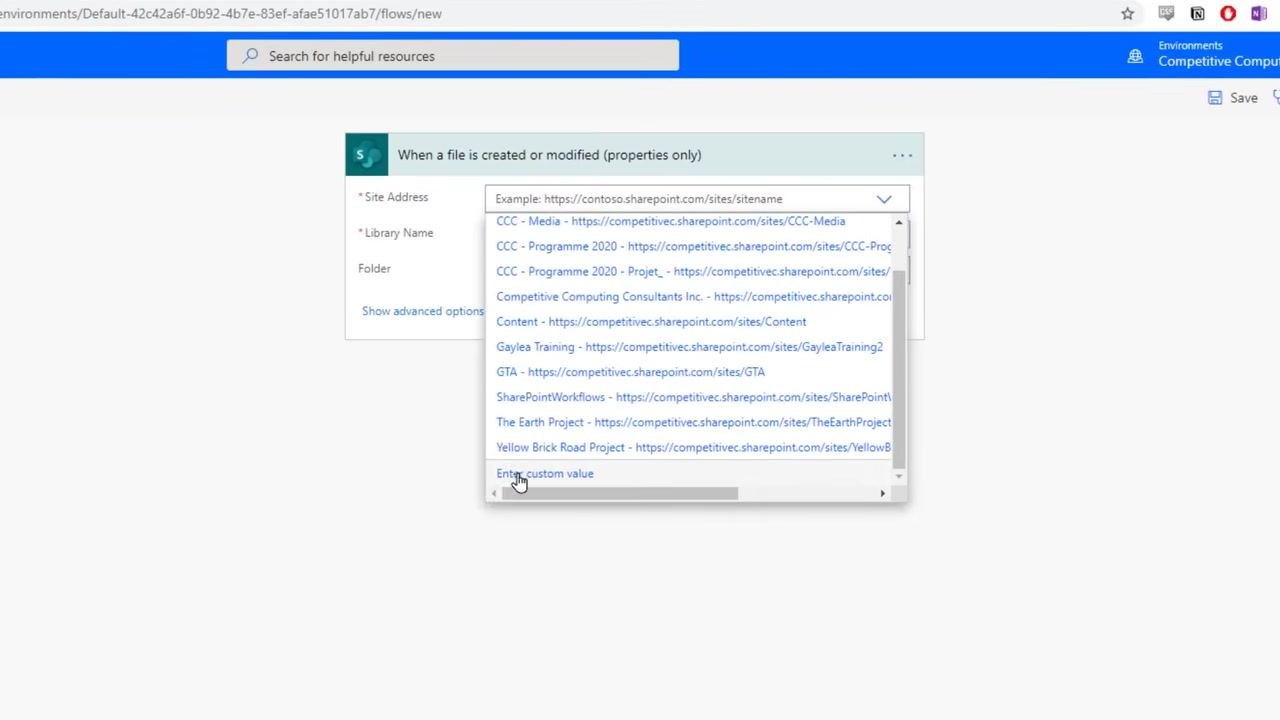
In the trigger configuration panel, use the Site Address dropdown to select your SharePoint site. If you're working from a Microsoft Team, the SharePoint site shares the same name as your team.
-
If your site does not appear in the dropdown, scroll to the bottom and select Enter custom value to manually enter the SharePoint site URL (for example,
https://contoso.sharepoint.com/sites/sitename).
Configuring the document library and folder
-
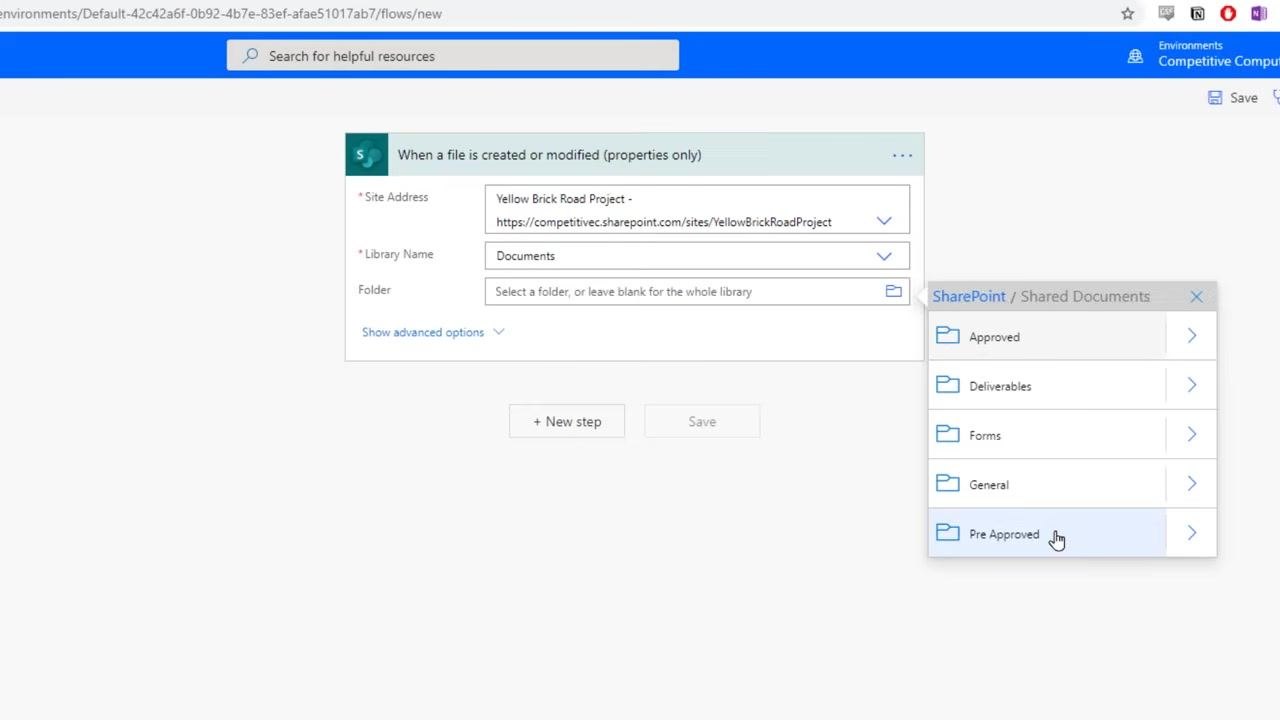
In the Library Name dropdown, select Documents. This is typically the default parent folder for all document folders in a SharePoint site or Microsoft Team.
-
Click the folder icon next to the Folder field to open the folder selection dialog. Scroll down to locate Shared Documents, which is where collaborative files are usually stored. Note that many folders may be hidden from regular user views, so you might see unfamiliar names.
-
Click the forward arrow next to Shared Documents to expand its contents, then select the Pre Approved folder so the flow monitors files added or modified there.
-
Confirm the Folder field now displays
/Shared Documents/Pre Approved. Your trigger is now fully configured to monitor the correct site, library, and folder.
Adding the approval action
-
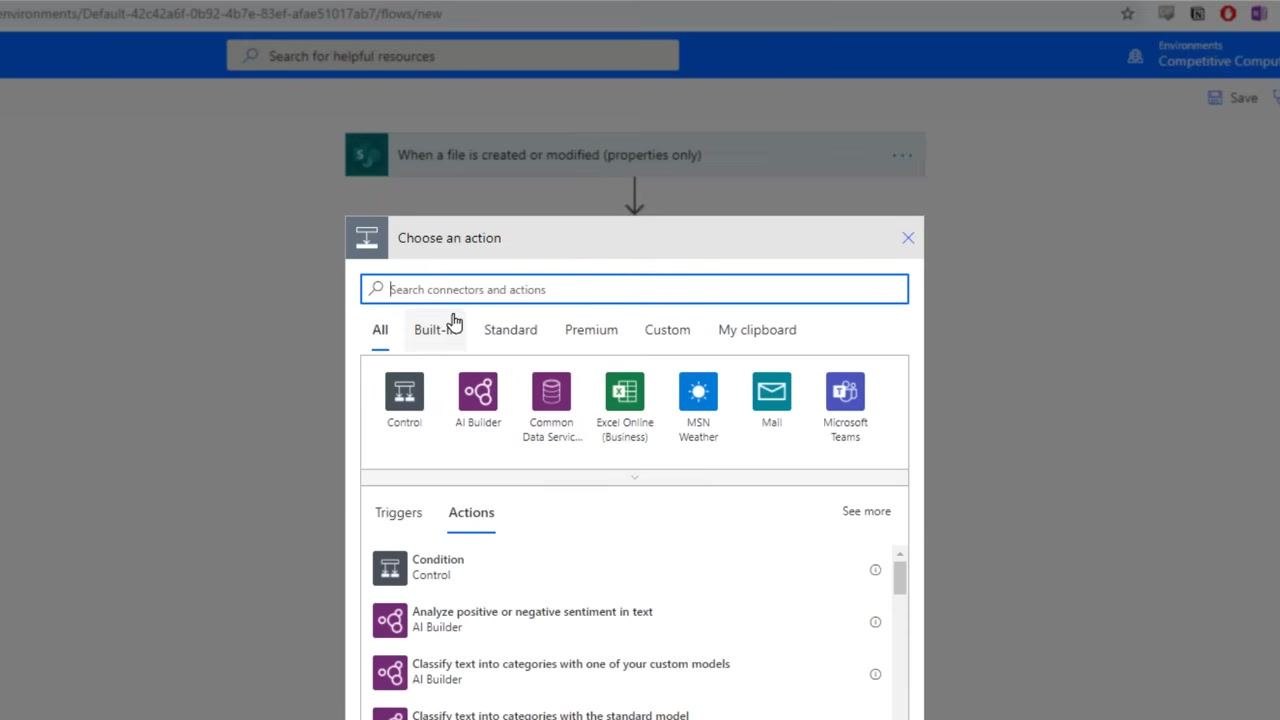
Click the + New step button below your trigger to add a new action to your flow.
-
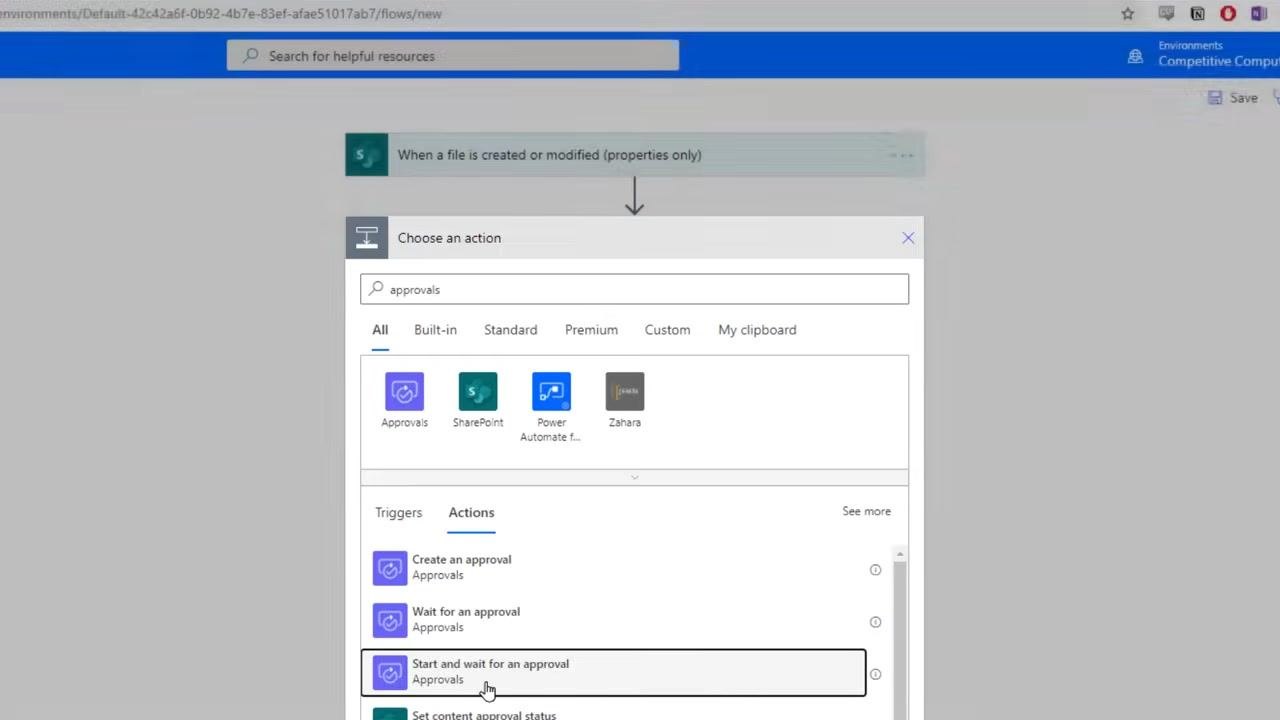
In the "Choose an action" dialog, type approvals in the search bar, then under the Actions tab select Start and wait for an approval from the Approvals connector. This action pauses the flow until a response is received from the approver.
Selecting the approval type and configuring approval fields
- Click the drop-down menu labeled Select an approval type. The available options are:
- Approve/Reject – Everyone must approve
- Approve/Reject – First to respond
- Custom Responses – Wait for all responses
- Custom Responses – Wait for one response
- Enter custom value
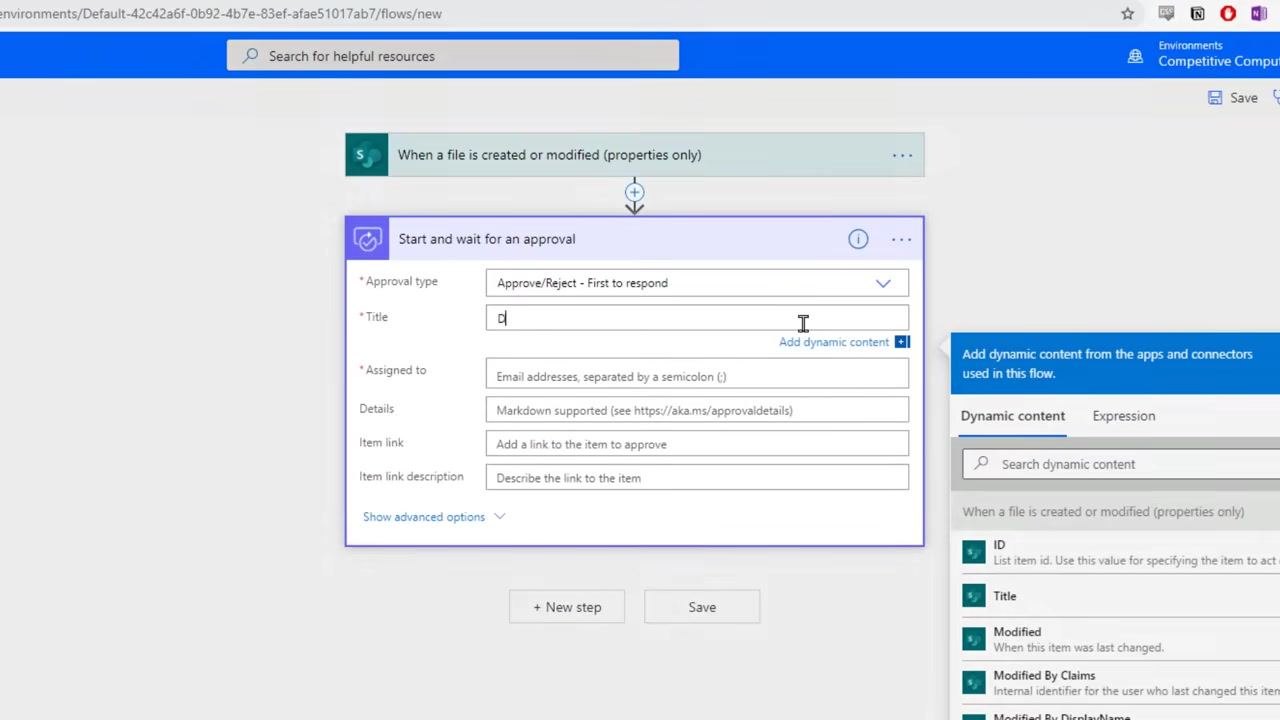
Select Approve/Reject – First to respond, the recommended option, which determines the outcome as soon as any assigned approver responds.
-
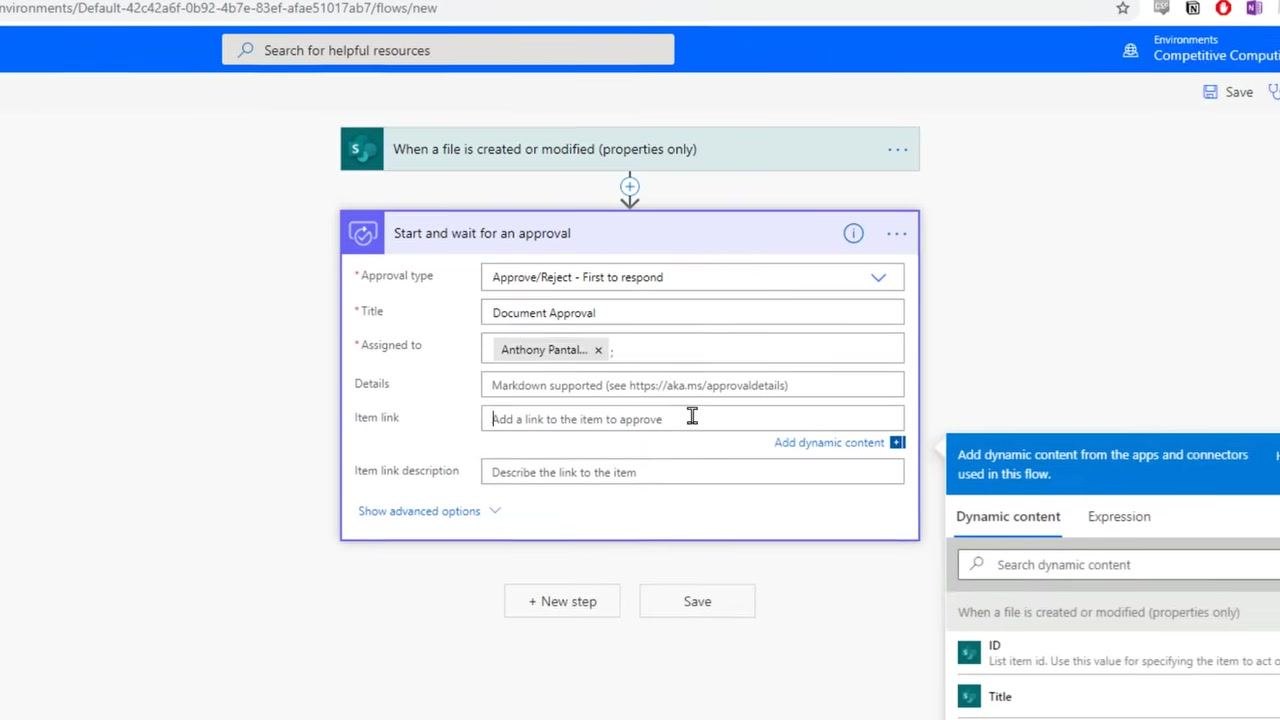
After selecting the approval type, fill in the required fields that appear, starting with Title. Enter a descriptive name, such as Document Approval. This title appears in the email notifications sent to approvers.
-
In the Assigned to field, enter the email address of the person who will approve the document. Use a semicolon (;) to separate multiple addresses if needed.
-
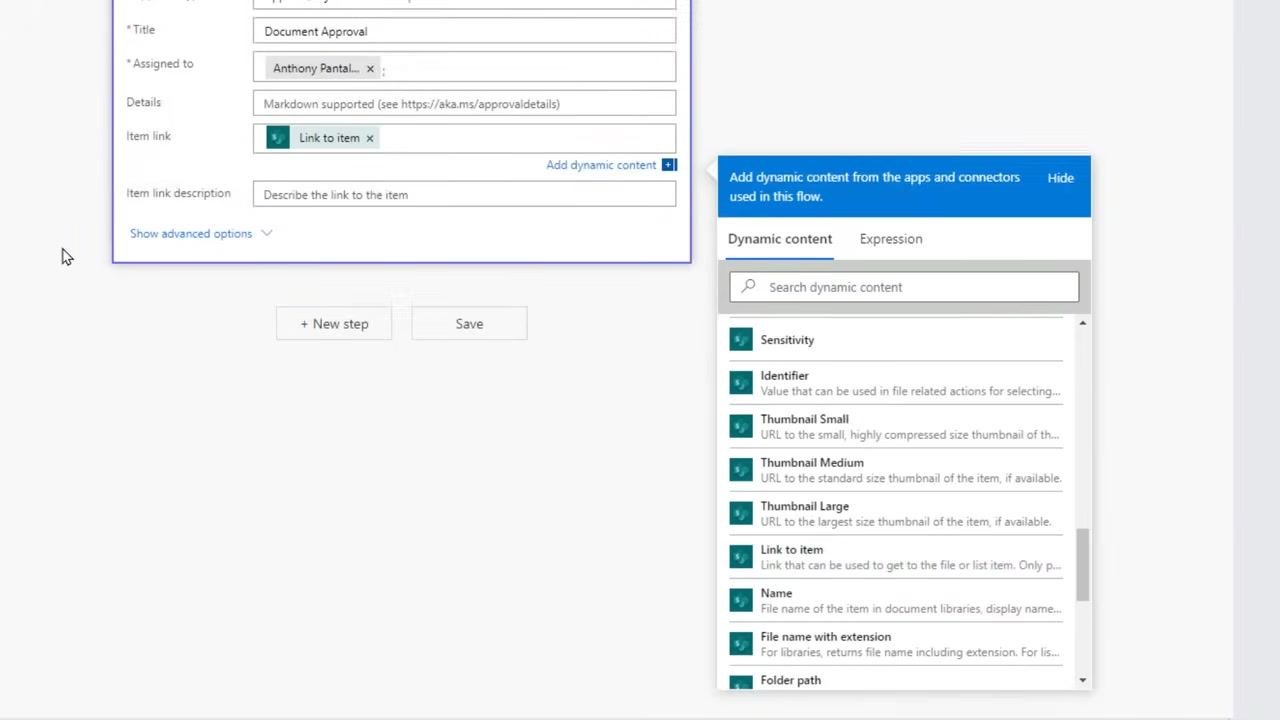
In the Details field, optionally add additional information about the approval (markdown formatting is supported). Then click into the Item link field, and under Dynamic content on the right, search for and select Link to item. This inserts a dynamic link to the file needing approval, so approvers can easily access and review the document.
-
Optionally, in the Item link description field, add a brief description of the link (for example, "Link to document"). Review that all fields are filled: approval type, title, assigned to, details, item link, and item link description.
With approvals, there are two possible outcomes: Yes, the file is approved, or No, the file is rejected. Next, you'll add conditional logic to handle each outcome.
Adding conditional logic based on the approval outcome
-
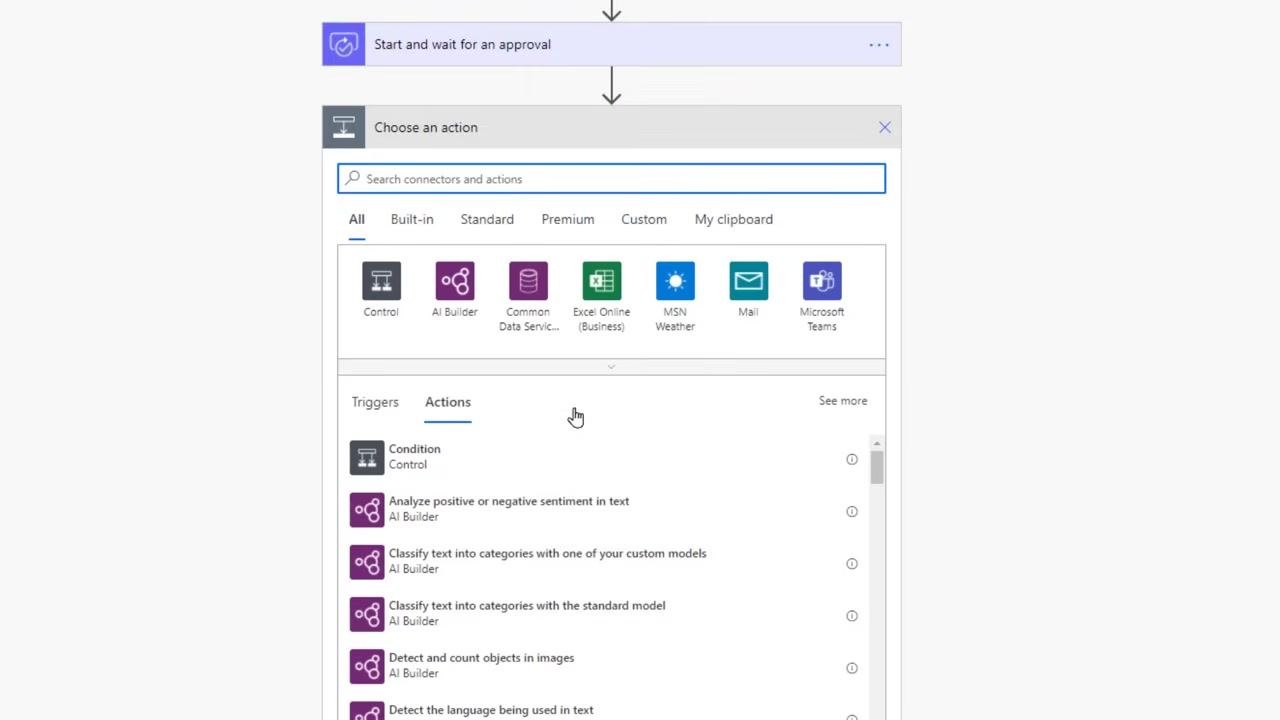
After the "Start and wait for an approval" step, click the plus (+) icon, ensure the Actions tab is selected in the "Choose an action" panel, and select the Condition action under the Control category.
-
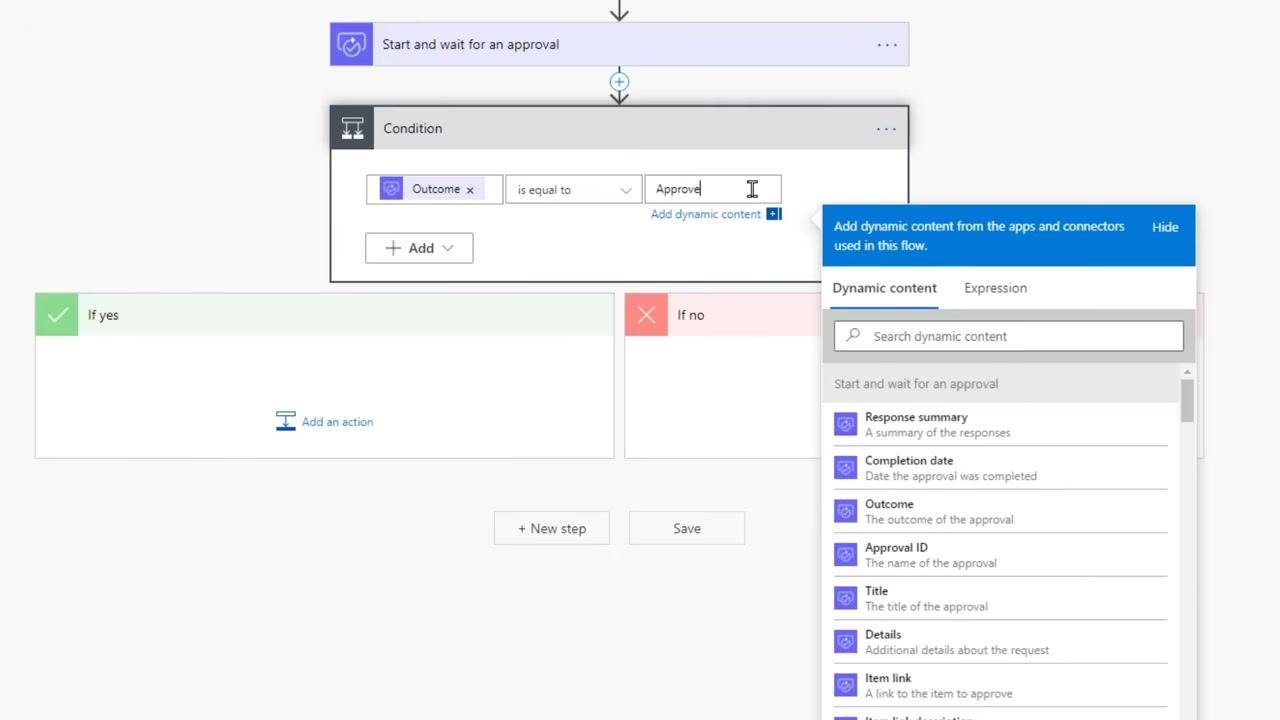
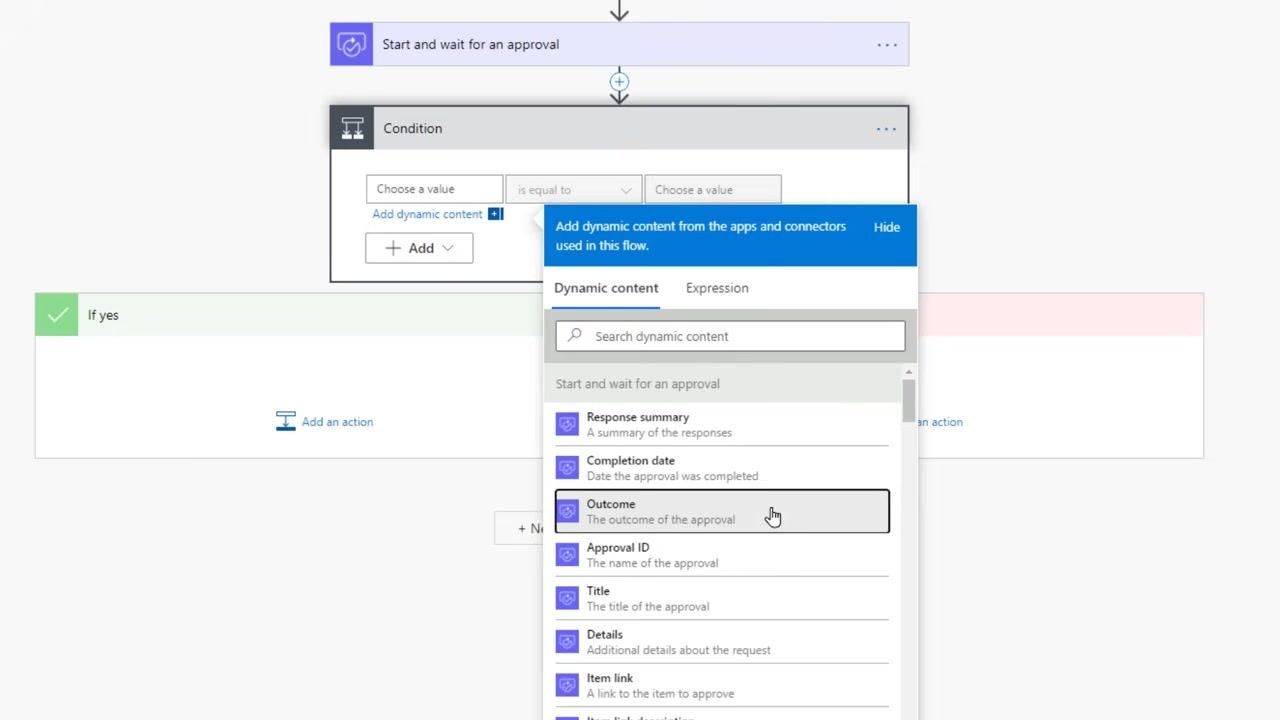
Click Choose a value on the left side of the condition, then in the dynamic content panel search for and select Outcome.
-
In the middle drop-down, ensure is equal to is selected, and in the right field enter Approve — the value returned when the approval is granted.
-
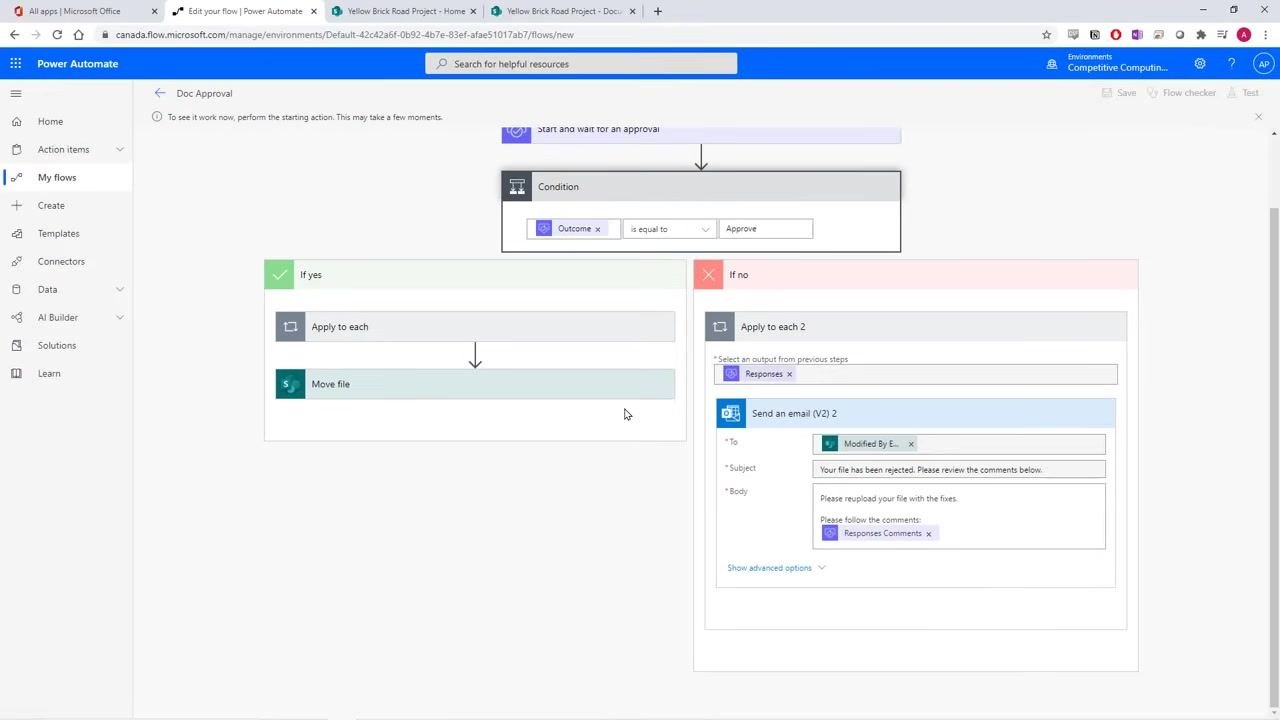
Review the two branches the condition creates: If yes executes when the outcome is "Approve," and If no executes for any other outcome (such as "Reject"). Both branches allow you to add further actions.
Sending an email notification for the approved outcome
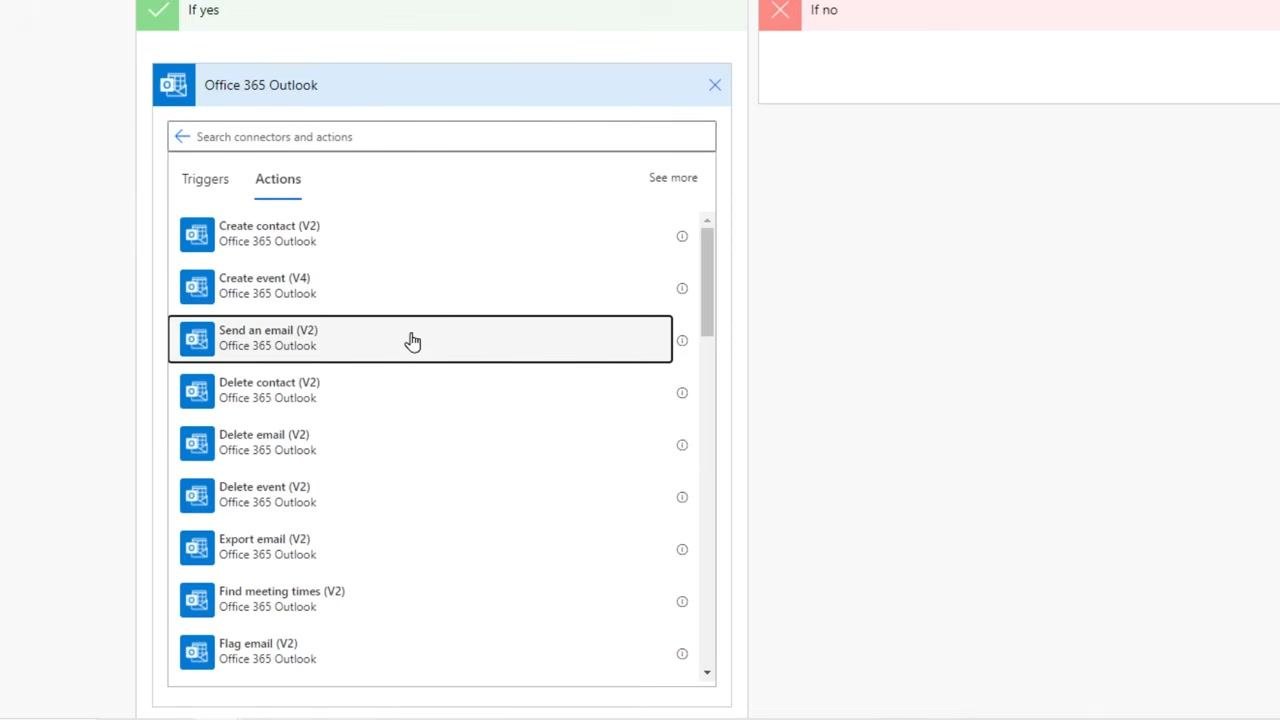
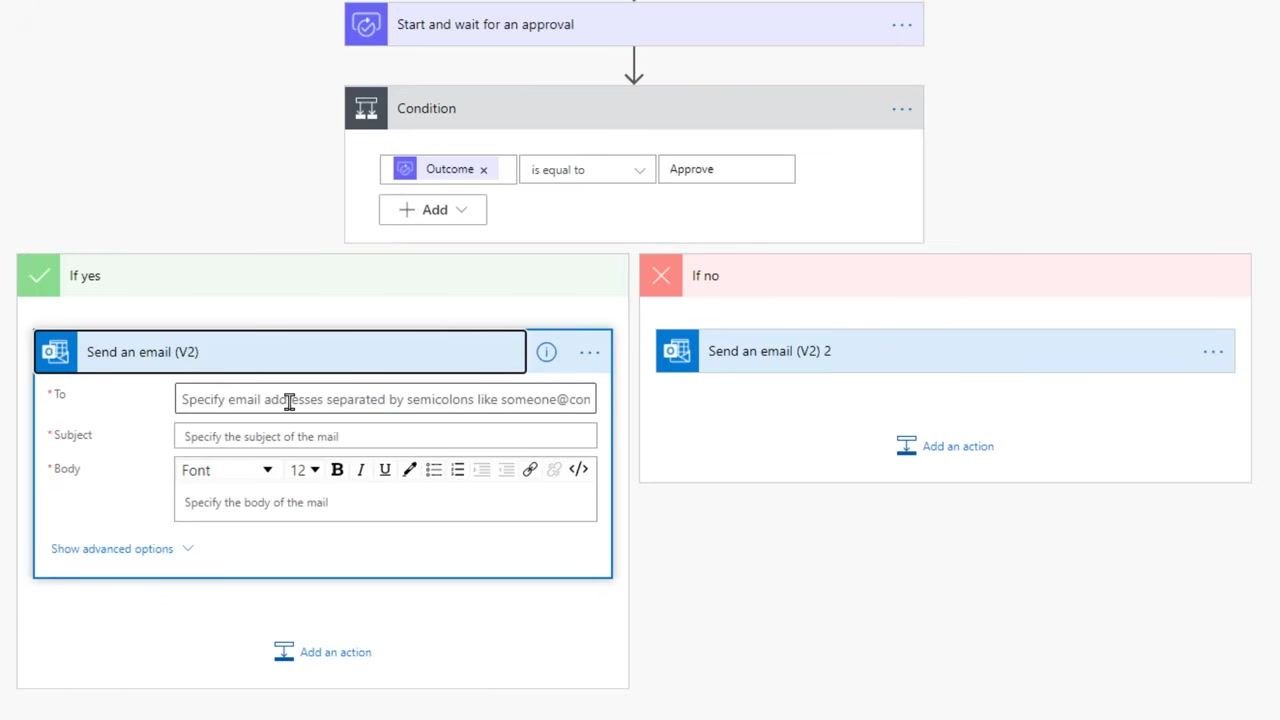
- Under the If yes branch, click Add an action, search for Outlook, select Office 365 Outlook (if you have a 365 business account), and under Actions select Send an email (V2).
-
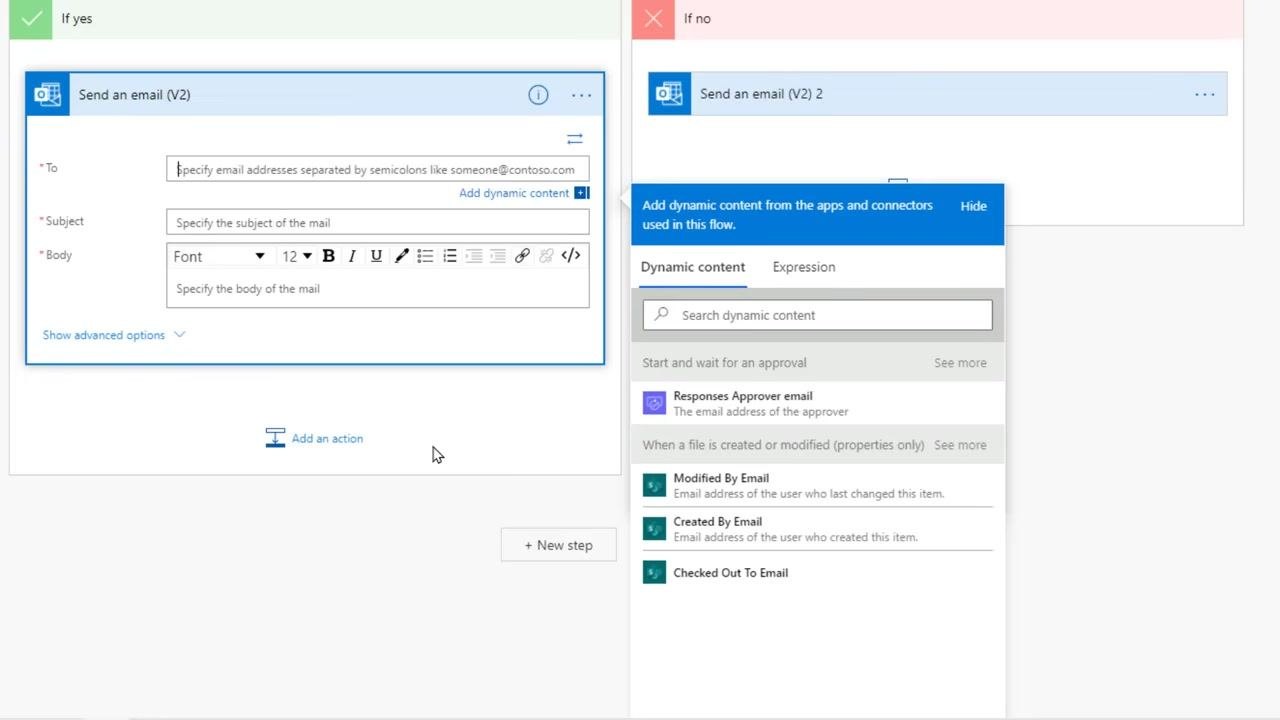
In the "Send an email (V2)" card, fill in the To, Subject, and Body fields, using dynamic content to personalize the message with approval details.
-
Click into the To field to begin specifying recipients.
-
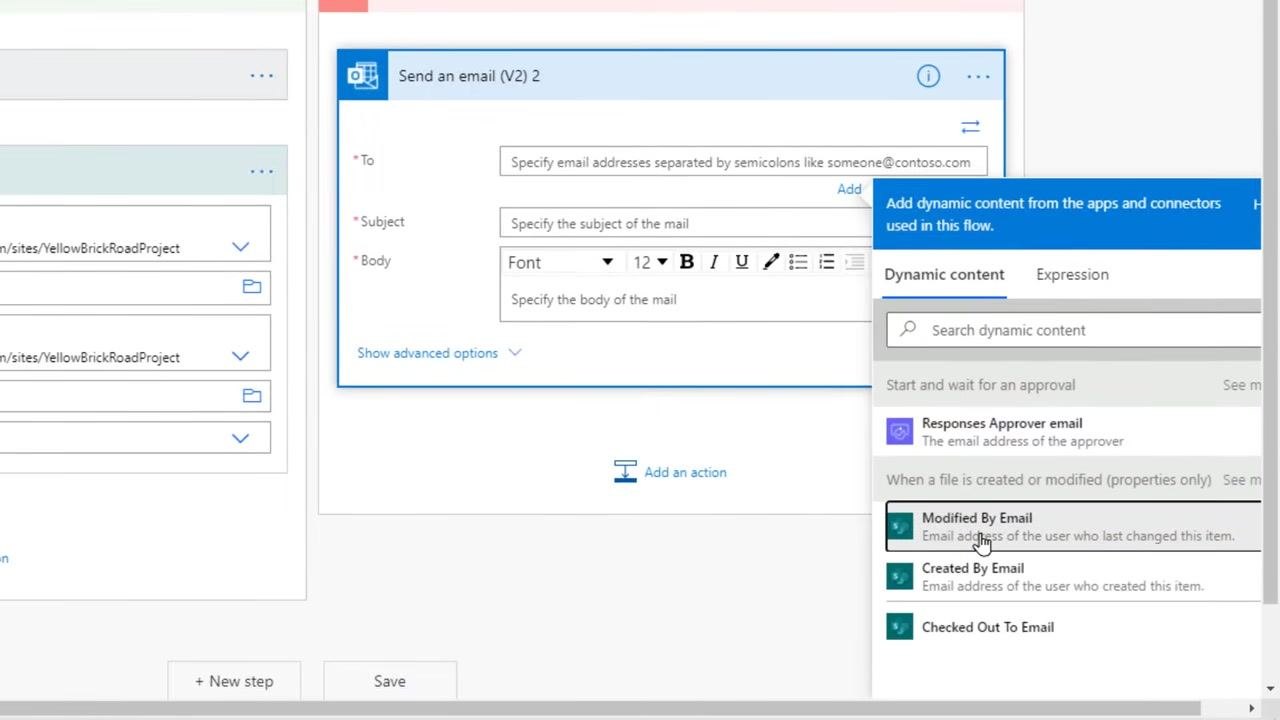
Click Add dynamic content below the To field. The panel that appears lists available fields from previous steps in your flow, such as Responses Approver email, Modified By Email, Created By Email, and Checked Out To Email.
-
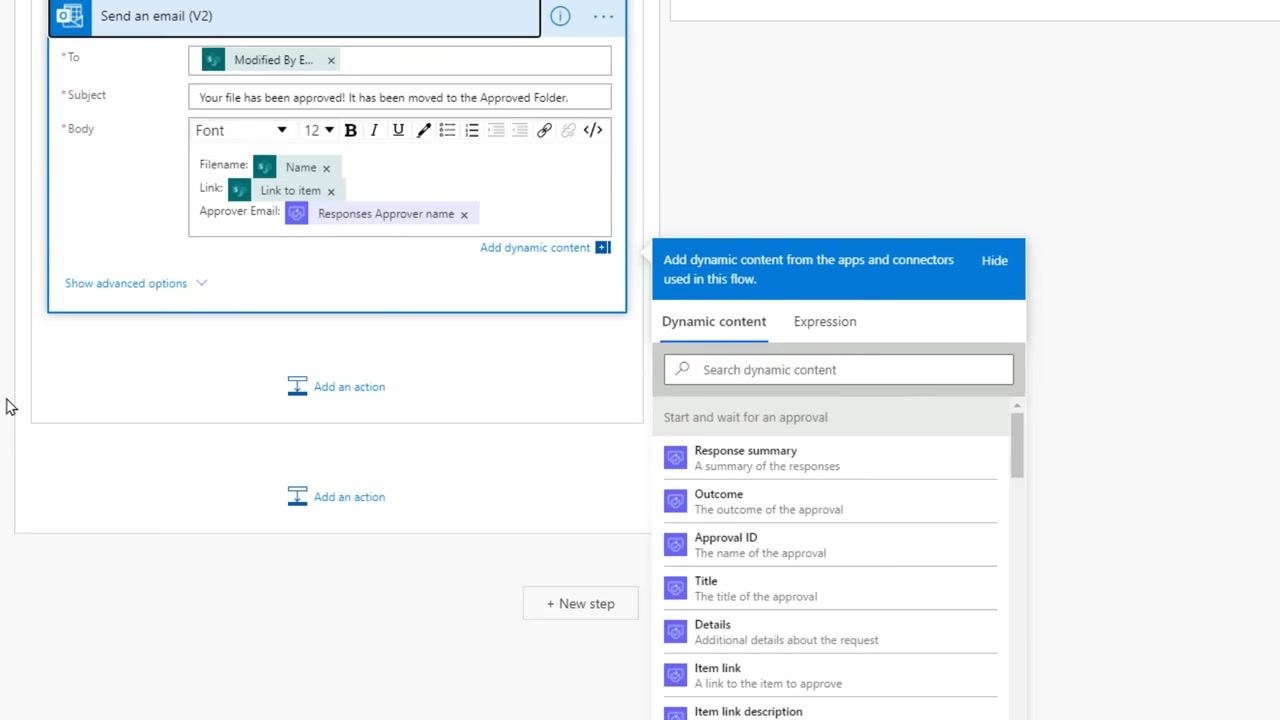
Select Modified By Email, which inserts the email address of the user who last modified (uploaded) the file. The To field now displays "Modified By Email."
-
In the Subject field, enter
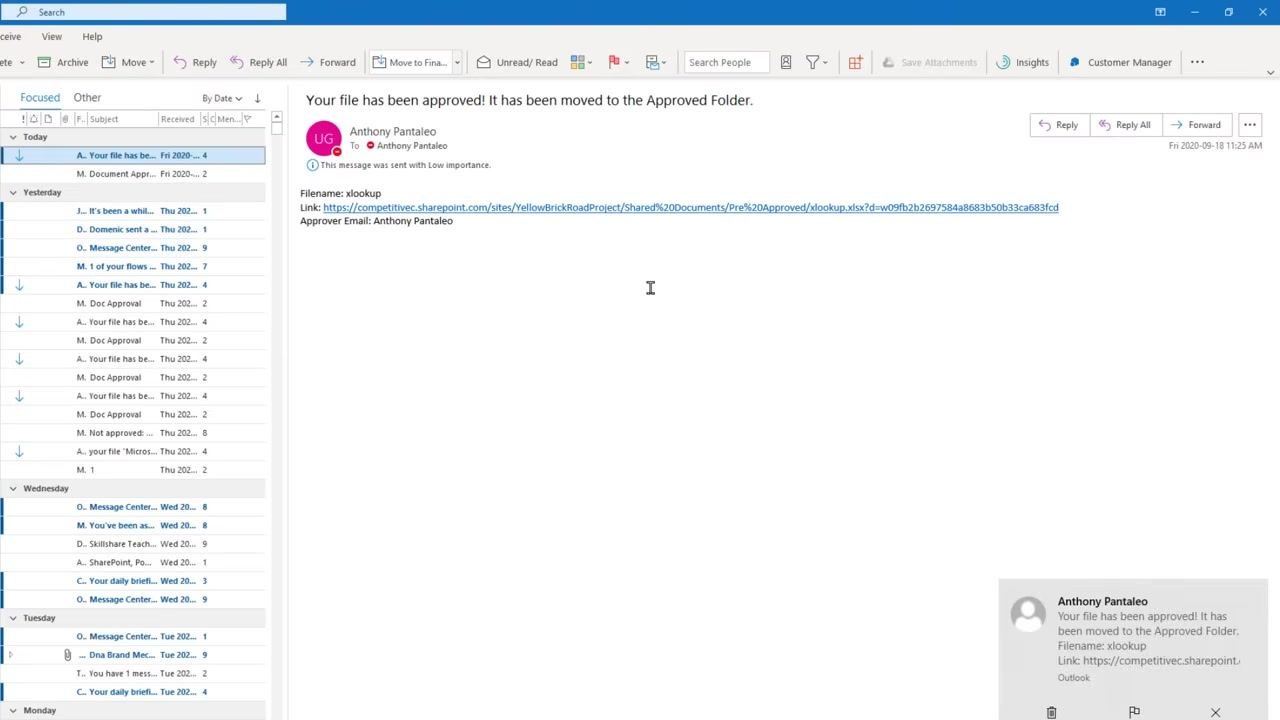
Your file has been approved! It has been moved to the Approved Folder.In the Body field, add formatted text and insert dynamic content such as Name, Link to item, and Responses Approver name — for example, a filename line, a link line, and an approver email line.
Moving approved files
-
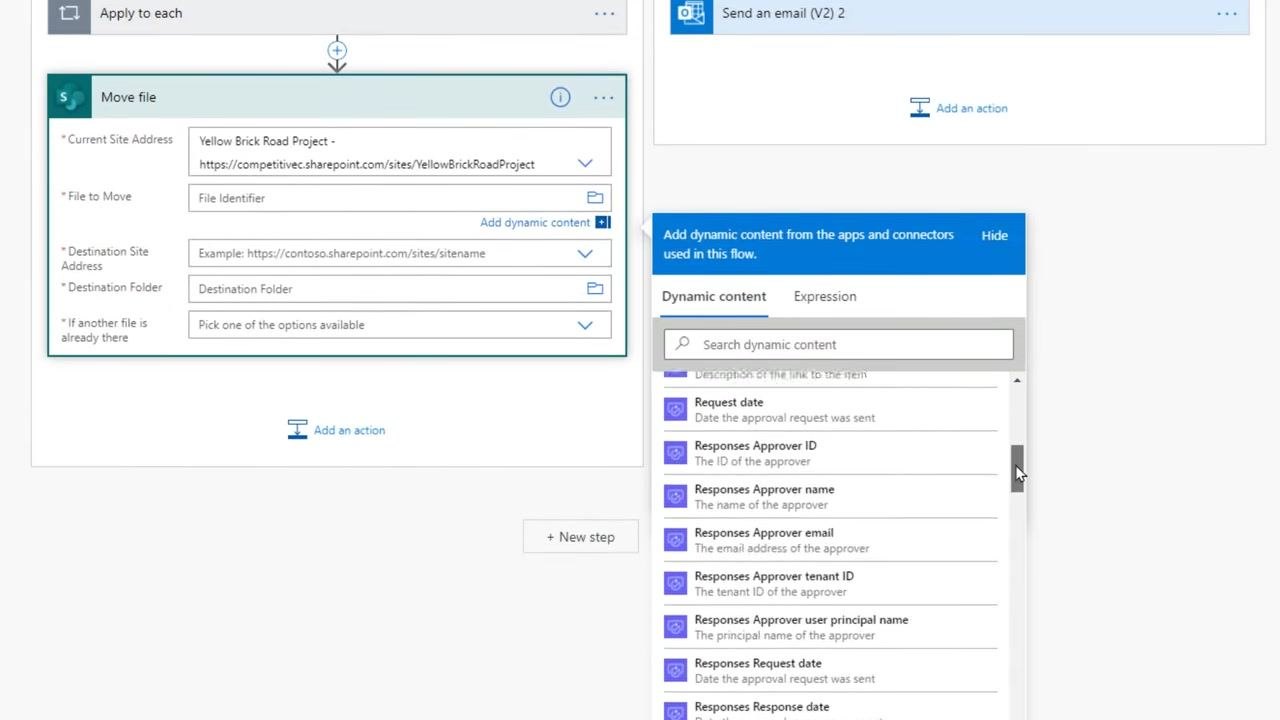
Below the email action in the If yes branch, click Add an action, search for "move," and under the Actions tab select Move file (SharePoint).
-
Fill in the Current Site Address with your SharePoint site (for example,
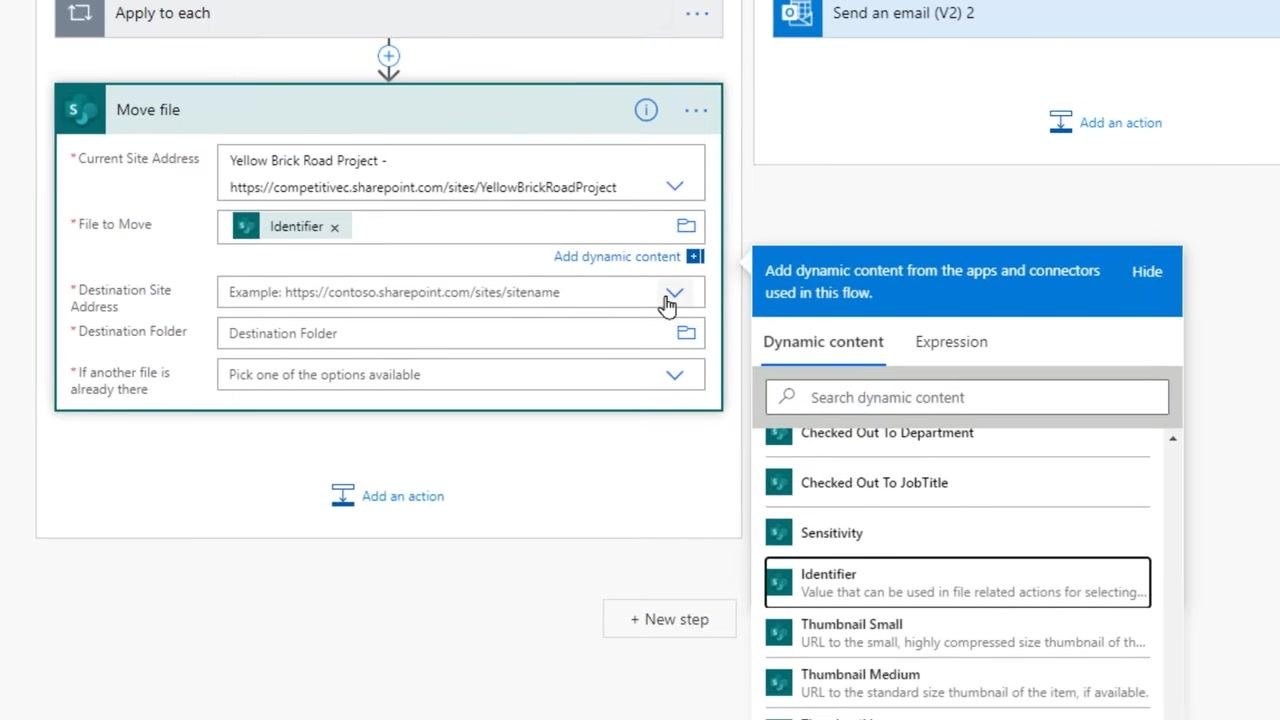
Yellow Brick Road Project - https://competitivevc.sharepoint.com/sites/YellowBrickRoadProject), and for File to Move, click Add dynamic content and select Identifier (not "ID"). -
Enter the Destination Site Address, specify the Destination Folder for approved files (for example,
/Approved), and choose the appropriate option under If another file is already there (such as "Replace," "Fail," or "Copy with new name").
Every field in Power Automate can accept dynamic content, letting you personalize notifications and automate file management. Always use the Identifier field for file operations in SharePoint actions to ensure correct file targeting.
Handling the rejected outcome
- Under the If yes branch, confirm the Move file action's Current Site Address, File to Move (Identifier), Destination Site Address, and Destination Folder (
/Shared Documents/Approved) are set, and under If another file is already there, select Move with a new name from the dropdown.
-
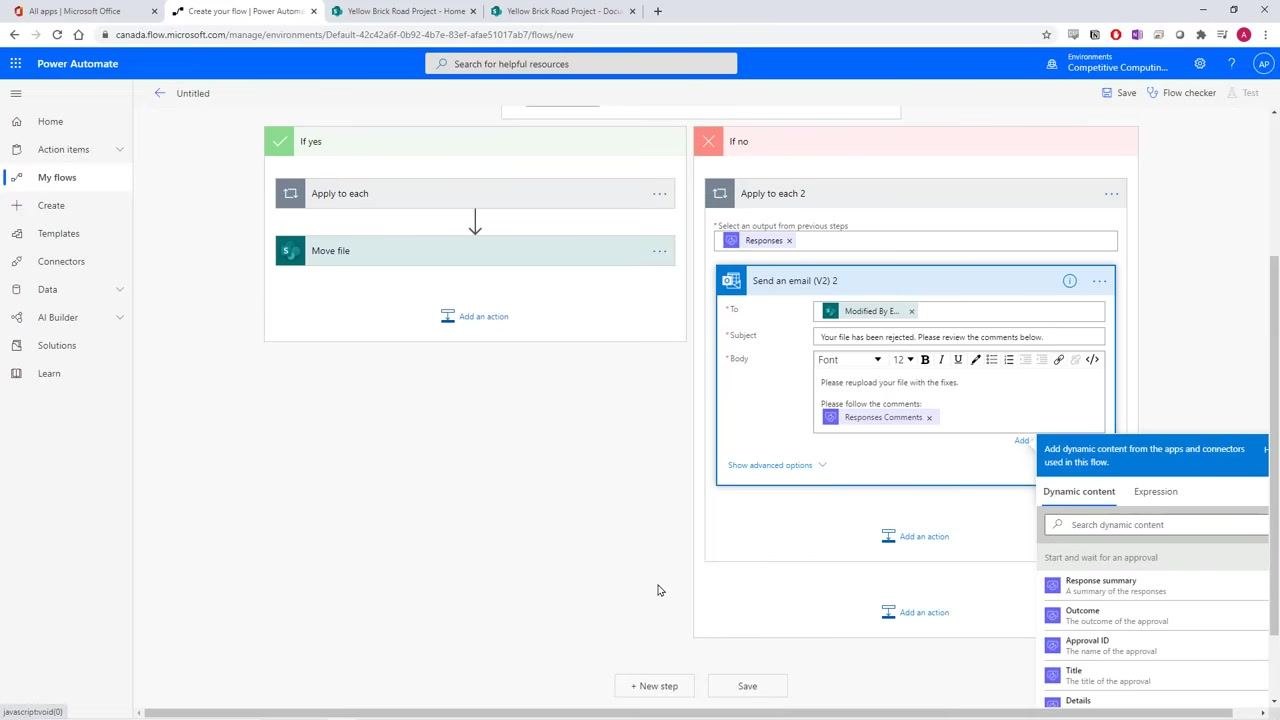
Under the If no branch, add a Send an email (V2) action. In the To field, insert the dynamic content Modified By Email so the email reaches the user who last changed the item.
-
In the Subject field, enter
Your file has been rejected. Please review the comments below. In the Body field, enterPlease reupload your file with the fixes.followed byPlease follow the comments:, then add the dynamic content Responses Comments to include the approver's feedback in the email.
-
Review the completed email action, which should show To: Modified By Email, Subject: the rejection message, and Body: the reupload instructions plus the dynamic comments.
-
Add any further actions as needed — for example, you might delete the file from the Pre Approved folder if it is rejected, though this is optional and not required for the core workflow. Consider also renaming your flow for better organization.
Testing the flow
- Ensure your flow is fully configured and saved. If saving takes an unusually long time, there may be an issue with your flow or network connection — wait for the save to complete before continuing.
- Click the Test button in the upper right corner of the Power Automate editor to begin a test run and simulate the process.
-
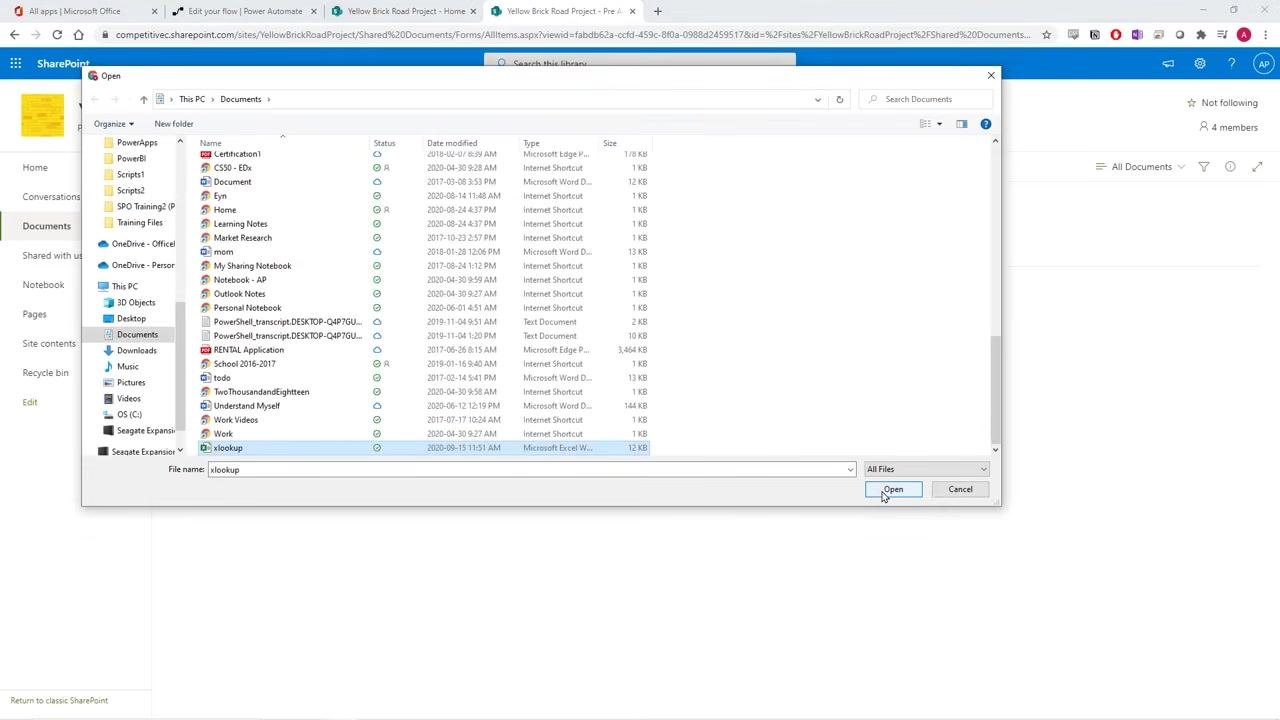
Upload a file to the Pre Approved folder in your SharePoint document library. In the file upload dialog, select the file to submit for approval (for example,
xlookup.xlsx) and click Open. -
Confirm the file now appears in the Pre Approved folder in SharePoint, listed with your name as the "Modified By" user.
-
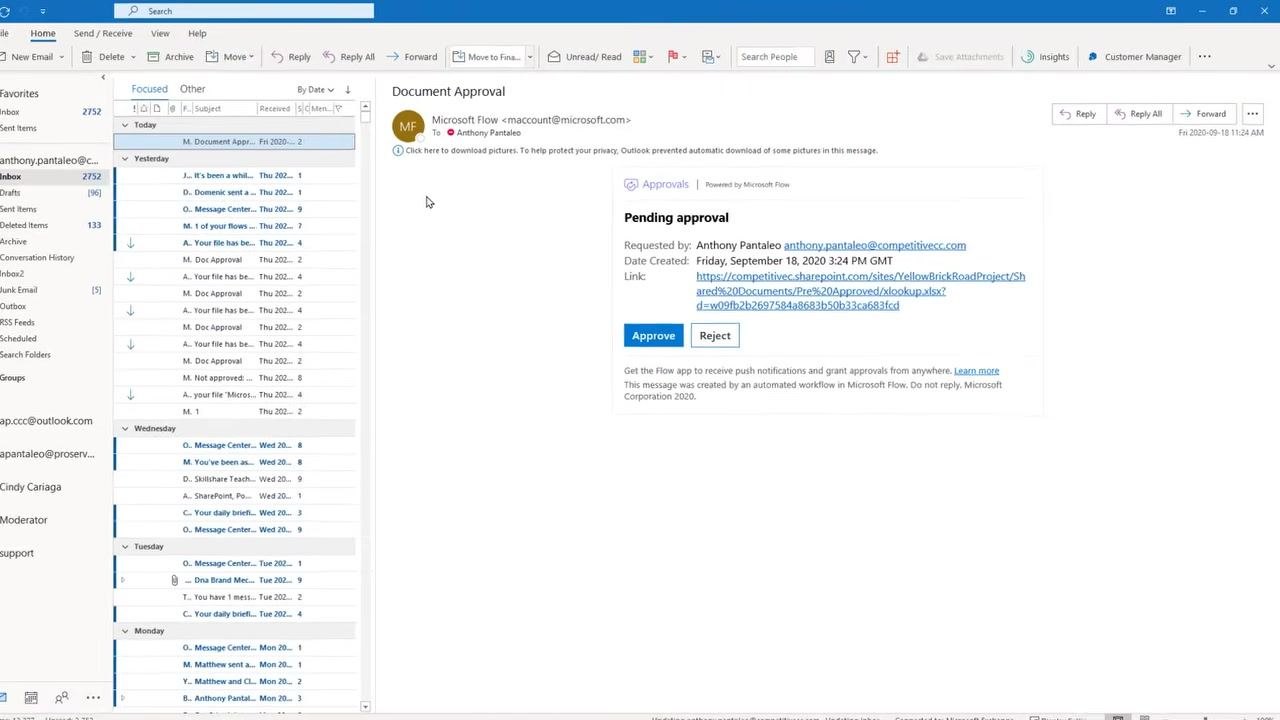
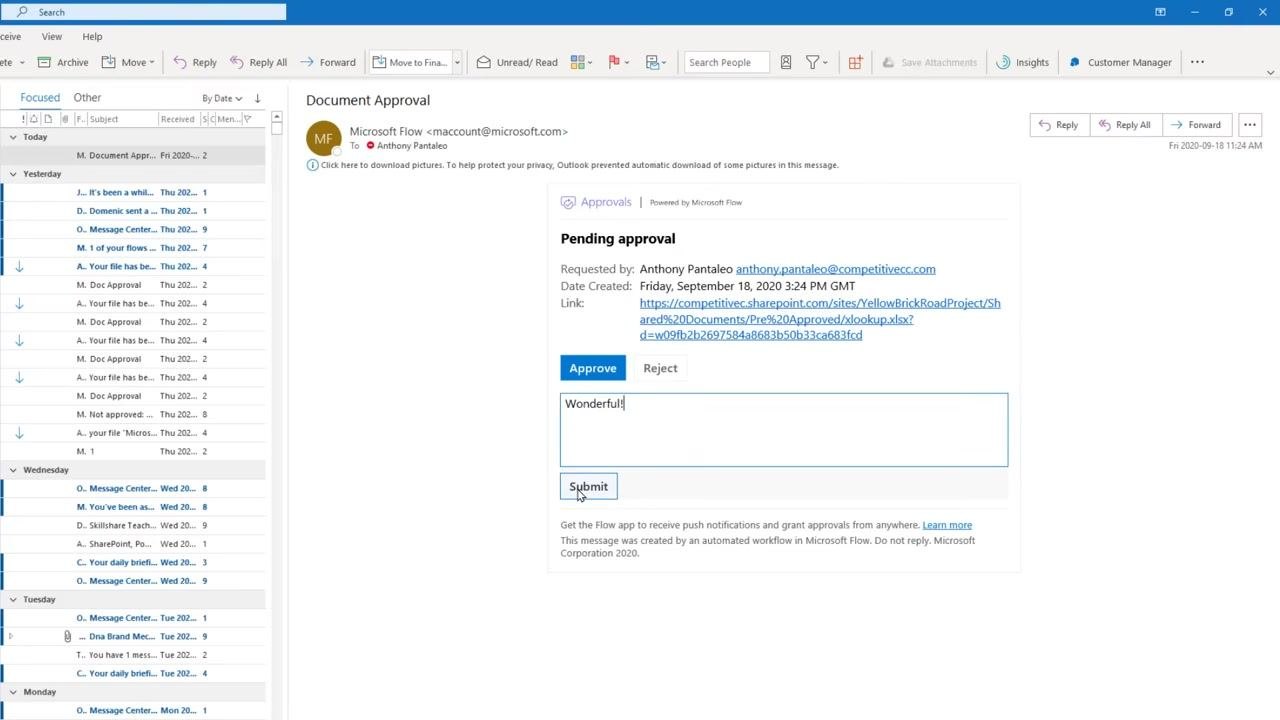
Check your email inbox for a Document Approval message. It includes the requester's name, the date created, a link to the uploaded file, and Approve and Reject buttons. Click the appropriate button, optionally enter a comment, and click Submit to finalize your decision.
- After submitting your decision, check your inbox for a confirmation email. If approved, you'll receive a message stating the file has been approved and moved to the Approved folder, including the filename, a link to the file, and the approver's email address.
- Go to the Approved folder in your SharePoint document library and confirm that the approved file (for example,
xlookup.xlsx) has moved from the Pre Approved folder, with the "Modified By" column showing the user who performed the action.
Once set up and tested, the flow runs automatically every time a file is uploaded to the Pre Approved folder — no manual intervention is required.
Managing and monitoring your flow
- In the Power Automate portal, click My flows in the left navigation pane to view a list of your flows, including their names, last modified times, and types. Locate your flow (for example, Doc Approval) and click the three-dot menu (•••) next to it to open management options, including Edit, Share, Save As, Send a copy, Export, Run history, Analytics, Turn off, Repair tips off, Delete, and Details.
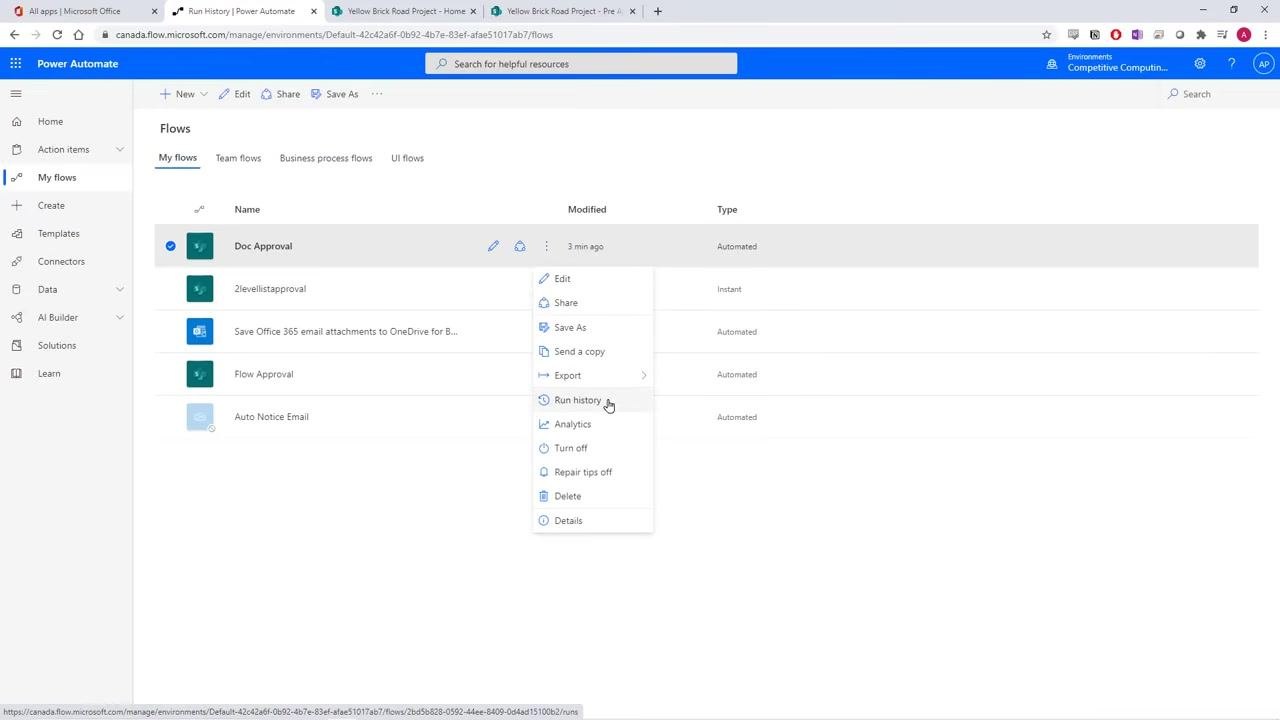
Use Run history to review past executions, check for successful and failed runs, and diagnose issues by viewing error messages and step-by-step execution details. Use Turn off to temporarily disable the flow, or Turn on to re-enable it. Click Edit to open the flow editor and make changes, then save to update the flow. Use Export to back up your flow or move it to another environment, Share to collaborate with team members, and Analytics to monitor usage patterns and optimize performance.
Summary
You've learned how to create a workflow in SharePoint for document approval: setting up Pre Approved and Approved folders or channels, building a Power Automate flow triggered by new or modified files, configuring an approval action, adding conditional logic for approved and rejected outcomes, sending dynamic email notifications, and moving approved files automatically. Regularly check Run history and Analytics in My flows to ensure your flow continues to meet your business needs, and adjust it as your requirements evolve.
Generation details: cost, quality tiers
Docsie billed 7,000 credits ($4.90) to analyze this 14-minute video at standard quality. The rewrite, template fill and Word/PDF exports were included. The same video at each quality tier:
| Quality | Frames sampled | Credits | Approx. cost |
|---|---|---|---|
| Draft | every 16-30 s | 3,500 | $2.45 |
| Standard (this guide) | every 8-15 s | 7,000 | $4.90 |
| Detailed | every 4-7 s | 14,000 | $9.80 |
| Ultra | every 1-3 s | 28,000 | $19.60 |
Credits priced at $0.70 per 1,000; plans include a monthly allowance. Enterprise customers on on-premise or bring-your-own-model deployments run this on their own inference and pay no per-video credits.
Generated by Docsie Video-to-Docs on 2026-09-14 from a 13-minute video. Screenshots are frames from the source video and belong to their creator, Competitive Computing Consultants Inc., whose original is embedded above. If you own this video and want the guide removed or credited differently, contact us and we will act within one business day.