
How to Use LSMW in SAP
This guide shows you how to use LSMW (Legacy System Migration Workbench) in SAP to import asset master data in bulk. You will create a new LSMW project, record a batch input session for asset creation, map source fields to target fields, prepare a data file in Excel, and run the import so that new asset master records are created automatically in SAP.
Video: LSMW Tutorial in SAP S/4HANA by SAP2Go (2024). All credit for the demonstration goes to the creator; watch the original on YouTube. The written guide below was generated from this video by Docsie. Creator? Request a change or removal.
This guide shows you how to use LSMW (Legacy System Migration Workbench) in SAP to import asset master data in bulk. You will create a new LSMW project, record a batch input session for asset creation, map source fields to target fields, prepare a data file in Excel, and run the import so that new asset master records are created automatically in SAP.
Prerequisites
- Access to SAP with authorization to use transaction LSMW.
- Authorization to create asset master records using transaction AS01.
- Microsoft Excel for preparing the data file used in the import.
- Knowledge of the asset class, company code, and other organizational values required for your assets (for example, Class, Company Code, Cost Center, Profit Center, and Segment).
Creating a new LSMW project
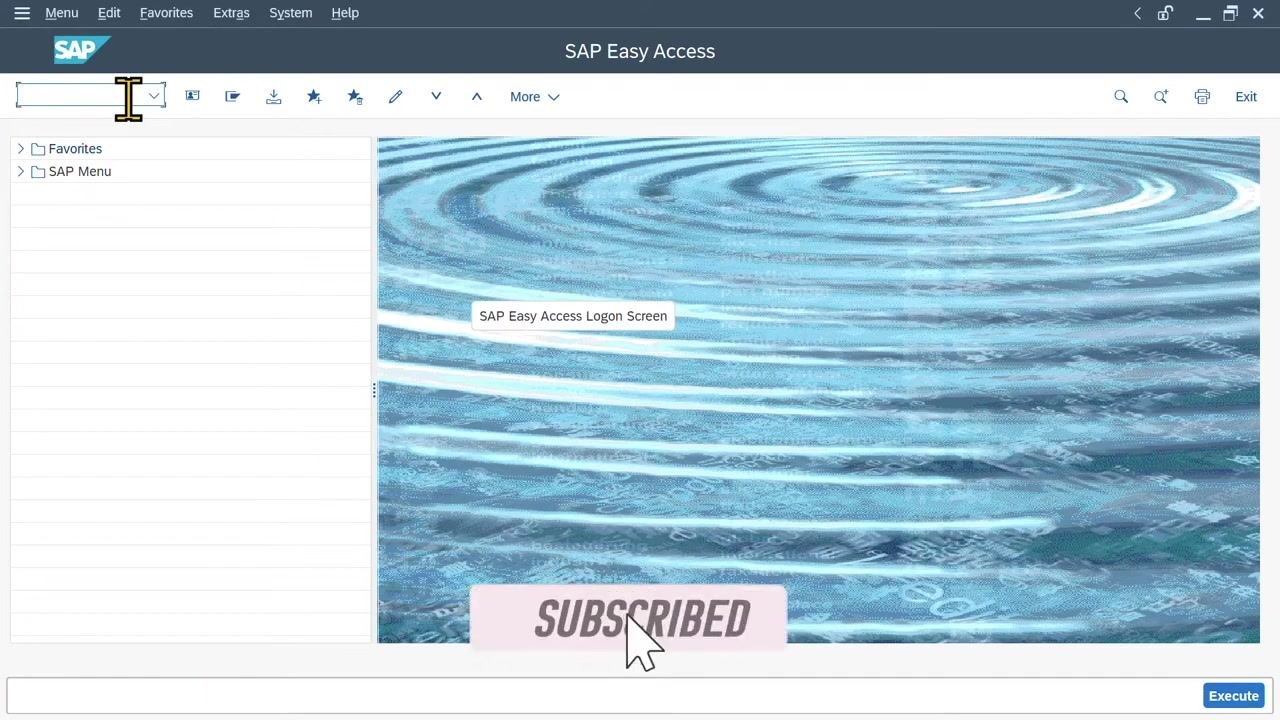
Step 1: Open SAP Easy Access
Launch SAP and make sure you are on the SAP Easy Access screen. This screen shows the SAP logo, the menu bar (Menu, Edit, Favourites, Extras, System, Help), and a search bar at the top. The left panel shows Favorites and SAP Menu.
Step 2: Navigate to the LSMW transaction
In the command field, enter LSMW and press Enter to open the Legacy System Migration Workbench. If a message from SAP appears, click Continue to proceed.
Step 3: Create a new project entry
Click the Create Entry button (the icon with a plus sign, also labeled "Create Entry (Shift+F1)"). The Project Selection section prompts you for Project, Subproject, and Object.
In the Create project dialog, enter the following:
- Project:
ZASSET1 - Description:
This project is to generate asset masters
Click the green checkmark to confirm.
Step 4: Enter subproject details
In the Create Subproject dialog, enter the following:
- Subproject:
ZASSET1 - Description:
This project is to generate asset masters
Click the green checkmark to confirm.
Step 5: Enter object details
In the Create Object dialog, enter the following:
- Object:
ZASSET1 - Description:
This project is to generate asset masters
Click the green checkmark to confirm.
Step 6: Define object attributes
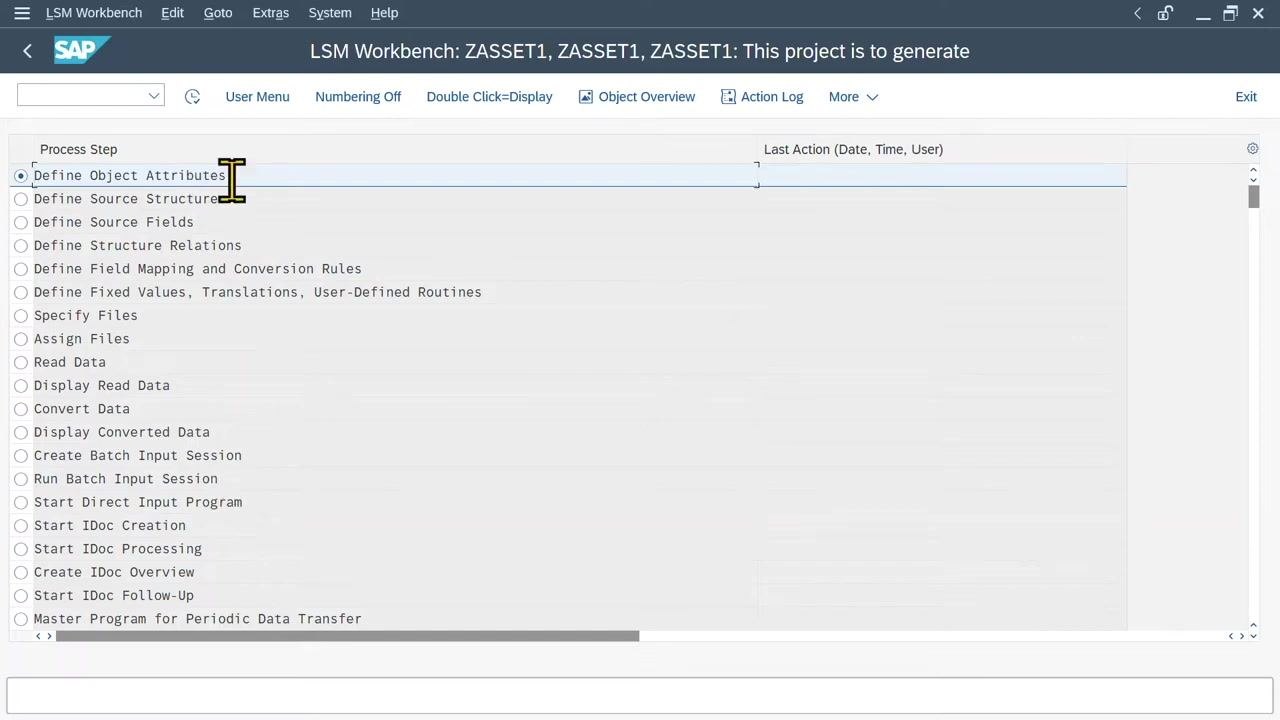
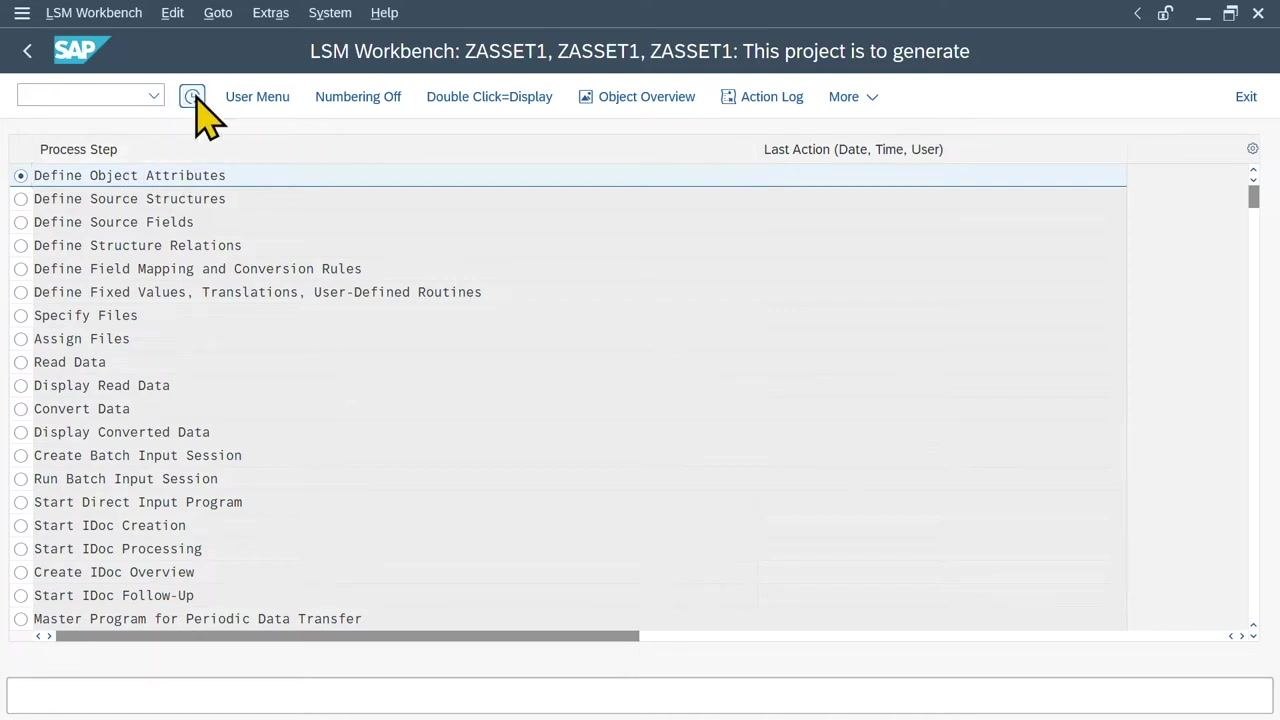
The LSM Workbench displays a list of process steps required for the migration project. The first step, Define Object Attributes, is selected by default.
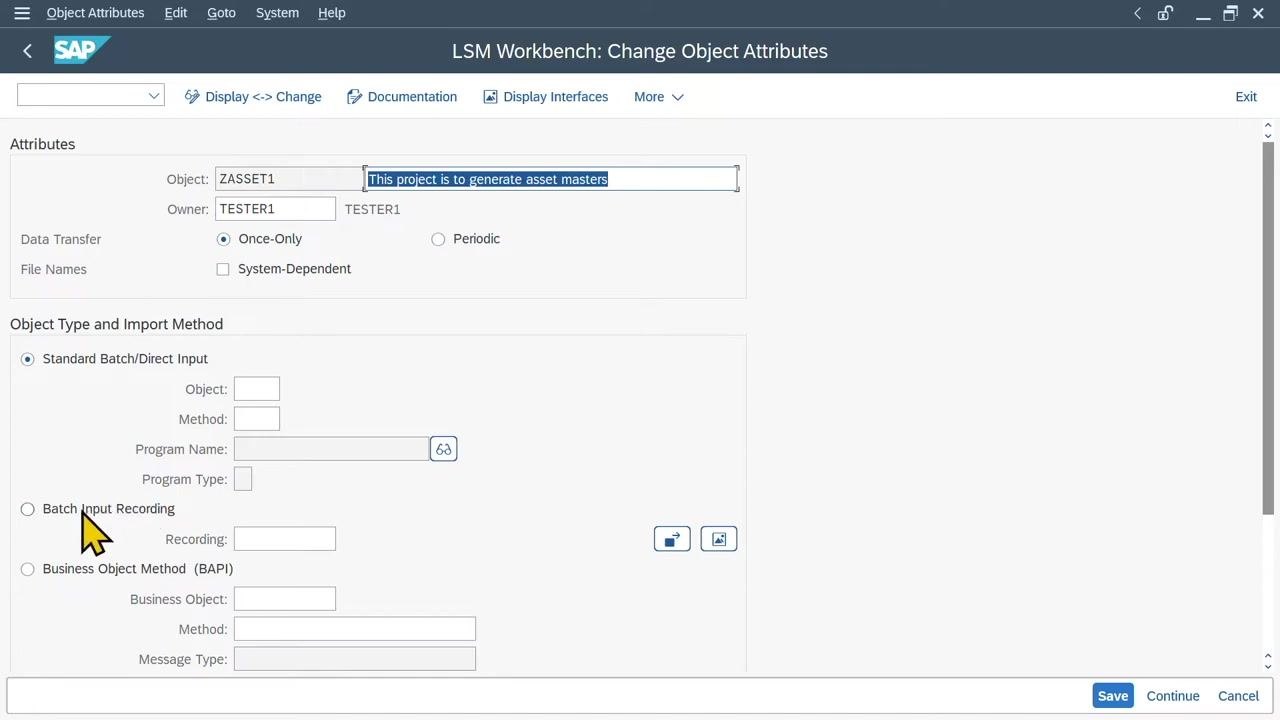
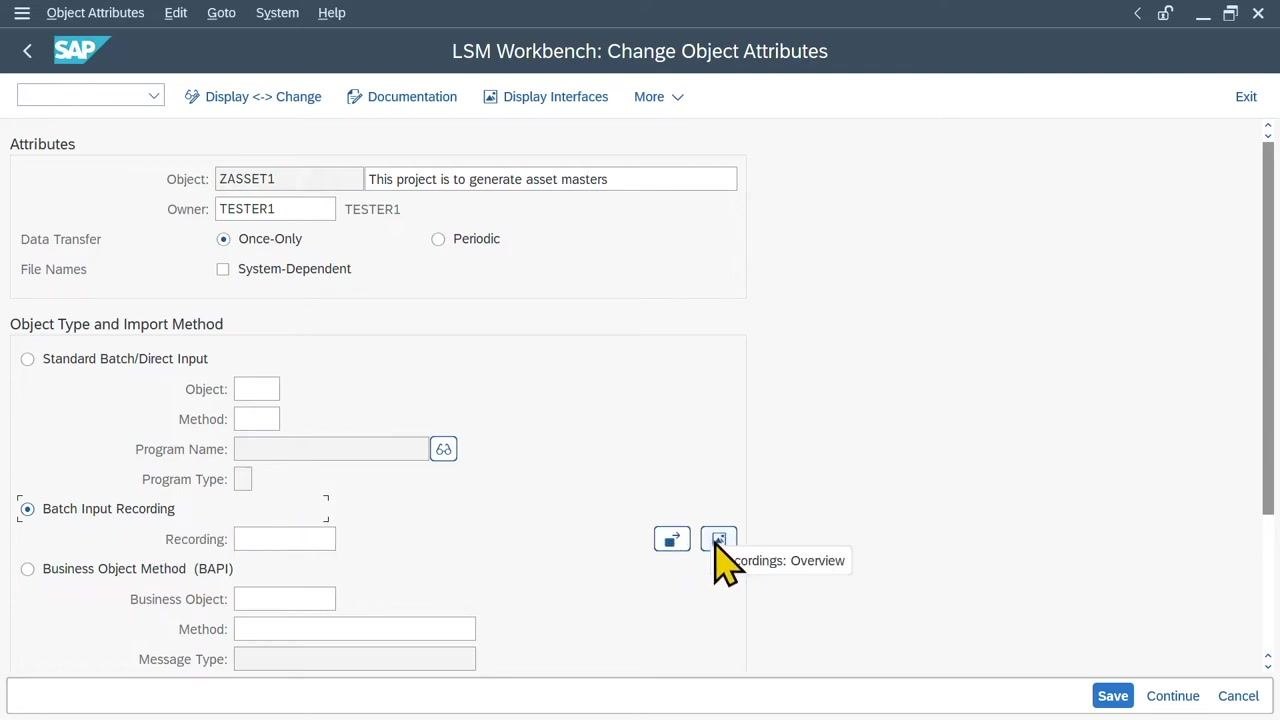
Click the Change button (the pencil icon, also labeled "Display <-> Change") to enable editing of the object attributes.
Step 7: Select batch input recording
In the Object Type and Import Method section, select the Batch Input Recording radio button. This method creates a batch input session for mass data processing.
Step 8: Create a new recording
Click the Recordings: Overview button (the folder icon next to the Recording field) to manage recordings.
In the Create Recording dialog, enter the following:
- Recording:
ZASSET - Description:
Create Asset Master - Owner: pre-filled automatically (for example,
TESTER1)
Click the green checkmark to confirm.
Step 9: Enter the transaction code
In the Transaction Code dialog, enter AS01 as the transaction code used for creating asset master data in SAP. Click the green checkmark to proceed.
Step 10: Record the asset creation steps
On the Create Asset: Master data screen, enter the following details:
- Description:
Test Asset LSMW2 - Class:
2000(Machinery Equipment) - Company Code:
1710
The Account Determination field should display 160020 Machinery and Equipment. Leave the "Asset Main No. Text," "Serial number," "Inventory Number," and "Quantity" fields blank unless required.
Click the Time-Dependent tab. No changes are required in the "Origin" or "Deprec. Areas" tabs at this stage. Include a Cost Center in the relevant field if prompted, then click Save to create the asset.
A confirmation message appears indicating the asset was created (for example, INTERN-00001 0 Test Asset LSMW2).
Step 11: Review and save the recording
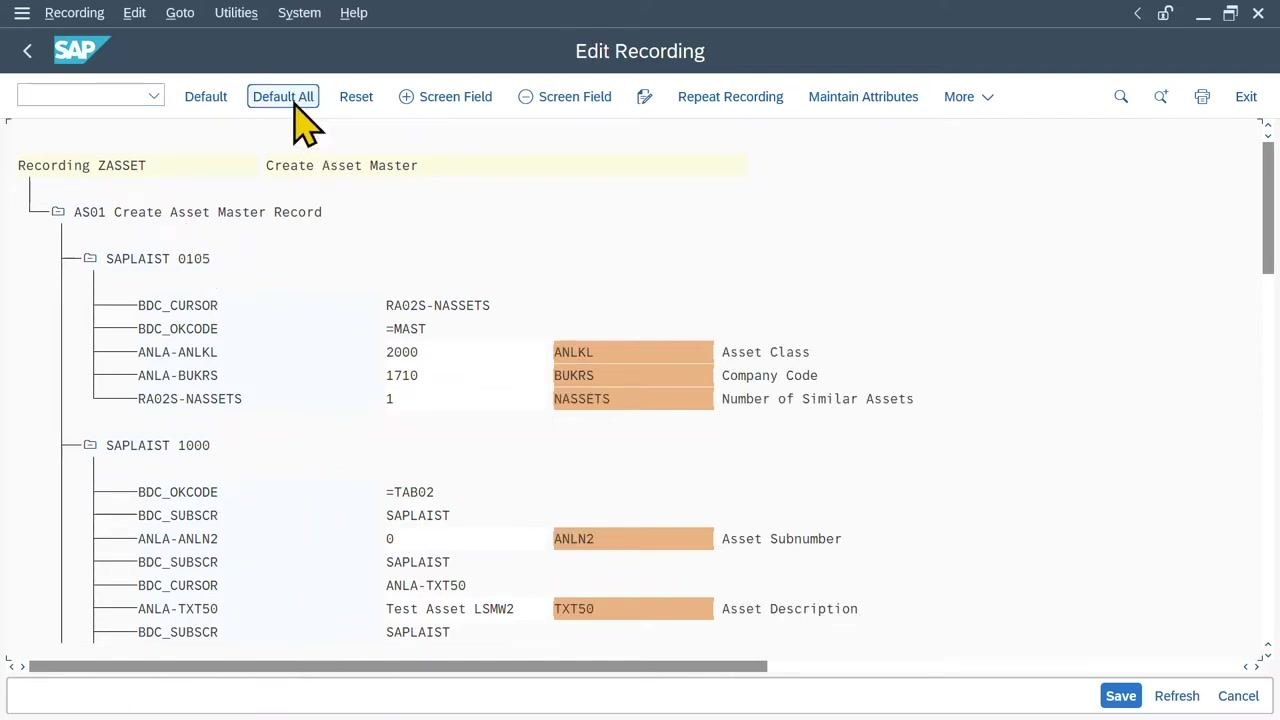
After saving, the system displays the steps it recorded during the asset creation. On the Edit Recording screen, click Default All to apply default values to all fields, then click Save to store the recording.
Click the Back button multiple times to return to the main LSMW Workbench screen.
Defining source structures and source fields
Step 12: Define source structures
In the LSM Workbench, select the Define Source Structures step and switch to Change Mode if necessary. Click Create Structure and enter the following:
- Structure:
ZTEST_ASSET - Description:
Structure to create a test asset
Click Save, then go back to the main process steps list.
Step 13: Review and copy technical fields
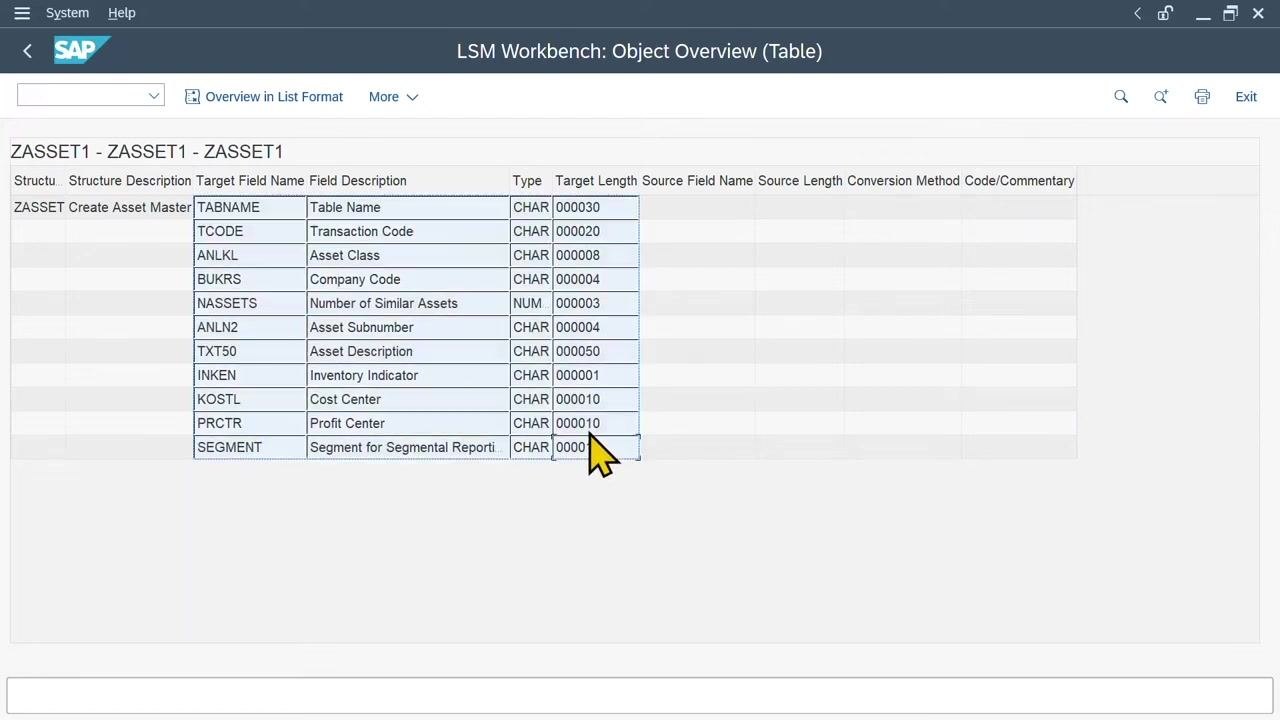
With Define Source Structures selected, click Object Overview. On the Object Overview (Table) screen, review the list of technical fields recorded by LSMW. These typically include:
TABNAME(Table Name)TCODE(Transaction Code)ANLKL(Asset Class)BUKRS(Company Code)NASSETS(Number of Similar Assets)ANLN2(Asset Subnumber)TXT50(Asset Description)INKEN(Inventory Indicator)KOSTL(Cost Center)PRCTR(Profit Center)SEGMENT(Segment for Segmental Reporting)
Confirm these are the fields you want to fill during the import. Select all the field entries and copy them into a blank Excel sheet for reference.
Open your Excel workbook and paste the list of technical fields (field names, labels, types, and lengths) from the LSMW Object Overview or Source Fields screen into consecutive columns:
- Column A: Field Name (for example, ANLKL, BUKRS, NASSETS)
- Column B: Field Label (for example, Asset Class, Company Code)
- Column C: Type (for example, CHAR, NUMC)
- Column D: Length (for example, 4, 3, 50)
Make sure the data types are correct — use CHAR for character fields and NUMC for numeric fields. Save your Excel file.
Step 14: Define source fields
Go back to the main process steps list and click Define Source Fields. Select the source field and switch to Change Mode, then click Table Maintenance to proceed. This prepares you to specify which technical fields should be filled during the data import.
Step 15: Save source fields in LSMW
On the Source Fields for Source Structure screen, verify that all required fields are entered with the correct type and length. Click Save, then click Back to return to the main LSMW process steps list.
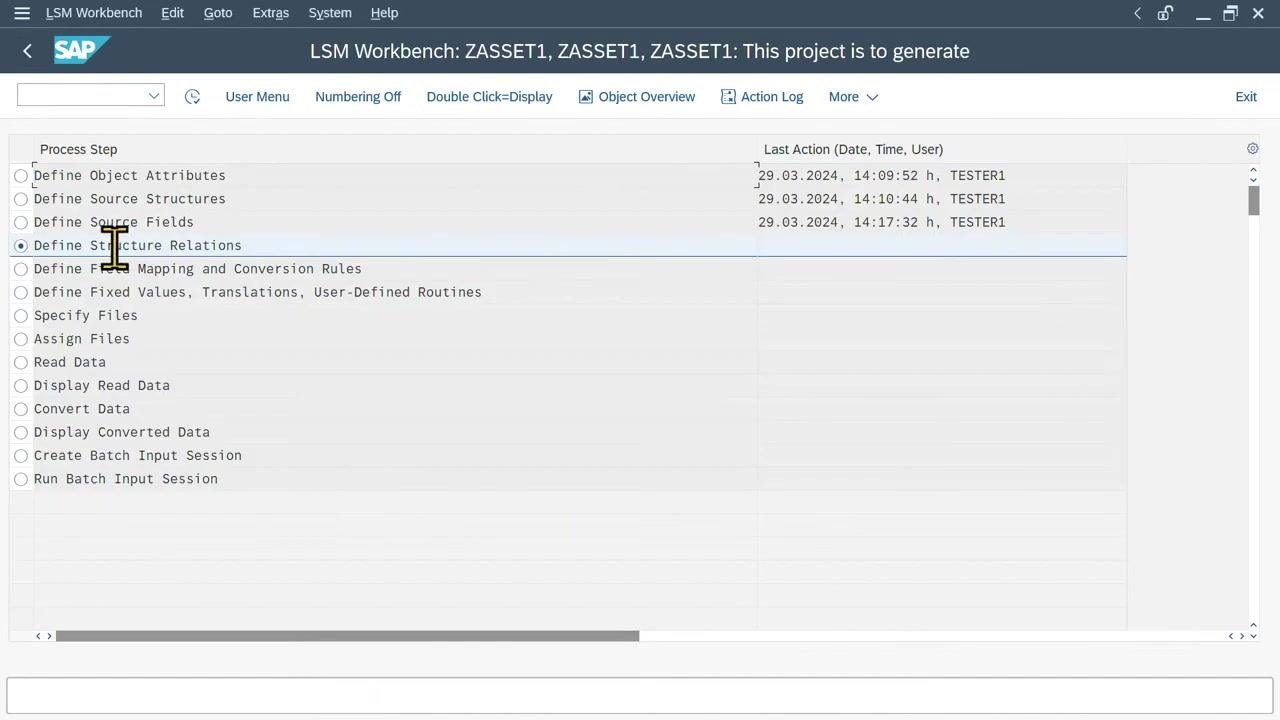
Step 16: Define structure relations
In the LSMW Workbench, select Define Structure Relations and switch to Change Mode if necessary. Click Create Relationship and confirm that the relationship between your source structure (for example, ZTEST_ASSET) and the target structure (Create Asset Master) is assigned. Click Save, then click Back to return to the main process steps list.
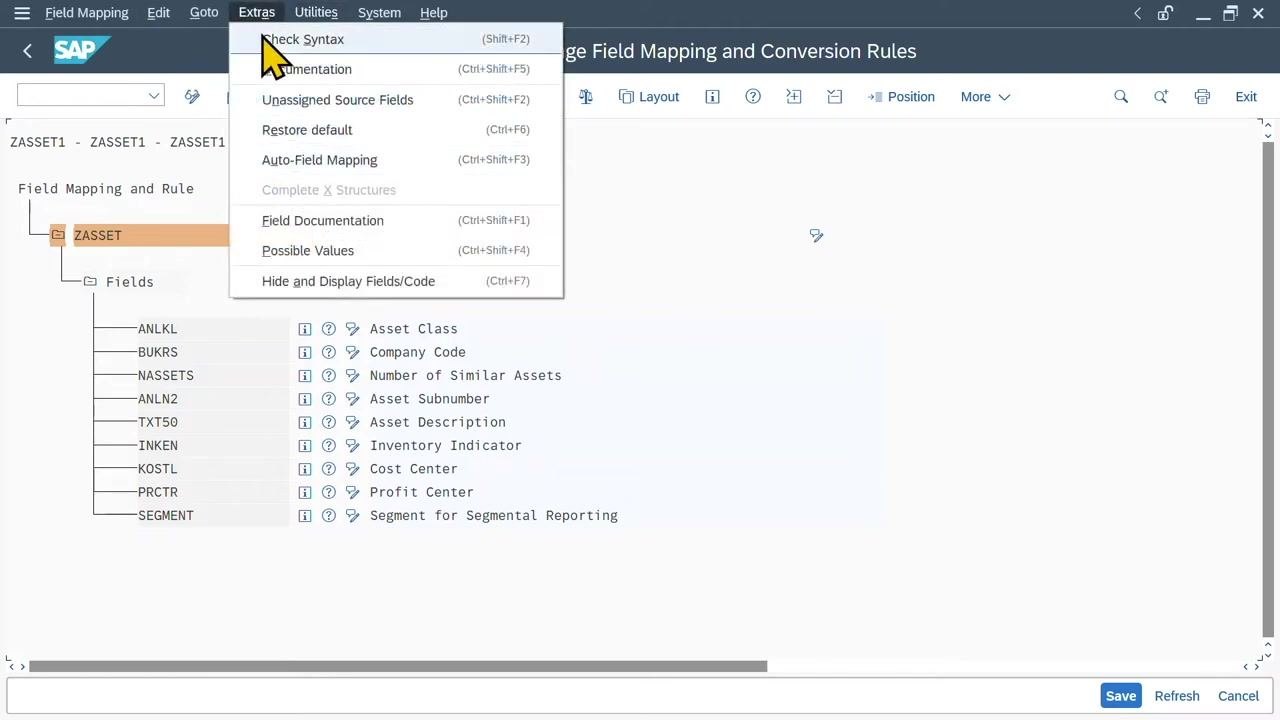
Step 17: Perform field mapping and conversion rules
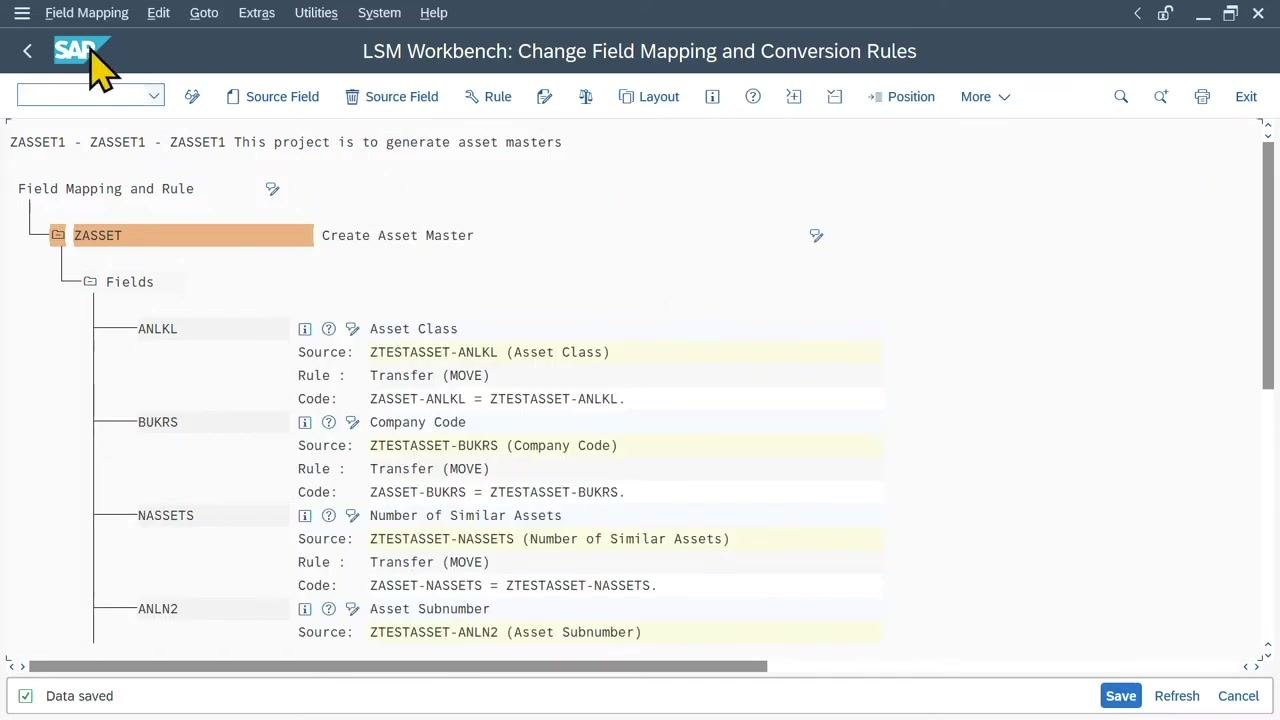
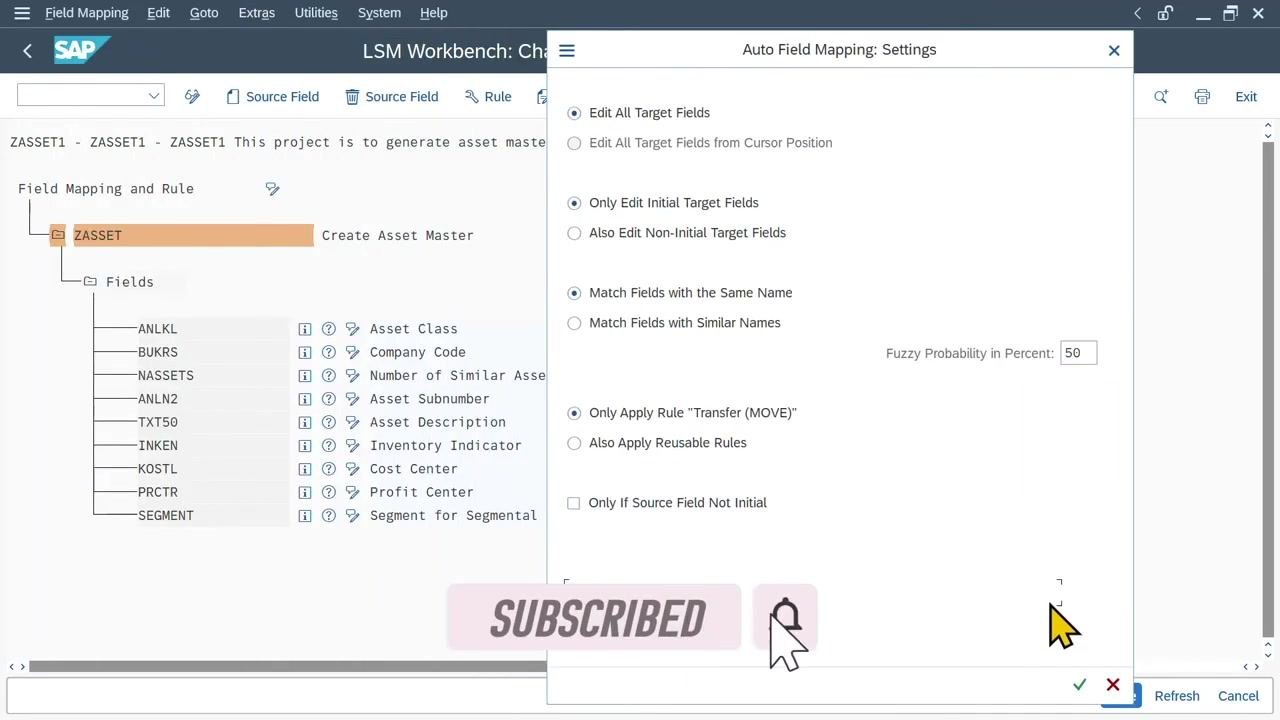
Select Define Field Mapping and Conversion Rules in the process steps and switch to Change Mode if required. Go to the Extras menu and select Auto Field Mapping. In the Auto Field Mapping settings dialog, make sure the following options are selected:
- Edit All Target Fields
- Only Edit Initial Target Fields
- Match Fields with the Same Name
- Only Apply Rule "Transfer (MOVE)"
Click the green checkmark to continue.
Review the mapping proposals to confirm that each source field is mapped to the correct target field — a 100% match is best practice. Click Accept Proposal for each mapping, then click Save to store the mapping.
The mapping results are displayed, showing the source, rule, and code for each field. Confirm all fields are mapped as intended, then click Save.
Preparing the data file for import
Step 18: Select and copy relevant fields for data import
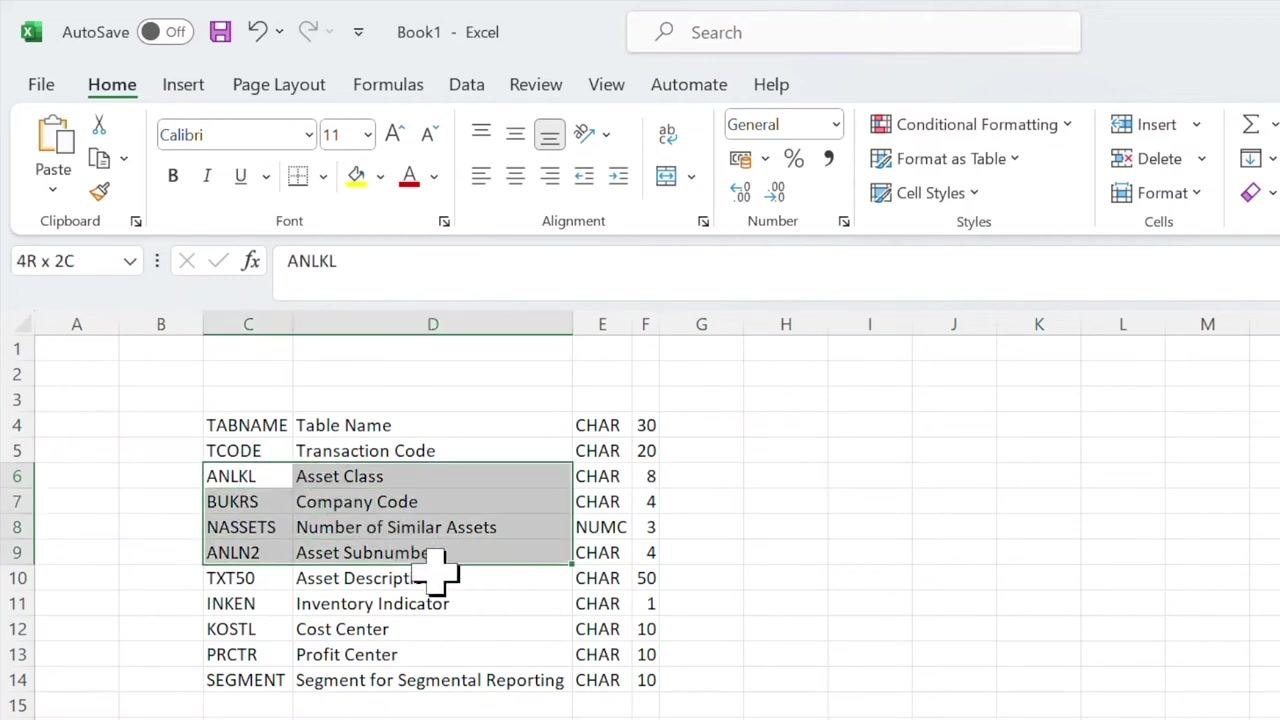
In your Excel workbook, locate the list of technical fields you previously pasted. Identify the rows below the "Transaction Code" (TCode) entry — these are the fields relevant for your data import. Select all rows starting immediately below "Transaction Code" down to the last required field. In this example, the following fields are selected:
- ANLKL (Asset Class)
- BUKRS (Company Code)
- NASSETS (Number of Similar Assets)
- ANLN2 (Asset Subnumber)
- TXT50 (Asset Description)
- INKEN (Inventory Indicator)
- KOSTL (Cost Center)
- PRCTR (Profit Center)
- SEGMENT (Segment for Segmental Reporting)
Include all columns for each field: Field Name, Field Label, Type, and Length. Right-click the selected area to prepare for copying.
Step 19: Transpose the fields into column headers
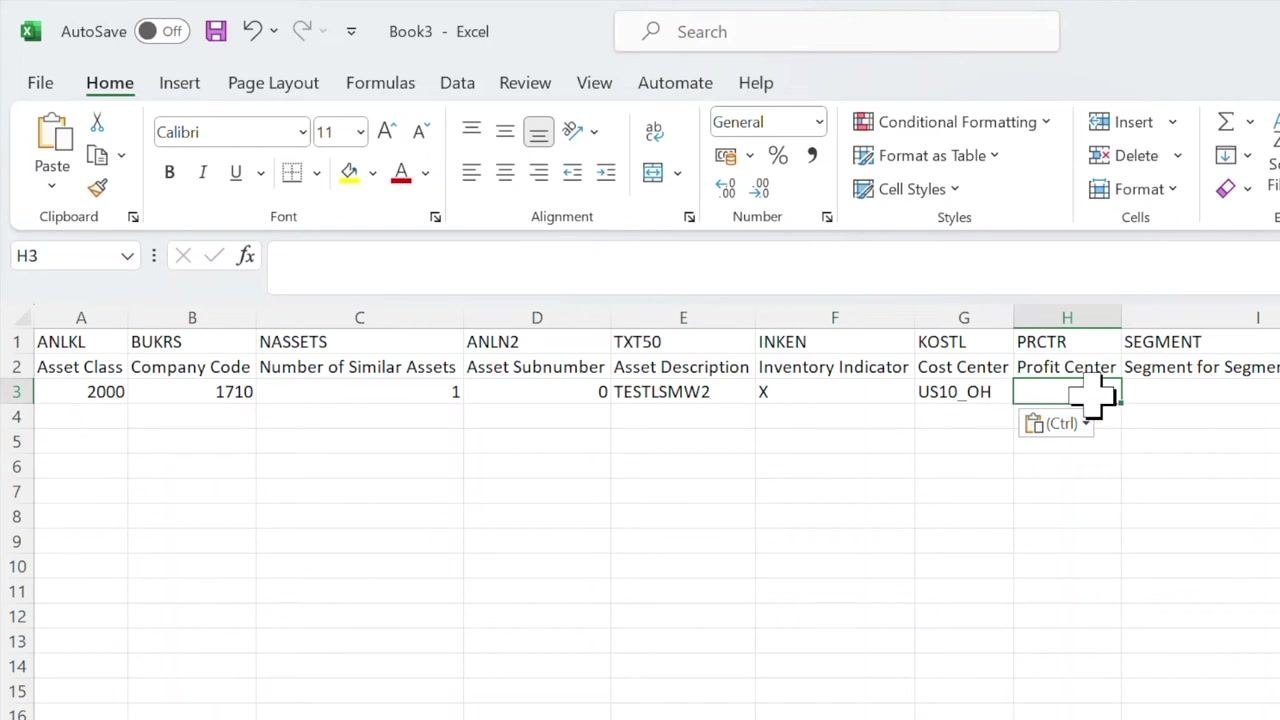
Open your Excel file again and copy only the relevant fields for import — typically everything below the transaction code. In a new Excel sheet, select cell A1, right-click, and choose Transpose to arrange the fields as columns. Your Excel sheet should now have the field names as column headers, ready for data entry and import.
Step 20: Enter the asset data into the Excel template
Fill in the data row with the following values:
- Cell A3: Asset Class =
2000 - Cell B3: Company Code =
1710 - Cell C3: Number of Similar Assets =
1 - Cell D3: Asset Subnumber =
0 - Cell E3: Asset Description =
TESTLSMW2 - Cell F3: Inventory Indicator =
X - Cell G3: Cost Center =
US10_OH - Cell H3: Profit Center =
US10_PC11 - Cell I3: Segment =
Z_SEG
Step 21: Clean up the data file
Remove any unnecessary lines or formatting from the Excel file so that only the data values remain, with no extra headers or blank rows.
Step 22: Save the Excel file
Save the file using a descriptive name, such as "lsmw test one."
Specifying files and reading data
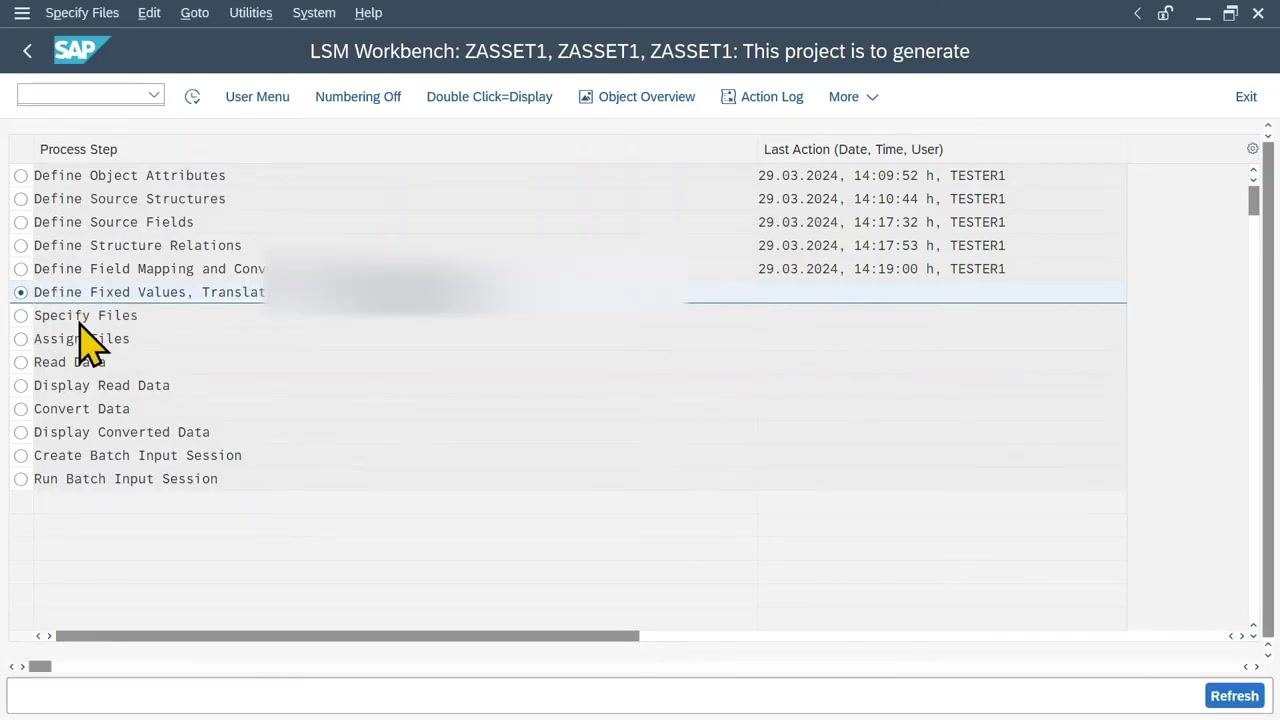
Step 23: Specify files
Open the SAP LSM Workbench and navigate to the Specify Files step. Click Change Mode if it is not already enabled. Under Legacy Data, click Add Entry.
In the File on Front End: Maintain Properties dialog, complete the following:
- Enter the file name (for example,
ZTESTA1). - Select Data for One Source Structure (Table) under File Contents.
- Choose Tabulator as the delimiter option.
- Make sure Field Order Matches Source Structure Definition is checked.
- Select Record End Marker (Text File) as the file type.
Click Save and then Go Back.
Step 24: Assign files
Click Assign Files in the process step list to proceed.
Step 25: Read data
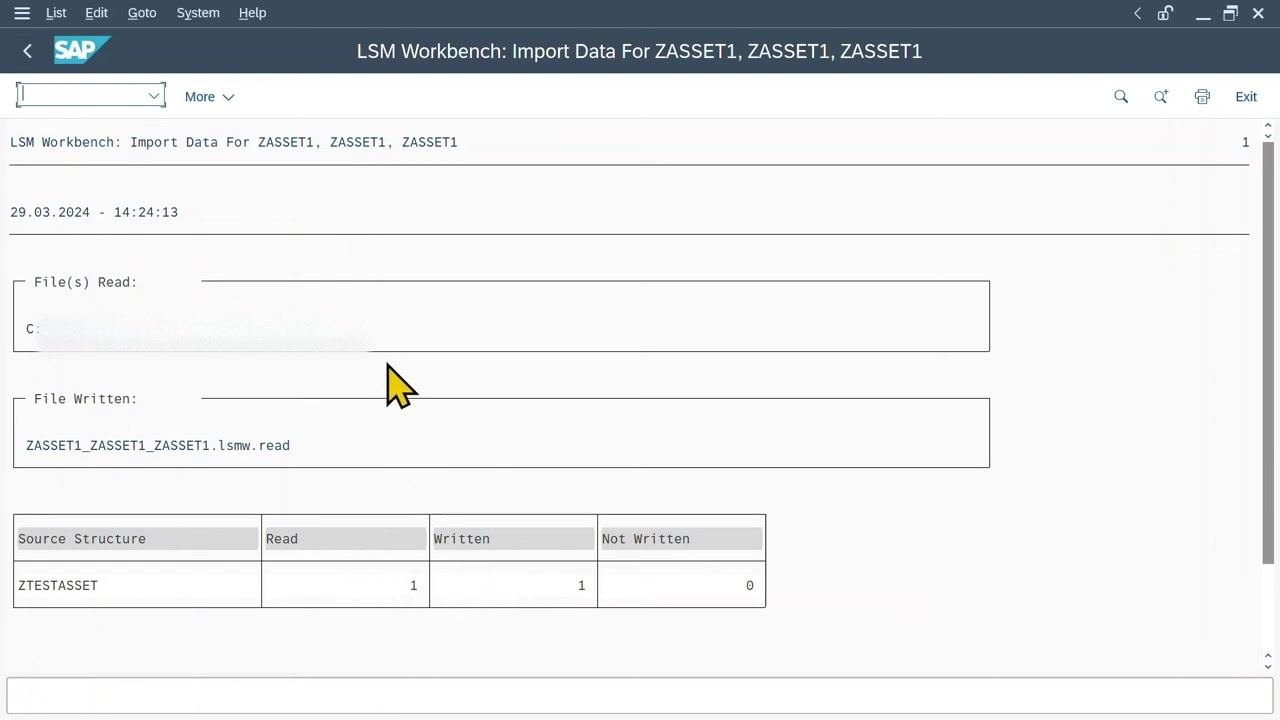
Click Read Data in the process step list to import the data from your file.
Step 26: Review the import summary
Confirm that the file was read successfully and check that the correct number of records were read and written (for example, Source Structure ZTESTASSET, Read: 1, Written: 1, Not Written: 0).
Step 27: Display the read data
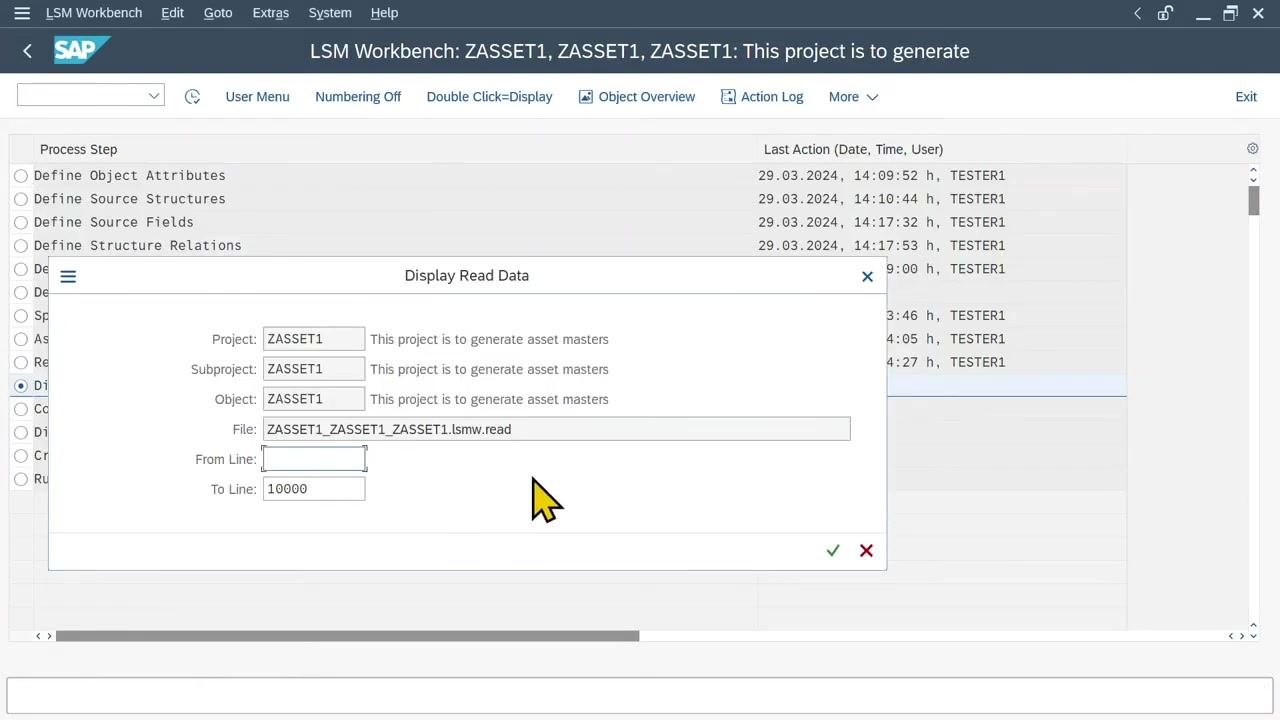
In the Display Read Data dialog, verify the project, subproject, object, and file name. Optionally, specify the line range to display (the default is 1 to 10,000). Click the checkmark to proceed.
Converting data and running the batch input session
Step 28: Convert the imported data into SAP format
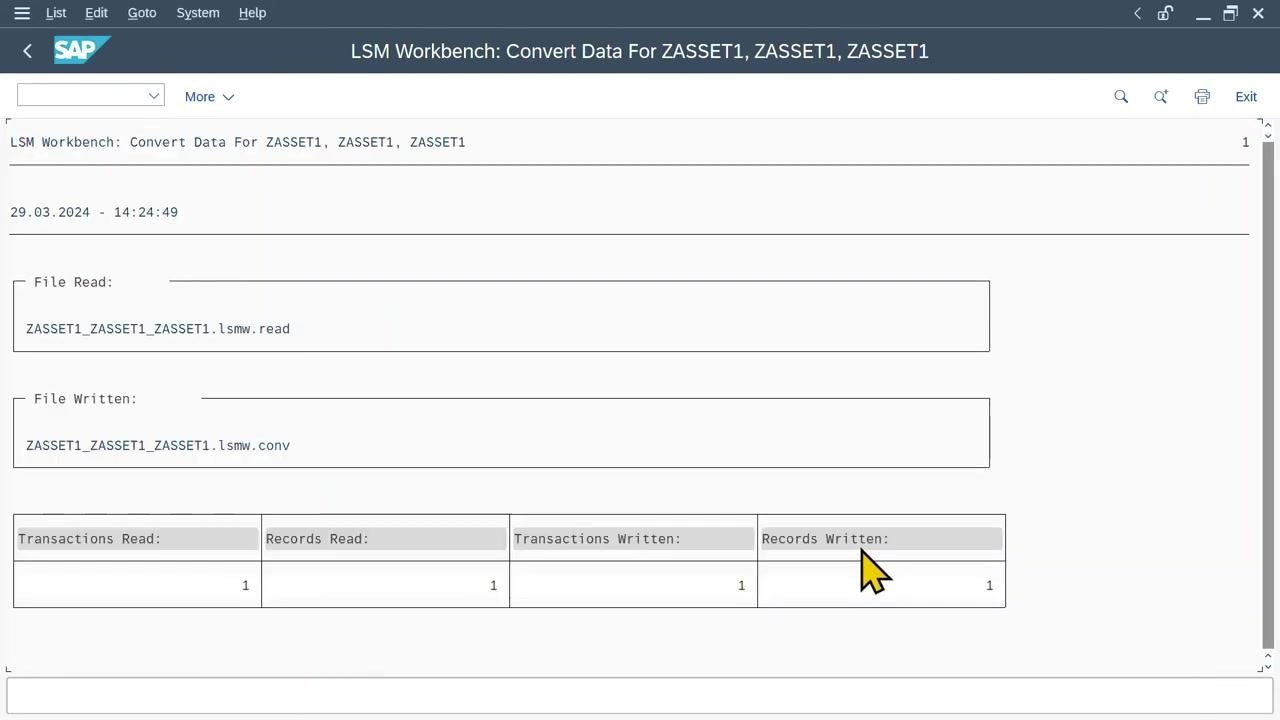
In the SAP LSM Workbench, review the Convert Data summary screen and confirm that the file was read and written successfully:
- File Read:
ZASSET1_ZASSET1_ZASSET1.lsmw.read - File Written:
ZASSET1_ZASSET1_ZASSET1.lsmw.conv - Transactions Read: 1
- Records Read: 1
- Transactions Written: 1
- Records Written: 1
Make sure there are no errors in the conversion summary.
Step 29: Create the batch input session
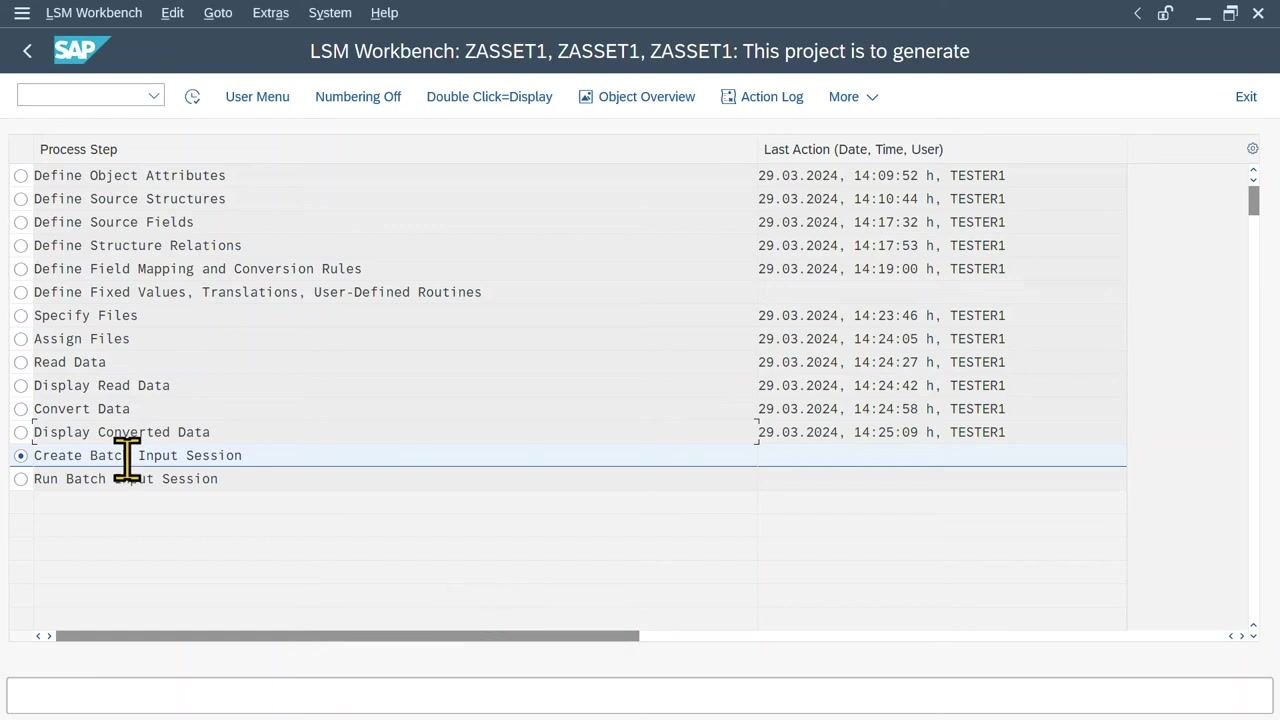
In the LSM Workbench process step list, select Create Batch Input Session. Confirm the last action timestamp and user for traceability, then proceed to the next step.
Step 30: Run the batch input session
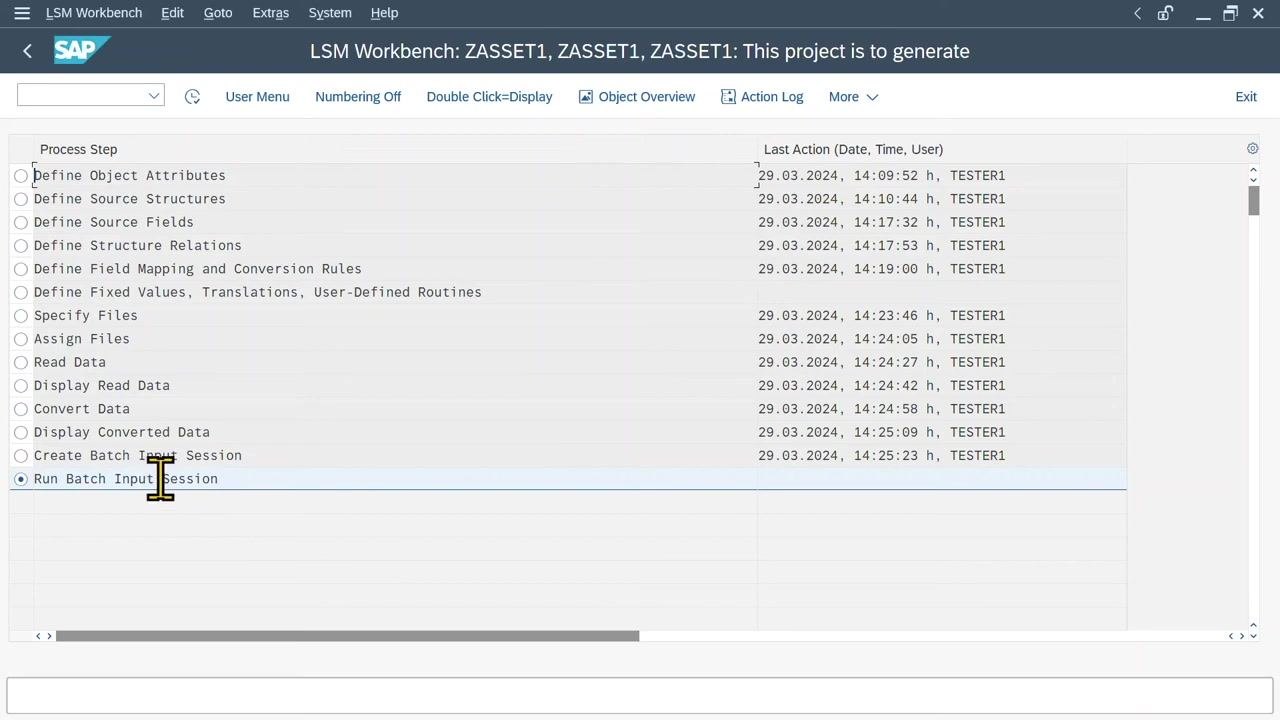
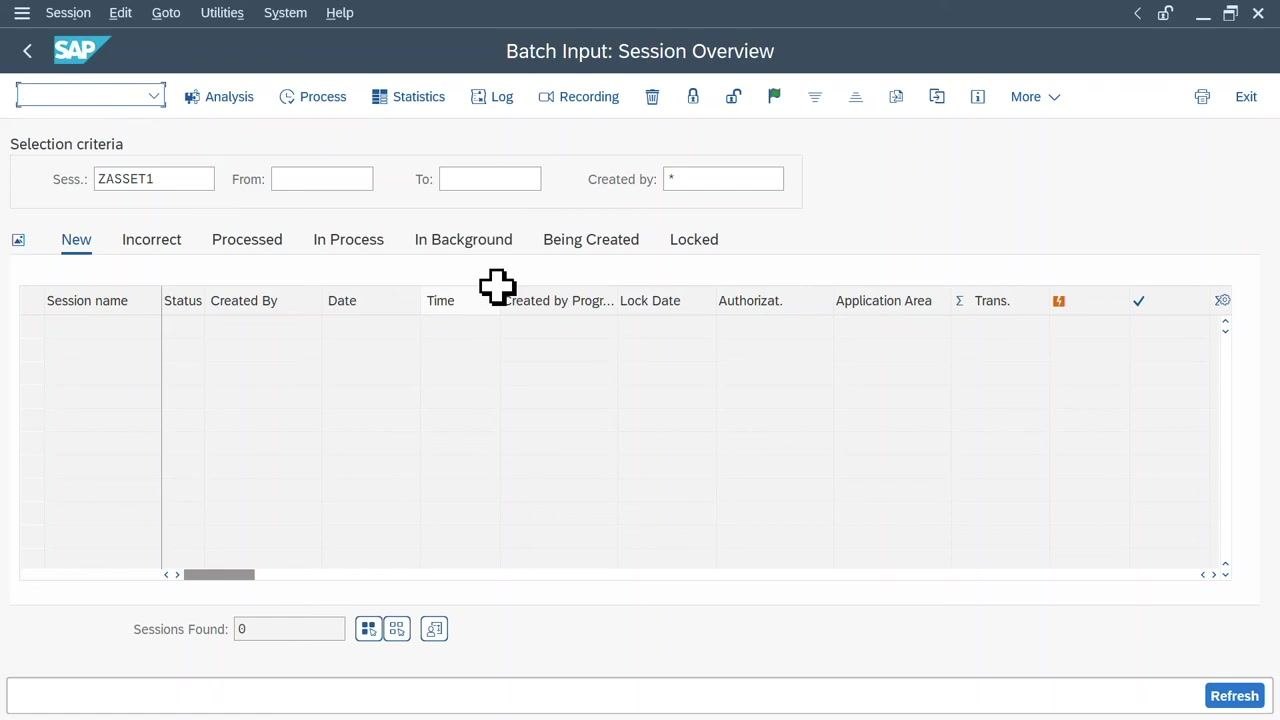
In the process step list, select Run Batch Input Session. This opens the Batch Input: Session Overview screen.
Step 31: Process the batch input session
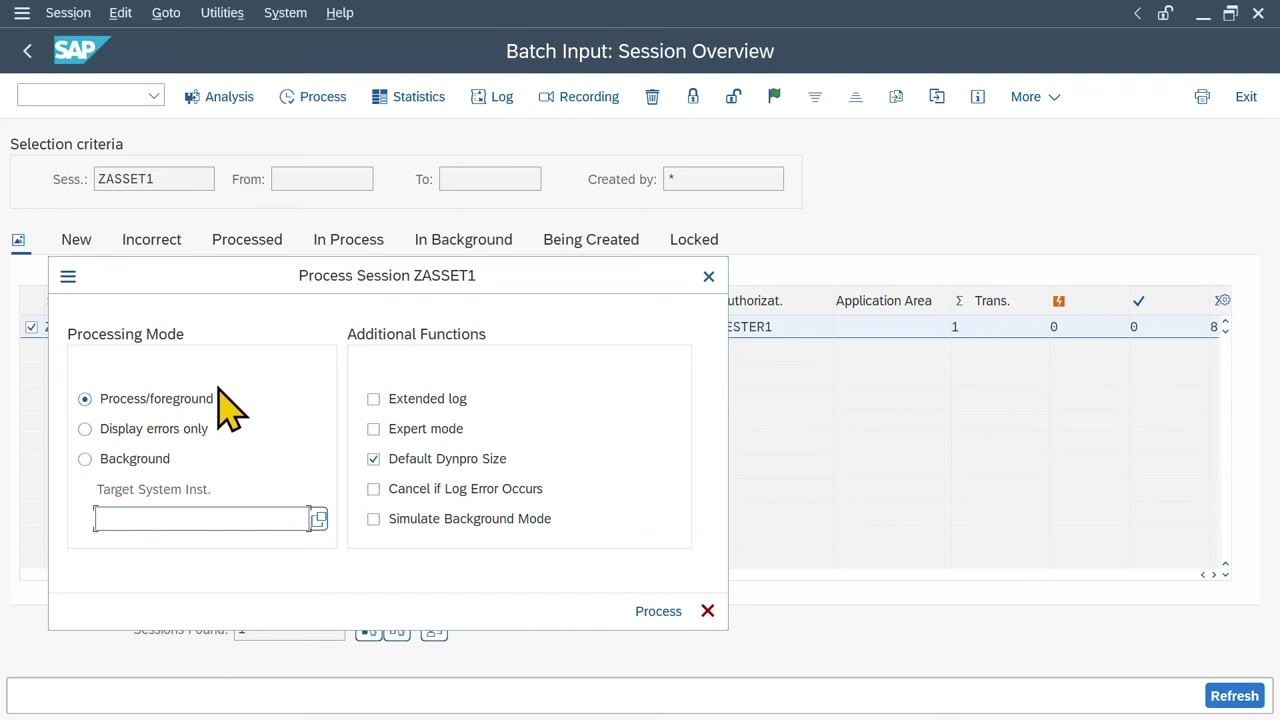
In the Batch Input: Session Overview screen, locate your session (for example, ZASSET1) and select it by checking the box next to its name. Click Process to open the processing options. In the Process Session dialog:
- Choose Process/foreground as the Processing Mode.
- Optionally, select Default Dynpro Size under Additional Functions.
Click Process to start the session.
Step 32: Review the asset creation in SAP
The system steps through the asset creation screens using the imported data. On the Create Asset: Master data screen, verify the following fields:
- Asset:
INTERN-00001/ Subnumber:0 - Class:
2000(Machinery Equipment) - Company Code:
1710 - Description:
TESTLSMW2 - Account Determination:
160020(Machinery and Equipment) - "Include asset in inventory list" is checked.
Click Enter to proceed.
Step 33: Confirm time-dependent and organizational data
On the Time-Dependent tab, verify the following:
- Cost Center:
US10_OH - Profit Center:
US10_PC11 - Segment:
Z_SEG
Click Enter to continue.
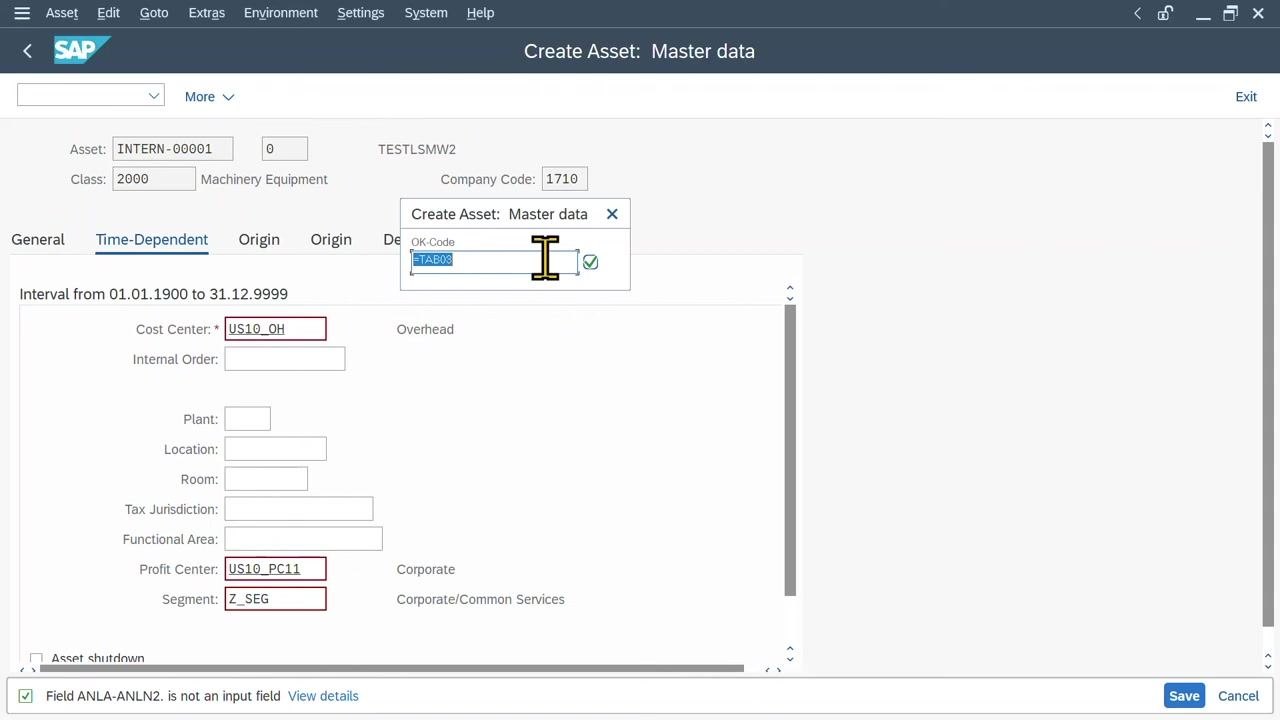
Step 34: Review depreciation areas
On the Depreciation tab, confirm that the correct depreciation areas and keys are populated (for example, Book Deprctn, IFRS loc cur). Click Enter to proceed.
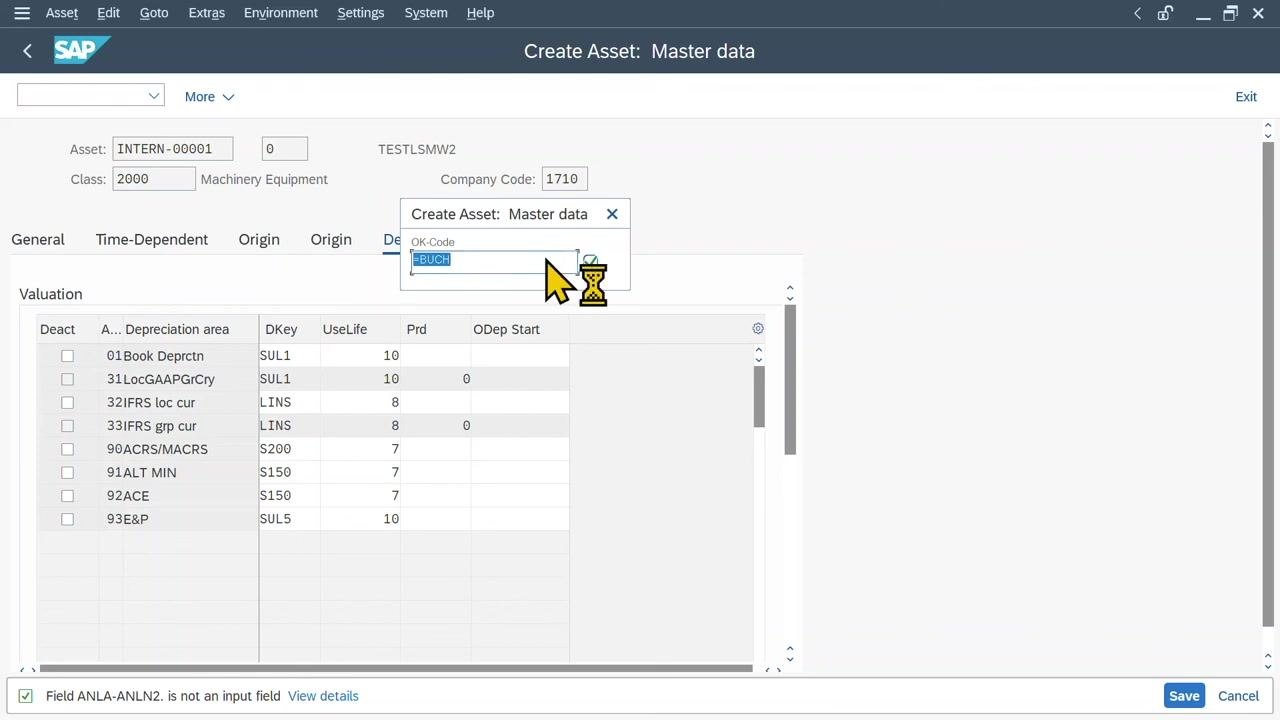
Displaying the newly created asset
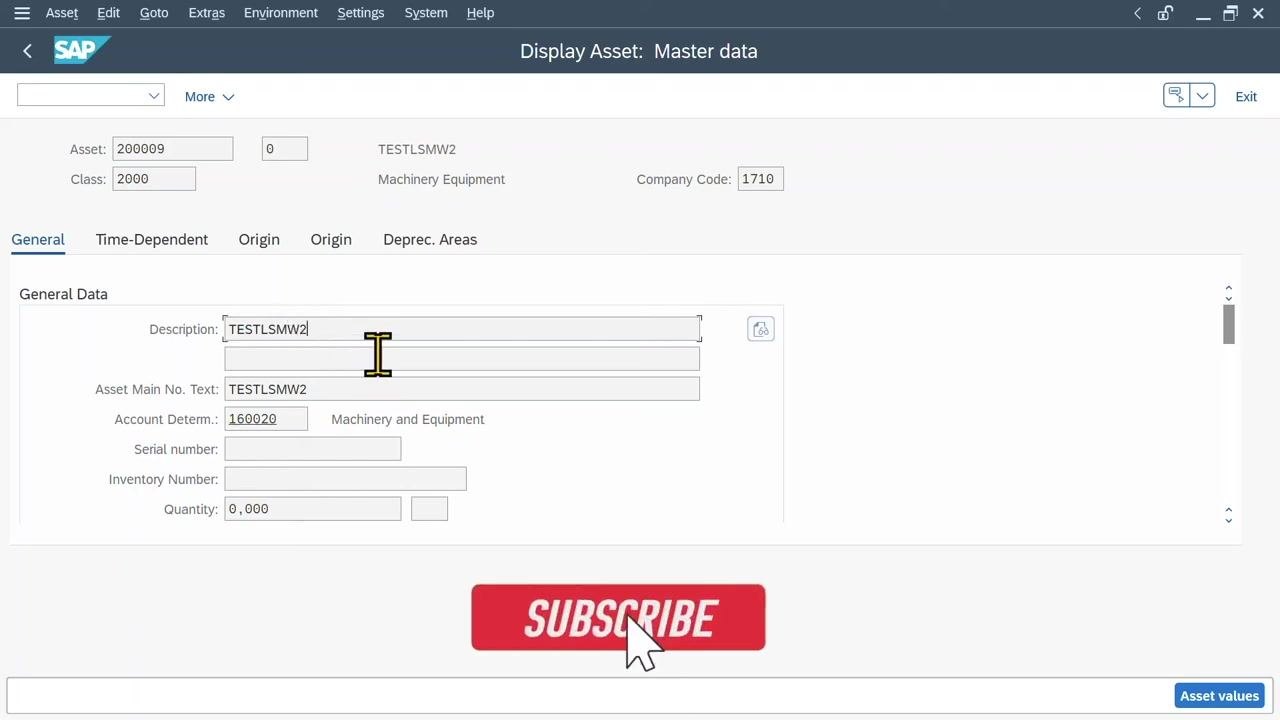
Step 35: Display the asset using transaction code /nSA03
In SAP, enter /nSA03 in the command field to open the Display Asset: Master data screen. Confirm that the correct asset number is already selected (for example, Asset: 200009, Subnumber: 0). Verify the asset details:
- Description:
TESTLSMW2 - Class:
2000(Machinery Equipment) - Company Code:
1710 - Account Determination:
160020(Machinery and Equipment) - Asset Main No. Text:
TESTLSMW2 - Quantity:
0,000
Review all relevant tabs (General, Time-Dependent, Origin, Deprec. Areas) to ensure all imported data is present and correct. Use the Asset values button if you need to review asset value details.
Step 36: Confirm completion of the process
Make sure the asset master data matches the imported values. If all data is correct, the asset creation and import process is complete. You can now exit the asset display screen or proceed to process additional assets as needed.
Summary
You have now learned how to use LSMW in SAP to create a project, record a batch input session for asset creation, map source fields to target fields, prepare a data file in Excel, and run the batch input session to import asset master data. By following these steps, you successfully displayed and verified the newly created asset in SAP using transaction /nSA03, and all imported values are now visible in the asset master data.
What's next
If you need to process more assets, repeat the data preparation, import, and verification steps shown in this guide using new asset data in your Excel file.
Generation details: cost, quality tiers
Docsie billed 4,500 credits ($3.15) to analyze this 9-minute video at standard quality. The rewrite, template fill and Word/PDF exports were included. The same video at each quality tier:
| Quality | Frames sampled | Credits | Approx. cost |
|---|---|---|---|
| Draft | every 16-30 s | 2,250 | $1.57 |
| Standard (this guide) | every 8-15 s | 4,500 | $3.15 |
| Detailed | every 4-7 s | 9,000 | $6.30 |
| Ultra | every 1-3 s | 18,000 | $12.60 |
Credits priced at $0.70 per 1,000; plans include a monthly allowance. Enterprise customers on on-premise or bring-your-own-model deployments run this on their own inference and pay no per-video credits.
Generated by Docsie Video-to-Docs on 2026-10-14 from a 8-minute video. Screenshots are frames from the source video and belong to their creator, SAP2Go, whose original is embedded above. If you own this video and want the guide removed or credited differently, contact us and we will act within one business day.