
How to Set Up a Printer in SAP
Setting up a printer in SAP involves creating an output device through Spool Administration and then assigning that device to a user's master record so it becomes their default printer. This guide walks you through how to set up a printer in SAP, from initial configuration to final assignment, using the SPAD and SU01 transactions.
Video: How to configure Printer in SAP | SAP Basis Administration by DSA Knowledge. All credit for the demonstration goes to the creator; watch the original on YouTube. The written guide below was generated from this video by Docsie. Creator? Request a change or removal.
Setting up a printer in SAP involves creating an output device through Spool Administration and then assigning that device to a user's master record so it becomes their default printer. This guide walks you through how to set up a printer in SAP, from initial configuration to final assignment, using the SPAD and SU01 transactions.
Prerequisites
- Access to the SAP Easy Access main screen with an active login session.
- Authorization to use the SPAD (Spool Administration) and SU01 (User Maintenance) transactions.
- Knowledge of your printer's device type, host name, and spool server details.
Part 1: Creating the output device
Step 1: Access the SAP Easy Access screen
On login, you land on the SAP Easy Access main screen. The left panel displays the SAP Menu with expandable folders, including Financial Services Network Connector, Office, Cross-Application Components, Logistics, Accounting, Human Resources, Information Systems, Tools, and WebClient UI Framework. The right panel shows informational text such as "SAP Easy Access Logon Screen" and "SAP DEMO SYSTEMS IDES ERP".
In the command field at the top of the screen, enter SPAD and press Enter to open Spool Administration.
Step 2: Start creating a new output device
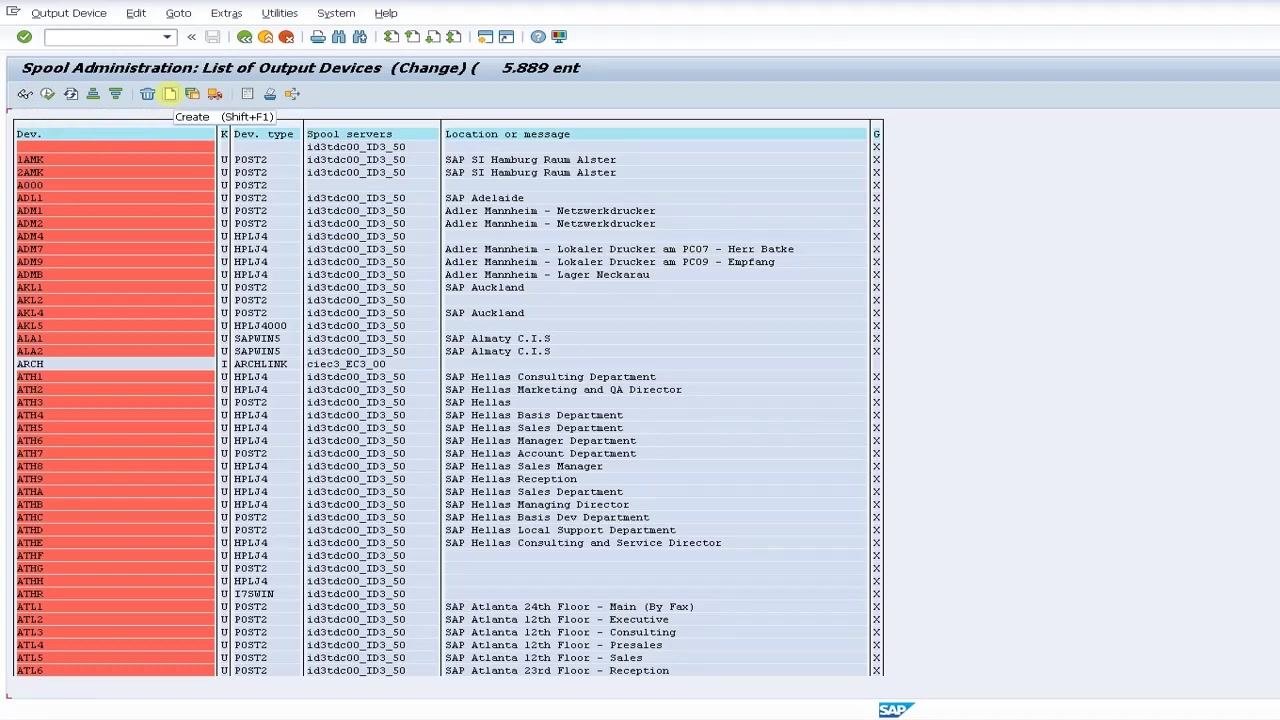
The Spool Administration: List of Output Devices (Change) screen opens, displaying a table of existing output devices with columns for Device name, Device type, Spool servers, and Location or message.
Click Create (Shift+F1) to add a new output device. On the Spool Administration: Create Output Device screen that appears:
- Enter
TEST_PRINTERin the Output Device field. - Enter
TP01in the Short name field. - Leave the Description field blank for now.
- Make sure the DeviceAttributes tab is selected.
Step 3: Select the device type
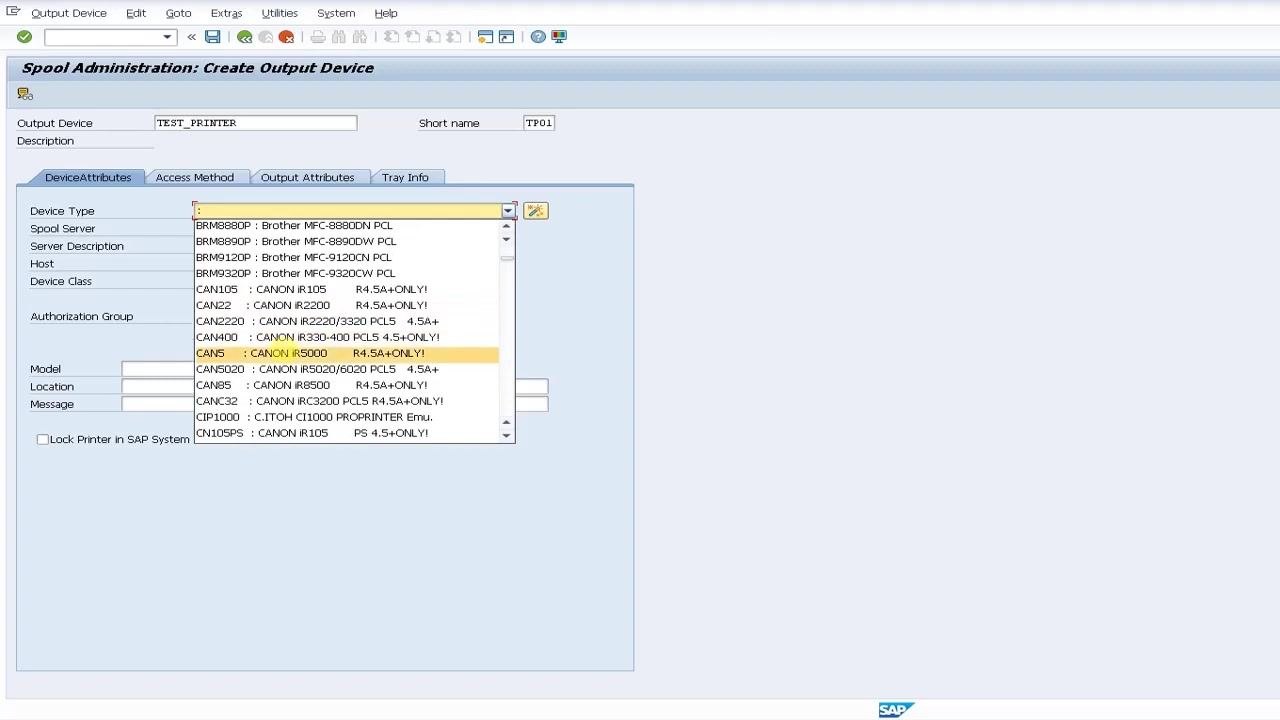
Click the dropdown menu for Device Type. A list of available device types appears, covering various printer models and formats. Scroll through the list and select the type that matches your printer — in this example, CAN85 : CANON iR5000.
Step 4: Assign a spool server
Click the selection button next to the Spool Server field. In the Spool Administration: List of Active SAP Servers popup, select the server ECCEhP7_EH7_00 with host ECCEhP7, then confirm your selection by clicking the green checkmark button.
Step 5: Configure the access method
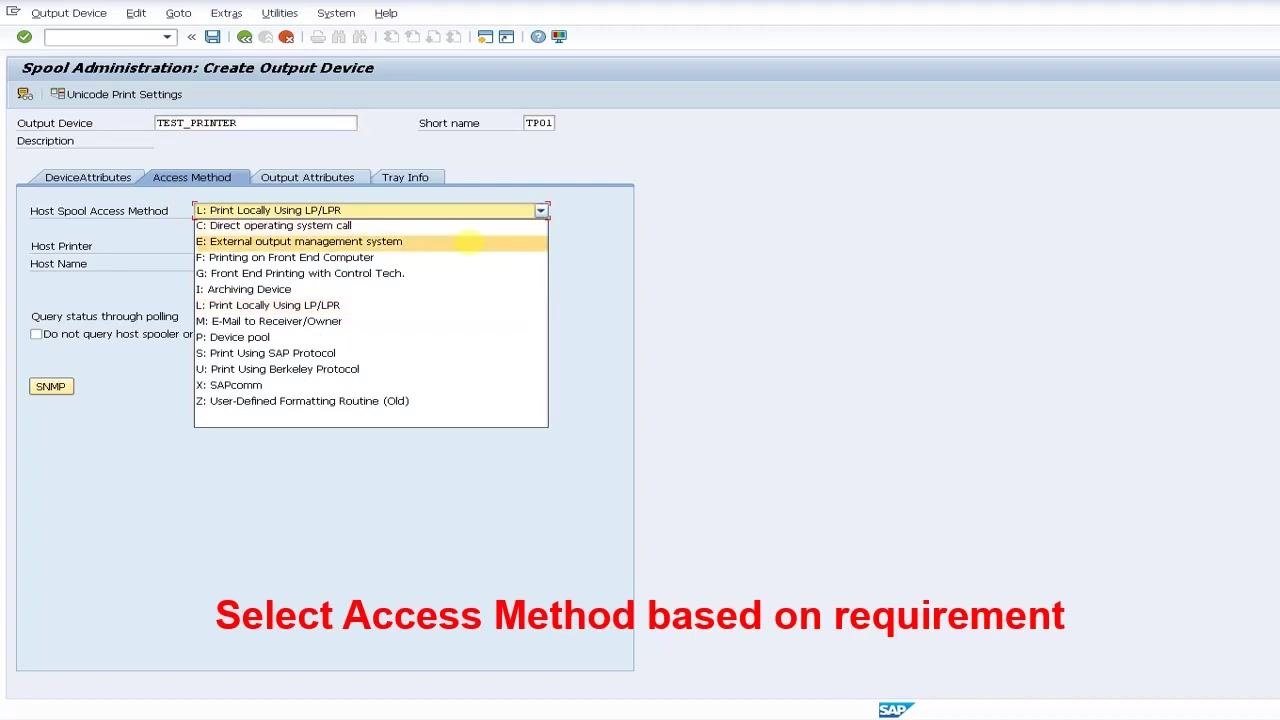
Switch to the Access Method tab and click the dropdown for Host Spool Access Method. Select the method that fits your requirements — for example, L: Print Locally Using LP/LPR. The screen may display a note in red text: "Select Access Method based on requirement."
Step 6: Set output attributes
Switch to the Output Attributes tab and configure the output request processing options:
- Leave SAP cover page unchecked.
- Set Host spool cover page to "Do not print host spooler cover page".
- Leave Monitor using monitoring architecture and Process requests sequentially unchecked.
- Set Copy Counter to "Pass Copy Counter to Host Spool System".
Under the Output Attributes section itself:
- Leave Color printer unchecked.
- Set Print mode to "DEFAULT: Printer default setting".
- Set Paper tray to "Default tray".
Step 7: Finalize access method details
Return to the Access Method tab and complete the remaining fields:
- Enter
TEST_PRINTERin the Host Printer field. - Enter
ECCEhP7in the Host Name field. - Leave "Do not query host spooler or printer for print requests" unchecked.
The SNMP button remains available if you need further configuration.
You have now configured the output device. Continue with any additional steps your organization requires, such as saving the configuration or testing the printer setup.
Step 8: Confirm output device creation
On the Spool Administration: Output Device (Change) screen, verify that:
- Host Spool Access Method is set to "Print Locally Using LP/LPR".
- Host Printer contains
TEST_PRINTER. - Host Name contains
ECCEhP7.
At the bottom of the screen, confirm the message "Output device TEST_PRINTER was saved" appears, indicating the device was created successfully.
Step 9: Return to the list of output devices
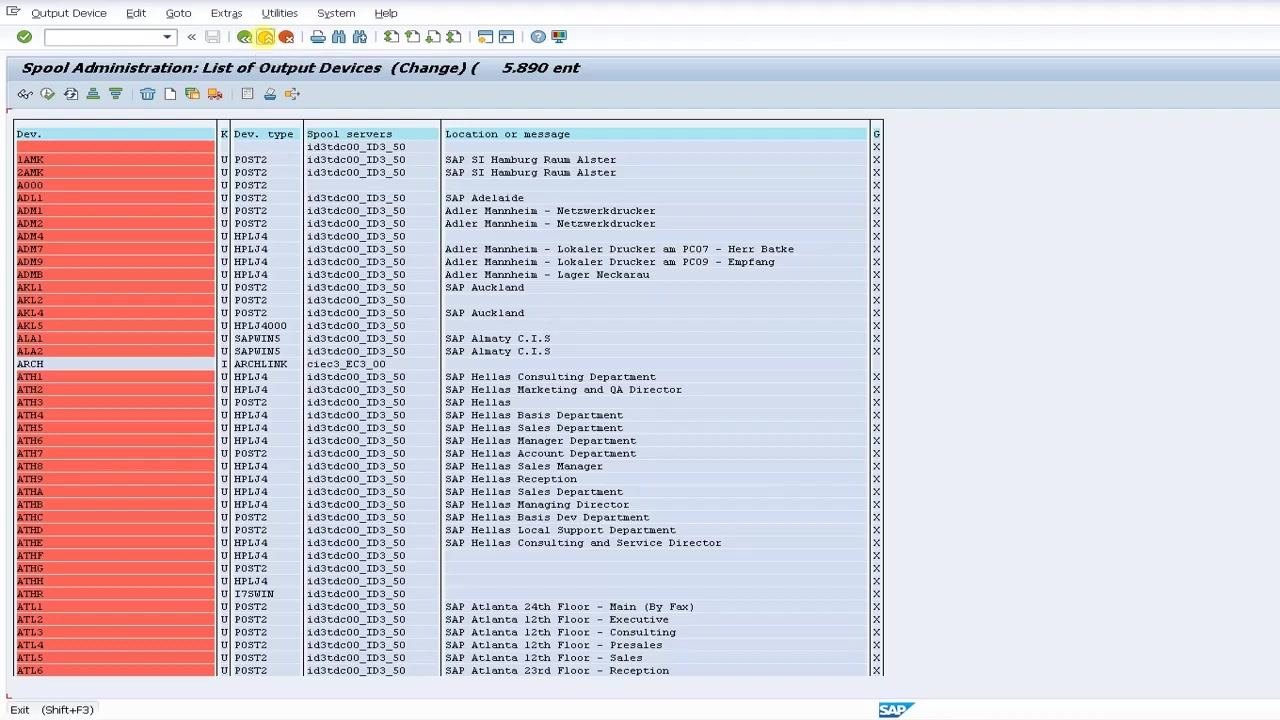
The system returns you to the Spool Administration: List of Output Devices (Change) screen. Review the list, which includes columns for Device Name, Device Type, Spool Servers, and Location or Message, to confirm your new device appears among the entries.
Part 2: Assigning the printer to a user master record
After creating and configuring the output device, assign it to a user's master record so it becomes that user's default output device.
Step 10: Navigate to user master record maintenance
Return to the SAP Easy Access screen. In the command field, enter SU01 to open the User Maintenance transaction. The screen displays the SAP menu on the left along with a message indicating you are assigning a printer to a user master record.
Step 11: Open the user master record
On the Maintain Users screen, enter the user ID (for example, TESTXYZ5) in the User field. The screen then displays user details such as name, language, department, and contact information, with the status showing "Saved".
Step 12: Assign the output device
Click the Defaults tab in the user master record. In the Spool Control section, locate the OutputDevice field and click the selection button next to it to open the Spool: Output device popup. Enter the short name TP01 — the one you defined earlier for your printer — and click the green checkmark or Start Search button to confirm the selection.
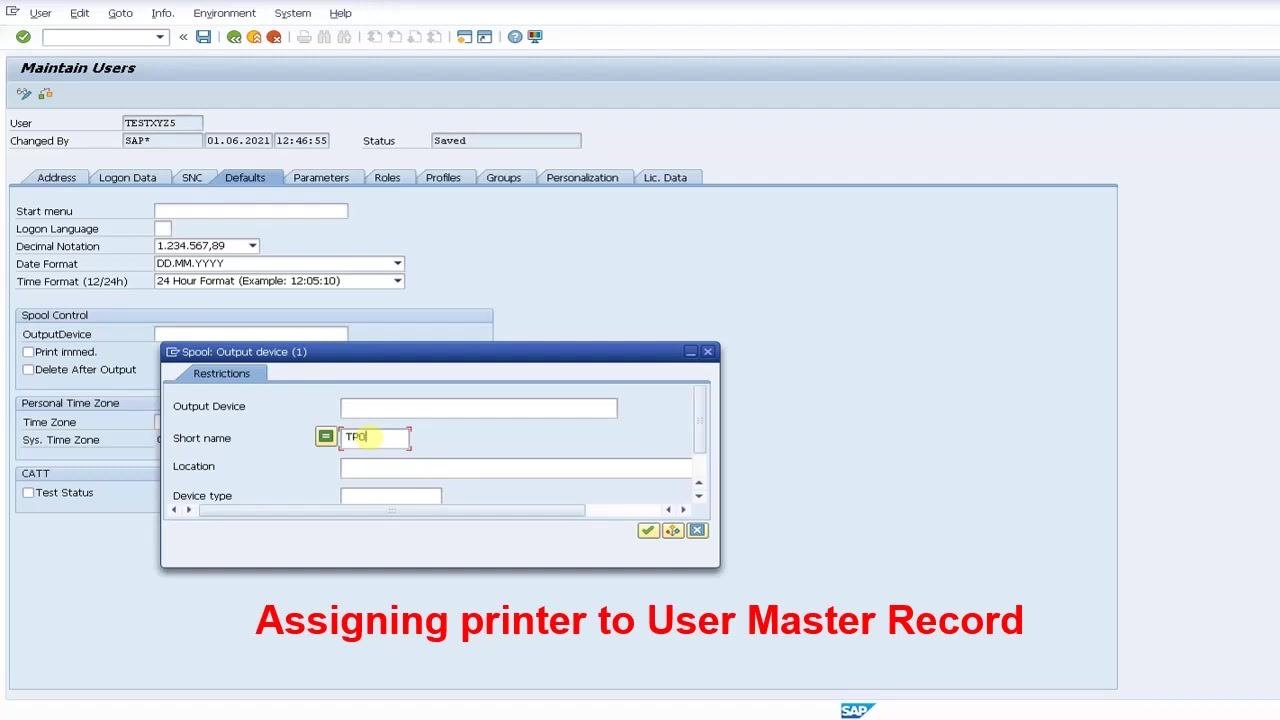
Step 13: Verify and save the assignment
Confirm that the OutputDevice field now displays TEST_PRINTER. Optionally, check or uncheck Print immed. and Delete After Output according to your requirements, and confirm the time zone settings if needed. Save the user master record by clicking the save icon or pressing Ctrl+S.
Summary
You have now learned how to set up a printer in SAP by creating an output device in Spool Administration and assigning it to a user master record. With TEST_PRINTER configured and linked to the user via the Defaults tab in SU01, the printer is ready to serve as that user's default output device for print requests.
Generation details: cost, quality tiers
Docsie billed 1,500 credits ($1.05) to analyze this 3-minute video at standard quality. The rewrite, template fill and Word/PDF exports were included. The same video at each quality tier:
| Quality | Frames sampled | Credits | Approx. cost |
|---|---|---|---|
| Draft | every 16-30 s | 750 | $0.52 |
| Standard (this guide) | every 8-15 s | 1,500 | $1.05 |
| Detailed | every 4-7 s | 3,000 | $2.10 |
| Ultra | every 1-3 s | 6,000 | $4.20 |
Credits priced at $0.70 per 1,000; plans include a monthly allowance. Enterprise customers on on-premise or bring-your-own-model deployments run this on their own inference and pay no per-video credits.
Generated by Docsie Video-to-Docs on 2026-10-12 from a 2-minute video. Screenshots are frames from the source video and belong to their creator, DSA Knowledge, whose original is embedded above. If you own this video and want the guide removed or credited differently, contact us and we will act within one business day.